manuals.online logo
Brands
  1. Home
  2. •
  3. Brands
  4. •
  5. Edision
  6. •
  7. TV Receiver
  8. •
  9. Edision mini-triton 2 HD User manual

Edision mini-triton 2 HD User manual

•Automatic PAL/NTSC conversion
•At least 400 programmable TV and Radio channels
•Selection of different favourite groups
•Multi-language On Screen Display
•Fully supports up to 7-day Electronic Program
•Supports Picture in Graphics(PIG) Guide(EPG)
•256-colour On Screen Display
•Automatic and Manual channel search
•Various channel editing functions(favorite, move, lock, rename and sort)
•Parental control for channels
•User friendly Automatic and Manual Menu System GMT Time setting
•Summer Time Zone support
•Subtitle support DVB EN300743 and EBU
•Teletext support DVB ETS300472 by VBI and OSD
•Memory of most recently selected channel
•Supports Logic Channel Number(LCN)
•Supports FAT16/FAT32/FAT12,NTFS(Option)
• Supports MP3/JPEG/BMP/AVI/VOB/MKV le format
•Info for Lock/Delete/Rename,Preview playback and Browse record functions
•Play/Pause/Stop functions
Main Features For Your Safety
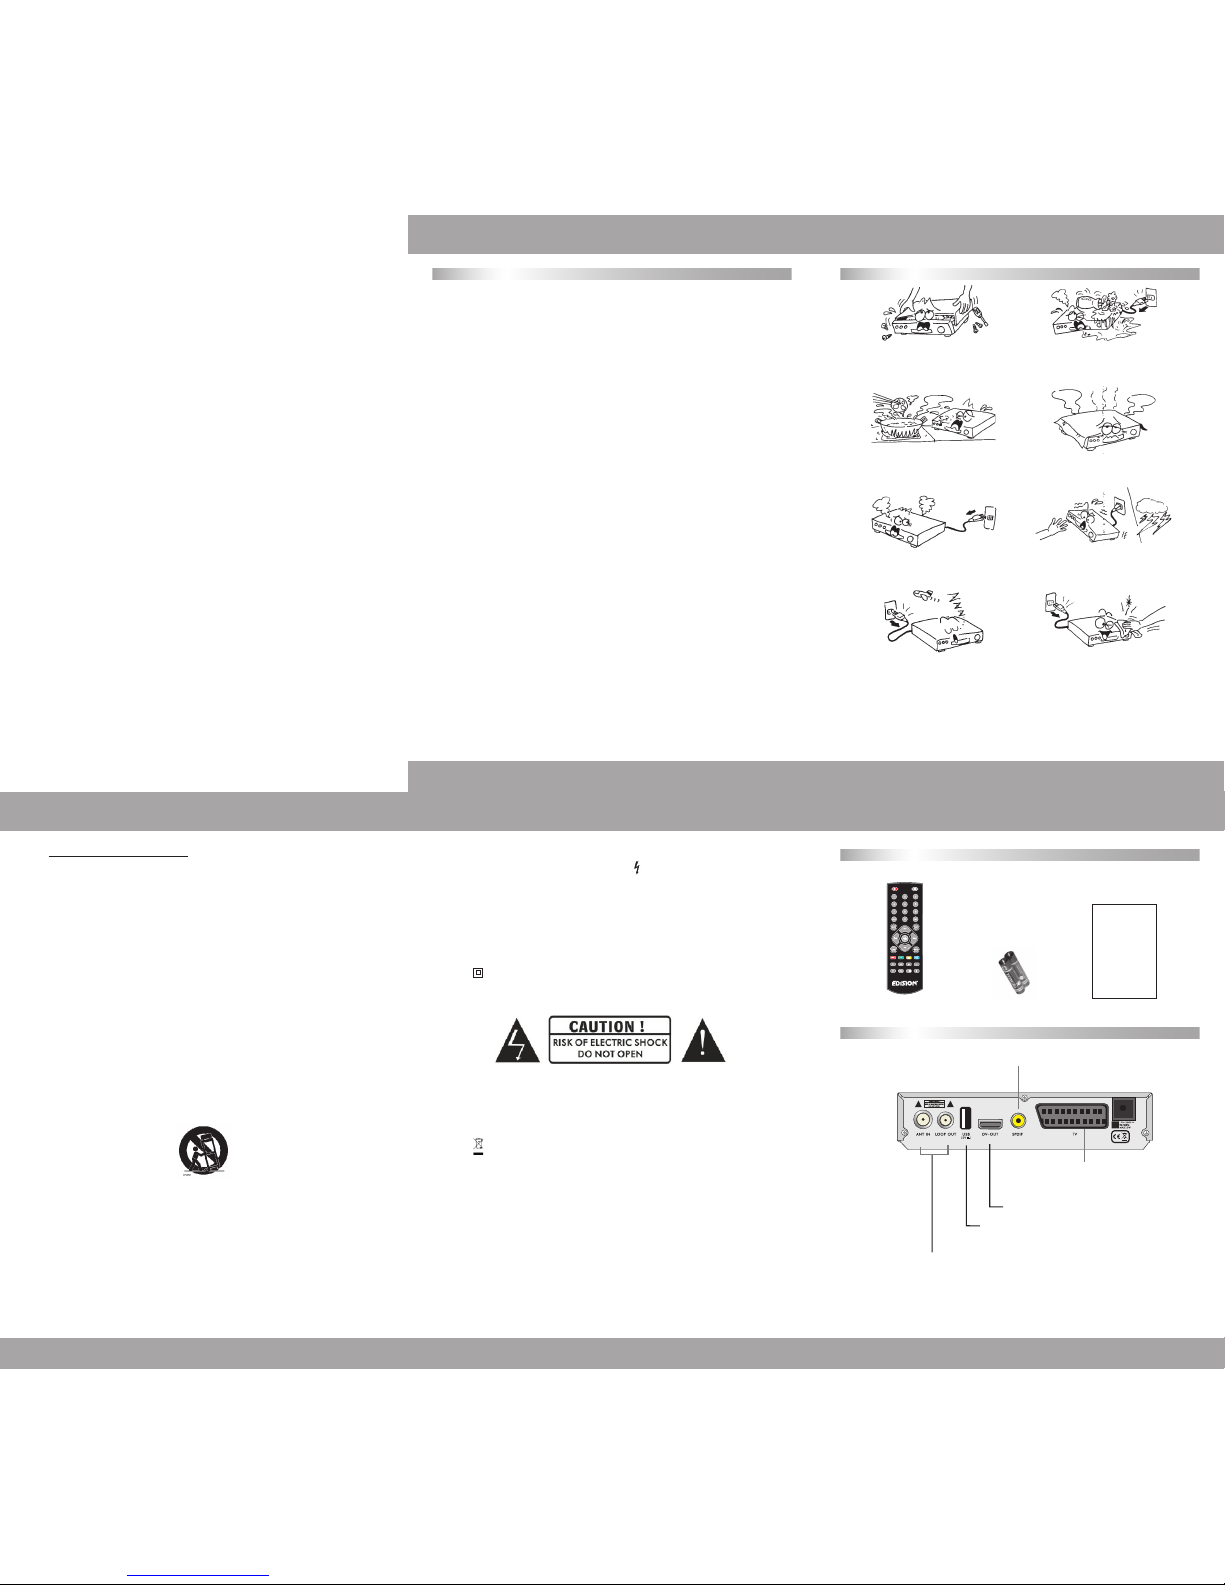
Unpacking (Optional)
Rear Panel (Optional)
GENERAL INFORMATION
GENERAL INFORMATION GENERAL INFORMATION GENERAL INFORMATION
1
345
2
GENERAL INFORMATION
•
To avoid electric-shock hazard, DO NOT open
the cabinet, refer only to qualied personnel
for repair and servicing.
•Do not expose the receiver under direct
sunlight. Keep it away from any heat
source.
•When any abnormal function occurs, please
remove AC cord plug from mains socket
immediately.
•Switch the receiver off when it remains out of
use for an extended period of time.
• Keep the receiver away from ower vases, tubs,
sinks and any source of water and moisture in
order to avoid damaging the equipment.
•Do not block ventilation holes of the Receiver so
that air can circulate freely.
•Do not touch the receiver during thunder, since that
might create electric-shock hazards.
•Before cleaning the receiver please proceed as
following: Turn off the receiver, disconnect the AC
power cord from mains socket, wipe clean with a
soft, damp cloth and nally wipe completely dry
with a dry cloth.
User’s Manual
mini-triton 2 HD
IMPORTANT SAFETY INSTRUCTIONS
1. Please read the following list of instructions. All safety and operating instructions
should be read and followed, before operating this product.
2. Keep these instructions - The safety and operating instructions should be retained for
future reference
3. Please pay attention to warning notices! All warning notices on the appliance should
be applied and followed at all times.
4. Follow all instructions - All operating and use instructions should be followed.
5. Do not use this appliance near water. The appliance should be kept away from water
and moisture environment eg. wet basement, near swimming pool, etc.
6. Clean only with dry cloth.
7. Do not block any ventilation openings. Install in accordance with the manufacture’s
instructions.
8. Do not install near any heat sources such as radiators, heat registers, stoves or other
apparatus (including ampliers) that produce heat.
9. If the provided AC plug cord does not t in the existing outlet on the wall, please DO
NOT plug in the device and consult a qualied electrician.
10. Please protect the AC power cord from being stepped on, pierced, stressed or cut and
bent. This applies to it’s full length, from the point it exits the device to it’s end tip.
11. Only use attachments/accessories specied by the manufacturer.
12. Use only with the cart, stand, tripod, bracket, or table specied by the manufacturer,
or sold with the apparatus. When a cart or rack is used, use caution when moving the
cart/apparatus combination to avoid injury from tip-over.
13. Unplug the apparatus during lightning storms or when unused for long periods of time.
14. Refer all servicing to qualied personnel. Servicing is required when the apparatus
has been damaged in any way, such as power supply cord or plug is damaged, liquid
has been spilled or objects have fallen into the apparatus has been exposed to rain
or moisture, does not operate normally, or has been dropped.
15. CAUTION: The servicing instructions are for use by qualied personnel only. To re-
duce the risk of electric shock, DO NOT perform any procedure other than the ones
stated in the operating instructions.
16. Please ensure sufcient ventilation of the device and do not cover the ventilation
openings with anything.
17. WARNING: To reduce the risk of re or electric shock, do not expose this apparatus to
rain or moisture. The apparatus should not be exposed to dripping or splashing water
and any objects lled with liquids, such as vases, should not be placed on apparatus.
18. WARNING: Terminals marked with the symbol can cause electric shock. All wiring
regarding these terminals should be carried out by qualied technician, using only the
leads and cords supplied with the product.
19. CAUTION: Danger of explosion if battery is not properly replaced. Replace only with
the same or equivalent type, with respect to polarity.
20. WARNING: The power pack (battery, batteries or battery pack) shall not be exposed
to excessive heat such as sunshine, re, heat sources etc.
21. WARNING: The mains plug is used only to disconnect the device from the AC power
line.
22. This device is a Class II (double insulated electrically) device. It has been de-
signed in such a way that it does not require a safety connection to electrical ground.
23. - The above symbols strongly indicate the risk of electric shock, due to presence of
non-insulated dangerous voltage inside the enclosure of the device.
- WARNING: DO NOT remove cover to avoid risk of electric shock. No user-servicea-
ble parts inside. Refer to qualied personnel only. Please read operating instructions
that are included in the product package box.
24. Please dispose of this product properly and not with other household waste. To
prevent possible harm to the environment or human health from uncontrolled waste
disposal, please recycle it responsibly to promote sustainability of resources. Please
contact local authorities, regarding recycling details.
25. Environmental working temperature: 0~35 C
• The above diagram is only for reference, please make sure it applies to your device.
• Remote Control
CONNECT TO A DIGITAL AMPLIFIER
CONNECT TO TV
USING A SCART CABLE
CONNECT TO TV SET HDMI INPUT
CONNECT TO USB DEVICE
ANT IN: CONNECT TO ANTENNA
LOOP: CONNECT TO ANOTHER RECEIVER
• Batteries • User’s Guide
User’s Manual
mini-triton 2 HD
1. Main Menu
•
Make sure that you have properly installed and connected the cables of the receiver . If the
receiver is the factory status or there is no program list, when power on, the Main Menu window
will be displayed on the screen.
During the normal TV/Radio mode, press MENU key on the RCU to enter into the Main Menu
window.
•
This menu consists of 7 major sub-menus as follow
- Program
- Picture
- Channel Search
- Time
- Language
- System
- USB
•
During the installation the OK key conrms a selection.
Use the PR+, PR- key to move upwards and downwards from one line to another line and
use key to move from main menu to sub menu and move from left side
to right side or vice versa.
You can exit the Menu display at any time, by pressing the MENU or EXIT button on the RCU
4. Software update
4.1 OAD
Select OAD upgrade, the system will search OAD channels automatically
4.2 USB Upgrade
Press OK to upgrade through USB Device.
5. Factory set User passwords:
Program Edit: The default password is “000000”.
Parental Guidance: The default password is “000000”.
Set Password: The default password is “000000”.
Restore Factory Default: The default password is “000000”.
RCU
MENU INFORMATIONGENERAL INFORMATION
MENU INFORMATION MENU INFORMATION TROUBLE SHOOTING
76
910 11
8
MENU INFORMATION
2. Channel Search
2.1 Auto Search
To search channels, please enter Auto Search mode and press OK button.
During the initial search, all TV and Radio channels will be displayed on the list.
By looking at the bar diagram at the bottom of the search window,
the user can view the search progress. Received TV and Radio channels
will appear on the list, with total number on top of window.
To cancel the search progress, please press EXIT key. To conrm the nish
of searching mode and return to operation mode, please press EXIT
when searching procedure is done.
2.2 Manual Search
Frequency channel: Press key to select the channel
Frequency: Press number key to select.
Bandwidth: Press keys to select among 6,7 and 8M
After setting, press OK key to enter into the search mode window.
On the 2-colour bar at the bottom of the search window, user can monitor signal quality
and strength of the specic channel.
Press OK button to enter search window after setting.
3. Restore Factory Default
Please select RESTORE FACTORY DEFAULT and press OK to conrm
the start of the procedure. When nished, please press EXIT to return to normal use.
NOTE: Please use this function with caution as ALL user congured menus
will be changed to factory default ones.
• Note: If you have tried all of the actions suggested above, without solving the
problem, please contact your dealer or service provider.
Key
0~9
TV/RADIO
EPG
FAV
FIND
INFO
MENU
OK/LIST
PR+, PR-
EXIT
TXT
REC
Function
• The above diagram is only for reference, please make sure it applies to your device.
Standby On/Off
Sound Mute
Switches between TV and Radio mode
EPG (Electronic Program Guide) function selection
Displays the favorite grouplist
Display the Find window
Show information of the current channel
Press this key one time to run menu onscreen
Switches back to previous channel
Switch to subtitle mode
Display the Audio window
Switch to teletext mode
Start Recording
Play and pause
Stop playing
Press to fast forward or fast backward
Moves up / down a page in the list
Previous and next in media player list
Executes the selected item in the menu screen
or enters the desired value in any input mode
When watching a channel, change channels or
move to the next higher or lower item in the menu
When watching a channel, adjust the volume or
move to the left or right item in the menu
Return to the previous menu on the menu
screen or escape from the menu
Channel number selection
and menu number entry
Main-menu Sub-menu
Problem Possible causes What to do
Program Program Edit
EPG
Sort LCN
Aspect Ratio Resolution
TV Format
Video Output
Time Offset Country Region
Time Zone Auto Standby
Power On/Off
OSD Language Subtitle Language
Audio Language Digital Audio
Audio Description
Parental Control Set Password
Restore Factory Default
Information Software Update
Multimedia Photo Congure
Movie Congure PVR Congure
Auto Search Manual Search
Country
Antenna Power
RF System RF Channel
Picture
Channel Search
Time
Language
System
USB
The display on the front
panel does not light up.
Front panel red light is on,
but there is no Audio/Video
although turned ‘ON’ with
IR remote control
No sound or picture.
Bad picture / blocking error.
The RCU is not working.
There is interference on
your terrestrial program or
video signal.
Main cable is not connected.
Signal cable not connected or
improperly connected
No signal or weak signal.
Signal is too strong.
Battery exhausted.
Antenna noise factor too high.
RCU is incorrectly aimed.
The system is connected by RF
leads and the output program of the
receiver interferes with an existing
terrestrial programs or Video signal.
The antenna is faulty
Check that the main cable is plugged
into the power socket.
Please check that the antenna signal
plug is properly commected to the right
plug on the receiver.
Connect a signal attenuator to the
antenna input.
Change the batteries.
Change to an antenna with lower
noise factor.
Aim RCU at the receiver, or check that
nothing blocks the front panel.
Change the receiver output channel
number to a channel number away from
adjacent operating ones or connect the
receiver to TV using scart cable.
Change the antenna.
Check the cable connections, antenna
and other equipment connected
between the antenna and the receiver.

Other manuals for mini-triton 2 HD

1

Other Edision TV Receiver manuals

Edision picco T265+ User manual

Edision

Edision picco T265+ User manual

Edision piccollino 3in1 User manual

Edision

Edision piccollino 3in1 User manual

Edision Proton T265 User manual

Edision

Edision Proton T265 User manual

Edision picco T265 Plus User manual

Edision

Edision picco T265 Plus User manual

Edision PICCOLLINO S2 User manual

Edision

Edision PICCOLLINO S2 User manual

Edision Piccollino User manual

Edision

Edision Piccollino User manual

Popular TV Receiver manuals by other brands

Sony HD100 operating instructions

Sony

Sony HD100 operating instructions

Enablia TitanSDR user manual

Enablia

Enablia TitanSDR user manual

FAAFTECH FT-TV-1SEG IV user manual

FAAFTECH

FAAFTECH FT-TV-1SEG IV user manual

Sagem ITD 58 user manual

Sagem

Sagem ITD 58 user manual

Sagem ITD 602 user manual

Sagem

Sagem ITD 602 user manual

DTS HDTV MODIX HD-2510 user manual

DTS

DTS HDTV MODIX HD-2510 user manual

PDi PDI-P10LCD-C Installation & operating instructions

PDi

PDi PDI-P10LCD-C Installation & operating instructions

Cisco ISB7105W installation manual

Cisco

Cisco ISB7105W installation manual

Digitus DA-70782 Quick installation guide

Digitus

Digitus DA-70782 Quick installation guide

Shaw Essential HD Receiver user guide

Shaw

Shaw Essential HD Receiver user guide

Planet Networking & Communication DTR-100DB Quick install guide

Planet Networking & Communication

Planet Networking & Communication DTR-100DB Quick install guide

Technomate TM-5402 HD user manual

Technomate

Technomate TM-5402 HD user manual

Bush BFSAT01HD instruction manual

Bush

Bush BFSAT01HD instruction manual

Strong SRT 8215 user manual

Strong

Strong SRT 8215 user manual

TechniSat ASTRASTAR AX 1 operating instructions

TechniSat

TechniSat ASTRASTAR AX 1 operating instructions

FTE Univers U6000 user manual

FTE

FTE Univers U6000 user manual

Haier L19A11W user manual

Haier

Haier L19A11W user manual

Alpine TUE-T200DVB owner's manual

Alpine

Alpine TUE-T200DVB owner's manual

manuals.online logo
manuals.online logoBrands
  • About & Mission
  • Contact us
  • Privacy Policy
  • Terms and Conditions

Copyright 2025 Manuals.Online. All Rights Reserved.