CONTENTS--------------------------------------
-
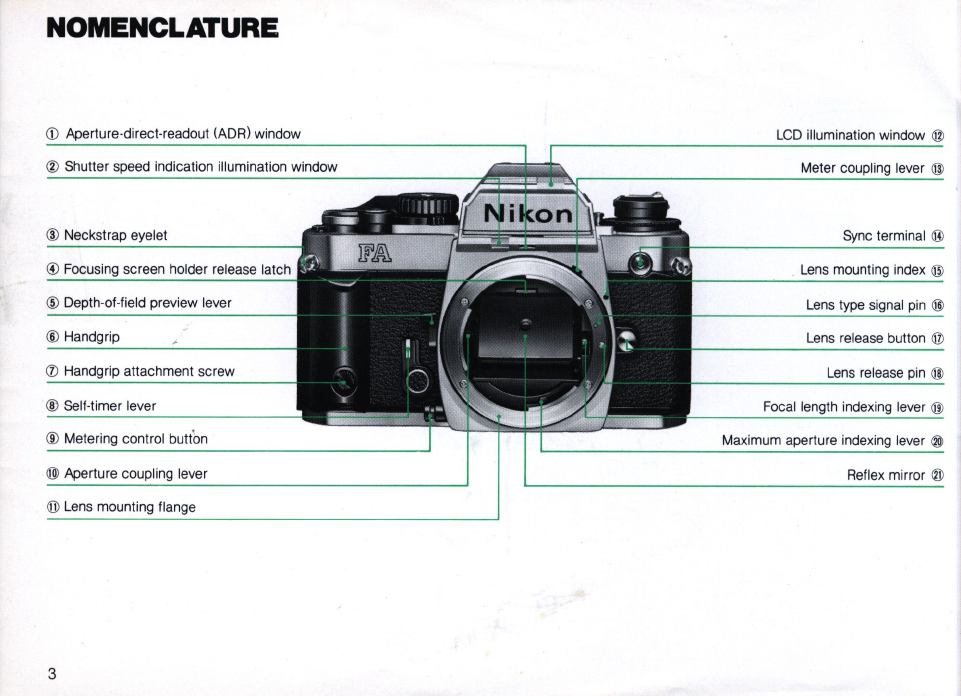
NOMENCLATURE
. .
...
. . . .
..
. . . . .
...
3- 5
MULTIPLE
EXPOSURE PHOTOGRAPHY. .
..............
55
POREWORD
.......................
...........
...
.
......
7 UNMANNED PHOTOGRAPHY.
..............
...
.
....
..
56-57
BASIC OPERATION
................
......
..
. .. .
..
...
.
....
8-38
Self-Timer. . . . . . . . . . . . . . . . . . . . . . . . . . . . . . 56
INSTALLING BATTERIES. . . .. . .. . .. .
........
8 Eyepiece Shutter . .
............
_
........
57
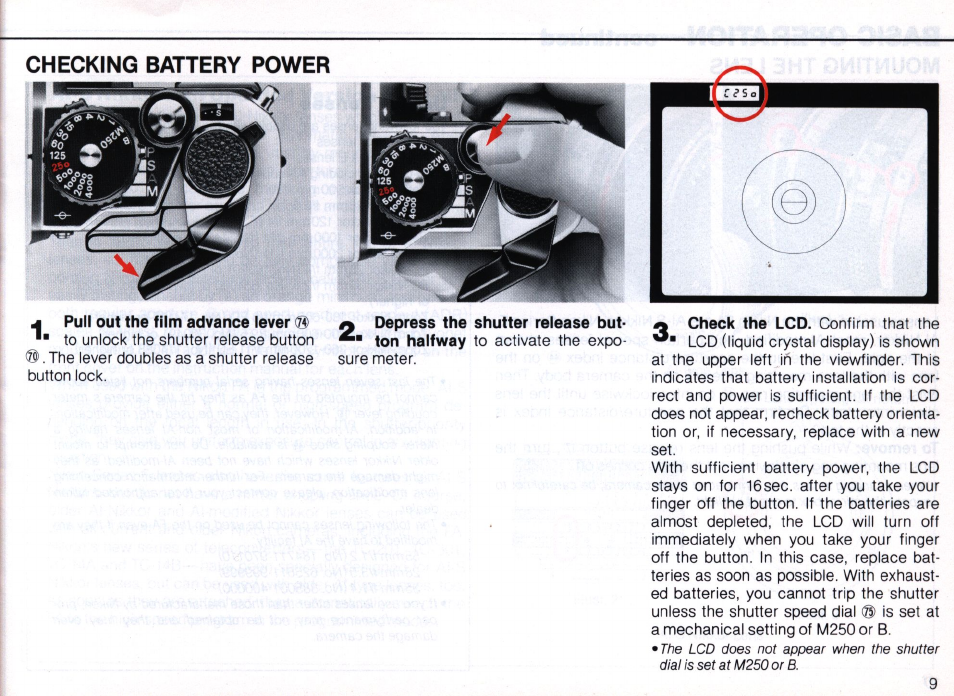
CHECKING
BATTERY
POWER . .
......
9 INFRARED PHOTOGRAPHY . .
.......
57
MOUNTING THE LENS .
..
1
0-11
FLASH PHOTOGRAPHY .
.................
........
....
58-6
1
Usable
Len
ses.
.
......
10
Accessory Shoe and Sync Terminal . .
.....
59
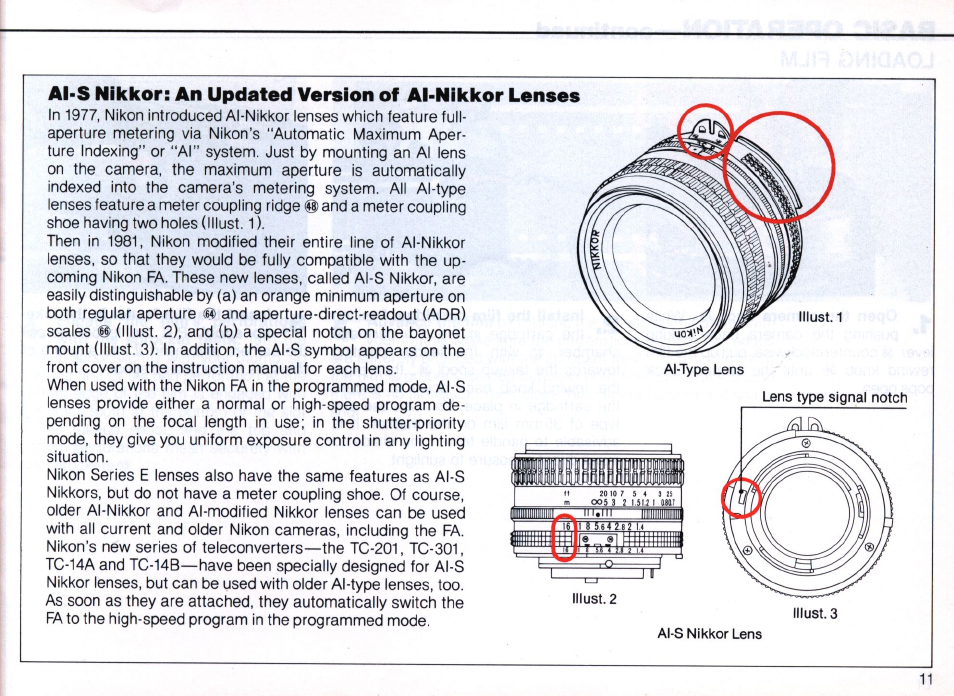
AI·S Nikkor:
An
Updated Version of AI-Nikkor
Len
ses. .
......
11
Ready-Light Indication
in
th
e Viewfinder
..........
_. _.. . . 60
LOADING FILM . .
.............
12-15
Nikon
FA
/Speedlight Combination Chart . .
..
61
Frame Counter. . . . . . . . . . . . . . . . . . . . .
.....
_
..
.
...........
15
CLOSE·UP PHOTOGRAPHY. . ..62
Film Advance Lever. . . . . . . . . . . . . .
...............
15
Close-Up Equipment . .
.....
62
Memo Holder . . . . . . . . . . . . . . . . . . . . . . . . . . . . . . . . .
...
15
ACCESSORIES. . . . . . . . . . . . . . . . . . . . . . . . . . .
...
.
..
...
...
.
63-69
SETTING FILM SPEED.
...................
.
....
..
......
....
16
ELECTRONIC FLASH UNITS. . .. ... . .. .. .. .. . . .
.........
63
SELECTING THE SHOOTING MODE . .
...
17-31
Speedlight SB-15 .
..
63
Viewfinder Information . .
19
P(Programmed) Mode. .
20-23
S(Shutter-Priority) Mode
..
. . .
....
_
......
_
..
....
..
. _
....
24-27
A(Aperture-Priority) Mode. .
...........
28-29
Speedlight SB-16B. .
...
63
Speedlight
SB
-
18
. . .
...
_
...
_
.....
63
MOTOR DRIVES. . .. . ... . .. . . .
............
64
Motor Drive MD-15 . .
.............
64
M(Manual) Mode . .
.......
_. . . .
30-31
Motor Drive
MD-1
2.
...........
....
64
HOLDING THE CAMERA. . . .. .. . .. . .. .. . .. . . . .. . . . . .
32-33
MISCELLANEOUS .. . .
.. .. ..
. . .. . .
..
. . .
..
. .
...
65
-
69
Detachable Handgrip . .
.......
33 Data Back MF-
16
..........................
.
..............
..
65
FOCUSiNG
..............
. . .
....
34-35
Interchangeable Focusing
Sc
reen
s.
.
...
66-67
TAKING
PICTURES .
..........
.
.....
.
...
..
...
..
....
........
36
Filters. . .
..
.
..
.
..
.
..
. .
..
.
..
. . . .
..
..
. . . .
.....
...
68
UNLOADING FILM
'.......................
.
37-38
Len
s Hood
s.
. . .
...........
68
TECHNICAL
INFORMATION'
Anti-Cold Battery Pack DB-2
.................
. . _. _. .
...
69
PHOTOGRAPHIC
TECHNIQUES
. .
39-62
Cable Release AR-3 . . . . . . . . . . . . . . . . . . . . . . . . . . . . . . . . 69
EXPOSURE METERING SYSTEM .. . . .. . .. . .. . . .
39-45
Right-Angle Viewing Attachment DR-3
...........
_. .
...........
69
Metering Control Button
.....................
. . . _
..
..........
40
Eyepiece Magnifier
DG
-2
....................................
69
Comparison of Automatic Multi-Pattern and Rubber Eyecup
..................
....
........•.•.•.
_. _
......
69
Centerweighted Metering. .
.....................
..
41-45
Eyepiece Correction
Len
ses.
. . . . . . . . . . .
..........
69
RELATIONSHIP BETWEEN SHUTTER SPEED Camera Cases . . . . . . . . . . . .
........
69
AND APERTURE . .
..........................
46-47
Neckstraps. .
........
_. .
.......
69
DEPTH OF FIELD. . . .. . .. . .. .. .. . .
...
48-49
EV
RANGE
OF
THE
CAMERA
. .
....
.....
...
70-71
EXPOSURE COMPENSATION . .
....
50-53
What is
EV
? . . . . . . . . . . . . . . . . . . . . . . .
..
70
In
Automatic Exposure Modes. .
.. ..
. _. . . .
.....
50-51
EV
Chart.
..
... ... ...
.
.. ..
. . .
...
70-71
In
the Manual Mode . . . . . . . . . . . . . . . . . . . . . . . . . . .
....
52
TIPS
ON
CAMERA
CARE
..
.
.........
72-7
3
Duplication Work and Photomicrography . . . . . . . . . . . . . .
....
53
TIPS
ON
BATTERY
USE . .
74
STOp·DOWN EXPOSURE MEASUREMENT .
....
..
. .. .
..
....
54
ABOUT
THE
LIQUID
CRYSTAL DISPLAY (LCD). .
......
74
6
SPECiFiCATIONS
..................................
.
....
75-77