Nilfisk Egholm City Ranger 2200 User manual

City Ranger 2200
OperatOr’smanual
WEED BRUSH

2
Dear Customer
Congratulations with your new Nilsk-Egholm product.
The City Ranger 2200 is a Danish designed and manufactured product, which oers a very exible
way of maintaining outdoor areas.
Optimal use of your Nilsk-Egholm Weed Brush:
To ensure optimal performance of your Nilsk-Egholm Weed Brush, please read this manual
carefully before using the machine. Failure to do so can result in personal injury and damage to
the machine.
Safety:
The Weed Brush is equipped with various devices to ensure optimal operational safety both for
the user and the surroundings. We ask you to pay particular attention to section 1.1 Safety. The
machine must only be serviced by professionals.
The Weed Brush is designed only for use by professionals. On delivery, the user will receive
thorough training to become a competent operator. Do not lend to anyone who has not been
thoroughly trained and who has not read this manual carefully.
The operator’s manual should be considered as a permanent part of the machine and must remain
with it if the machine is sold.
Warnings:
Some items in this operator’s manual are marked with this warning symbol.
The warning indicates areas where extra care has to be taken to avoid personal
injury or damage to the machine and its accessories. The warning also shows
what you should pay special attention to.
Reservations:
As it is the Nilsk-Egholm policy to make continuous improvements, we reserve the right to
alter the machine’s specications and equipment at any time without notice. Nilsk-Egholm A/S
accepts no liability for errors or omissions in the operator’s manual.
Contact us:
Do not hesitate to contact Nilsk-Egholm A/S should you have questions of any kind regarding
your new Nilsk-Egholm product..
Best Regards
Nilsk-Egholm A/S · Transportvej 27 · DK-7620 Lemvig
T. +45 97 81 12 05 · F. +45 97 81 12 10
E-mail: info@egholm.dk · www.nilsk-egholm.com
Operator’s Manual City Ranger 2200 Weed Brush
Introduction

3
The Weed Brush is the perfect, most-eective eco-friendly
tool for keeping outdoor areas weed-free, i.e. pavements,
paths, agstones, asphalt, etc. There isn’t a weed
anywhere that can resist the rotating brush as it sweeps
over it.
The brush scours weeds loose and stresses new shoots.
Regular brushing keeps an area weed-free without the use
of pesticides.
Operator’s Manual City Ranger 2200 Weed Brush
Contents
Content
General information..............................................................................4
1.1 Safety.....................................................................................4
1.2 EC Declaration of Conformity.................................................................5
1.3 Technical data .............................................................................6
Operator’s manual ...............................................................................7
2.1 Assembly/Disassembly ......................................................................7
2.2 Before start-up ............................................................................8
2.3 Weed Brush applications ....................................................................9
2.4 Change between vertical and horizontal brushing .............................................10
2.5 Sideways arm movement...................................................................11
2.6 Forward/back brush adjustment ............................................................12
2.7 Sideways brush adjustment.................................................................13
2.8 Keeps areas weed-free by collecting .........................................................14
2.9 Directional-rotation and resonances .........................................................15
2.10 Guard use ...............................................................................16
2.11 Weed Brush start-up ......................................................................17
Service and maintenance ........................................................................18
3.1 Cleaning .................................................................................18
3.2 Adjusting the guard .......................................................................18
3.3 Adjusting the vacuum nozzle. . . . . . . . . . . . . . . . . . . . . . . . . . . . . . . . . . . . . . . . . . . . . . . . . . . . . . . . . . . . . . . .19
3.4 Lubrication / storage ......................................................................21
3.5 Replacing the brush .......................................................................21
3.6 Guard maintenance........................................................................22
3.7 Replacing rubber prole on vacuum nozzle ...................................................23
3.8 Troubleshooting...........................................................................23
Conditions .....................................................................................24
4.1 Warranty.................................................................................24
4.2 Complaints ...............................................................................25
4.3 Disposal..................................................................................25
Spare parts. . . . . . . . . . . . . . . . . . . . . . . . . . . . . . . . . . . . . . . . . . . . . . . . . . . . . . . . . . . . . . . . . . . . . . . . . . . . . . . . . . . . .26
5.1 Spare parts - City Ranger 2200 Weed Brush ...................................................26
Notes .........................................................................................27

4
2
Max. 10°
3
1
1.1 Safety
Make sure no one is standing close to
the machine while it is in use:
Make sure that no one is near the machine
while it is in use as there is a danger of
crushing.
N.B!
As it is articulated, the rear end of the
machine swings out when turning. Make
sure that no one is standing near the
machine while it is in use. (Picture 1)
The Weed Brush swings to the side when the joystick is
moved left or right. Make sure that no one is standing near
the machine while it is in use. (Picture 2)
Avoid crushing ngers:
Keep your hands and ngers away from
areas where there is a danger of crushing.
Avoid roll-overs:
Do not drive the machine in a place where it
can slide, tip or roll. Do not drive on slopes
with an incline of more than 10°. (Picture 3)
When using with hopper.
Read the safety instructions in the Suction Sweeper
Operator’s Manual.
General information
Operator’s Manual City Ranger 2200 Weed Brush
Joystick
Do not drive on slopes with an incline of more than 10°
Prevent people from standing in the working area

5
General information
Operator’s Manual City Ranger 2200 Weed Brush
1.2 EC Declaration of Conformity
Manufacturer: Nilsk-Egholm A/S
Address: Transportvej 27 · DK-7620 Lemvig
Telephone: +45 97 81 12 05
hereby declares that
The machine: Weed Brush
Type: 22UKB2200
· has been manufactured in conformity with the provisions of the Machinery
Directive 2006/42/EU
Place: Lemvig
Date:
Signature:
Knud Olsen, Senior Engineer

6
General information
Operator’s Manual City Ranger 2200 Weed Brush
1.3 Technical data
Dimensions:
Length (L)
Width (W)
Height (H)
Attached:
3,850 mm
1,020 mm
1,960 mm
Storage dimensions:
1,500 mm
1,000 mm
850 mm
Technical data:
Type
Working zone width
Ground clearance under brush
Ground clearance under vacuum nozzle
Brush diameter
Weed Brush weight
Typical working speed
22UKB2200
2,100 mm
330 mm
90 mm
675 mm
115 kg
2-4 km/h
N.B!
Specications may be changed without prior notice.

7
1
2
4
3
Operator’s manual
Operator’s Manual City Ranger 2200 Weed Brush
2.1 Assembly/Disassembly
1. The locking handle on the A-frame of the basic machine
must be in the unlocked position. (Picture 1)
2. Drive the base machine right up to the A-frame of the
Weed brush, so the A-frames t into each other. (Picture 2)
3. Raise the A-frame by pulling the joystick back until the
Weed Brush is suspended and free of the ground.
(Picture 3)
4. Stop the machine.
5. Lock the Weed Brush in place with the locking handle
on the A-frame. (Picture 4) The locking handle can only be
engaged when the machine has been stopped.
Removing:
Follow the procedure for tting in the reverse order.
Joystick
Locking the attachment
Locking handle
Locking
U
n
l
o
c
k
e
d
1
8
2
3
Operator’s Manual City Ranger 2200 Weed Brush
Operator’s manual
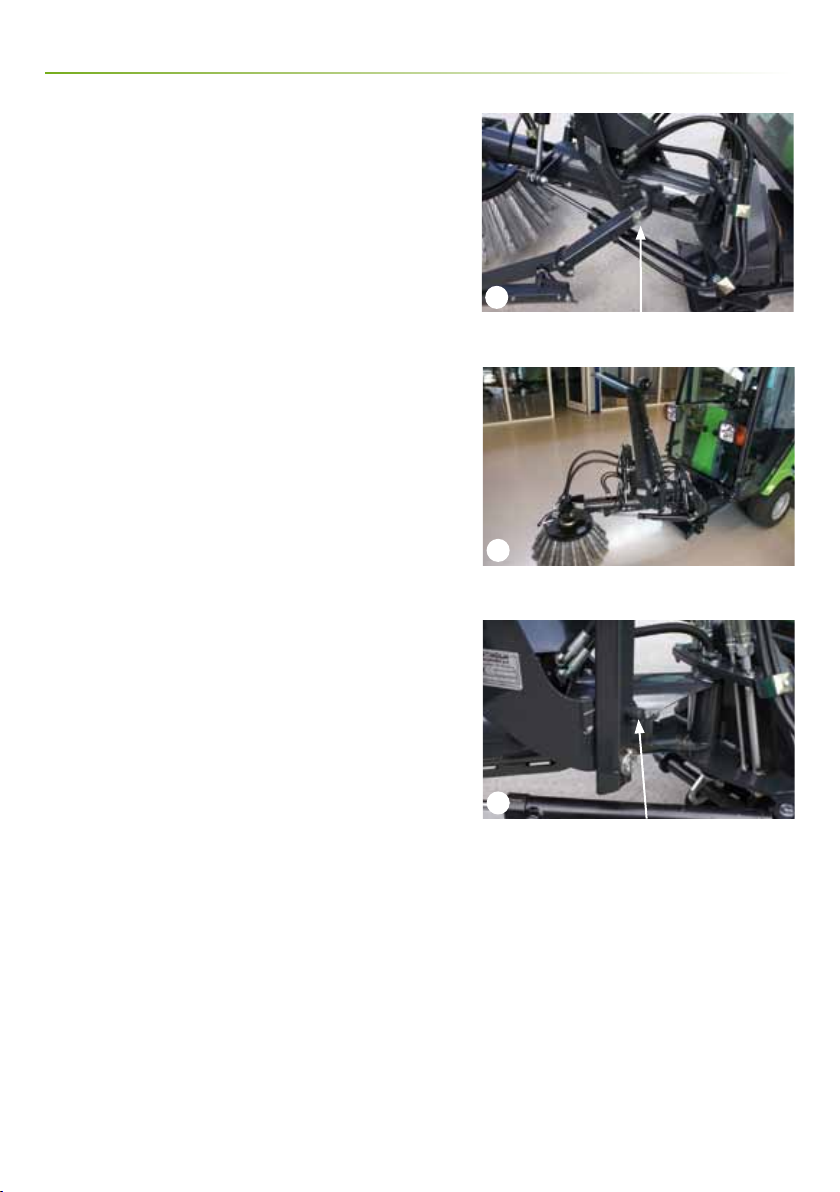
2.2 Before start-up
Transport
Position the Weed Brush arm in front of the machine for
optimum stability.
The transport lock prevents the attachment from lowering
during transport. (Picture 1)
How to use the transport lock:
Move the handle to the uppermost position. Lift the
A-frame by moving the joystick up. As the A-frame lifts,
the transport lock is automatically activated. (Picture 2)
How to unlock the transport lock:
Unhitch the handle and lift the A-frame to the uppermost
position. The attachment can now be lowered again.
(Picture 3)
Counterweight
It is recommended that counterweights are tted to the
machine for stability when using the Weed Brush with the
Suction Sweeper hopper tank.
New counterweights can be ordered from an authorised
Nilsk-Egholm distributor.
Arm in front of the machine
Transport lock – locked
Transport lock – unlocked
1
2
4
9
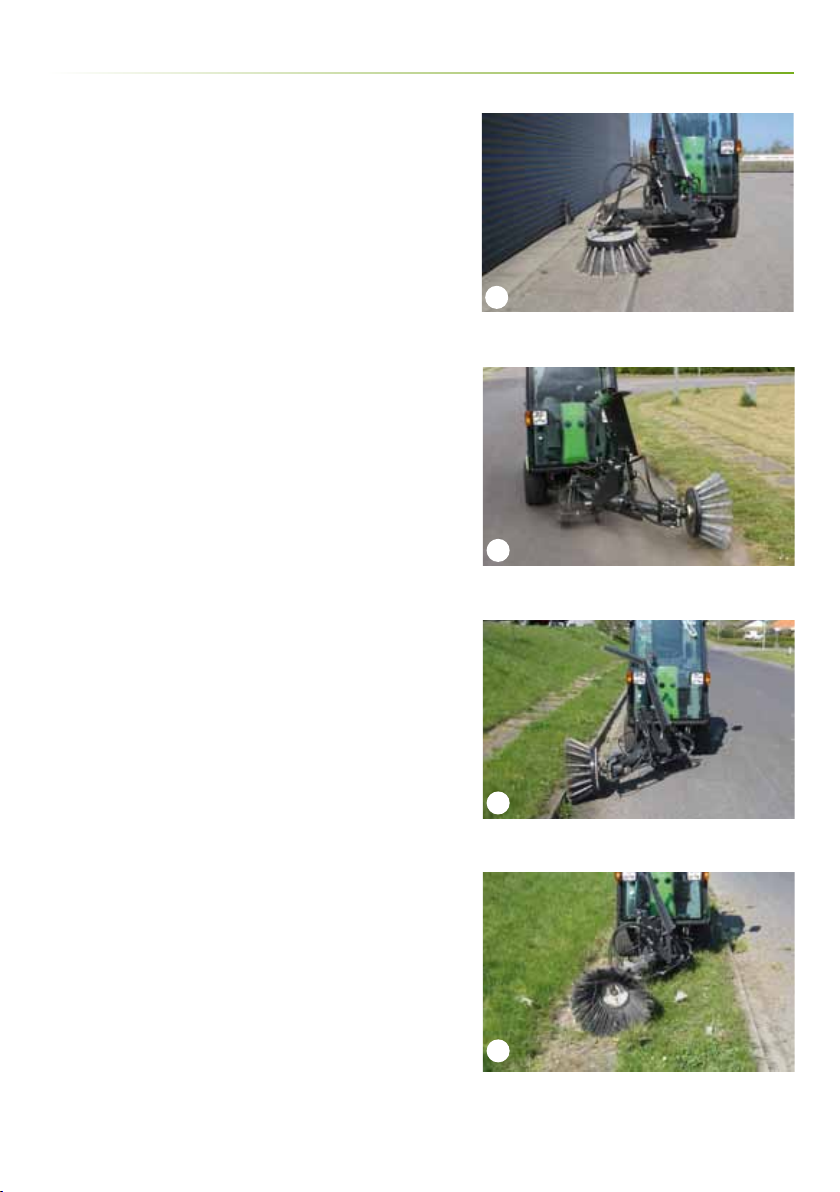
2.3 Weed Brush applications
The Nilsk-Egholm Weed Brush design makes it extremely
exible.
Three applications:
1. Scouring weeds horizontally. (Picture 1)
2. Scouring weeds vertically on left side. (Picture 2)
3. Scouring weeds vertically on right side. (Picture 3)
N.B!
Vertical scouring requires weight distribution. (See City
Ranger 2200 operator’s manual)
Tips!
The brush can also scour in front of the machine, so the
operator can easily clean pavements and deep gutters.
(Picture 4)
Operator’s manual
Operator’s Manual City Ranger 2200 Weed Brush
3

10
1
2
3
4
Operator’s Manual City Ranger 2200 Weed Brush
Operator’s manual
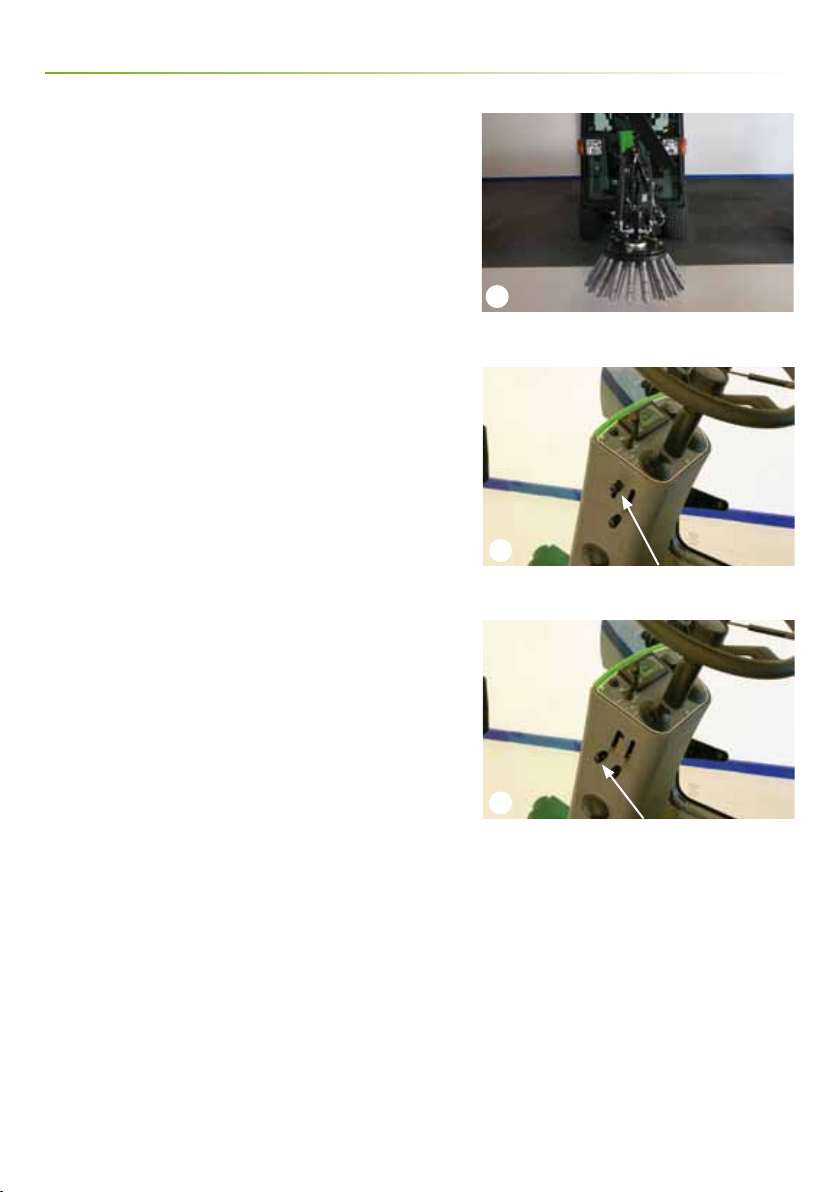
2.4 Change between vertical and horizontal
brushing
Warning!
The brush head can move when the
locking pin is lifted. Keep your distance
from the brush head when the handle
is used. The brush is abrasive. We
recommend the use of protective gloves.
Changing from horizontal to vertical brushing:
1. Lift the Weed Brush, engage the transport lock (see
section 2.2) and stop the machine.
2. Lift the locking pin to the open position. (Picture 1)
3. Turn the brush head manually to the desired position.
(Picture 2)
See Weed Brush ‘Three applications’ for positions.
(Picture 3)
4. Free the handle so the locking pin is again engaged.
(Picture 4)
5. Continue to turn the brush head to the desired position
until the locking pin falls into position with a click.
(Picture 4)
Positioning the brush completely vertically requires extra
adjustment using the joystick. (See Section 2.7)
Locking pin open position
Turn brush head
3. Vertical left – 1. Horizontal– 2. Vertical right
Free/continue turning

11
1
3
2
Operator’s manual
Operator’s Manual City Ranger 2200 Weed Brush
2.5 Sideways arm movement
Warning!
Make sure there is no one close to the
machine when it is in use.
The arm can move from side to side: (Pictures 1 and 2)
1. Move the joystick sideways to move the arm out to the
side. (Picture 3) The arm swings in the same direction as
the joystick.
Left
Right

1
1
12
2
3
4
Operator’s Manual City Ranger 2200 Weed Brush
Operator’s manual
2.6 Forward/back brush adjustment
The brush can tilt forward and back. (Pictures 1 and 2)
1. Move switch F2 to locked position (R). (Picture 3)
2. Move joystick sideways. (Picture 4) The brush tilts
forward and back.
Forward
Back
Switch F2, locked position
Forward - Back

1
2
3
13
Operator’s manual
Operator’s Manual City Ranger 2200 Weed Brush
2.7 Sideways brush adjustment
The brush can tilt from side to side. (Pictures 1 and 2)
1. Press on the black button on the joystick. (Picture 3)
2. Move joystick sideways. (Picture 3) The brush tilts in the
same direction as the joystick.
Left
Right
Engage the black button and move sideways
14
1
2
3
Operator’s Manual City Ranger 2200 Weed Brush
Operator’s manual
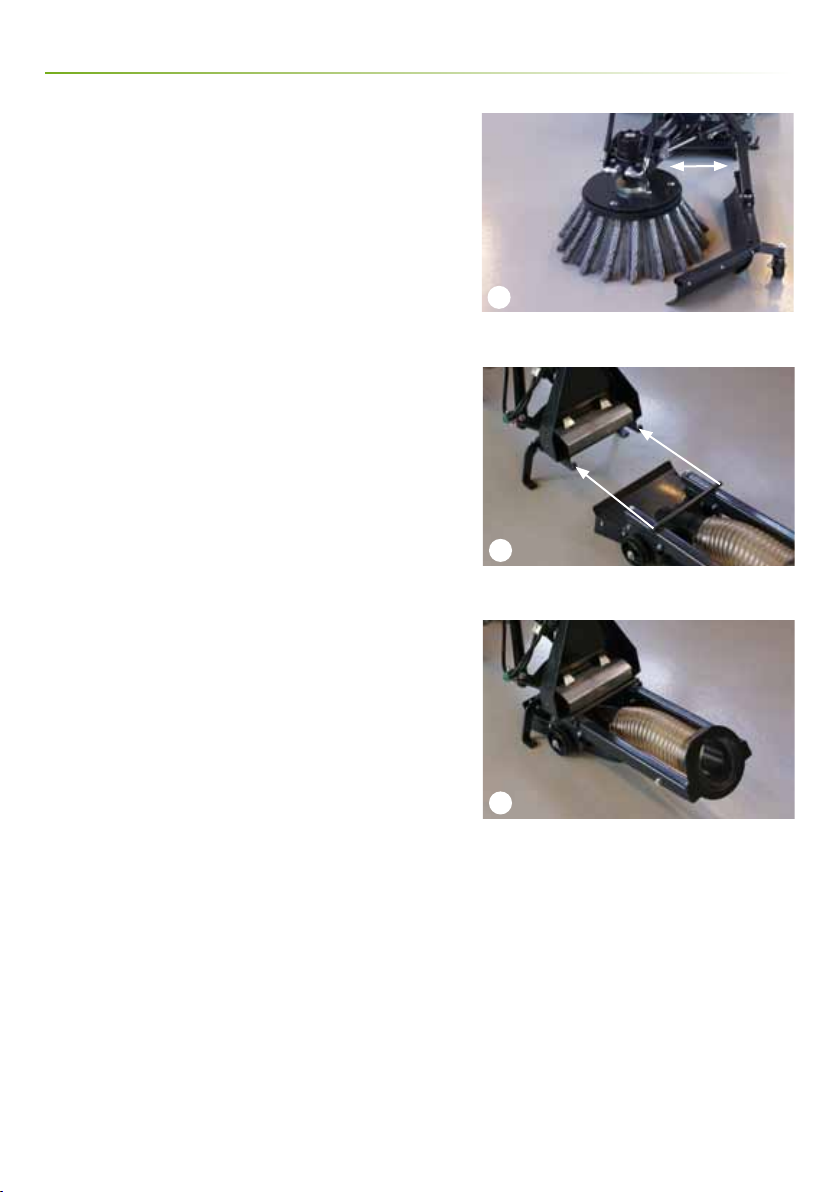
2.8 Keeps areas weed-free by collecting
Collecting removes seeds and organic matter. In perfect
conditions, all loose organic material is collected and
removed from the area.
See the Suction Sweeper operator’s manual on how to use
the hopper.
When the vacuum nozzle is operating at the centre of the
machine below the A-frame, some Weed Brush exibility
is lost. The vacuum nozzle work width is 340 mm and
loosened organic material must be precisely under the
nozzle for the best results. (Picture 1)
Fitting the vacuum nozzle
1. Detach the Weed Brush from the machine.
2. Push the vacuum nozzle in between the support struts
and t in the two small notches. (Pictures 2+3)
3. Fit the Weed Brush on the machine.
Repeat the process in reverse order to detach vacuum
nozzle.
Tips!
When the vacuum nozzle is not in use, it can be stored
away, preventing the rubber guard from being warped.
Vacuum width: 340 mm
Fitting the vacuum nozzle
Vacuum nozzle tted

1
2
15
2.9 Directional-rotation and resonances
Brush rotation direction
The Weed Brush is extremely exible because brush
rotation can be reversed and the brush can be used on
both sides of the machine.
Right rotation. (Picture 1)
Left rotation. (Picture 2)
Resonances
Initially, certain brush types cause resonances, especially
if the brush is operating completely at. These resonances
can also be generated when the direction of rotation is
changed or if the operator drives too fast.
To avoid resonances, slightly tilt the brush initially or drive
more slowly.
Operator’s manual
Operator’s Manual City Ranger 2200 Weed Brush
Right
Left
16
1
2
3
Operator’s Manual City Ranger 2200 Weed Brush
Operator’s manual
2.10 Guard use
Guard use.
The guard is used to prevent scoured weeds from
spreading over a wide area and for collecting the weeds
under the vacuum nozzle. When ordering, indicate which
side you would prefer the guard to be on. You can also
remove the guard and t it onto the opposite side, if
required. Guards can be tted onto both sides, but only
one can be raised at a time.
Fitting and raising guard.
1. Set the guard in place and t the pin. (Picture 1)
2. The guard can be raised if it gets in the way. (Picture 2)
3. If the guard needs to be lowered again, pull the button
and push guard down manually. (Picture 3)
Pin
Raised
Release button

1
2
17
Operator’s manual
Operator’s Manual City Ranger 2200 Weed Brush
2.11 Weed Brush start-up
Set the brush to the required position.
(See section 2.3-2.7)
Start the Weed Brush using the PTO front switch
(Picture 1) and lower it to the ground by moving the
joystick forward. Activate weight distribution. (Picture 2)
Collecting (See section 2.8)
Start the suction in the hopper using the Rear PTO switch.
(Picture 2)
Push the throttle all the way forward. (Picture 2)
In dusty conditions, turn on the water-sprayer using the
Water Front Brushes (F1) switch. (Picture 2)
Weight distribution
When brushing horizontally, the weight must be on the
attachment. When brushing vertically, weight must
be distributed away from the Weed Brush. See the City
Ranger 2200 operator’s manual.
Tip!
Regulating brush speed reduces wear on the brush and on
surfaces.
See the City Ranger 2200 operator’s manual.
Front PTO Water (F1) Rear PTO
Weight distribution Joystick Throttle
18
1
2
3
Operator’s Manual City Ranger 2200 Weed Brush
Service and maintenance
3.1 Cleaning
Daily cleaning and maintenance will extend the lifetime of
both the machine and the attachment.
Clean the Weed Brush with water after use. Avoid high
pressure cleaning of the snap couplings.
Clean the snap couplings with a cloth. (Picture 1)
3.2 Adjusting the guard
As the brush wears, the guard will need to be adjusted.
1. Place the brush at on the surface.
2. Loosen the handle. (Picture 2)
3. Adjust the guard height so that it is parallel with the
surface. (Picture 3)
4. Tighten the handle.
It may be necessary to adjust the guard sideways.
1. Place the brush at on the ground.
2. Loosen the three bolts. (Picture 4)
3. Adjust the guard so that it is parallel to the surface.
4. Tighten the bolts.
4
”Clean couplings with a cloth”
Handle
Parallel
Loosen the bolts. Guard parallel with surface
1
2
3
19
x
Service and maintenance
Operator’s Manual City Ranger 2200 Weed Brush
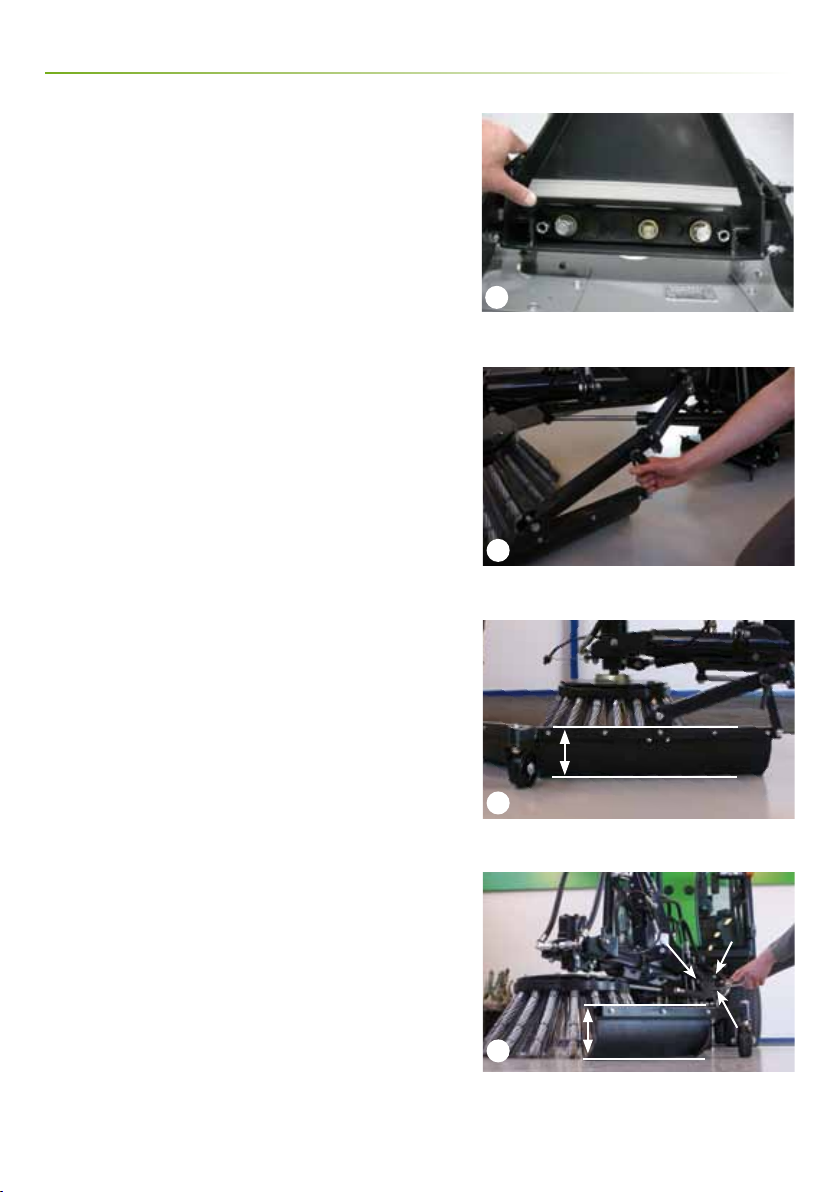
3.3 Adjusting the vacuum nozzle
The vacuum nozzle setting is pre-set before delivery.
When tting the vacuum nozzle for the rst time, or if
the vacuum level is less than optimal, we recommend
checking the machine’s vacuum hose connection.
1. Fit the vacuum nozzle and attach the Weed Brush to the
machine.
2. Check X. (Picture 1+2) It must be between 53 and 59
mm, from the lower edge of the A-frame to the centre of
the bolt.
To adjust:
3. Detach the vacuum nozzle.
4. Remove the two bolts. (Picture 3)
5. There are extra washers under the nuts. (Picture 4) To
reduce distance (X) t an extra washer under the bolt. To
increase distance X, remove a washer. One washer alters
the distance by 6 mm. Both bolts must have the same
number of washers.
6. Tighten the bolts and repeat steps 1 and 2.
4
53-59 mm
Remove bolts
Extra washers underneath

20
1
2
3
xx
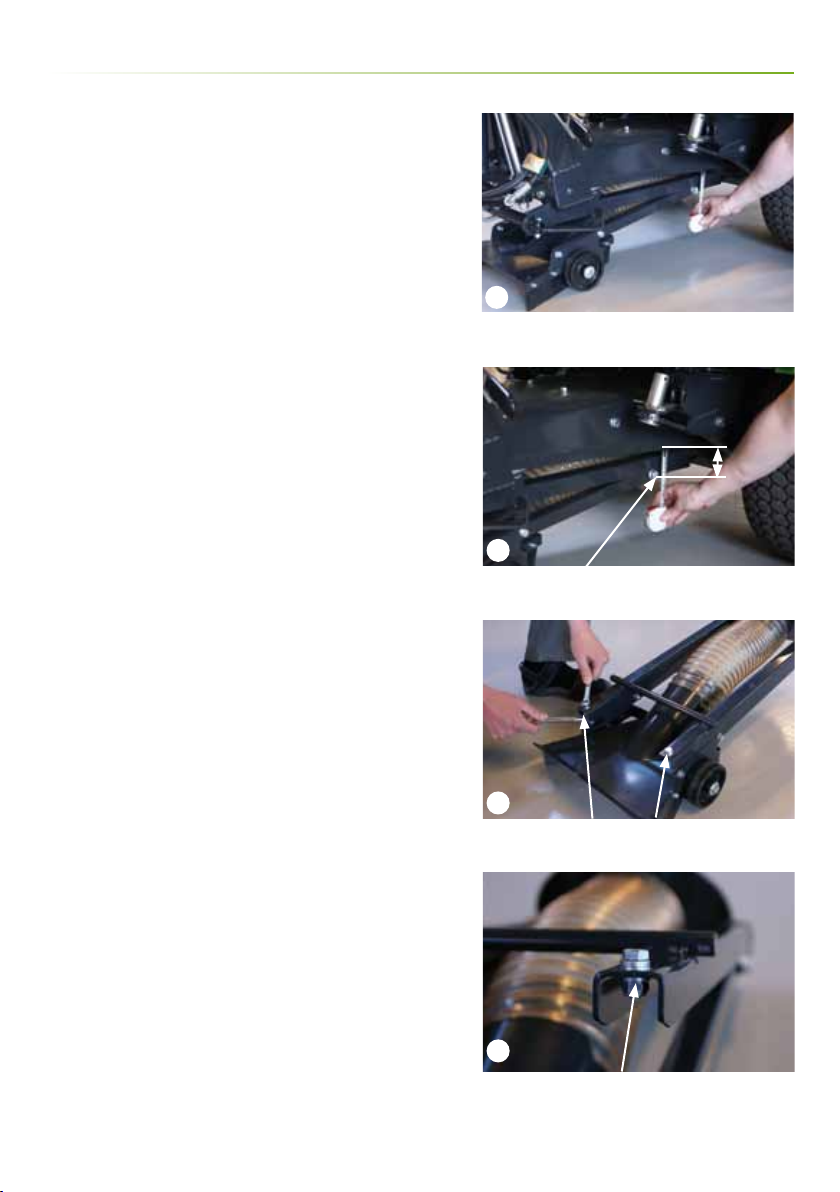
Operator’s Manual City Ranger 2200 Weed Brush
Service and maintenance
3.3 Adjusting the vacuum nozzle
- continued -
When changing the brush or rubber prole on the vacuum
nozzle, check the angle.
1. Place the brush at on the ground.
2. Loosen the bolts, two on each side. (Picture 1)
3. Adjust the angle so that distance X is the same in front
of and behind the wheel. (Picture 2)
If distance X exceeds 4 mm.
4. Remove the bolt. (Picture 3)
5. Move the wheel to the required position, typically one
hole up, i.e. from pos. 1 to pos. 2, etc. (Picture 4)
6. Repeat on the opposite side.The wheels must be tted
in the same position on each side.
7. Adjust the angle so there is the same distance (X) in
front and behind the wheel (Picture 2) and tighten the
bolts on both sides. (Picture 1)
4
Parallel
Wheel bolt
Pos 1, Pos 2, Pos 3, Pos 4
Other manuals for City Ranger 2200
2
Table of contents
Other Nilfisk Egholm Blower manuals

Popular Blower manuals by other brands


Greenlee
Greenlee Mighty Mouser Fishing Systems instruction manual

EINHELL
EINHELL GE-UB 18/250 Li E-Solo Original operating instructions

Trac Vac
Trac Vac 1080 Operating and assembly manual

Dulevo
Dulevo 6000 Original instructions

Little Wonder
Little Wonder Sho Owner's manual and safety instructions

Husqvarna
Husqvarna 24B instruction manual