Trac Vac 1080 Product guide

08-02-16
Model 1080
Operating and Assembly
Manual
Midwest Equipment Mfg.
5225 Serum Plant Road
Thorntown, IN 46071

2
SAFETY RULES
Remember, any power equipment can cause injury if operated improperly or if the user does not understand
how to operate the equipment. Exercise caution at all times when using power equipment.
This symbol means Attention!!!!! It is used to point out safety precautions.
▪ Read and follow all instructions in this manual before assembly or operation of this equipment.
Failure to comply with these instructions may result in personal injury. Keep this manual for future
reference and for ordering replacement parts.
▪Read this instruction manual carefully. Become familiar with the controls and proper use of this
equipment.
▪Read the engine owners manual and safe operation rules before using this equipment.
▪Never allow children less than 16 years of age to operate the Trac-Vac. Children 16 years
and older should operate only under close parental supervision.
▪Do not allow anyone to operate this equipment without proper instruction.
▪Do not allow passengers to ride on the Trac-Vac or on the towing vehicle.
▪Keep children and pets out of area of operation.
▪Check fuel before starting engine. Do Not fill fuel tank indoors, or while engine is running or hot.
Wipe off any spilled fuel before starting engine.
▪Engine and muffler get HOT!Do Not touch! Keep debris from accumulating on or around engine
and muffler to avoid fire hazard.
▪Allow engine to cool before storing in any enclosed area. Never store Trac-Vac with fuel in tank.
▪Do not operate engine if air cleaner or cover is removed, except for adjustments. Removal of the part
could create a fire hazard.
▪Keep hands, feet, face, long hair and clothing out of inlet and discharge areas. There are ROTATING
BLADES inside these openings.
▪Make certain that all moving parts come to a complete stop before cleaning, repairing or inspection.
Disconnect spark plug wire and keep away from plug to prevent accidental starting.
▪If Trac-Vac should become clogged with debris, SHUT OFF ALL ENGINES and wait until impeller
comes to a complete stop before attempting to remove obstruction. Disconnect spark plug wire to
prevent accidental starting.
▪If excessive vibration occurs while operating your Trac-Vac, stop the engine immediately, disconnect
the spark plug wire and allow all moving parts to stop completely before taking the following steps.
A. Inspect for damage.
B. Repair or replace any damaged parts.
C. Check for loose parts and tighten to assure continued safe operation.
▪Check all hardware periodically to insure safe operation.
▪Check cart cover periodically for wear and replace if worn or damaged.
▪Never operate Trac-Vac without intake hose and exhaust hose attached in proper place.
▪Do Not remove exhaust hose or attempt to empty contents of container while engine in running.
▪Keep all shields and guards in place and securely attached.
▪Always wear eye protection (safety glasses or goggles) when operating this equipment.
▪Do Not stand behind unit in exhaust discharge area while engine is running.
▪Do Not operate this equipment while intoxicated or while taking medications that could impair
reactions or senses.
▪Operate this equipment at reduced ground speed on rough terrain, along creeks and ditches and on
slopes to prevent tipping or loss of control.
▪Vehicle stability and braking are affected by the addition of this unit. Do not fill the Trac-Vac to its
full capacity without checking the capability of the towing vehicle to safely pull and stop with the unit
attached.
▪Do Not operate on slopes in excess of 10 degrees. STAY OFF OF STEEP SLOPES!
▪Follow the maintenance instructions outlined in this manual.

3
1080 P A R T S D R A W IN G

4
MODEL 1080 TRAC VAC PARTS LIST
KEY PART NO. DESCRIPTION
1 18012 Main Frame, RH
18014 Main Frame, LH
2 18013 Sub Frame
3 18030 Turbine Housing, RH
18031 Turbine Housing, LH
4 86040 Turbine, 8HP
5 18050 Inlet
6 85028 Bearing, 1” Flange
7 85029 Bearing, 1” Pillow Block
8 85027 Pulley, 8400 x 1
9 18109 Shaft, 1”
10 18106 Jack
11 18080 Drawbar Extension
12 18132 Throttle Cable
13 18110 Key Switch
14 18107 Control Stand
15 18111 Belt Guard, RH
18112 Belt Guard, LH
16 18105 Belt, AX35
17 18126 Pulley, AK50 x 1
18 18113 Briggs & Stratton, 342CC IC Elec.
19 18135 Choke Cable
20 88060 Latch Handle
21 88105 Latch Link
22 88104 Latch Pin
23 88103 Latch Adjustment Screw
24 18120 Metal Hose Clamp
25 18040 Metal Exhaust Hose, RH
18041 Metal Exhaust Hose, LH
26 18070 Cart Connector
27 18071 Support Arm, RH
18072 Support Arm, LH
28 18125 Support Arm Extension
29 18118 Hose Support Strap
30 18117 Battery Strap
31 18123 Battery
32 18119 Hose Clamp
33 18124 Intake Hose, 8” x 10’
34 18122 Battery Cable
35 58104 Hitch Pin
36 18116 Battery Pad
37 85034 Bearing Support Bracket
38 18115 Muffler Deflector
39 ***-8 Chute (tractor specific)
40 180120 Adjustment Support
5
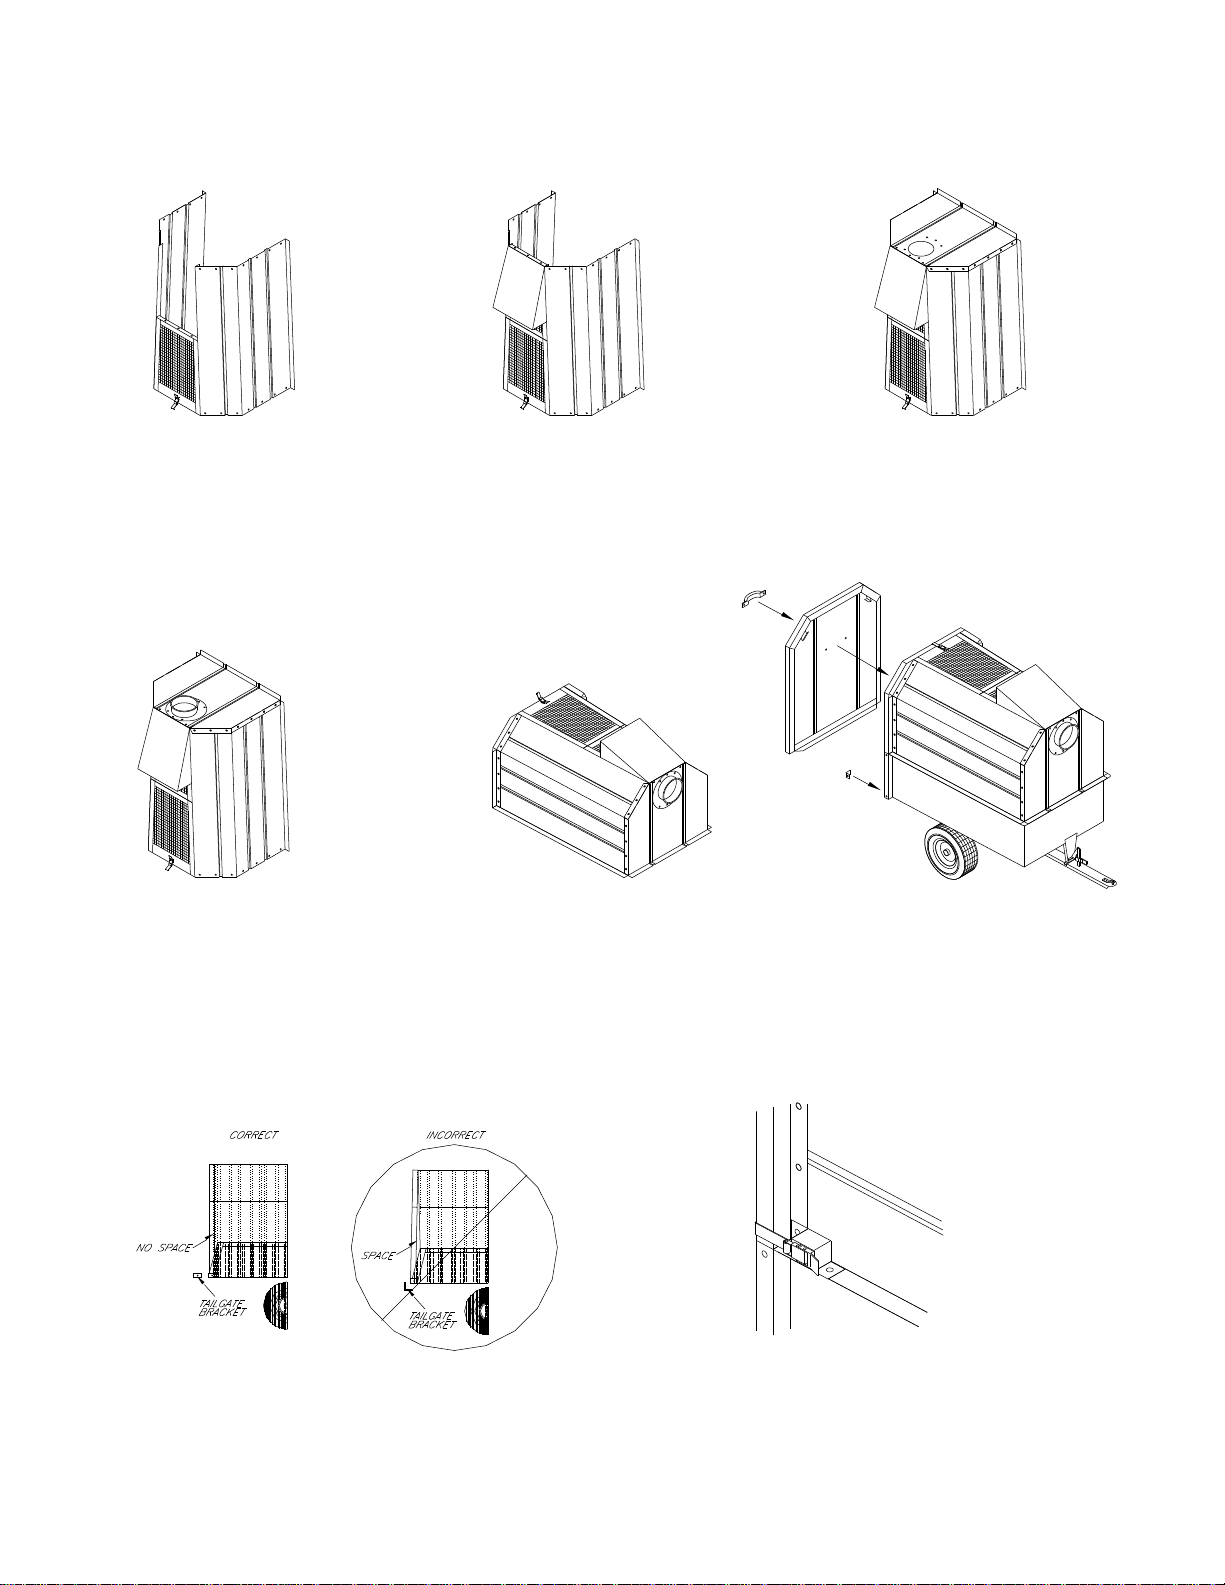
P lace sid e pan els on end w ith decal
ou tw ard and ab ou t a foo t apart at
top . P lace sc reen w ith latch , ( rear
sc reen), on e nd b etw een sid es w ith
latch o utw ard an d to th e floo r.
A ttach to sid es w ith 1 /4 x 1/2 bo lts.
P la ce s cr ee n w ith o ut la tc h , (fro n t
sc reen), on top o f rear screen an d
betw e en sid es. S ecu re to rear
sc reen w ith 1/4 x 1 /2 bolts. S lip
deflector betw een sid es and front
sc reen w ith tapered e nd u p.
S ecu re w ith 1/4 x 1 /2 b olts.
P la ce f ro n t o n sid es w ith fla ng es o n
o utsid e . S ta rt c orn er b o lts in sid es
and screen b efo re tigh tening . S tart
bo lts at to p & bo ttom of sid e p ane ls
and w o rk you r w a y to w ard cen ter,
w ith tru ss head , ro un d, to th e o utsid e.
P lace co ver flat on floo r and attach an gles
to sid e p anels at rear o f cov er w ith an gles
on the ou tside o f co ver. S ecure w ith 1/4 x
1/2 b olts. S tart at the to p and secon d ho le
fro m th e b ottom , (latch uses bo ttom hole),
then w ork to w ard s the center o f th e pan els.
B o lts truss, (rou nd), h ead should b e to the
insid e o f cart.
A ttach hand le to tailg ate o n sm o oth
side. Pla ce cover o n cart. M ake sure
the tw o low e r black a ng le brack ets
have been in stalled on the lo w er rear
of the c art. Fit tailgate to th e cov er
usin g the to p latch and lo w er brack ets
on ly.
P lace latch on each side of cart w ith
ton gu e of latch to re ar. A tta ch to
side panel an d cart w ith 1 /4 x 1/2 b olts.
P lace conn ecto r, (packed in w ith vac),
on o utsid e of fro nt w ith the lip to th e
ou tside . A ttach w ith 1 /4 x 1/2 bo lts.
M odel 280 C art C over A ssem bly Instructions
G ently m ove cov er to the re ar to insu re
contact be tw een the tailg ate and co ver,
(alo ng entire con tacting su rface). C enter
1/4 x 1 /2 bo lts.
drill 9 /32 " h ole s. A ttach cover w ith
fro nt on cart. M ark h ole locatio ns, an d
N O T E : D o not tig hten any b olts until the end of co nstru ction .
T ig hte n all ha rd w a re .
Table of contents
Other Trac Vac Blower manuals


Popular Blower manuals by other brands

Lithium Earthwise
Lithium Earthwise LB20024 Operator's manual

EINHELL
EINHELL GE-CL 36 Li E Original operating instructions

EINHELL
EINHELL VENTURRO 18/210 operating instructions

Troy-Bilt
Troy-Bilt 657 Operator's manual

Weed Eater
Weed Eater VS2000BV instruction manual

KRAUSMANN
KRAUSMANN U37020-00 Operation manual


