Ninglu DF Series User manual

Doc No::NLT-DFXXXX-SSEN
Version:V160106
10 INCH LCD DIGITAL FISH FINDER
OPERATION MANUAL
Model:DF SERIES

CONTENTS
CONTENTS........................................................................2
SYSTEM DESCRIPTION........................................................1
Specifications....................................................................2
Performance.................................................................... 2
Environment.................................................................... 2
Operation..........................................................................3
Keyboard........................................................................ 3
Operation..........................................................................4
Fixed key functions............................................................ 4
POWER ................................................................... 4
RANGE.................................................................... 4
SHIFT...................................................................... 4
GAIN & GAIN 1 & GAIN 2 .............................................. 4
Color (single-freq fish finder)........................................... 4
ZOOM...................................................................... 4
Operation..........................................................................5
BRILL ...................................................................... 5
MENU...................................................................... 5
AUTO ...................................................................... 5
FREQ ...................................................................... 5
MODE...................................................................... 5
Arrows (UP▲/DOWN▼/LEFT / RIGHT )........................ 6
MENU contents and factory setting......................................... 6
MENU <1> ................................................................ 6
MENU <2> ................................................................ 7
Setting on MENU.............................................................. 8

Pic Speed ................................................................. 8
Auto Range ............................................................... 8
MaxA-Range ............................................................. 8
Zoom....................................................................... 8
Fish Alarm................................................................. 8
Back Ground.............................................................. 9
Pulse Width ............................................................... 9
TVG ...................................................................... 10
Noise Rej. ............................................................... 10
Echo Color .............................................................. 10
Palette ................................................................... 10
Depth Alarm............................................................. 11
Upper Limit.............................................................. 11
Lower Limit.............................................................. 11
Zone Limit............................................................... 11
How to get the steady data..................................................12
Installation ......................................................................13
Operating unit installation .................................................. 13
Installation ......................................................................14
Connection ................................................................... 14
Power Supply ................................................................ 14
VGA............................................................................ 14
Transducer wiring............................................................ 15

1
SYSTEM DESCRIPTION
We thank you very much for your purchasing our fish finder.
Please be sure to read this operation manual carefully and understand
what it describes before operating this unit. Your fish finder will perform to
the utmost of its ability only if it is operated and maintained in accordance
with the correct procedures.
Overview:
Model
Channel
Frequency &
Output power
Transducer
cable(m)
Transducer
maker
DF612
double
50/200 kHz –600/600W
BP60-200-15L
LEISHEN
DF1011
single
50 kHz - 1500W
TGM60-50B-15L
NEC
DF2022
double
50/200 kHz- 700/700W
TGM50/200B-15L
NEC
DF5022
single
50/200 kHz- 1500/1500W
CM422
AIRMAR
DF5066
double
50/200 kHz –1800/600W
TD67
HONDEX
DF5088
double
50/200 kHz –2000/1000W
CM488
AIRMAR
DF5099
single
50 kHz -2500W
CM158
AIRMAR
Features
Digital signal processing without IF transformer and advanced technology.
Digital signal reception with low background noise and high sensitivity.
Digital signal conditioning, no change with temperature and high stability.
Video extension, transfer a large screen display and HD display.
Custom-order NMEA signal interface and serve as customer service.
System:
The whole fish finder system consists of operating unit, transducer and
power supply.
Operating unit:
Display LCD: 10.4 inch color TFT LCD.
Back cabinet: connect with power supply, transducer, display, ground
stud and repeater (custom-order).

2
Specifications
Performance
Dimension: 264(H) x 270(W) x 93(D) mm
Power: DC24V (19~36V)
Fish finder will automatically shut down when overhigh voltage.
Consumption: <24W
Frequency & DF612 50/200kHz 600/600W
Output power DF1011 50kHz 1500W
DF2022 50/200kHz 700/700W
DF5068 50/200kHz 1800/600W
DF5088 50/200kHz 2000/1000W
DF5099 50kHz 2500W
LCD: 10.4 inch TFT color LCD, 640X480 pixels
Background:Grey Blue D-Blue Black
Echo colors:16 echo levels and 6 kinds of color configuration
Time scale: 30s, continuously move left
Range scope: 5 10 20 30 40 50 60 80 100 120 150 180 200 250 300
400 500 600 800 1000 1500 2000m
Shift range:5 ~500 m
Alarm: shallow alarm (prior), fish alarm
Alarm mode:buzzing, letters glittering on screen
Environment
Working temperature: -10 ~40℃, complying to IEC60945
Working humidity: 10 ~90% relative humidity
Operating unit waterproofing: IP23, complying to IEC60529
Transducer waterproofing: IP66

3
Operation
Keyboard
POWER
Turn power off/on.
RANGE
Set depth range.
SHIFT
Shift initial position of depth
range.
GAIN 1
Adjust sensitivity of frequency 1.
GAIN 2
Adjust sensitivity of frequency 2.
ZOOM
Move the expanded area toward
sea surface or sea bottom.
BRILL
Adjust the brightness of display.
MENU
Open MENU<1>, MENU<2>,
and EXIT.
AUTO
Turn on/off Auto-range.
Arrows
Right/Left: Adjust Pic speed.
Up/Down: adjust the echo color.
Select items or change the
settings in MENU.
FREQ
Select display mode:
Low-freq /High- freq / Low-freq &
High-freq/ High-freq & Low-freq.
MODE
Switch Normal mode / Bottom-Z
/ Fixed-Z
Dual-freq
Fish finder
Single-freq
Fish finder

4
Operation
Fixed keyfunctions
POWER
【POWER】button is used to turn on/off the system. “0”is off and “1”is on.
RANGE
【RANGE】button sets the depth range(how deep from the surface)
showed on the screen: 5 10 20 30 40 50 60 80 100 120 150 180 200 250
300 400 500 600 800 1000 1500 2000m (22 optional values).
SHIFT
You can shift the initial displaying depth downward. For example, when you
shift 5m downward at 0 ~5m depth range, initial display depth becomes
to 5m and display range becomes to 5 ~10m. Shift range: 5 ~500m.
GAIN & GAIN 1 & GAIN 2
This adjusts the sensitivity to distinguish the bottom or fish school easily.
Dual-freq fish finder:
【GAIN 1】: adjust the sensitivity of 50 kHz signal received.
【GAIN 2】: adjust the sensitivity of 200 kHz signal received.
Color (single-freq fish finder)
This facilitates clear observation by eliminate weak echo.
ZOOM
Expanded display is shown on the left half screen.
Zoom mode is set by【MODE】key, more details refer to page 5 MODE.
Fixed-Z
You can choose expansion area by【ZOOM】key as you wish.
Expansion rate is set in MENU 1 Zoom: ×2.5, ×5, ×10.
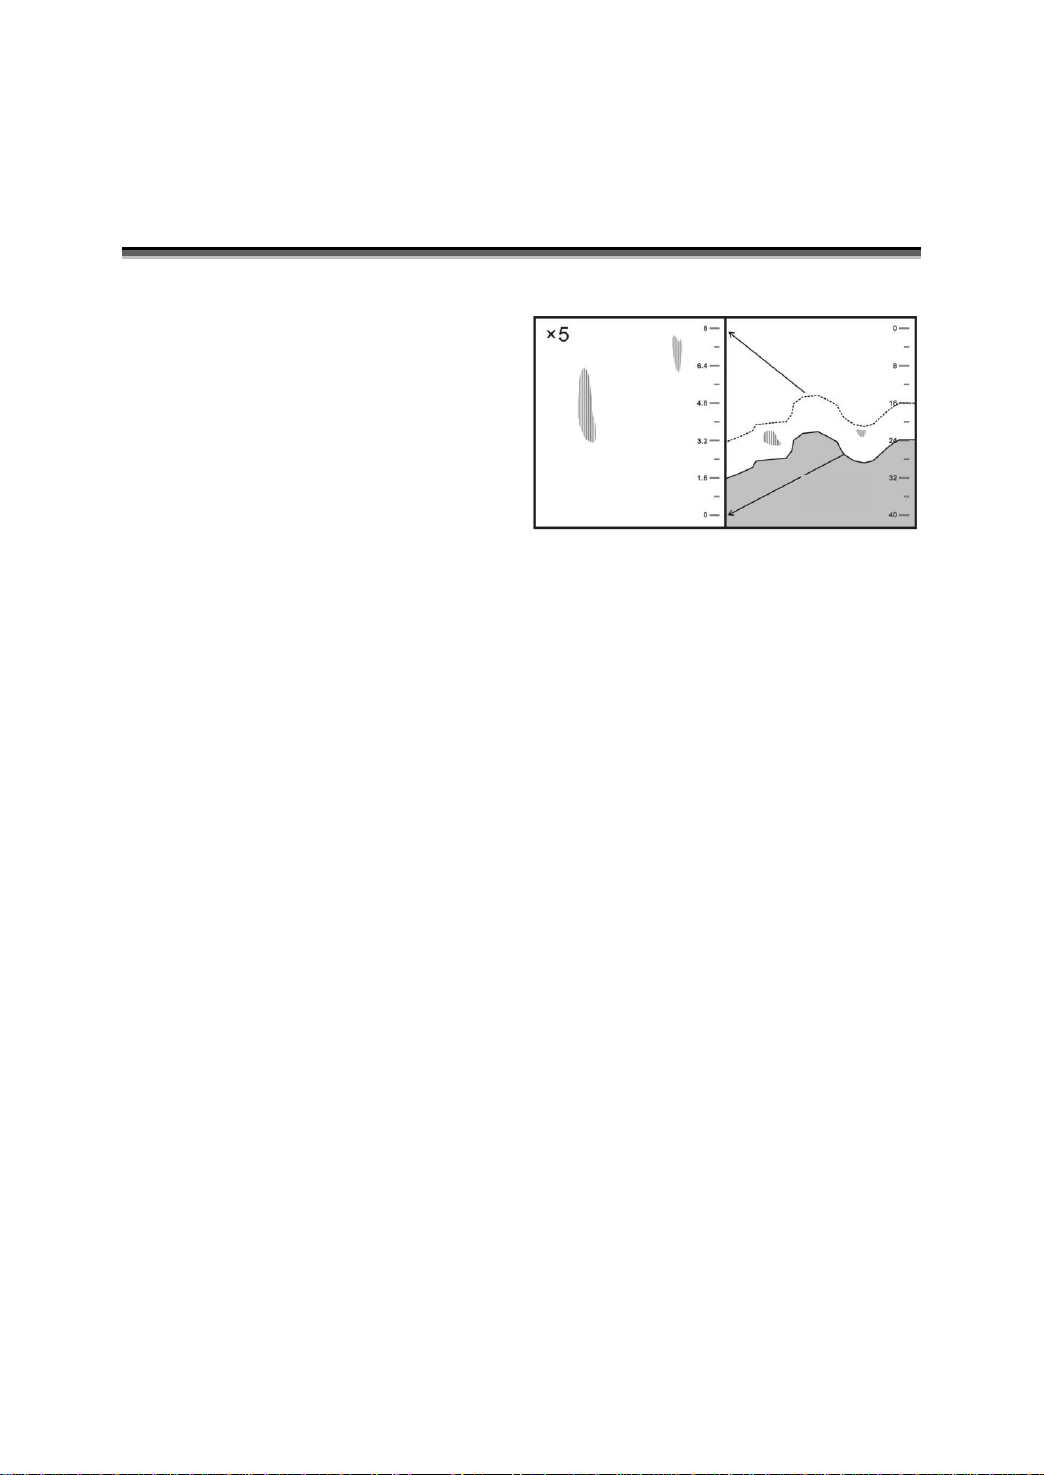
5
Seabed
Operation
Bottom-Z
Bottom contour is indicated as a
straight line and expansion view of
certain area from its contour is
shown. Zoom rate is set in MENU 1
Zoom: ×2.5, ×5, ×10.
BRILL
【BRILL】key is used to adjust the LCD brightness.
MENU
【MENU】button facilitates selection of MENU 1, MENU 2 and EXIT.
AUTO
【AUTO】button is used to turn on or off Auto Range.
FREQ
Frequency displayed toggles among 50 kHz(L), 200 kHz (H), 50 / 200 kHz
(L/H) and 200/50kHz (H/L).
MODE
Three modes a re optional toggled by pressing【MODE】key:
Normal mode
Display normal echo graphic.
Bottom-Z
Bottom contour is indicated as a straight line and expansion view of certain
area from its contour is shown.
Fixed-Z

6
Expansion display a certain area.
Arrows (UP▲/DOWN▼/LEFT / RIGHT )
UP▲/DOWN▼: Select the item of the MENU and adjust Pic speed.
LEFT / RIGHT : Set values of item selected and adjust the echo color.
MENU contents and factorysetting
Note: In the following MENU list, the factory setting is marked with grey back color, such as 100m.
MENU <1>
Pic Speed
01 2 3 4 ×2 ×4
Auto Range
Off On
Max A-Range
30m 100m 200m 300m 500m 800m Max
Zoom
×2.5 ×5 ×10
Noise Rej.
Off Low High
Output Power
0 10 20 30 40 50 60 70 80 90 100
TVG
Off Low Standard High
White Line
off On
Press 【MENU】key to MENU <2>

7
MENU <2>
Note: In the following MENU list, the factory setting is marked with grey back color, such as 100m.
Back Ground
Grey Blue D-Blue Black
Palette
0 1 2 3 4 5
Fish Alarm
Off Small Big
Depth Alarm
Off Upper Zone Lower
Upper Limit
1m ~(Lower Limit-10)m
Lower Limit
(Upper Limit -10 )m ~501m
Pulse Width
Short Standard Long
Unit
m fm
Press 【MENU】or【OK】key to EXIT
Press 【MENU】key to MENU <2>

8
Setting on MENU
Pic Speed
On fish finder, the newest display (display just under the boat) is shown on
the right edge of screen. At the same time previous display moves leftward.
Display of fish finder is formed by repeating such movement. Pic speed is
speed that display forwards. Display expands or reduces horizontally by
changing the pic speed.
Set Pic speed on MENU 1 or left/right arrows: 0, 1, 2, 3, 4, ×2, ×4.
Auto Range
Depth range is automatically changed so that sea bottom is always shown
on the optimum position of the screen (lower half area).
When auto range function is operating, 【DEPTH】key is non-functional.
Set Auto range on MENU 1: Off, On.
Max A-Range
It sets maximum depth when auto range is operating.
Set Max A-Range on MENU 1: 30, 100, 200, 300m,500m, 800m, Max.
Zoom
Set zoom rate in MENU 1:×2.5, ×5, ×10.
Fish Alarm
When the response to be supposed fish school is displayed and the fish
depth is above 4m, alarm goes off.
Off:fish alarm is cancelled.
Small:to catch the response form big and small fish school.
Big:to catch the response from big fish school only.
Note: Fish alarm sometimes reflects to floating matter except fish.
Set Fish Alarm on MENU 1: Off, Small, Big.

9
Back Ground
Reflected echo is indicated in different colors according to its strength.
Visual image of display differs from surrounding brightness. It becomes
easy to see the display by selecting different the background color.
Select Back Ground color in MENU 1: Grey, Blue, D-Blue, Black.
Pulse Width
Normally pulse width is set to short automatically according to set
displayed depth range.
Set Pulse Width on MENU 1: Short, Standard, Long.

10
TVG
This function suppresses sensitivity shallower than approx. 100m and
eliminates reflected signal form plankton and air bubble. Stronger TVG is
set, sensitivity near sea surface decreases. When you make TVG too
strong, response near sea surface disappears. On the other hand, when
you make TVG too weak, response near sea surface becomes strong and
you can not judge the image in some case.
Set TVG on MENU 1: off Low Standard High. More details see How to get steady data in page 12.
Noise Rej.
The echo interferences of the same frequency transducers nearby are
eliminated.
Set Noise Rej. on MENU 1: Off, Low, High.
Echo Color
This function facilitates clear observation by eliminate weak echo.
Set Echo Color by up/down arrows: 04 ~16.
Palette
Reflected signals of sound wave are converted into 16 ranks of digital
signals according to the strength of response. 16 ranks of color are
arranged and it is called color configuration. As image of fish finder is
displayed in colors by this color configuration, you can know the strength of
response by displayed color. As display of response varies by changing
color configuration in Palette, it enables to displayed color specially.
Set Palette in MENU 2: 0, 1, 2, 3, 4, 5.

11
Depth Alarm
Depth alarm goes off within the 3 depth ranges.
Set depth alarm on MENU 2:
Off, Upper, Zone, Lower.
Upper depth and Lower depth are set
in MENU 2: Upper limit and Lower
limit.
Upper Limit
Set Upper depth alarm value.
Set Upper Limit in MENU 2: 1m
~
(Lower Limit –10) m.
Lower Limit
Set Lower depth alarm value.
Set Lower Limit in MENU 2: (Upper Limit –10) m
~
501m
Zone Limit
Set Zone depth alarm value.
Set Zone Limit in MENU 2: Upper Limit
~
Lower Limit.
Upper
Lower
Zone

12
How to get the steady data
The key to getting the steady data lies in the correct adjustment of GAIN &
Color Del..
【GAIN 1】/【GAIN 2】are used to adjust the sensitivity of signal received.
GAIN may be adjusted from the min value to max value and you can get
the appropriate sensitivity at one time point which comes before the time
point of showing littery wave on screen.
【Color Del.】: suppress unwanted echoes and noise to be adapted with
different waters environment.
Too low
Appropriate
Appropriate
but littery
Too high
Del. Color is too much

13
Installation
Operating unit installation
Installation mode: Table
Unit:mm

14
Installation
Connection
Power Supply
VGA
VGA interface realizes external 15-32 inch LCD to display the echo graphics.
Wiring method:
Positive →Pin 1 of 2-pin plug
Negative →Pin 2 of 2-pin plug
1. DC+
2. DC-

15
Transducer wiring
When using double channel, Channel 1 is connected with 50kHz and Channel 2 is
connected with 200kHz. When using single channel, connect with Channel 1.
DF612 -- BP60-200-15L
DF1011 -- TGM60-50B-15L,
wiring method:
Shielded wire →Pin 1 of 5-pin plug
Other signal wires →Pin 3/ Pin 4 of 5-pin plug
DF2022 -- TGM50/200B-15L wiring method:
Shielded wire →Pin 1 of 5-pin plug
White/ Black wire (50kHz) →Pin 3/ Pin 4 of 5-pin plug
Red/ Green wire (200kHz) →Pin 2/ Pin 5 of 5-pin plug
DF5088 –CM488 wiring method:
Shielded wire →Pin 7 of 7-pin plug
Cut off violet and orange wire from the root.
Yellow/ Black wire (50kHz) →Pin 3/ Pin 4 of 7-pin plug
Blue/ Black wire (200kHz) →Pin 2/ Pin 5 of 7-pin plug
White/ Brown wire (Temperature) →Pin 1/ Pin 6 of 7-pin plug
DF5099 –CM158 wiring method:
Shielded wire →Pin 1 of 5-pin plug
Cut off orange and brown wires from the root.
Blue-white/ Black-white wire (50kHz) →Pin 3/ Pin 4 of 7-pin plug
This manual suits for next models
7
Table of contents
Other Ninglu Fish Finder manuals


