Nissei NA 9420 User manual

Win Equipment B.V.
De Kronkels 31
3752 LM Bunschoten
The Netherlands
Operator Manual
NA 9420
Tel.: +31 (0)33 299 22 66
Fax: +31 (0)33 299 22 50
E-mail: [email protected]

Version date: April 5th 2013
2
‘Translation of the Original Instructions’

C
Version date: April 5th 2013 3
Operator Manual
NA 9420
Contents
Contents
Contents . . . . . . . . . . . . . . . . . . . . . . . . . . . . . . . . . . . . . . . . . . . . . . . 3
1Introduction. . . . . . . . . . . . . . . . . . . . . . . . . . . . . . . . . . . . . . . . . . . 5
1.1 Purpose . . . . . . . . . . . . . . . . . . . . . . . . . . . . . . . . . . . . . . . . . . . . . . . . . 5
1.2 Manufacturer . . . . . . . . . . . . . . . . . . . . . . . . . . . . . . . . . . . . . . . . . . . . . . 5
1.3 Machine identification. . . . . . . . . . . . . . . . . . . . . . . . . . . . . . . . . . . . . . . . 5
1.4 Warranty. . . . . . . . . . . . . . . . . . . . . . . . . . . . . . . . . . . . . . . . . . . . . . . . . 6
1.5 Accessories . . . . . . . . . . . . . . . . . . . . . . . . . . . . . . . . . . . . . . . . . . . . . . . 6
1.6 Liability . . . . . . . . . . . . . . . . . . . . . . . . . . . . . . . . . . . . . . . . . . . . . . . . . . 6
1.7 Copyright . . . . . . . . . . . . . . . . . . . . . . . . . . . . . . . . . . . . . . . . . . . . . . . . 6
2 Safety. . . . . . . . . . . . . . . . . . . . . . . . . . . . . . . . . . . . . . . . . . . . . . . . . 7
2.1 Symbols used in this manual.. . . . . . . . . . . . . . . . . . . . . . . . . . . . . . . . . . . 7
2.2 Emergency stop . . . . . . . . . . . . . . . . . . . . . . . . . . . . . . . . . . . . . . . . . . . . 7
2.3 Safety symbols on the machine . . . . . . . . . . . . . . . . . . . . . . . . . . . . . . . . . 8
2.4 Safety instructions . . . . . . . . . . . . . . . . . . . . . . . . . . . . . . . . . . . . . . . . . . 9
2.5 Operation and maintenance . . . . . . . . . . . . . . . . . . . . . . . . . . . . . . . . . . . 10
2.6 Hygiene . . . . . . . . . . . . . . . . . . . . . . . . . . . . . . . . . . . . . . . . . . . . . . . . 10
2.7 Storage. . . . . . . . . . . . . . . . . . . . . . . . . . . . . . . . . . . . . . . . . . . . . . . . . 10
3 Installation . . . . . . . . . . . . . . . . . . . . . . . . . . . . . . . . . . . . . . . . . . . 11
3.1 Introduction. . . . . . . . . . . . . . . . . . . . . . . . . . . . . . . . . . . . . . . . . . . . . . 11
3.2 Installation site . . . . . . . . . . . . . . . . . . . . . . . . . . . . . . . . . . . . . . . . . . . 11
3.3 Electrical connection. . . . . . . . . . . . . . . . . . . . . . . . . . . . . . . . . . . . . . . . 11
4 Machine description . . . . . . . . . . . . . . . . . . . . . . . . . . . . . . . . . . 12
4.1 Machine overview . . . . . . . . . . . . . . . . . . . . . . . . . . . . . . . . . . . . . . . . . 12
4.2 Operating panel . . . . . . . . . . . . . . . . . . . . . . . . . . . . . . . . . . . . . . . . . . . 13
5Operation. . . . . . . . . . . . . . . . . . . . . . . . . . . . . . . . . . . . . . . . . . . . . 15
5.1 Start up (start of working day). . . . . . . . . . . . . . . . . . . . . . . . . . . . . . . . . 15
5.2 Switching off (end of working day). . . . . . . . . . . . . . . . . . . . . . . . . . . . . . 17
Switching off & standby . . . . . . . . . . . . . . . . . . . . . . . . . . . . . . . . . . . 17
Switching off & pasteurising . . . . . . . . . . . . . . . . . . . . . . . . . . . . . . . . 18
5.3 Emergency stop . . . . . . . . . . . . . . . . . . . . . . . . . . . . . . . . . . . . . . . . . . . 19
5.4 Switching on/off . . . . . . . . . . . . . . . . . . . . . . . . . . . . . . . . . . . . . . . . . . 19
5.5 Adjusting the viscosity . . . . . . . . . . . . . . . . . . . . . . . . . . . . . . . . . . . . . . 20

C
Version date: April 5th 2013
4
Operator Manual
NA 9420
Contents
6Faults. . . . . . . . . . . . . . . . . . . . . . . . . . . . . . . . . . . . . . . . . . . . . . . . 21
6.1 Introduction. . . . . . . . . . . . . . . . . . . . . . . . . . . . . . . . . . . . . . . . . . . . . . 21
6.2 Messages on display. . . . . . . . . . . . . . . . . . . . . . . . . . . . . . . . . . . . . . . . 21
6.3 Faults table . . . . . . . . . . . . . . . . . . . . . . . . . . . . . . . . . . . . . . . . . . . . . . 23
7 Maintenance. . . . . . . . . . . . . . . . . . . . . . . . . . . . . . . . . . . . . . . . . . 24
7.1 Safety instructions . . . . . . . . . . . . . . . . . . . . . . . . . . . . . . . . . . . . . . . . . 24
7.2 General instructions . . . . . . . . . . . . . . . . . . . . . . . . . . . . . . . . . . . . . . . . 24
Requirements . . . . . . . . . . . . . . . . . . . . . . . . . . . . . . . . . . . . . . . . . . 25
Preventive maintenance . . . . . . . . . . . . . . . . . . . . . . . . . . . . . . . . . . . 25
Cleaning and disinfecting . . . . . . . . . . . . . . . . . . . . . . . . . . . . . . . . . . 26
Decalcify . . . . . . . . . . . . . . . . . . . . . . . . . . . . . . . . . . . . . . . . . . . . . 27
7.3 (Dis)assembling, cleaning and disinfecting the machine. . . . . . . . . . . . . . . . 27
Procedure . . . . . . . . . . . . . . . . . . . . . . . . . . . . . . . . . . . . . . . . . . . . . 27
Defrosting and draining the machine. . . . . . . . . . . . . . . . . . . . . . . . . . . 28
Cleaning the mix tank and cylinder . . . . . . . . . . . . . . . . . . . . . . . . . . . . 29
Decalcify the machine . . . . . . . . . . . . . . . . . . . . . . . . . . . . . . . . . . . . 30
Removing the ice cream head and cylinder beater . . . . . . . . . . . . . . . . . 31
Disassembling ice cream head, cylinder beater and mix feed pipe. . . . . . . 32
Cleaning and disinfecting components . . . . . . . . . . . . . . . . . . . . . . . . . 32
Fitting the ice cream head, cylinder beater and mix feed pipe . . . . . . . . . 33
disinfecting the machine . . . . . . . . . . . . . . . . . . . . . . . . . . . . . . . . . . . 34
Starting up the machine . . . . . . . . . . . . . . . . . . . . . . . . . . . . . . . . . . . 35
8 Transportation and Storage . . . . . . . . . . . . . . . . . . . . . . . . . . . 36
8.1 Transportation . . . . . . . . . . . . . . . . . . . . . . . . . . . . . . . . . . . . . . . . . . . . 36
8.2 Storage. . . . . . . . . . . . . . . . . . . . . . . . . . . . . . . . . . . . . . . . . . . . . . . . . 36
9 Discarding . . . . . . . . . . . . . . . . . . . . . . . . . . . . . . . . . . . . . . . . . . . . 37
9.1 Environmental factors . . . . . . . . . . . . . . . . . . . . . . . . . . . . . . . . . . . . . . . 37
Annex 1 Specifications . . . . . . . . . . . . . . . . . . . . . . . . . . . . . . . . . . . . . . . . 38
Annex 2 Spare Parts . . . . . . . . . . . . . . . . . . . . . . . . . . . . . . . . . . . . . . . . . . . 40
Annex 3 EC Declaration. . . . . . . . . . . . . . . . . . . . . . . . . . . . . . . . . . . . . . . . 42

Version date: April 5th 2013 5
1
Operator Manual
NA 9420
Chapter 1 - Introduction
1 Introduction
This chapter provides some general informa-
tion about the machine.
1.1 Purpose
The purpose of this Operator Manual is to provide the operator with information
relating to the use and maintenance of the NA 9420.
Read this Operator Manual carefully before using
the machine.
1.2 Manufacturer
Win Equipment B.V.
De Kronkels 31
3752 LM Bunschoten
The Netherlands
Dealer mark
1.3 Machine identification
The machine plate is affixed to the rear of the
machine. This plate carries the CE mark. This
means that the machine meets the basic health
and safety requirements of the European Union.

Version date: April 5th 2013
6
1Operator Manual
NA 9420
Chapter 1 - Introduction
1.4 Warranty
The dealer offers a 5-year warranty on expensive parts and a 12-month warranty
on non-wearing parts and repair costs. This is in accordance with the conditions
specified in the order confirmation.
1.5 Accessories
The following items are supplied with the machine:
• Operator manual
• O ring remover
• Cleaning brush, narrow and wide
• Tube of lubricant (Petrogel)
• Spray can of disinfectant
• O ring replacement set
•Setoffuses
1.6 Liability
The dealer is not liable for any unsafe situations, accidents and/or damage
resulting from any of the following points:
• Failure to observe warnings or instructions as displayed on the machine or in
this Operator Manual.
• Use of the machine for applications or under conditions other than those
specified in this Operator Manual.
• Changes of kind made to the machine. This also includes the use of different
replacement parts.
• Inadequate maintenance.
Win Equipment B.V. is not liable for any consequential damage due to machine
faults, such as damage to products, business interruptions, production loss etc.
1.7 Copyright
Copyright © 2013 Win Equipment B.V.
All rights reserved.
No part of this publication may be copied, stored in an automated data file or
made public, in any form or in any way, be it electronically, mechanically, by
photocopy, recording or in any other way, without the prior written consent of
the manufacturer.

Version date: April 5th 2013 7
2
Operator Manual
NA 9420
Chapter 2 - Safety
2 Safety
This chapter details the safety instructions for
the machine.
2.1 Symbols used in this manual.
Below you will find an explanation of the symbols that may be used in this manual
to draw the attention of the reader to particular situations.
Caution needed:
- an accident may occur or
- damage may occur to the machine
Do not do this!!!
Important point.
Suggestion to make tasks or actions easier to
carry out.
It is important to read the information provided.
Wait before continuing with the next action.
2.2 Emergency stop
The emergency stop button must be pressed immediately
if people or machinery are at risk.
The entire machine stops immediately and the power is
turned off. The emergency circuit is now in operation.
The operation of the emergency stop is described in
chapter 5.3 - ’Emergency stop’.
Use the emergency stop button immediately if
people or machinery are at risk.
People who operate the machine must be informed
about the operation and location of the emergency
stop button.

Version date: April 5th 2013
8
2Operator Manual
NA 9420
Chapter 2 - Safety
2.3 Safety symbols on the machine
The following safety symbols have been affixed to the machine:
Risk of trapping hand.
This symbol is affixed to the top of the machine next to the
mix tank.
Do not spray with water.
This symbol is affixed to the rear of the machine next to the
ventilation slots.
Danger: electricity.
This symbol is affixed inside the housing.

Version date: April 5th 2013 9
2
Operator Manual
NA 9420
Chapter 2 - Safety
2.4 Safety instructions
The machine meets the basic health and safety requirements of the relevant
directives of the European Union.
Improper or careless use can lead to dangerous situations. Please observe the
following general safety instructions:
• Connect the machine in accordance with the basic health and safety
requirements of the relevant European directives.
• Exercise caution with loose hair and clothing.
• Keep your hands away from dangerous zones.
• Never power up the machine if people are in contact with it.
• Pull the plug out of the socket before carrying out maintenance work on the
machine.
• Faulty safety equipment must be replaced before the machine is used in
production.
• The machine must be maintained in accordance with the instructions found in
chapter 7 - ’Maintenance’ on page -24.
• Changes to the machine must not be implemented without the prior consent
of the manufacturer.
• The safety equipment of the machine must be checked weekly for correct
operation.
• Never remove the machine's plating. There are no parts that you can replace
or adjust yourself.
• Do not remove or cover any labels on the machine.
The safety instructions specified in this document
must be observed. Deviating from the instructions
can cause unacceptable risks.

Version date: April 5th 2013
10
2Operator Manual
NA 9420
Chapter 2 - Safety
2.5 Operation and maintenance
The machine may only be operated, maintained and cleaned by trained staff. The
end user determines the basis on which staff are authorised for this purpose.
2.6 Hygiene
Good hygiene is very important. Please adhere to the following rules:
•Clean and disinfect the machine at least according the hygiene code ice
making but at least once every 6 weeks
•Decalcify the machine every 4th cleaning, but at least twice a year.
•Use the recommended cleaning, disinfecting and decalcify agents to ensure
an optimum result.
•Use prescribed lubricants only.
Good hygiene ensures better ice cream and
satisfied customers.
The operator always remains responsible for good
hygiene.
2.7 Storage
To prevent the machine being damage due to frost the machine must always be
stored by a temperature between 0 and 50°C when it is not used.
Prevent damage by frost. Store the machine when
it is not used by a temperature between 0 and
50 °C .

Version date: April 5th 2013 11
3
Operator Manual
NA 9420
Chapter 3 - Installation
3 Installation
This chapter describes how to connect and
adjust the machine.
Read this chapter carefully before installing the
machine. This is the only way to ensure maximum
safety.
3.1 Introduction
The manufacturer carries out the initial installation. When moving the machine
you are advised to contact the dealer.
The machine may only be installed by qualified
personnel.
3.2 Installation site
• DO NOT place the machine outside.
• Place the machine on a firm, flat surface
(to prevent noise and vibration).
• Keep 10 cm free at the rear and 2 cm at the sides for ventilation.
• Do not place the machine in direct sunlight (not even behind glass) or near to
a heat source (e.g. radiator or deep fryer).
• Place the machine in a room with a temperature between +5°C and +35°C.
3.3 Electrical connection
• Connect the plug of the machine to a high-voltage power supply
(400 volts, 3 x 16 amps + PE).
When setting up the machine, make sure it is not
positioned on the connection cable. This can
damage the insulation and lead to a short-circuit.

Version date: April 5th 2013
12
4Operator Manual
NA 9420
Chapter 4 - Machine description
4 Machine description
This chapter describes the machine and its
means of operation.
4.1 Machine overview
1.Mix tank
2.Operating panel
3.Ice cream head with dispensing
handle
4.Drip tray
5.On/off switch
(backside of the machine)
6.Release button operating panel
(behind the drip tray, optional)
1
6
3
2
4
5
Version date: April 5th 2013 13
4
Operator Manual
NA 9420
Chapter 4 - Machine description
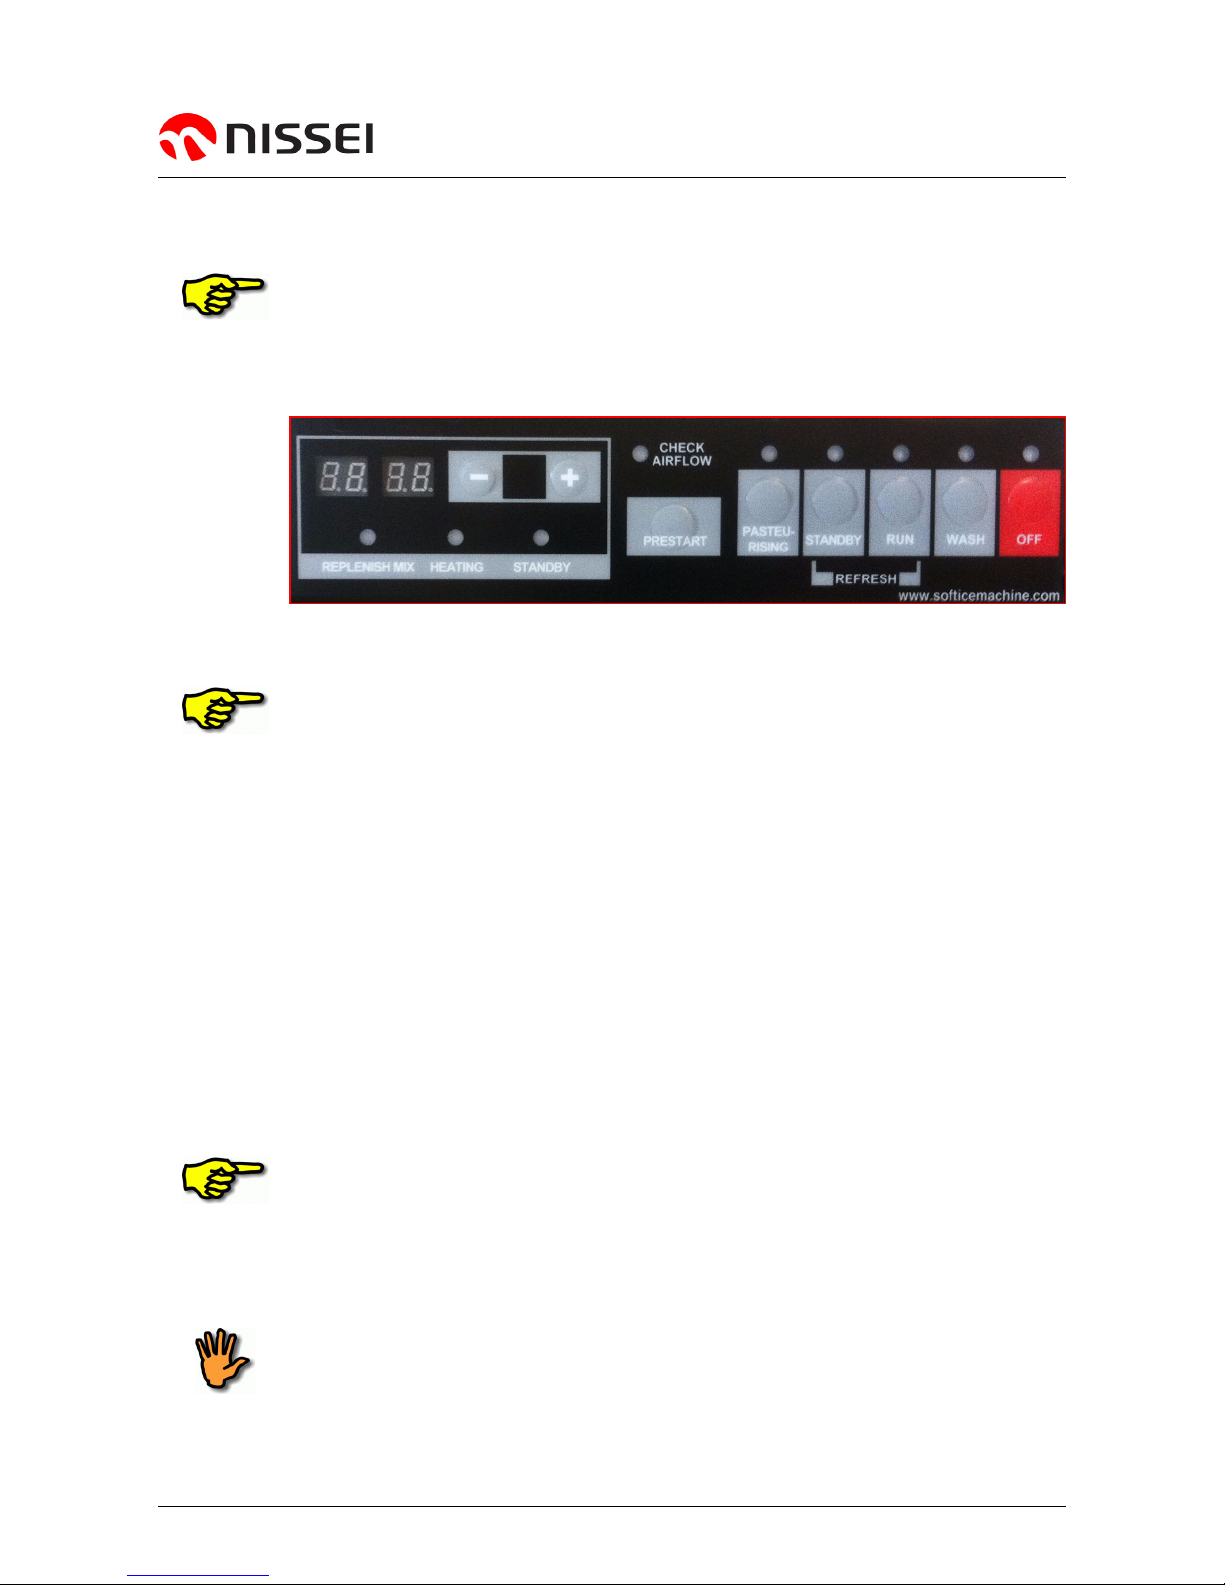
4.2 Operating panel
Attention! When the machine is equiped with the
optional release button the buttons on the
operating panel only react when the release button
behind the drip tray is pressed simultaneously.
•OFF
Press to switch off the machine; only the lights remain lit.
First press 'OFF' before changing the mode.
•PASTEURISING
Sets the machine to pasteurising mode. The ice cream mix in the cylinderand
mix tank are heated and cooled back.
•STANDBY
Sets the machine to standby mode. The cylinder and mix tank are cooled to
approx. 5ºC.
•RUN
Sets the machine to operating mode. Ice cream can be dispensed.
•WASH
Sets the machine to wash mode and switches on the mixing apparatus in the
cylinder.
•REFRESH (press STANDBY and RUN simultaneously)
Sets the machine to refresh mode. The ice cream mix in the cylinder is
defrosted and frozen again.
The machine can only be set in refresh mode while
in run mode.
•CHECK AIRFLOW
Control light airflow cooling, lights up RED during when the machine gets too
hot.
Check whether a free air flow to the bottomside of
the machine is possible and the air vent openings
at the top side of the machine aren’t blocked.

Version date: April 5th 2013
14
4Operator Manual
NA 9420
Chapter 4 - Machine description
•- and +
Selection keys to reduce and increase viscosity.
•STANDBY
Control light; lights up GREEN if the machine is in standby mode.
•HEATING
Control light; lights up RED during pasteurising.
•REPLENISH
Control light; flashes YELLOW if there is insufficient ice cream mix in the mix
tank.
Ice cream head
1. Soft ice cream dispensing handle
On the underside of the ice cream head
you will find:
2. Soft ice cream dispensing spout
Mix tank
1. Mix feed pipe
2. Mix tank agitator
1
2
1
2

Version date: April 5th 2013 15
5
Operator Manual
NA 9420
Chapter 5 - Operation
5 Operation
This chapter describes the daily operation of
the machine.
5.1 Start up (start of working day)
First check whether the machine is in ‘STANDBY’
mode. If this is not the case, measure the
temperature of the mix in the mix tank.
If the temperature is higher than 7°C, empty, clean
and disinfect the machine (see chapter 7 -
’Maintenance’, page 24)
If the temperature is lower than 7°C, first
pasteurise the machine before use.
Attention! When the machine is equiped with the
optional release button the buttons on the
operating panel only react when the release button
behind the drip tray is pressed simultaneously.
10 min
1. Press ‘OFF’. 2. Press ‘WASH’. 3. Wait at least 10 minu-
tes.
4. Press ‘OFF’. 5. Press ‘RUN’. 6. Clean the dispensing
spout with a piece of
paper and alcohol-
pray.

Version date: April 5th 2013
16
5Operator Manual
NA 9420
Chapter 5 - Operation
7. Wait until 2 horizontal
lines are shown in the
left display.
8. Turn the mix feed pipe
to the ‘open’ position.
(Orifice in the outside
pipe in line with the
arrow on the inside
pipe.
9. Dispence one ice
cream and throw it
away.
The machine is now
ready for use.

Version date: April 5th 2013 17
5
Operator Manual
NA 9420
Chapter 5 - Operation
5.2 Switching off (end of working day)
The machine is not switched off in the same way each day. A choice can be made
between switching off & standby and switching off & pasteurising.
Instructions for pasteurising
The Dutch hygiene code gives the following guidelines for pasteurising:
• Pasteurising takes place after the mix has been topped up.
• Always allow the machine to pasteurise at the end of the day.
(with a low turnover rate, pasteurise at least every two days)
• Before starting work, check that pasteurisation has been performed correctly.
• Do not keep pasteurised mix for longer than 72 hours.
• Store mix at a temperature of 7ºC or lower; preferably 4ºC or lower.
Win Equipment B.V. advises you to follow the above
guidelines.
5.2.1 Switching off & standby
1. Press ‘OFF’. 2. Press ‘STANDBY’. 3. Turn the mix feed pipe
to the ‘close’ position.
(Line mark on the out-
side pipe in line with
the arrow on the insi-
de pipe.
4. Clean the dispensing
spout with a piece of
paper and alcohol-
pray.

Version date: April 5th 2013
18
5Operator Manual
NA 9420
Chapter 5 - Operation
5.2.2 Switching off & pasteurising
5. Press ‘OFF’. 6. Press ‘PASTEURI-
SING’.
The ice cream mix will
now be pasteurised
and the machine will
then switch to ‘stand-
by’ mode.
7. Turn the mix feed pipe
to the ‘close’ position.
(Line mark on the out-
side pipe in line with
the arrow on the insi-
de pipe.
8. Clean the dispensing
spout with a piece of
paper and alcohol-
pray.

Version date: April 5th 2013 19
5
Operator Manual
NA 9420
Chapter 5 - Operation
5.3 Emergency stop
The machine must be switched off immediately if
people or machinery are at risk:
•Press the emergency stop button.
The entire machine stops immediately and the
power is turned off. The emergency circuit is now
in operation.
Press the emergency stop button immediately if
people or machinery are at risk.
Resetting
Resetting the emergency stop button:
•Rotate the emergency stop button a quarter turn.
The machine can now be started up again.
First check why the emergency stop button was
pressed. And remedy the problem.
5.4 Switching on/off
The machine does not have an on/off button. To switch off the machine
completely:
1. Press the emergency stop button.
2. Pull the plug out of the socket.
To switch on the machine:
1. Insert the plug in the socket.
2. Reset the emergency stop feature.
Do not switch off the machine at the end of the day;
set it to ‘PASTEURISING’ or ‘STANDBY’.

Version date: April 5th 2013
20
5Operator Manual
NA 9420
Chapter 5 - Operation
5.5 Adjusting the viscosity
Use this function only during ‘Run’.
The viscosity can be adjusted in 0.5 increments.
5 sec
1. Press ‘-’ and ‘+’ toge-
ther until the display
flashes. The display
on the right now
shows the set value.
2. Press ‘+’ or ‘-’ to in-
crease or decrease the
viscosity.
3. Wait approximately 5
seconds. The display
on the right now
shows the new set
value.
Table of contents


