NITA Joust Product manual
Operator and parts manual - 2013
OPERATOR AND PARTS MANUAL
These systems are packaged to include one or several label heads as well
as a conveyor and may contain several options such as status light tower,
transparent label detectors, etc.
Some of the options described in this manual may not apply to your equipment.
HMI Password: 12345678
Adv. Settings: 222183600

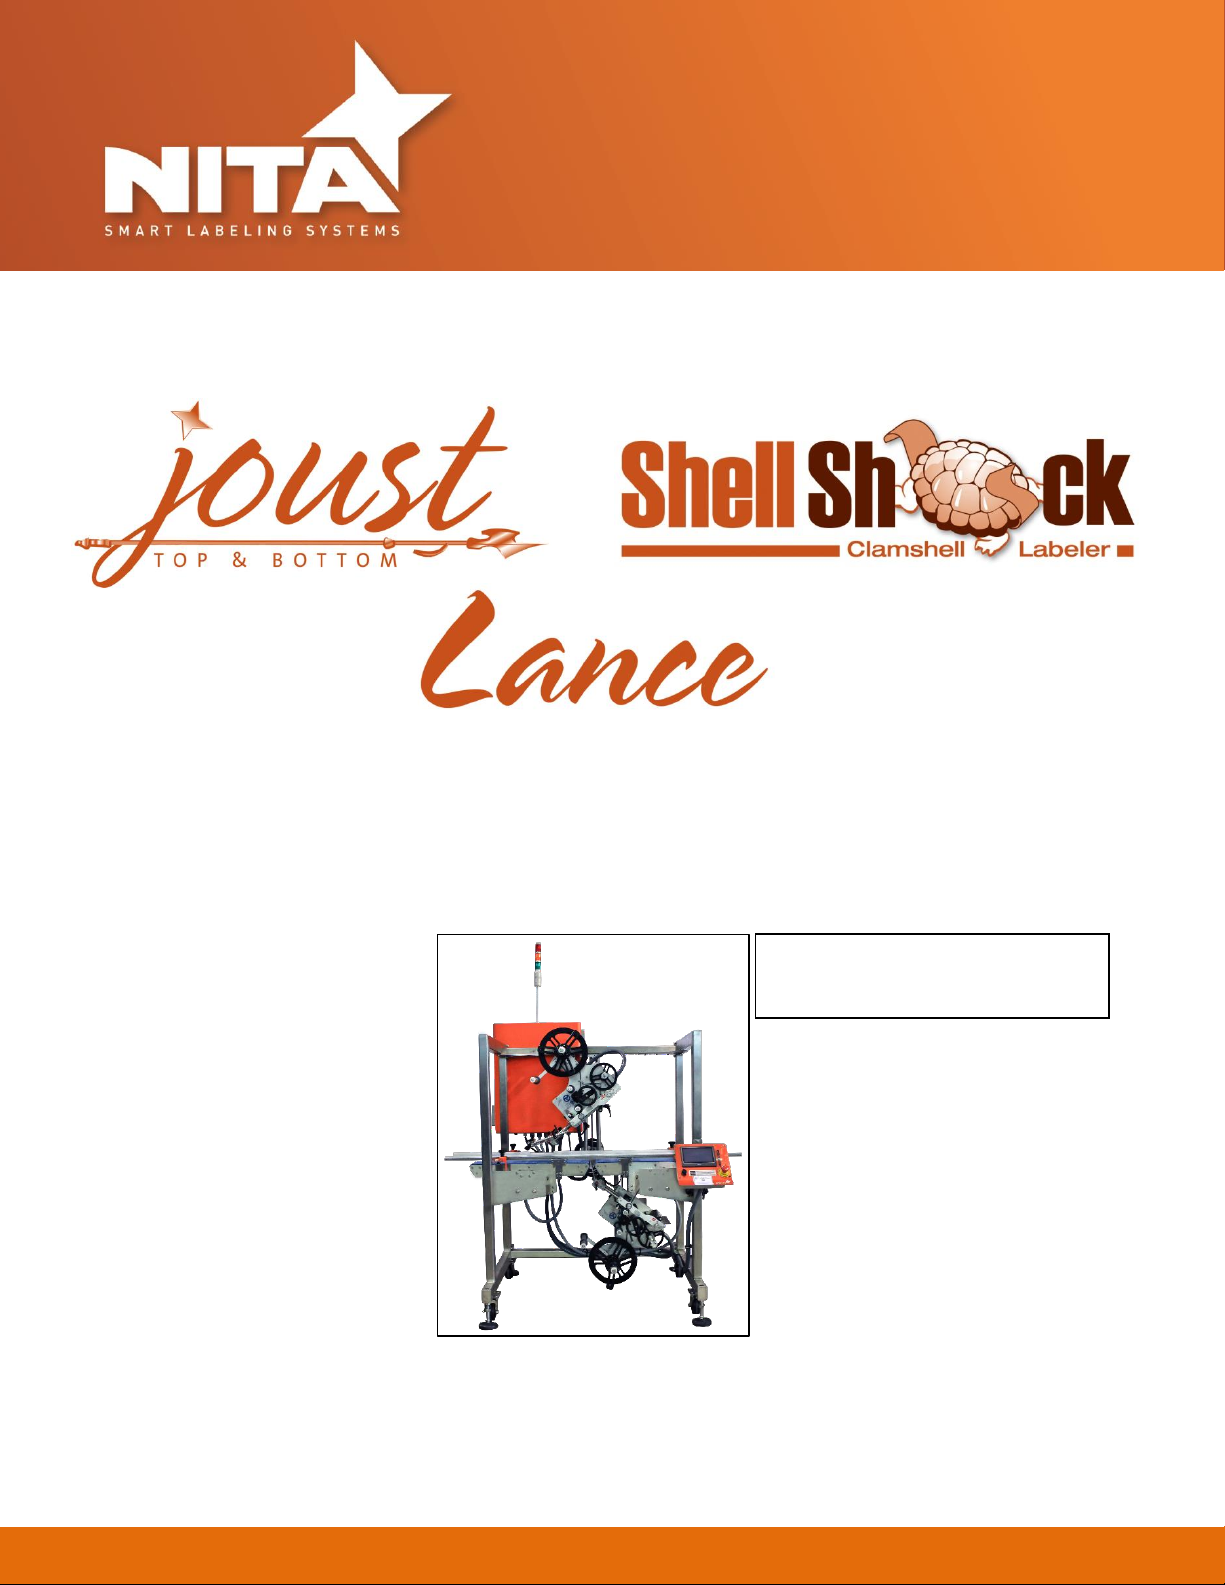
Joust-Shellshock-Lance-Servo Labeling system
i
TABLE OF CONTENTS
1 MANUAL PREFACE –Machine identification......................................................................................................1
2 CERTIFICATION APPROVALS ...............................................................................................................................2
3 WARNINGS AND CAUTION INFORMATION ........................................................................................................3
4PRODUCT INTRODUCTION..................................................................................................................................5
4.1Joust 5
4.2Shellshock (SSK).............................................................................................................................................6
4.3Joust / Shellshock (Combo) ...........................................................................................................................7
4.4Lance top .......................................................................................................................................................8
4.5Lance bottom ................................................................................................................................................9
4.6Shellshock with servo closer 360 ................................................................................................................10
4.7This equipment is an assembly of 3 major components.............................................................................11
4.8Direction of travel .......................................................................................................................................11
5 SHIPMENT RECEPTION (uncrating)...................................................................................................................12
6 SYSTEM SETUP..................................................................................................................................................14
6.1MAIN CONTROL PANEL with HMI Touch Screen.........................................................................................14
6.2Labeling Head:.............................................................................................................................................15
Loading & unloading the label stock roll .............................................................................15
Connectivity and labeler head manual feed control button ...............................................19
Setting the Label GAP sensor...............................................................................................20
Standard GAP sensor –for Opaque labels Tritronic model # LER ........................20
GAP sensor for transparent label Tritronic Model # CLS .....................................................21
GAP sensor for transparent label SICK Model # UF3............................................21
GAP Sensor calibration - Quick procedure –SICK Model UF3..............................23
GAP sensor calibration - CLEAR label - Quick procedure Di-Soric Model # KSSTI 1000
(Capacitive - Black)...............................................................................................................23
Filtering the Gap sensor trigger ...........................................................................................24
Product sensors ...................................................................................................................25
Labeling head POSITIONING adjustments and rulers..........................................................26
Vertical Up/Down adjustment..............................................................................26
Joust-Shellshock-Lance-Servo Labeling system
ii
Lateral adjustment................................................................................................27
Angle adjustments ................................................................................................28
Peel plate angle adjustments ...............................................................................29
6.3Side guide rails.............................................................................................................................................30
6.4Top retaining guides (skis)...........................................................................................................................30
6.5Shell Shock option (C-shaped application) adjustments.............................................................................31
6.6Shellshock with Servo closer 360 ................................................................................................................32
6.7Thermal Transfer coder...............................................................................................................................37
6.8Loose Loop printer: .....................................................................................................................................39
7 HMI –GETTING TO KNOW THE HMI TOUCH SCREEN –OPERATOR INTERFACE ..............................................40
7.1Start-up screen............................................................................................................................................42
7.2Main screen.................................................................................................................................................43
7.3TOP Labeler - Screen ...................................................................................................................................44
7.4Ruler values screen .....................................................................................................................................46
7.5Offset Setting for label application - Normal Mode....................................................................................47
Label flag (normal mode).....................................................................................................47
Label position on product....................................................................................................48
Product length (normal mode) ............................................................................................49
Gap sensor to peel plate (normal mode).............................................................................49
7.6Offset Setting for label application –3 Panels Mode..................................................................................49
Label flag (Tri-panel mode)..................................................................................................50
Label position on product (Tri-panel mode)........................................................................50
Product Length (Tri-panel mode).........................................................................................50
Gap sensor to peel plate (Tri-panel mode)..........................................................................50
7.7Production menu screen .............................................................................................................................51
7.8Conveyor screen..........................................................................................................................................51
7.9Recipe screen ..............................................................................................................................................52
Saving a recipe .....................................................................................................................53
Load an existing recipe: .......................................................................................................54
Erase a Recipe ......................................................................................................................55
Creating/Saving a new recipe ..............................................................................................56
Memory Stick.......................................................................................................................59

Joust-Shellshock-Lance-Servo Labeling system
iii
7.10 System configuration ........................................................................................................................61
7.11 Advanced setting screens .................................................................................................................62
CONVEYOR:.................................................................................. Erreur ! Signet non défini.
LABELER NODE 1: Corresponding to the Top Labeler.........................................................63
7.12 Alarm screen .....................................................................................................................................66
Temperature screen Alarm.................................................................................................66
Emergency screen:..............................................................................................................66
Label out: ............................................................................................................................67
8 INFORMATION..................................................................................................................................................69
9 MAINTENANCE .................................................................................................................................................70
10 TROUBLE SHOOTING –QUICK GUIDE...............................................................................................................75
11 WARRANTY .......................................................................................................................................................76
12 PARTS LIST ........................................................................................................................................................78
13 MANUFACTURER’S COORDINATES...................................................................................................................82

Joust-Shellshock-Lance-Servo Labeling system
1
1MANUAL PREFACE –Machine identification
GENERAL DESCRIPTION OF THE EQUIPMENT
Thank you for choosing NITA. We have designed and manufactured this equipment with the utmost pride and care
ensuring you the absolute best quality, maximum versatility and reliability.
The AE MKII labeling head guarantees constant precision and repeatability in a virtually maintenance-free operation.
Being built with high grade anodized aluminum and stainless steel ensures that it provides multiple long-lasting benefits
in a hostile and humid environment (please note: it is NOT considered a WASH DOWN-friendly system). Its open design,
controlled by a servo motor and drive as well as an HMI touch screen operator interface, offers great flexibility suited
to handling the most demanding labeling applications.
WHAT IS A LABELING SYSTEM?
Found in almost every sector of manufacturing, a labeling system is used to apply pressure sensitive labels onto boxes,
cartons and plastic and glass containers. A labeling system is generally a stand-alone machine and does not require the
use of a computer or label software program in order to perform its operations. It is typically built to automatically
dispense one label at a time. Using a variety of different media roll widths the NITA system can run to the maximum
dispensing speed of 1570 inches / minute and conveying speed of 130 feet/minute. Depending on the application the
system will typically receive a signal from a product sensor to allow the dispensing of a label onto a specific product.
This equipment is intended to be used only as described in this document. NITA Labeling Equipment Inc. cannot be held
responsible for the improper use or functioning of non-described functions of this machinery. Liability for any personal
injury, loss of production or revenues, or property damage occasioned by the use of this manual in effect maintenance;
operation, or repair of the equipment is in no way assumed by NITA Labeling Equipment Inc. Anyone using a procedure
not recommended by the end user should first completely satisfy himself/herself that personal safety and equipment
integrity will not be jeopardized in the method selected.
This manual will provide operating instructions, parts listing and schematics. The information contained in this manual
will help the user in his/her operations, troubleshooting and maintaining the machine in good operating conditions.
Information, illustrations and specifications contained in this manual are based on the latest product information
available at the time of this manual release. Nita Labeling Equipment Inc. reserves the right to alter and substitute
information contained herein at any time.
It is also possible that you have received a different variation of this equipment, with several different options. Some
pictures used in this manual may not totally reflect your configuration, although the labeling is completely the same.
All rights reserved
While every precaution has been taken in the preparation of this manual, Nita Labeling Equipment Inc. assumes no
responsibility for errors or omissions. Neither is any liability assumed for damages, loss of production, or revenues
resulting from the use of the information contained herein.
Joust-Shellshock-Lance-Servo Labeling system
Operator and parts manual –2015 2
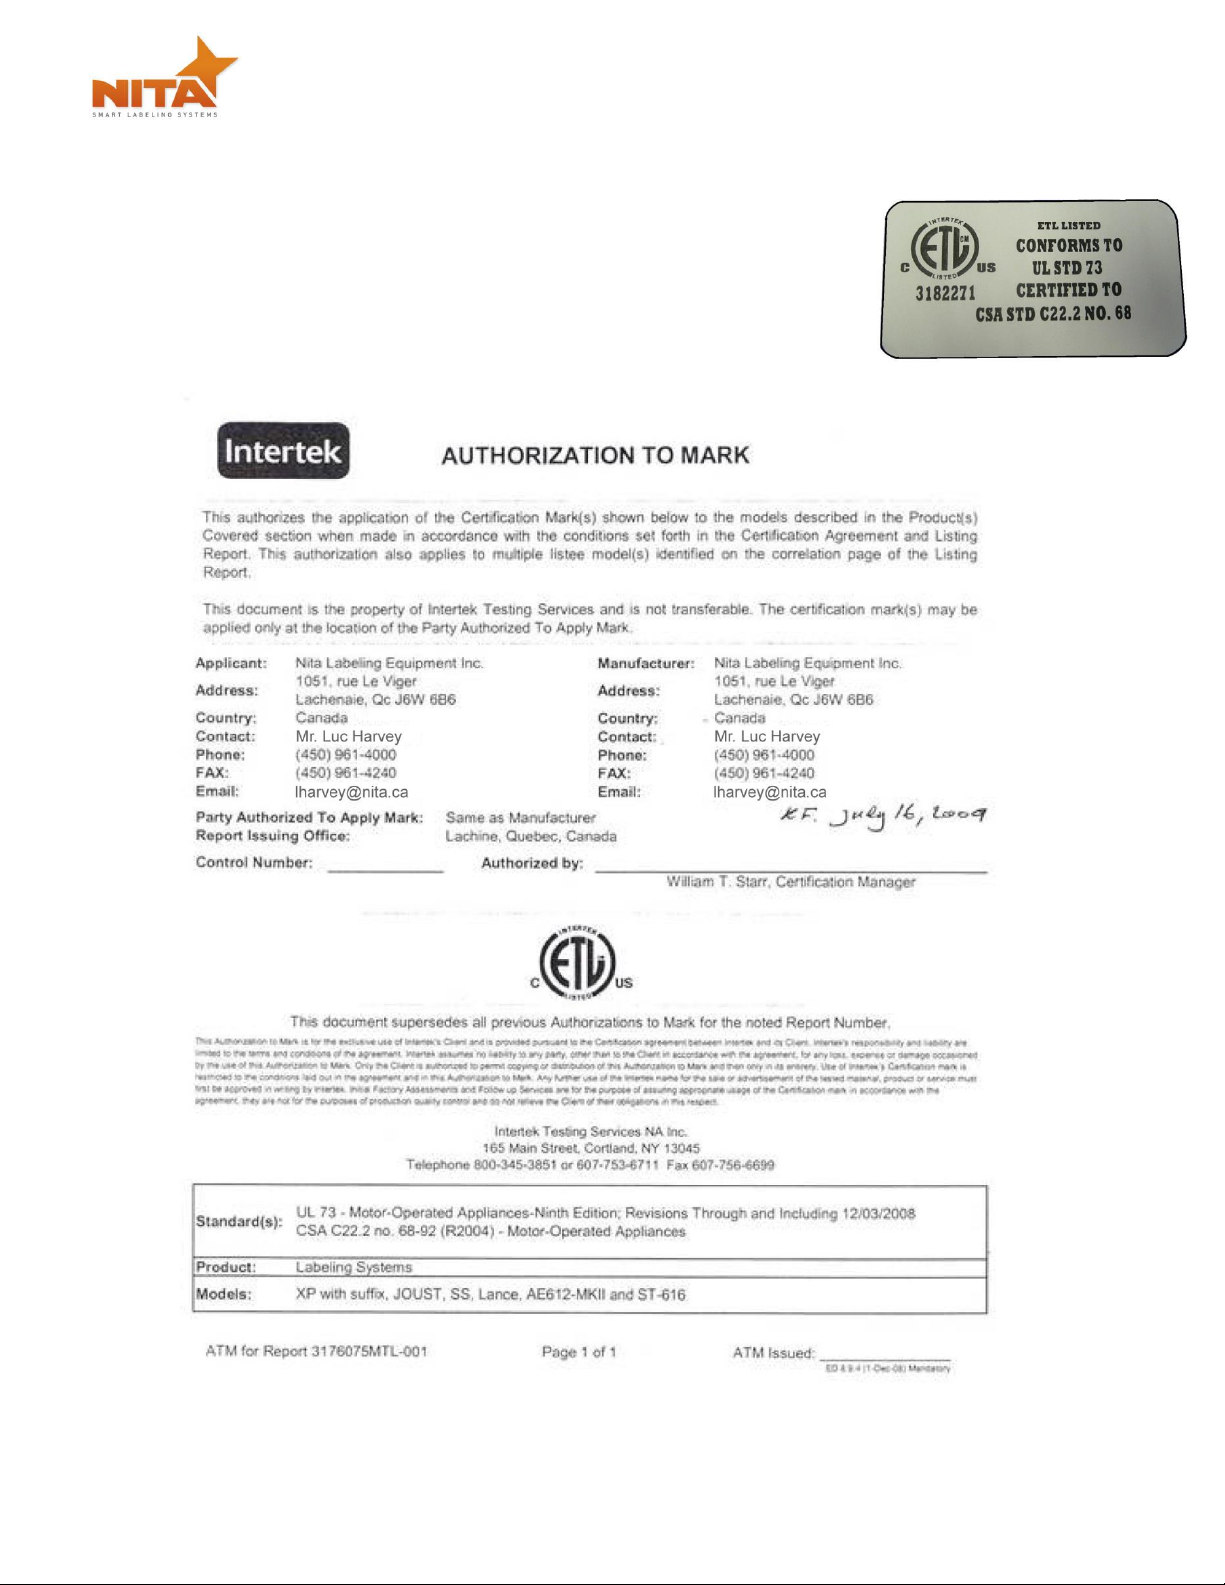
2CERTIFICATION APPROVALS
All the NITA systems mentioned in this manual conform to the following
certification ensuring quality standards.
Standard 73 from Underwriter’s Laboratory (UL) Standard C22.2 no 68 from
Canadian Standards Association, (CSA) Tests and certification have been
executed and allotted by UL and CSA mandated firm by the name of Intertek and
bare the certification markings ETL. FILE IDENTIFICATION NUMBER: 318227
Joust-Shellshock-Lance-Servo Labeling system
Operator and parts manual –2015 3
3WARNINGS AND CAUTION INFORMATION
Machine use disclaimer
This equipment must NOT be used for the purposes other than for which it has been supplied to the customer
under the purchase agreement and reflected in the quotation provided to the distributor or end user prior to
purchase. Failure to use the equipment for the purpose described in this manual nullifies any warranty claim
or injury claim that could arise as a result.
Safety
Be certain that the operators and maintenance personnel read this manual before attempting to operate
perform maintenance or service to this equipment. Failure to follow these instructions could possibly result
in serious personal injury, and cause damage to the equipment, or its components. Recognize safety symbols,
words, and labels. Warning and Safety Instructions appearing in this manual are not meant to cover all
possible conditions and situations that can occur. Common sense, caution, and care must always be exercised
when installing, maintaining, servicing or operating this equipment.
The Joust / Lance / SSK are engineered to feed and apply labels on your products. In designing this device,
NITA valued personal safety; however we would like to draw your attention to the following safety
acknowledgments.
WARNING
Hazards or unsafe practices, which COULD result in severe personal injury or
death
CAUTION
Hazards or unsafe practices, which COULD result in minor injury
CAUTION
The presence of safety systems in these units does not exempt the operators
to act cautiously, avoiding behaviours that could endanger their health or the
equipment. These models are engineered to feed and apply labels on your
products. In designing this device, NITA valued personal safety; however we
would like to draw your attention to the following safety acknowledgments:
Operators should know the basic operations and setup procedures
before operating this equipment.
Safe operations should be maintained at all times.
Know the location of E-stops and power switches prior to operating
machinery such as this.
WARNING
To reduce risk of fire, electrocution or other personal injury when operating
or maintaining the Joust / Lance / SSK, follow basic safety precaution,
including the following:
This equipment must have an operator attending the machine at all
times to monitor the operations at all times. Do NOT leave this
equipment un-attended during maintenance or perform any
maintenance on the equipment unless the E-Stop condition has been
activated or power turned off.
The electrical power to this device is 240 Vac, 1 Phase, 60 HZ, and 10
Amps. While installing, make sure the electrical cord (supplied without
Joust-Shellshock-Lance-Servo Labeling system
Operator and parts manual –2015 4
a connector plug) is properly configured and connected by a qualified
electrical technician.
Do not bypass any of the safety circuits or safety features designed into
this equipment.
ALWAYS turn off the power before performing any repairs.
The control box door must always be closed as well as the stainless steel
back panel cover of the label head. Do NOT remove this back cover
label when machine is under tension (plugged in).
The electrical connection must be done through the end user’s electrical
panel directly without using a quick-connect or twist lock plug.
CAUTION
To reduce risk of fire, electrocution or other personal injury when operating
or maintaining the Joust / Lance / SSK, follow basic safety precaution,
including the following:
This device is built to perform in humid conditions, but must not be
pressure washed. In case of wash down conditions, it is recommended
to cover with a plastic wrapping or Nita’s optional head cover. It is
always best to remove the system from the wash down environment
temporarily to return it afterwards. The use of compressed air and
wiping down the device is the recommended cleaning method.
This equipment is designed to function in automatic mode. Do NOT
stand, sit or allow any personnel to be within reach of tamp cylinder
activation (if so equipped).
Report any malfunctions, or problems with the equipment to qualified
maintenance personnel for repair or adjustments that may be required.
For devices equipped with a pneumatic air cylinder, you must first shut-
off the air supply to the device in order to change label roll (or perform
all set-up operations).
For systems containing conveyors, you must be vigilant with loose clothing or bodily parts as they can get
caught in the conveyor’s belt or chains as direct injury or death can incur. DO NOT use the conveyor as a
working platform or walkway.
TUCK IN ANY LOOSE CLOTHING. DO NOT WEAR TIES, PENDANTS, JEWLERY OR ANY OTHER ARTICLE OF
CLOTHING OR ACCESSORY THAT MAY GET CAUGHT ON ANY PORTION OF THE SYSTEM

Joust-Shellshock-Lance-Servo Labeling system
Operator and parts manual –2015 5
4PRODUCT INTRODUCTION
4.1 Joust series
The JOUST system is a conveyor with two AE612-MKII labeling heads mounted in a top and bottom
configuration. Options can be packaged together to make the system more complete (you will see the
components described in each section of this manual). With the appropriate settings the JOUST can fulfill all
of your labeling requirements. The JOUST can accept flat cardboard, plastic, foam or clamshell containers as
well as parallel lipped shrink wrapped products. In its normal operation mode, the JOUST can apply labels on
the top or bottom in wipe-on fashion. The Joust is available with both a 5 and an 8 foot long conveyor.
Joust-Shellshock-Lance-Servo Labeling system
Operator and parts manual –2015 6
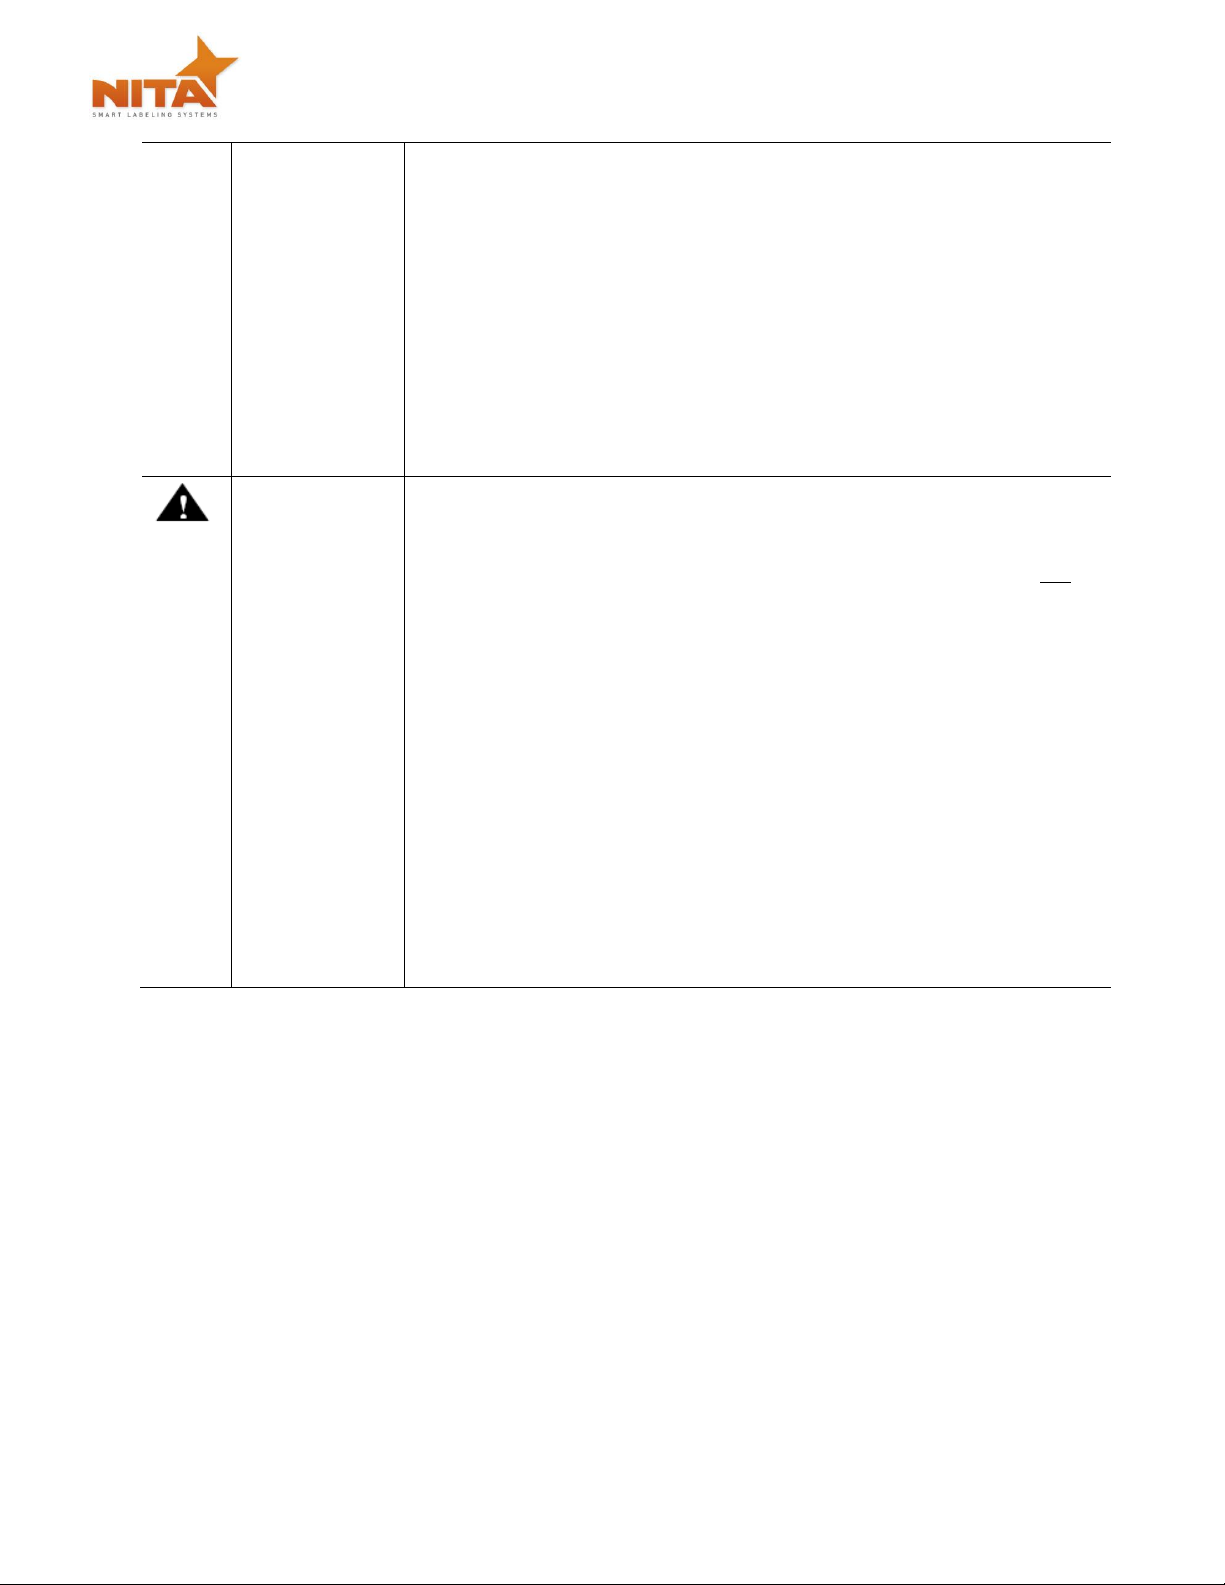
4.2 Shellshock (SSK)
The Shellshock system is a packaged system which a single head over the conveyor having a laterally split belt
configuration in order to allow the application of a label in a “c-shaped” tamper evident configuration (top,
front and under). Usually used for clamshells it is also suitable for foam trays and platters. The Shellshock is
available with a 5 foot conveyor.

Joust-Shellshock-Lance-Servo Labeling system
Operator and parts manual –2015 7
4.3 Joust/Shellshock (Combo)
This system is equipped with two labeling heads, one on the top and one on the bottom of the conveyor
which generally has a split belt configuration from side to side as well as on the front and back ends. These
belts are made of rubber and are used for both top and bottom labeling application as well as providing a “C-
shaped” tamper evident seal (with the top head only in tri-panel mode). The Joust / Shellshock are available
with both a 5 and an 8 foot long conveyor.
Joust-Shellshock-Lance-Servo Labeling system
Operator and parts manual –2015 8
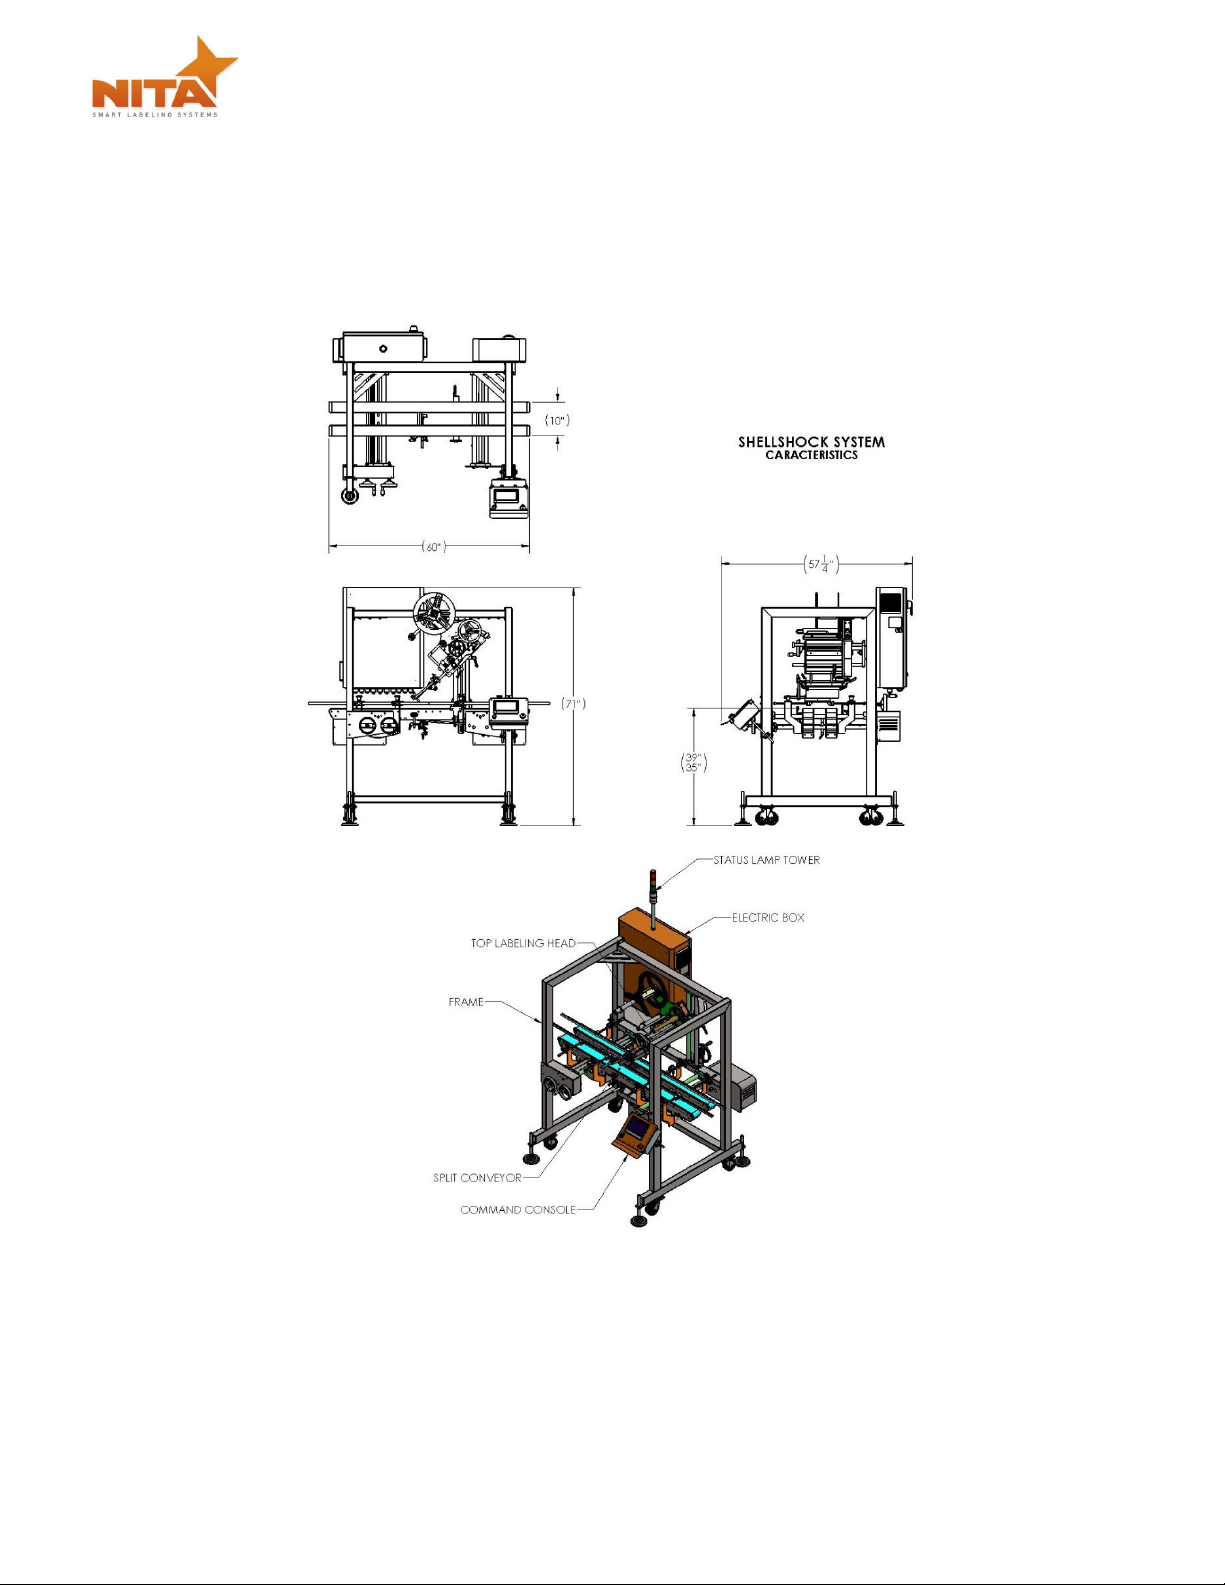
4.4 Lance top
The Lance is a system which combines an AE612-MKII labeling head with an automatic conveyor. The belt is
generally configured with a full width belt. It is built to simply place a label on the top of a package, container
or box. The Lance top is available with a 5 foot conveyor.
Joust-Shellshock-Lance-Servo Labeling system
Operator and parts manual –2015 9
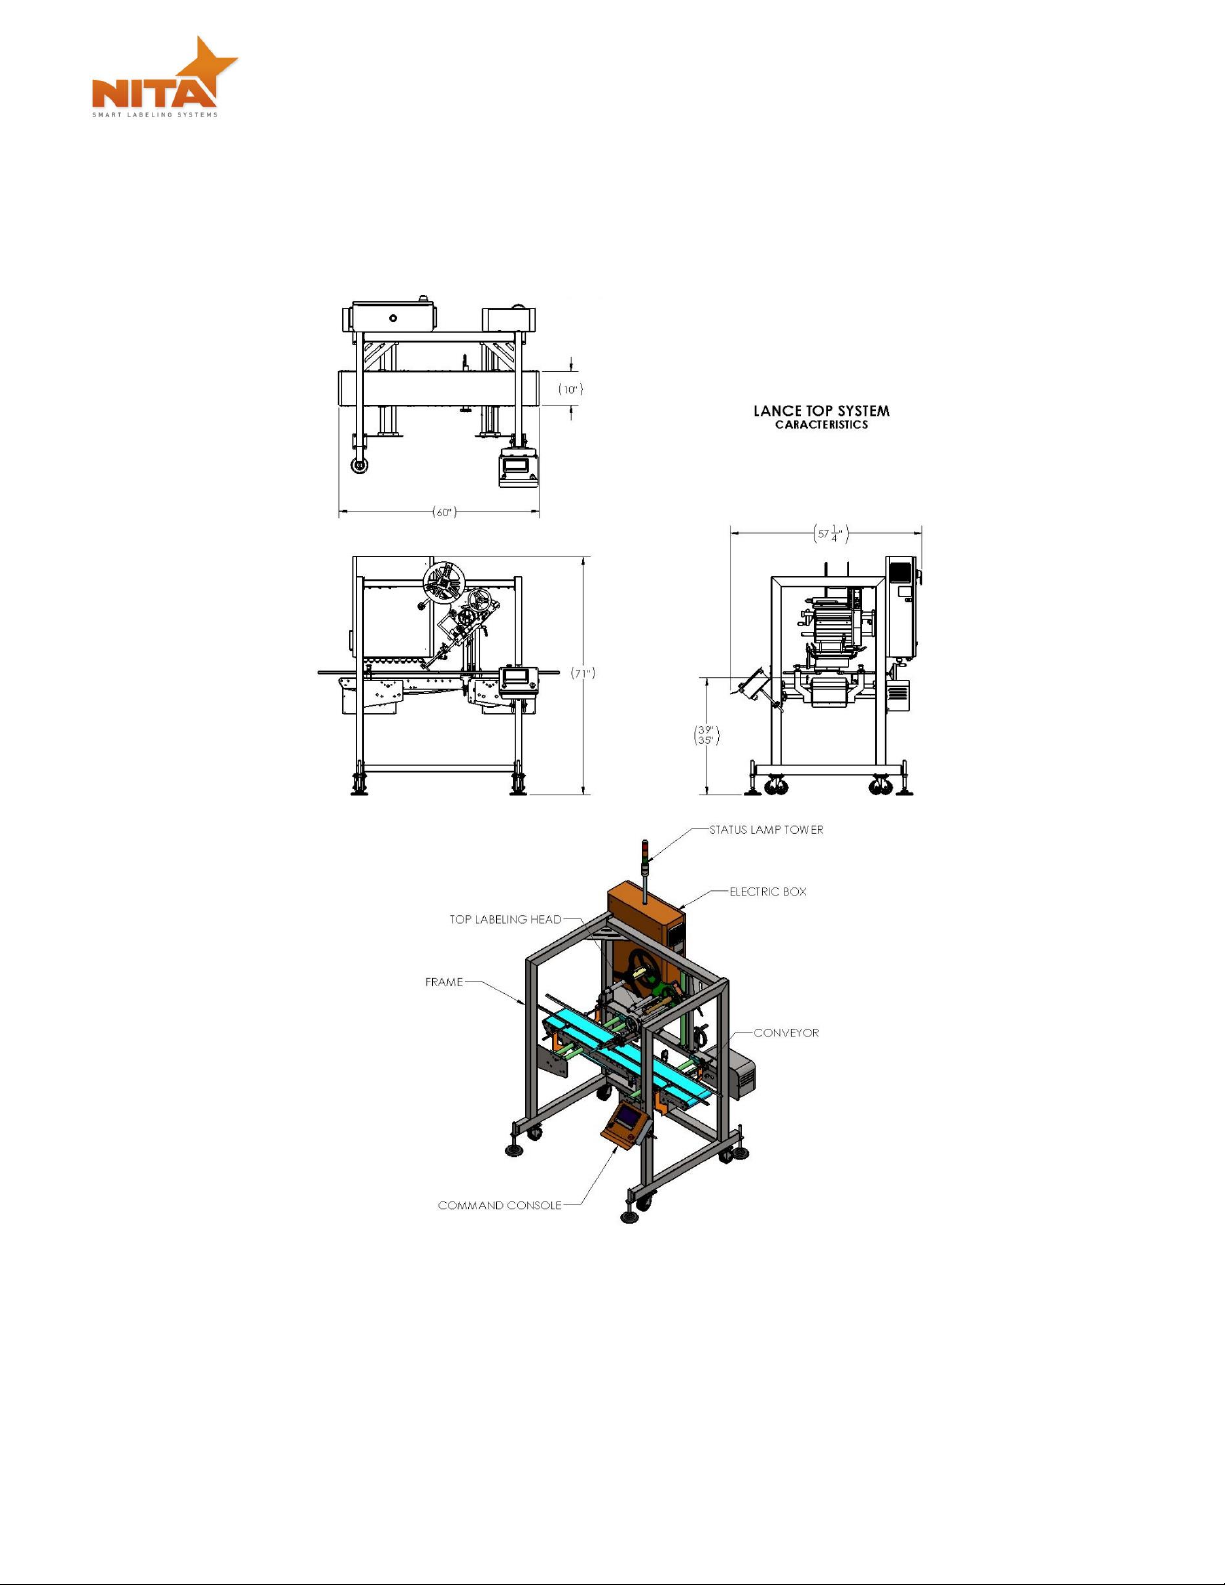
4.5 Lance bottom
The Lance is a system which combines an AE612-MKII labeling head with an automatic conveyor. The labeling
head is mounted through the bottom portion of the split belt. It is built to simply place a label on the bottom
of a package, container or box. The Lance bottom is available in 5 and 8 foot conveyor.

Joust-Shellshock-Lance-Servo Labeling system
Operator and parts manual –2015 10
4.6 Shellshock with servo closer 360
The Shellshock with servo closer system is a packaged system which a single head over the conveyor having
a laterally split belt configuration in order to allow the application of a label in a “band-shaped” tamper
evident configuration. Usually used for clamshells it is also suitable for foam trays and platters. The Shellshock
with servo closer is available with a 5 foot conveyor.
Joust-Shellshock-Lance-Servo Labeling system
Operator and parts manual –2015 11
4.7 This equipment is an assembly of 3 major components
Conveyor
1 or 2 Wipe-On AE612-MKII Servo driven label applicators
HMI touch screen control panel and electrical cabinet
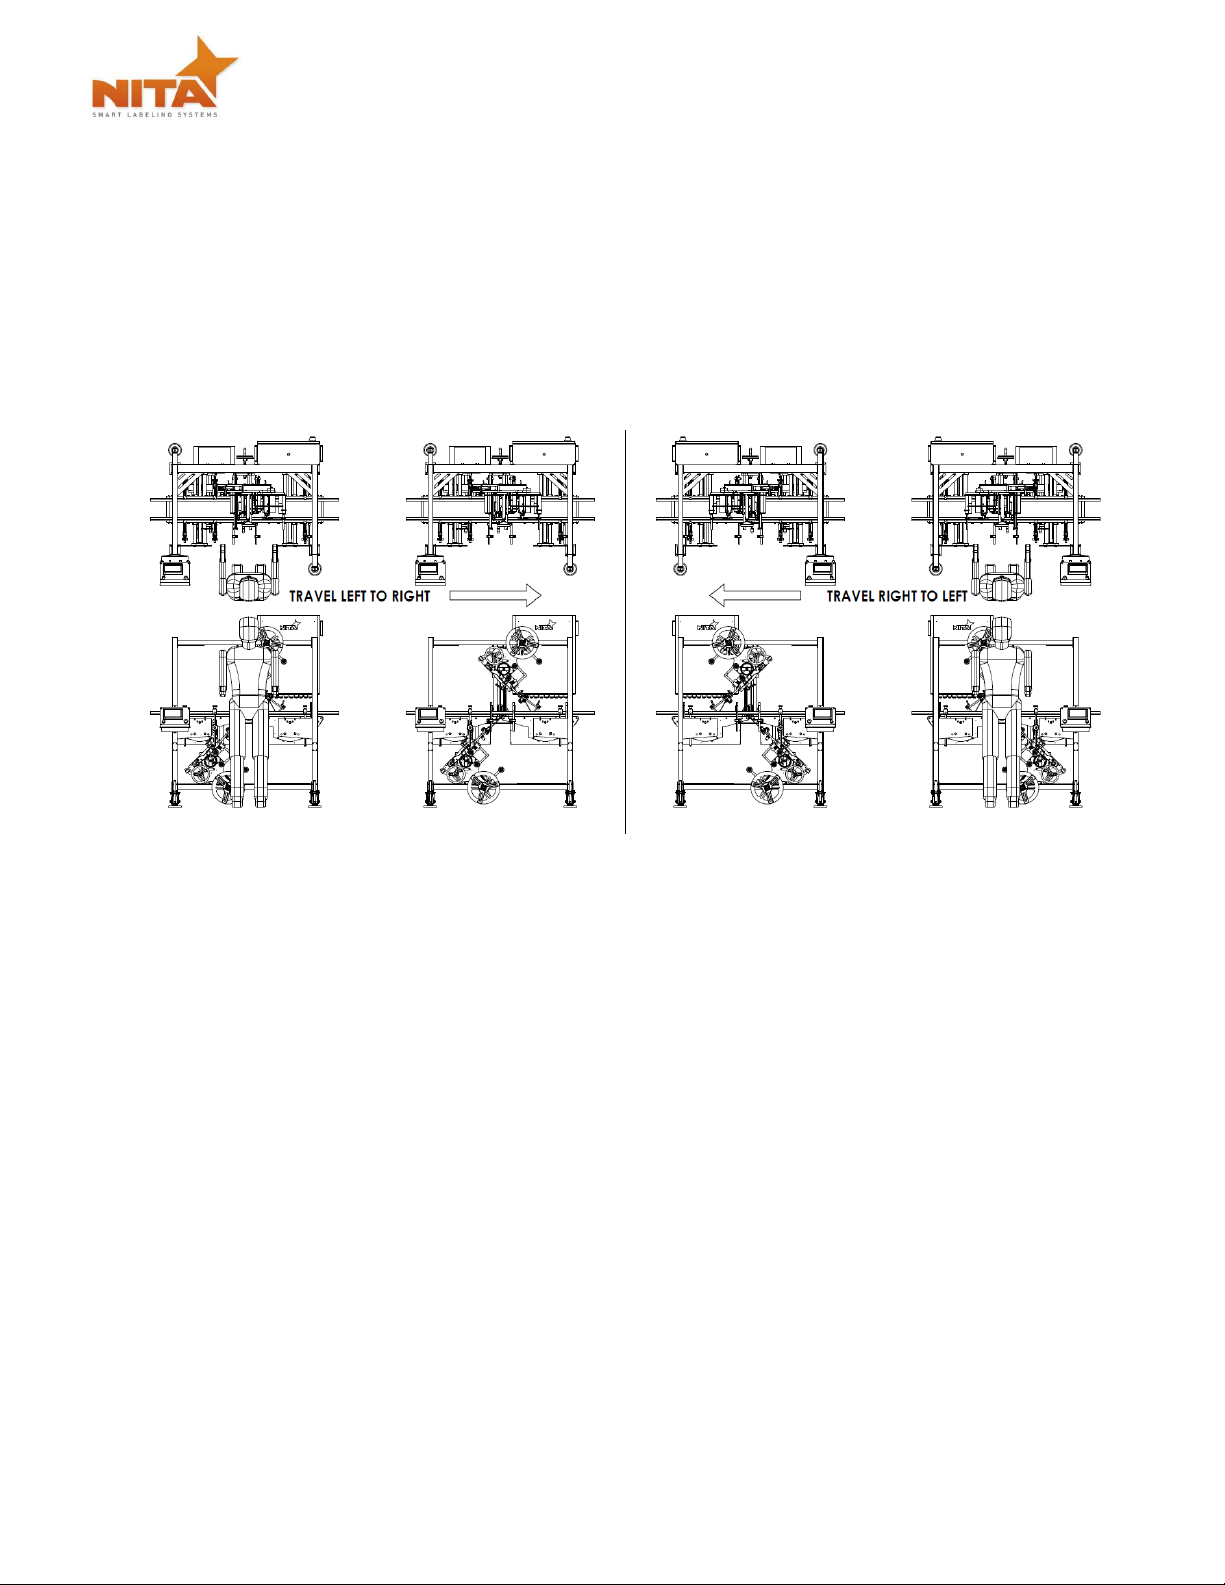
4.8 Direction of travel

Joust-Shellshock-Lance-Servo Labeling system
Operator and parts manual –2015 12
5SHIPMENT RECEPTION (uncrating)
For shipping purposes, a half crate is used. This avoids any damage to the device as well as protects the
adjustment settings allowing for a very stable product once installed in its final destination.
The crate is generally pop-nailed together and can be taken apart by using a simple hammer or a nail crowbar.
Proceed in removing the side wood panels from the crate and work your way inward.
WARNING
Always be vigilant while using any tools as they can result in bodily injury.
The Joust / Lance / SSK was carefully packaged and protected prior to transportation. On reception of the
machine, a complete visual inspection should be done in order to detect any apparent damage before
proceeding with the equipment power up.
If any anomaly is detected, verify if the packaging/crating shows apparent damage. If it is the case, please
contact the transporter right away (it is always a good idea to take pictures of the damages).
After the visual inspection is done, proceed with the un-packaging of the Joust / Lance / SSK. The Joust /
Lance / SSK should be installed on a level floor with 200 - 240Vac, 1 phase, 60 Hz, 10 amps and compressed
air 80 PSI available in proximity.
Ensure the Joust / Lance / SSK is perfectly level to the ground. If necessary, the level of the Joust / Lance / SSK
can be adjusted with the adjustable legs located at the extremities of the frame.

Joust-Shellshock-Lance-Servo Labeling system
Operator and parts manual –2015 13
Once the Joust / Lance / SSK system is perfectly levelled, you can connect the power (200 - 240 vac, 1 phase)
and the compressed air (80 PSI).
To turn power ON or OFF, simply turn the main handle power switch on the electrical panel.
Joust-Shellshock-Lance-Servo Labeling system
Operator and parts manual –2015 14
6SYSTEM SETUP
This equipment can accommodate many variations of containers on the market. There are adjustable
components on this machine that allows the operator to effectively make changeovers. The proper
adjustments are described in the following pages.
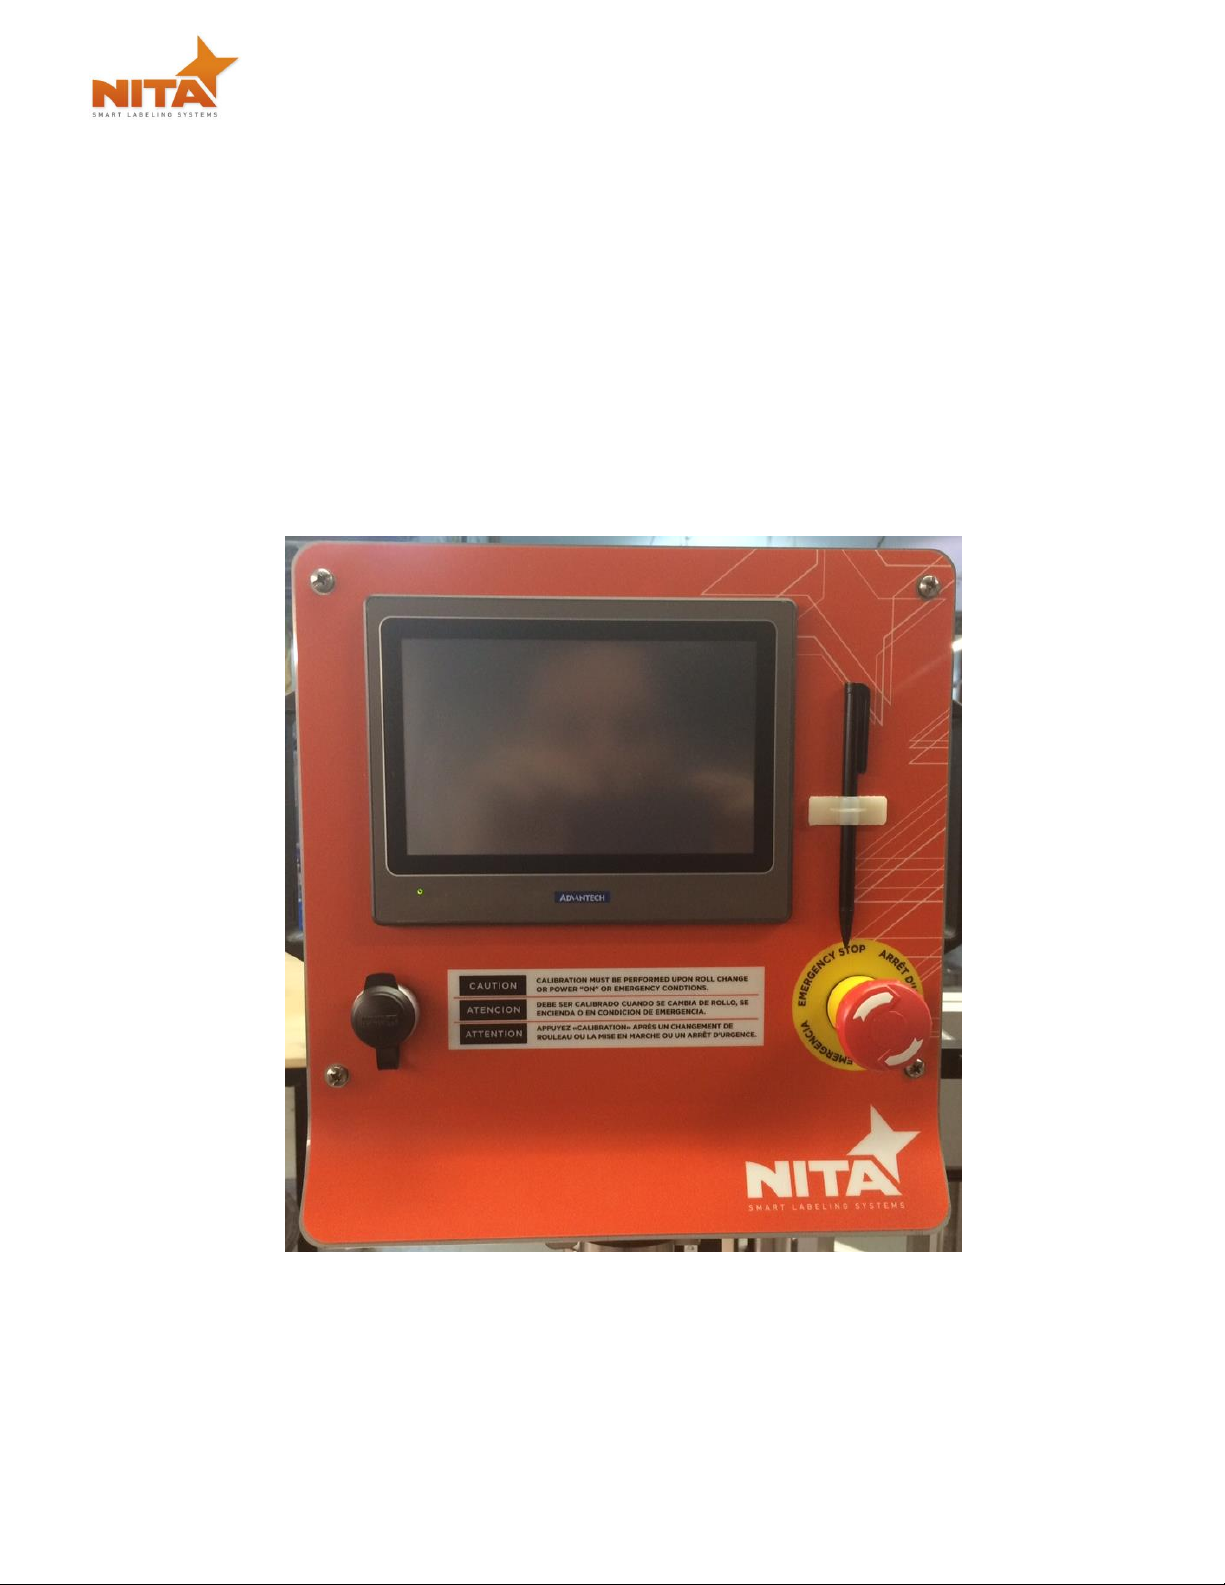
6.1 MAIN CONTROL PANEL with HMI Touch Screen
The main control panel is a HMI (touch screen) controller and appears such as the picture below shown below.
The HMI panel allows the user to switch between manually and automatically controlling the speeds and all
peripheral functions of the equipment.
Joust-Shellshock-Lance-Servo Labeling system
Operator and parts manual –2015 15
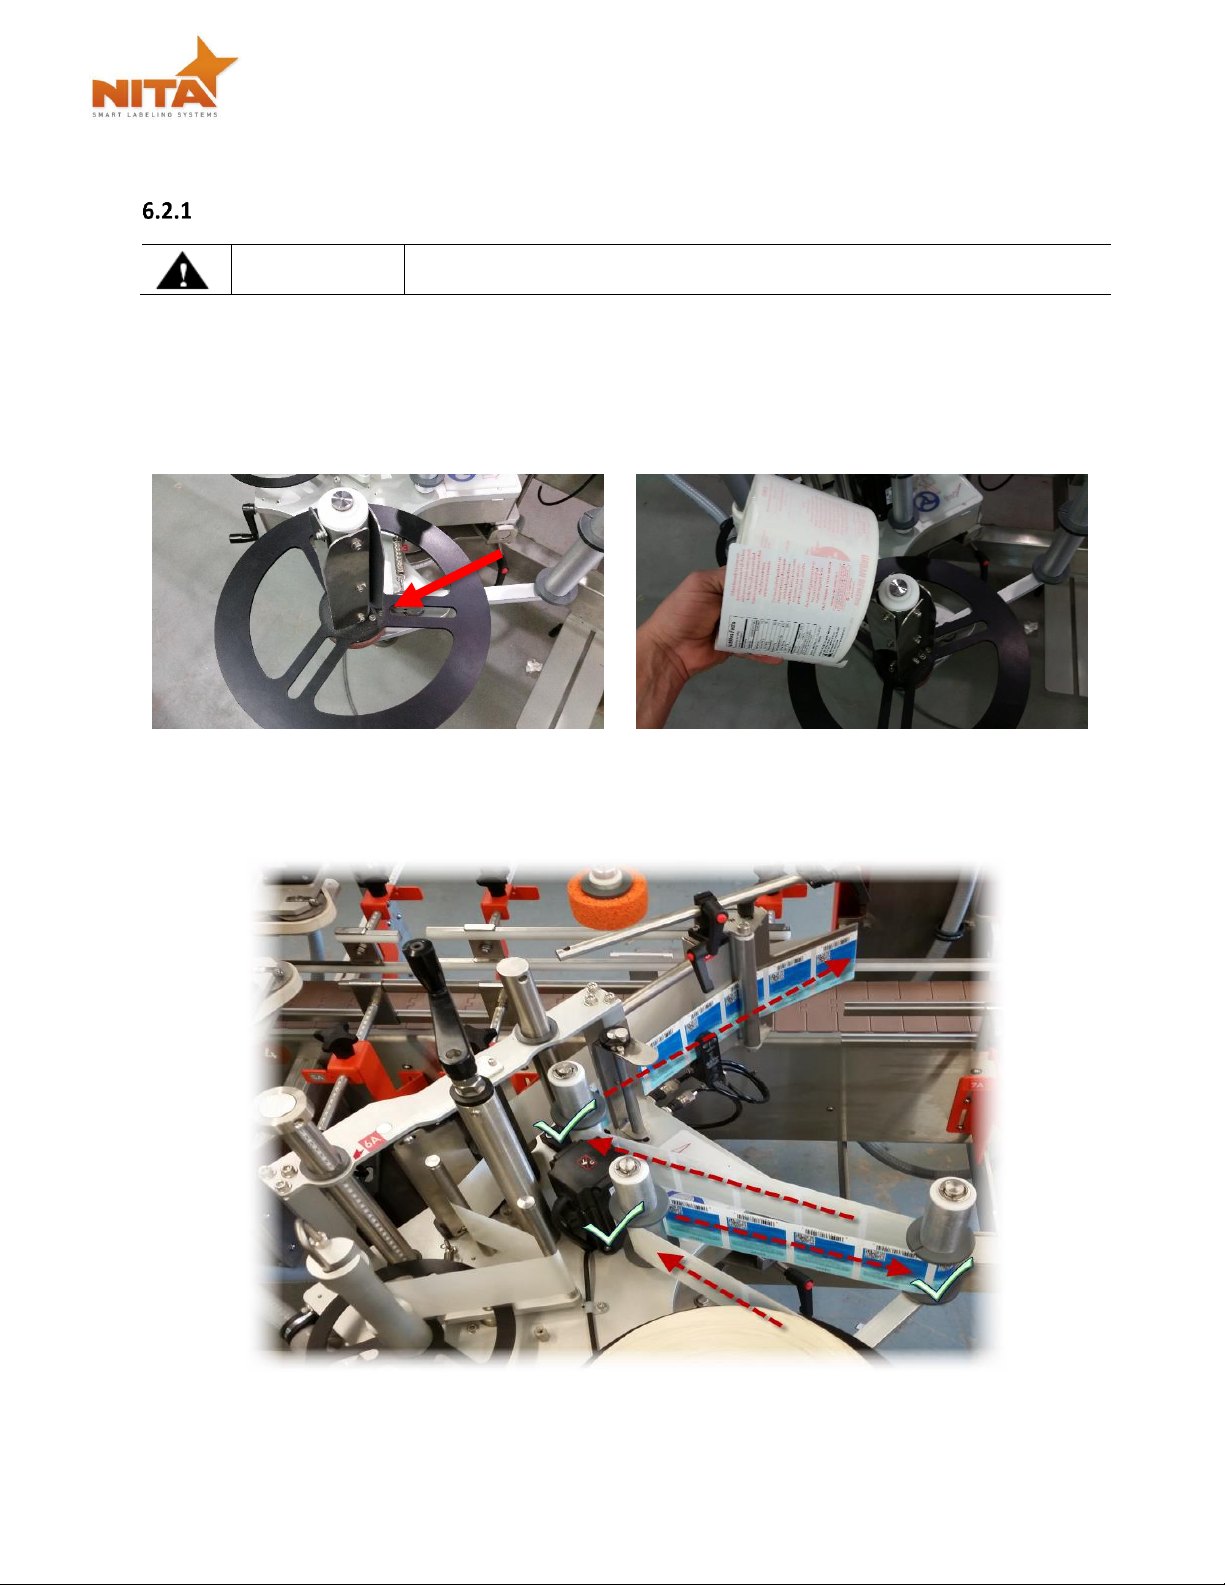
6.2 Labeling Head:
Loading & unloading the label stock roll
CAUTION
To avoid injuries, you must keep the unit in MANUAL mode!
Look carefully at the diagram and follow the threading procedures indicated below.
You will also find the threading diagram directly on the Label applicator head as well as a quick reference
1) Place the label stock roll on the label support cylinder. Make sure that the stock roll is well secured
2) Pull approximately 36 inches of stock from label stock roll.
3) Follow the webbing diagram as shown in this manual or on the ID plate of the device itself.

Joust-Shellshock-Lance-Servo Labeling system
Operator and parts manual –2015 16
4) For different label widths, slide the guides on the rollers to avoid label swirling. Do not move the
guides closest to the main plate, these are the zero point.
5) Release the spring-loaded tension plate by gently pulling the lock.
This manual suits for next models
2
Table of contents


