Nitec PHAROS 50 User manual

Compact LED profile with zoom
TABLE OF CONTENTS
SAFETY / GENERAL INSTRUCTIONS
INTRODUCTION
Features
Specications
OVERVIEW
Rear view
Top view
MOUNTING
CONTROL MENU OVERVIEW
Control Panel
Function Menu
DMX FUNCTION CHART
3-channel mode
1-channel mode
OPERATION
MAINTENANCE
- PHAROS 50
- Gel Frame
- Framing Shutters
- Gobo Holders
- Power Cord
- User Manual
- Warranty Card
PACKING CONTENT
211
3
SAFETY
General instruction
• The products referred to in this manual conform to the European Community Directives and are there-
fore marked with .
• The unit is supplied with hazardous network voltage (230V~). Leave servicing to skilled personnel only.
Never make
risk an electric shock.
•
cording to standard EN 60598-1). It is, moreover, recommended to protect the supply lines of the units
from indirect contact and/or shorting to earth by using appropriately sized residual current devices.
installer. Check that the main frequency and voltage correspond to those for which the unit is designed
as given on the electrical data label.
• This unit is not for home use, only professional applications.
- in places subject to vibrations or bumps;
- in places with a temperature of over 40 °C.
an inspection or contact the manufacturer directly.
plant for a disposal which is not harmful to the environment.
Warnings and installation precautions
damage and the guarantee becomes void. Furthermore, any other operation may lead to dangers like
short circuit, burns, electric shock, etc.
• Always additionally secure the projector with the safety rope. When carrying out any work, always com-
ply scrupulously with all the regulations (particularly regarding safety) currently in force in the country
• Shields, lenses or ultraviolet screens shall be changed if they have become damaged to such an extent
• The lamp (LED) shall be changed if it has become damaged or thermally deformed.
trigger epileptic seizures in photosensitive persons or persons with epilepsy.
• Do not touch the product’s housing when operating because it may be very hot.
WARNING! Before carrying out any operations with the unit, carefully read this instruction
manual and keep it with cure for future reference. It contains important information about
the installation, usage and maintenance of the unit.
MAINTENANCE
MAINTENANCE AND CLEANING THE UNIT
• Make sure the area below the installation place is free from unwanted persons during setup.
• All screws used for installing the device and any of its parts should be tightly fastened and should not
be corroded.
deformation.
• The main cables must be in impeccable condition and should be replaced immediately even when a
small problem is detected.
• It is recommended to clean the front at regular intervals, from impurities caused by dust, smoke, or
other particles to ensure that the light is radiated at maximum brightness. For cleaning, disconnect the
main plug from the socket. Use a soft, clean cloth moistened with a mild detergent.Then carefully wipe
the part dry. For cleaning other housing parts use only a soft, clean cloth. Never use a liquid, it might
penetrate the unit and cause damage to it.
FUSE REPLACEMENT
1. Disconnect this product from the power outlet.
2. Remove the safety cap by a screwdriver.
3. Replace the blown fuse with a fuse of the exact same type and
rating (T1A,250V).
4. Install the safety cap, and reconnect power.
TROUBLESHOOTING
Fuse
Problems Possible causes Checks and remedies
Fixture does not light up
• No mains supply
• Dimmer fader set to 0
• All color faders set to 0
• Faulty LED
• Faulty LED board
• Check the power supply voltage
• Increase the value of the dimmer channels
• Increase the value of the color channels
• Replace the LED board
• Replace the LED board
General low light intensity • Dirty lens assembly
• Misaligned lens assembly
•
• Install lens assembly properly
Fixture does not power up
• No power
• Loose or damaged power cord
• Faulty internal power supply
• Check for power on power outlet
• Check power cord
• Replace internal power supply
Fixture does not respond to DMX
• Wrong DMX addressing
• Damaged DMX cables
• Bouncing signals
• Check control panel and unit addressing
• Check DMX cables
• Install terminator as suggested
Contact an authorized service center in case of technical problems or not reported in the table can not be
resolved by the procedure given in the table.
10
INTRODUCTION
PHAROS 50 is a compact LED prole with zoom.
FEATURES
- 20° - 39° zoom for convenient versatility across many applications
- Crisp gobo image projection, even at close range
- Extremely at eld projection
- Gel frame brackets and retaining clip included
- Flicker-free output for worry-free video
- Quiet operation suitable for studio use
- Rugged die-cast body and low-maintenance design
- Power In and Out connections for linking multiple units
- Flawless dimming with consistent color temperature throughout the dimming curve
- Four selectable dimming curves
- DMX and Manual control options
SPECIFICATIONS
Light Source: 1 x 50W white LED
Color Temp: 3500K
Zoom Range: 20° - 39°
Output at 20°: 7,900 lux @ 2 meters
Output at 39°: 2,700 lux @ 2 meters
Strobe: 0 - 30 Hz
Dimming: 0-100% dimming, 4 selectable dimming curves
Gobo: D size (53.3mm outer/ 43mm inner / 2mm max thickness)
Control modes: DMX, Manual
DMX Channels: 1 / 3
Built-in Programs: Yes
Menu: 4 digit LED menu with touch buttons
Mains: 100 - 240 VAC, 50/60 Hz
Power: 60W
Fuse: T2A 250V
Power connections: IEC power In/Out
Power linking: up to 16 units @ 120V ; up to 26 units at 230V
Data connections: 3-pin XLR In/Out for DMX
Housing: Aluminum
Finish: Matte black
IP rating: IP20
Cooling: Auto-sensing noiseless fan
Dimensions: 480 x 157 x 381 mm
Weight: 4.2 KG
4
OPERATION
FRAMING SHUTTERS
Use the (4) framing shutters to shape the projected beam
ZOOM and FOCUS KNOBS
Use the Zoom knob to adjust beam angle
Use the Focus knob to adjust sharpness of projected patterns or beam edges
CUSTOM GOBOS
The gobo holder accepts M size (66mm outer/ 48mm inner) custom gobos
GELS
Color gels may be inserted in the gel frame, which ts into the gel frame holder
DMX MODES
Press MENU button until 1-CH or 3-CH is displayed
Press ENTER to select 1-channel or 3-channel DMX mode
Press UP or DOWN to select DMX starting address
Press ENTER
MANUAL DIMMING AND STROBE
Press MENU button until U-- is displayed
Press ENTER
Press UP or DOWN to select dimmer (d000-255) or strobe (S000-255)
Press ENTER and use UP or DOWN to select values
SELECTING DIMMER CURVES
Press MENU button until dIM is displayed
Press ENTER
Press UP or DOWN to select dimmer curve (OFF, dIM1, dIM2, dIM3)
Press ENTER
FAN
Press MENU button until FAN is displayed
Press ENTER
Press UP or DOWN to select AUTO or ON
Press ENTER
9
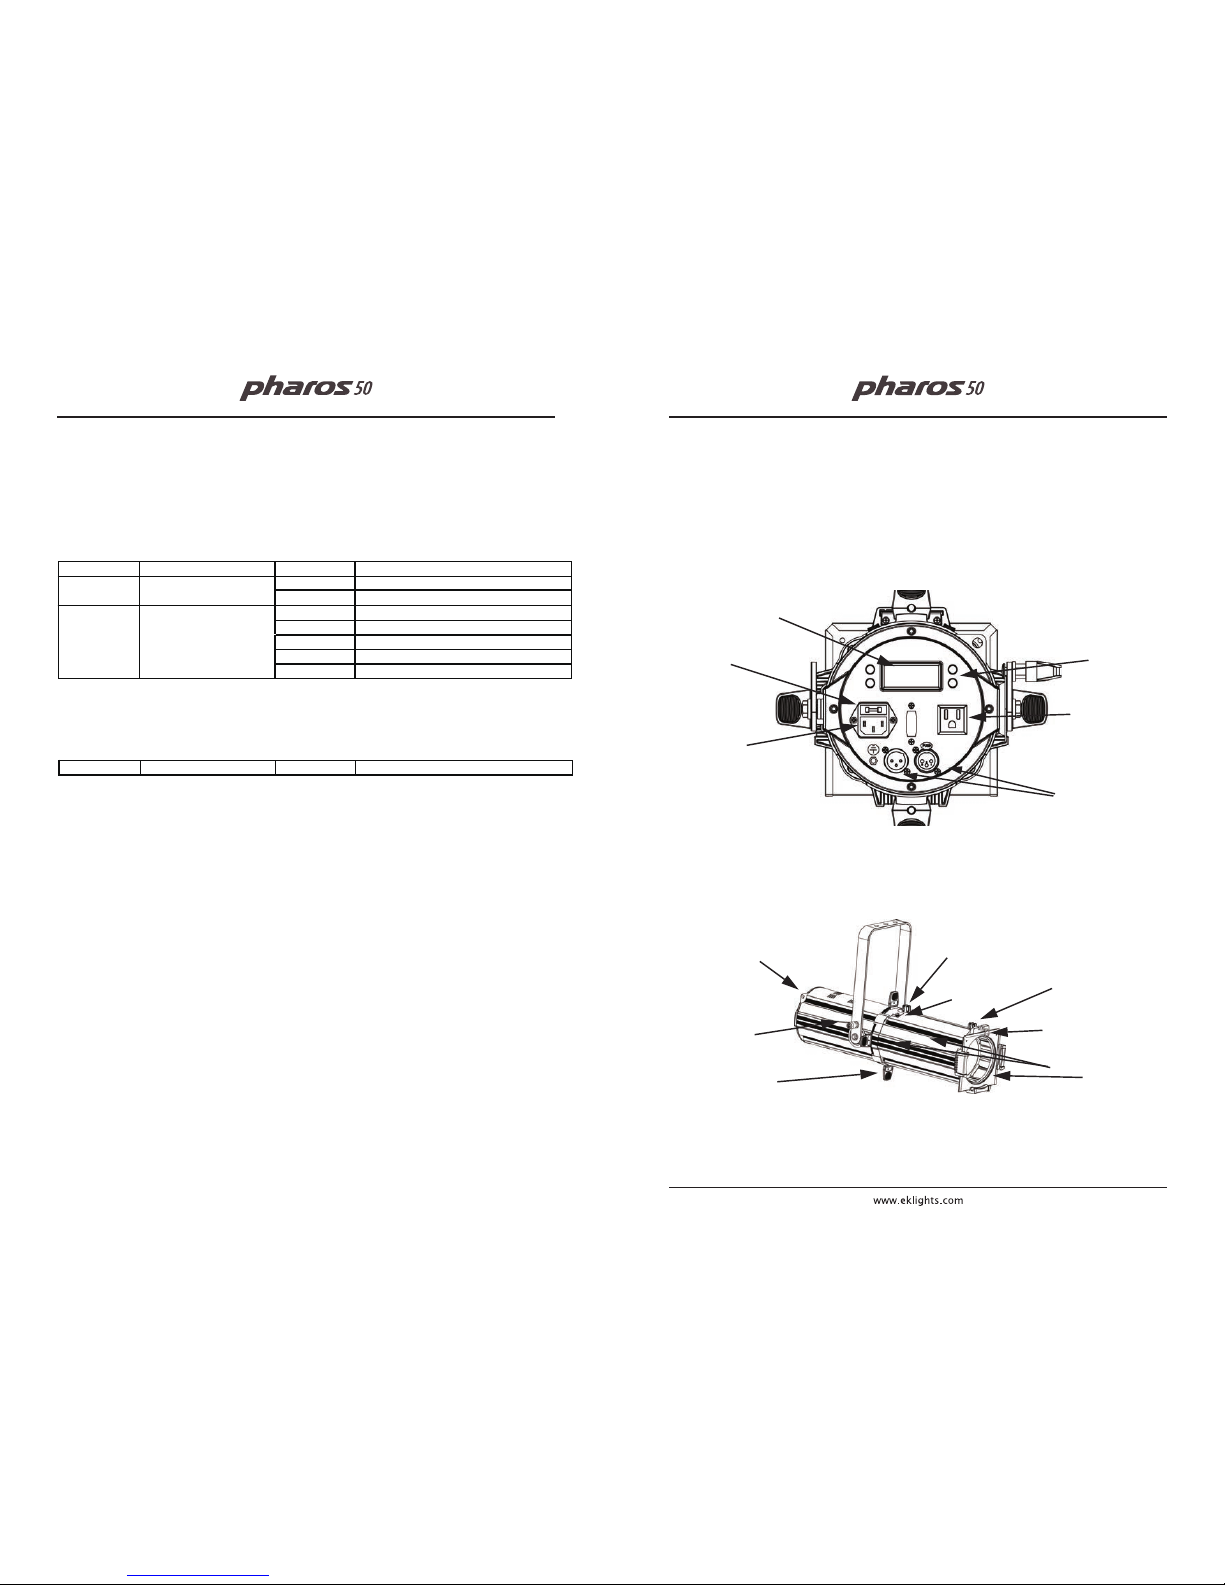
OVERVIEW
5
Fuse Holder
Power In
Menu Buttons
Power Out
DMX IN/OUT
LED Display
Safety Loop
Focus Knob
Gel Frame Holder
Bracket
Adjustment
Knob
Gel Frame
Framing
Shutter x4
Zoom Knob
Gobo Holder
Thumbscrew
DMX FUNCTION CHART
Channel Function Value Percent/Setting
8
3-CHANNEL MODE
1
1-CHANNEL MODE
1
Dimmer
000 - 255
0–100%
Strobe
000 - 010
No function
010 - 255
Strobe speed (slow to fast)
7 Dimmer Speed
000 - 051
Dimmer Speed set from display
052 - 101
Dimmer speed mode o
102 - 152
Dimmer speed mode 1 fast
153 - 203
Dimmer speed mode 2 medium
204 - 255
Dimmer speed mode 3 slow
Dimmer
000 - 255
0–100%
2
Table of contents
Other Nitec Dj Equipment manuals


