Nitec ULTRA PAR User manual
Compact UV wash featuring
ultra wide coverage and
high-output COB LED

TABLE OF CONTENTS
SAFETY / GENERAL INSTRUCTIONS
INTRODUCTION
Features
Specications
OVERVIEW
Front view
Rear view
DIMENSIONS
MAGNETIC FRESNEL LENS
CONTROL MENU OVERVIEW
Control Panel
Function Menu
UFI OPERATION
DMX FUNCTION CHART
5-channel mode
1-channel mode
OPERATING MODE PRIORITY RANK
STAND-ALONE OPERATION
INFRARED (IR6) REMOTE CONTROL OPERATION
MASTER/SLAVE OPERATION (via DMX cable)
MASTER/SLAVE OPERATION (via UFI wi-)
MAINTENANCE
- ULTRA PAR
- Fresnel lens
- Power cord
- User manual
- Warranty Card
PACKING CONTENT
215

ULTRA PAR
ULTRA PAR
3
14
T2A-
INTRODUCTION
ULTRA PAR is a compact UV wash utilizing the latest in COB LED technology and
delivers saturated blacklight coverage.
FEATURES
- Extremely wide UV coverage in a compact package utilizing the latest in
Chip-on-Board LED technology
- Magnetic lens attachment system for easy swapping of narrow (30°) and wide (60°)
Fresnel lenses (included)
- Die-cast road-worthy custom housing design
- Easily ts inside standard truss dimensions for dramatic uplighting eects
- Side-mounted Power and DMX connections for perfectly at oor mounting
- High-frequency LED modulation for icker-free video playback
- Built-in sound-active and auto (stand-alone) programs
- Power In and Out connections for linking mutliple units
- USB port for optional UFI wi- transceiver for wireless DMX control
- Infrared sensor for optional IR6 remote control
SPECIFICATIONS
Light Source: 1 x 80W Ultraviolet COB LED
Beam Angle: 30° or 60°
Field Angle: 50° or 100°
Colors: UV 400nM
Strobe: 0 - 30 Hz
PWM Frequency: 600 Hz, icker-free
Dimming: 0-100% dimming
Control modes: DMX, Auto, Sound-Active, Koala wireless DMX (with optional
UFI transceiver), IR (with optional IR6 controller)
DMX Channels: 1 / 5
Built-in Programs: Yes
Menu: 4-digit LED display
Mains: 100 - 240 VAC, 50/60 Hz (auto-ranging)
Power: 61W
Power Linking: Up to 8 units
Power connections: IEC power In/Out
Data connections: 3-pin XLR In/Out for DMX
Housing: Die-cast Aluminium
Finish: Matte Black
IP rating: IP20
Cooling: Passive
Dimensions: 253 x 200 x 143 mm
Weight: 2 KG
4
MASTER/SLAVE OPERATION (via UFI wi- transceiver)
ULTRA PAR units can operate in Master/Slave mode wirelessly using the optional UFI wi-
transceiver. The master UFI-enabled unit can be operated in Auto mode or by the IR6
infrared remote, with the UFI set to transmit. The slave units should all be set to slave
mode, with the UFI set to receive.
Note: Slave units should be congured before conguring master unit
Note: All units should be set to same DMX address, mode and UFI channel
Setup as below:
SLAVE UNITS:
Press MENU button until 1-CH or 5-CH is displayed
Press ENTER
Set DMX address to d 1
Set UFI to preferred receiving channel (1-16)
Attach UFI to the ULTRA PAR's USB port
MASTER UNIT:
Press MENU button until DMX mode is displayed that matches slave conguration
Press ENTER
Set DMX address to d 1
Set to Auto mode or control by IR6 infrared remote
Set UFI to chosen transmitting channel (1-16)
Attach UFI to the ULTRA-PAR's USB port
13
MASTER/SLAVE OPERATION (via DMX cable)
When multiple ULTRA PAR units are used together, Master/Slave mode enables the
assignment of one master unit and multiple slave units. The master unit can be operated
in stand-alone mode or by IR6 infrared remote control. The slave units should all be set to
slave mode.
Note: Slave units should be congured and connected before linking to master unit
Setup as below:
SLAVE UNITS:
Press MENU button until 1-CH or 5-CH is displayed
Press ENTER
Set DMX address to d 1
Connect DMX cable from master unit to DMX In connector
Link following slave units in similar cable conguration
MASTER UNIT:
Set to Auto or control with IR6 infrared remote
Link to slave units, beginning from the master DMX Out connector
12
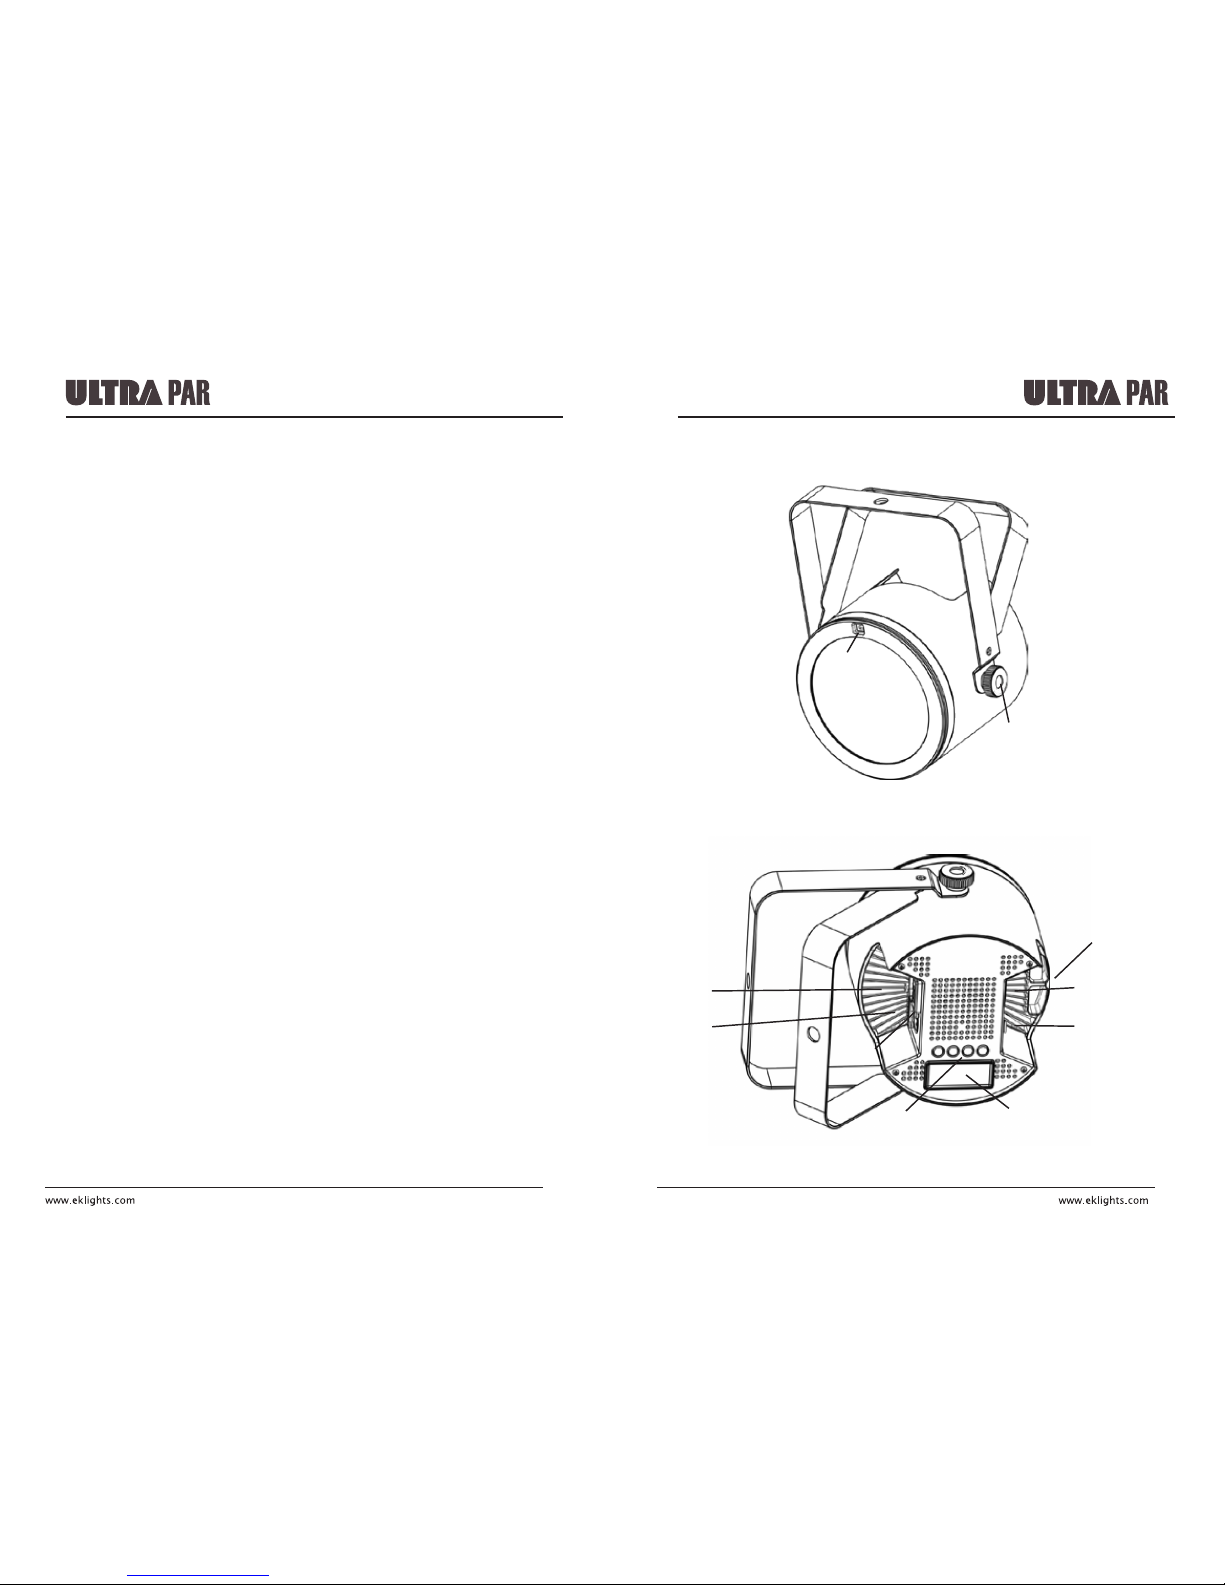
OVERVIEW
Display
DMX In
UFI Port
Power Out
Menu
Buttons
Rear View
IR sensor
Adjustment knob
5
Power In
DMX Out
Mounting bracket
Safety cable
attachment point
Table of contents
Other Nitec Dj Equipment manuals


