manuals.online logo
Brands
  1. Home
  2. •
  3. Brands
  4. •
  5. NITEVIZOR
  6. •
  7. Riflescope
  8. •
  9. NITEVIZOR OWL-XTR User manual

NITEVIZOR OWL-XTR User manual

Popular Riflescope manuals by other brands

Leupold Hunting Equipment Owner's handbook

Leupold

Leupold Hunting Equipment Owner's handbook

ATN PS-40 Operator's manual

ATN

ATN PS-40 Operator's manual

Newcon Optik NVS-33 Operation manual

Newcon Optik

Newcon Optik NVS-33 Operation manual

ATN Daytime 3-9x55LU user guide

ATN

ATN Daytime 3-9x55LU user guide

Newcon Optik DN482 Operation manual

Newcon Optik

Newcon Optik DN482 Operation manual

ATN Mars4x-3P user guide

ATN

ATN Mars4x-3P user guide

TRUGLO TG7650 instructions

TRUGLO

TRUGLO TG7650 instructions

ATN ThOR Series Operator's manual

ATN

ATN ThOR Series Operator's manual

ATN MARS6-3A specification

ATN

ATN MARS6-3A specification

ATN Trident Pro2x-2 user guide

ATN

ATN Trident Pro2x-2 user guide

Burris Predator Quest user guide

Burris

Burris Predator Quest user guide

ATN 3.5X26 user guide

ATN

ATN 3.5X26 user guide

Burris AR Riflescopes user guide

Burris

Burris AR Riflescopes user guide

Nikon 2.5-10x40 instruction manual

Nikon

Nikon 2.5-10x40 instruction manual

ATN ThOR 3 B&W specification

ATN

ATN ThOR 3 B&W specification

Newcon Optik NC 3-12x50 Operation manual

Newcon Optik

Newcon Optik NC 3-12x50 Operation manual

Bushnell ET3124F user manual

Bushnell

Bushnell ET3124F user manual

ATN LTAD-SN Specifications

ATN

ATN LTAD-SN Specifications

manuals.online logo
manuals.online logoBrands
  • About & Mission
  • Contact us
  • Privacy Policy
  • Terms and Conditions

Copyright 2025 Manuals.Online. All Rights Reserved.

OWL-XTR
USER MANUAL
2
OWL-XTR
NITEVIZOR OWL-XTR
Thank you for choosing the NITEVIZOR OWL-XTR. Please read the user manual
carefully before using your new device.
Important Safety Information
1. Never look directly at the IR ll light when illuminated.
2. Do not leave the product un-supervised with persons under the age of 16.
3. Do not aim the IR ll light at combustible objects at close range.
4. Turn off the IR ll light or adjust it to sleep mode if it will not be used for a
period of time.
5. Never leave on charge unattended.
Contents
• OWL-XTR Digital Rie Scope
• 850nm IR Illuminator
• Universal Joint Mount
• IR Illumintator Mount
• Rubber Eye Piece
• Sunshade
• Charging Cable
• Bluetooth Remote Control
• TF Card
• Card Reader
• Carry Bag
• Cleaning Cloth
• Allen Key
• 3x 18650
Rechargeable Batteries
3
OWL-XTR
P.OFF Button
On / Off Button
Photo / Video Button
Scroll Wheel
Side Accessory Rail
Exit / Rangender Button
Distance Focus Ring
Diopter Adjustment Ring
4
OWL-XTR
Initial Setup
Charging the Rie Scope
The rie scope is equipped with a USB Type C port which is located under the
rubber cap on the right side of the rie scope. Plug the included USB Type C
cable into a USB wall charger that has an output of 2 amps.
The rie scope can be charged while it is powered On or Off, but it charges
faster in when powered Off. When in Recording Mode, the rie scope will be
powered, but not charged.
Note: Using a wall charger with lower amperage will take longer to charge the
rie scope.
1. Recommended charger is 2.0A USB charger
2. Battery charging time (from 0 to 100%) is 2 hours using a 2.0A USB charger
with the rie scope powered Off
3. Battery run time is 6 hours on a single charge
MicroSD & USB C Ports
The rie scope is equipped with a microSD Card
and USB (type C) ports. You can nd them under
the rubber caps on the right side of the rie scope.
To open the rubber port cover, gently lift the rub-
ber cover and move it out of the way.
Note: Make sure that the device is powered Off
before inserting the formatted MicroSD Card into
its port.
1. Always format a new microSD card before using
2. Insert the MicroSD card as shown
3. Use a thin object (small coin, paper clip) to fully insert and lock the MicroSD
in place in the slot
4. Close the rubber the cover
Note: There is only one correct direction to insert the MicroSD card. Do not
force the microSD card into the slot as doing so may cause damage to both the
rie scope and the MicroSD card.
5
OWL-XTR
...MicroSD & USB C Ports
To remove the MicroSD Card from the port, push the card slightly in using the
same thin object that was used to insert it. When the MicroSD card pops up a
few millimeters, the card can be removed with nger tips or tweezers.
Note: The rie scope requires a high quality TF card for recording 4K HD video.
We advise to use a minimum specication of U3-V30 with 64GB or higher. The
rie scope supports cards up to 256GB capacity.
Controls
Full Power Off
The rie scope can be fully powered off by holding the P.OFF button for 3 sec-
onds. The rie scope will be fully disconnected from the power supply. Use Full
Power Off when storing the rie scope for longer periods when not in use.
Microphone
The rie scope’s Microphone is located to the right of the P.OFF button. The
Microphone should be clean and unencumbered for optimal performance.
ON/OFF
The rie scope can be switched On and Off using the On/Off button. Hold the
On/Off button for 3 seconds to either switch On or Off.
If the rie scope fails to start using the On/Off button press the P.OFF button for
1 second, then pressing the On/Off button for 3 seconds.
Photo & Video Recording
Press the Photo/Video button for 1 second to switch between Photo and Video
modes. Press the Photo/Video button briey to take a photo or start/stop Video
recording.
6
OWL-XTR
... Controls
Exit/Rangender
The Exit/Rangender botton has multiple functions.
In the Menu/Settings interface, press the Exit/Rangender button briey to
navigate Up/Back through the menu and back to rie scope mode.
In rie scope mode, press the Exit/Rangender button to activate and deacti-
vate the Rangender and Ballistic Calculator. When activated, use the Scroll
Wheel to measure the distance using the Rangender ranging rule.
Scroll Wheel
In rie scope mode the Scroll Wheel operates the Zoom by rotating to the left or
right. Press briey the Scroll wheel to enter the Menu/Settings interface. In the
Menu/Settings interface use the Scroll Wheel to select and conrm settings.
Optical Adjustment
Dipoter Adjustment
Rotate the Diopter Adjustment Ring to focus the eyepiece. Look through the
eyepiece while focusing on the reticle and widgets on the screen, until the
screen is sharp.
Distance Focus
Rotate the Distance Focus Ring to achieve the correct focus in relation to the
distance of the target.
Mounting
The rie scope can be mounted using 30mm mount-
ing rings. Apply equal torque to all screws with the
supplied Allen key.
Ensure the mounting rings are securely tightened to
the correct torque settings.
To mount the rie scope on a Picatinny rail:
1. Loosen the xing screws on the sides of the mounting rings
2. Place the rie scope on the Picatinny rail so that the projection of the rail,
which is in the base of the ring, enters the recess in the rail
3. Tighten the mounting ring screws
7
OWL-XTR
...Mounting
Caution: Before mounting, ensure the rearm is not loaded. Always use safe
weapon handling procedures.
Note: Please do not overtighten the mounting ring scews as this could damage
the rie scope. We recommend torque settings of 30in-lbs.
IR850 Infra-Red Illuminator
Note: Please hold the battery tube (not the ashlight head or neck) when tight-
ening/loosening the tail-cap.
The IR850 IR Illuminator is powered by 1x 18650 rechargeable battery.
1. Remove the tail cap unscrewing it until it is free of the body
2. Install the battery in the body, observing battery polarity
3. Install the tail cap back on the body
Modes
The IR850 IR Illuminator can be used on full power continuously for 2 hours.
Operation
Press the button on the tail to turn it On. Press the button again to turn Off.
Spot Adjustment
Turn on the light and shine it on wall 8 to 10 meters away. To focus the beam,
hold the head with one hand and rotate the neck clockwise or counterclockwise
with the other hand to focus the beam.
Installation
Install the IR Illuminator on the adjustable base as follows:
1. Unscrew four screws
2. Place the IR Illuminator in the installation seat
3. Replace the screws and tighten
8
OWL-XTR
...IR850 Infra-Red Illuminator
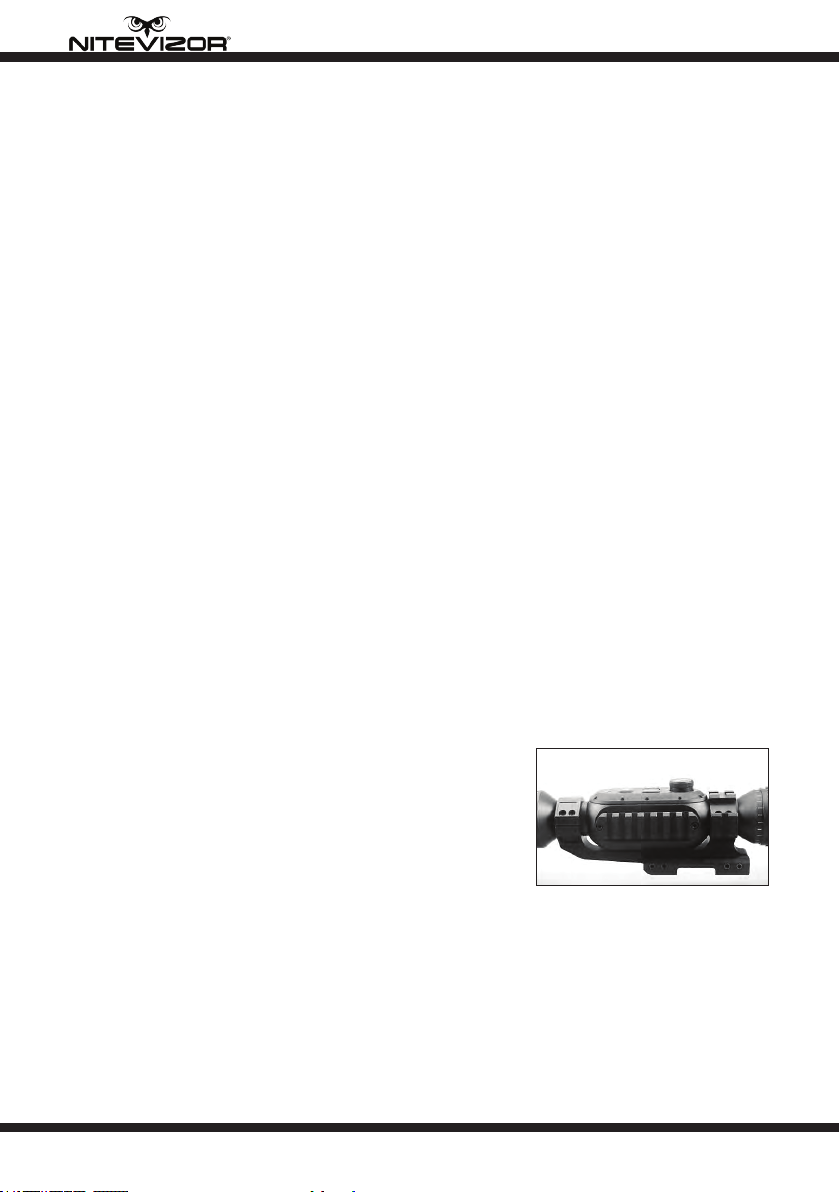
In order to make the spot area of IR Illuminator coincide with the observation
range of the rie scope, it is assembled into the mounting seat. Place it on the
side accessory slide rail of the rie scope. After securely installing, loosen the
two screws at the top of the mounting ring slightly. Turn on the IR Illuminator
and the rie scope, and set the rie scope in night mode to view the IR beam.
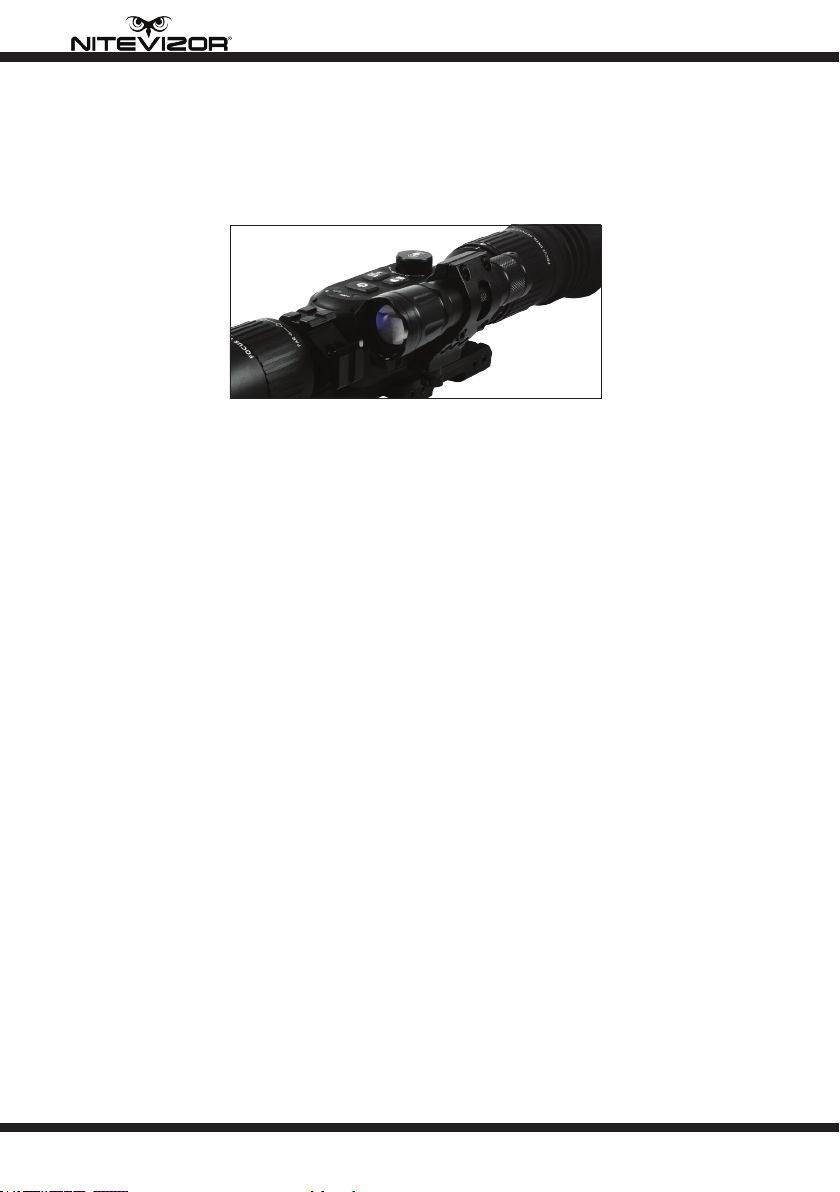
Move the infrared compensation ashlight in the installation seat until the
whole spot of the IR beam is visible in the rie scope screen, and then adjust, so
that the spot and the display screen are synchronized. Use the hexagon wrench
to gently tighten the two screws at the top of the mounting ring to secure the IR
Illuminator.
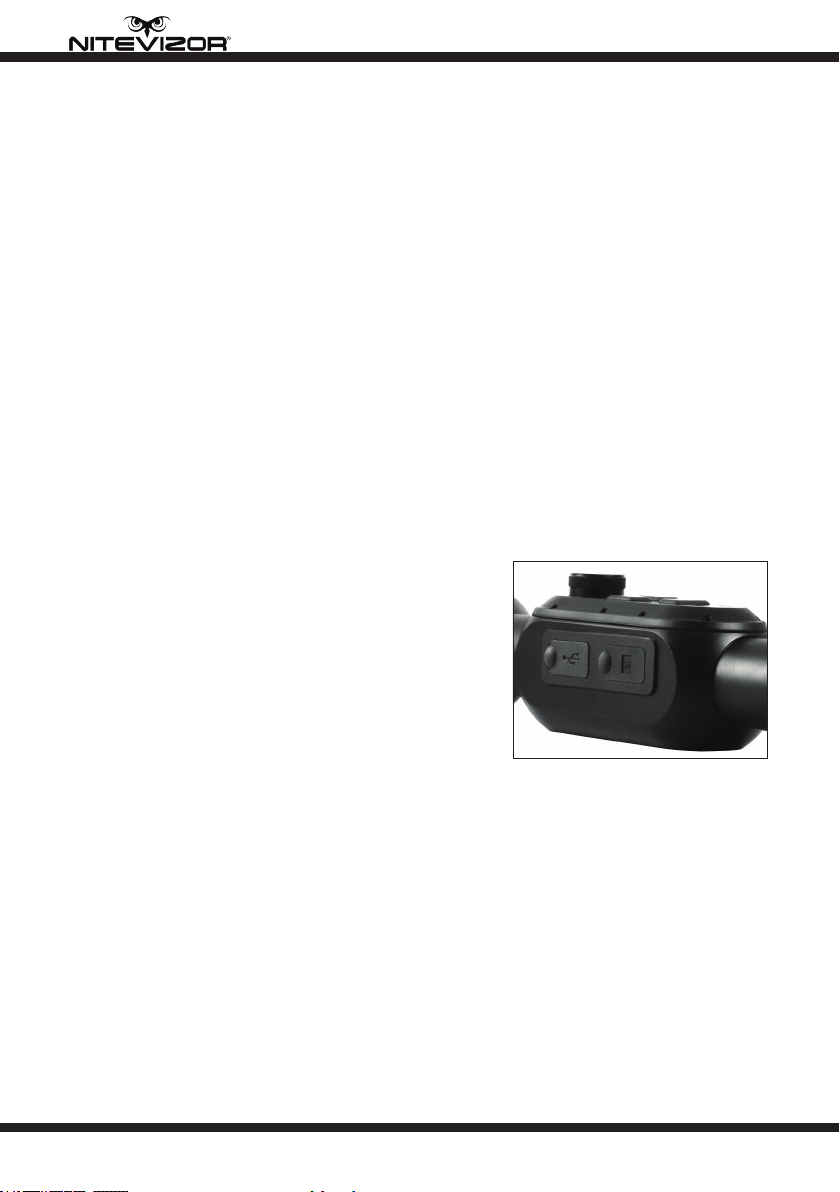
Note: To prevent wear and maintain water resistance, regularly lubricate
threads and O-rings.
Compass Calibration
In different areas, the compass needs to be calibrat-
ed. The calibration of the compass can be divided into
Azimuth Calibration and Incline Calibration.
In the Menu/Settings interface, select More, then
select Compass line then select Compass. Follow
the instructions as indicated on the image displayed.
Rotate 3-4 times in each direction, and place the equipment at rest horizontal
to the ground or other horizontal surface. Then wait for about 30 seconds, and a
success screen appears. If the calibration fails, repeat the calibration procedure
again.
To calibrate the Incline, select More in then select Compass, change to Incline
and select. The Incline will then be calibrated.
If either of the calibration procedures fails, please repeat the above steps.
Bluetooth Remote Control
Photo and Video recording, along with the ZOOM level can all be controlled via
the Blutooth Remote Control.
1. Switch on the rie scope, enter the Menu/Settings interface and choose the
BT. Press the Scroll Wheel and ‘Bluetooth Pairing…’ will be displayed
2. Press any button on the remote control. The indicator will display green if suc-
cessfully paired. If pairing has failed and the indicator is red, repeat step 1
3. Wait approximately 10 seconds for the remote control to be operational
9
OWL-XTR
...Bluetooth Remote Control
Press the PHOTO/VIDEO button to take a photo in Photo Mode or to record
video in Video mode. Use the Photo/Video button directly on the rie scope to
change between Photo and Video modes.
To adjust the ZOOM press the Plus or Minus buttons to zoom in or out.
Application for Android and iOS
The APP for the rie scope is available for Android and iOS devices. Please
check www.nitevizor.com for the latest download links.
Once installed, you the following icon will appear on the device:
Connecting to the APP
Turn on the WIFI setting of your Android or iOS device and select the ‘rie-
scope-xxxxx’ WIFI option. The initial password is: 88888888. Once connected
you can change the password via the device. If you forget the password, reset to
88888888 in the rie scope Settings.
Once successfully connected via WIFI, click the APP icon on your device. The
APP will launch and then select ‘Connect’.
If ‘Connect’ does not display, or the APP fails to connect, please restart the rie
scope and repeat the steps above.
Note: If the scope was recording before entering the APP, real-time video will
not be displayed. Stop recording on the rie scope and real-time video will be
displayed.
10
OWL-XTR
Operating the OWL-XTR Rie Scope
Home Screen
When the rie scope is switched on, the Home Screen will be displayed, com-
prising the real-time video image, a status bar at the bottom and additional
information at the top of the screen.
Menu/Settings Interface
Use the Scroll Wheel to enter the Menu/Settings Interface to adjust settings and
options.
COR (Crosshair Calibration):
Step 1: Aim the crosshairs at the target and shoot.
Step 2: Re-aim the crosshair at the target, enter the menu, and select the the
COR option
Step 3: Click the Scroll Wheel, and rotate it, choosing COR. The xed white
crosshair refers to the center of the screen. If entering this selection for the
rst time, a red crosshair in the center of the screen will also be visible, which
overlaps with the white crosshair. 8X=O 8Y= 0 will be displayed which are the
current coordinate values.
Step 4: Rotate the Scroll Wheel, to adjust the position of the white crosshair.
Move the center point of the white cross hair to the ballistic point. Push the
Scroll Wheel to switch between X-axis and Y-axis.
1. Pitch Angle
2. Electronic Compass
3. TF Card Status
4. WiFi Status
5. Bluetooth Status
6. Battery Information
7. Electronic Magnication Value
8. Photo / Video / Vibration Video
Status
9. Resolution Setting