Nitro XHDART User manual

XHDART
User manual

User’s Manual | 2
Safety Information
Before You Begin
Read these instructions before installing or operating this product.
Note: This installation should be made by a qualified service person and should conform to local
codes.
This manual provides installation and operation information. To use this document, you must
have the following minimum qualifications:
A basic knowledge of CCTV systems and components
A basic knowledge of electrical wiring and low-voltage electrical connections
Intended use
Only use this product for its designated purpose; refer to the product specification and you
documentation.
Customer Support
For assistance in installing, operating, maintaining and troubleshooting this product refer to this
document and any other documentation provided. If you still have questions, please contact
Norbain Technical Support and Sales:
Norbain SD, 210 Wharfedale Road, IQ Winnersh, Wokingham, Berkshire RG41 5TP, England.
UK +44 (0) 118 912 5000
Note: You should be at the equipment and ready with details before calling Technical Support.
Conventions Used in this Manual
Boldface or button icons highlight command entries. The following warning, CAUTION and Note
statements identify potential hazards that can occur if the equipment is not handled properly:
* Warning:
Improper use of this equipment can cause severe bodily injury or equipment
damage.
** Caution:
Improper use of this equipment can cause equipment damage.
Note: Notes contain important information about a product or procedure.
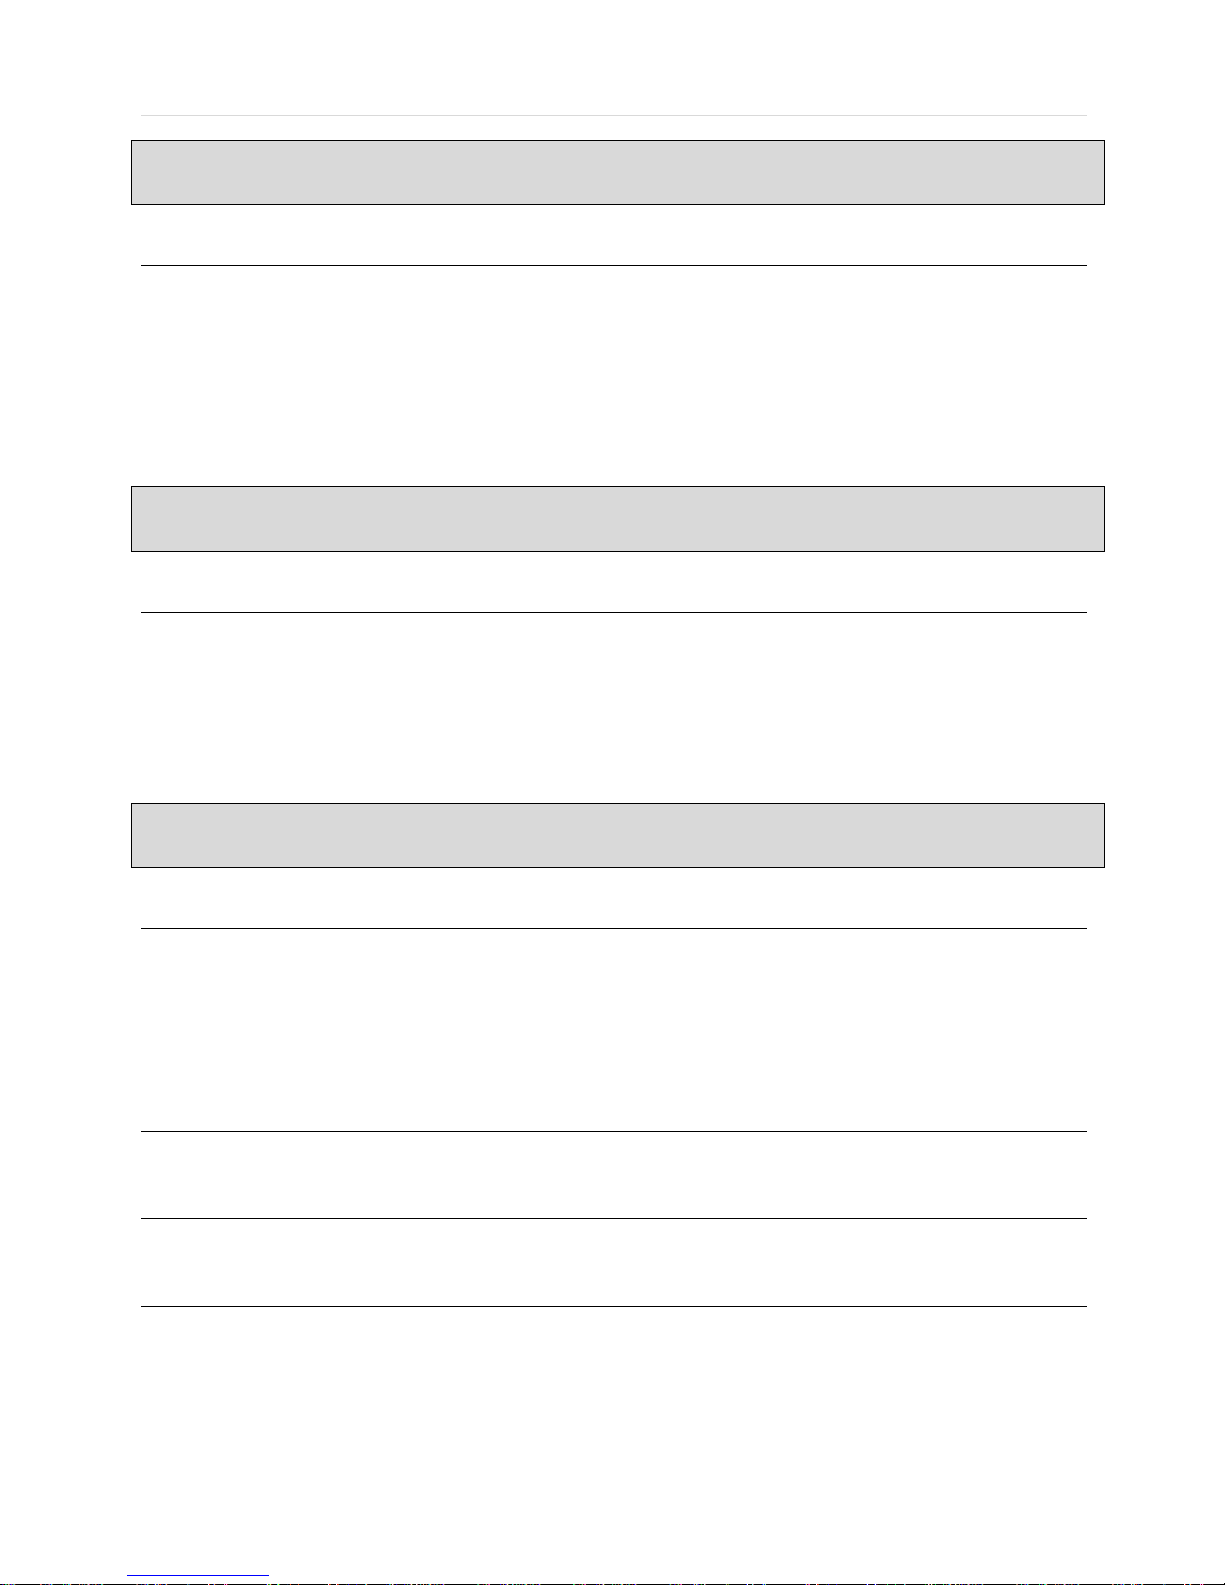
This apparatus is manufactured to comply with the radio interference.
A Declaration of Conformity in accordance with the following EU standards has
been made. The manufacturer declares that the product supplied with this
document is compliant the provisions of the EMC Directive 2004/108/EC, the CE
Marking Directive 93/68 EEC and all associated amendments.
All lead-free products offered by the company comply with the requirements of
the European law on the Restriction of Hazardous Substances (RoHS) directive:
2011/65/EU, which means our manufacture processes and products are strictly
“lead-free” and without the hazardous substances cited in the directive.

3 | Full HD Digital Video Recorder
The crossed-out wheeled bin mark symbolizes that within the European Union the
product must be collected separately at the product end-of-life. This applies to your
product and any peripherals marked with this symbol. Do not dispose of these
products as unsorted municipal waste.
* This symbol indicates electrical warnings and cautions.
** This symbol indicates general warnings and cautions.
NORBAIN SD reserves the right to make changes to the product and specification of the product
from time to time without prior notice.
WARNINGS AND CAUTIONS:
To reduce the risk of fire or electric shock, do not insert any metallic objects through the
ventilation grills or other openings on the equipment.
CE COMPLIANCE STATEMENT
WARNING
This is a Class A product. In a domestic environment this product may cause radio interference in
which case the user may be required to take adequate measures.

User’s Manual | 4
Contents
CHAPTER 1:DVR USER MANUAL
1GETTING STARTED 7
1.1 Checking Supplied Items 7
1.2 Connecting Peripheral Device 8
1.3 System Startup and Shutdown 10
2EXPLANATION FOR EACH FUNCTION 12
2.1 Front Panel 12
2.2 Rear Panel 14
3OPERATION 16
3.1 User Log-in 16
3.2 Live Display Mode 17
3.3 PTZ Operation 22
3.4 Spot out Monitor 23
3.5 Playback of Recorded Video 24
3.6 Search Recording Image 26
3.7 DST Setting 30
3.8 Screen Saver 31
4SETTING 32
4.1 System 33
4.2 Device 39
4.3 Record 45
4.4 Network 48
4.5 Backup 54
4.6 Quick Setup 56
5WEB SURVEILLANCE 57
5.1 Web Login 57
5.2 Web Configuration 58
5.3 Web monitoring 60
5.4 Web Playback 63

5 | Full HD Digital Video Recorder
CHAPTER 2:CMS CLIENT SOFTWARE USER MANUAL
6CMS USER GUIDE 65
6.1 PC REQUIREMENT 65
6.2 INSTALL 65
6.3 UNINSTALL 67
6.4 BASIC OPERATION 69
CHAPTER 3:MAC ACS CLIENT SOFTWARE USER MANUAL
7MAC ACS USER GUIDE 106
7.1 System Requirement 106
7.2 Install 106
7.3 Basic Operation 108
CHAPTER 4:MOBILE PHONE SOFTWARE USER MANUAL
8MOBILE PHONE SOFTWARE USER GUIDE 116
8.1 iPhone application software 116
8.2 Basic Operation 117
8.3 iPhone application software 125
APPENDIX :DYNDNS SITE REGISTRATION 127
APPENDIX :NETWORK SETUP FOR EXTERNAL USAGE 130
APPENDIX :SPECIFICATION 131

User’s Manual | 6
Chapter 1
DVR USER MANUAL

7 | Full HD Digital Video Recorder
1 GETTING STARTED
1.1 Checking Supplied Items
Make sure that you have the following items supplied with your DVR. If any of these items are missing or damaged, notify
your vendor immediately. Keep the packing utilities for moving or storage purposes afterwards.
Items
Photo
Quantity
Quick Start Guide
1 Set
CD (Manual & Software)
1 Set
12V DC Adaptor
Power Cable
1 Set
USB Mouse
1 Set
Screws
1 Set

User’s Manual | 8
1.2 Connecting Peripheral Device
This section describes how to connect peripheral devices efficiently to the DVR.
Install the DVR on flat surface. If required, attach a rubber mount for installation. If a 19-inch rack is used with 1.5U Height
case, it is recommend to install the system on a shelf and use 2.5~3U (1U=1.75 inch or 4.45 cm) space for proper ventilation.
4ch 1HDD type
8ch 1HDD type
NOTE
Install the system in a location with good ventilation to prevent overheating.

9 | Full HD Digital Video Recorder
16ch 1HDD type
16ch 2HDD / Front Key type
WARNING !
※When connecting power cord to the system, it is strongly recommended first to plug the power cord
to the system and then plug the other side of power cord into the wall socket.

User’s Manual | 10
1.3 System Startup and Shutdown
1.3.1 System Startup
After connecting peripheral devices such as cameras, monitors and a mouse to the DVR, power up the DVR by connecting
DC12V adaptor to the power jack on the rear panel. The boot log will display as shown below. Please wait until the boot
process completes.
Login with ‘User Name’ at the login window which will appear as shown below.
There is only one Administrator Account configurable in the DVR system. It is assigned with an unchangeable User ID
marked as ‘admin’. The default password is empty (No Password). Administrator account has full access to the DVR and its
configurable parameters. The Administrator Account also has the ability to create new users and to assign rights to the new
user accounts. Those new users created by ‘admin’ account can also login with a specific password set by ‘admin’ account.
NOTE
Do not forget the administrator’s password that was set for the first time. In case the password is lost,
contact your vendor.
NOTE
The mouse is included. In case you need to replace it, it is highly recommended to choose well-known
major brands such as DELL, MICROSOFT, LOGITECH, or SAMSUNG.

11 | Full HD Digital Video Recorder
1.3.2 System shutdown and change password
Option 1. Click the Shutdown button and input password on pop-up to power off the DVR
Option 2. Click the right button on the mouse and select the Shut Down to power off the DVR.
NOTE
It is not recommended to disconnect the power cable abruptly from the back of the DVR because it may
affect the DVR and Hard Drive.
The default password for ‘admin’ account is none. Therefore, just click ‘Enter’ button on the dial pad. If you changed the
password for ‘admin’ account, please type in the changed password to login.
NOTE
User can type in the password using the virtual keyboard.

User’s Manual | 12
2 EXPLANATION FOR EACH FUNCTION
2.1 Front Panel
4/8/16ch 1HDD type
16ch Front Key type
1
Playback Speed Control
Playback Speed Control(Short Press) when Playback
Reverse Step Playback(Short Press) when Pause
First Data Playback(Long Press)
2
Forword & Backward Play
Pause
Forward play & Backward Play(Long Press)
Pause(Short Press)
3
Playback Speed Control
Playback Speed Control(Short Press) when Playback
Forward Step Playback(Short Press) when Pause
Last Data Reverse Playback(Long Press)
4
Search
goto Search menu(Short Press)
5
Book-mark / Instant play
Book-Mark(Short Press) / Last Data Reverse Playback(Long Press)
6
Instant Record / Spot out
Emergency Recording(Short Press)
Spot out monitor(Long Press)
7
PTZ / I-backup
Bring Up PTZ Camera Control(Short Press)
Used to initiate instant back up(Long Press)
8
Mode
Change screen mode(Short Press)
9
USB Port
USB port(Ver.2.0)for mouse operation or backup or F/W update
10
LED Indicator
Indicates system status Power, Record, Network
11
Menu / Exit
Toggles On or Off Menu Setup Display
12
Enter
Select value or setting
13
Direction
Move to the direction that user wants to select
14
DVD±RW
DVD±RW door

13 | Full HD Digital Video Recorder
NOTE
I- Backup (Instant Backup)
In playback mode, the user can press the “I-backup” button on the frontal keypad to configure both “start” and
“End” time. Once the “Start” and “End” time is set, click the “Start” button to start the backup process.(Front
Key type)

User’s Manual | 14
2.2 Rear Panel
4ch 1HDD type
8ch 1HDD type
16ch 1HDD type

15 | Full HD Digital Video Recorder
16ch / Front Key type
No.
Name
Description
1
Video-In
Camera inputs (Supports NTSC/PAL)
2
Audio-In
Audio Input Device (with Amplifier)
3
Audio-Out
Audio Output Device (with Amplifier)
4
USB Port
USB 2.0 Port for Mouse Operation, Backup Device, or Firmware Update
5
HD OUTPUT
HD OUTPUT
6
LAN Port
1 x 10/100/1000M
7
Power Input
4ch : 12V/2A 8ch : 12V/3A 16ch : 12V/5A
8
Alarm Output
Alarm Output
9
Sensor Input
Sensor Input
10
RS-485 Port
PTZ Dome Camera or External Keyboard Controller connection
11
VGA
D-sub VGA Output
12
SPOT
SPOT Output
Note
Carefully check whether the specifications of the peripheral devices match the DVR’s specifications.

User’s Manual | 16
3 OPERATION
3.1 User Log-in
The DVR has various setting categories. The administrator can set the system password and <User> to prevent
unauthorized changes to setting values and alteration of recorded file.
Enter the <Admin> or <User> password which had been set by using the virtual keyboard.
NOTE
1) <LOGIN> window will be permanently displayed in monitor as above picture until user logs in with the
right ID and password.
2) If it is set as Auto Log-In, DVR does not require LOG-IN. (Please refer to 4.1.2 User.)

17 | Full HD Digital Video Recorder
3.2 Live Display Mode
3.2.1 Full HD(1080p) Live Display
Full HD Live Display can be supported in live mode by using its HD output.
Able to set max 4k(3840x2160) : HD output and supplied 4K monitor
NOTE
HD Resolution 4K(3840x2160) support only 8ch and 16ch. 4ch is not support 4K resolution
<Full HD Live Display>

User’s Manual | 18
3.2.2 Channel Selection
Channel selection can be done by following one of the steps below:
1~16 virtual buttons at the bottom of the GUI display.
The display mode can be changed by pressing the ‘MODE’ button on the DVR’s front panel. (Front Key type)
The live images can be displayed in real-time in 1, 4, 9, 16 screen splits. Whenever the left/right arrow button on the front
panel is pressed, the screen will be sequentially changed.
[1 Ch] [4 Ch]
[9 Ch] [16 Ch]
To select channel by mouse, click target channel single time to display in full screen. To return to previous display mode,
click the screen again.
To view the pop-up menu, right click anywhere on the display screen.
NOTE
To properly select a channel using the mouse, the user is required to perform a slow and clear click of the
left mouse button.

19 | Full HD Digital Video Recorder
3.2.3 Icons
The live mode display’s icons or messages will be indicated on the screen to indicate the system mode or status.
Below are the icon categories that are indicated on the monitor:
Icon to be shown
at Left-upper corner on each channel screen
Icon to be shown
at Left-bottom corner on full screen.
Continuous Recording
Sequence display on
Motion Detection Recording
Digital zoom on
Sensor Activating Recording
Audio Channel
Continuous+ Motion Recording
Continuous + Sensor Activating
Recording
Emergency Recording
NOTE
If you cannot find any colored-mark in the top right corner of the live screen mode, then it means that the
system does not record any image. In this case, you need to check recording schedule or camera of the
main setup menu.
The sliding menu for display will be appeared when mouse cursor move into bottom and right click of mouse enale to access
pop-up menu.
To show the menu bar, move the mouse’s cursor to
the bottom of the screen. The menu bar will be
displayed.
To hide the menu bar, move the mouse’s cursor
away from the menu bar.
Menu Bar
Menu button. When pressed, System Setup, Search, Backup, Logout will appear.
Screen split options- Select from single channel, 4 channel, 9 channel, or 16 channel display.
Sequence- if pressed, the system will start displaying all the channels in sequence mode.
To stop, press the button again, or right click on the screen and select ‘SEQUENCE’
CH. Buttons- view a specifc channel in full screen mode.
Instant (emergency) recording- The system will record video based on the panic record
settings.
PTZ mode- Control any supported PTZ cameras by moving the mouse pointer.
Go to Instant playback.
HDD usage indicator- Indicates the percentage of your HDD being used. If it shows 60%,
then 60% of HDD space has been used.

User’s Manual | 20
3.2.4 Pop-up Menu
User can click the right button of the mouse to pop up sub-menu as shown below.
DISPLAY- Select the display split from the available options:
- 1 Screen- Single channel. Automatically displays CH1. If 1 Screen is selected again, next chronological channel will be
displayed.
- 4 Screen- Quad mode. Automatically displays channels 1~4. If 4 Screen is selected again, the next chronological 4
channels (5~8) will be displayed.
- 9 Screen- Automatically displayes channels 1~9. If 9 Screen is selected again, the next cohoronological channels
(10~16+1~2) will be displayed.
- 16 Screen- Displays all 16 channels (available only in 16 channel models)
PTZ CONTROL- Open the DVR’s PTZ control. See section 3.3 PTZ for more information.
SEQUENCE On/Off- when selected, icon will appear on the bottom right corner of the screen, and the display
screen will be sequentially changed.
Please note, option will be disabled if display area is in Max channel mode.
Spot out Monitor- Enter Spot out Monitor Control Mode.
ZOOM- Enables/ disables digital zoom function with x2, x4, x8 button. When enabled, icon will appear and
zoomed area will be displayed on the bottom right corne. The Zoom will automatical y focus on the center of the camera’s
display. To adjust ot, go to the small zoom display at the bottom of the camera display and move the yellow frame to the
desired are you would like to view in zoom. To move the yellow frame, use your mouse to drag the lines of the yellow frame to
the desired location. To go back to live display mode, right-click on the screen and select “ZOOM” again. This feature is
available in single channel mode only.
INSTANT REC On/Off- Start/ Stop Panic Recording.
PLAYBACK- Select playback option:
- 10, 15, 30, 60 seconds- start playback from the selected number of seconds ago.
- 2, 3, 5, minutes- start playback from the selected number of minutes ago.
- Open Playback Mode- automatically go to instant playback.
SEARCH- Select video search options:
- Date/ Time- open calendar search.
- First/ Last Data- Go to the first or last recorded data.
- System/ Event Log- open log search window.
- Bookmarks- open bookmark search.
Backup - Users can archive a video clip recorded for a certain period on a selected channel.
SETUP- open the DVR’s main menu.
Table of contents
Other Nitro DVR manuals
Popular DVR manuals by other brands

Sony
Sony SVR-3000 - Digital Network Recorder Viewer's guide

Beantech
Beantech Headsup WC1 quick start guide

Meicheng
Meicheng HVR-7200 user manual

AJA
AJA KiProRack Installation and operation guide

Luxon Video
Luxon Video LIN104M Quick installation guide

Dahua Technology
Dahua Technology XVR5232AN-I3 user manual