Nitty-Gritty 1.0 User manual

OWNER’S
MANUAL
FOR ALL MODELS
OF RECORD CLEANERS
NITTY GRITTY RECORD CARE PRODUCTS, INC.
4650 Arrow Hwy. • Ste. #F-4 • Montclair, CA 91763
Sales: (909) 625-5525 • Service: (909) 621-9666
Fax: (909) 625-5526
www.nittygrittyinc.com
Rev. 10/16

See inside back cover for NITTY GRITTY warranty information.
YOUR MODEL INFORMATION
MODEL # _________________________________________________
SERIAL # _________________________________________________
DATE PURCHASED ________________________________________
PURCHASED FROM _______________________________________
LIMITED WARRANTY:
NITTY GRITTY will repair any part of the NITTY
GRITTY record cleaning system (except the velvet
vacuum slot liners and the rubber drive wheel), which has
a defect in materials or workmanship, within a period of
one year from the date of purchase. The velvet vacuum
slot liner (VAC-SWEEP™) and the rubber drive wheel
(capstan) are warrantied for a period of 90 days. NITTY
GRITTY accepts no liability for the misuse of this device.
The warranty for commercial, industrial, and rental users
is limited to 90 days from the date of purchase. A COPY
OF THE SALES RECEIPT MUST ACCOMPANY ALL
WARRANTY REPAIRS. The warranty is not transferrable.
The use of cleaning fl uids other than PURE 1™, PURE 2™
or PUREnzyme+™ may invalidate the warranty.

CONGRATULATIONS!
You have just purchased what may become
the single most important component for your
sound system! In joining the ranks of the Library
of Congress, the Smithsonian, the Kennedy
Library, not to mention countless schools,
libraries, record collectors and audiophiles
worldwide, you will now have the opportunity
to hear your records as they were meant to be
heard — sweet music without the surface noise
you thought you just had to endure. You will be
preserving your valuable record collection, as
well as extending the life of your stylus, in the
one brief minute it takes to clean a record. So,
bask in the reverie and swoon to the music,t’cuz
your records never had it so good!
– 1 –– 8 –
1. Remove the small fi ller cap from the fl uid tank, and fi ll the reservoir with PURE
2. (DO NOT TWIST THE LARGER “PUMP BUTTON”!)
2. Your Mini-Pro is equipped with an upper and lower suction slot. The upper
slot is mounted in the arm, which pivots horizontally to allow for positioning of
the record. Lift the arm slightly (from the end nearest the power switch) and
pivot it away from the lower slot. Spindle the record, inserting the edge of the
disc under the “lip” of the capstan rubber. (The capstan/drive shaft assembly
is spring-loaded and will fl ex away from the slot as you spindle the record.)
Return the arm to its original position and lower it to the record.
3. Feed the cleaning fl uid to the velvet-like VAC-SWEEP by pumping the larger
button up and down 20-25 times to prime the pump. (Once fl uid lines are primed,
only 8-12 “pumps” will be necessary to wet the VAC-SWEEP.) Cleaning fl uid
will now be injected onto both sides of the disc.
4. Turn on the drive (rotation) motor by pressing the 3-position switch away from
you (the record will rotate, but the vacuum will not come on). As the record
rotates 2–3 revolutions, hundreds of the Vac-Sweep’s fi bers will scrub the
grooves.
5. Once the fl uid application is complete, press down on the front edge of the
3-position switch. The vacuum will come on, and the record continues to rotate.
(NEVER PUMP FLUID WHEN VACUUM IS ON!) Fluid and debris will now
be drawn from deep within the grooves. Allow the record to rotate 5 revolutions,
to assure complete removal of the fl uid.
6. To empty waste fl uid, slide out tray located on the underside of the machine.
(Please see pages 2 and 3.)
INSTRUCTIONS FOR USE OF THE MINI-PRO 1 or 2
YOUR MINI-PRO SHOULD INCLUDE: 1 sixteen-ounce bottle of PURE 2™,
1 VAC-SWEEP™ Kit, 1 Capstan Kit, 1 waste fl uid tray, and 1 small whisk.
ACCESSORIES FOR YOUR SYSTEM: DC1-L soft vinyl dust cover, DC2-L
smoked acrylic dust cover, 3-way adapter for 7” and 10” records, and NITTY GRITTY
Professional Grade Record Sleeves.
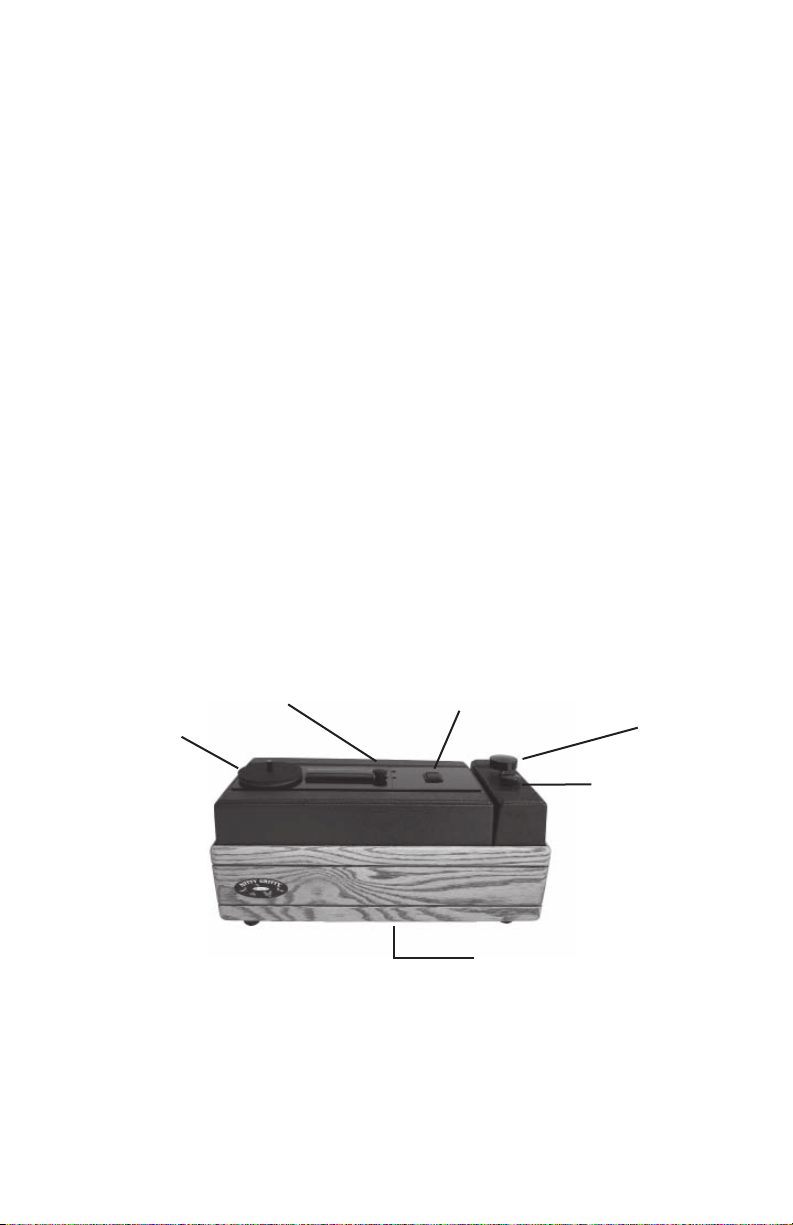
Record Platter
3 postition
on/off Switch Pump Button
DO NOT TWIST
Fluid Tank
Filler Cap
Upper Vacuum Arm
(Lift here)
Waste Fluid Tray

– 2 –
1. The record vacuum should NEVER be left on continuously — it is important
for the proper cooling of the motor to turn it off after each record cleaned.
2. NEVER pump fl uid when vacuum is on.
3. The NITTY GRITTY record cleaner should NEVER be used while its air vents
(on the bottom) are blocked — this is important for the proper cooling of the
motor.
4. For best results, use only PURE 2™ (included with your system) or PURE 1™
(for 78 RPMs), or PUREnzyme+ for all records. Other record cleaning fl uids
may not clean a record as well and may cause problems with the operation of
and/or seals in your machine.
5. Your NITTY GRITTY is made of wood and plastic. The plastic may be cleaned
with alcohol. The wood should be cleaned and polished as any fi ne wood.
Spilled record cleaning fl uid should be wiped up as soon as possible. The
suction head is made of Lexan. It may also be cleaned with alcohol.
6. The suction slot is lined with the VAC-SWEEP™. It is important to clean away
any dust or debris collected in the scrubbing fi bers. When the VAC-SWEEP is
dry, turn on the NITTY GRITTY vacuum and brush back and forth along the
suction slot with the whisk* provided for you on page 3 (do not brush when
the VAC-SWEEP is wet!). Debris will be sucked into the vacuum slot. If your
VAC-SWEEP becomes worn or damaged, a replacement is available from
your authorized dealer or from NITTY GRITTY. When applying your new VAC-
SWEEP, be sure to maintain a 1/16th inch gap at the suction slot. The effi ciency
of the vacuum will decrease, if the suction slot is blocked by the fi bers. DO NOT
use the cleaning machine without the VAC-SWEEP.
7. For the most effi cient vacuuming, be sure to empty the waste tray (on all models
except the 1.0/2.0 and Record Masters) often!
8. If the machine is to be stored or shipped, ALWAYS drain as much fl uid as
possible.
PLEASE READ BEFORE OPERATING YOUR RECORD
CLEANER (THESE INSTRUCTIONS APPLY TO ALL MODELS):
WARNING FOR ALL MODELS:
If cleaning several records in one session, your record cleaner may get quite
warm. To keep unit from overheating, clean no more than (10) records per
session, as per the instructions for you particular model. Allow unit to cool at
least 15-20 minutes before cleaning additional records. (Or you could set up a
fan, if necessary, to draw away excess heat.)
– 7 –
1. Remove the small fi ller cap from the fl uid tank, and fi ll the reservior with PURE
2. (DO NOT TWIST THE LARGER “PUMP BUTTON”!)
2. Before the initial use, prime the fl uid lines by pressing the plunger 20-25
times, or until you see fluid come through the front half of the
VAC-SWEEP (the injector holes are located across the front portion of the
vacuum slot only; once the record is positioned on the unit, fl uid will immediately
be distributed to the entire VAC-SWEEP).
3. Once you see fl uid on the VAC-SWEEP, spindle the record, inserting the edge
of the disc under the “lip” of the capstan rubber. (The capstan/drive shaft
assembly is spring-loaded and will fl ex away from the slot as you spindle the
record.) Press the plunger 3-4 more times to ensure saturation of the ‘’velvet
lips’’.
4. Turn on the drive (rotation) motor by pressing the 3-position switch away from
you (the record will rotate, but the vacuum will not come on). As the record
rotates 2–3 revolutions, hundreds of the Vac-Sweep’s fi bers will scrub the
grooves.
5. Once the fl uid application is complete, press down on the front edge of the
3-position switch. The vacuum will come on, and the record continues to rotate.
(NEVER PUMP FLUID WHEN VACUUM IS ON!) Fluid and debris will
now be drawn from deep within the grooves. Allow the record to rotate 3–5
revolutions, to assure complete removal of the fl uid. Repeat steps 3-5 for second
side.
6. To empty the waste fl uid, slide out tray located on the underside of the machine.
(Please see pages 2 and 3.)
INSTRUCTIONS FOR USE OF THE MODEL 1.5Fi Mk2
or 2.5Fi Mk2
YOUR SYSTEM SHOULD INCLUDE: 1 sixteen-ounce bottle of PURE 2™,
1 waste fl uid tray, and 1 small whisk.
ACCESSORIES FOR YOUR SYSTEM: DC1-L soft vinyl dust cover, DC2-L
acrylic dust cover, 3-way adapter for 7” and 10” records, NITTY GRITTY Professional
Grade Record Sleeves, VAC-SWEEP™ Replacement Kit, Capstan Replacement Kit.
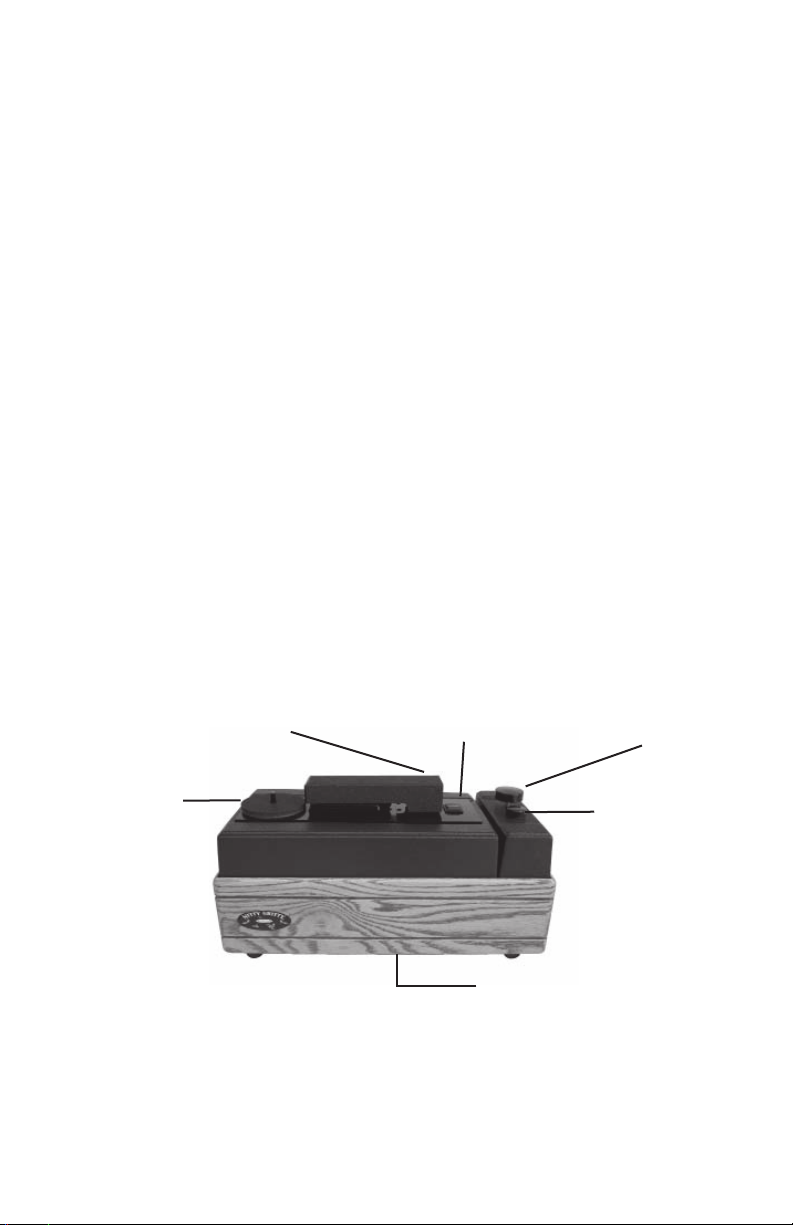
Record Platter
3 postition
on/off Switch Pump Button
DO NOT TWIST
Fluid Tank
Filler Cap
Capstan Record Drive
Waste Fluid Tray

– 3 –
RECOMMENDATION:
For the best results, clean a record immediately before playing it. This will insure
the record’s grooves against the attraction of airborne dust, accidental fi nger
grease, and incidental static charge. The cleaning process perfectly prepares
a record for playing.
After cleaning a record, it is recommended that you store it in a high-grade inner
sleeve, designed to protect it from dust, grease, abrasion, and static charge (LP
inner sleeves are available from NITTY GRITTY in packs of 50, 100, and 500).
NOTE FOR UNITS WITH AUTOMATIC ROTATION:
If capstan is too low to accommodate thicker records, adjust as follows:
A. Remove (2) small round caps from switch plate.
B. Insert 1/8” Phillips screwdriver through holes to adjuster screws below (down
about 1-1/2”).
C. Turn both screws clockwise approximately 1/4 turn to raise the height of the
capstan.
*Whisk for Cleaning Vac-SweepTM (Vacuum Slot Liner)
– 6 –
1. Before spindling the record, generously apply Pure 2 to the VAC-SWEEP
fi bers.
2. Spindle the record, inserting the edge of the disc under the “lip” of the capstan
rubber. (The capstan/drive shaft assembly is spring-loaded and will fl ex away
from the slot as you spindle the record.)
3. Turn on the drive (rotation) motor by pressing the 3-position switch away from
you (the record will rotate, but the vacuum will not come on). As the record
rotates 2–3 revolutions, hundreds of the Vac-Sweep’s fi bers will scrub the
grooves.
4. Once the fl uid application is complete, press down on the front edge of the
3-position switch. The vacuum will come on, and the record continues to rotate.
Fluid and debris will now be drawn from deep within the grooves. Allow the
record to rotate 3–5 revolutions, to assure complete removal of the fl uid. Repeat
steps1-4 for second side (or scrub both sides at once using a wet hand-held
brush on top, then fl ip the record to vacuum the second side).
5. To empty the waste fl uid, slide out tray located on the underside of the machine.
(Please see pages 2 and 3.)
INSTRUCTIONS FOR USE OF THE MODEL 1.5 or 2.5
YOUR SYSTEM SHOULD INCLUDE: 1 four-ounce bottle of PURE 2™,
1 waste fl uid tray, and 1 small whisk.
ACCESSORIES FOR YOUR SYSTEM: DC1 soft vinyl dust cover, DC2
smoked acrylic dust cover, 7” record adapter (or 3-way adapter for 7” and 10”
records), NITTY GRITTY Professional Grade Record Sleeves, VAC-SWEEP™
Replacement Kit, Capstan Replacement Kit.
Record Platter
VAC-SWEEP Lips
4oz bottle of
PURE 2
on/off Switch
Capstan Record Drive
Waste Fluid Tray

– 4 –
1. First, apply a liberal amount of record cleaning fl uid to the fi bers of the VAC-
SWEEP (“velvet” slot liner); then, spindle the record and record turner.
2. Apply fl uid generously across the grooved section of the disc and/or to the fl uid
applicator (Record Cleaning Brush). As you rotate the record with the turner,
brush back and forth in the direction of the grooves. As you scrub the
top side of the disc, the underside is getting scrubbed, as well. (If you prefer
additional scrubbing of the lower grooves, fl ip the record over and repeat the
procedure…no need to add additional fl uid.)
3. Once the scrub cycle is completed, turn on the vacuum motor and slowly
rotate the record over the vacuum slot. Three revolutions will dry the grooved
surface, as well as the VAC-SWEEP fi bers. Flip the record over and repeat the
vacuuming process on the second side.
4. Waste fl uid is collected in a tank inside the machine. It will usually evaporate
if just a few records are cleaned each day. However, with heavier use, you
may drain this tank by removing the black rubber stopper on the bottom of the
machine and placing a dish beneath the unit. (Please see pages 2 and 3.)
INSTRUCTIONS FOR USE OF THE MODEL 1.0 or 2.0
YOUR SYSTEM SHOULD INCLUDE: 1 “velvet” record cleaning brush,
1 four-ounce bottle of PURE 2™, 1 black plastic record turner, and 1 small whisk.
ACCESSORIES FOR YOUR SYSTEM: DC1 soft vinyl dust cover, DC2 smoked
acrylic dust cover, NITTY GRITTY Professional Grade Record Sleeves, VAC-
SWEEP™ Replacement Kit.
– 5 –
1. Before spindling the record, swivel the 45/78/LP selector arm so that the entire
vacuum slot is exposed. Apply a liberal amount of Pure 2 (or Pure 1 for 78s)
to the VAC-SWEEP fi bers, then spindle the record and record turner.
2. Apply fl uid generously across the grooved section of the disc and/or to the fl uid
applicator (Record Cleaning Brush). As you rotate the record with the turner,
brush back and forth in the direction of the grooves. As you scrub the
top side of the disc, the underside is getting scrubbed, as well. (If you prefer
additional scrubbing of the lower grooves, fl ip the record over and repeat the
procedure…no need to add additional fl uid.)
3. Once the scrub cycle is completed, position selector arm so that it covers the
exposed portion of the vacuum slot. Turn on the vacuum motor and slowly rotate
the record over the slot. Three revolutions will dry the grooved surface, as well
as the VAC-SWEEP fi bers. Flip the record over, and repeat the vacuuming
process on the second side.
4. Waste fl uid is collected in a tank inside the machine. It will usually evaporate
if just a few records are cleaned each day. However, with heavier use, you
may drain this tank by removing the black rubber stopper on the bottom of the
machine and placing a dish beneath the unit. (Please see pages 2 and 3.)
INSTRUCTIONS FOR USE OF RECORD MASTER 1 or 2
YOUR SYSTEM SHOULD INCLUDE: 1 “velvet” record cleaning brush,
1 four-ounce bottle of both PURE 2™and PURE 1™ (for 78s), 1 black plastic record
turner and 1 small whisk.
ACCESSORIES FOR YOUR SYSTEM: DC1 soft vinyl dust cover, DC2 smoked
acrylic dust cover, NITTY GRITTY Professional Grade Record Sleeves, VAC-
SWEEP™ Replacement Kit.
Record Turner
over the
Record Platter
Vacuum Slot
with
VAC-SWEEP
Record Brush and
4oz bottle of PURE 2
on/off Switch
Record Turner
over the
Record Platter
Vacuum Slot
with
VAC-SWEEP
Record Brush and
4oz bottle of PURE 2
on/off Switch
45/78/LP
Selector Arm

– 3 –
RECOMMENDATION:
For the best results, clean a record immediately before playing it. This will insure
the record’s grooves against the attraction of airborne dust, accidental fi nger
grease, and incidental static charge. The cleaning process perfectly prepares
a record for playing.
After cleaning a record, it is recommended that you store it in a high-grade inner
sleeve, designed to protect it from dust, grease, abrasion, and static charge (LP
inner sleeves are available from NITTY GRITTY in packs of 50, 100, and 500).
NOTE FOR UNITS WITH AUTOMATIC ROTATION:
If capstan is too low to accommodate thicker records, adjust as follows:
A. Remove (2) small round caps from switch plate.
B. Insert 1/8” Phillips screwdriver through holes to adjuster screws below (down
about 1-1/2”).
C. Turn both screws clockwise approximately 1/4 turn to raise the height of the
capstan.
*Whisk for Cleaning Vac-SweepTM (Vacuum Slot Liner)
– 6 –
1. Before spindling the record, generously apply Pure 2 to the VAC-SWEEP
fi bers.
2. Spindle the record, inserting the edge of the disc under the “lip” of the capstan
rubber. (The capstan/drive shaft assembly is spring-loaded and will fl ex away
from the slot as you spindle the record.)
3. Turn on the drive (rotation) motor by pressing the 3-position switch away from
you (the record will rotate, but the vacuum will not come on). As the record
rotates 2–3 revolutions, hundreds of the Vac-Sweep’s fi bers will scrub the
grooves.
4. Once the fl uid application is complete, press down on the front edge of the
3-position switch. The vacuum will come on, and the record continues to rotate.
Fluid and debris will now be drawn from deep within the grooves. Allow the
record to rotate 3–5 revolutions, to assure complete removal of the fl uid. Repeat
steps1-4 for second side (or scrub both sides at once using a wet hand-held
brush on top, then fl ip the record to vacuum the second side).
5. To empty the waste fl uid, slide out tray located on the underside of the machine.
(Please see pages 2 and 3.)
INSTRUCTIONS FOR USE OF THE MODEL 1.5 or 2.5
YOUR SYSTEM SHOULD INCLUDE: 1 four-ounce bottle of PURE 2™,
1 waste fl uid tray, and 1 small whisk.
ACCESSORIES FOR YOUR SYSTEM: DC1 soft vinyl dust cover, DC2
smoked acrylic dust cover, 7” record adapter (or 3-way adapter for 7” and 10”
records), NITTY GRITTY Professional Grade Record Sleeves, VAC-SWEEP™
Replacement Kit, Capstan Replacement Kit.
Record Platter
VAC-SWEEP Lips
4oz bottle of
PURE 2
on/off Switch
Capstan Record Drive
Waste Fluid Tray
– 2 –
1. The record vacuum should NEVER be left on continuously — it is important
for the proper cooling of the motor to turn it off after each record cleaned.
2. NEVER pump fl uid when vacuum is on.
3. The NITTY GRITTY record cleaner should NEVER be used while its air vents
(on the bottom) are blocked — this is important for the proper cooling of the
motor.
4. For best results, use only PURE 2™ (included with your system) or PURE 1™
(for 78 RPMs), or PUREnzyme+ for all records. Other record cleaning fl uids
may not clean a record as well and may cause problems with the operation of
and/or seals in your machine.
5. Your NITTY GRITTY is made of wood and plastic. The plastic may be cleaned
with alcohol. The wood should be cleaned and polished as any fi ne wood.
Spilled record cleaning fl uid should be wiped up as soon as possible. The
suction head is made of Lexan. It may also be cleaned with alcohol.
6. The suction slot is lined with the VAC-SWEEP™. It is important to clean away
any dust or debris collected in the scrubbing fi bers. When the VAC-SWEEP is
dry, turn on the NITTY GRITTY vacuum and brush back and forth along the
suction slot with the whisk* provided for you on page 3 (do not brush when
the VAC-SWEEP is wet!). Debris will be sucked into the vacuum slot. If your
VAC-SWEEP becomes worn or damaged, a replacement is available from
your authorized dealer or from NITTY GRITTY. When applying your new VAC-
SWEEP, be sure to maintain a 1/16th inch gap at the suction slot. The effi ciency
of the vacuum will decrease, if the suction slot is blocked by the fi bers. DO NOT
use the cleaning machine without the VAC-SWEEP.
7. For the most effi cient vacuuming, be sure to empty the waste tray (on all models
except the 1.0/2.0 and Record Masters) often!
8. If the machine is to be stored or shipped, ALWAYS drain as much fl uid as
possible.
PLEASE READ BEFORE OPERATING YOUR RECORD
CLEANER (THESE INSTRUCTIONS APPLY TO ALL MODELS):
WARNING FOR ALL MODELS:
If cleaning several records in one session, your record cleaner may get quite
warm. To keep unit from overheating, clean no more than (10) records per
session, as per the instructions for you particular model. Allow unit to cool at
least 15-20 minutes before cleaning additional records. (Or you could set up a
fan, if necessary, to draw away excess heat.)
– 7 –
1. Remove the small fi ller cap from the fl uid tank, and fi ll the reservior with PURE
2. (DO NOT TWIST THE LARGER “PUMP BUTTON”!)
2. Before the initial use, prime the fl uid lines by pressing the plunger 20-25
times, or until you see fluid come through the front half of the
VAC-SWEEP (the injector holes are located across the front portion of the
vacuum slot only; once the record is positioned on the unit, fl uid will immediately
be distributed to the entire VAC-SWEEP).
3. Once you see fl uid on the VAC-SWEEP, spindle the record, inserting the edge
of the disc under the “lip” of the capstan rubber. (The capstan/drive shaft
assembly is spring-loaded and will fl ex away from the slot as you spindle the
record.) Press the plunger 3-4 more times to ensure saturation of the ‘’velvet
lips’’.
4. Turn on the drive (rotation) motor by pressing the 3-position switch away from
you (the record will rotate, but the vacuum will not come on). As the record
rotates 2–3 revolutions, hundreds of the Vac-Sweep’s fi bers will scrub the
grooves.
5. Once the fl uid application is complete, press down on the front edge of the
3-position switch. The vacuum will come on, and the record continues to rotate.
(NEVER PUMP FLUID WHEN VACUUM IS ON!) Fluid and debris will
now be drawn from deep within the grooves. Allow the record to rotate 3–5
revolutions, to assure complete removal of the fl uid. Repeat steps 3-5 for second
side.
6. To empty the waste fl uid, slide out tray located on the underside of the machine.
(Please see pages 2 and 3.)
INSTRUCTIONS FOR USE OF THE MODEL 1.5Fi Mk2
or 2.5Fi Mk2
YOUR SYSTEM SHOULD INCLUDE: 1 sixteen-ounce bottle of PURE 2™,
1 waste fl uid tray, and 1 small whisk.
ACCESSORIES FOR YOUR SYSTEM: DC1-L soft vinyl dust cover, DC2-L
acrylic dust cover, 3-way adapter for 7” and 10” records, NITTY GRITTY Professional
Grade Record Sleeves, VAC-SWEEP™ Replacement Kit, Capstan Replacement Kit.
Record Platter
3 postition
on/off Switch Pump Button
DO NOT TWIST
Fluid Tank
Filler Cap
Capstan Record Drive
Waste Fluid Tray
CONGRATULATIONS!
You have just purchased what may become
the single most important component for your
sound system! In joining the ranks of the Library
of Congress, the Smithsonian, the Kennedy
Library, not to mention countless schools,
libraries, record collectors and audiophiles
worldwide, you will now have the opportunity
to hear your records as they were meant to be
heard — sweet music without the surface noise
you thought you just had to endure. You will be
preserving your valuable record collection, as
well as extending the life of your stylus, in the
one brief minute it takes to clean a record. So,
bask in the reverie and swoon to the music,t’cuz
your records never had it so good!
– 1 –– 8 –
1. Remove the small fi ller cap from the fl uid tank, and fi ll the reservoir with PURE
2. (DO NOT TWIST THE LARGER “PUMP BUTTON”!)
2. Your Mini-Pro is equipped with an upper and lower suction slot. The upper
slot is mounted in the arm, which pivots horizontally to allow for positioning of
the record. Lift the arm slightly (from the end nearest the power switch) and
pivot it away from the lower slot. Spindle the record, inserting the edge of the
disc under the “lip” of the capstan rubber. (The capstan/drive shaft assembly
is spring-loaded and will fl ex away from the slot as you spindle the record.)
Return the arm to its original position and lower it to the record.
3. Feed the cleaning fl uid to the velvet-like VAC-SWEEP by pumping the larger
button up and down 20-25 times to prime the pump. (Once fl uid lines are primed,
only 8-12 “pumps” will be necessary to wet the VAC-SWEEP.) Cleaning fl uid
will now be injected onto both sides of the disc.
4. Turn on the drive (rotation) motor by pressing the 3-position switch away from
you (the record will rotate, but the vacuum will not come on). As the record
rotates 2–3 revolutions, hundreds of the Vac-Sweep’s fi bers will scrub the
grooves.
5. Once the fl uid application is complete, press down on the front edge of the
3-position switch. The vacuum will come on, and the record continues to rotate.
(NEVER PUMP FLUID WHEN VACUUM IS ON!) Fluid and debris will now
be drawn from deep within the grooves. Allow the record to rotate 5 revolutions,
to assure complete removal of the fl uid.
6. To empty waste fl uid, slide out tray located on the underside of the machine.
(Please see pages 2 and 3.)
INSTRUCTIONS FOR USE OF THE MINI-PRO 1 or 2
YOUR MINI-PRO SHOULD INCLUDE: 1 sixteen-ounce bottle of PURE 2™,
1 VAC-SWEEP™ Kit, 1 Capstan Kit, 1 waste fl uid tray, and 1 small whisk.
ACCESSORIES FOR YOUR SYSTEM: DC1-L soft vinyl dust cover, DC2-L
smoked acrylic dust cover, 3-way adapter for 7” and 10” records, and NITTY GRITTY
Professional Grade Record Sleeves.
Record Platter
3 postition
on/off Switch Pump Button
DO NOT TWIST
Fluid Tank
Filler Cap
Upper Vacuum Arm
(Lift here)
Waste Fluid Tray

See inside back cover for NITTY GRITTY warranty information.
YOUR MODEL INFORMATION
MODEL # _________________________________________________
SERIAL # _________________________________________________
DATE PURCHASED ________________________________________
PURCHASED FROM _______________________________________
LIMITED WARRANTY:
NITTY GRITTY will repair any part of the NITTY
GRITTY record cleaning system (except the velvet
vacuum slot liners and the rubber drive wheel), which has
a defect in materials or workmanship, within a period of
one year from the date of purchase. The velvet vacuum
slot liner (VAC-SWEEP™) and the rubber drive wheel
(capstan) are warrantied for a period of 90 days. NITTY
GRITTY accepts no liability for the misuse of this device.
The warranty for commercial, industrial, and rental users
is limited to 90 days from the date of purchase. A COPY
OF THE SALES RECEIPT MUST ACCOMPANY ALL
WARRANTY REPAIRS. The warranty is not transferrable.
The use of cleaning fl uids other than PURE 1™, PURE 2™
or PUREnzyme+™ may invalidate the warranty.

OWNER’S
MANUAL
FOR ALL MODELS
OF RECORD CLEANERS
NITTY GRITTY RECORD CARE PRODUCTS, INC.
4650 Arrow Hwy. • Ste. #F-4 • Montclair, CA 91763
Sales: (909) 625-5525 • Service: (909) 621-9666
Fax: (909) 625-5526
www.nittygrittyinc.com
Rev. 10/16
This manual suits for next models
9
Table of contents
Popular Ultrasonic Jewelry Cleaner manuals by other brands


Dentsply Sirona
Dentsply Sirona Resurge Directions for use

Kränzle
Kränzle Round Cleaner UFO light Operating manual with spare parts list

Practical Systems, Inc.
Practical Systems, Inc. Futura CD-2800 operating instructions

aidapt
aidapt VR278B manual

Fakir
Fakir RCT 108 Turbo instruction manual

Static Clean
Static Clean PV Particle Vac manual