Nixie Dream 4 Tube Clock V1.00 IN-14 User manual

Nixie Dream 4 Tube Clock IN-14 V1.00 Operation Manual
Nixie Dream 4 Tube Clock V1.00 IN-14
Operation Manual
Software Version 1.00
Revision 08.07.2021
This document is copyrighted. No parts of this documentation may be used commercially.

Nixie Dream 4 Tube Clock IN-14 V1.00 Operation Manual
FOR YOUR SAFETY –PLEASE READ CAREFULLY FIRST.
Don’t open the enclosure when the clock is powered up. Danger! Anode voltage of 170 Volts exists on
the board. Do not operate the clock with damaged or removed tubes. Beware of hard impacts. Use the
clock only in a dry environment. Don’t expose the clock to moisture or rain. Don’t expose the clock
near heat sources or cover the clock. This clock is not a children’s toy. Now when you are aware of the
safety precautions we can proceed with the most interesting part.
Close adult supervision is necessary when any
product is used by or near children.
Do not operate any product with a damaged electrical
cord or plug or operate it after the appliance
malfunctions or has been damaged in any manner.
Do not use the product close to any heat sources
such as radiators, heat registers, stoves, or other
products that produce heat.
Do not let the power cord come in contact with hot
surfaces.
If you notice any smoke or scorched smell near the
product, unplug the power cord and refer to qualified
personnel for service and/or repair.
Do not use or place any combustible or flammable
substances near the product.
To electrically disconnect the product remove
the electrical power plug from the socket-
outlet.
Do not place heavy articles on or step on the
product.
Do not place the product on an unstable cart,
stand, tripod or table.
Do not use this product for other than intended
use.
This product is only intended for use indoors.
This product is not waterproof.
Do not immerse this product in water and/or
expose to dripping or splashing water.
When this product is left unattended and
unused for long period of time, unplug it from
the wall outlet.
Nixie Dream 4 Tube Clock IN-14 V1.00 Operation Manual
FIRST START AND SELF CHECK
Plug in the power connector of the supplied power adapter to the socket on the backside of the clock.
The clock will shortly beep indicating its firmware is run successfully and run the “Tube Test Mode”.
This mode is intended to let you see if all the tubes are working correctly by cycling through the digits
00:00 to 99:99.
After the test is completed the clock will turn into its normal operation “Clock Mode” and show a
default time.
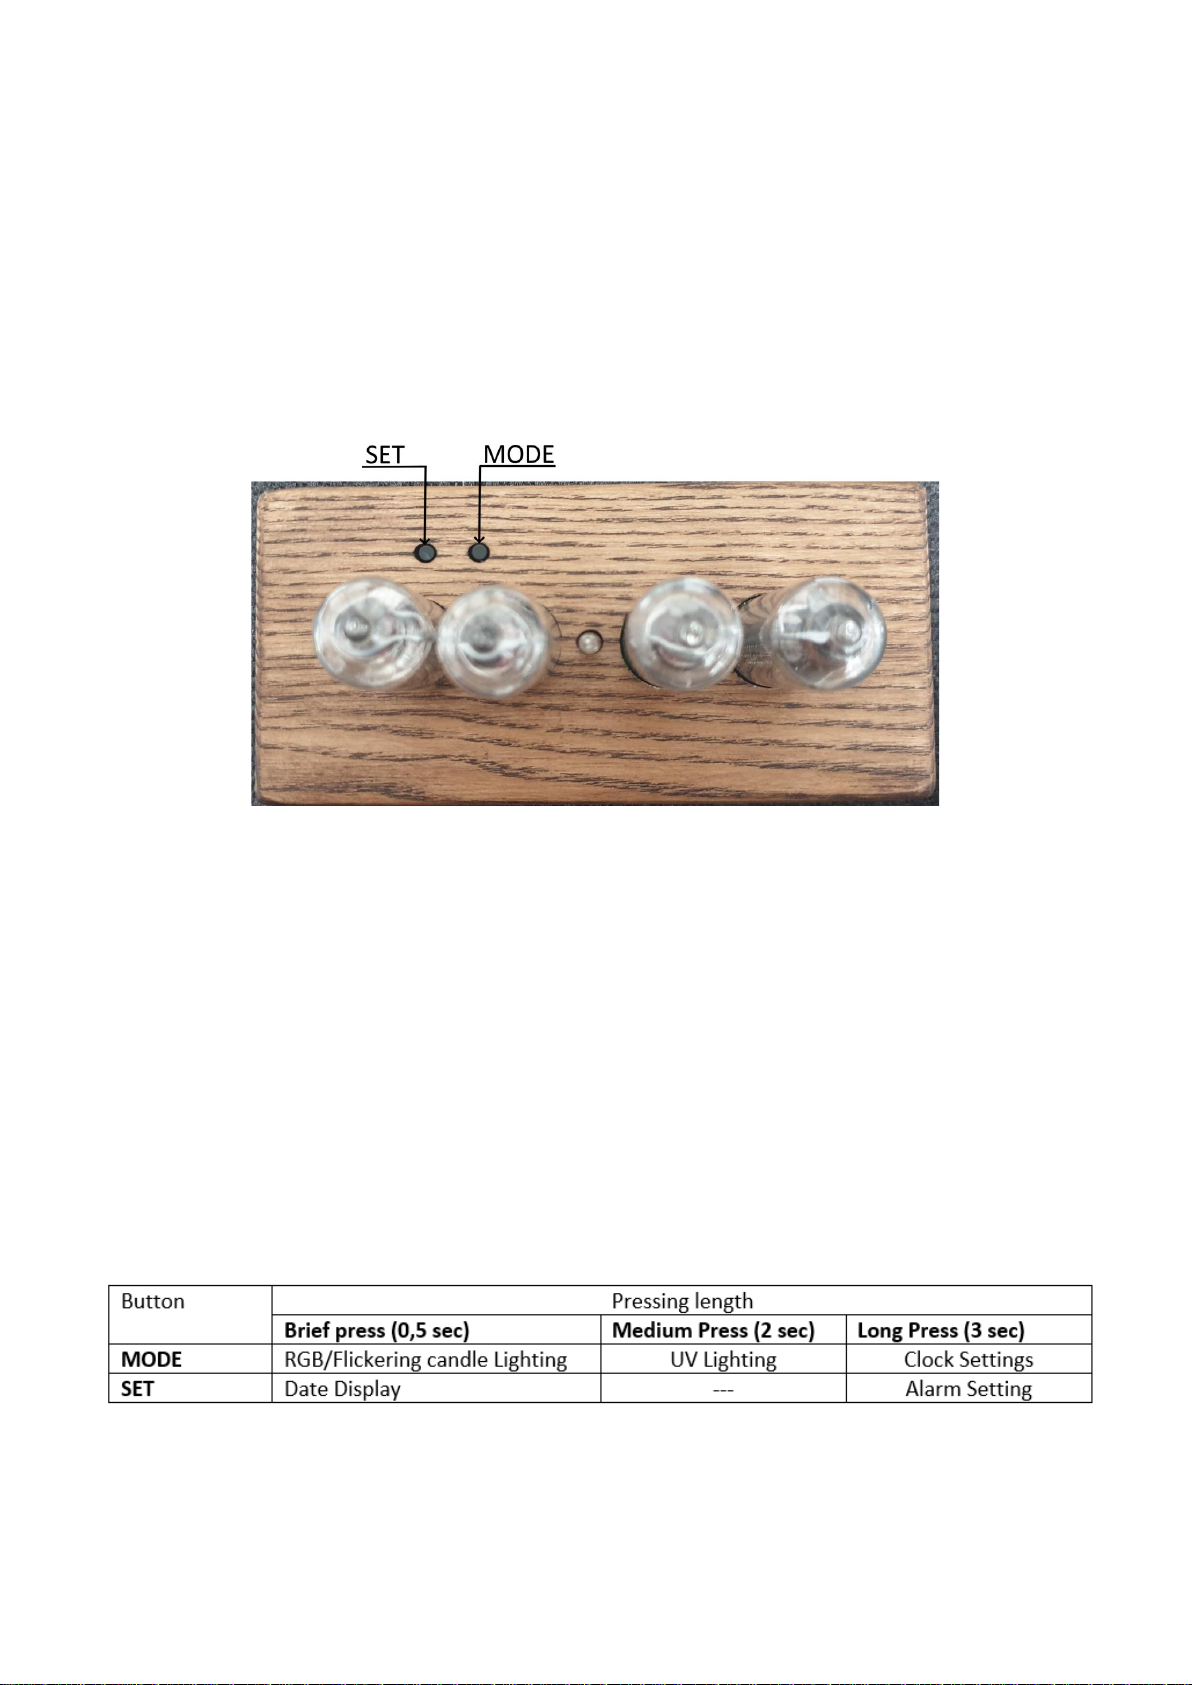
CLOCK BUTTON’S FUNCTION
Core clock settings are carried with two buttons located on the rear left side of the upper part of the
casing. Alternatively, the clocks settings can be carried out with the supplied IR remote control plus
the remote control is used for operational options, e.g., activating tube’s lighting, changing nixie
effects, etc. For all remote-control functions please refer to the REMORE CONTROL section in this
manual.
Normally the clock is always in “Clock Mode” showing the time. If you press buttons for differing lengths,
different things will happen. MODE button has three functions, SET button has two functions, please
see the table below for details.

Nixie Dream 4 Tube Clock IN-14 V1.00 Operation Manual
MODE BUTTON
“Brief Press” of MODE button (less than 1 second, you will hear a single short beep): lets you switch
between different underneath tubes lightings. Press it repeatedly to cycle through RGB lighting and
‘Flickering Candle’ effect. In RGB mode the colours are changing automatically. When RGB lighting is
active, every next button press will stop the colours changing and keep the selected colour.
“Medium Press” of MODE button (more than 1 second, you will hear a second short beep) will switch
on/ off the UV (ultraviolet) tubes lighting. To switch it off just repeat perform the medium press again.
“Long Press” of MODE button (more than 3 seconds, you will hear a single long beep), will enter the
clock settings.
SET BUTTON
“Brief Press” of SET butting (less than 1 second): a date will be shown for 4 seconds. This is useful if you
want to know the date.
“Long Press” of SET button (more than 3 seconds, you will hear a single long beep), will enter the clock
alarm mode. Please refer to the SETTING THE CLOCK ALARM SECTION in this manual for more
information.
SETTING THE CLOCK
When in settings mode, pressing and releasing the SET Button will advance the parameter to move onto
the next one. Active parameter will be highlighted, while others will be dimmed. Pressing the MODE
button changes the value of the active parameter.
When you finish going through all the parameters, the clock returns to normal time display mode.
Clock’s parameters are grouped into ‘pages’, one so called page consists of four tubes, where a particular
parameter(s) is shown within a pair of tubes. Parameters are explained in the manual on a page basis.
IMPORTANT: In the below sections first digit represent the menu page, the second, the pair of tubes,
the third the tube in the pair.
For example, 1.1 means 1st menu page and first pair of tubes. Another example: 1.2 means 1st menu
page and 2nd pair of tubes.
And some final examples: 8.2.1 means the 8th menu page, the second pair of tubes, first tube in this pair,
8.2.2 means the second pair of tubes, second tube in this pair.

Nixie Dream 4 Tube Clock IN-14 V1.00 Operation Manual
TIP: All the settings ale located from page 3 to page 15. Clock alarm setting are located on page 1 and 2.
That is why when you enter the clock settings it will start with page 3. Just before showing specific
parameters, a page number is shown for 0,5 seconds for your reference.
Let’s get started now.
To enter the setting mode, press the MODE button for around 3 seconds until you hear a long beep,
then release the button. You can jump now directly to the page 3 in this manual.
To enter the alarm setting mode, press the SET button for around 3 seconds until you hear a long beep,
then release the button. Press the SET button repeatedly until the desired hours’ time for the alarm is
set. Press the MODE button to move to the alarm minutes setting. Press the SET button repeatedly until
the desired minutes time for the alarm is set. Press the MODE button to move to the alarm on/off
setting.
MENU PAGE 1
1.1 ALARM HOURS:
The hours tubes light up bright, and the MINUTES are dimmed. Press the SET button repeatedly until
the correct HOURS are shown. Press the MODE button to move to MINUTES.
1.2 ALARM MINUTES:
The hours tubes light up bright, and the MINUTES are dimmed. Press the SET button repeatedly until
the correct HOURS are shown. Press the MODE button to move to MINUTES. Press the MODE button
to move to the alarm on/off setting.
MENU PAGE 2
Press the SET button repeatedly until the desired mode of the alarm is shown.
0: Alarm is ON
1: Alarm is OFF

Nixie Dream 4 Tube Clock IN-14 V1.00 Operation Manual
MENU PAGE 3
3.1 HOURS:
The hours tubes light up bright, and the MINUTES are dimmed. Press the SET button repeatedly until
the correct HOURS are shown. Press the MODE button to move to MINUTES.
3.2 MINUTES:
Now the HOURS are dimmed, and the MINUTES are bright. Press the SET button repeatedly until the
correct MINUTES are shown. When finished press the MODE button to move to SECONDS.
MENU PAGE 4
4.2 SECONDS:
Press the SET button, to reset SECONDS to zero. Press the MODE button to toggle to the next DATE
setting page.
MENU PAGE 5
DATE:
5.1 DAY: The DAY light up bright, since they are being set, and the MONTH and YEAR are dimmed.
Press the SET button repeatedly until the correct DAY is shown. Press the MODE button to move to
MONTH.
5.2 MONTH: Now the DAY and YEAR are dimmed, and the MONTH is bright. Press the SET button
repeatedly until the correct MONTH is shown. When finished press the MODE button to move to
YEAR.
MENU PAGE 6
6.2 YEAR: Press the SET button repeatedly until the correct YEAR is shown. Press the MODE button to
toggle to the WEEKDAY setting page.
MENU PAGE 7
7.2 WEEKDAY setting:
Press the SET button repeatedly until the correct WEEKDAY is shown.

Nixie Dream 4 Tube Clock IN-14 V1.00 Operation Manual
Congrats! You are done now with the basic setting. You can leave the other settings as it is if having
time and date set is sufficient for you. The clock will return into its normal mode after a while.
Or if you would like to explore all other settings of the clock, press the MODE button to move to the
next page with other parameters.
MENU PAGE 8
8.1 TIME/DATE toggling interval
Press the SET button repeatedly until the desired time (in sec.) is shown when you would like the clock
to toggle to DATE and back to TIME. Press the MODE button to move to the next option.
8.2.1 TIME/DATE transition effect
Press the SET button repeatedly until the desired effect is selected. There are five different effects
available:
0. No effect, direct toggle
1. Fading. The DATE is faded out, the TIME is faded in.
2. Slot machine. All digits are shuffled while transitioning between the TIME and DATE.
3. Cross-fading. While the DATE is faded out, the TIME is faded in simultaneously.
4. Repeating all effects in a loop. Every time the effect is new.
Press the MODE button to move to the next parameter.
8.2.2 DATE format
Press the SET button repeatedly until the desired DATE format is shown. There are two formats:
DD:MM:YY or MM:DD:YY 0: DD:MM:YY 1: MM:DD:YY Press the MODE button to move to the next
option.
MENU PAGE 9
9.1 12/24 Time Format
Press the SET button repeatedly until the desired Time format is shown.

Nixie Dream 4 Tube Clock IN-14 V1.00 Operation Manual
Press the MODE button to move to the next option.
9.2.1 COLON effect
Press the SET button repeatedly until the desired COLON effect is shown. There are four effects:
0: Switched off
1: Frequent blinking
2: Normal blinking (1 Hz)
3: Constant lighting
Press the MODE button to move to the next option.
9.2.2 TIME change transition effect
Press the SET button repeatedly until the desired SECONDS switching effect is shown.
There are four effects for SECONDS:
0: Digits change instantly
1: Fading
2: Shuffling
3: Crossfading
4: Repeating all effects in a loop
Press the MODE button to move to the next option.
Auto-Dimmer
The clock has two dimmers: for evenings and nights. It can automatically adjust the brightness of the
tubes in relation to the light in the room using a built-in light sensor. Auto-dimming feature can extend
the lifespan of the tubes by 10-15 times.
For each dimmer you can setup the lighting level when you want the clock to reduce its brightness,
and what brightness should be than.
The ambient light is coming to the clock from its underneath semi-translucent cover. Please make sure
there are no objects around blocking the light.

Nixie Dream 4 Tube Clock IN-14 V1.00 Operation Manual
Explaining the Dimmer settings
MENU PAGE 10
10.1 Current light level in the room –the darker is in the room, the bigger the number displayed. E.g.,
when it is very light it can be around 25, while it is dark it can be around 60. The current light level is
shown to define the threshold more precisely.
10.2 Evening threshold
This parameter sets the level of the ambient light in the room (refer to the current level shown in the
1st pair of tubes) when the clock should decrease the brightness (e.g., in the evening)
For example, you would like the clock to decrease it brightness when the light level in the room is
below 40, then set this parameter to 40. When the level will go below 40, the clock will decrease its
brightness.
Press the SET button repeatedly until the desired threshold level for switching for the evening is
shown. The current light level in the room is shown in the 1st pair of tubes for your convenience.
TIP: It is better to setup it at a light level when you want the clock to decrease its brightness.
Press the MODE button to move to set the brightness level setting.

Nixie Dream 4 Tube Clock IN-14 V1.00 Operation Manual
MENU PAGE 11
Evening brightness
11.2 Press the SET button repeatedly until the desired tubes brightness level for the evening is shown.
The brightness is set in the range from 04 to 32. Where 32 is the maximum brightness, 04 –is the
minimum brightness.
Press the MODE button to move to the dimmer settings for the night.
MENU PAGE 12
12.1 Current light level in the room –the darker it is in the room, the bigger the number displayed.
E.g., when it is very light it can be around 25, when it is dark it can be around 60. The current light level
is shown to define the threshold more precisely.
12.2 Night threshold
This parameter sets the level of the ambient light in the room (refer to the current level shown in the
2nd pair of tubes) when the clock should decrease the brightness (e.g., in the evening)
For example, you would like the clock to decrease it brightness when the light level in the room is
below 60, then set this parameter to 60. When the level will go below 60, the clock will decrease its
brightness.
Press the SET button repeatedly until the desired threshold level for switching for the evening is
shown. The current light level in the room is shown in the middle tubes (6.2) for your convenience.
TIP: It is better to set this up at a light level when you want the clock to decrease its brightness.
Press the MODE button to move to set the brightness level setting.
MENU PAGE 13
Night brightness
13.1 Press the SET button repeatedly until the desired tubes brightness level for the night is shown.
The brightness is set in the range from 04 to 32. Where 32 is the maximum brightness, 04 –is the
minimum brightness.
Press the MODE button to move to the next option.

Nixie Dream 4 Tube Clock IN-14 V1.00 Operation Manual
MENU PAGE 14
Auto-Dimmer On/Off
14.2.1 Press the SET button repeatedly until the desired mode of the Auto-Dimmer is shown.
0: Auto-Dimming is ON
1: Auto-Dimming is OFF
MENU PAGE 15
Default tubes brightness (or normal brightness)
This setting allows you to adjust the normal brightness of the tubes.
15.2 Press the SET button repeatedly until the desired default level of the tube’s brightness is shown.
The default brightness is set in the range of 04-32. Where 32 is the maximum brightness, 04 –is the
minimum brightness.
TIP: We recommend keeping the default brightness at level in a range of 08-12.
Press MODE button to exit the MENU or wait for a minute –the clock will exit the MENU
automatically.
Congratulations, you are done now, and your clock is ready to use!
Nixie Dream 4 Tube Clock IN-14 V1.00 Operation Manual
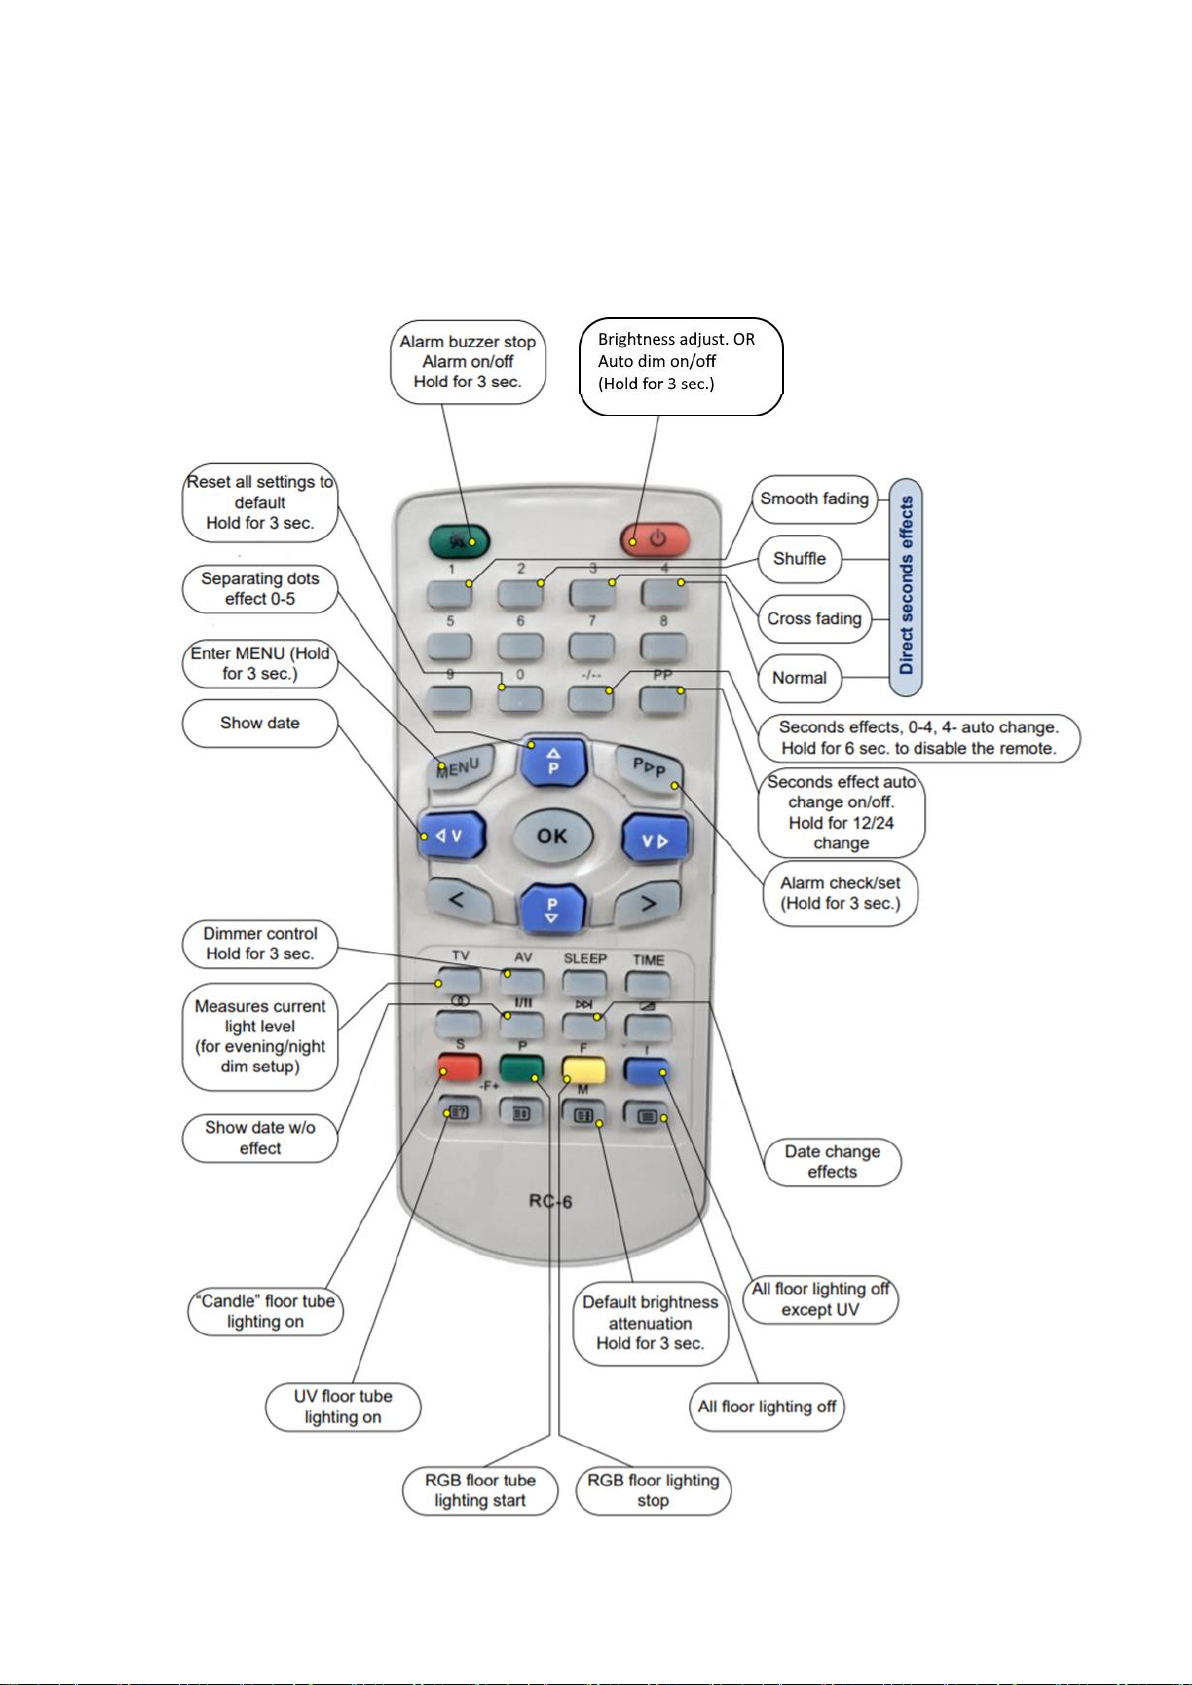
REMOTE CONTROL
With the IR Remote Control, you can control the tube’s underneath lighting, select a desired nixie
effect, see a current light level in the room and control some other features and settings. Please see
below all the functions of the remote control.
Nixie Dream 4 Tube Clock IN-14 V1.00 Operation Manual
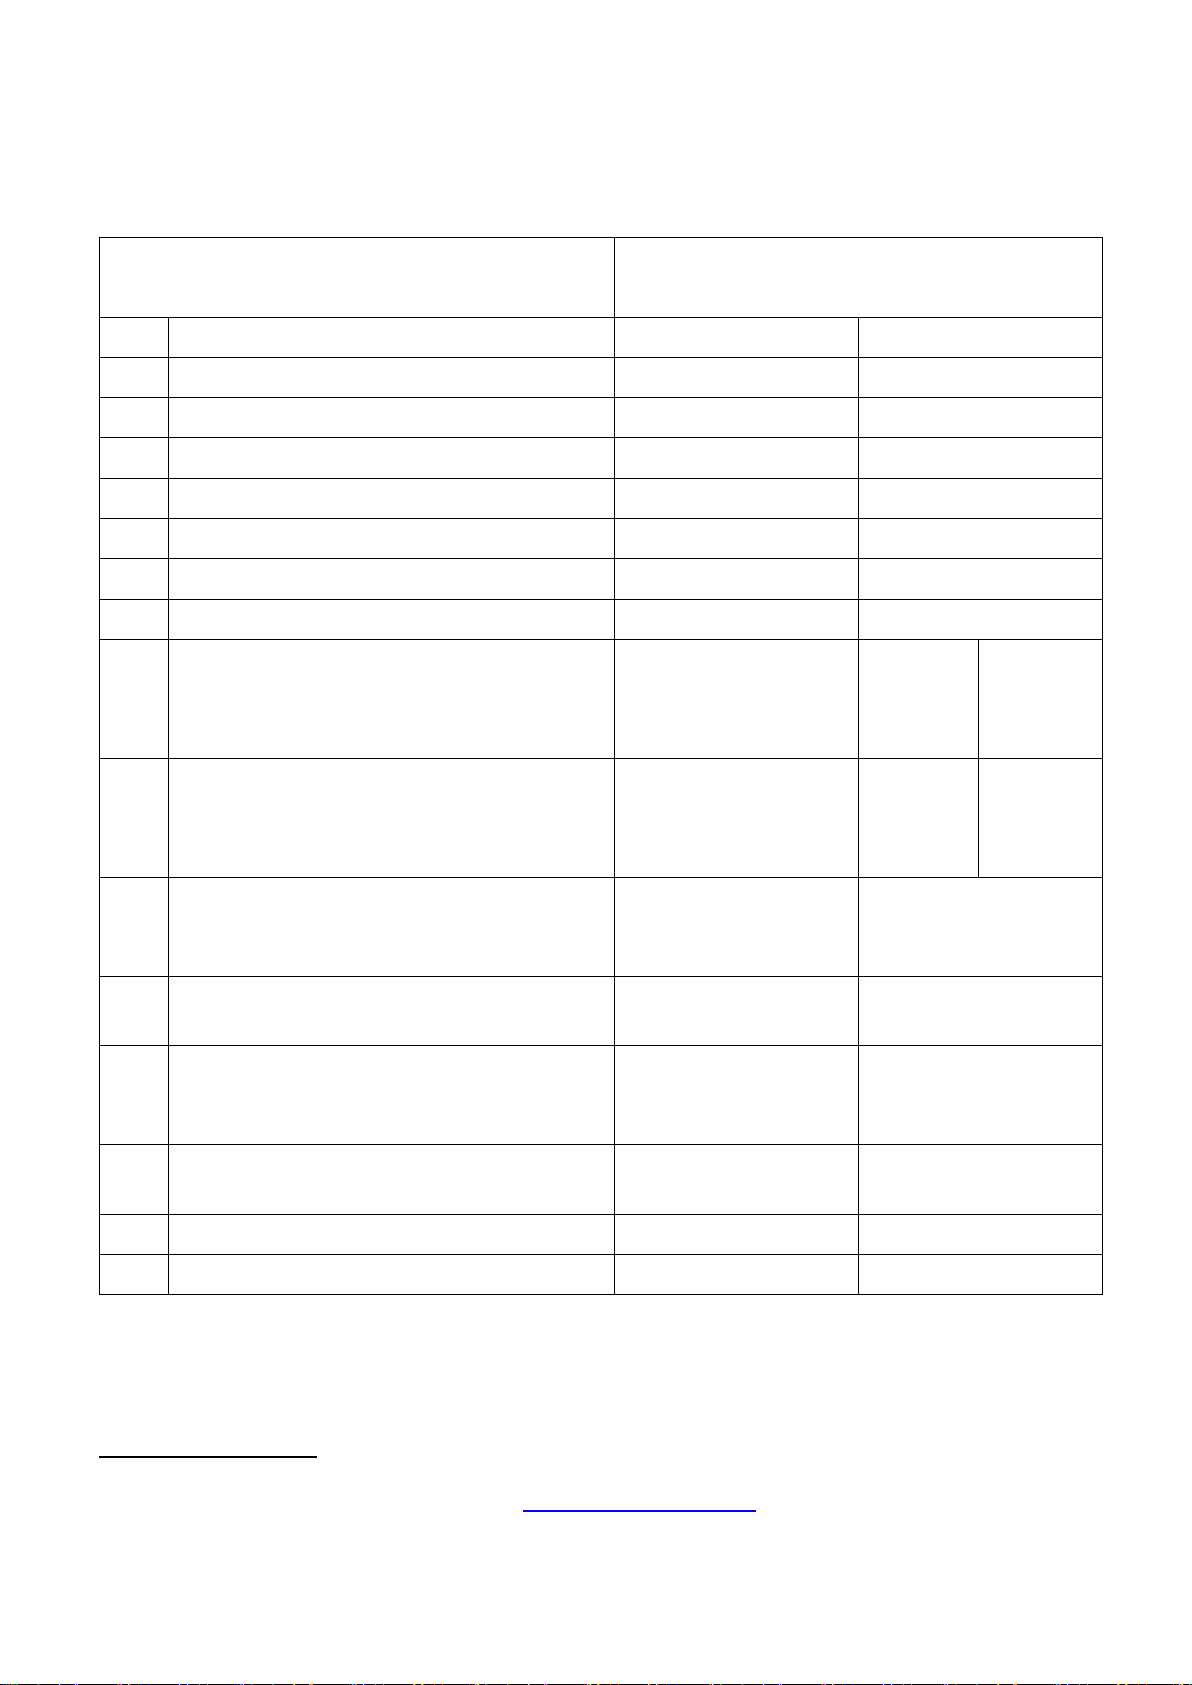
ALL CORE CLOCK’S SETTINGS
Page/ Setting
Parameter
Page
Setting
1st pair of tubes
2nd pair of tubes
1
Alarm Time
Minutes
Hours
2
Alarm On/Off
1/0
3
Clock Time
Minutes
Hours
4
Seconds
Seconds
5
Date
Day
Month
6
Year
Year
7
Weekday
1-7
8
8.1 TIME/DATE switch interval
8.2.1 TIME/DATE switch effect
8.2.2 DATE format (0=DDMM, 1=MMDD)
00-99
0-4
0/1
9
9.1 TIME format
9.2.1Colon mode: 0-off, 1-blinking, 3-on
9.2.2 TIME change effect
12/24
0-3
0-4
10
Auto-Dimmer Evening Light Level
Current Ambient Level
Evening Ambient Light
Level Threshold (10-
60)
11
Auto-Dimmer Evening Brightness
Evening Brightness
(04-32)
12
Auto-Dimmer Night Light Level
Current Ambient Level
Night Ambient Light
Level Threshold (10-
60)
13
Auto-Dimmer Night Brightness
Night Brightness (04-
32)
14
Auto-Dimmer on/off
0/1
15
Default tubes brightness
04-32
If you require any further support in setting up the clock, feel free to contact us at
Please also check our VFD clocks models at https://nixiedream.com

Nixie Dream 4 Tube Clock IN-14 V1.00 Operation Manual
Table of contents
Other Nixie Dream Clock manuals

Popular Clock manuals by other brands

Bodet
Bodet Profil 750 Installation and operation manual

Howard Miller
Howard Miller Seville instruction manual

Macma
Macma 4124006 instruction manual

Somogyi
Somogyi Home OC 02 instruction manual

La Crosse Technology
La Crosse Technology WT-3102 user manual

Explore Scientific
Explore Scientific RPW3009 instruction manual


