NIXON AF12BT User manual

Nixon
AF12BT
AM/FM Retro Radio with Bluetooth

Product Overview
Front View
1. STANDBY On/Off
2. FUNCTION
3. PAIR / SCAN
4. ST / MO
5. SNOOZE / DIM
6. MEM / CLOCK
7. ALARM 1
8. ALARM 2
9. VOLUME CONTROL
10. DISPLAY
11. TUNING KNOB
Rear View
1. AUX IN
- 3.5mm AUX IN socket for
connecting auxiliary devices.
2. DC IN 5V
- Connect the power adaptor
3. EXTERNAL ANTENNA
- Connect the optional dipole antenna
EN-1

Safety precaution
1. DO NOT place objects on top of the device, as objects
may scratch the device.
2. DO NOT expose the device to dirty or dusty environments.
3. DO NOT place the device on an uneven or unstable
surface.
4. DO NOT insert any foreign objects into the device.
5. DO NOT expose the device to strong magnetic or
electrical field.
6. DO NOT expose the device to direct sunlight as it can
damage the device. Keep it away from heat sources.
7. DO NOT store your device in temperatures higher than
40°C(104°F). The internal operating temperature for this
device is from 20°C(68°F) to 60°C(140°F).
8. DO NOT use the device in the rain.
9. Please check with your Local Authority or retailer for
proper disposal of electronic products.
EN-2

10. The device and adaptor may product some heat during
normal operation of charging. To prevent discomfort or injury
from heat exposure, DO NOT leave the device on your lap.
11. POWER INPUT RATING: Refer to the rating label on the
device and be sure that the power adaptor complies with the
rating. Only use accessories specified by the manufacturer.
12. Clean the device with a soft cloth. If needed, dampen the
cloth slightly before cleaning. Never use abrasives or
cleaning solutions.
13. Always power off the device to install or remove external
devices that do not support hot-plug.
14. Disconnect the device from an electrical outlet and
power off before cleaning the device.
15. DO NOT disassemble the device. Only a certified service
technician should perform repair.
16. The device has apertures to disperse heat. DO NOT
block the device ventilation, the device may become hot and
malfunction as a result.
17. PLUGGABLE EQUIPMENT: the socket-outlet shall be
installed near the equipment and shall be easily accessible.
EN-3
Connecting the Power
Electrical Power

Connect the power adapter (included) to the 5V DC Socket on the back of the radio,
plug the adapter into a wall socket and switch on.
Setting the Clock
1. The first time you plug in your radio the clock will display "0:00.” Follow these
instructions to set the clock manually.
2. Press and hold the MEM/ CLOCK button until you see 12/24 Hr flashing on
display.
3. Turn the TUNE knob to select 12 hours or 24 hour clock, and press MEM/ CLOCK
to confirm.
4. Turn the TUNE knob to set hour and press MEM/ CLOCK to confirm.
5. Turn the TUNE knob to set minute and press MEM/ CLOCK to confirm.
6. The radio contains an internal circuit to retain the set time for about 10 minutes
should you relocate the radio or experience a temporary power failure.
Setting the Alarms
Your radio has 2 alarms that you can set to wake you up with a buzzer or music from
the radio. The volume level can also be set.
Setting Alarm Volume Level
To set the volume level you hear when the alarm sounds:
1. Turn the radio ON and set the volume level (for example, volume level “10”).
2. Press the Standby button to turn off the radio
3. The volume level last used will be the level heard when the alarm sounds.

EN-4
Setting alarm 1
1. Make sure your radio is switched to Standby mode.
2. Press the ALARM 1 button. The icon ‘Alarm 1’ will be displayed.
3. Tune the TUNE knob to select the hour you would like the alarm to switch on.
4. Press the ALARM 1 button.
5. Tune the TUNE knob to select the time in minutes for the alarm time setting.
6. Press the ALARM 1 button.
7. Press the ALARM 1 button to select the source you want to wake up to Buzzer or
Radio FM.
8. This icon as radio and alarm bell symbol will also be displayed with
number 1 next to it.
Setting alarm 2
• Press the ALARM 2 button, and then repeat the instructions above.
Reviewing the alarm setting
• Press the ALARM 1 or 2 button repeatedly to review the setting.
Cancelling and deactivate the alarm
• Press Alarm 1 or 2 repeatedly until the icon and alarm bell symbol
disappears.
•Press the SNOOZE button to stop the alarm temporarily, the alarm will stop and
ring up again after 9 minutes.
•Press STANDBY button to deactivate the alarm sound.
SLEEP to Music
1. Select your desired mode to be used by the sleep function.
2. Press SLEEP button, the "SLEEP" lights up and the device will go to sleep mode.
3. By pressing SLEEP button to select the desired sleep time (90 - 80 - 70 ...... -10
minutes)
Dimming the display
Your radio has 3 backlighting levels for main display. Press the SNOOZE/DIM
button to select the clock backlighting dimming level you desire.

EN-5
Bluetooth operation
You can listen to tracks from a media device if it is connected to the radio via
Bluetooth®. To connect your device to the radio via Bluetooth®, follow the steps
below:
1. While the radio is on, press FUNCTION button a few times until you see the [ BT ]
icon flashing.
2. This radio will begin automatically activate Bluetooth pairing while the [ BT ] icon
is flashing. When successfully paired the [ BT ] icon will remain steady.
3. Use your Bluetooth device to search for the radio. You should see “AF12BT”.
Enter password "0000" if required. When connected, the [ BT ] icon will stop
flashing and remain steady.
Note: When the radio has found the last paired Bluetooth device, it will connect
automatically.
4. Manual Pairing: Press and hold PAIR/SCAN button for 3 seconds. You should
now see the device ID# AF12BT on your Bluetooth device. The Bluetooth
operating range for the radio is about 10 meters without obstruction. Walls,
structures and the other objects may affect the Bluetooth range.
Listening to an Auxiliary Devices
Connect your auxiliary device to the 3.5mm AUX IN socket on the back of the radio.
An auxiliary device could be a MP3 player, a CD Player, personal computer, etc.
Adjust the volume on the device to ensure proper amplification by the radio without
distortion.
Playing music
1. Press the FUNCTION button to select AUX mode.
2. Set the auxiliary device to play. You may need to adjust the volume levels on
both devices.

EN-6
Listening to the AM/ FM radio
- For AM reception, the radio has a built-in antenna so the telescopic antenna is not
needed. Turning the radio may help improve reception.
- For optimal FM reception, fully extend the attached telescopic antenna and adjust
its position.
- You may also connect the included “t-shaped” dipole wire antenna to the rear
F-terminal for improved reception of distant signals. Changing the direction of
the dipole antenna can improve reception.
- You can store a maximum of 20 radio stations.
1. Press the FUNCTION button to select the AM or FM mode.
2. Press the PAIR/ SCAN button. The radio will automatically start searching for radio
stations. When a station is found it will stop searching and you will hear the
station.
Stereo/Mono reception in FM
You can set your radio to switch between stereo and mono reception.
Press and hold ST / MO button in 1 second, "ST" will show on display and receiving
stereo.
Press and hold ST / MO button in 1 second again to disable stereo reception. The
"ST" icon will be removed.
Storing radio stations
You can store up to 20 radio stations in your radio’s memory.
1. Search for a station you want to store and then press MEM/CLOCK button.
2. Display will show "P01" and then press MEM/CLOCK button to preset a channel
number.
3. When you have stored stations, to listen to them press the MEM/CLOCK button
for the station
EN-7
Maintenance
Problem
Solution
No Sound
Adjust the volume control, Check mode to ensure it
is set to the desired mode (AM, FM, BT, AUX)
Static Sound
Signal reception is too low. Adjust the antenna or
move the radio to a stronger signal location.
Sound is distorted
Volume is too high. Adjust the volume control.
Desired station not found
Weak signal. Use the Manual Tune function. Try
external antenna (FM).
Bluetooth device not
detected
Have you selected the correct SEARCH mode on your
Bluetooth device? Has the Bluetooth icon been
correctly selected on Franklin radio? Have you
pressed and held PAIRING on the product you are
pairing with the radio? Is another device already
paired with the radio? Have you found “Franklin FR-1”
on your Bluetooth device and then selected “pair with
this device” Does your Bluetooth device support
A2DP connection?
The display is blank
Radio unplugged or power is off at the wall outlet.
Alarm didn’t sound
Check the alarm is set; the alarm icon will be
displayed when it is set.
Adjust the alarm volume it may be set too low.
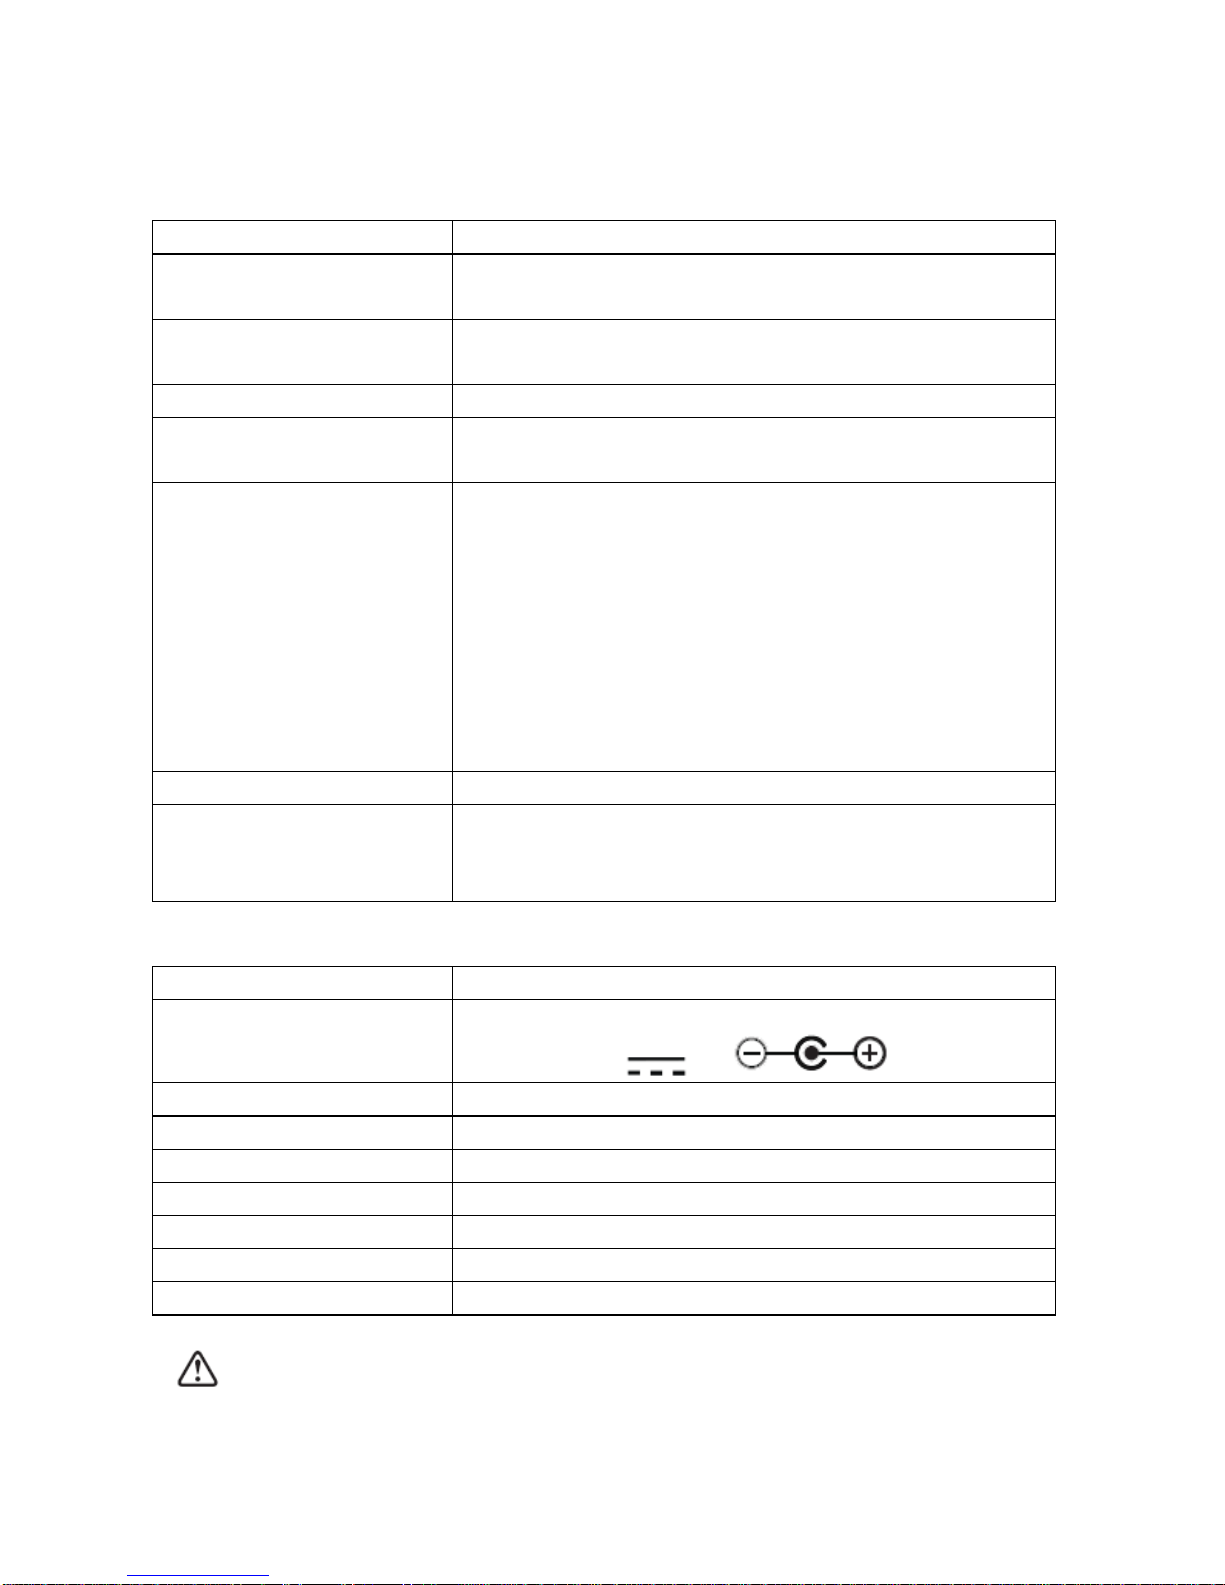
Specifications
Model
Franklin FR-1
Wall Power Adaptor
Input AC 100-240V~50/60Hz
Output DC 5V 2A
Power consumption
14 W
Power Output
2x3W RMS
Radio Frequency
AM 520 -1620 kHz
FM 87.5 -108 MHz
Bluetooth
V2.1+EDR, support A2DP and AVRCP profile
Country of origin
Made in China
Ensure the radio is fully unplugged from the wall outlet before servicing.
Note: This radio is not user-serviceable. Service should be performed only by a
qualified service technician.
Features and specifications are subject to change without prior notice.

EN-8
Safety Warnings
• Read all instructions carefully before use and retain them for future reference.
• Use only the power supply provided with the radio.
Damage
• Please inspect the radio for damage after unpacking.
• Do not continue to operate the radio if you are in doubt about it working normally,
or if it is damaged in any way –turn the switch off, remove the wall power
adapter and consult your dealer.
Location of Radio
• The radio must be placed on a flat stable surface and not subjected to vibrations.
• Do not place the radio on sloped or unstable surfaces where it may fall or tip over.
• The wall outlet must be located near the radio and should be easily accessible.
• For indoor use only. Do not expose the radio to rain or splashing water.
Temperature
• Avoid temperature extremes either too hot or cold. Place the radio well away
from heat sources such as radiators or gas / electric fires.
• Avoid exposure to direct sunlight and other sources of heat.
Naked Flames
•Never place any type of candle or naked flame on the top of or near the radio.
Moisture
• To reduce the risk of fire, electric shock or product damage, do not expose this
radio to rain, moisture, or splashing water. No objects filled with liquids, such as
vases, should be placed on the radio.
• If you spill any liquid into the product, it can cause serious damage. Turn off the
radio, remove the wall power adapter immediately and consult your dealer.
Ventilation
• To prevent the risk of electric shock or fire hazard due to overheating ensure that
curtains and other materials do not obstruct the ventilation vents.
• A minimum distance of 5cm around the product should be maintained to allow for
sufficient ventilation.
•Do not install or place this product in a bookcase, built-in cabinet or in another
confined space. Ensure the radio is well ventilated.
Safety
• Always disconnect the product from the wall power adaptor before connecting /

disconnecting other devices or moving the radio.
EN-9
• Unplug the power adaptor from the wall outlet during a lightning storm.
• In the interests of safety and to avoid unnecessary energy consumption, never
leave the radio switched on while unattended for long periods of time, e.g.
overnight, while on holiday or while out of the house. Switch it off and disconnect
the power adaptor from the wall outlet.
Power Adapter Cable
• Make sure the radio is not resting on top of the wall power adapter cable, as
the weight of the product may damage the cable and create a safety hazard.
Interference
• Do not place the radio on or near appliances which may cause electromagnetic
interference, such as computers, power supplies, sound bars and other
electronics. If you do, it may adversely affect the working of the radio, and
cause distorted sound.
Cautions
•No open flame sources, such as lighted candles, should be placed on the radio.
Supervision
•Children should be supervised to ensure that they do not play with the product.
•Never let anyone especially children push anything into the holes, slots or any
other openings in the case - this could result in a fatal electric shock.
FCC Part 15 Notice
This equipment generates, uses, and can radiate radio frequency energy and, if not
installed and used in accordance with the manufacturer's instruction manual, may
cause interference with radio and television reception.
This device complies with Part 15 of the FCC Rules.
Operation is subject to the following two conditions:
1) This device may not cause harmful interference.
2) This device must accept any interference received, including interference that
may cause undesired operation.
This equipment complies with the FCC RF radiation exposure limits set forth for an
uncontrolled environment. This equipment should be installed and operated with
a minimum distance of 20 centimeters between the radiator and your body.

EN-10
Changes or modifications not expressly approved by the party responsible for compliance
could void the user’s authority to operate the equipment.
This equipment has been tested and found to comply with the limits for a Class B digital
device, pursuant to part 15 of the FCC Rules. These limits are designed to provide
reasonable protection against harmful interference in a residential installation. This
equipment generates, uses and can radi-ate radio frequency energy and, if not in-stalled
and used in accordance with the instructions, may cause harmful interference to radio
communications. However, there is no guarantee that interference will not occur in a
particular installation. If this equipment does cause harmful interference to radio or
television reception, which can be determined by turning the equipment off and on, the
user is encouraged to try to correct the interference by one or more of the following
measures:
—Reorient or relocate the receiving antenna.
—Increase the separation between the equipment and receiver.
—Connect the equipment into an outlet on a circuit different from that to which the
receiver is connected.
—Consult the dealer or an experienced radio/ TV technician for help.
Table of contents


