Nixplay Signage 1 Series User manual

English •Deutsch •Italiano •Français •Español
Nixplay Signage Cloud Display Series 1
(8”, 10.1”, 13.3”and 17.1”)
Quick Start Guide


1
1.1 Box Contents
IT Nixplay Signage IT Alimentazione elettrica
e adattatori
IT Telecomando
ES Nixplay Signage ES Fuente de alimentación y
adaptadores
ES Mando a distancia
DE Nixplay Signage DE Netzgerät und Adapter DE Fernbedienung
EN Nixplay Signage EN Power Supply and
Adaptors
EN Remote Control
FR Nixplay Signage FR Source d’alimentation et
adaptateurs
FR Télécommande

B
C
1.2 Overview
A
IT Lato Anteriore del Dispositivo/Lato Posteriore
del Dispositivo
ES Parte Delantera del Dispositivo/Parte
Trasera del Dispositivo
DE Gerätefront/Geräterückseite
EN Front of Signage/Back of Signage
AMotion Sensor
Senses movement and turns the Digital Frame on and off when standby mode has been congured.
FR Au dos de l’appareil/L’avant de l’appareil
ASensore di movimento
Rileva il movimento e attiva e disattiva il dispositivo
quando è congurata la modalità standby.
B
C
Altavoces integrados
Supporto per cavi
Supporto per cavi regolabile e adattatore di corrente
CC-in
ASensor de movimiento
Detecta el movimiento y enciende y apaga el
dispositivo cuando se congura el modo en espera.
B
C
Altavoces integrados
Cable de soporte
Cable de soporte ajustable y transformador de
corriente DC-in
ABewegungssensor
Erkennt Bewegung und schaltet das Gerät automatisch
an oder aus, wenn dieser im Standby-Modus ist.
B
C
Einbaulautsprecher
Kabelständer
Einstellbarer Kabelständer und Netzteil DC IN
B
C
Built in Speakers
Cable Stand
Adjustable cable stand and Power Adaptor DC-in
ACapteur de mouvement
Détecte les mouvements et allume et éteint l’appareil
lorsque le mode Standby est conguré.
B
C
Haut-parleurs intégrés
Support de câble
Support de câble réglable et adaptateur CC-in

E
D
G
F
JIH
1.3 Remote Control
Infrared Transmitter
On / Off
Display Playlists
Back
Navigation Menu
(Volume Control - UP/DOWN)
Select / Play / Pause
Settings
D
E
F
H
G
I
J
EN Remote Control
D
E
F
H
G
I
J
IT Telecomando
Trasmettitore a infrarossi
Acceso / spento
Presentazione
Indietro
Menu Navigazione
(Volume - SU/GIU)
Seleziona / Play / Pausa
Impostazioni
D
E
F
H
G
I
J
ES Mando a distancia
Emisora de infrarrojos
Encender/ Apagar
Presentación
Atrás
Menú de navegación
(Volumen - ARRIBA/ABAJO)
Seleccionar / Reproducir / Pausa
Conguración
D
E
F
H
G
I
J
DE Fernbedienung
Infrarot-Sender
Ein / Aus
Diashow
Zurück
Navigationsmenü
(Lautstärkeregler - OBEN/UNTEN)
Auswahl / Wiedergabe / Pause
Einstellungen
D
E
F
H
G
I
J
FR Télécommande
Émetteur infrarouge
Marche / arrêt
Diaporama
Retour
Menu de Navigation
(Volume - HAUT/BAS)
Sélectionner / Lecture / Pause
Paramètres

1.4 Signage Orientation : Cable Stand
1) 2)
EN
FRDE
ESIT
Signage can be adjusted for different viewing angles. Adjust to your preferred angle by positioning
the frame in either 1) portrait or 2) landscape orientation. Bend the power cable to stand and to
support the signage.
Positions de l’appareil : Support de câble
On peut régler l’appareil par des angles de
vue divers. Réglez votre angle préféré en le
positionnant avec l’orientation 1) verticale ou
2) horizontale. Pliez le câble d’alimentation en
positionnant et soutenir l’appareil.
Ausrichtung des Geräts: Kabelständer
Das Gerät kann für verschiedene
Betrachtungswinkel eingestellt werden. Stellen
Sie es in Ihrem bevorzugten Betrachtungswinkel
auf, indem Sie es entweder im 1) Hochformat
oder 2) Querformat positionieren. Biegen Sie
das Netzkabel, um das Gerät aufzustellen und
zu stützen.
Posiciones del dispositivo: Cable de soporte
El dispositivo puede ajustarse para modicar
el ángulo de visualización. Colóquelo en
posición 1) vertical o 2) horizontal, según su
elección. Doble el cable para que se sirva de
soporte al dispositivo.
Posizioni del dispositivo: Supporto per cavi
Il dispositivo può essere regolato per diversi
angoli di visione. Regola il tuo angolo preferito
posizionandolo con orientazione 1) verticale o
2) orizzontale. Piega il cavo di alimentazione per
posizionare e sostenerlo.

EN
FRDE
ESIT
Signage Set-up
Plug in the Power Adaptor to your signage. Then plug the cable into a power source.
Paramètres de l’appareil
Branchez l’adaptateur à l’appareil. Branchez
ensuite le câble à une prise de courant.
Einstellungen des Geräts
Verbinden Sie das Netzteil mit dem Gerät.
Stecken Sie danach den Adapter in die
Steckdose.
Conguración del dispositivo
Conecte el transformador de corriente al
dispositivo. Después, conecte el cable a un
enchufe.
Impostazione del dispositivo
Inserisci l’adattatore nel dispositivo. Inserisci il
cavo in una fonte di alimentazione.
1.5 Signage Set-up
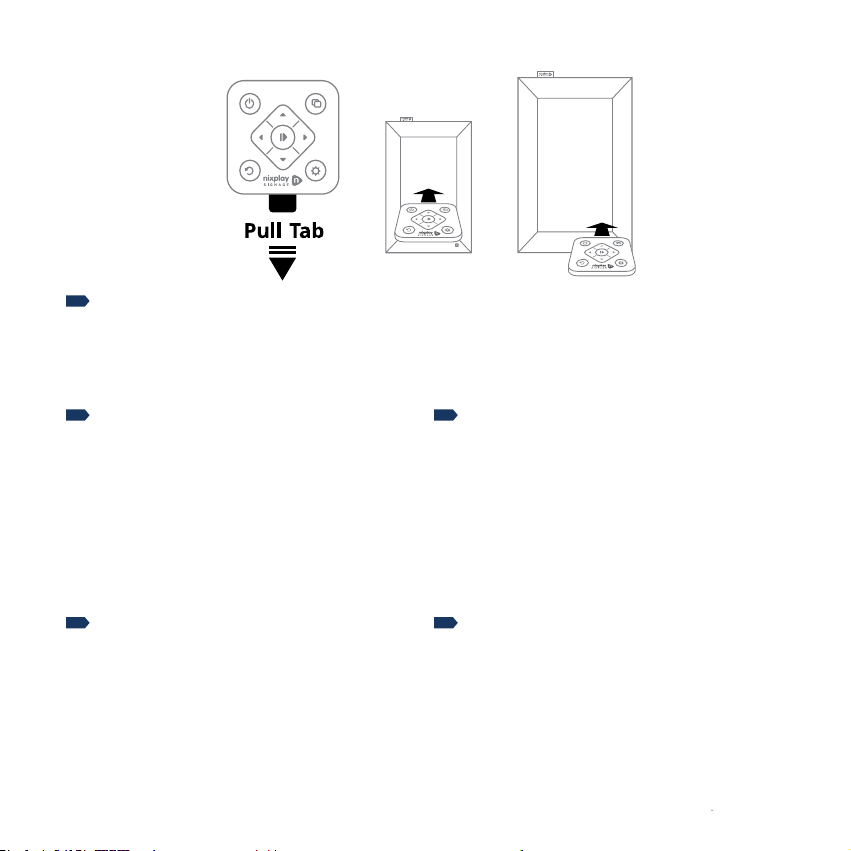
EN
FRDE
ESIT
Once powered on, the Nixplay Signage will load and you will be greeted by the Main Menu screen.
Remove the plastic tab from your Remote.
To control the activity of the signage, point the remote control as shown, towards the Infra-red
Receiver.
à commencer
Lorsque l’appareil est mis sous tension, il se
charge et l’écran du menu principal apparaît.
Télécommande
Retirez la languette en plastique de votre
télécommande.
Pour contrôler l’activité de l’appareil, dirigez
la télécommande tel qu’indiqué vers le
récepteur infrarouge
Erste Schritte
Nach dem Einschalten werden Sie bei dem
Hauptmenü begrüßt.
Fernbedienung
Entfernen Sie die Kunststofasche aus der
Fernbedienung.
Um das Gerät zu steuern, richten Sie die
Fernbedienung wie auf den Infrarotsensor
dargestellt.
Primeros pasos
Al encender, se iniciará y verá la pantalla del
Menú principal.
Mando a distancia
Extraiga la tira de plástico del mando a
distancia.
Para controlar la actividad del dispositivo,
apunte el mando a distancia tal como se
muestra, hacia el receptor infrarrojo.
Come iniziare
Ad accendere, verrà visualizzata la schermata del
Menu principale.
Telecomando
Rimuovi la linguetta di plastica dal telecomando
Per controllare l’attivita del dispositivo, puntare
il telecomando como mostrato, verso il ricevitori
a infrarossi.
13”/17”
8”/10”
1.6 Getting Started

8”/10”
13”/17”
Welcome
Let’s get started Welcome
Let’s get started
2
EN
FRDE
ESIT
A welcome message will appear on the screen. Using the remote, press to continue.
Un message de bienvenue s’afche à l’écran.
À l’aide de la télécommande, appuyez sur
pour continuer.
Auf dem Gerät erscheint eine
Begrüßungsnachricht. Drücken Sie in der
Fernbedienung auf, um fortzufahren.
Un mensaje de bienvenida va a aparecer en la
pantalla. Pulse en el mando a distancia para
continuar.
Un messaggio di benvenuto apparirà sullo
schermo. Utilizzando il telecomando, premi
per continuare.

3
Wi-Fi Setup
Please select
your WiFi network
EN
FRDE
ESIT
If you want to connect Nixplay Signage to Wi-Fi, use the remote and select your Wi-Fi network, enter
the associated Wi-Fi password and select ‘Connect’.
En utilisant la télécommande, sélectionnez
votre réseau Wi-Fi, saisissez le mot de passe
de votre réseau Wi-Fi et sélectionnez Se
connecter (Connect).
Wählen Sie Ihr WLAN-Netzwerk mit der
Fernbedienung, und dann geben Sie das
WLAN-Passwort ein und wählen Sie Verbinden
(Connect) aus.
Utilizando el mando a distancia, seleccione
una red Wi-Fi, introduzca la contraseña y
seleccione conectar (Connect).
Seleziona la rete Wi-Fi con il telecomando,
inserisci la password del WiFi e seleziona
Connetti (Connect).

EN
FRDE
ESIT
Once your signage is connected to Wi-Fi, follow the screen display.
Visit www.nixplaysignage.com/setup using a desktop or laptop to create your Nixplay account or log
in to pair this signage to an existing account.
Une fois connecté au réseau Wi-Fi, suivez
l’afchage à l’écran.
Visitez www.nixplaysignage.com/setup sur
votre ordinateur de bureau ou portable pour
créer votre compte Nixplay ou pour apparier
l’appareil à un compte existant.
Al conectarse al internet, siga las
instrucciones en la pantalla.
Visite www.nixplaysignage.com/setup en su
ordenador para crear una cuenta Nixplay o
para acceder a una cuenta existente.
Bei der Verbindung mit dem WLAN, folgen Sie
der Bildschirmanzeige.
Besuchen Sie www.nixplaysignage.com/setup
auf einem PC oder Laptop, um Ihr persönliches
Nixplay-Konto zu erstellen, oder melden Sie
sich an, um das Gerät mit einem bestehenden
Konto zu verbinden.
Ad collegare al Wi-Fi, segui le indicazioni sullo
schermo.
Visita www.nixplaysignage.com/setup da un
computer sso o portatile per creare un conto
Nixplay oppure per accedere ad un conto
esistente.
SIGN UP
LOG IN
OR
Visit
nixplaysignage.com/setup
using a desktop or a laptop
and follow the instructions
on your screen.

Changes or modications not expressly approved by the party responsible for compliance could void the user’s authority to
operate the equipment.
This equipment has been tested and found to comply with the limits for a Class B digital device, pursuant to Part 15 of the
FCC Rules. These limits are designed to provide reasonable protection against harmful interference in a residential installation.
This equipment generates, uses and can radiate radio frequency energy and, if not installed and used in accordance with the
instructions, may cause harmful interference to radio communications. However, there is no guarantee that interference will not
occur in a particular installation. If this equipment does cause harmful interference to radio or television reception, which can be
determined by turning the equipment off and on, the user is encouraged to try to correct the interference by one or more of the
following measures:
Reorient or relocate the receiving antenna.
Increase the separation between the equipment and receiver.
Connect the equipment into an outlet on a circuit different from that to which the receiver is connected.
Consult the dealer or an experienced radio/TV technician for help.
USB port only supports USB stick. It cannot be used for charging or other purposes.
This equipment must be installed and operated in accordance with provided instructions and the antenna(s) used for this
transmitter must be installed to provide a separation distance of at least 20 cm from all persons and must not be co-located or
operating in conjunction with any other antenna(s) or transmitter.
End-users and installers must be provided with antenna(s) installation instructions and transmitter operating conditions for
satisfying RF exposure compliance.
A Friendly FCC Compliance Notication
Warning:

This device contains licence-exempt transmitter(s)/receiver(s) that comply with Innovation, Science and Economic Development
Canada’s licence-exempt RSS(s). Operation is subject to the following two conditions:
1 This device may not cause interference.
2 This device must accept any interference, including interference that may cause undesired operation of the device.
This equipment complies with IC RSS-102 radiation exposure limits set forth for an uncontrolled environment. This transmitter
must not be co-located or operating in conjunction with any other antenna or transmitter.
This equipment complies with FCC/IC RSS-102 radiation exposure limits set forth for an uncontrolled environment. This
equipment should be installed and operated with minimum distance 20cm between the radiator & your body.
L’émetteur/récepteur exempt de licence contenu dans le présent appareil est conforme aux CNR d’Innovation, Sciences et
Développement économique Canada applicables aux appareils radio exempts de licence. L’exploitation est autorisée aux deux
conditions suivantes :
1 L’appareil ne doit pas produire de brouillage;
2 L’appareil doit accepter tout brouillage radioélectrique subi, même si le brouillage est susceptible d’en compromettre le
fonctionnement.
Ce matériel est conforme aux limites de dose d’exposition aux rayonnements ic rss-102 énoncées pour un autre environnement.
cet émetteur ne doit pas être situées ou opérant conjointement avec toute autre antenne ou l’émetteur.
Ce matériel est conforme aux limites de dose d’exposition aux rayonnements, FCC / CNR-102 énoncée dans un autre
environnement.cette eqipment devrait être installé et exploité avec distance minimale de 20 entre le radiateur et votre corps.
IC Compliance Notication / Conformité aux normes IC
Warning:
Avertissement:

Nixplay Ofcial YouTube
EN
FR
DE
ES
IT
Nixplay Ofcial tutorial videos are available to
watch on our Nixplay YouTube channel:
Nixplay Ofcial Tutorial-Videos sind auf unserem
Nixplay YouTube-Kanal zu sehen:
Un video tutorial di Nixplay Ofcial sono disponibili
sul canale YouTube Nixplay:
Des vidéos de tutoriel Nixplay Ofcial peuvent être
visionnées sur la chaîne YouTube de Nixplay :
Están disponibles unas guías de vídeo en nuestro
canal de Nixplay en YouTube.

support.nixplaysignage.com
EN
FR
DE
ES
IT
Have a question? Need help?
Visit support.nixplay.com
Haben Sie eine Frage? Brauchen Sie Hilfe?
Besuchen Sie support.nixplay.com
Hai una domanda? Hai bisogno di aiuto?
Visita support.nixplay.com
Avez vous des questions? Avez vous besoin d’assistance?
Visitez support.nixplay.com
Tienes una pregunta? Necesita ayuda?
Visita support.nixplay.com

V.1
www.nixplaysignage.com
support.nixplaysignage.com
support@nixplaysignage.com
Table of contents


