Noaton AC 5110 User manual

INSTRUCTIONS
Noaton AC 5110.
Local air conditioner

Read these instructions Before any kind of use, please read the relevant section of
this owner’s manual
At the end of its service life, this product may not be disposed of with other
household waste, but must be taken to a collection point designated for recycling
electrical appliances.
This product complies with valid EU and other regulations.
The appliance contains fluorinated greenhouse gases included in the Kyoto Protocol that are
hermetically sealed in the cooling system.

3
Contents
Safety instructions................................................................................................................................... 4
General principles.................................................................................................................................... 5
Cooling principles of the air conditioner................................................................................................. 5
Technical specifications........................................................................................................................... 5
Product description................................................................................................................................. 6
Control panel........................................................................................................................................... 7
Power on/off button (POWER)............................................................................................................ 7
Mode change button (MODE)............................................................................................................. 7
Timer button (TIMER).......................................................................................................................... 7
Fan speed button (SPEED)................................................................................................................... 8
Sleep mode button (SLEEP)................................................................................................................. 8
Dehumidification button (DEHUM) and connection of the hose........................................................ 8
Remote control........................................................................................................................................ 8
Overview of modes ................................................................................................................................. 9
Cooling mode (COOL).......................................................................................................................... 9
SMART mode....................................................................................................................................... 9
Fan mode (FAN)................................................................................................................................... 9
Attaching the hose and mounting the air-tight bracket (for sliding windows only)............................. 10
Connecting the air hose and the adapter.......................................................................................... 10
Mounting the adjustable air-tight bracket into the window (5)....................................................... 11
Mounting the sliding air-tight bracket –an overview....................................................................... 12
Cleaning and storage............................................................................................................................. 13
Error messages on the display............................................................................................................... 13
Troubleshooting .................................................................................................................................... 14
Product fiche ......................................................................................................................................... 15

4
Safety instructions
WARNING
This portable air conditioner may not be used in areas in which the following conditions apply
-Potentially explosive places
-Aggressive environments
-Areas containing high concentrations of solvents
-Places with extremely high levels of dust
Protect against children: To prevent possible injury, do not allow children to play with this
appliance or around it. In your absence, ensure that the appliance remains out of the reach of
children.
Ensure appliance is properly earthed: Always use the appliance with an earthing plug and an
earthing socket. An earthing plug is an important safety feature that helps reduce the risk of
electric shock or fire.
Protect the power cable against damage: Never use an appliance with a damaged power
cable, since this may cause a risk of electric shock or fire. If the power supply cable is
damaged, it must be replaced by an experienced service technician with another cable of a
similar type and rated current.
Extension cables: Extension cables must be earthed and able to supply the appropriate
voltage to the unit.
Careful handling: Do not throw the air conditioner; do not allow it to fall from any height; and
do not allow it to impact against other objects or people. Unsuitable handling may damage
the appliance’s components or electrical connection and may therefore result in conditions
that may cause risk.
Operate on a stable surface: Always operate the appliance on a stable, level surface, e.g. on
the floor, so that the air conditioner is unable to fall and cause an injury or be damaged.
Keep away from water: Never use the appliance if it is standing in spilt water: this may cause
an electric shock. Do not store or use the appliance outdoors. If the electrical connection or
components are damp, dry them thoroughly before use. In case of doubt, do not use the air
conditioner and seek advice from a qualified electrician or approved technician.
Keep the air intake clear: Do not block or otherwise impede the air intake. This may occur e.g.
if the air conditioner is placed too close to net curtains, walls or any other objects that restrict
air intake. This may cause the unit to overheat and start a fire, or cause a risk of electric shock.
Keep electrical components dry: Never allow water to penetrate into the electrical
components of the air conditioner. If they, nonetheless, come into contact with water, unplug
the appliance from the mains and dry it thoroughly. If you have any doubts about the air
conditioner, do not use it –contact a qualified electrician or approved technician.
The operator must instruct the user on how to handle the appliance and check that the user
understands this manual and has been familiarized with the safety instructions.

5
General principles
Before starting the air conditioner for the first time, please carefully read through the entire
instruction manual.
After taking receipt of the appliance, check it carefully to see whether it has suffered any damage
during transport. In the case of any damage, you must inform the sender immediately.
After transport, allow the air conditioner to stand in a vertical position for 6 hours before being
switched on.
Keep the packaging of the air conditioner stored in a safe place so that you can safely repackage the
unit and send it for a service, if required. In those places where it has been glued using sticky tape,
the packaging can be simply cut through and folded up for easier storage.
Cooling principles of the air conditioner
Cooling works best in spaces that have been well sealed, so that there is as little heat intake from
sunlight as possible. Leave doors closed, draw the curtains/blinds, and if possible try and cool the
room before using it. This procedure is especially suitable with e.g. bedrooms, which should be
cooled in advance before going to bed in order to avoid having to keep the air conditioner running
overnight.
Technical specifications
Model
Noaton AC 5110
Power source
AC 220-240 V/1 Ph/50 Hz
Air flow
330 m3/h
Dehumidifying capacity (30 °C, 80% RV)
2.25 l/h
Maximum cooling capacity
10000 BTU
Power consumption (cooling mode)
1085 W
Cooling current
5.1 A
Operating temperature
15°C–43°C
Refrigerant type
R-410A/0.47 kg
GWP coefficient
2088
Equivalent CO2
0.981 t
Noise
55 dB(A)
Dimensions
320 x 320 x 740 mm
Length and diameter of the air hose
160 cm/Ø 151 mm
Length of power cable
188 cm
Inner diameter of the outflow hose
16 mm
Net weight
23.7 kg
Gross weight
29 kg
Battery for the remote control
1x CR2025 –3V

6
Product description
Front
Rear
Control
panel
Remote control signal
receptor
Air
outflow
Handle
Air suction
Cable storage
Connecting the air hose
Drain with plug

7
Control panel
Power on/off button (POWER)
Once connected to the mains power supply, the air conditioner will enter standby mode, the display will flash
for a time and emit an audio signal. Press the on/off button (POWER) and the unit will switch to the initial
"Smart" mode. To protect the compressor, when the appliance is switched back on it will not start for a period
of three minutes.
By pressing the on/off button once again you will switch off the appliance; the fan will continue to function for
an additional 10 seconds or so after the machine has been switched off.
Mode change button (MODE)
Press the MODE button to change available modes - COOL/SMART/FAN.
Timer button (TIMER)
If the air conditioner is in standby mode, using the timer button and the “+” and “-” buttons you can set an
interval between 1 and 24 hours after which the appliance will switch itself on. The appliance display will show
the remaining time until it starts up in hours [Note: always rounded up to the nearest whole hour; so, if e.g.
there is 1 h and 15 min until the start, the display will show 02].
In this mode it is also possible to set the required setting after the appliance has started, either by using the
buttons on the display or with the remote control.
If the air conditioner is switched on an running, you can use the timer button to set an interval between 1 and
24 hours after which the appliance will switch itself off.
By selecting 0 hours the timer function will switch itself off.

8
Fan speed button (SPEED)
By pressing this button you switch between low (LOW) and high (HIGH) fan speeds. At the same time, a diode
will light up on the control panel beside the relevant speed. This option to change speeds is switched off in the
dehumidification (DEHUM) and sleep (SLEEP) modes.
Sleep mode button (SLEEP)
In the cooling (COOL) mode you can select sleep mode. Because of the lower noise level the fan runs at a lower
speed and during the first two hours of the target temperature will be automatically raised by one degree
Celsius every hour.
Dehumidification button (DEHUM) and connection of the hose
The air conditioner will operate at the lower fan revolutions and dry out the air in the room, provided room
temperature remains above 15°C. In this mode it is not possible to set a required temperature or change the
fan speed. If the room temperature is lower than 15°C, the compressor will switch itself off and
dehumidification will stop.
In this mode it is necessary to attach the hose for releasing water –remove the plug from the lower part of the
appliance and attach the hose with a 16 mm diameter (included in the pack). The other end of the hose should
either drain into a suitable vessel or directly to a drain. The hose should be set at the minimum incline in order
for the condensate to drain out properly.
Once dehumidification is complete, disconnect the hose from the machine and –with a gentle tipping motion
towards the outflow –pour out the remaining water from the air conditioner (it is a good idea to place a
shallow vessel or plate below the outflow); finally, replace the plug onto to the outflow.
Switch off the dehumidification mode by changing to another mode using the MODE button.
Remote control
Decreasing
temperature/timer value
Increasing temperature/timer
value
Sleep mode
Change of fan speed
Choice of mode
(MODE)
Two-way timer
(to set a delayed start or
switch-off, see the section
Timer button)
Switch the
appliance on/off

9
Overview of modes
Cooling mode (COOL)
When room temperature is higher than the required temperature, the compressor will run and the air
will be cooled. If room temperature is lower than the target (as set by the user), the fan will continue
to run but the compressor will be switched off. The pilot light on the control panel beside the
inscription COOL will flash [Note: just like when you switch the machine off and back on again the
cooling circuit does not start for 3 minutes in order to protect the compressor ].
Cooling does not work at temperatures under 15°C or above 43°C.
SMART mode
In the 22–24°C range or below, the unit only uses the fan; above that threshold temperature, the
cooling circuit of the appliance is activated and therefore the air conditioner works in cooling mode.
In this mode it is not possible set the required target temperature, although the fan speed can be
adjusted.
Fan mode (FAN)
In this mode you can switch between fan speeds, but the compressor will not work.
It is not possible to set the temperature.
Inserting battery (battery is included in the pack)
When you first use the device it is necessary to remove the protective plastic cover
from the battery.

10
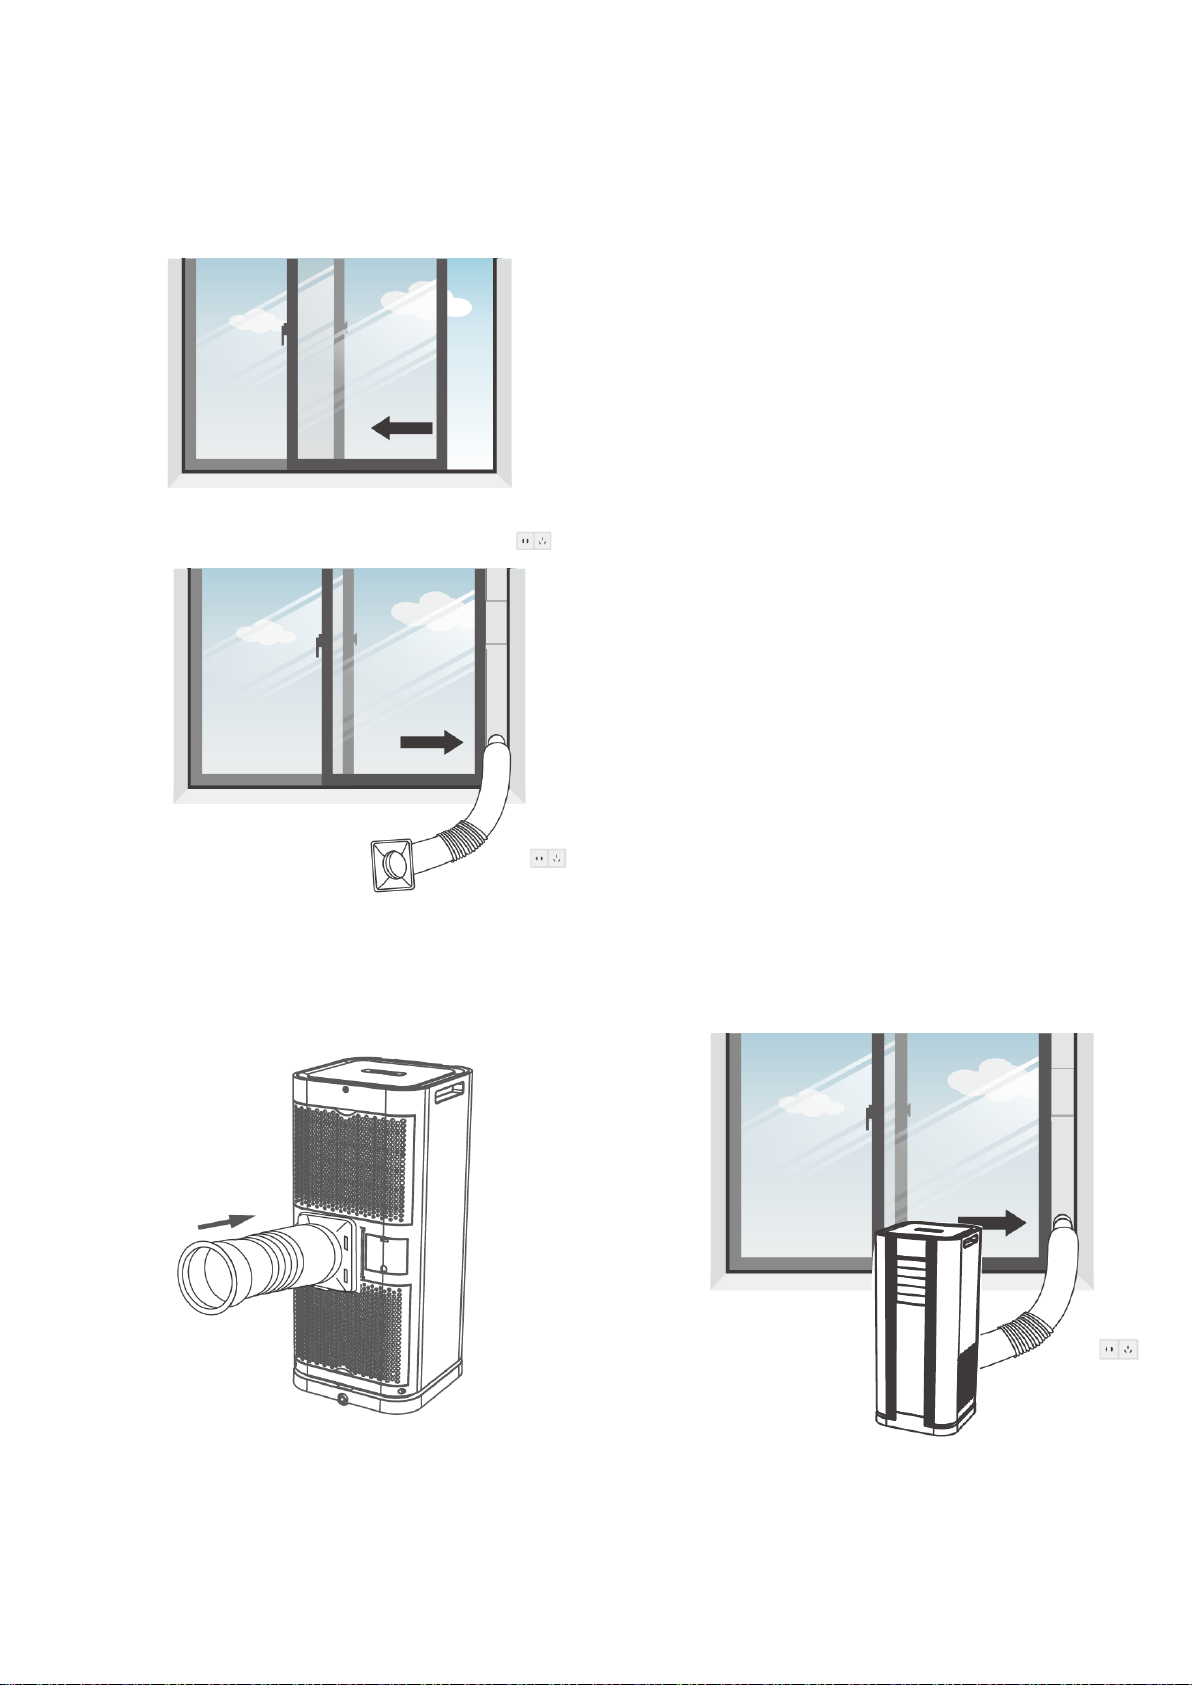
Attaching the hose and mounting the air-tight bracket
(for sliding windows only)
1Hose
4Remote control
2 Hose adapter
5Adjustable airtight window bracket
3 Hose end-piece
6 Outflow hose
Connecting the air hose and the adapter

11
1. By pulling on both ends of the hose (1) you will stretch it out till its maximum length (160 cm).
2. Attach one end of the hose to the hose adapter (2)
3. Attach the other end of the hose to the hose end-piece (3)
4. Attach the hose using the adapter (2) to the rear of the appliance. The adapter should snap
into place.
Mounting the adjustable air-tight bracket into the window (5)
1
2
3
4
5
Figure 1: Insert bracket A into bracket B –as illustrated by the arrow in Figure 1
Figure 2: Figure 2 shows that assembly is complete and the user can set the length of the air-tight
bracket to match the height of the window
Figure 3: If the air-tight screen is still too short for the gap in the window, insert the extra bracket C
(see Fig. 3).
Figure 4: Assembly of the screen is now complete and the user can set the position of brackets A and
C to match the height/width of the window until there is no longer any gap remaining in the window.
Figure 5: Attach the hose with the end-piece onto the air-tight bracket. The mounting of the air-tight
bracket is now complete.
12
Mounting the sliding air-tight bracket –an overview
Use the attached sliding air-tight bracket
with your sliding windows if you have the
hose attached to your appliance and you
have no alternative option for removing hot
air from the machine (e.g. a through pipe in
a wall or through a door into another room).
Insert the air-tight bracket onto which you
have mounted the hose with the end-piece
(3) into the window opening and slide the
window closed so that the bracket is held
firmly in place, while at the same time taking
care not to damage it.
Mount the other end of the hose
together with the adapter (2) onto the
air outlet on the rear of the machine
.
Final checks for correct assembly. Make sure
the hose is pointing upward and that it has
no excessive bends or kinks.

13
Cleaning and storage
Before cleaning your unit, ensure that it is switched off and unplugged from the socket. Clean the
appliance using a soft, dry cloth. Prevent any water from penetrating into the machine. Do not
use any chemical agents or abrasive preparations on the surface of the appliance. The filter can
be vacuum cleaned or washed in warm soapy water. Make sure it is completely dry before
reinstallation. The filter should be checked once a week.
Before relocating the air conditioner or moving it into storage, drain off the water using the
drainage hose.
Prior to storage, let the appliance run for 4–6 hours in fan mode to let the inner components of the
machine dry out completely and remaining water residue evaporate away
When storing the appliance, use the cable space at the rear of the machine for storing the power
supply cable. Clean the filter and place in a plastic bag or in its original box in order to protect the fan
against dust.
Error messages on the display
IF YOU SEE THE ERROR MESSAGES E0, E1 OR E2 ON THE DISPLAY,PLEASE CONTACT YOUR LOCAL DISTRIBUTOR.
Error message on
the display
Meaning
Problem-solving procedure
Ft
Internal water tank is full
Release water from the appliance using the outflow
hose.
E0
Error in the main control unit
In this case it is necessary to check whether the cable
from the main control board has become detached;
alternatively, the control board and/or display may
need replacing. Such actions must only be performed
by a authorized technician. Please contact your local
distributor.
E1
Temperature sensor fault
The temperature sensor needs replacing. Please
contact your local distributor
E2
Evaporator coils sensor fault.
The temperature sensor of your evaporator coils needs
replacing. Please contact your local distributor

14
Troubleshooting
BEFORE CONTACTING TECHNICAL SUPPORT,PLEASE CHECK THE FOLLOWING TABLE.
PROBLEM
POSSIBLE CAUSE
SOLUTION
Appliance does not start
Appliance has no power supply
Plug the appliance into the mains.
Appliance is not switched on
Press the on/off button (POWER).
Power on/off button does
not work
Follow the instructions above.
If the problem cannot be solved,
contact the manufacturer.
The unit has switched itself
on, but the compressor is
not working
Wait for a while
The compressor will come on after
the first three minutes of
operation. This technical measure
extends the appliance’s lifespan.
Remote control does not
function
Worn out battery/remote control
out of range
Change the battery in the remote
control or stand nearer the
appliance.
Increased noise level
Dirty air filter
Clean the air intake filter.
Air intake is blocked
Check to see whether furniture or
curtains are blocking the air intake.
Uneven floor
Place the air conditioner unit on a
level surface
Too loud in the bedroom
Cool the room in advance
Start the air conditioner several
hours before you go to bed, and
make sure curtains and doors are
shut so that the room is cool before
sleep.
Cannot change fan speed-
Appliance is in dehumidification or
sleep mode.
Change the appliance mode, if
required (MODE button).
Cooling is not effective
Room is too big
Check whether cool air is coming
out of the machine and either let
the machine run for a longer time,
or relocate it into a smaller room.
Keep doors and windows shut.
Too much direct sunlight
Prevent direct sunlight by using
blinds or curtains.
Machine has not been running for
a long enough time
Cooling the room will take longer if
a large amount of heat has
accumulated in the walls and other
parts of the room. Let the machine
run for a longer time.
Air filter is dirty or blocked
Clean the filter.
Appliance switches itself
off.
Required temperature has been
reached
If you would like the machine to
continue running, set a lower target
temperature.
Water leaked when moving
the machine
Internal water tank is full
Always drain the water tank before
moving the unit.

15
Product fiche
MANUFACTURER
Gavri s.r.o. | Masná 27/9 | Brno | 60200 | CZ
MODEL
Local air conditioner Noaton AC 5110
DIMENSIONS
320 x 320 x 740 mm
TYPE OF AIR CONDITIONER
Single duct, cooling mode only
INNER SOUND PRESSURE LEVEL IN dB(A)
55
REFRIGERANT
R-410A (GWP 2088)
Refrigerant leakage contributes to climate change. Refrigerant with lower global warming potential
(GWP) would contribute less to global warming than a refrigerant with higher GWP, if leaked to the
atmosphere. This appliance contains a refrigerant fluid with a GWP equal to 2088. This means that if
1 kg of this refrigerant fluid would be leaked to the atmosphere, the impact on global warming
would be 2088 times higher than 1 kg of CO2, over a period of 100 years. Never try to interfere with
the refrigerant circuit yourself or disassemble the product yourself and always ask a professional.
ENERGY EFFICIENCY CLASS
A
Energy consumption 1.08 kWh per 60 minutes, based on standard test results. Actual energy
consumption will depend on how the appliance is used and where it is located.
NOMINAL COOLING POWER PRATED
2.83 kW
EERRATED
2.61
NOMINAL CURRENT
5.1 A
ELECTRICITY CONSUMPTION OF COOLING QSD
1.08 kWh / 60 min
SOUND POWER LEVEL IN dB(A) re1 pW
55
REFRIGERANT
R-410A
REFRIGERANT GWP
2088
AMOUNT OF REFRIGERANT
0.47 kg
GAVRI S.R.O.
SLUNEČNÁ 6, BRNO
63400
CZECH REPUBLIC
www.gavri.cz
WWW.NOATON.CZ

16
Table of contents
Other Noaton Air Conditioner manuals


Popular Air Conditioner manuals by other brands

Technibel
Technibel MCAV77R5VAA Technical & service manual

Ontel
Ontel Arctic Blast 19001 Product guide

GE
GE AJEH12DC Owner's manual and installation instructions

ClimateRight
ClimateRight CR-2500 Assembly and instruction manual

GE
GE AEC14 Owner's manual and installation instructions

LG
LG LS-J0761CL Service manual


EIC Solutions
EIC Solutions AAC-145A-4XT Series Installation and operation manual

Kenmore
Kenmore 405.84086 Use & care manual

Trane
Trane DC-UC-WEB01 owner's guide

Samsung
Samsung MH FSBA Series installation manual

GE
GE AGM24DH Owner's manual and installation instructions

EINHELL
EINHELL Split 3500 EQ C+H operating instructions