NOKO NOKOFORZA 2022 User manual
2022
NOKO BIKE
NOKO BIKE

2
INDEX
1. WELCOME 05
2. GENERAL WARNINGS 08
3. INTENDED USAGE 12
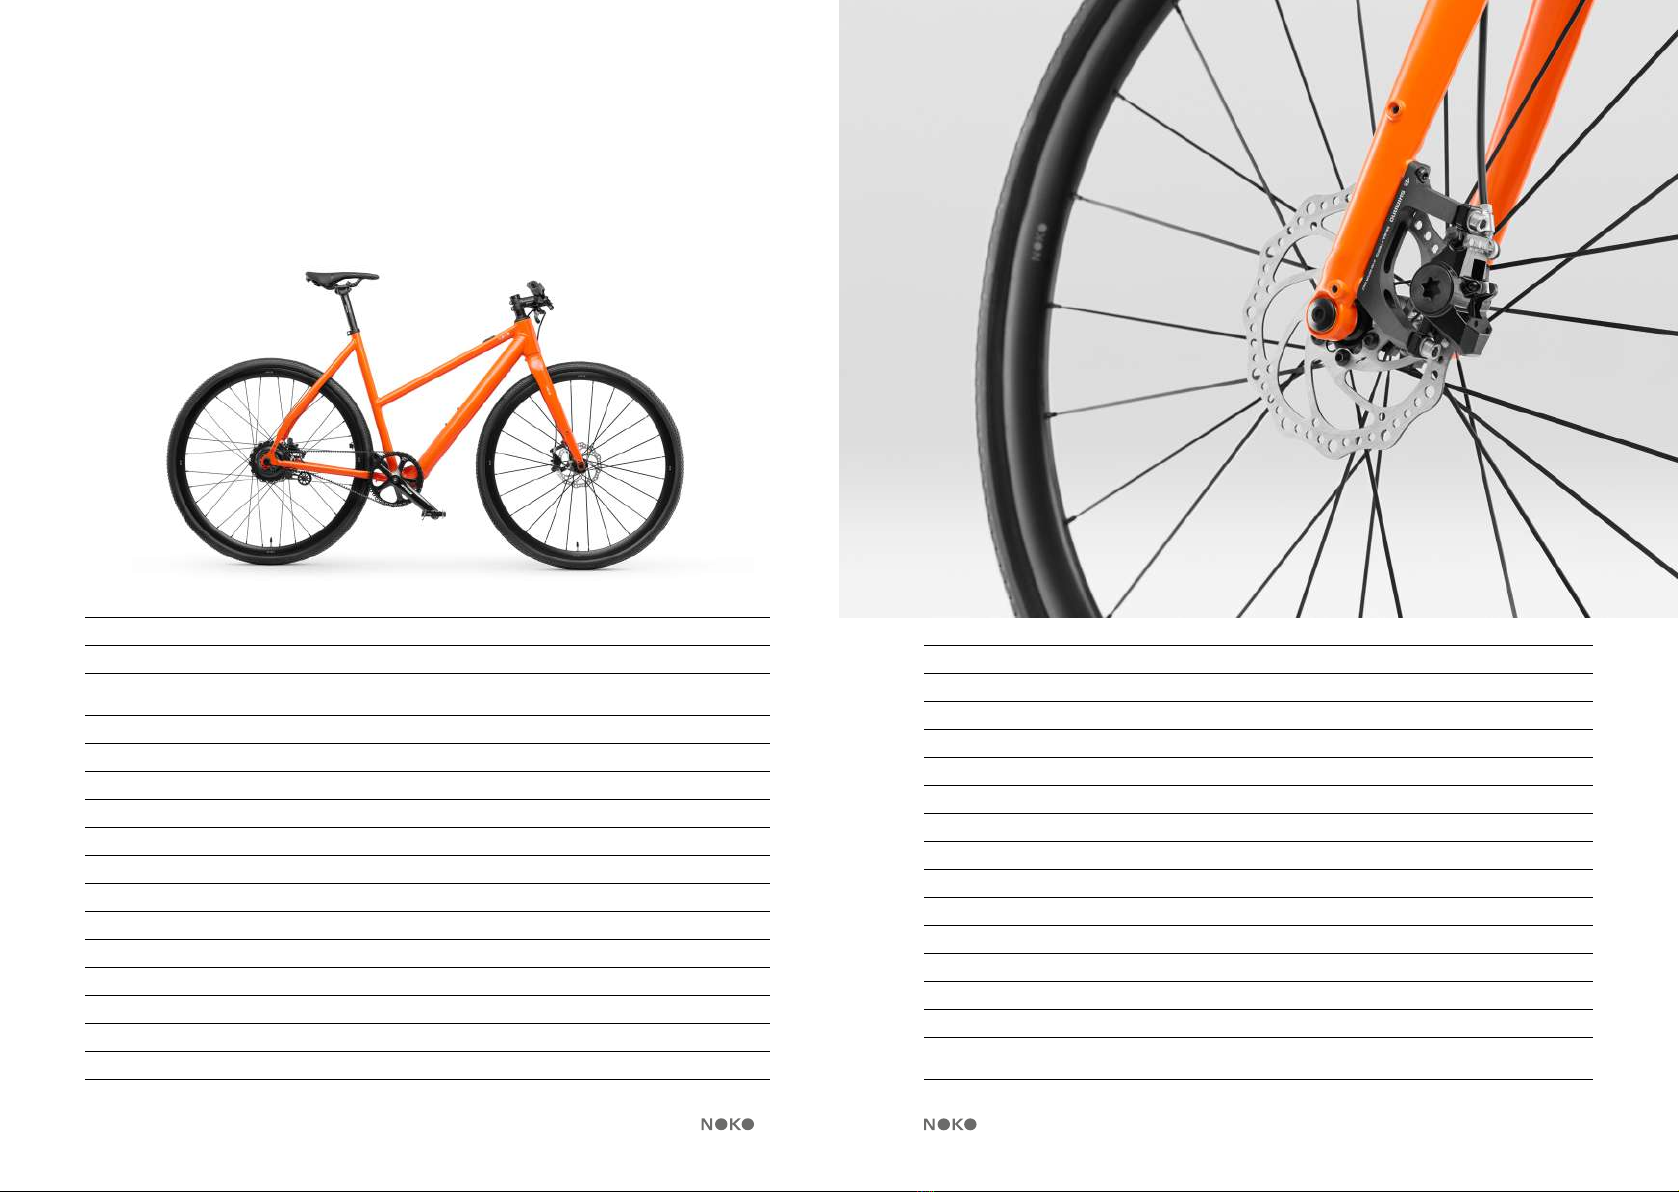
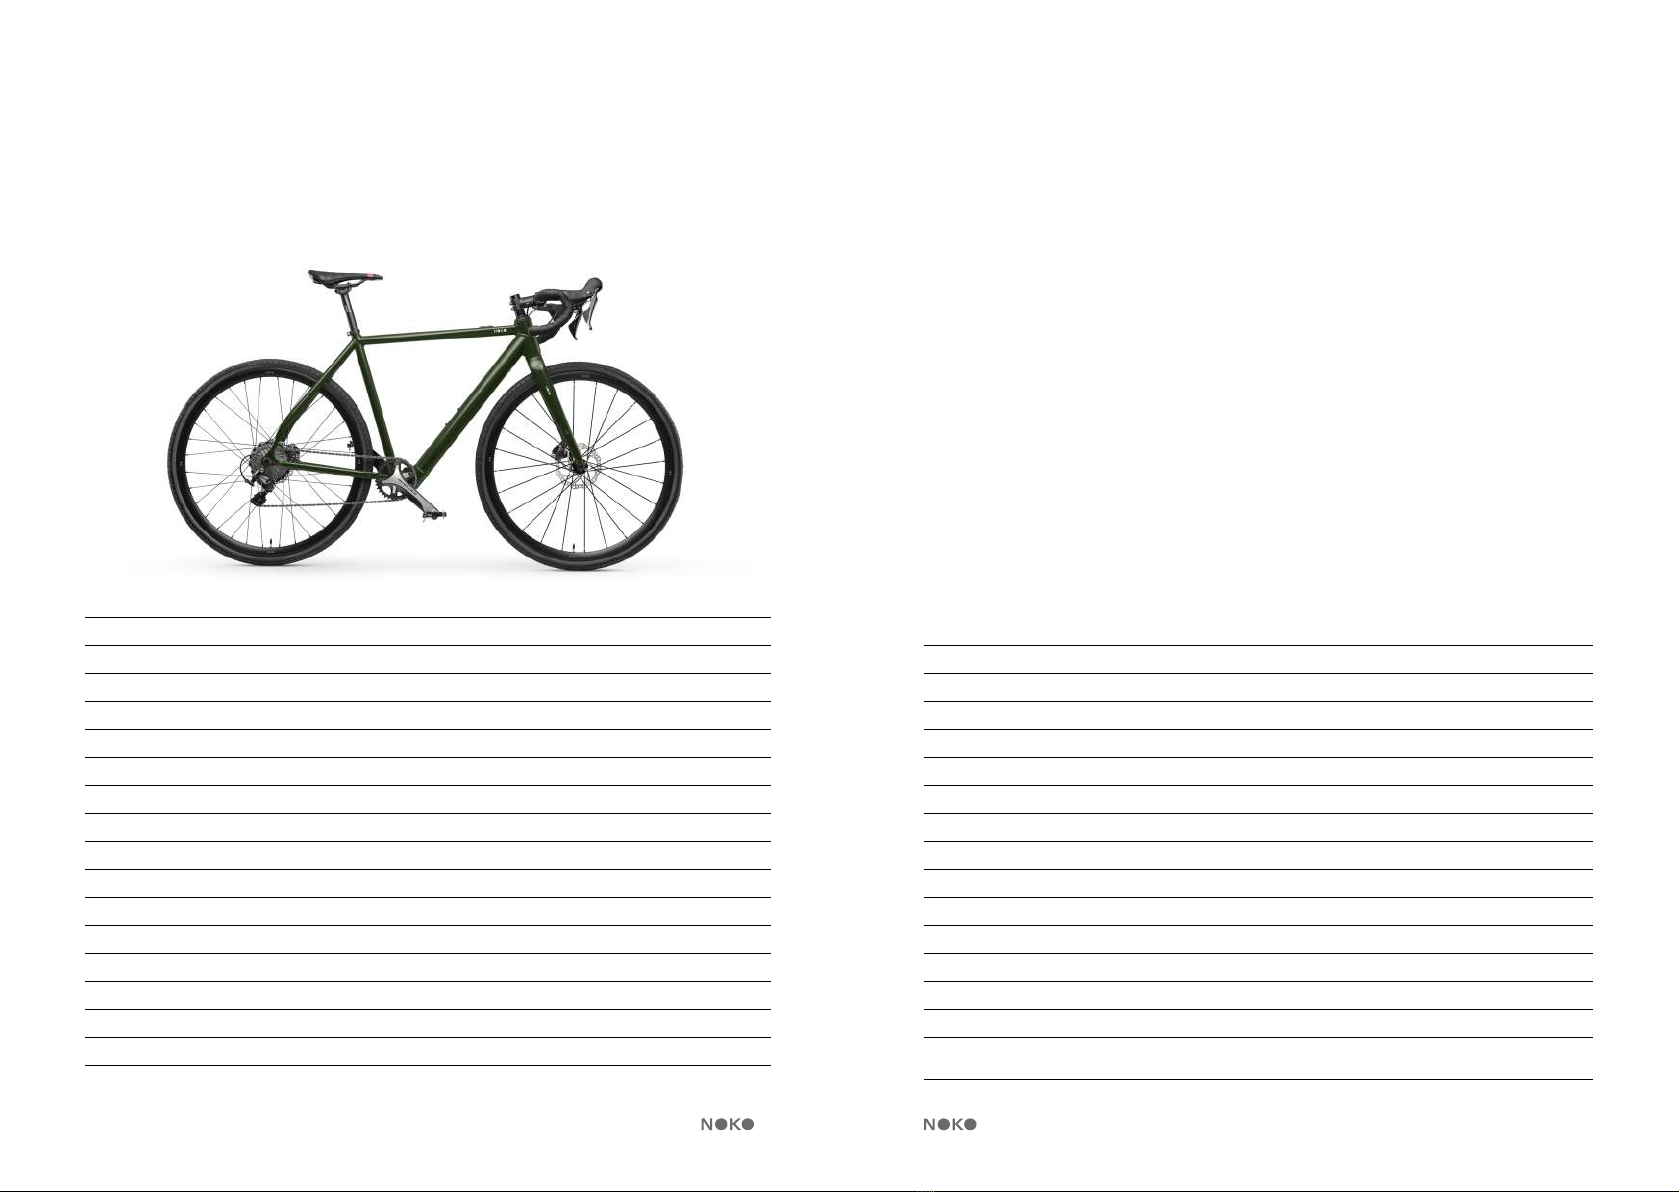
4. E-BIKE COMPONENTS 14
4.1 Urban: NOKOFORZA, NOKOTEMPO 14
4.2 Mid-Gravel: NOKOVULCANO 16
5. TECHNICAL SPECIFICATIONS 20
5.1 NOKOFORZA 20
5.2 NOKOTEMPO 22
5.3 NOKOVULCANO 24
6. ARRIVAL OF YOUR NOKO 28
6.1 Verifying the integrity of the package 28
6.2 Unpacking 28
6.3 Installation and assembling 28
7. FIRST USAGE 32
7.1 Battery charging 33
7.2 Saddle and handlebar adjustement 34
7.3 Check the braking system 35
8. BEFORE EVERY RIDE 36
8.1 General instructions 36
8.2 Wheel removal and installation 38
8.3 Replacing inner tube 40
9. BATTERY USAGE 44
9.1 Power ON / OFF 44
9.2 Charge the battery 45
9.3 Verify the battery charge level 45
9.4 Range extender 46
10. PEDAL ASSISTANCE 47
10.1 Assistance level 47
10.2 Range 48
11. MAINTENANCE AND INSPECTION 49
11.1 General maintenance warnings 49
11.2 Cleaning your NOKO 50
12. WARRANTY 53
13. TERMS AND CONDITIONS 56
4 5
WELCOME
Dear rider, welcome to NOKO! You are now a member of our e-bike com-
munity all over the world. Our team thanks you for choosing our product,
and we hope you enjoy the ride.
This manual includes the information you need for the proper usage of
NOKO e-bikes and your safety. Please, read carefully the information and
instructions to follow on the rst and subsequent rides. You will also nd
the guidelines for the necessary periodic maintenance.
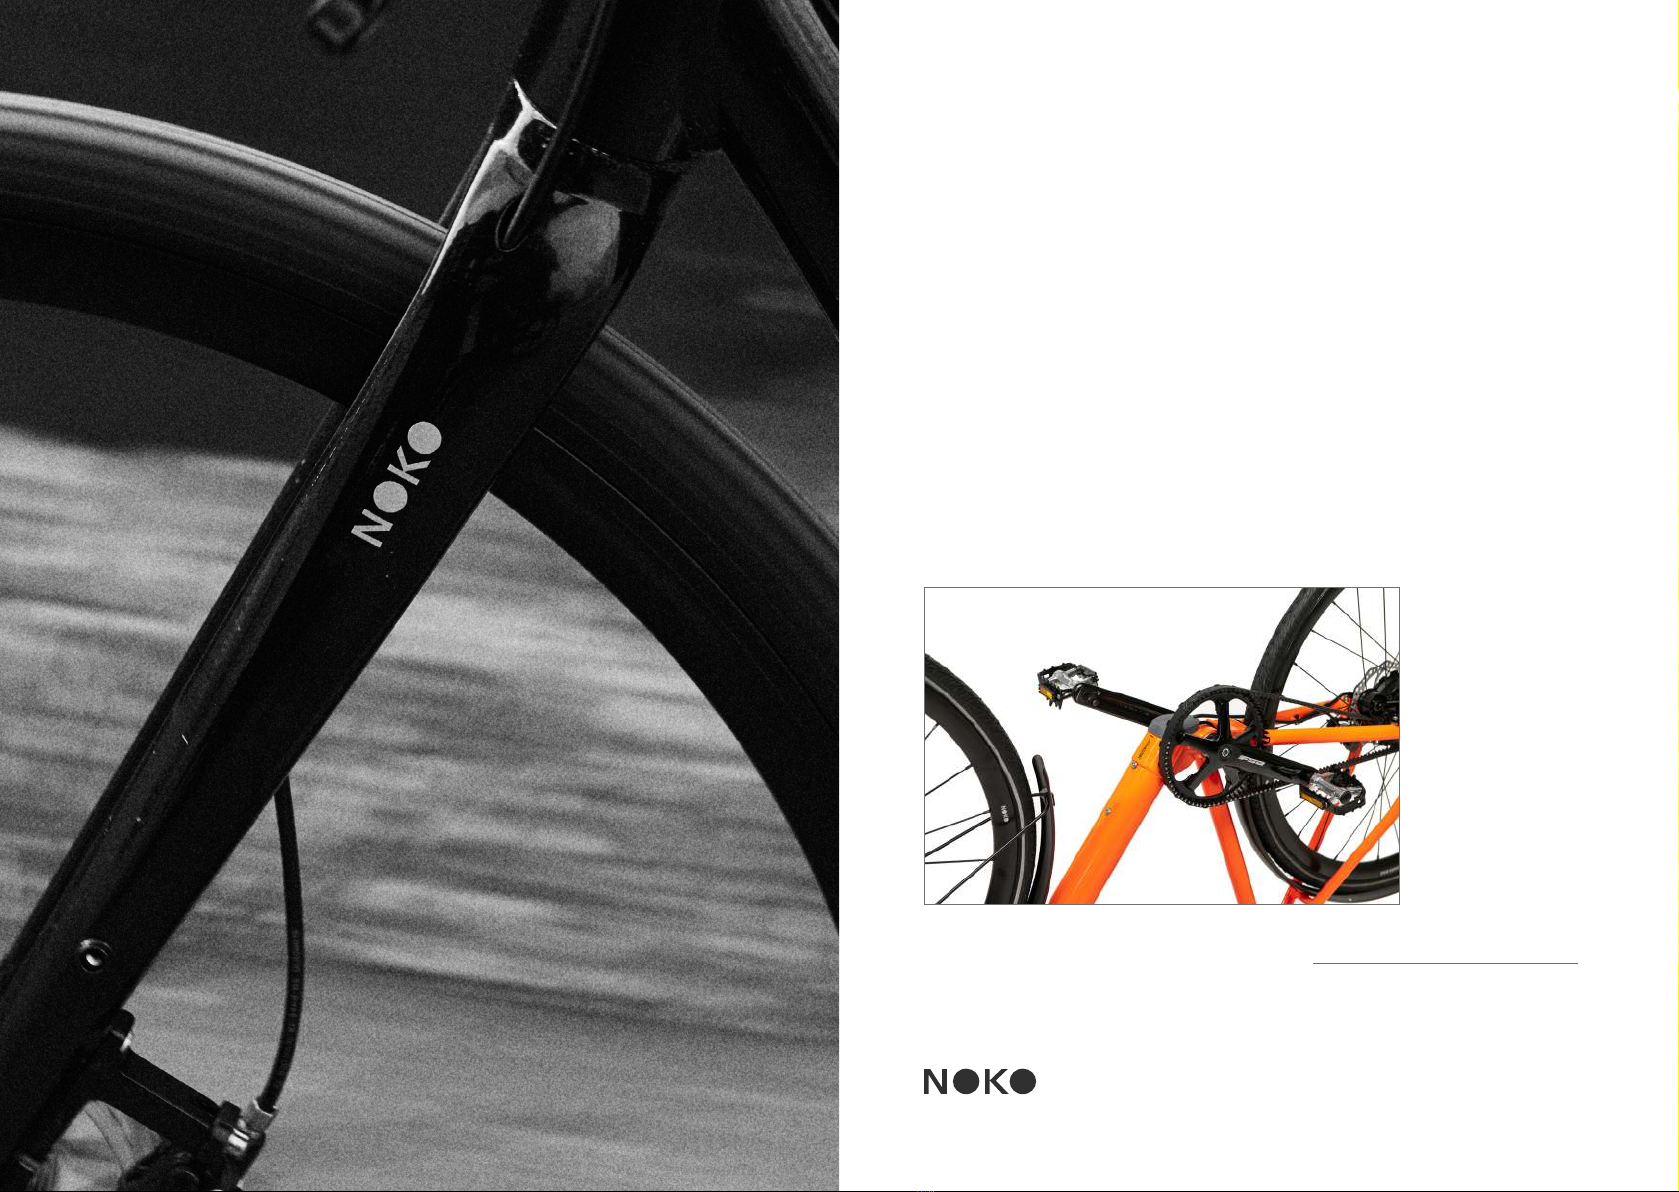
For your information, the frame number of your NOKO bike is located on
the down tube, close to the bottom braket housing (see the image below).
The number consists of a string of letters and numbers, i.e. 0X00TB*000*.
For assistance, please contact us via email at customercare@nokobike.com.
1.

6 7

8 9
GENERAL WARNINGS
Failure to comply with the instructions and/or warnings contained in this
manual is responsibility of the user or the corresponding guardian, in
case of a minor.
The instructions contained in this manual are limited to the correct use of
your pedal assist bike. The manual does not take into account external fac-
tors that may pose a risk to the driver’s safety during the ride. The experi-
ence of those who carry out the control and/or adjustment operations, the
user’s ability to drive, compliance with road regulations, route conditions,
personal conditions, etc., are just some of the factors that can contribute to
the possible risk of falling or suffering injuries.
Controlling these factors reduces the danger, but does not eliminate the
risk of falling or suffering injuries. We recommend that you drive with cau-
tion, and comply with the road regulation enforced in the country of usage.
This manual explains the most relevant indications and warnings, and is
not able to replace the knowledge of a bike mechanic. If you encounter
any difculties during operations, we recommend that you consult an
expert in adjusting your NOKO before its usage. You can nd the video
guidelines for setting your e-bike in the “Support” section of our website
www.nokobike.com.
The instructions in this manual do not teach how to ride a pedal assist bike,
therefore the driver is responsible for any harms caused.
2. The driver must be aware of performing a potentially dangerous activity.
We recommend to drive your NOKO with caution, and always respect
other road users.
• Do not drive under the inunce of alcohol or medication, which im-
pairs driving skills and/or cause drowsiness. The risk is to harm other
road users, and face legal sanctions.
• Do not ride with objects hanging from the handlebars or other parts
of the frame: they could get into the spokes, and cause an unexpected
movement of the handlebar, risking the loss of control of the e-bike.
• Do not ride without front and rear lights. Driving without an adequate
light system increases the risk of accidents.
• While riding your e-bike, for your safety it is advisable to wear protec-
tive equipment such as: helmet, glasses, and gloves.
• Protect your e-bike from impacts, place your NOKO in a stable posi-
tion, and avoid any falls. If your e-bike ecounters a fall, it could result in
damage to the components.
• We remind you that NOKO e-bikes are not designed to support the
weight of another person; it is not possible to transport other people.
The maximum supported weight of NOKO e-bikes is 120 kg, which
includes the load on the rack.
GENERAL WARNINGS

10 11
12 13
INTENDED USAGE
To use your NOKO in safety, it is important to be aware that any type of
bike is designed and built for a specic use; therefore, it must meet certain
requirements. Frames and other components are designed and selected
according to the conditions of use to which they are subjected to.
The international standard ASTM F2043-1311provides four different cat-
egories of bicycles according to the intended usage2.
CATEGORY 1: Routes on paved roads.
The rst category includes bikes designed for exclusive usage on paved
surface, and where wheels remain in constant contact with
the ground. To this category belong the NOKOFORZA and
NOKOTEMPO e-bikes.
CATEGORY 2: Paved and off-road routes with jumps of less than 20 cm.
This category includes bikes and its components included in Category 1,
and are also designed to travel on unpaved grounds, dirt roads,
and paths with moderate slopes. Jumps of less than 20 cm are
allowed. To this category belongs the NOKOVULCANO e-bike.
3.
CATEGORY 3: Rough paths and jumps up to 60 cm.
The bikes in this category can be used in the conditions provided by Cate-
gories 1 and 2; they are also suitable on rough paths, unpaved
roads, and paths that require special technical skills. In this cat-
egory, jumps of up to 60 cm are allowed.
CATEGORY 4: Rough paths and jumps up to 120 cm.
This category includes bicycles that can be used in the conditions provided
by Categories 1-3, in addition to downhill rough trails at speeds
above 40 km/h, and extreme jumps up to 120 cm are allowed.
INTENDED USAGE
Note.
1For the ofcial record please visit the ASTM website www.astm.org.
2For explanation of the ASTM F2043-13 Categories the following manuals have been consulted: GT
Bicycle, “Manuale dell’utente. 2020”, https://www.gtbicycles.com/media/019_GT_OM_131515_IT.pdf;
Campagnolo, “Categorie ASTM”, https://www.campagnolo.com/media/les/035_2475_ASTM_
Categories_Campagnolo_ITA_Rev00_04_2021.pdf.
14
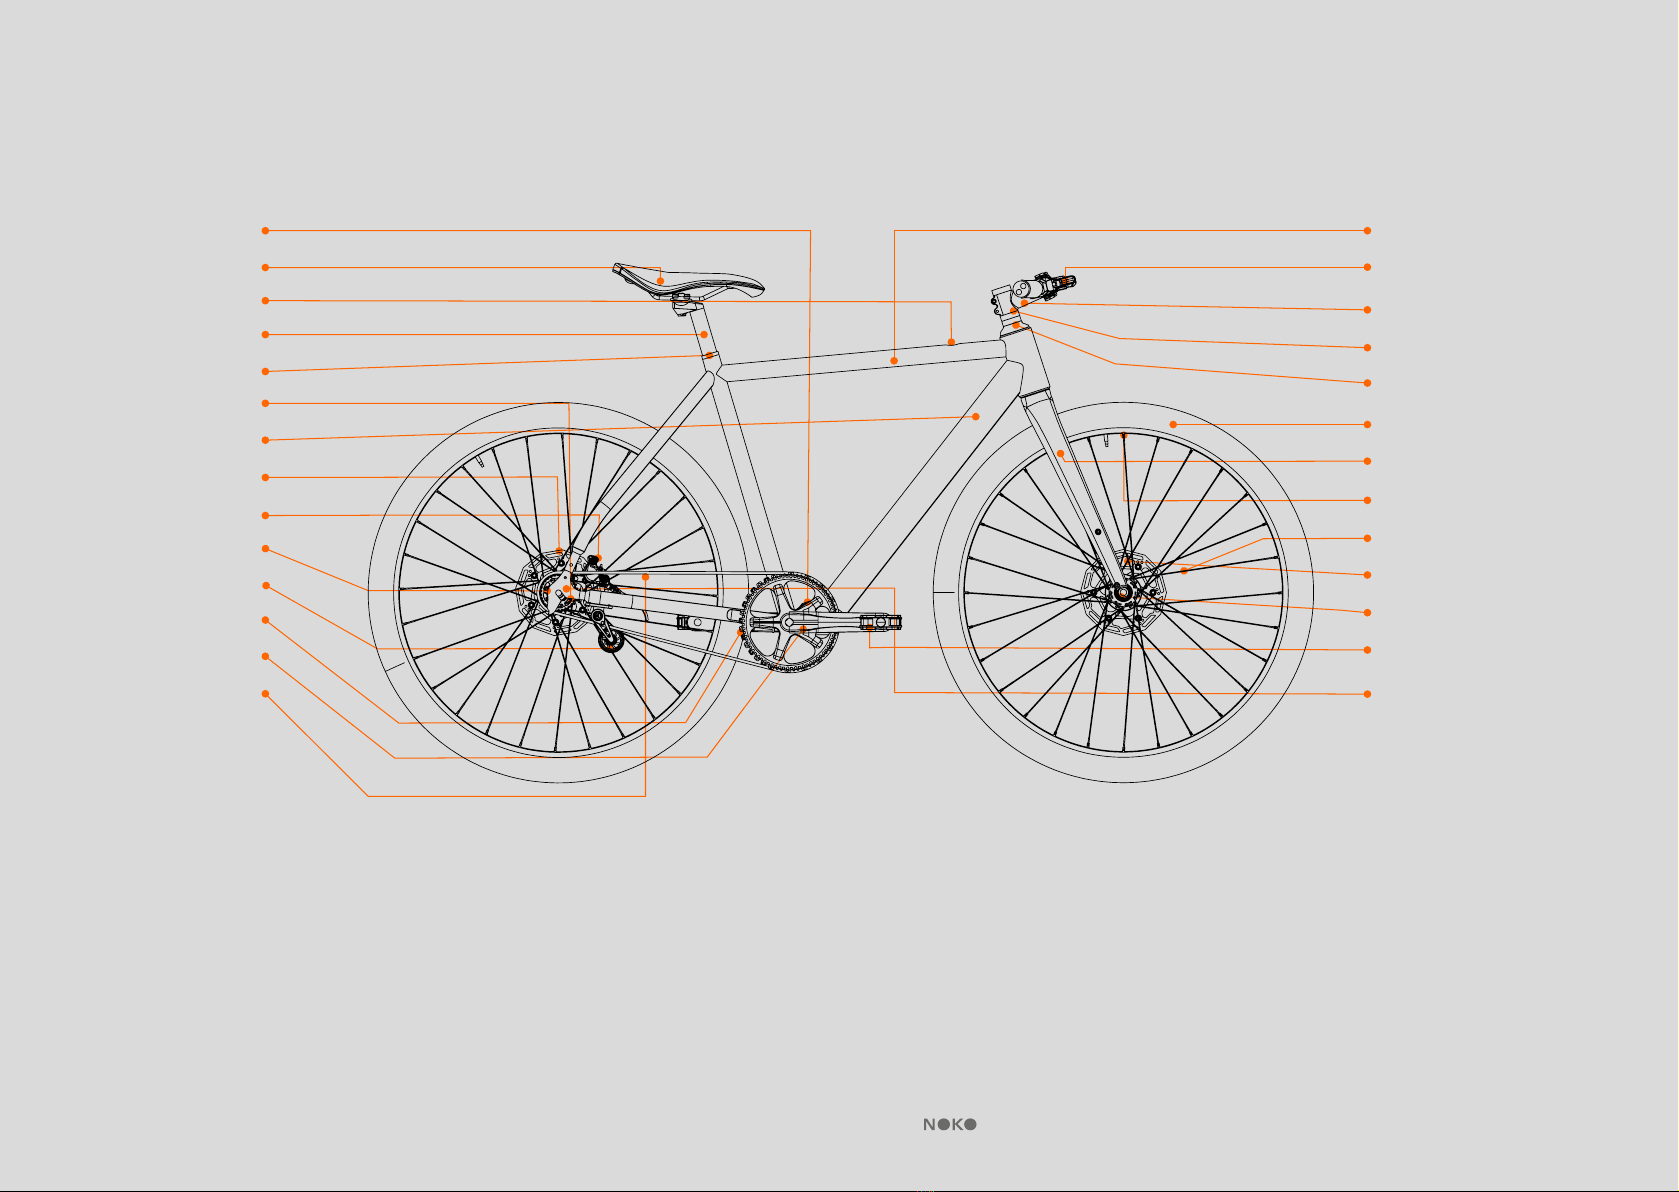
4.1 Urban: NOKOFORZA NOKOTEMPO
4. E-BIKE COMPONENTS
01. Frame
02. Fork
03. Handlebar stem
04. Handlebar
05. Headset
06. Brake lever
07. Tire
08. Rim
09. Spokes
10. Front hub
11. Dropout
12. Pedals
13. Crank arm
14. Belt
01
02
03
04
05
06
07
08
18
09
10
11
12
13
16
14
15
17
18
19
22
20
21
26
24
25
23
*The image above represents the NOKOFORZA e-bike. The NOKOTEMPO model has the same
components; it differs only for the superior tube that slopes downward.
15. Belt tensioner
16. Front cog
17. Rear sprocket
18. Brakes
19. Disc brake
20. Seatpost
21. Saddle
22. Collar
23. Rear hub motor
24. Integrated battery
25. Power button
26. Charge socket
15E-BIKE COMPONENTS

4.2 Mid-Gravel: NOKOVULCANO
01. Frame
02. Fork
03. Handlebar stem
04. Handlebar
05. Headset
06. Brake lever
07. Tire
08. Rim
09. Spokes
10. Front hub
11. Dropout
12. Pedals
13. Crank arm
14. Chain
01
02
03
04
05
06
07
08
18
09
10
11
12
13
16
14
15
17
18
19
22
20
21
26
24
25
23
27
15. Rear derailleur
16. Front chainring
17. Sprocket set
18. Brakes
19. Disc brake
20. Seatpost
21. Saddle
22. Collar
23. Rear hub motor
24. Integrated battery
25. Power button
26. Charge socket
27. Gear shift
17E-BIKE COMPONENTS16 E-BIKE COMPONENTS

18 19

20 21
5.1 NOKOFORZA
5. TECHNICAL SPECIFICATIONS
Frame Aluminium alloy, BSA 68 (English), integrated battery, at mount, integrated wires
Total weight 14,8 kg size M
Maximum weight capacity
(Rider + luggage)
120 kg
Available sizes S 46 – M 52 – L 58
Colors Black – Green – Orange
Transmission VEER Belt drive, carbon ber tech.
Gears Single speed
Front cog 45 T eq, made of aluminium alloy
Rear sprocket 19 T eq, made of steel
Crankset FSA BDC 130 mm 5 H. L
Crank arm 170 mm
Brake system Front and rear hydraulic disc brakes 160 mm
Brake lever RAICAM
Headset 1” ½ - 1” ½
Wheel Vision
Wheel type Aluminium / Carbon
Tires 700x35 CST
Seatpost Aluminium, 27.2 mm
Battery 36 V 250 Wh + 250 Wh
Type of cells Samsung 18650-35E
Motor Brushless DC, FSA 250 W
Torque max 42 Nm
Max speed with assistance 25 km/h
Assistance levels 5
Battery maximum autonomy 90-100 km
Battery maximum autonomy with range extender 180-200 km
Charging time 4 h
Rack Optional
Kickstand Optional
Lights Front and rear rechargeable LED USB
Bolts Stainless steel
General notes Maximum autonomy of the battery varies according to the driver’s
weight, driving style, and track travelled.
TECHNICAL SPECIFICATIONS
22 23
TECHNICAL SPECIFICATIONS
5.2 NOKOTEMPO
Frame Aluminium alloy, BSA 68 (English), integrated battery, at mount, integrated wires
Total weight 14,8 kg size M
Maximum weight capacity
(Rider + luggage)
120 kg
Available sizes S 46 – M 52
Colors Black – Green – Orange
Transmission VEER Belt drive, carbon ber tech
Gears Single speed
Front cog 45 T eq, made of aluminium alloy
Rear sprocket 19 T eq, made of steel
Crankset FSA BDC 130 mm 5 H. L
Crankarm 170 mm
Brake system Front and rear hydraulic disc brakes 160 mm
Brake lever RAICAM
Headset 1” ½ - 1” ½
Wheel Vision
Wheel type Aluminium / Carbon
Tires 700x35 CST
Seatpost Aluminium, 27.2 mm
Battery 36 V 250 Wh + 250 Wh
Type of cells Samsung 18650-35E
Motor Brushless DC, FSA 250 W
Torque max 42 Nm
Max speed with assistance 25 km/h
Assistance levels 5
Battery maximum autonomy 90-100 km
Battery maximum autonomy with range extender 180-200 km
Charging time 4 h
Rack Optional
Kickstand Optional
Lights Front and rear rechargeable LED USB
Bolts Stainless steel
General notes Maximum autonomy of the battery varies according to the driver’s
weight, driving style, and track travelled
TECHNICAL SPECIFICATIONS
24 25
TECHNICAL SPECIFICATIONS
5.3 NOKOVULCANO
Frame Aluminium alloy, BSA 68 (English), integrated battery, at mount, integrated wires
Total weight 14,8 kg size M
Maximum weight capacity 120 kg
Available sizes S 46 – M 52 – L 58
Colors Black – Green – Orange
Transmission Chain
Gears Sram Apex 1x11
Front chainring 42 T, made of aluminium alloy
Sprocket set 11-36 T, made of steel
Crankset SRAM
Crank arm 172,5 mm
Headset 1” ½ - 1” ½
Brake system Front and rear hydraulic disc brakes 160 mm
Brake lever SRAM
Wheel Vision
Type of wheel Aluminium / Carbon
Tires 700x38 Vittoria
Seatpost Aluminium 27.2 mm
Saddle Prologo AKERO AGX
Battery 36 V 250 Wh + 250 Wh
Type of cells Samsung 18650-35E
Motor Brushless DC, FSA 250 W
Max torque 42 Nm
Max speed with assistance 25 km/h
Assistance levels 5
Battery maximum autonomy 90-100 km
Battery maximum autonomy with range extender 180-200 km
Charging time 4 h
Kickstand Optional
Lights Front and rear rechargeable LED USB
Bolts Stainless steel
General notes Maximum autonomy of the battery varies according to the driver’s
weight, driving style, and track travelled
TECHNICAL SPECIFICATIONS

26 27

28 29
ARRIVAL OF YOUR NOKO
6.1 VERIFYING THE INTEGRITY OF THE PACKAGE.
At the time of delivery check the perfect integrity of the package. If the box
has alterations in its packaging or obvious tampering, you are required to
immediately notify NOKO by e-mail at customercare@nokobike.com.
Attach to the e-mail a detailed photographic documentation of the pack-
age and/or damaged contents.
For further details, see the page “Terms and conditions” on our website
www.nokobike.com.
6.2 UNPACKING.
Open the box and remove the protective packaging; unpack your e-bike
and place it in a support stand (e.g. a bike rack). Unpack all the components
in the box, paying attention to not lose them (pedals, seatpost, saddle, re-
ectors, front and rear LED lights rechargeable via USB, and battery charger).
It is advisable to keep the original box for transportation in case
of possible return.
6.3 INSTALLATION AND ASSEMBLING.
The box also includes the components to be assembled and/or adjusted
to your NOKO e-bike (handlebar, seatpost with saddle, and pedals).
ScantheQRCodetoviewthevideoguides,also availableon nokobike.com,
on how to properly adjust the components, otherwise follow the instruc-
tions below.
6.
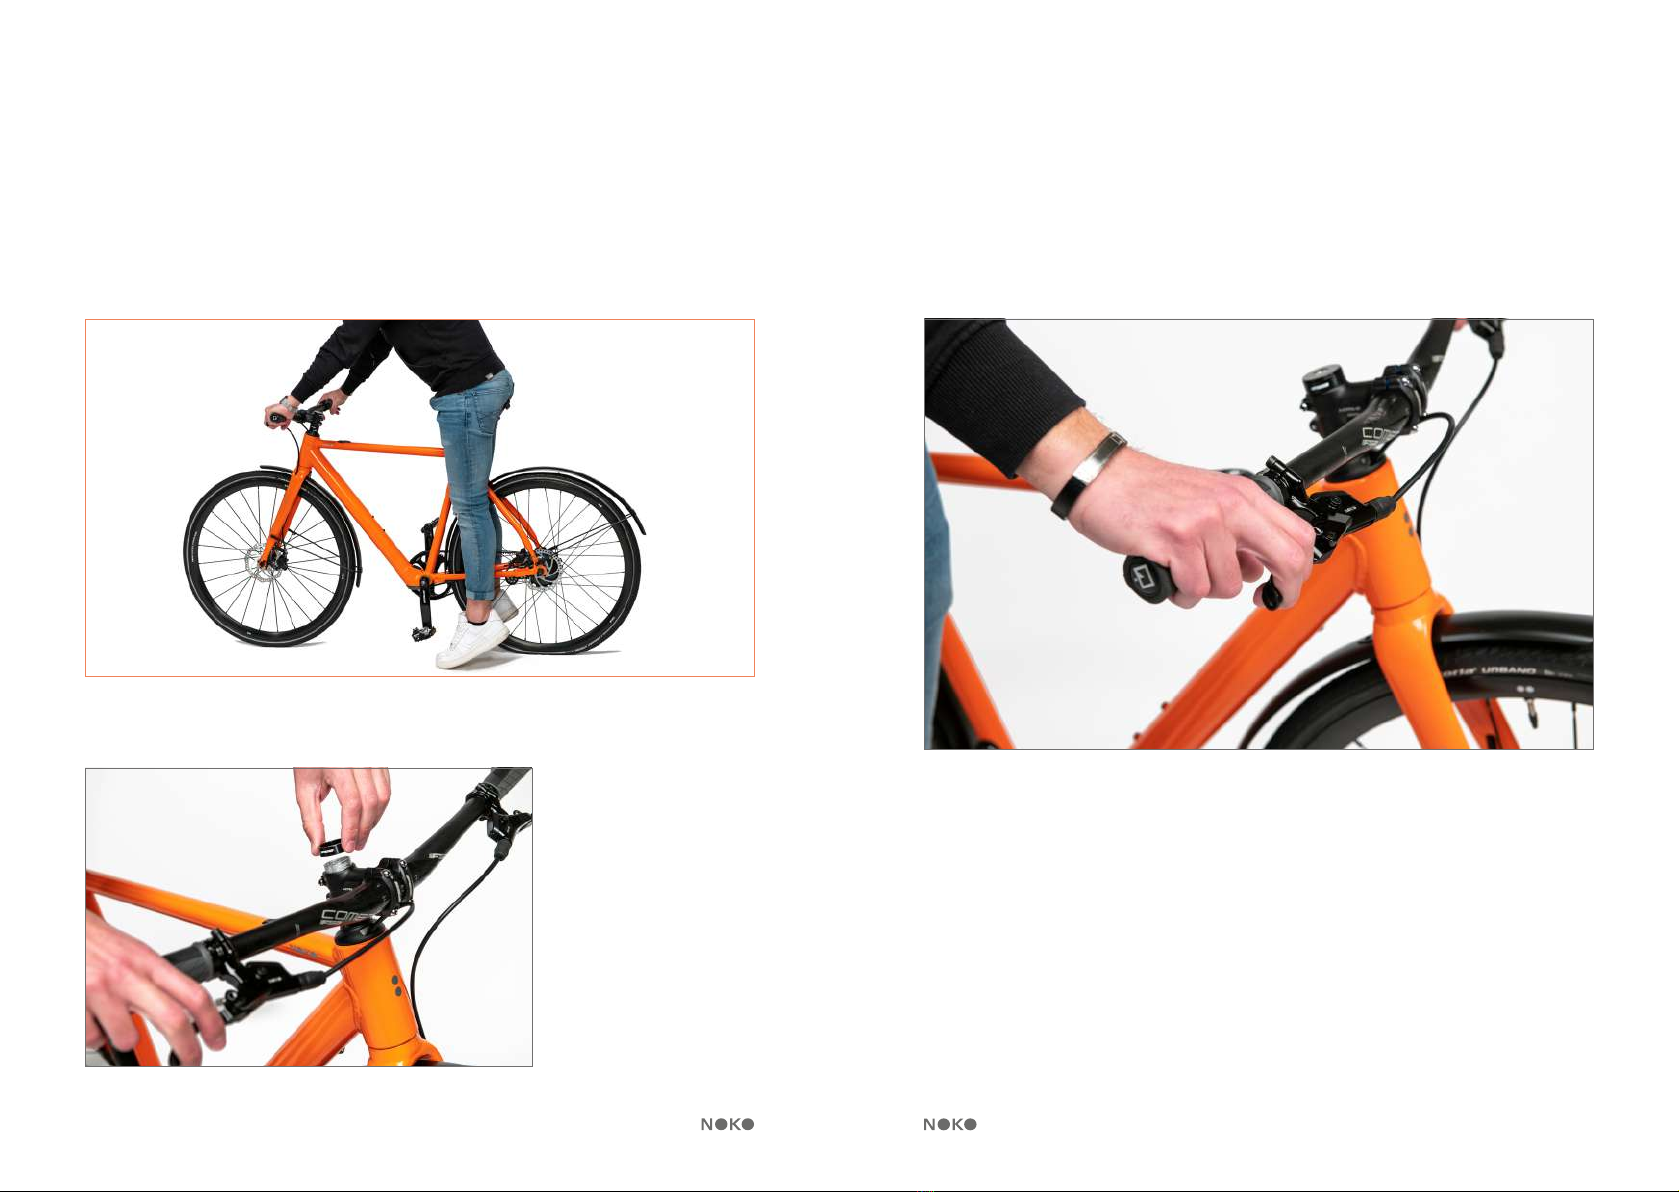
ADJUST THE HANDLEBAR.
What tools do you need? 4 mm allen hexagonal wrench.
Among all the basic operations, the adjustment of the handlebar is the one
that requires the greater manual skill.
• First step, align the handlebar with the front wheel. Slightly tighten the
bolt of the cover on the fork steerer with a 4 mm hexagonal allen key, until
you encounter no play in the headset or any jamming. In case the move-
ment of the handlebar is not uid enough, slightly loosen the bolt.
• Slightly tighten the bolts of the stem with the same 4 mm allen key; ensure
that the handlebar is well aligned with the front wheel, then tighten the
bolts in order that the stem is xed on the steerer. Verify that the handlebar
has a uid movement, if necessary please visit a specialised service center.
ARRIVAL OF YOUR NOKO
30 31
The handlebar is already adjusted in ordinary height and perpendicularity.
If modication are needed, we recommend to contact a specialised ser-
vice center, otherwise act on the four front bolts.
In case of NOKOVULCANO, once you removed the e-bike from the
box, gently move the handlebar rst upwards away from the top tube
and gently turn it forward. Proceed adjusting the handlebar following
the instructions above.
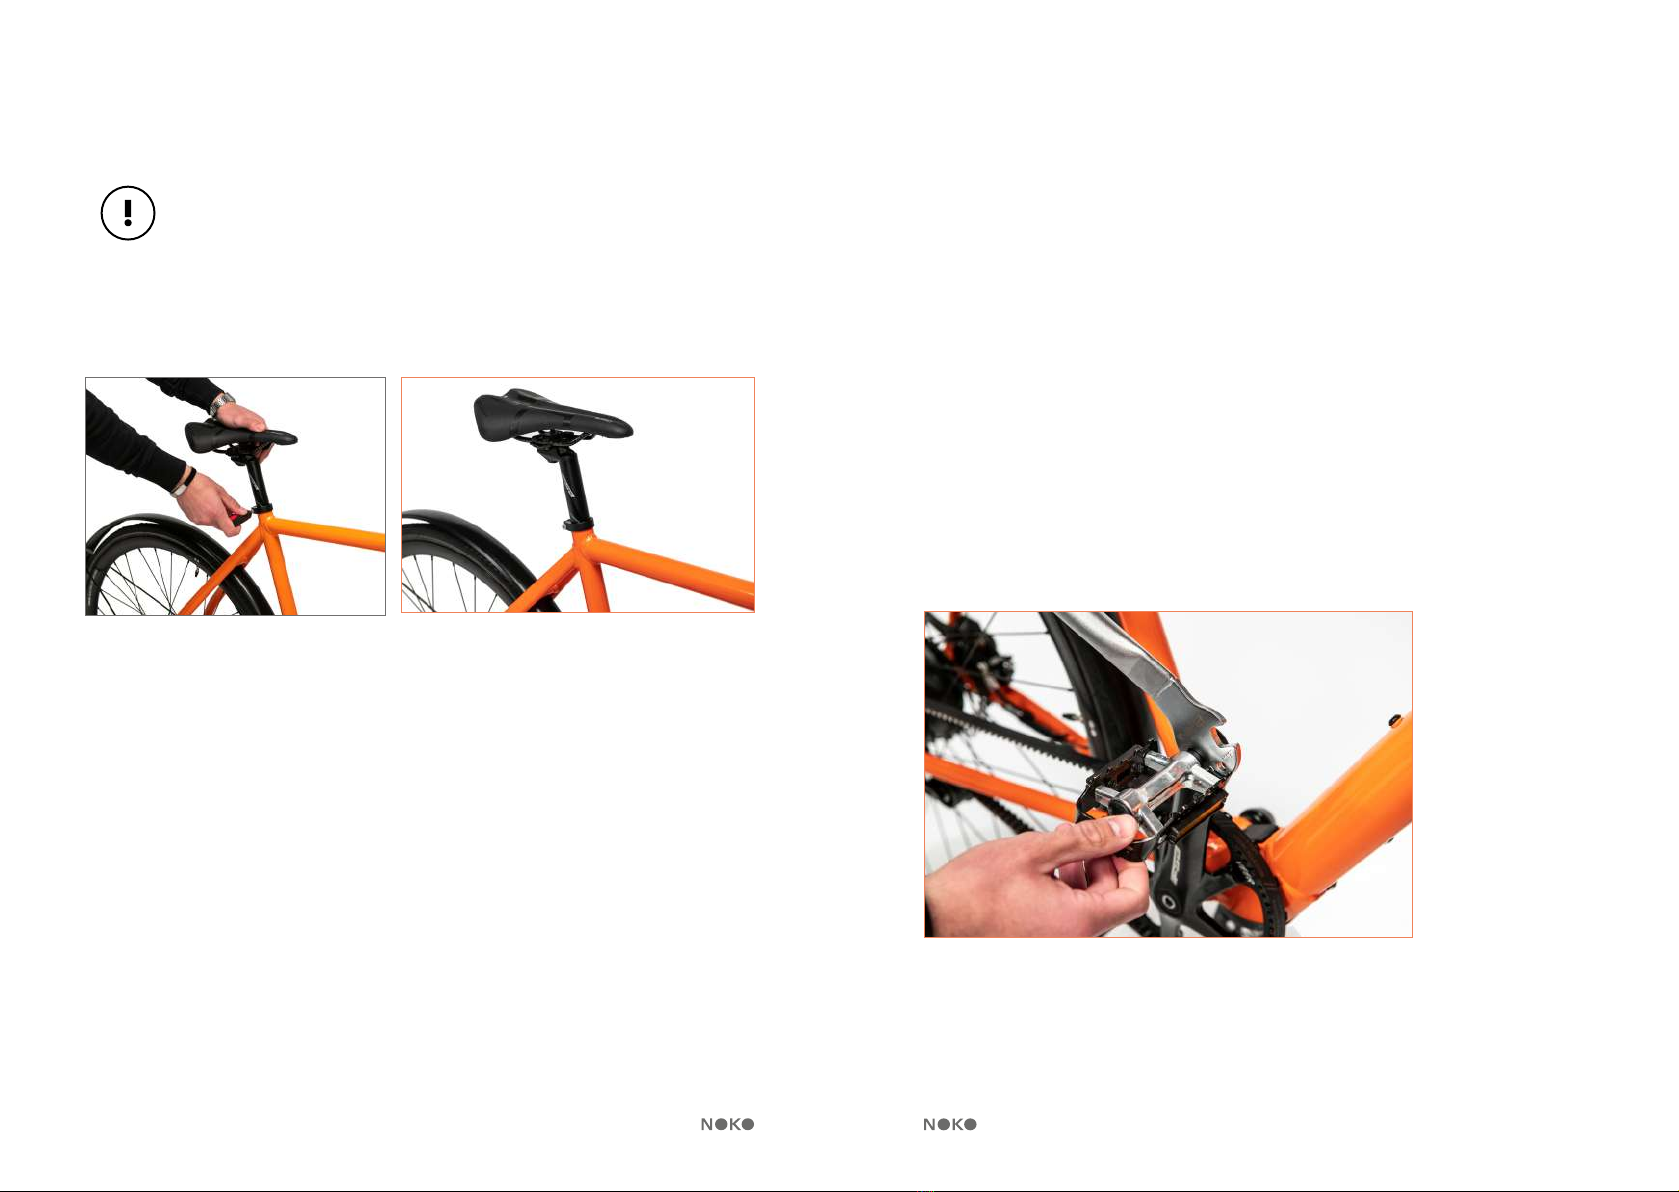
INSTALL THE SEATPOST.
What tools do you need? 4 mm and 6 mm allen hexagonal wrenches.
• To install the seatpost start by loosen the bolt found on the seatpost collar
using a 4 mm allen wrench, apply a small quantity of bike grease on the bot-
tom of seatpost. It should easily slide into the frame. Make sure to slide the
seatpost past the minimum insert line; align your saddle to the desired height.
• Tighten the seatpost hex bolt at the collar with an allen wrench, just
enough to make little adjustments, if needed. The saddle should not be
moving; fasten bolt of the seatpost collar.
• Adjust the saddle fore/aft position and inclination according to the per-
sonal needs, using a 6 mm allen wrench.
ARRIVAL OF YOUR NOKO
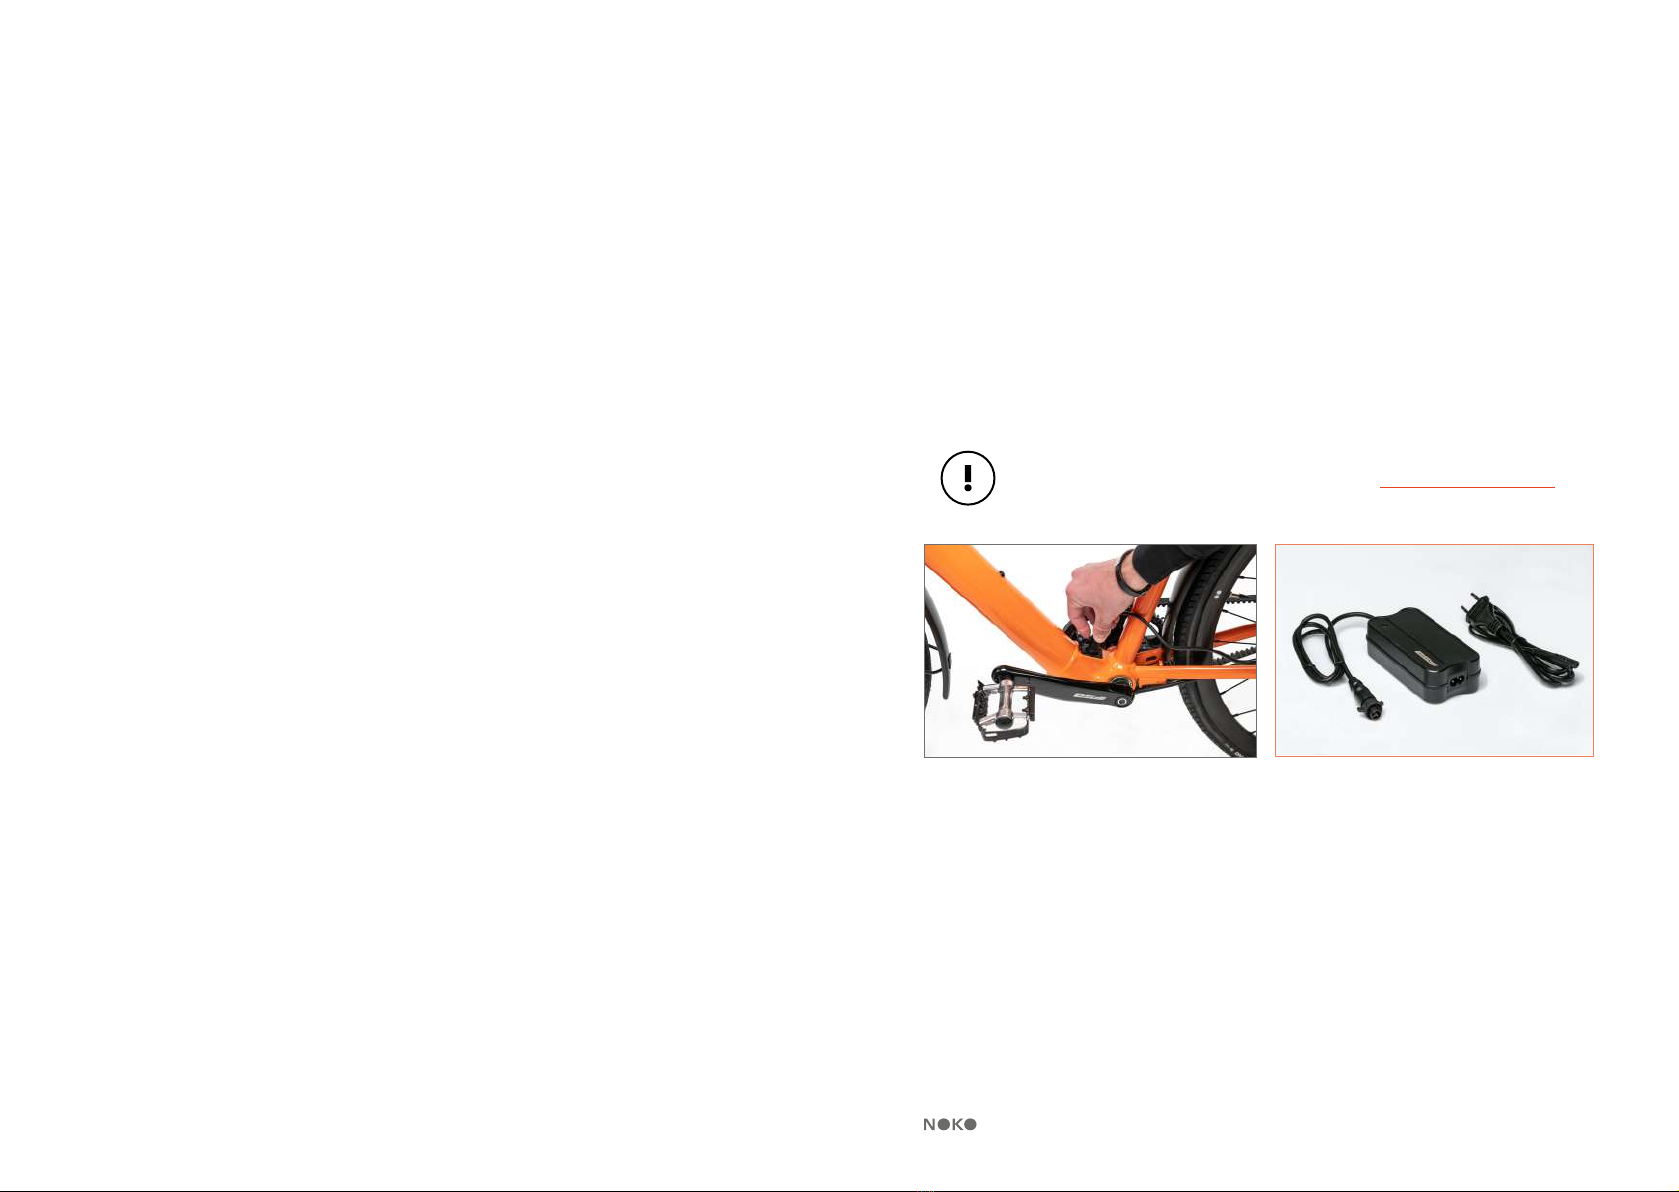
INSTALL / REMOVE PEDALS.
What tools do you need? 15 mm wrench.
Before installing, remember pedals are not interchangeable; right pedal is
marked with the letter “R” and left pedal is marked with the letter “L”.
The right and the left pedal are installed and removed in opposite ways.
• To install the right pedal, rst grease the thread and t the pedal in, then
start tightening with your hands. Tighten it with the 15 mm wrench, turning
clockwise towards the front wheel.
• To install the left pedal, rst grease the thread and t the pedal in, then
start tightening with your hands. Tighten it with the 15 mm wrench, turning
counterclockwise towards the front wheel.
• To remove the right pedal, use the 15 mm wrench and turn counterclock-
wise towards the rear wheel; once loosen use your hands to remove it.
To remove the left pedal, use the 15 mm wrench and turn clockwise to-
wards the rear wheel; once loosen use your hands to remove it.
ARRIVAL OF YOUR NOKO
32 33
FIRST USAGE
You just received your NOKO, and you can’t wait to ride it! Prior to your
rst ride with NOKO, pay close attention to the following instructions.
WHAT TO KNOW BEFORE THE FIRST USAGE?
Please, note that the road trafc is regulated by a specic code. Before
merging into road trafc, check the rules enforce in the country where you
intend to use your pedal assist bike.
We recommend to follow all the precautions in order to limit the risk of
falling and suffering other injuries. Please, wear protective equipment, and
appropriate clothing.
In case you have never driven a pedal assist bike, it’s advisable to start on
less trafcated road, in order to become familiar with the characteristics of
your e-bike. If necessary, take a safe driving course.
Our NOKO e-bikes are designed to support a maximum weight of 120 kg
(which takes into consideration the rider and luggage on the rack, if any).
For further information, read Chapter 5, regarding the technical specica-
tions of your NOKO.
7. WHAT TO DO BEFORE THE FIRST RIDE?
NOKO is been entirely assembled and adjusted in the factory; however, it
could be necessary to modify the saddle and adjust the handlebar depend-
ing on personal need. For a perfect setup, visit a specialised service center.
Following, you will nd instructions to prepare your NOKO for the rst ride.
7.1 BATTERY CHARGING.
Completely charge the battery of your NOKO for the rst time (at least 4
hours). For further information, on proper battery usage and its charging
please read Chapter 9: battery management.We advise to follow instructions
in this manual to improve the autonomy and the life duration of the battery.
For complete instructions on the battery, please consult the FSA manu-
al downloadable in the “Support” section at www.nokobike.com.
FIRST USAGE
34 35
7.2 SADDLE AND HANDLEBAR ADJUSTEMENT.
Verify that saddle and seatpost are properly set and tighten. For the com-
plete process of installation and assembling please, check Chapter 6.
For information, the proper saddle position is based on the rider’s height.
If you are able to touch the oor with your toes, then your saddle height is
correct. To modify the standard adjustment, we advise you to visit a spe-
cialised service center.
If necessary, you can further adjust the handlebar height by shifting the
spacers of the headset; your NOKO includes 3 spacers, each of 10mm.
FIRST USAGE
7.3 CHECK THE BRAKING SYSTEM.
Always check that front and rear brakes are working properly. Before rid-
ing your NOKO in urban trafc, practice braking on roads with less trafc
and become familiar with the braking system.
We recommend to carefully decelerate; do not brake suddenly, in order
to avoid the risk of falling.
FIRST USAGE

36 37
BEFORE EVERY RIDE
8.1 GENERAL INSTRUCTIONS.
It’s advisable to do a general check-up of your NOKO before each outing.
We also recommend, to regularly verify the overall conditions of your bike
in a specialised service center.
If during the check up of your NOKO, you nd out that a compo-
nent doesn’t work correctly, please don’t use your e-bike until
the issue is resolved.
Prior to each ride, it’s advisable to check that the saddle is correctly tight-
ened and adjusted. Assure that the handlebar stem and the handlebar are
steady, and properly aligned towards the front wheel. For more detailed in-
formation on how to adjust the handlebar and the saddle, review Chapter 6.
Remember: always test the status and pressure of the tires of your NOKO.
What would you need? A bike pump to test the ination pressure.
Each tires supplier denes the suggested pressure values, which are ex-
pressed in PSI and in bar. Generally, the pressure of a urban-type tire
should be maintained between 2.5 and 5 bar. The minimum and maximum
pressure values can be found on the tires itself.
TO LEARN MORE! Bike tires are marked with the direction of the rotation,
and the dimensions expressed in millimetres (i.e.700x35) or inches (i.e. 29”).
8.
After testing the tires pressure, check that both front and rear wheels are
well anchored.
Scan the QR Code for the video guidelines on nokobike.com,or read the
following information.
The wheels have to be well anchored to the fork and the frame; if neces-
sary, further tighten the wheel axle.
To tighten the front wheels axles, use a 6 mm hexagonal wrench; to tight-
en the rear wheel axles, use an 8 mm hexagonal wrench.
Take into consideration the following specication for NOKO e-bikes:
the front wheel is equipped with a thru-axle of 12 mm; the rear wheel is
equipped with anti-rotation threaded-axle M12, of 10 mm.
BEFORE EVERY RIDE
38 39
Before each ride, please check the correct tension of the belt or the chain;
both need to be properly placed in location for the correct use.
Verify that all bolts, fasteners of front and rear wheels, and kickstand (if
any) are steady. Check that both pedals are properly tightened in the crank
arms; if needed remove and reinstall the pedals, following the instructions
in Chapter 6.
Make sure that the battery of your NOKO is completely charged, especially
when travelling long distance. Instructions on how to properly charge the
battery of your NOKO are included in Chapter 9.
8.2 WHEEL REMOVAL AND INSTALLATION.
Follow the instruction or view our video guides on nokobike.com, how to re-
move and install independently the wheel of your NOKO, in case of necessity.
It is recommended to visit a in a specialized service center, to ensure the
correct position of the wheel, chain or belt.
What do you need? 6 mm hexagonal wrench for the front wheel; 8 mm
hexagonal wrench for the rear wheel.
For the NOKO e-bikes, to disassemble the front wheel, the rst step is to
loosen the thru-axle using the hexagonal wrench of 6 mm. Proceed by pull-
ing out the pin manually, and remove the wheel.
BEFORE EVERY RIDE
To install the wheel, guide the wheel in position by sliding the pin back
and manually tighten the thru-axle. Conclude by tightening with the 6 mm
hexagonal wrench.
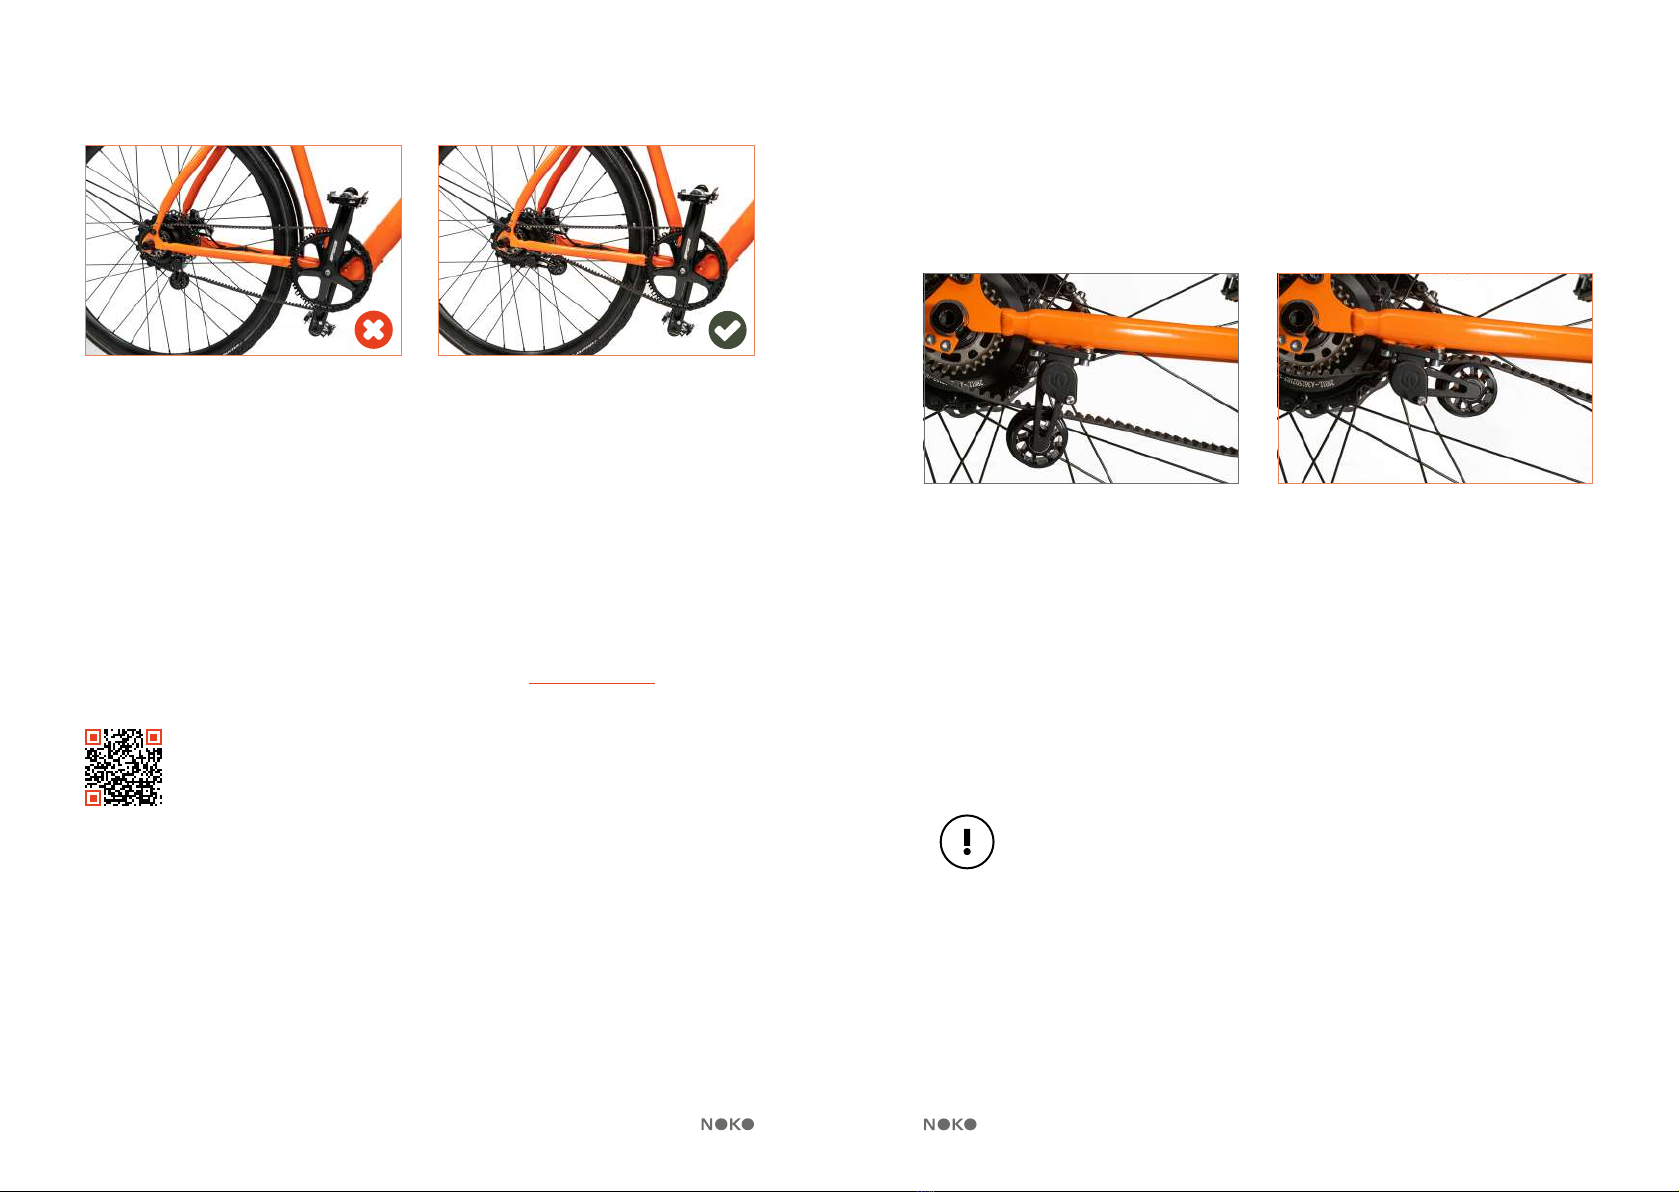
For the models NOKOFORZA and NOKOTEMPO, to disassemble the rear
wheel, remember to release the tension of the belt: bring down the belt
tensioner and lock it by pressing the button.
Shift the belt from the front cog and rear sprocket, to facilitate the process.
Proceed by loosen the washers from both side of the hub axle, without
completely removing them. At this point, guide the wheel out of the drop-
outs. To install the wheel, assure that the belt is positioned over the bodice,
then proceed guiding the wheel back in the dropouts. At this point, place
the belt rst in the front cog and then the in the rear sprocket, making sure
that the belt is positioned above the belt tensioner. Proceed by tighten the
washer on both side of the hub axle, manually at rst, then with the 8 mm
hexagonal wrench. Conclude, by removing the lock and bring the belt in
tension again.
The belt tensioner is equipped with a spring tensioner system.
Pay close attention while removing the block. It is advisable to
accompany the belt tensioner manually, to avoid colliding with
the frame and/or getting injured.
For NOKOVULCANO, to disassemble the rear wheel, remember to release
the tension of the chain: by using the set paddles shift gear and place the
chain on the smaller sprocket. Bring down the lower cog of the derailleur
and lock it by pressing the button. Proceed by loosen the washers from
both side of the hub axle, without completely removing them.
BEFORE EVERY RIDE
This manual suits for next models
2
Table of contents


