Travelux Tiempo User manual

TRAVELUX
TRAVELUX
TRAVELUX
TRAVELUX
TRAVELUX
TRAVELUX
TRAVELUX
TRAVELUX
TRAVELUX
TRAVELUX
User Manual
Travelux Tiempo

~ 1 ~
User Manual
© 2014 VAN OS MEDICAL UK Ltd. Excel House, Ashbrooke Park, Lincoln Way,
Sherburn in Elmet, North Yorkshire, LS25 6PJ
Tel. +44-(0)1977 681400, Fax +44-(0)1977-683397,
BEFORE YOU ARE GOING TO USE YOUR NEW TRAVELUX TIEMPO SCOOTER, YOU
AND / OR YOUR ATTENDANT MUST READ AND FULLY UNDERSTAND THIS MANUAL.
General information
You have just purchased a Van Os Medical UK ltd. scooter and we want to thank you
for the confidence in our Travelux products. The scooter is a quality product.
The policy of Van Os Medical UK ltd. is to continually improve the quality and
reliability of our products. We reserve the right, therefore, without prior
notification, to alter this guide.
It is important that your guide for the use is read carefully. The manual contains
important information about the safe use and maintenance of your scooter. We
recommend that you keep this guide, it's also your proof of warranty and you will
find it useful for referring to at a later date.
The safety instructions in this guide are general guidelines that must be seen as
broad guidelines.
Your new scooter requires frequent maintenance, much of which you can do
yourself. We want you to take your scooter once a year to be inspected by a
professional.
Caution!
In this guide you will find informative comments, recommendations and warnings.
These are clearly identified by the below symbols and the appearance of the text.
Tip
Information.
Warning:
To avoid personal injury, warnings must be followed.

~ 2 ~
User Manual
© 2014 VAN OS MEDICAL UK Ltd. Excel House, Ashbrooke Park, Lincoln Way,
Sherburn in Elmet, North Yorkshire, LS25 6PJ
Tel. +44-(0)1977 681400, Fax +44-(0)1977-683397,
Fill out the information on your authorised dealer below:
Company: …………………………………………………………………
Address: …………………………………………………………………
…………………………………………………………………
Telephone number: …………………………………………………………………
Fax number: …………………………………………………………………
Email address: …………………………………………………………………
Website: …………………………………………………………………

~ 3 ~
User Manual
© 2014 VAN OS MEDICAL UK Ltd. Excel House, Ashbrooke Park, Lincoln Way,
Sherburn in Elmet, North Yorkshire, LS25 6PJ
Tel. +44-(0)1977 681400, Fax +44-(0)1977-683397,
1 IDENTIFICATION......................................................................................................... 4
2 GENERAL EXPLANATION OF YOUR SCOOTER......................................................... 5
2.1 COMPONENTS OF THE SCOOTER...................................................................................................5
2.2 GENERAL EXPLANATION OF THE FUNCTION AND POSSIBILITIES OF YOUR SCOOTER .....................................6
3 SAFETY REGULATIONS .............................................................................................. 6
3.1 GENERAL SAFETY REGULATIONS ...................................................................................................6
3.2 WARNINGS FOR SAFE USE ..........................................................................................................6
4 INSTRUCTIONS FOR USE .......................................................................................... 7
4.1 CONTROL PANEL ......................................................................................................................8
4.2 GETTING ON AND OFF YOUR SCOOTER ...........................................................................................9
4.3 CHARGING BATTERIES................................................................................................................9
4.4 BEFORE DRIVING ....................................................................................................................10
4.5 BASIC DRIVING ......................................................................................................................13
4.6 STEERING .............................................................................................................................13
4.7 CONTROL THROUGH TIGHT SPOTS...............................................................................................14
4.8 GOING UP AN INCLINE /DOWN A DECLINE ....................................................................................15
4.9 EMI /RFI............................................................................................................................16
5 INSTRUCTIONS FOR USE AND MOUNTING OPTIONS ........................................... 18
5.1 TECHNICAL INFORMATION ........................................................................................................18
5.2 ARMREST ADJUSTMENTS ..........................................................................................................19
5.3 SEAT ADJUSTMENTS ................................................................................................................20
5.4 TILLER .................................................................................................................................20
5.5 DISASSEMBLE ........................................................................................................................21
5.6 ASSEMBLY ............................................................................................................................22
6 TRANSPORTING YOUR SCOOTER............................................................................ 23
7 CARE AND MAINTAINANCE...................................................................................... 23
8 PROBLEM ANALYSIS AND SOLUTIONS.................................................................... 24
9 WARRANTY............................................................................................................... 26
9.1 WARRANTY APPLICATION .........................................................................................................26
9.2 WARRANTY CONDITIONS..........................................................................................................26
10 GENERAL MAINTENANCE INSTRUCTIONS .............................................................. 27

~ 4 ~
User Manual
© 2014 VAN OS MEDICAL UK Ltd. Excel House, Ashbrooke Park, Lincoln Way,
Sherburn in Elmet, North Yorkshire, LS25 6PJ
Tel. +44-(0)1977 681400, Fax +44-(0)1977-683397,
1 IDENTIFICATION
Your Travelux Tiempo scooter is equipped with a unique serial number. You can find
this number on the frame of your scooter. Below is an example of the frame label on
which you can find the identification number. Furthermore you will find the
explanation of the various data stored on the frame label listed below.
1. Serial number Every scooter has its own unique serial number.
You must have this number when making technical
requests or if warranty parts are required.
2. Maximum user weight The largest occupant weight allowed for
protection of both the scooter and the user.
3. Production date The date on which your scooter was
manufactured.
4. Type number This number indicates which model of scooter you
have, again this is always required when making
technical calls.
5. Warranty Here the guarantee period of your scooter is
reflected. Chapter 9 describes your warranty
terms and conditions in more detail.
6. Description Description of the design of your scooter.
7. Model name The model name of your scooter.
3
1
4
7
6
2
5

~ 5 ~
User Manual
© 2014 VAN OS MEDICAL UK Ltd. Excel House, Ashbrooke Park, Lincoln Way,
Sherburn in Elmet, North Yorkshire, LS25 6PJ
Tel. +44-(0)1977 681400, Fax +44-(0)1977-683397,
2 GENERAL EXPLANATION OF YOUR SCOOTER
2.1 Components of the scooter
1
Control panel
10
Foot board
2
Hand grip
11
Battery pack
3
Tiller
12
Rear wheel
4
Basket
13
Freewheel lever
5
Tiller adjustment knob
14
Seat column tube
6
Front shroud
15
Seat
7
Front wheel
16
Armrest
8
Front bumper
17
Arm pad
9
Rim
18
Backrest
Your scooter is equipped with a number of elements and parts. You should know
these before continue reading this manual. Designs and specifications may change
without prior notice.
1
4
6
10
11
12
13
15
7
9
14
3
5
2
17
18
16
8

~ 6 ~
User Manual
© 2014 VAN OS MEDICAL UK Ltd. Excel House, Ashbrooke Park, Lincoln Way,
Sherburn in Elmet, North Yorkshire, LS25 6PJ
Tel. +44-(0)1977 681400, Fax +44-(0)1977-683397,
2.2 General explanation of the function and possibilities of your scooter
Your scooter is equipment with multifunctional brakes and stable wheels which roll
easy. The scooter is designed to be adjusted to the user. Your scooter is a medical
product, not a standard users product. It is important that your guide for the use is
read carefully for optimal use of your scooter.
3 SAFETY REGULATIONS
Van Os Medical UK ltd. specifically disclaims responsibility for any body injury or
property damage which may occur during any use which does not comply with laws or
ordinances. If used correctly, the Travelux Tiempo scooter is an utmost safe and
stable product, if the instructions for use as described in this manual are followed.
However, it is possible when the Travelux Tiempo scooter is not used correctly,
dangerous situations may occur.
3.1 General safety regulations
Protect your Travelux Tiempo scooter by checking it regularly. When a part of your
Travelux Tiempo scooter is not functioning properly, a dangerous situating could
occur.
Warning:
You must keep your scooter in a good state to guarantee safe use.
3.2 Warnings for safe use
Warnings:
Failure to follow all the instructions in this manual may result in damage to the
scooter or serious injury;
Always operate your scooter with thought, care and safety;
Do not drive into curbs;
Never connect anything to the wheels;
The maximum weight capacity has been indicated on your scooter frame label;
Unauthorised modification and or use of parts not supplied by Travelux will
invalidate the warranty of this scooter and may lead to injury to the user and
or damage to the scooter;
Before using your scooter, always check if the brakes are working perfectly;
Do not let children play with or on your scooter;
Do not turn your scooter suddenly at full speed;
All wheels must be in contact with the floor at all times during use. This will
ensure the scooter is properly balanced;
Do not use your scooter when it is damaged or has any malfunction;
Do not attempt to use your scooter on an escalator. Always use a lift;

~ 7 ~
User Manual
© 2014 VAN OS MEDICAL UK Ltd. Excel House, Ashbrooke Park, Lincoln Way,
Sherburn in Elmet, North Yorkshire, LS25 6PJ
Tel. +44-(0)1977 681400, Fax +44-(0)1977-683397,
Do not carry passengers under any circumstances;
Do not mount or dismount your scooter unless the brake is engaged;
Always make sure that the key switch is set to “Off” before mounting or
dismounting your scooter;
Do not drive backwards with your scooter on an incline or across an uneven
surface;
Always make sure the seat is locked forward before operating your scooter;
Always come to a full stop before changing direction from forward to reverse
or from reverse to forward;
Do not operate your scooter where you could not safely or legally walk;
Do not climb ramps or curbs that exceed your scooters capacity;
Always approach inclines straight on;
Always be aware of and careful near mechanical pinch points especially when
assembling and disassembling your scooter;
Never sit on your scooter when it is being transported;
Always fasten down your scooter securely with an approved tie-down system
while transporting your scooter;
Always use caution when driving on soft or uneven surfaces such as grass and
gravel. Also use caution on decks where there is no railing;
Always use designated cross points to cross roads or the most direct route
available, make sure that your path is clear and that you are visible to motor
vehicles;
Never back up or down a step or curb;
Never drive your scooter up or down a step or curb that is higher than 3.5 cm;
Never drive your scooter over a gap greater than 7.5 cm;
Do not drive your scooter in icy conditions;
Never drive on the road, except when you have to cross the street;
Never operate your scooter while you are under the influence of alcohol;
Always check with your physician to determine if any of the medications you
are taking may affect your judgment and/or your ability to operate your
scooter. Also check with your physician concerning your physical ability to
operate a scooter.
4 INSTRUCTIONS FOR USE
Your Travelux Tiempo scooter is a battery-operated personal mobility vehicle. Please
exercise caution and consideration when you are operating it. Driving your scooter
carefully and thoughtfully will help ensure your personal safety and the safety of
other people.

~ 8 ~
User Manual
© 2014 VAN OS MEDICAL UK Ltd. Excel House, Ashbrooke Park, Lincoln Way,
Sherburn in Elmet, North Yorkshire, LS25 6PJ
Tel. +44-(0)1977 681400, Fax +44-(0)1977-683397,
4.1 Control panel
Battery indicator
The battery indicator shows the voltage of the batteries:
Green; the batteries are fully charged;
Yellow; the batteries are at half charge capacity.
Red; the batteries should be recharged.
Speed adjustment dial
With the speed adjustment dial you can adjust the minimum and maximum
speed of your scooter;
Turn the dial counterclockwise to operate your scooter at the lowest speed
level;
Turn the dial clockwise to increase the operational speed of your scooter;
We recommend that you select a speed setting at which you feel comfortable,
safe, and in control of your scooter.
Key Switch
This switch turns the power on and off to your scooter.
Insert the key into the key switch.
Turn the key 90 degrees clockwise to turn on your scooter´s power. Your
scooter will beep once, the DC Voltage Meter will light up, and the needle will
move to indicate that power is on.
Turn the key back to the vertical position to turn off your scooter's power.
Horn
Press this button to horn.
Lever forward and backwards
Pull the right lever to drive forwards / push against the left lever;
Pull the left lever to drive backwards / push against the right lever.
Battery indicator
Key switch
Speed adjustment dial
Horn
Lever forward /
Lever backward

~ 9 ~
User Manual
© 2014 VAN OS MEDICAL UK Ltd. Excel House, Ashbrooke Park, Lincoln Way,
Sherburn in Elmet, North Yorkshire, LS25 6PJ
Tel. +44-(0)1977 681400, Fax +44-(0)1977-683397,
Brakes and throttle lever
When the throttle lever is in neutral position the electromagnetic brake will
automatically release and your scooter will move. When the throttle lever is released
it will return to the neutral position and the scooter will decelerate and come to a
complete stop. The parking brake will prevent any further movement of your
scooter.
4.2 Getting on and off your scooter
Before getting on your scooter
Check to be certain that the power is turned off. This will eliminate the
possibility of accidentally activating the paddle controls and causing injury to
yourself or to others;
Check to be certain that your scooter’s brake handle is in the engaged position;
Flip up the armrests.
Getting on your scooter:
Position the seat for safe and easy mounting;
Return tiller to full upright position;
Carefully place one foot on the approximate center of the foot board and seat
yourself comfortably and securely on the seat;
Fasten the seatbelt, if your scooter is equipped with one;
Flip down the armrests.
Getting off your scooter:
Make certain that the power is turned off and the key is removed;
Return tiller to full upright position;
Flip up the armrests;
Unfasten the seatbelt;
Carefully place one foot on the ground, transfer your weight to that leg, and
slowly come to a standing position;
Step away from the scooter.
4.3 Charging batteries
Warning:
Always keep your weight in the middle of the deck. Putting all or the majority
of your weight on the edges of the foot board could cause a dangerous
unstable condition to occur.
Warning:
Before using new batteries for the first time you should charge them for 12
hours.
~ 10 ~
User Manual
© 2014 VAN OS MEDICAL UK Ltd. Excel House, Ashbrooke Park, Lincoln Way,
Sherburn in Elmet, North Yorkshire, LS25 6PJ
Tel. +44-(0)1977 681400, Fax +44-(0)1977-683397,
Batteries and charging
Your scooter is equipped with two maintenance free batteries. These batteries
require no maintenance other than ensuring they are properly charged.
Because your batteries may only have a partial charge when you first receive your
scooter, you may not experience full riding time until you have fully charged them
about 12 hours. Your scooter is equipped with an off-board charger. Charge your
batteries of your scooter after every use for 6-8 hours to extend the maximum life of
your batteries:
We advise you to charge your batteries 6-8 hours after every use of your scooter
to guarantee a longer life;
Turn off the power of the scooter;
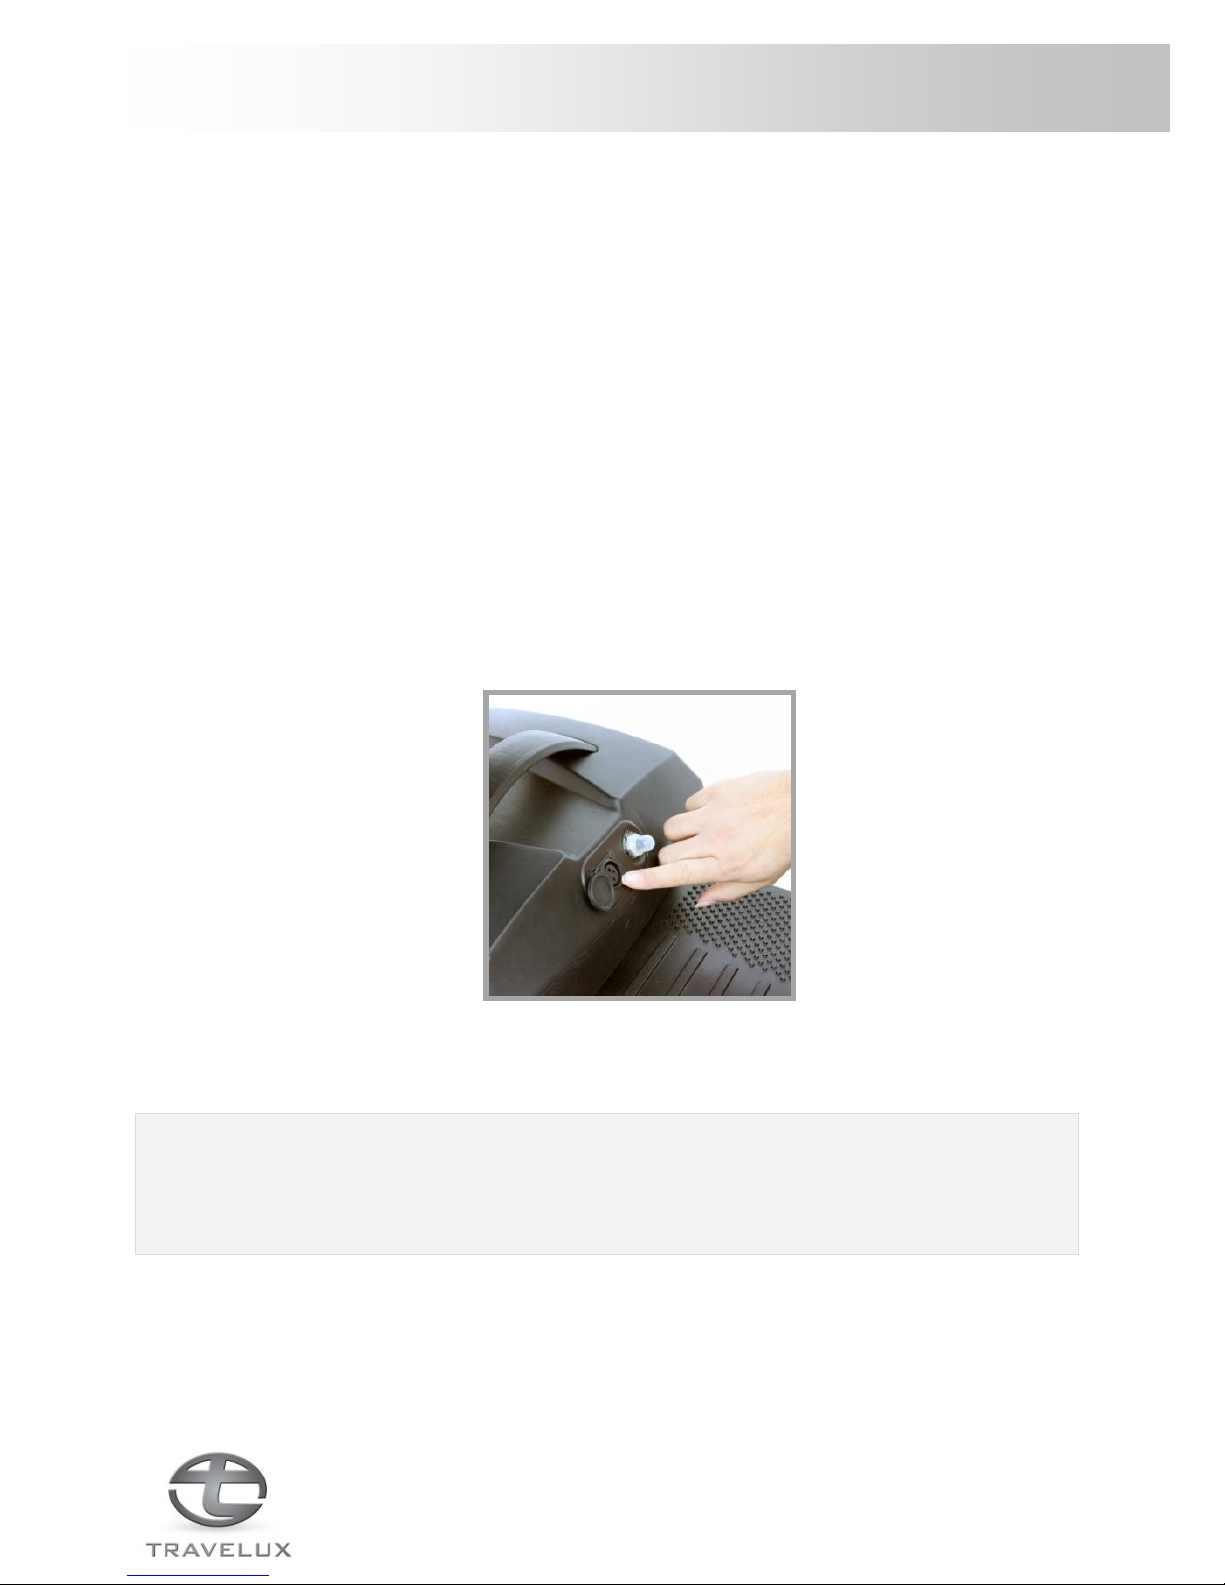
Slide away the cover of the battery socket at the driving position of the tiller
and insert the battery charger in the socket, see photo 1;
Put the charger into the outlet;
Do not switch on the battery charger until all the plugs are in position;
The led light of the battery will be amber while charging;
The led light will turn green when the batteries are fully charged;
If you are not going to use the scooter for more than a week, fully charge the
batteries and then disconnect them from the scooter.
4.4 Before driving
Tip
For your first driving session, make certain that your scooter starts out on a
level surface and that you will continue driving on a level surface.
Photo 1
~ 11 ~
User Manual
© 2014 VAN OS MEDICAL UK Ltd. Excel House, Ashbrooke Park, Lincoln Way,
Sherburn in Elmet, North Yorkshire, LS25 6PJ
Tel. +44-(0)1977 681400, Fax +44-(0)1977-683397,
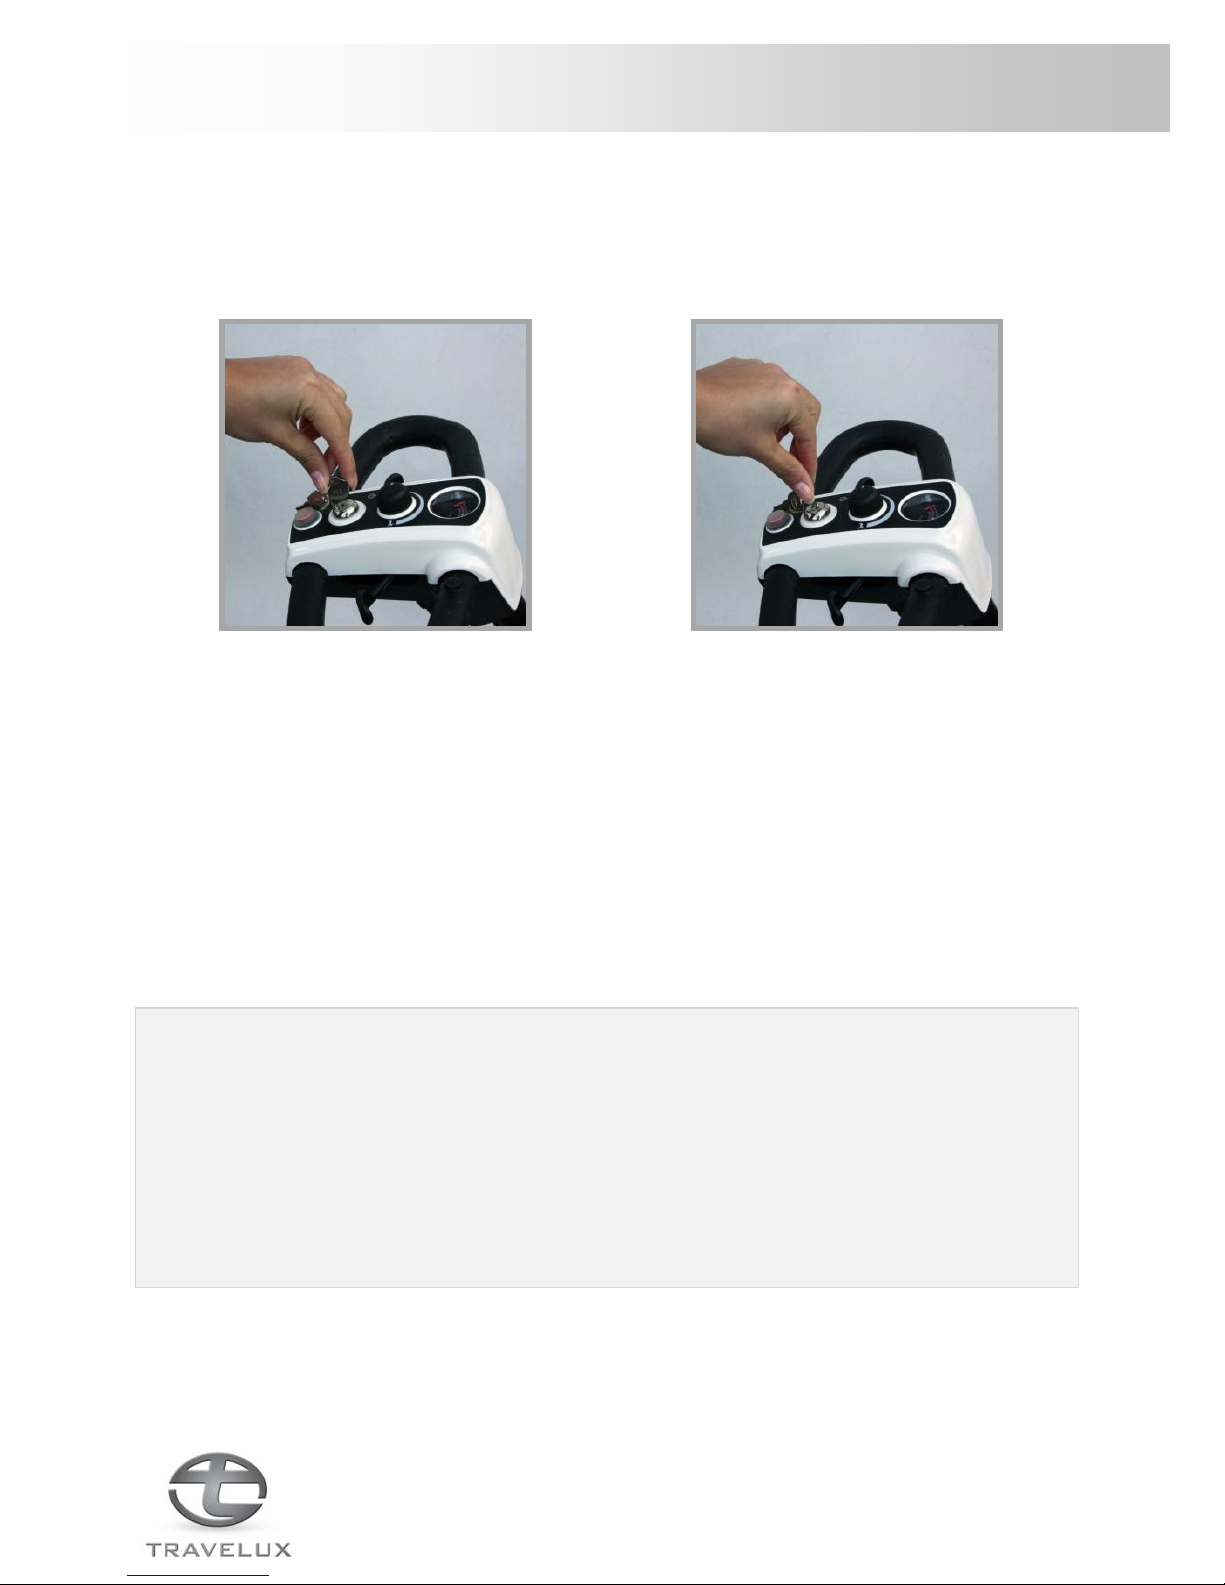
Turning your scooter on and off
Make sure that your scooter is in the drive position;
Make sure your scooter is turned off when getting off of your scooter or
disassemble your scooter, see photo 2;
Turn the key to the left when you want to use your scooter. This will engage
the power of the scooter (photo 3).
To get on your scooter:
Stand behind your scooter;
Make sure that the scooter is in the drive position, photo 4;
Make certain that the seat is positioned for safe and easy use;
Seat yourself on the seat;
Use the seat rotate lever to position the seat fully forwards and to lock the
seat;
Fasten your seat belt, if your scooter is equipped with one;
Place the key into the key switch;
Rotate the key 90oto the left to the on position (photo 3).
Warning:
Pushing the scooter too quickly into the freewheel position (photo 4) will cause
the motor to act as a generator causing the scooter to become difficult to
push;
Never set your scooter in freewheel mode when it is on an incline;
Never disengage the park brake while you are operating your scooter;
Always make certain that your scooter park brake is engaged before inserting
the key into the key switch and turning it to the on position.
Photo 2
Photo 3

~ 12 ~
User Manual
© 2014 VAN OS MEDICAL UK Ltd. Excel House, Ashbrooke Park, Lincoln Way,
Sherburn in Elmet, North Yorkshire, LS25 6PJ
Tel. +44-(0)1977 681400, Fax +44-(0)1977-683397,
Freewheel mode
Your scooter is equipped with a freewheel mode, see photo 4.
Tip
On the decal next to the freewheel lever (photo 4) the Drive position is
indicated by “D”and the freewheel mode is indicated by “N”.
Freewheel mode
Pull the lever downwards into the freewheel mode (photo 4).
Drive position
Pull the freewheel lever upwards to the Drive position to activate the
electromagnetic brakes of your scooter. You can now drive with your scooter
and the scooter can’t be pushed (photo 4).
Photo 4

~ 13 ~
User Manual
© 2014 VAN OS MEDICAL UK Ltd. Excel House, Ashbrooke Park, Lincoln Way,
Sherburn in Elmet, North Yorkshire, LS25 6PJ
Tel. +44-(0)1977 681400, Fax +44-(0)1977-683397,
4.5 Basic driving
Make certain that you are seated safely and properly on your scooter;
Turn the speed control knob fully counter clockwise to the slowest setting;
Insert the key into the key switch;
Turn the key counter clockwise to the “On” position;
Place your hands on the handgrips;
oDriving forward; Pull the right lever / push the left lever;
oDriving backwards; Pull the left lever / push the right lever;
Pull the throttle control lever to gently accelerate your scooter;
Release the throttle control lever to allow your scooter to come gently to a full
stop;
Practice these two basic functions until you feel that you have control of your
scooter.
4.6 Steering
Place both hands on the handgrips of the tiller, turn the tiller to the right to
travel to the right;
Turn the tiller to the left to travel to the left;
Make certain to maintain sufficient clearance when turning your scooter so that
the rear wheels will be clear of any obstacles.
Warning:
Turning your scooter too sharply at a too high speed can have result that the
rear wheels won’t be on the ground which will cause the scooter to tip over.
Avoid this at all times by decelerating and making a large curve around corners
and obstacles.
Steering in a tight spot
If you must steer in a tight spot, such as entering or leaving a doorway;
Bring your scooter to a full stop;
Set speed at the lowest setting;
Turn the tiller to the direction in which you wish to drive.
Steering in reverse
Please be extra careful when you are driving in reverse.
Pull the left lever / push the right lever;
Turn the tiller to the left to drive to the left;
Turn the tiller to the right to drive to the right.

~ 14 ~
User Manual
© 2014 VAN OS MEDICAL UK Ltd. Excel House, Ashbrooke Park, Lincoln Way,
Sherburn in Elmet, North Yorkshire, LS25 6PJ
Tel. +44-(0)1977 681400, Fax +44-(0)1977-683397,
4.7 Control through tight spots
Your scooter is developed to increase your mobility but you will undoubtedly
encounter some obstacles that will require practice to manoeuvre smoothly and
safely. Below are some common obstacles that you may encounter during the daily
use of your scooter. Below are also driving tips which will help you conquer those
obstacles. Study and follow these tips so that you will be in control of your scooter as
you manoeuvre it through doors, up and down ramps, up and over curbs, through
grass and gravel, and up and down inclines.
Ramps
When driving up a ramp, curb, or incline:
Lean forward to move the centre of gravity of the scooter forwards for
maximum stability and safety.
When a ramp has a turn:
Make sure that the front wheels make a large curve;
This will make sure that the rear wheels follow in a large curve and will be free
of obstacles.
When you will have to stop while driving up a ramp:
While starting up again you should pull the lever gently and steady;
Accelerate slowly after stopping on any incline.
Driving down a ramp
Make sure that the speed setting of your scooter is the slowest speed setting;
When you come to a stop release the lever slowly and carefully.
Curbs
Always use curbs;
Do not go up or down a curb that is higher than 4 cm;
Always use caution when descending a curb;
Approach the curb so that both back wheels of your scooter go over the curb at
the same time;
Never go down on curbs by traversing them. Doing this will cause the scooter to
tip over;
Go down a curb slowly to avoid a jarring bump. Use as little power as possible.
Grass and Gravel
Your scooter performs admirably on grass, gravel and hills but you must follow the
operational parameters presented in this manual, see chapter 3. If you are unsure
about any situation avoid it.
Feel free to use your scooter on lawns or in park areas;
Avoid long or high grass, which may wrap around your scooter's axles;
Avoid loose gravel.

~ 15 ~
User Manual
© 2014 VAN OS MEDICAL UK Ltd. Excel House, Ashbrooke Park, Lincoln Way,
Sherburn in Elmet, North Yorkshire, LS25 6PJ
Tel. +44-(0)1977 681400, Fax +44-(0)1977-683397,
4.8 Going up an incline / down a decline
Driving on inclines
For maximum stability lean forward;
Drive with caution when attempting to drive up to any incline, even handicap
access ramps;
Always climb or descend an incline by driving straight up or straight down
the face of the slope;
Do not traverse or drive across the face of an incline in any direction;
Do not attempt to descend an incline that is covered with snow, ice, cut or
wet grass, leaves, of any other potentially hazardous material;
Do not back down of an incline;
Try to keep your scooter moving when climbing on an incline. If you have
to stop, restart and accelerate slowly and carefully;
Do not try to descend or climb a slope which gradient is higher than
recommended. The recommended incline gradient is 6°.
Warning:
While you are driving down a slope and your scooter starts to move faster than
you feel is safe release the throttle control lever slowly. Which will cause your
scooter to decelerate. Keep the lever in the same position when you feel that
you are in the control of your scooter again.
Driving down a decline
Lower the speed of your scooter;
When it’s safe to descend drive down the decline.
Tip
When using either of the following procedures to back down a slope Van Os
Medical UK ltd. strongly advises that you have the assistance of another
person.
Van Os Medical UK ltd. does not recommend that you drive your scooter in reverse
down any incline, ramp, curb, or low rise. Backing down any slope may create a very
hazardous situation. If it is necessary to back down a slope follow one of the
following.

~ 16 ~
User Manual
© 2014 VAN OS MEDICAL UK Ltd. Excel House, Ashbrooke Park, Lincoln Way,
Sherburn in Elmet, North Yorkshire, LS25 6PJ
Tel. +44-(0)1977 681400, Fax +44-(0)1977-683397,
Procedure 1: Under power
Set the key switch to the “Off position”;
Get off of your scooter;
Set the key switch to the “On position”;
While standing next to your scooter, carefully operate the controls at the lowest
speed setting;
Slowly and carefully back your scooter down the incline;
Step on your scooter and resume normal operation.
Procedure 2: Emergency (No power)
Set the key switch to the “Off position”;
Get off of your scooter;
Put the scooter into the freewheel position;
While standing next to the scooter, carefully manually maneuver it down the
slope;
When you have reached a level surface at the bottom of the slope, put the
scooter into the drive position;
See chapter 7 to restore power.
Warning:
When your scooter is in freewheel mode, the park brake is released. The
weight of the scooter on a slope may cause you to lose control of the scooter.
If you do not feel capable of manually controlling your scooter down the slope
request assistance or do not attempt to use this procedure.
4.9 EMI / RFI
The rapid development of electronics, especially in the area of communications, has
saturated our environment with electromagnetic (radio) waves that are emitted by
television transmitters, cellular phones, citizen’s band radios (CBs), amateur radios
(ham radios), wireless computer left, microwave transmitters, paging transmitters,
etc. These electromagnetic (EM) waves are invisible and increase in strength the
closer one gets to the source of transmission. When these energy waves act upon
electrical devices and cause them to malfunction or to function in an erratic or
uncontrolled manner, they are referred to as Electromagnetic Interference (EMI) of
Radio Frequency Interference (RFI).
EMI / RFI and your scooter
All electrically powered vehicles, including scooters are susceptible to
Electromagnetic Interference / Radio Frequency Interference (EMI / RFI). This
interference could result in abnormal, unintended movement of your scooter.

~ 17 ~
User Manual
© 2014 VAN OS MEDICAL UK Ltd. Excel House, Ashbrooke Park, Lincoln Way,
Sherburn in Elmet, North Yorkshire, LS25 6PJ
Tel. +44-(0)1977 681400, Fax +44-(0)1977-683397,
Warning:
Unintended movement or brake release could cause an accident or injury.
The FDA has determined that each make and model of scooter can resist EMI/ RFI to
a certain level. The higher the lever of resistance, the greater the degree of
protection from EMI/ RFI –measured in volts per meter (V/m). The FDA has also
determined that current technology is capable of providing 20 V/m of resistance to
EMI/ RFI, which would provide useful protection against common sources of
interference. This product has been tested and has passed an immunity lever of 20
V/m.
EMI / RFI recommendations
Do not turn on or use hand-held personal electronic communication devices
such as cellular phones, walkie-talkies, and CB radios while your scooter is
turned on;
Be aware of any nearby transmitters (radio, television, microwave, etc.) on
your intended route and avoid operating your scooter close to any of those
transmitters;
Turn off the power if your scooter is going to be in a stationary position for any
length of time;
Be aware that adding accessories or components or modifying your scooter may
make it more susceptible to EMI/ RFI;
Warning:
Turn off your scooter as soon as it is safely possible if unintended or
uncontrollable motion occurs or if unintended park brake release occurs.

~ 18 ~
User Manual
© 2014 VAN OS MEDICAL UK Ltd. Excel House, Ashbrooke Park, Lincoln Way,
Sherburn in Elmet, North Yorkshire, LS25 6PJ
Tel. +44-(0)1977 681400, Fax +44-(0)1977-683397,
MAKING ADJUSTMENTS TO YOUR SCOOTER CAN CAUSE BIG RISKS FOR
YOUR SAFETY AND THE FUNCTION OF YOUR SCOOTER. ADJUSTMENTS
MADE BY YOURSELF ARE STRONGLY ADVISED AGAINST AND CARRIED OUT
AT YOUR OWN RISK.
5 INSTRUCTIONS FOR USE AND MOUNTING OPTIONS
5.1 Technical information
Total length 106 cm
Total width 55 cm
Total height 88 cm - 94 cm
Seat width 43 cm
Seat depth 40 cm
Backrest height 40 cm
Front wheels 8”
Rear wheels 8”
Anti-tip wheels 2”
Maximum user weight 135 kg
Ground clearance 6 cm
Maximum speed 7,2 km/h
Maximum turning range 99 cm
Maximum slope gradient 6ᵒ
Batteries 2-12AH/ 2-18AH
Weight battery pack 9.5 kg
Weight 52 kg
Weight (exclusive battery pack) 42.5 kg
Weight seat with armrests 9.5 kg
Operating range 12 km*
* Note: operating range is measured under ideal conditions. Weather conditions, surfaces,
battery type and user weight can affect the operating range.

~ 19 ~
User Manual
© 2014 VAN OS MEDICAL UK Ltd. Excel House, Ashbrooke Park, Lincoln Way,
Sherburn in Elmet, North Yorkshire, LS25 6PJ
Tel. +44-(0)1977 681400, Fax +44-(0)1977-683397,
5.2 Armrest adjustments
Armrest width adjustment
To adjust the armrest width:
Loosen the adjustment knob at the back of the seat (photo 5);
Slide the armrest in or out to the desired width;
Tighten the adjustment knob.
Flip-up the armrest
Place your hand on the end of the armrest and pull it upwards (photo 6) to flip it up
for easy transfer on and off your scooter.
Photo 6
Photo 5
Other manuals for Tiempo
2
Table of contents
Other Travelux Scooter manuals


