Nonstop Station E Parts list manual

Setup &
Usage Guide
nonstopproducts.com
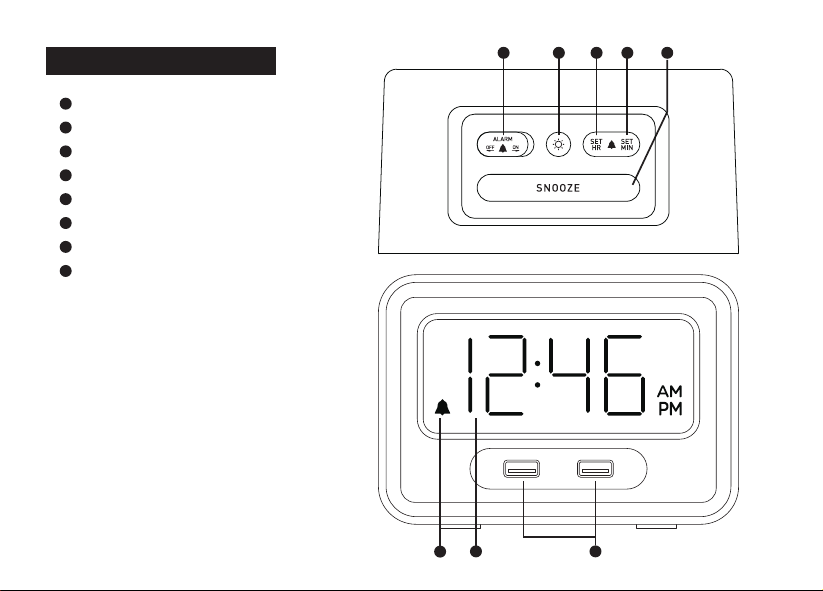
Alarm On/Off Slide
Screen Brightness
Alarm Hour Set
Alarm Minute Set
Snooze
Alarm Indicator
Time Display
USB CHARGING PORTS (2.0A)
Interface & Display
1
2
3
4
5
6
7
8
5
687
3 41 2

1. Plug the AC / DC (120 V AC) power cord into the
power outlet on the AC wall. Your clock will turn on.
It's ready to use now.
2. When the device is ON, the LED will blink. Press
both "SNOOZE" and "DIMMER" together to set
the current time.
3. If desired, place the safety clip on the cable and
attach it to the furniture or wall.
Installation
The Station E features dual USB charging ports
(2 X 2A) on the front of the unit which are designed to
charge most USB compatible devices. Simply plug in
a USB cable into the USB port then connect to your
device to begin charging.
USB Charging
Specifications
Power .............................................................................................................. DC 5V 4.0A Adapter
USB Charging Ports............................................................................................................. 2X / 2.A
Alarm Duration.................................................................................................................60 Minutes
Snooze Duration................................................................................................................ 9 Minutes

To set the time, simply press the HR button and MIN
button to change the alarm time.
Slide the ALARM switch to the "ON" position. When
the alarm is on, the alarm indicator icon will appear
the display.
Setting the Alarm
To snooze, tap the SNOOZE button. The Alarm will
sounds again after 9 minutes. While the alarm is
being snoozed, the Alarm indicator LED will flash .
To reset ALARM to sound again next day, press
switch to the “ON” again.
Using the Alarm
There are three (3) levels of display brightness.
Repeatedly press the DIMMER button to select the
desired setting.
Adjusting the Brightness
1. On the top of the clock, press both "SNOOZE" and
"DIMMER" together to enter year setting mode,
with the display will begin flashing "20 ", and then
press the HR/MIN buttons to set the year .
2. Press SNOOZE (or DIMMER)button again to set
the date. The display will begin flashing "1/1 ",
press theHR to set the month and press MIN to
set the day.
3. Press SNOOZE(or DIMMER button confirm date
set and enter time setting mode. Press the HR and
MIN buttons to set the hours/minutes. (You can
tap or hold down to change the time faster). As
you cycle through, the hours will change from AM
to PM.
4. Press SNOOZE (DIMMER)button again to confirm
the month and enter to set the DST (auto day light
savings time) mode.
5. Press the HR /MIN button to change
DST"ON"/"OFF"
Press SNOOZE (DIMMER)button again to confirm
DST,and then exit the set.
Note: the DST by default is ON.
Setting the Date & Time

SAFETY PRECAUTIONS
Some of the following information may not apply to your
particular product; however, as with any electronic product,
precautions should be observed during handling and usvve.
1. Read these instructions.
2. Keep these instructions.
3. Heed all warnings.
4. Follow all instructions.
5. Do not use this apparatus near water.
6. Clean only with a dry cloth.
7. Do not block any of the ventilation openings. Install in
accordance with the manufacturer’s instructions.
8. Do not install near any heat sources such as radiators,
heat registers, stoves, or other apparatus (including
amplifiers) that produce heat.
9. Do not defeat the safety purpose of the polarized or
ground-type plug. A polarized plug has two blades with
one wider than the other. A grounding type plug has two
blades and a third grounding prong. The wide blade or the
third prong are provided for your safety. When the
provided plug does not fit into your outlet, consult an
electrician for replacement of the obsolete outlet.
10. Protect the power cord from being walked on or pinched
particularly at plugs, convenience receptacles, and the
point where they exit from the apparatus.
11. Only use attachments/accessories specified by the
manufacturer
12. Refer all servicing to qualified service personnel. Servicing is
required when the apparatus has been damaged in any way,
such as power-supply cord or plug is damaged, liquid has
been spilled or objects have fallen into the apparatus, the
apparatus has been exposed to rain or moisture, does not
operate normally, or has been dropped.
13.
SURGE PROTECTORS: It is recommended to use a
surge protector for AC connection. Lightning and
power surges ARE NOT covered under warranty for
this product.
a. Do not expose this unit or the AC/DC adapter to dripping or
splashing water. Keep liquid-filled objects, such as vases,
away from this unit and AC/DC adapter.
b. To ensure that this unit is completely disconnected,
unplug it from the wall.
c. Ensure that the AC/DC adapter is easily accessible.
d. Please note the information printed underneath the unit.
e. Do not impede the ventilation of this unit by covering the
ventilation openings with items such as newspapers,
table-cloths, curtains, etc.
f. Keep open flames, such as lighted candles, away from this
unit.
g. Do not place this unit in closed bookcases, racks, or other
spaces without proper ventilation.

FCC STATEMENTS
NOTE: This equipment has been tested and found to
comply with the limits for a Class B digital device,
pursuant toPart 15 of the FCC Rules. These limits are
designed to provide reasonable protection against
harmful interference in a residential installation. This
equipment generates, uses and can radiate radio
frequency energy and, if not installed and used in
accordance with the instructions, may cause harmful
interference to radio communications. However, there is
no guarantee that interference will not occur in a
particular installation. If this equipment does cause
harmful interference to radio or television reception,
which can be determined by turning the equipment off
and on, the user is encouraged to try to correct the
interference by one or more of the following measures:
• Reorient or relocate the receiving antenna.
• Increase the separation between the equipment and
receiver.
• Connect the equipment into an outlet on a circuit
different from that to which the receiver is connected.
• Consult the dealer or an experienced radio/TV
technician for help.
Compliance information: This device complies with Part
15 of the FCC Rules. Operation is subject to the following
two conditions: (1 ) this device may not cause harmful
interference, and (2) this device must accept any
interference received, including interference that may
cause undesired operation. Changes or modifications not
expressly approved by the party responsible for
compliance could void the user’s authority to operate the
equipment.
This equipment complies with FCC radiation exposure
limit set forth for an uncontrolled environment. This
equipment should be installedand operated with
minimum distance 20 cm between the radiator and your
body
Supplier’s Declaration of Conformity
Product Name: Station E
Model number: NSE
Responsible party:
Nonstop,Inc.
+1775-398-3038

CAUTION
RISK OF ELECTRIC SHOCK
DO NOT OPEN
ATTENTION: The exclamation point within an equilateral triangle is Intended to alert the user to
the presence of important operating and maintenance (servicing) instructions in the literature
accompanying the appliance.
DANGEROUS VOLTAGE: The lightning flash with arrowhead symbol, within an equilateral triangle
is intended to alert the user to the presence of uninsulated dangerous voltage within the product’s
enclosure that may be of sufficient magnitude to constitute a risk of electric shock to persons.
WARNING: Changes or modifications to this unit not expressly approved by the party responsible for compliance
could void the user's authority to operate the equipment.
CAUTION: TO REDUCE THE RISK OF ELECTRIC SHOCK, DO NOT REMOVE COVER (OR BACK).
NO USER-SERVICEABLE PARTS INSIDE. REFER SERVICING TO QUALIFIED SERVICE PERSONNEL.
ATTENTION: POUR ÉVITER LES CHOC ÉLECTRIQUES, INTRODUIRE LA LAME LA PLUS LARGE DE LA FICHE DANS
LA BORNE CORRESPONDANTE DE LA PRISES ET POUSSER JUSQU’AU FOND.
WARNING: TO PREVENT FIRE OR SHOCK HAZARD, DO NOT EXPOSE THIS UNIT TO RAIN OR MOISTURE.

Nonstop Inc. All Rights Reserved.
Table of contents
Other Nonstop Alarm Clock manuals


