NookBox P119037 User manual
1NookBox Installation Guide Smoke Mini Detector
NookBox Smoke Detector Zigbee
(P119037 / E6309676)
Installation Guide

2NookBox Installation Guide Smoke Mini Detector
NookBox Smoke Detector is a ZigBee Smoke Detector with built-in PIR and Temperature sensor, it is
capable of sending wireless signals to the coordinator in the ZigBee network upon detection of smo-
ke particles or abnormal high heat to protect house from re hazards. The Smoke Detector’s alarm
situations, battery condition, operating conditions, supervisory data and general fault information
are sent to the ZigBee Control Panel wirelessly.
The Smoke Detector also features IR detection. The it detects infrared signature to pick up mo-
vements within an assigned area and signals the Control Panel to activate the alarm if an intruder
crosses its’ path of detection.
The Smoke Detector utilizes ZigBee technology for wireless signal transmission. ZigBee is a wireless
communication protocol that is reliable and has low power consumption and high transmission e-
ciency. Based on IEEE802.15.4 standard, ZigBee allows a large amount of devices to be included in a
network and coordinated for data exchange and signal transmission.
The Smoke Detector serves as an end device in the ZigBee network. It can be included in the ZigBee
network to transmit signal upon activation, but cannot permit any other ZigBee device to join the
network through the Smoke Detector.
NookBox Smoke Detector Zigbee
(P119037 / E6309676)
3NookBox Installation Guide Smoke Mini Detector
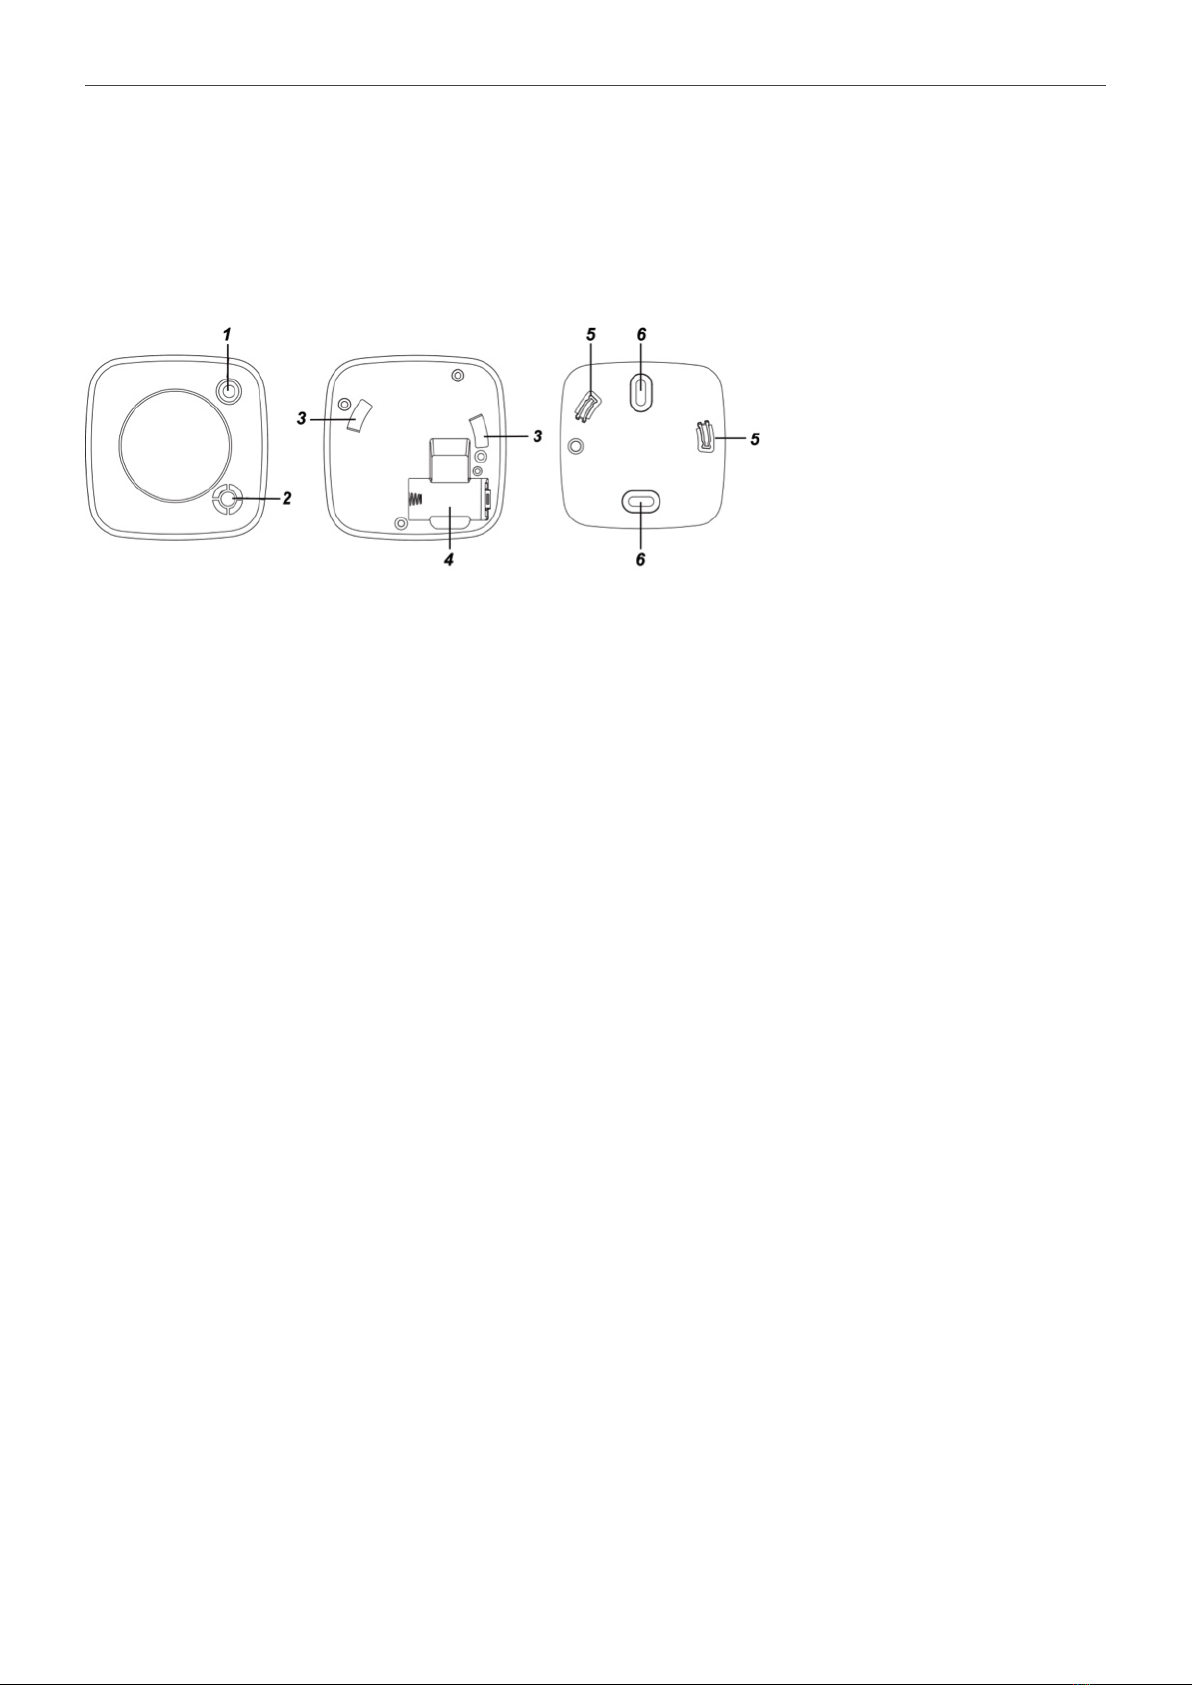
Parts Identication
1. LED Indicator / Test Button
Red LED
• Turns ON briey: Transmitting signal.
• Quick ash: Alarming.
• Flashes every 2 seconds: Smoke Detector under warmup and calibration process.
• Flashes every 1 second: Smoke Detector under Sleep Mode.
• Flashes every 4 seconds: battery exhausted.
• Flashes once every 20 minutes: the Smoke Detector has lost connection to its current ZigBee network.
Orange LED
• Flash every second: Device power on/Calibration failed.
• Flashes every 5 seconds: Detecting smoke failed or device malfunctioning.
• Flashes every 4 seconds: battery exhausted.
• Flashes every 45 seconds: Low battery condition.
Test Button
• Press and hold the button for 10 seconds then release to reset the Smoke Detector.
• Press and hold the button for 20 seconds to enter calibration process.
• Press the button once to:
» Send a supervision / test signal.
» Check smoke detection chamber.
» Silence alarm.
2. Buzzer
3. Mounting Holes (for Hooks)
The Hooks of the Mounting Bracket can hook into this Mounting Hole.
4. Battery compartment
5. Hooks
6. Mounting Holes

4NookBox Installation Guide Smoke Mini Detector
Features
Battery
• A 3V CR123A Lithium Battery is used to supply power to the Smoke Detector.
• The Smoke Detector has a foolproof mechanism which prohibits cover closure without rst installing battery.
• When the Smoke Detector is low on battery, a low battery signal will be transmitted along with regular signal transmissions.
The Orange LED will ash with accompanying low-volume beep once every 45 seconds.
• The Red and Orange LED will ash once every 4 seconds when the battery is exhausted.
<NOTE>
When changing the battery, after removing the old battery, press the Test Button twice to fully discharge before inserting new battery.
Testing the Smoke Detector
By pressing the Test Button on the Smoke Detector, you can test if the Smoke Detector is functioning normally.
• If the Smoke Detector functions normally, the Red LED will be on for 2 seconds followed by a 2-tone beep.
• If the buzzer sounds 2-tone beeps 3 times, the “Optical Chamber” on the Smoke Detector is either dirty or out-of-order.
• If the Red LED doesn’t light and no beep is sounded, it means the Smoke Detector is out-of-order.
Test Mode
• The Smoke Detector can be put into Test mode by pressing the Test Button. In Test mode, it will disable the sleep timer and will
enable the LED indicator to ash every time a movement is detected. Every time the Test Button is pressed, the Smoke Detector
will transmit a test signal to the Control Panel for radio range test and enter the test mode for 3 mins. It will exit Test Mode automatically
after 3 minutes and return to normal mode.
Supervision
• The Smoke Detector will transmit a supervision signal to report its condition regularly according to user setting. The factory default
interval is 30 minutes. The user can also press the Test Button once to transmit a supervision signal manually.
Temperature Detection
The Temperature Sensor will transmit temperature signals regularly according to setting. The factory default interval is 10 minutes.
• The Smoke Detector will also send temperature signal when temperature changes by +/- 2°C.
• You can also press the Test Button once to transmit a temperature signal manually.
• The temperature detection range is about -10°C ~ 50°C.( 14°F ~ 122°F)

5NookBox Installation Guide Smoke Mini Detector
Alarm Detection
The Smoke Detector will activate re alarm when either of its smoke detection or high heat detection function is triggered. When an alarm is
activated, the Smoke Detector will transmit alarm signal and raise alarm with its built in buzzer, the Red LED will ash rapidly. The alarm sound
will repeat in pattern of 3-second alarm and 1-second pause.
Smoke Detection:
• The Alarm is activated whenever the smoke concentration exceeds the detection threshold.
• The Smoke Detector will check some concentration every 8 seconds, the alarm will continue until the smoke concentration drops
below alarm threshold.
Heat Detection:
• Rate of Rise: When the temperature rises by 8.25°C per minute.
• High Heat: When the temperature exceeds 57.3°C
The Smoke Detector will check temperature every 10 seconds. It will only stop alarming if the temperature drops below alarm threshold:
• If the alarm was triggered by Rate of Rise condition (8.25°C per minute or more): The temperature must drop to 4°C below highest
temperature detected for the Detector to stop alarming.
• If the alarm was triggered by High Heat condition (57.3°C): The temperature must drop below 49°C for Smoke Detector to stop
alarming.
• For both Smoke alarm and Heat Alarm, a restore signal will be transmitted if no smoke is detected again for 160 seconds.
(Climax Control Panel Only)
The Smoke and Heat Detection function of the Smoke Detector can be disabled by sending ZigBee command from the Control Panel
if needed to accommodate dierent installation environment. To disable the Smoke or Heat detection function:
1 Go to the Device List in the Control Panel setting, select “Edit Device” and nd the “Bypass” option.
2 Before sending command from the Control Panel, press the Function Button on Smoke Detector once.
3 Select the function to be disabled from the Bypass option and conrm to send command.
IR Detection:
• The Smoke Detector will only transmit burglar alarm signal to the Control Panel if any movement is picked up within the IR
detection coverage, the buzzer will not sound and the LED will not ash. (Please refer to your Control Panel for details).
Alarm Silence
• After alarm activation, the Smoke Detector can be silenced temporarily by pressing the button.
1. If the button is pressed within 1 minute after alarm activation, the alarm will be silenced 1 minute after button press. E.g. If the button
is pressed 30 seconds after alarm activation, then the alarm will be silenced at 1 minute and 30 seconds after alarm trigger.
2. If the button is pressed when the alarm has been activated for more than 1 minute, the alarm silenced immediately and will enter
Alarm Silence mode for 9 minutes.
• The Alarm Silence mode lasts 9 minutes, the Red LED will ash every second during this period.
• During the Alarm Silence period, f the smoke concentration or temperature continue to rise, the Smoke Detector will sound the alarm
again and cannot be silenced by button press. The alarm condition must subside for the alarm to stop
• When the 9-minute Alarm Silence period expires:
If the smoke concentration or temperature has dropped below alarm threshold, the Smoke Detector will sound a 2-tone beep and,
transmits an alarm restore signal and returns to normal operation mode.
If the smoke concentration or temperature is still above alarm threshold, the Smoke Detector will sound the alarm again.
Recalibration
As the operation condition of the Smoke Detector may vary after being installed for some time, you may wish to recalibrate the Smoke De-
tector to take a new smoke detection threshold value and ensure optimal performance of the Smoke Detector. To do this:
• Press 20 seconds on the Test Button and hold until the Red LED starts to ash. The Smoke Detector will sound 3 short beeps then
follow the calibration process to take the new reference value with the Red LED will ash every 2 seconds to indicate.
• If calibration fails, the Smoke Detector will continuously beep with Orange LED ashing every second, you need to remove the
battery, press the Test Button twice to fully discharge the battery, then reinsert the batteries to restart Smoke Detector.
• Every time the battery is removed and reinserted, the Smoke Detector will also take the new threshold value following the warming
and calibration process.

6NookBox Installation Guide Smoke Mini Detector
ZigBee Network Setup
ZigBee Device Guideline
ZigBee is a wireless communication protocol that is reliable and has low power consumption and high transmission efficiency. Based on the
IEEE802.15.4 standard, ZigBee allows a large amount of devices to be included in a network and coordinated for data exchange and signal
transmission.
Due to the fundamental structure of ZigBee network, ZigBee device will actively seek and join network after powering on. Since performing a
task in connecting network may consume some power, it is required to follow the instructions to avoid draining battery of a ZigBee device.
• Ensure your ZigBee network router or coordinator is powered on before inserting battery into the ZigBee device.
• Ensure the ZigBee network router or coordinator is powered on and within range while a ZigBee device is in use.
• Do not remove a ZigBee device from the ZigBee network router or coordinator without removing the battery from a ZigBee device.
Joining the ZigBee Network
As a ZigBee device, the Smoke Detector needs to join a ZigBee network to transmit signal when smoke concentration or temperature
is detected. Please follow the steps bellow to join the Smoke Detector into ZigBee network.
The Smoke Detector has 3 ZigBee Endpoints for PIR, Smoke Detector and Temperature Sensor function. When joining ZigBee network,
it will be recognized as 3 separate ZigBee devices and will occupy 3 zones in your ZigBee network coordinator.
1. Insert the battery into the battery compartment to power on the Smoke Detector.
2. The Smoke Detector will emit 2 short beeps, and begin warm up for 1 minute, LED flashes every 2 seconds.
3. After 1-minute warm up period expires, the Smoke Detector will emit a beep to indicate it now enters calibration process.
The calibration process takes 1~7 minutes; the LED will continue to flash during calibration.
Joining ZigBee network is prohibited during warm up and calibration process. After calibration process the Smoke Detector will
emit a 2-tone beep, LED will turn off.
4. The Smoke Detector is only available for joining the ZigBee network after completing calibration.
Press and hold the Test Button for 10 seconds and release to search for existing ZigBee network. Please make sure the permit-to-join
feature on the router or coordinator of your ZigBee network is enabled.
5. After joining the ZigBee network, the Smoke Detector will be registered in the network automatically. Please check the ZigBee
coordinator, security system control panel or CIE (Control and Indicating Equipment) to confirm if joining and registration is successful.
6. When calibration is complete, the Smoke Detector will emit 2 beeps and LED will stop flashing to indicate it is now under normal
operation. If calibration fails, the Smoke Detector will sound continuous beep.
7. Under normal operation, if the Smoke Detector loses connection to its current ZigBee network, the LED indicator will flash
every 20 minutes to indicate the situation. Please check your ZigBee network condition and Smoke Detector signal range to correct
the situation.
Removing Device from ZigBee Network (Factory Reset)
To remove the Smoke Detector from current ZigBee network, the Smoke Detector must be put to Factory Reset to complete device removal.
Factory Reset function will clear the device of its stored setting information and prompt the device to search for new ZigBee network.
Before removing device, make sure the Smoke Detector is within current ZigBee network signal range.
1. Press and hold the function button for 10 seconds, then release the button to reset Smoke Detector.
2. Upon reset, the device will clear current ZigBee network setting and transmit signal to ZigBee coordinator to remove itself from current
ZigBee network. It will then actively search for available ZigBee network again and join the network automatically.

7NookBox Installation Guide Smoke Mini Detector
Installation
Installation Guideline
• It is recommended that the installation site be in the center area of the ceiling.
• Do not locate the detector in the following locations:
» The Kitchen – Smoke from cooking might cause an unwanted alarm.
» Near a ventilating fan, florescent lamp or air-conditioning equipment – air drafts from them may affect the
sensitivity of the detector.
» Near ceiling beams or over a cabinet – stagnant air in these areas may affect the sensitivity of the detector.
» In the peak of an “A” frame type of ceiling.
Installation Recommendation
• It is recommended to install the Smoke Detector in the following locations.
» In a ceiling area with full view of its detection coverage unobstructed by appliances and furniture.
» Near the entrance of a room or house to monitor entry activity.
• Limitations
» Do not install the Smoke Detector exposed to direct sunlight.
» Avoid installing the Smoke Detector in areas where devices may cause rapid change of temperature in the detection area, i.e. air
conditioner, heaters, etc.
» Avoid large obstacles in the detection area.
» Do not pointing directly at sources of heat e.g. Fires or boilers, and not above radiators.
» Avoid moving objects in the detection area i.e. curtain, wall hanging etc.
• Press the Test Button to enter Test Mode. Walk around the protected area noting when the LED lights up and check that the detection
coverage is adequate.
• When detection coverage is found to be satisfying, installation is now completed.
8NookBox Installation Guide Smoke Mini Detector
Mounting the Smoke Detector
Step 1. Place the Smoke Detector at desired mounting location and use the Range Test function to make sure the Smoked
Detector can be received by the Control Panel at mounting location.
Step 2. The Smoked Detector has a mounting bracket for ceiling installation. Use the holes on the bracket as template; mark the
mounting location on ceiling.
Step 3. Screw the mounting bracket onto the ceiling according marked locations, drill holes in and insert wall plugs if required.
Step 4. Align the mounting holes on Smoke Detector with the hooks on the mounting bracket. Fit the Smoke Detector onto
bracket and rotate clockwise to lock the hook. Installation is now complete.
• The Smoke Detector is designed to be mounted on the ceiling.
• The ideal mounting height for the Smoke Detector is 2.4 meters to 3 meters. Mounting above 3 meters can affect
detection performace.
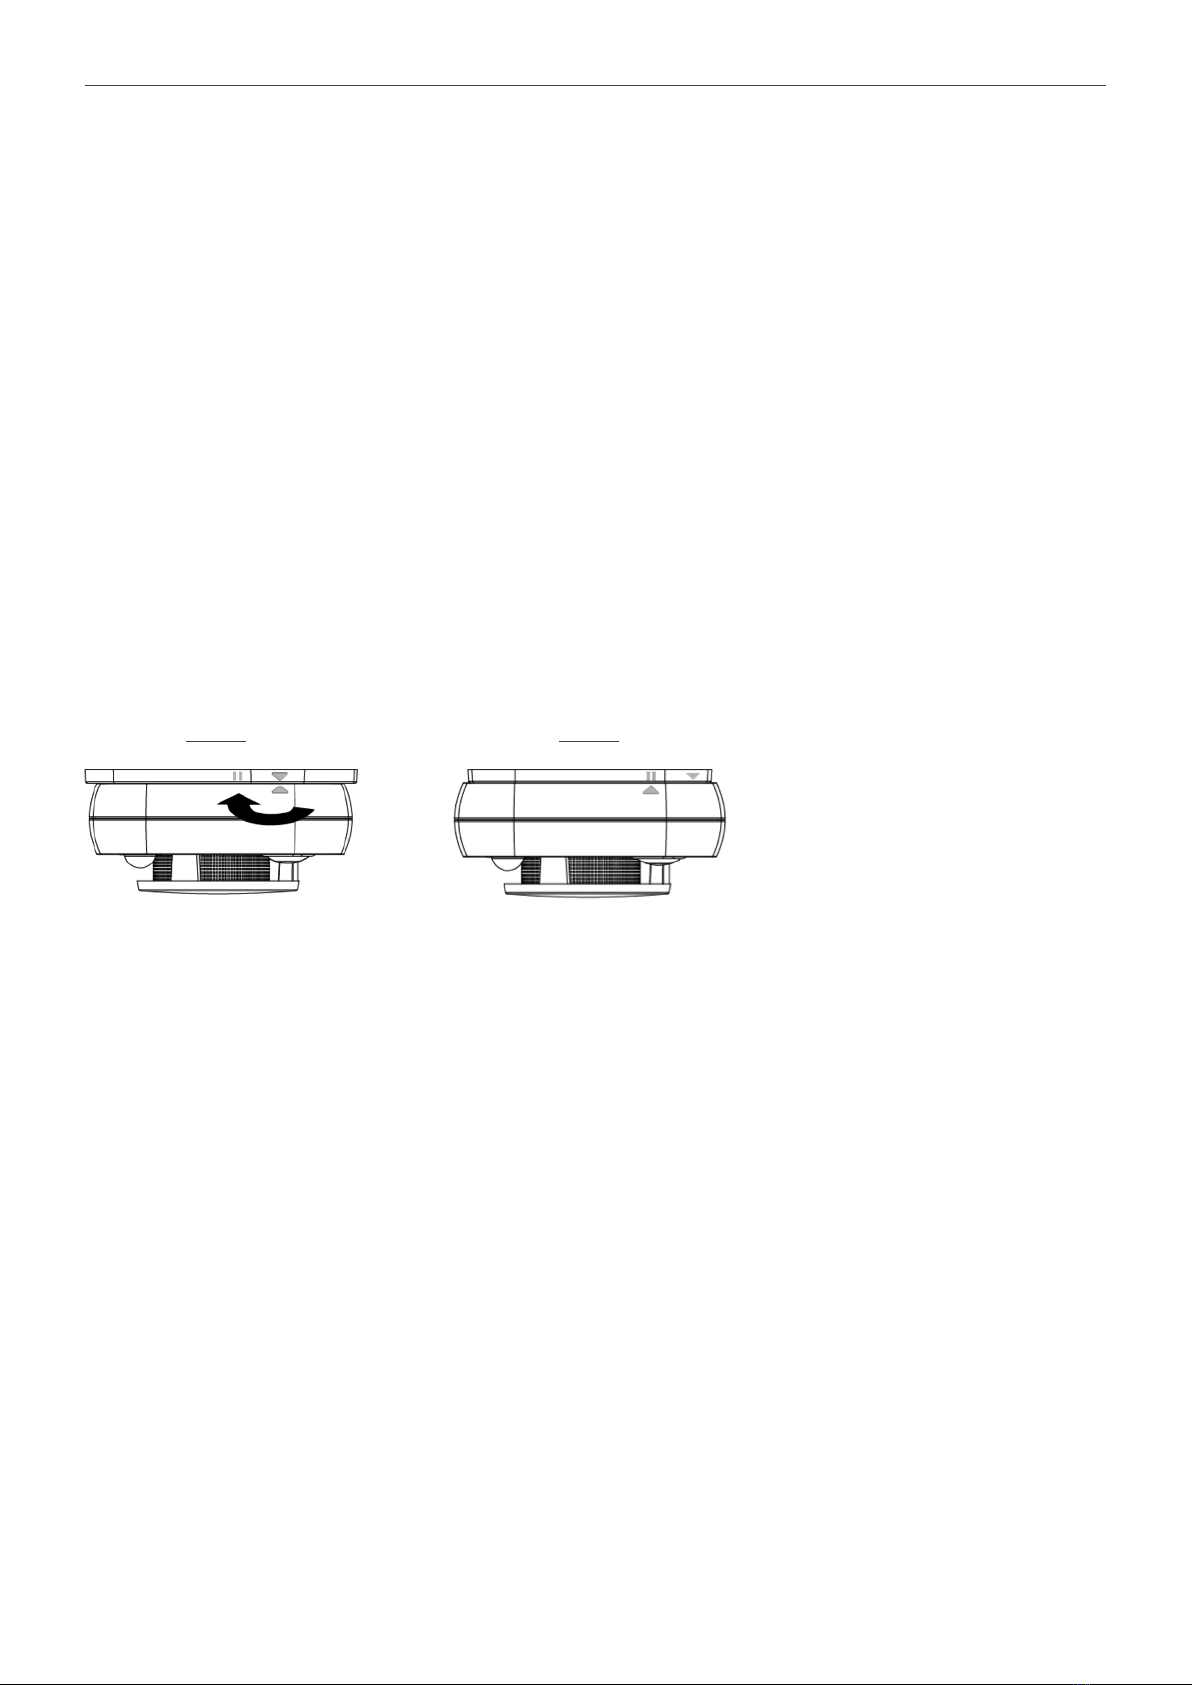
Step 5. The imprinted marks provide an easy identification for installation. Make sure the two triangle marks are aligned with each other,
as shown in Figure A.
Step 6. Rotate clockwise to lock the hook.
Step 7. When the pause mark is aligned with the triangle mark, as shown in Figure B, the installation is now complete.
Figure A Figure B
9NookBox Installation Guide Smoke Mini Detector
Maintenance
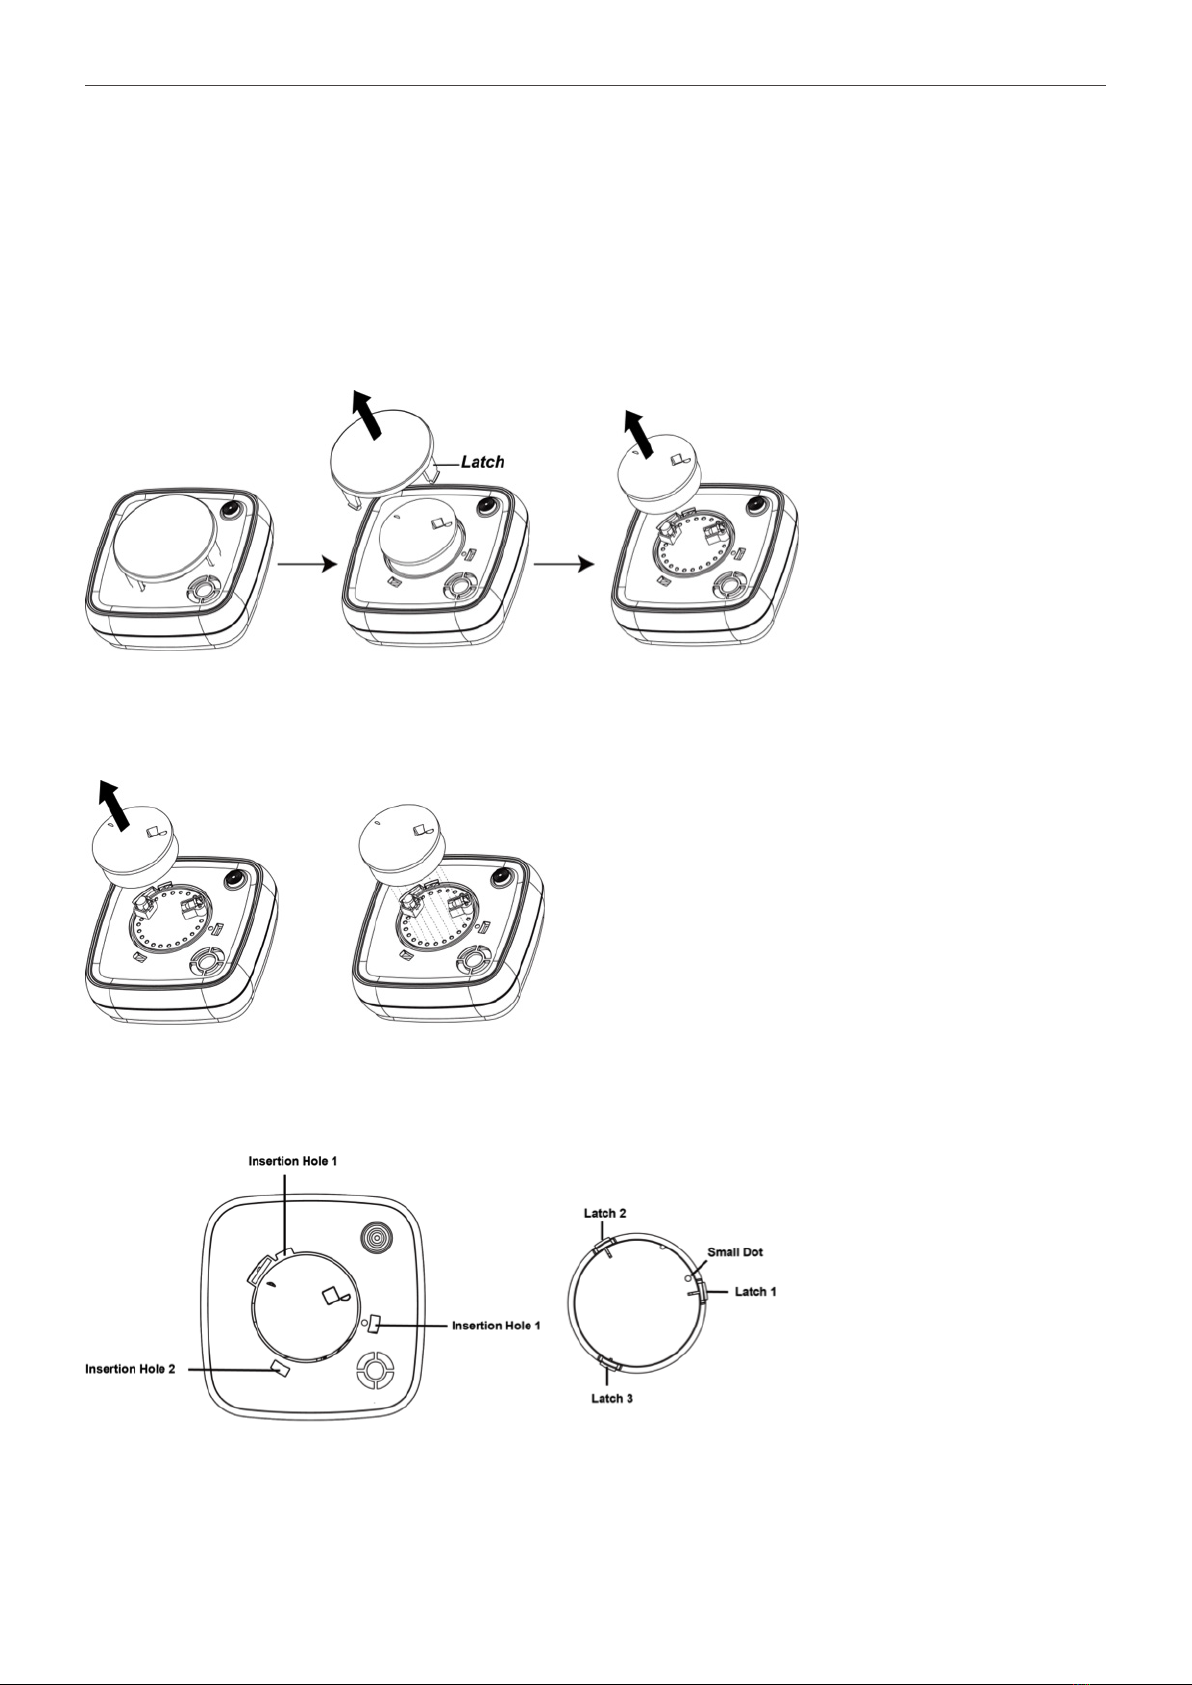
The top cover and the smoke detecting chamber can be detached from the Smoke Detector for maintenance.
Follow the steps below to maintain the smoke detecting chamber:
Step 1. Remove the top cover by gently pressing the latches by using your fingers.
Step 2. Pull out the smoke detecting chamber.
Step 3. Pull out the anti-insect mesh inside the chamber and clean the chamber and mesh with brush or water.
Step 4. Re-insert the anti-insect mesh into the chamber and insert the chamber back onto the Smoke Detector.
Please make sure the chamber is dry before re-inserting back onto the Smoke Detector.
Step 5. Insert the top cover back onto the Smoke Detector. The top cover includes 3 insertion latches to stabilize.
Each latch correspond to the insertion holes on the Smoke Detector. Match the numbers as below picture shown to
place the top cover back to the Smoke Detector. (Latch 1 is located next to a small dot)
10NookBox Installation Guide Smoke Mini Detector
Appendix (For developers only)
Temperature Sensor Cluster ID
Device ID: IAS Zone 0×402 //SD
Endpoint: 0×01
Device ID: IAS Zone 0×402 //IR
Endpoint: 0×02
Device ID: Temperature Sensor 0×0302 //TS
Endpoint: 0×03
Server Side Client Side
Mandatory
Basic (0×0000) – EP1 Basic (0×0000)
Identify(0×0003) – EP1
IAS Zone (0×0500) – EP1, EP2
Temperature Measurement (0×0402) – EP3
Optional
None None
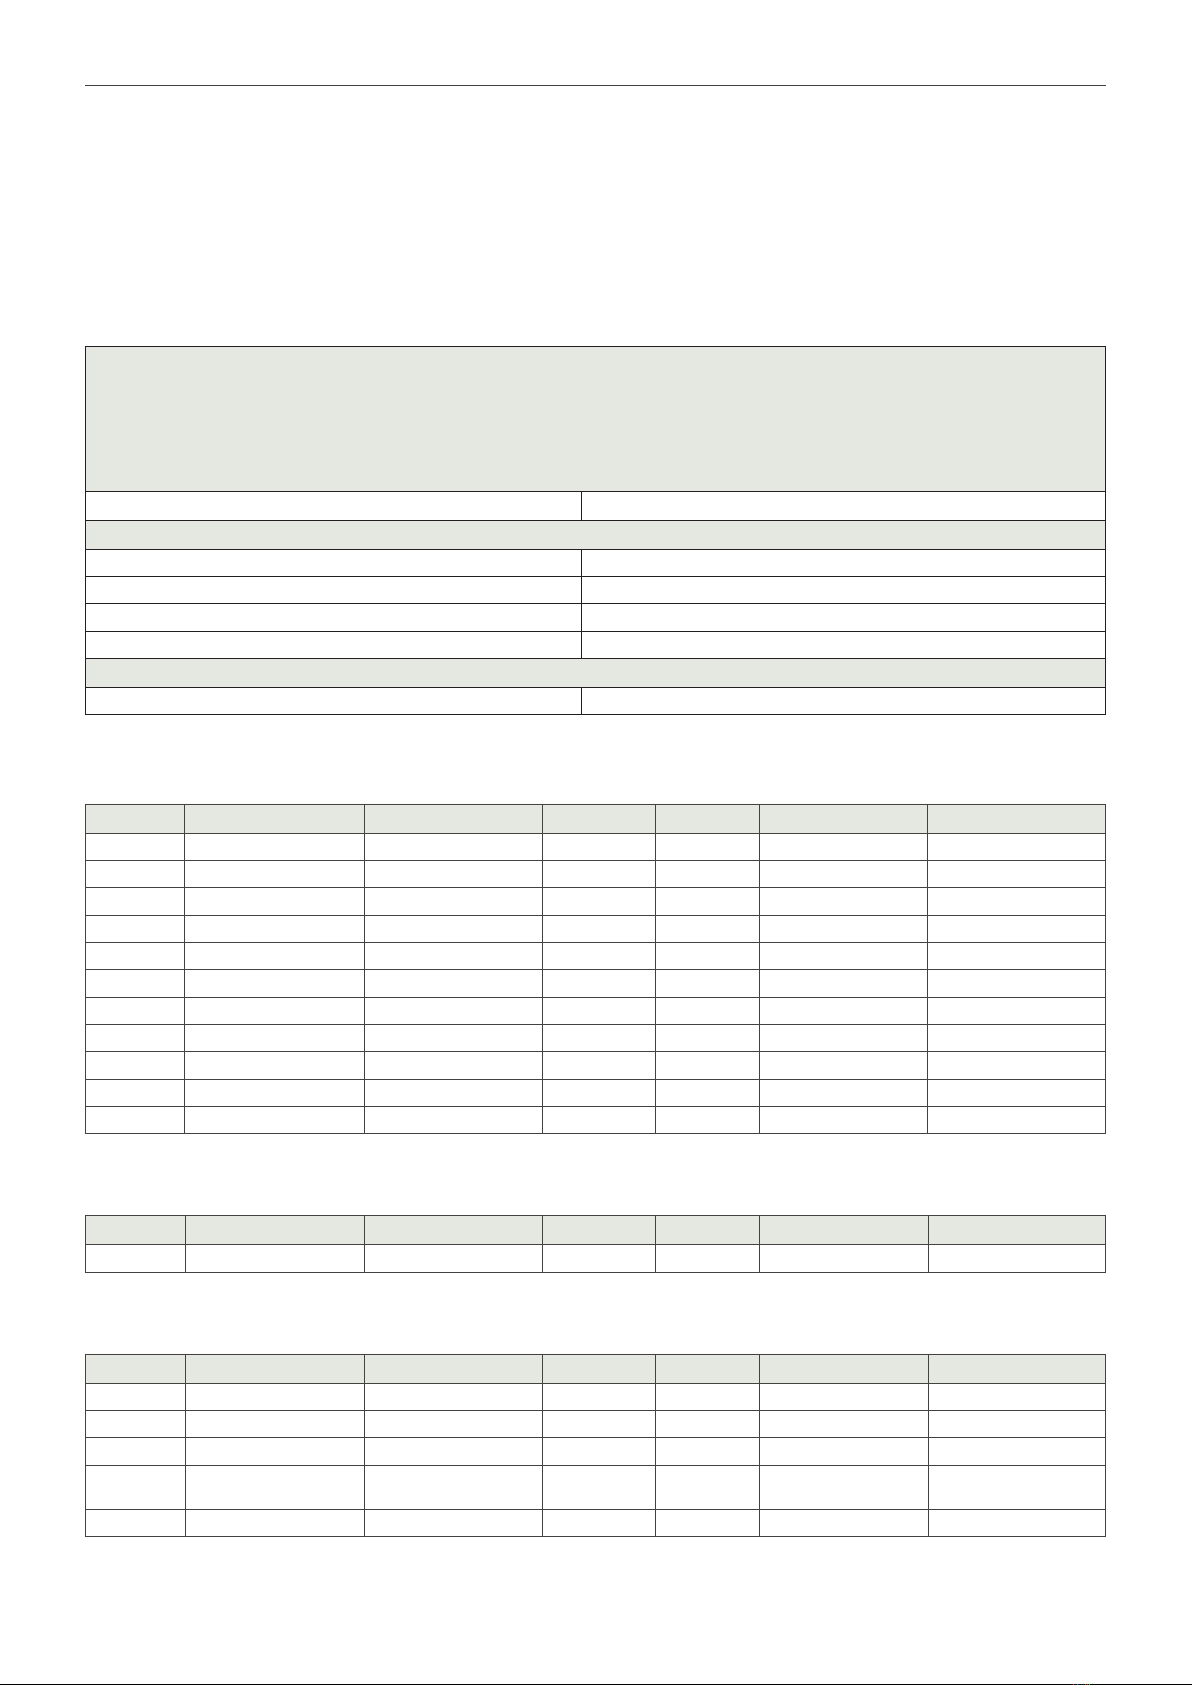
Attribute of Basic Cluster Information
Identier Name Type Range Access Default Mandatory / Optional
0×0000 ZCLVersion Unsigned 8-bit integer 0×00 –0x Read only 0×01 M
0×0001 ApplicationVersion Unsigned 8-bit integer 0×00 –0x Read only 0×00 O
0×0003 HWVersion Unsigned 8-bit integer 0×00 –0x Read only 0 O
0×0004 ManufacturerName Character String 0 – 32 bytes Read only Climax Technology O
0×0005 ModelIdentier Character String 0 – 32 bytes Read only (Model Number) O
0×0006 DateCode Character String 0 – 16 bytes Read only O
0×0007 PowerSource 8-bit 0×00 –0x Read only M
0×0010 LocationDescription Character String 0 – 32 bytes Read / Write O
0×0011 PhysicalEnvironment 8-bit 0×00 –0x Read / Write 0×00 O
0×0012 DeviceEnabled Boolean 0×00 –0×01 Read / Write 0×01 M
Attribute of Identify Cluster Information
Identier Name Type Range Access Default Mandatory / Optional
0×0000 IdentifyTime Unsigned 16-bit integer 0×00 –0x Read / Write 0×0000 M
Attribute of IAS Zone Cluster Information
Identier Name Type Range Access Default Mandatory / Optional
0×0001 ZoneState 8-bit Enumeration All Read only 0×00 M
0×0002 ZoneType 8-bit Enumeration All Read only M
0×0003 ZoneStatus 16-bit bitmap All Read only 0×00 M
0×0010 IAS_CIE_ADDRESS IEEE ADDRESS Valid 64bit
IEEE address Read / Write M
0×0011 ZONE_ID Unsigned 8-bit integer All Read only 0xFF M

11NookBox Installation Guide Smoke Mini Detector
Attribute of Temperature Measurement Cluster Information
Identier Name Type Range Access Default Mandatory / Optional
0×0000 MeasuredValue Signed 16-bit Integer
Min
Measured
Value to Max
Measure
Value
Read only 0×00 M
0×0001 MinMeasuredValue Signed 16-bit Integer 0×954d –
0×7e Read only -10 M
0×0002 MaxMeasuredValue Signed 16-bit Integer 0×954e –
0×7f Read only 90 M

12NookBox Installation Guide Smoke Mini Detector
For more information visit:
www.getnookbox.com
This manual suits for next models
1
Table of contents
Other NookBox Smoke Alarm manuals


