2 / 4©2018 EMS Ltd. All rights reserved 3 / 4©2018 EMS Ltd. All rights reserved
Specication
Operating
Temperature -10 to +70°C (ambient)
Storage
Temperature 0 to +35°C
Humidity Up to 95% non-condensing
Supply 6x AA Alkaline (Panasonic LR6AD
Powerline / Varta 4006 Industrial)
IP Rating IP23
Operating
Frequencies 868 MHz
Output Transmitter
Power Variable 0-14 dBm
Dimensions 113mm (Ø) 40mm (D)
(No detector head)
113mm (Ø) 90mm (D)
(With detector head)
Weight 0.30kg (No detector head)
0.40kg (With detector head)
Regulatory information
Manufacturer EMS Ltd.
Technology House, Sea Street,
Herne Bay, Kent, CT6 8JZ,
United Kingdom
Year of
manufacture See serial number label inside unit
Certication
Certication body
CPR Certicate
DOP 0359-CPR-0128 (module)
0370-CPR-1818 (head)
Approved to EN54-5
EN54-7
EN54-25
Application Indoor use only
European Union
directives
EMS declares that the radio
equipment type Ziton Wireless
Multisensor Detector is in
compliance with Directive
2014/53/EU. The full text of the EU
declaration of conformity is
available at the following internet
address:
www.utcfssecurityproducts.eu/dop/
2012/19/EU (WEEE directive):
Products marked with this symbol
cannot be disposed of as unsorted
municipal waste in the European
Union. For proper recycling, return
this product to your local supplier
upon purchase of equivalent new
equipment, or dispose of it at
designated collection points.
For more information see
www.recyclethis.info
Dispose of your batteries in an
environmentally friendly manner
according to your local regulations.
Contact information
For contact information, see www.utcreandsecurity.com
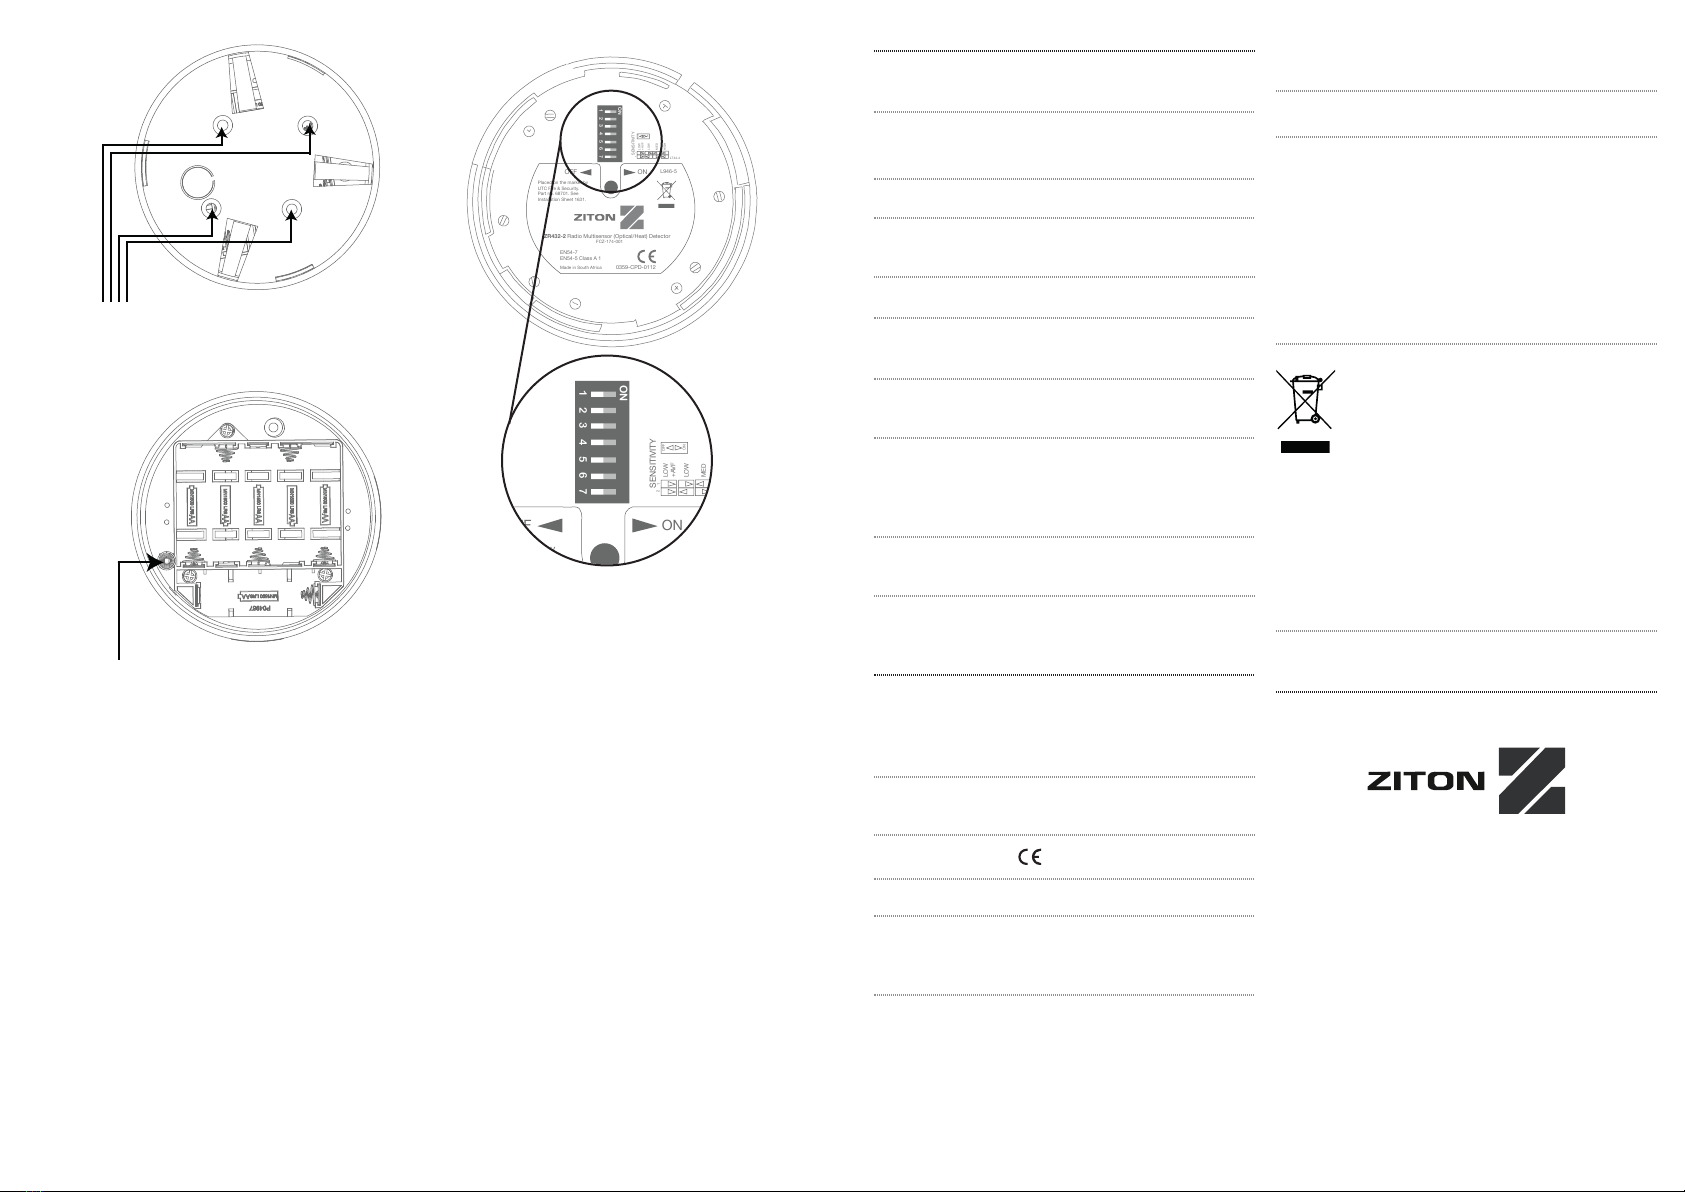
Ceiling mounting
positions
Figure 3
Tamper
spring
Figure 4
To ensure correct operation, connect the power jumper
across the PIN header on the battery PCB located on the
front of the detector (shown in Figure 2).
The unit is powered by 6 x AA alkaline batteries. These
are supplied tted. Should batteries require
replacement, only use specied batteries whilst
observing correct polarity as shown in Figure 4.
Batteries that have been removed must be disposed of in
accordance with your country’s relevant Waste Electrical
and Electronic Equipment (W.E.E.E) regulations.
Please see programming manual for log on procedure
details.
The detector’s sensitivity can be set via the detectors DIL
switches on the head section (shown in Figure 5)
Please see ZR432 detector installation sheet for settings.
OFF ON L946-5
Placed on the market by
UTC Fire & Security.
Part no. 68701. See
Installation Sheet 1631.
ZR432-2 Radio Multisensor (Optical/Heat) Detector
FCZ-174-001
EN54-7
EN54-5 Class A 1
Made in South Africa 0359-CPD-0112
SENSITIVITY
LOW
LOW
+AVF
MED
HIGH
OFF
ON
21
L744-4
ON
1 2 3 4 5 6 7
OFF ON L946-5
Placed on the market by
UTC Fire & Security.
Part no. 68701. See
Installation Sheet 1631.
ZR432-2 Radio Multisensor (Optical/Heat) Detector
FCZ-174-001
EN54-7
EN54-5 Class A 1
Made in South Africa 0359-CPD-0112
SENSITIVITY
LOW
LOW
+AVF
MED
HIGH
OFF
ON
21
L744-4
ON
1 2 3 4 5 6 7
Figure 5
To reassemble the unit, place the detector and head
section into the xed ceiling mount (ensuring that
locating lugs line up) and turn clockwise to achieve a
positive location.
Ensure that the tamper switch operates correctly. The
switch should make contact with the ceiling mount
plate.
Please Note: The nal commissioning, detector
sensitivity detection settings and hand over of the
wireless re system to the end user is the responsibility
of the re installation contractor.
MK107 Iss 14 12/07/2019 AJM MK107 Iss 14 12/07/2019 AJM
12
0359, 0370


