Nordmende HCT781FL User manual

OPERATING AND INSTALLATION INSTRUCTIONS
78cm BUILT-IN FOUR HEATER
VITROCERAMIC HOB
HCT78FL
HCT781FL

DESCRIPTION OF THE HOB 3
SAFETY INSTRUCTIONS 4
INSTALLATON 6
Loc ting Your Built-in Hob 6
Electric l Connection of Your Hob 8
USAGE 10
Turn On nd Turn Off The Control 11
Select He ter 11
Turn on du l- nd triple zones 12
Set Cooking Level With nd Without He t Boost 12
Turn Off Individu l He ters 13
Timer Function 14
Key Lock 16
Child Lock 17
Stop & Go Function 18
TOUCH CONTROL SAFETY FUNCTIONS 20
Sensor S fety Cut Off 20
Over Temper ture Switch Off 21
Oper ting Time Limit tions 21
Residu l He t Functions 22
CLEANING AND CARE 23
CONTENTS:
........................................................
..............................................................
...............................................................................
...........................................................
...............................................
...........................................................................................
...............................................
.................................................................................
.....................................................
......................
..........................................................
..............................................................................
........................................................................................
......................................................................................
.......................................................................
....................................
...................................................................
.......................................................
..........................................................
...............................................................
..................................................................
2

3
DESCRIPTION OF THE HOB
Dear Customer,
It is important that you should read this manual for best performance and
to extend the life of your appliance. We recommend you to keep this manual
for future reference.
Your ne hob is guaranteed and ill give lasting service. This guarantee
is only applicable if the appliance has been installed and operated in
accordance ith the operating and installation instructions detailed in this
manual.
Note: Appearance of your hob maybe different than the model sho n above
due to its configuration.
SINGLE ZONE
HEATER
OVAL ZONE
HEATER
HOB
FRAME
VITROCERAMIC
SURFACE
TOUCH CONTROL
PANEL

4
SAFETY INSTRUCTIONS
Ple se comply with these instructions. If you do not, ny d m ge
resulting from improper, incorrect or negligent use or improper
connection or inst ll tion is not covered by the w rr nty.
· This appliance should be used only for normal domestic use.
· This appliance must only be used for the purpose of heating or cooking
food, any other use, for example heating rooms, orking surface or
storage surface, is dangerous.
· Additions or modifications to the appliance are not permitted.
· Do not place or store flammable liquids, highly inflammable materials or
fusible objects on or near the appliance.
· Small children must be kept a ay from the appliance.
· The appliance may only be installed and connected by an authorised
service personnel.
· The electrical safety of this hob is guaranteed only if it is connected to
a properly earthed system, hich complies ith the electrical safety
standards.
· Built-in appliances may only be used after they have been built in to
suitable built-in units and ork surfaces that meet the standards.
· Do not put pressure on the po er supply cable hile fitting the hob.
· Po er supply cable length should not exceed 2m for isolation safety.
· In the event of faults ith the appliance or damage to the glass ceramic
(cracks, scratches or splits), the appliance must be s itched off and
disconnected from the electrical supply to prevent the possibility of an
electric shock.
· Repairs to the appliance must only be carried out by authorised service
personal.
· Make sure all the packaging has been removed before you use the
appliance.
· Cables from electrical appliances must not touch the hot surface of the
appliance or hot cook are.

5
· Never leave the the appliance hob unattended hen cooking ith fat or
oil.
. They can rapidly catch fire if overheated.
· Do not cut any food on the glass of the vitroceramic hob. Glass panels
should not be used as orking surfaces.
· Be careful hen using small household appliances, such as irons, near
the elements.
· Do not use the cooking zones ith empty cook are or ithout cook are.
· Make sure all the controls are in the off position hen not in use.
· For cleaning, the appliance must be s itched off and cooled do n.
· For safety reasons, the cleaning of the appliance ith steam jet or high-
pressure cleaning equipment is not permitted.
. Use only stable flat-based pans.
. Do not use a steam cleaner to clean your hob.
. During operation the hob surface can be get hot, small children must be
kept a ay from the appliance.
. The appliance is not intended for use by persýns(including children) ith
reduced physical, sensory or mental capabilities, or lack of experience and
kno ledge, unless they have been given supervision or instruction concerning
use of the appliance by a person responsible for their safety.
. Children should be supervised to ensure that they do not play ith the
appliance.

6
The electric l connection of this hob should be c rried out by n
uthorised service person l or qu lified electrici n, ccording to the
instructions in this guide nd in compli nce with the current regul tions.
· Prior to installation, ensure that the local distribution conditions and the
adjustment of the appliance are compatible.
· The la s, ordinances, directives and standards in force in the country of
use are to be follo ed (safety regulations, proper recycling in accordance
ith the regulations, etc.)
Loc ting your built-in hob
After removing the packaging material from the appliance and its accessories,
ensure that the hob is not damaged. If you suspect any damage, do not use
the appliance and contact an authorised service personal or a qualified
electrician immediately.
· This built-in hob is to be inserted into a cut out of a orktop.
· Create an opening ith the dimensions sho n in the picture on the next
page. The distance bet een the rear edge of the hob and any adjacent all
depends on all surface. Please dont use easily combustible material like
curtain, paper at nearby the hob.
INSTALLATION

7
· Scre the 4 orktop mounting brackets on the side alls of product.
· Apply the one-sided self-adhesive sealing tape supplied all the ay round
the lo er edge of the cooking surface along the outer edge of the glass
ceramic panel. Do not stretch it.
orktop mounting bracket
Neighboorhood alls A [mm] B [mm]
Combustible 60 150
Non-combustible 25 40
520mm
780mm
41mm
750mm
490mm
Min.
A
Min.
B
Min.
130mm
Min.
25mm

8
Electric l connection of your hob
. Before proceeding ith the electrical connection, verify that the current
carrying capacity of the system and the socket is adequate for the maximum
po er rating of the hob.
· Electrical installation of the residence and the electrical current plug in
use must be earthed and conform ith safety regulations.
· If there is no dedicated hob circuit and fused s itch, they must be installed
by a qualified electrician before the hob is connected.
· S itch must be easily accessible once the hob has been installed.
· Do not use adaptors, multiple sockets and/or extension leads.
· This appliance conforms ith the requirements ofthe follo ing EEC
Directives:
1. Vitroceramic hob EEC/73/23 and 93/68, EEC/89/336 relating to
radio interference,
2. EEC/89/109 relating to contact ith foods.
· The electrician must provide a fused double-pole s itch, hich disconnects
both the line (live) and neutral conductors ith a contact separation of at
least 3,0 mm and rated 30A.
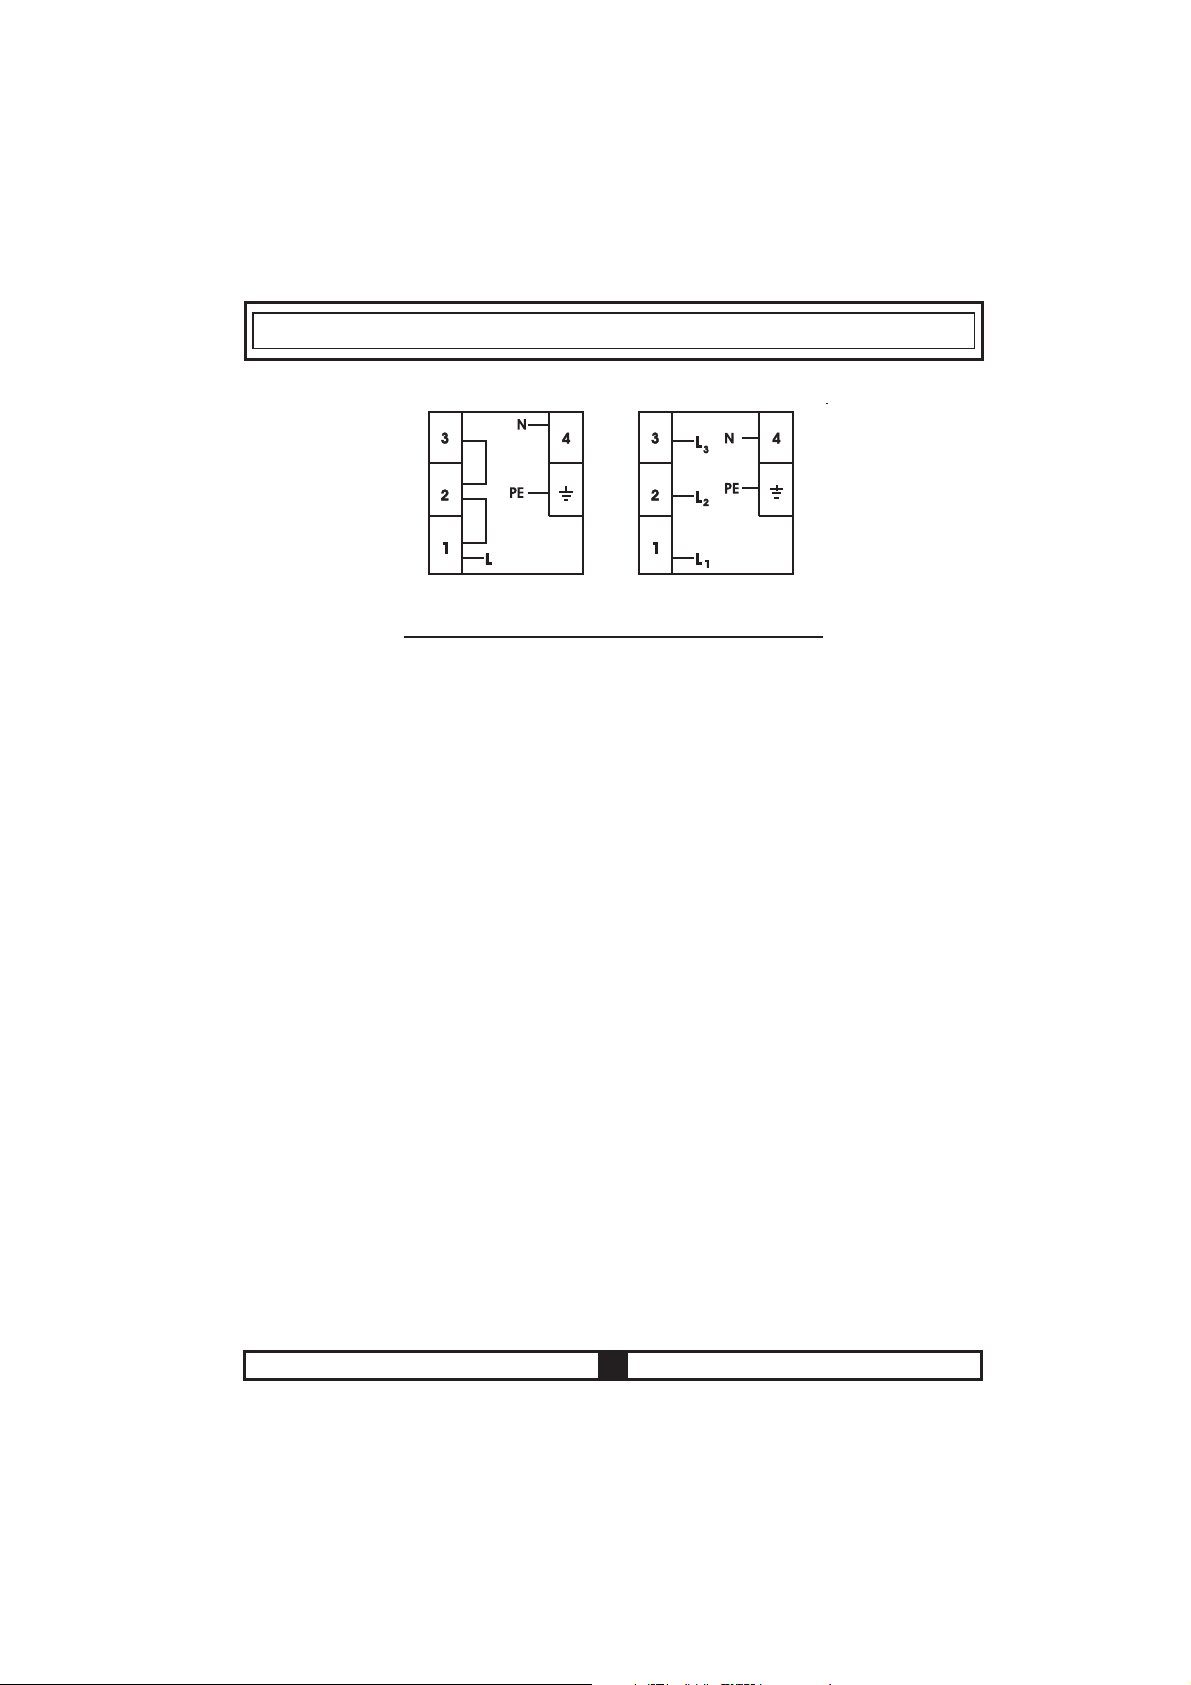
9
. For the touch controlled vitroceramic hob, the cable must be H05VV-F
3X2,5 mm² / 60227 IEC 53. You ill find the connection diagram sho n
on the back of your appliance.
· During installation, please insure that isolated cables are used. An incorrect
connection might damage your appliance. The guarantee ill not cover
such damages.
· All repairs must be carried out by an authorised service personnel or a
qualified electrician.
· Unplug your appliance before each maintenance. For reconnection, follo
the connection diagrams strictly.
* This appliance must be earthed.
* For this connection a power lead of wire type
H05V V -F should be used.
3x2,5 mm
3x2,5 mm
3x2,5 mm
² 220V~
² 230V~
² 240V~
5x1.5 mm
5x1.5 mm
5x1.5 mm
² 380V 3N
² 400V 3N~
² 415V 3N~
~

Mode Descriptions
USAGE
The appliance is operated by touching buttons and the functions are
confirmed by displays and acoustic signals.
10
Stand-By-Mode S-Mode The mains are applied to the hob control
and all heater displays are off or a residual
heat display is active.
Operating-Mode B-Mode At least one heater display sho s a heat
setting bet een ´0`and ´9`
Lock Mode VR-Mode The hob control is locked.

11
Turn On nd Turn Off The Appli nce
If the appliance is in Stand-By-Mode, it is put in Operating-Mode by pressing
the On/Off button at least 1 second. A buzzer signal indicates the
successful operation acoustically.
On all heaters a ´0` appears and all Decimal Point of the heater flashes (1
sec on, 1 sec off).
If there is no operation ithin 10 sec, the display of all heaters ill turn off.
If the displays are turned off, the heater ill be set into Stand-By-Mode.
If is pressed more than 2 sec (in Operating-Mode), the appliance is
s itched off and is set into the S-Mode again. The appliance can be turned
off by pressing at any time; even if other buttons are pressed
simultaneously.
If there is a residual heat of a heater remaining, this ill be indicated in the
correspondent heat setting Heater Display.
Select He ter
If a single heater is chosen ith the corresponding Active/Deactive Heater
Button , the Decimal Point of the related Heater Display flashes. For the
selected heater, you can set the heat level bet een 1-9 by touching the
Heat Setting Buttons or .
The buttons must be pressed ithin 3 sec, other ise the heater selection
is erased and heat setting dot ill disappear (Decimal Point). If there is no
further operation ithin 10 sec, the heater falls back into the S-Mode.
The heat setting can al ays be changed by pressing or bet een
level 1-9.
Each button operation or each display change is quitted by a buzzer signal.

12
Turn on du l nd triple zones ( v il ble only in some models)
Turn on the dual zone
The activation of the dual zone is done after selecting the desired heater
by actuating . This is confirmed by a buzzer signal. At the same time, the
corresponding Dual one Indicator goes on statically. Touching for a
second time, the status of the dual zone toggles: it changes from dual zone
on to dual zone off and back again.
The extension zone can be activated only, after a level bet een 1-9 is set
on the basic zone of the heater.
Turn on triple zones
A dual or triple zone can only be s itched on, if the basic zone of a heater
is set to level 19 and the heater is selected, the dot is on.
If is pressed, the buzzer signal sounds and the Dual one Indicator is
statically on. If is pressed once again, there is another acoustical signal
and the triple heater is s itched on. The Triple one Indicator ill be
illuminated and the triple zone ill be energized.
After touching once again, the triple zone of the heater ill be s itched
off again. Each operation causes a status change of the dual/triple zones
follo ing in this manner (Dual zone on, triple zone on, all extended zones
off, dual zone on, triple zone on, dual zone on, etc.)
Set Cooking Level With nd Without He t Boost
All heaters are equipped ith heat boost functionality.
If the heat boost is active, than the heater ill be operated ith maximum
po er for the period of the heat boost time, that is dependent from the
selected heat setting. This is indicated through a flashing ´A`, alternating
ith the heat setting value (e.g. 0,5 sec ´A` and 0,5 sec ´9`) in the heater
display. Once the heat boost time ended only the heat setting ill be indicated.
If the heat boost should be used for a heater, heater level 9 must be operated
by pressing starting from level 0. After setting the heat to level 9 , ´A`
ill be indicated alternating. This means that level 9 and heat boost is active
no .

13
The heat boost can be turned off by pressing until heat setting ´0`
appears.
If the heat boost should be used, it can al ays be activated by actuating
again if the heat setting is set to level 9. In the heat display ´A/9` flashes.
Turn Off Individu l He ters
A selective heater can be turned off ith 3 different ays:
. Simultaneous operation of and buttons
· Reduction of the heat setting to ´0` by operating button
· Use of timer turn off function for the corresponding heater
Simultaneous operation of and buttons
The corresponding heater must be chosen ith the Active/Deactive Heater
Button , the Decimal Point of the related Heater Display flashes. To turn
off the heater, and must be pressed at the same time. A buzzer
signal sounds and ´0` appears in the heat setting display.
If the timer is active for the selected heater, then ´0` ill appear in the heater
display and also the related timer Cooking one Indicator Timer Function
and the Timer Display is turned off.
If there is a residual heat for this heater remaining, this ill be indicated by
a static display ´H` in the heat setting display.
Reduction of the heat setting to ´0` by operating button
The heater can also be turned off by reducing the operated heat setting to
´0`.
When Heater Display indicates ´0`, an associated Decimal Point of the
heater ill also be turned off.
Turning off an active heater, not only the ´0` appears in the Heater Display,
but also the related timer Cooking one Indicator and the Timer Display is
turned off.
If there is a residual heat for this heater remaining, this ill be indicated by
a static display ´H` in the heat setting display.

14
Use of timer turn off function for corresponding heater (available only in
some models)
After reaching a remaining time of 0 minutes, the timer stops the linked
heater, sho ing the ´0` sho n in the Heater Display and shuts do n Timer
Display. In the Timer Display is sho n ´00`. The related timer Cooking one
Indicator disappears.
An assigned Dual/Triple one Selection Indicator also disappears if it is
active.
Additionally the buzzer indicates acoustically the timer run out. After
confirmation of the timer run out by touching any button, the buzzer goes
silent.
Timer Function ( v il ble only in some models)
The timer provides follo ing features:
The control can run max. 4 heater assigned timers and 1 minute minder
( hich is assigned to no heater) simultaneously.
All timers can be used only in B-Mode. A heater timer can only be assigned
to a active heater, running in levels bet een 1-9. The minute minder is
independent of any heater.
In order to use both functions, timer function must be activated by the
Active/Deactive Timer button .
Touching for the fist time after activating the heaters, the control proposes
the minute minder (no Cooking one Indicator is flashing, they are all on
or off).
Touching for the second time, the control proposes the assignment to
one of the activated heaters by flashing Cooking one Indicator. No the
timer to the linked timer signalised.
Touching again, the next timer in the in the clock ise direction, is
proposed for assignment of the next active heater. And so on

15
Minute Minder
No matter hether a heater is activated or not, the minute minder can be
operated by touching . The appearing ´00` sho s that timer is active and
the dot in the right Timer Display indicates that and are no linked
for setting the timer value.
The minute minder is selected hen all Cooking one Indicators are statically
on or off (no Cooking one Indicator is flashing).
With and , the timer value can be set.
After successful setting of the minute minder time, the timer starts to
decrement the time.
The minute minder ill not be stopped by s itching off the appliance or
activating the key lock function, it ill proceed increasing the minutes until
run out indication.
After reaching the ´00` of the timer, buzzer indicates the run out of time.
To stop the buzzer you have to confirm the ´run out` by touching any button.
Heater timer
Heater timers can be set only for activated heaters (heater level must be
set bet een 1-9)
First touch of , the minute minder is activated. After touching for the
second time, the timer is assigned to the activated heater. The proposed
assignment is indicated by the related Cooking one Indicator, ho is
flashing.
Touching again after activating the fist heater timer, the control recommends
the next active heater assigned to the timer in the clock ise direction. The
assignment recommendation is indicated by the flashing Cooking one
Indicator.
Touching and , the timer value for the heater can be set.
The running timer of the first set heater timer is indicated by the statically
lighting Cooking one Indicator.
Touching once again further timers can be assigned to other activated
heaters.

16
10 sec after the last operation, the timer display changes to the timer that
ill run out next.
The assignment of that timer is displayed al ays by a flashing Cooking
one Indicator. Ho many timer are running you can identify by the number
of Cooking one Indicator that are statically on.
By toggling , you can display the timer values for the heater timer and
the minute minder. The assignment is al ays indicated by the flashing
Cooking one Indicator. If no Cooking one Indicator flashes, the minute
minder time is sho n in the 2-digit Timer Display.
All heater timers can be erased by s itching off the appliance into the S-
Mode using . A minute minder ill not be erased, it ill proceed operation
until run out.
To erase a timer in Operation Mode, you first have to select the timer by
toggling the Active/Deactive Timer Button until it is displayed. The value
can be erased then in 2 different ays:
· Decrement by touching until ´00` appears on the Timer Display.
· Touch and simultaneously for 0,5sec until ´00` is sho n in Timer
Display.
After reaching the ´00` of a heater timer, the assigned heater level ill be
set to ´0`.
The heater timer or minute minder run out is indicated acoustically by a
buzzer tone. This ill be erased by touching any button for ackno ledgement.
Key Lock
Key lock functionality is for blocking and set the appliance into a save
modus during operation. Touch modifications as for example rise heat
settings and others should not be possible. It is only possible to s itch the
appliance off.
The lock function is active, if the Key Lock button is pressed at least 2
sec. This operation is ackno ledged by a buzzer. After successful operation
of more than 2 sec, the Key Lock Indicator flashes and the heater is locked.
The heater can only be locked in Operating Mode (B-Mode).

17
If the heater is locked, only can be operated, all other buttons are blocked.
If there is any other button operated in the blocked mode, the buzzer signal
sounds and the Key Lock Indicator flashes as indication for the activated
key lock functionality. Only the s itch off by operation of is possible. But
if you s itched off the appliance, you can not restart it again ithout
unlocking.
After pressing 2 sec, the Key Lock Indicator disappears. No , the hob
control is unlocked and can be operated in normal order.
Child Lock
Child lock functionality is foreseen to lock the appliance in a complicated
Multi-Step process.
Child locking and unlocking is only available in the S-Mode.
First has to be pressed until the buzzer beeps, then the and have
to be pressed for at least 0,5 sec, but max 1 sec. simultaneously. Follo ing
that, the appliance can be locked by touching the . All 4 heater displays
´L` is sho ed as a confirmation.
In the case the minute minder is still running, it ill proceed until ´00` is
reached and the timer ill beep. After confirmation of timer run out, the
appliance is fully locked. None of the buttons can be used as long as the
appliance is locked.

18
The same ay the child lock is activated, it can also get deactivated. After
pressing until the beep, then the and have to be pressed
simultaneously for at least 0,5 sec, follo ed by touching only the . As
a confirmation for successful unlocking, ´L` symbol in the displays ill be
erased immediately.
Stop & Go Function ( v il ble only in some models)
The Stop & Go functionality can be used only alternatively to Key lock
functionality. It is not possible to use both.
The Stop & Go function is activated by pressing for 1 sec. After ards
it is ackno ledged acoustically by t o beeps.
The Stop-function is active and all heaters hich are turned on ill be
reduced to heat setting ´1` for 1 minute, then for the remaining 9 minutes
a running light ith a horizontal bar starting from the bottom to the top is
displayed. After ards all heaters are reduced to heat setting 0 for the rest
of the time. For all inactive heat settings, there is ´0` or the residual heat
´H` indicated.
The heater completely turns off after 10 minutes or after immediate operation
of .
If the heater is turned off via , the heater is in S-Mode and the Stop-
function is deleted. If the heater is turned on again, there is no Stop & Go
function.

19
If the timer is used as minute minder, the time ill continue during Stop &
Go function.
If the timer is used ith the turn off functionality of an assigned heater, then
the timer stops decrementing the time during Stop & Go operation. After
deactivating the Stop & Go function, the timer ill operate again.
If the heat boost for a heater is active, then the expired time of the heat
boost is stored and after deactivating the Stop & Go function, the remaining
heat boost time ill expire (meaning the heat boost time does not continue
during the Stop & Go condition).
To deactivate the Stop & Go function, must be pressed for 1 sec. It is
ackno ledged acoustically ith a beep.
After ards release and actuate any button ithin 10 sec (except and
), than the operating conditions active before the Stop & Go operation
ill be activated again. All reduced heater continue to ork ith the last
chosen heat setting. If no further button or is actiavted ithin 10 sec,
the heater turns off.

20
TOUCH CONTROL SAFETY FUNCTIONS
The follo ing safety functions are available to avoid unintended operations
of the hob control.
Sensor S fety Cut Off
To prevent the appliance from un anted, random sensor operation, a sensor
monitoring is included.
In case of one or more buttons are pressed longer than 12 sec, the sensor
monitoring routine indicates acoustically that rong operation (pot or other
object placed on the button, sensor failure, etc.) and s itches off the
appliance.
The safety turn off causes that the hob control is turned off to the S-Mode.
An ´F` ill flash in all heater displays.
If residual heat is present, it ill be displayed in all other heater displays.
The hob control ill then go in S-Mode. At the same time a buzzer signal
appears. After 10 minutes the acoustic signaling ill stop.
If there is no erroneous operation present any longer, both the visual and
the acoustic signal ill disappear.
Table of contents
Languages:
Other Nordmende Hob manuals

Nordmende
Nordmende HCT78FL User manual

Nordmende
Nordmende HCI901FL User manual

Nordmende
Nordmende HC62FL User manual

Nordmende
Nordmende HCT78FL User manual

Nordmende
Nordmende HCT62FL User manual

Nordmende
Nordmende HCT61FL User manual

Nordmende
Nordmende HE62BL User manual

Nordmende
Nordmende HTC30 User manual

Nordmende
Nordmende HCI781FL User manual

Nordmende
Nordmende HCT61FL User manual

Nordmende
Nordmende HGE603IX User manual

Nordmende
Nordmende HGX703IX User manual

Nordmende
Nordmende HGX903BGL User manual

Nordmende
Nordmende HG62IX User manual

Nordmende
Nordmende HCI61FL User manual

Nordmende
Nordmende HCI79FL User manual

Nordmende
Nordmende HCP604FL User manual

Nordmende
Nordmende HCI90FL User manual