norelem 21010 Operating instructions

E
E
E3
D
My
B
A1
A2
L3
E1
E
GUIDE RAILS
SERVICE INSTRUCTIONS

www.norelem.fr© norelem 2/12www.norelem.co.uk© norelem
1. Introduction
2. Overview of the norelem range
3. Safety regulations and security notice
4. Using the guide rails
4.1 Bill of materials
4.2 Using and connecting accessories
4.3 Geometric tolerances
5. Care and maintenance
5.1 Lubrication
5.2 Adjusting the slide guide
6. Services
Summary

www.norelem.fr© norelem 3/12www.norelem.co.uk© norelem
1. Introduction
2. Overview of the norelem range
A wide range of guide rails for high-precision movement
norelem guide rails have many uses. Whether for metrology equipment construction, or in the optical
industry, or for maintenance, milling or even the creation of special machinery, norelem guide rails provide
you with a versatile, qualitative and high-precision solution that can be adapted to all your needs.
21010
21060
21061
21062
21064
21068
21070
Guide rail with dovetail mount
High-precision guide rail
Roller-mounted high-precision guide rail
with micrometric adjustment screw
with end plates
with micrometric adjustment screw
with end plates
roller-mounted
with micrometric adjustment screw

www.norelem.fr© norelem 4/12© norelem www.norelem.co.uk
Attention - please pay attention to the following points:
■Avoid impact to maintain micrometric accuracy
■Always comply with the applicable accident prevention guidelines and general technical rules when handling,
cleaning and using rails with accessories
■Do not exceed the recommended load bearing capacities specified in the table
■When disassembling the rails, be sure to re-adjust the clearance
4.1 Bill of materials
Planed faces
3
Grease nipple
4
End plate
5
Integrated modular grid
1
Micrometric adjustment screw
2
3. Safety regulations and security notice
4. Using the guide rails
5
2
3
1
4

www.norelem.fr© norelem 5/125 / 12© norelem www.norelem.co.uk
Illustration of movement along the X, Y and Z axes, with a total of three rails
To assemble the two rails, unscrew the two fastening screws of rail Y, and move the slide back to reveal
the counterbores.
4.2 Using and connecting accessories
2
1
3
x
y
y
x
z
Counterbores visible
2
1
2
1Fastening screw
End plate
4. Using the guide rails
The movement rail following the Y axis is positioned above the first rail.
Movement rail, following the X axis.

www.norelem.fr© norelem 6/12© norelem www.norelem.co.uk
Restore the rail along the Y axis to its original state.
Remember to re-adjust the clearance if necessary.
Insert the centring bushes in the through holes of the modular grid to achieve precise positioning
Fix the two rails using a fastening screw.
4.2 Using and connecting accessories
Centring bush
1
1
2
5
4
2Fastening screw
4. Using the guide rails

www.norelem.fr© norelem 7/12© norelem www.norelem.co.uk
Attach a mounting bracket to the rail to create a Z axis.
Perform the same operations as described in Step 4 to attach the Z axis to the X and Y axes.
4.2 Using and connecting accessories
Centring bush
1
Mounting bracket
1
2Fastening screw
1
1
2
7
6
4. Using the guide rails

www.norelem.fr© norelem 8/12© norelem www.norelem.co.uk
Example of a displacement assembly on the X, Y and Z axes.
4.2 Using and connecting accessories
8
4. Using the guide rails
x
y
z
y
x
z

www.norelem.fr© norelem 9/12© norelem www.norelem.co.uk
4.3 Geometric tolerances
a
Movement tolerances,
measured across the entire travel path
Guide rail with dovetail mount, cast iron:
Guide rail with dovetail mount, aluminium
Roller-mounted high-precision guide rail, cast iron
Parallelism
in the central position
b c d
Length
of the slide in mm
Deviations in µm
a b c d
L<100 8 10 20 20
100<L<200 12 15 25 25
200<L 18 22 35 25
Length
of the slide in mm
Deviations in µm
a b c d
L<100 12 15 30 30
100<L<200 18 22 37 37
200<L 27 33 52 37
Length
of the slide in mm
Deviations in µm
a b c d
L<100 4 4 15 15
100<L<200 4 6 20 20
200<L 5 8 30 20
4. Using the guide rails

www.norelem.fr© norelem 10/12© norelem www.norelem.co.uk
5. Care and maintenance
Setscrew
1
1
5.2 Adjusting the slide guide
Afteracertainperiodofuse,orafterreassemblyofthenorelem
guide rails, it may be necessary to adjust the slide guide.
In the case of both dovetail guide rails and roller bearing
rails, the slide guide is adjusted using the setscrews on
the side of the rail. The adjustment must be carried out
from the centre of the rail, in a homogeneous manner,
alternating from right to left.
For roller-mounted guide rails, the adjustment of the slide
guide (in the absence of a clearance) will be more refined
if we compensate for the weight of the elements of the
carriage by lifting them. The fastening screws of the rails
must not be loosened.
Attention: Only adjust the screws when the carriage is
positioned opposite the screw to be adjusted.
5.1 Lubrication
Lubricating norelem guide rails ensures protection against
corrosion, and reduces wear. Depending on stresses and
the environmental conditions, the first lubrication can be
effective for several years. However, be careful not to
leave a rail without corrosion protection if the lubrication
disappears.
It is important to avoid the ingress of cutting oil or spray
emulsion, as this can dilute the lubricant, and cause it
to spread. In addition, these emulsions tend to become
sticky when drying. Lubricants containing solid additives
must also be avoided.
Grey cast iron dovetail guide rails play a key role in sliding
guide systems, and may require periodic lubrication.
Lubrication grooves, which are fuelled by one or more
grease nipples, are provided for this purpose. The grease
nipples are fuelled by a special slideway lubricant - Mobil
Vactra No. 2 (original).
Grease nipple
1
Lubrication grooves
2
12

www.norelem.fr© norelem 11/12© norelem www.norelem.co.uk 11/12
6. Services
Green Means Go. Find it. Get it. Go.
■60,000 products available from stock.
■Technical support listening to all your questions, giving advice and assisting you in making decisions.
■
Fast and simple implemention of your ideas with our free CAD-data.

www.norelem.co.uk
WE10ENBDAL2003
This manual suits for next models
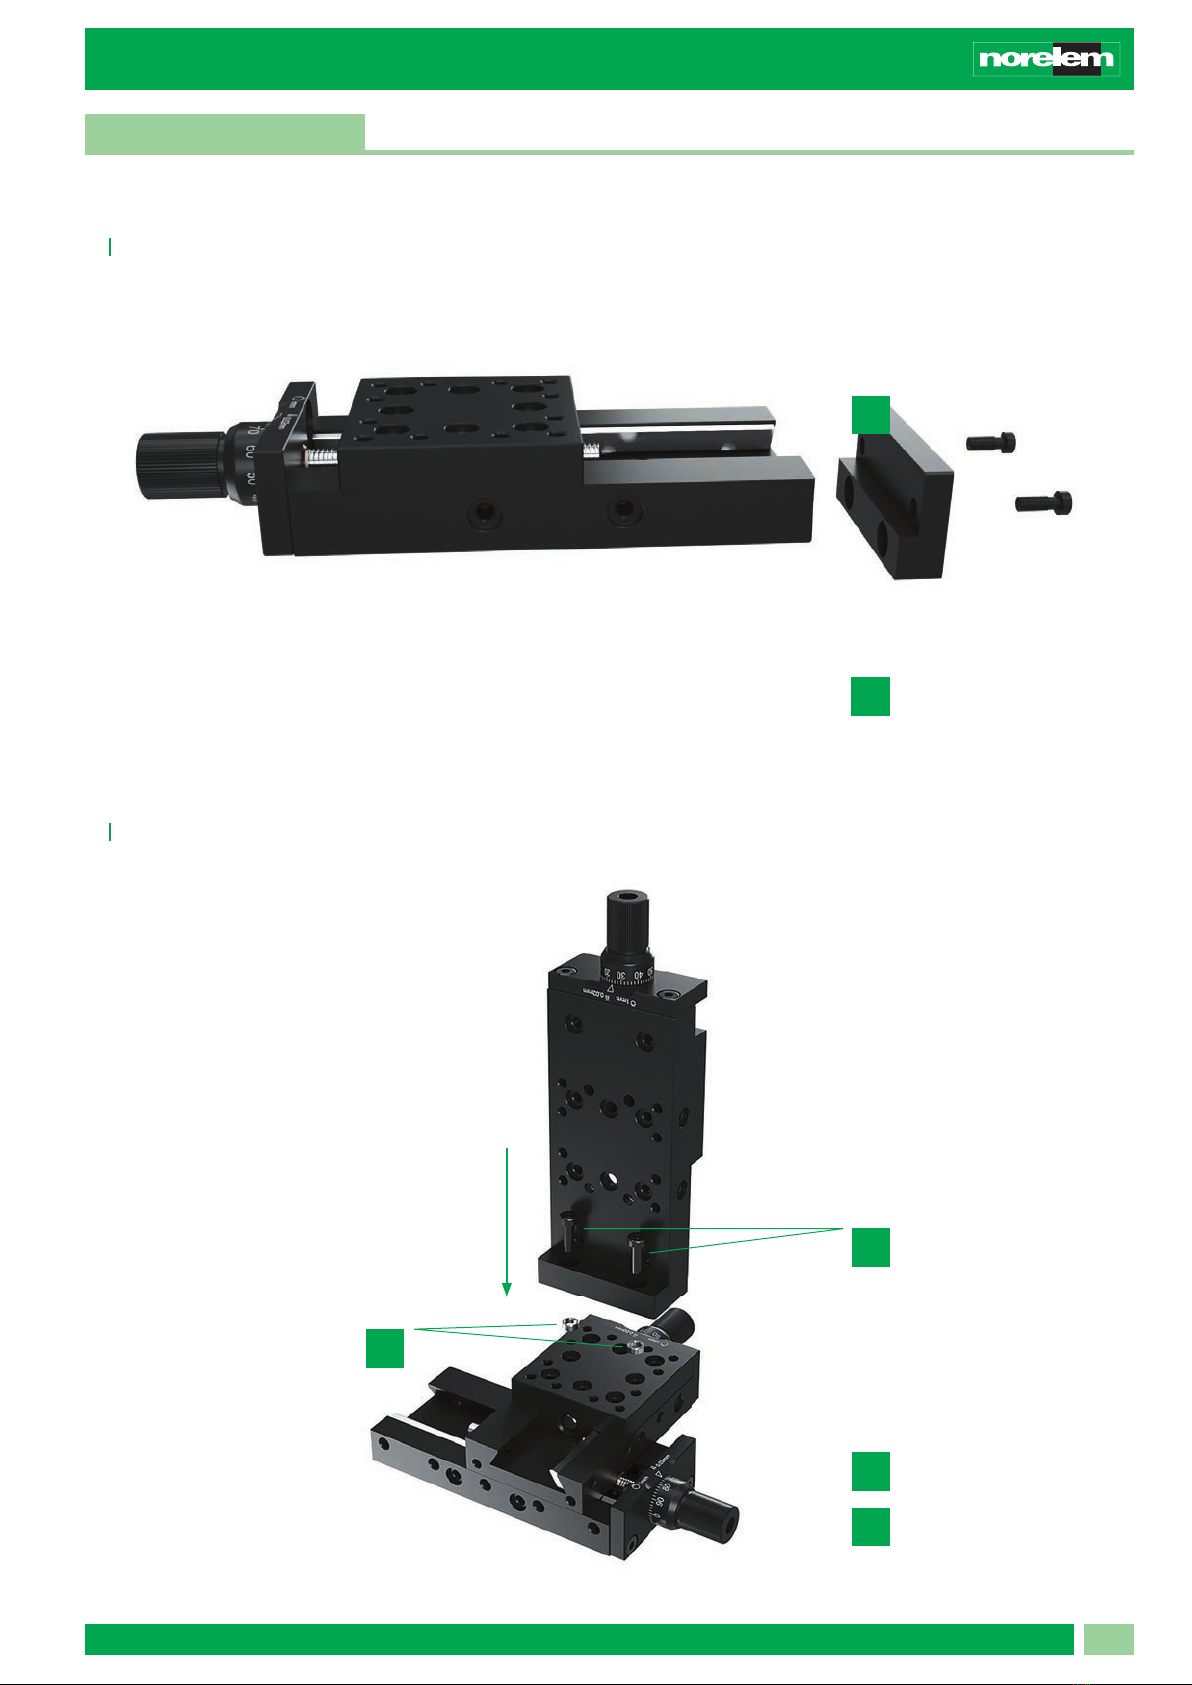
6
Table of contents