NOREMAT AXIONA Series User manual

SIDE ARM FLAIL MOWERS
Operator’s
MANUAL
Axiona - Prodigia
Left Hand Version
Eco-friendly printing on 100% recycled paper.
This book contains pictures that are not contractual.
Translation of the operator’s manual original version
Book ref : 132524 Index : -

Operator’s manual
Axiona - Prodigia
2
INDEX
INTRODUCTION . . . . . . . . . . . . . . . . . . . . . . . . . . . . . . . . . . . . . . . . . . . . . . . . . . . . . . . . . . . . . . . . . . . . . . . . . . . . . . . . . . . . . . . . . . . . . . . . . . . . . . . . . . 4
RECOMMENDATIONS
. . . . . . . . . . . . . . . . . . . . . . . . . . . . . . . . . . . . . . . . . . . . . . . . . . . . . . . . . . . . . . . . . . . . . . . . . . . . . . . .
5
RESPONSIBILITIES OF THE USER . . . . . . . . . . . . . . . . . . . . . . . . . . . . . . . . . . . . . . . . . . . . . . . . . . . . . . . . . . . . . . . . . . . . . . . . . . . . . . . . 6
GENERAL SAFETY RULES. . . . . . . . . . . . . . . . . . . . . . . . . . . . . . . . . . . . . . . . . . . . . . . . . . . . . . . . . . . . . . . . . . . . . . . . . . . . . . . . . . . . . . . . . . . . 7
1. Contact with oil . . . . . . . . . . . . . . . . . . . . . . . . . . . . . . . . . . . . . . . . . . . . . . . . . . . . . . . . . . . . . . . . . . . . . . . . . . . . . . . . . . . . . . . . . . . . . . . . . . . . . . . 7
2. Noise/dust. . . . . . . . . . . . . . . . . . . . . . . . . . . . . . . . . . . . . . . . . . . . . . . . . . . . . . . . . . . . . . . . . . . . . . . . . . . . . . . . . . . . . . . . . . . . . . . . . . . . . . . . . . . . . . . 8
3. Vibrations . . . . . . . . . . . . . . . . . . . . . . . . . . . . . . . . . . . . . . . . . . . . . . . . . . . . . . . . . . . . . . . . . . . . . . . . . . . . . . . . . . . . . . . . . . . . . . . . . . . . . . . . . . . . . . . 8
4. Heat . . . . . . . . . . . . . . . . . . . . . . . . . . . . . . . . . . . . . . . . . . . . . . . . . . . . . . . . . . . . . . . . . . . . . . . . . . . . . . . . . . . . . . . . . . . . . . . . . . . . . . . . . . . . . . . . . . . . . . . 8
5. Delivery . . . . . . . . . . . . . . . . . . . . . . . . . . . . . . . . . . . . . . . . . . . . . . . . . . . . . . . . . . . . . . . . . . . . . . . . . . . . . . . . . . . . . . . . . . . . . . . . . . . . . . . . . . . . . . . . . . 8
6. Before tting to the tractor/cv . . . . . . . . . . . . . . . . . . . . . . . . . . . . . . . . . . . . . . . . . . . . . . . . . . . . . . . . . . . . . . . . . . . . . . . . . . . . . . . . . . . 9
7. Before starting the rotor . . . . . . . . . . . . . . . . . . . . . . . . . . . . . . . . . . . . . . . . . . . . . . . . . . . . . . . . . . . . . . . . . . . . . . . . . . . . . . . . . . . . . . . . . . . 9
8. Before leaving the tractor/cv. . . . . . . . . . . . . . . . . . . . . . . . . . . . . . . . . . . . . . . . . . . . . . . . . . . . . . . . . . . . . . . . . . . . . . . . . . . . . . . . . . . . . 9
CHAPTER 1 : TECHNICAL CHARACTERISTICS. . . . . . . . . . . . . . . . . . . . . . . . . . . . . . . . . . . . . . . . . . . . . . . . . . . . . . . . . . . . . . . 10
1. Technical specications. . . . . . . . . . . . . . . . . . . . . . . . . . . . . . . . . . . . . . . . . . . . . . . . . . . . . . . . . . . . . . . . . . . . . . . . . . . . . . . . . . . . . . . . . . . 10
1.1 Power and features . . . . . . . . . . . . . . . . . . . . . . . . . . . . . . . . . . . . . . . . . . . . . . . . . . . . . . . . . . . . . . . . . . . . . . . . . . 10
1.2 Weights . . . . . . . . . . . . . . . . . . . . . . . . . . . . . . . . . . . . . . . . . . . . . . . . . . . . . . . . . . . . . . . . . . . . . . . . . . . . . . . . . . . . . . . 10
1.3 Performances . . . . . . . . . . . . . . . . . . . . . . . . . . . . . . . . . . . . . . . . . . . . . . . . . . . . . . . . . . . . . . . . . . . . . . . . . . . . . . . . 10
1.4 Manoeuvrability . . . . . . . . . . . . . . . . . . . . . . . . . . . . . . . . . . . . . . . . . . . . . . . . . . . . . . . . . . . . . . . . . . . . . . . . . . . . . . 10
1.5 Standard equipment . . . . . . . . . . . . . . . . . . . . . . . . . . . . . . . . . . . . . . . . . . . . . . . . . . . . . . . . . . . . . . . . . . . . . . . . . 10
2. Transport of the machine by lorry . . . . . . . . . . . . . . . . . . . . . . . . . . . . . . . . . . . . . . . . . . . . . . . . . . . . . . . . . . . . . . . . . . . . . . . . . . . . . 11
Loading . . . . . . . . . . . . . . . . . . . . . . . . . . . . . . . . . . . . . . . . . . . . . . . . . . . . . . . . . . . . . . . . . . . . . . . . . . . . . . . . . . . . . . . . . . . 11
Unloading. . . . . . . . . . . . . . . . . . . . . . . . . . . . . . . . . . . . . . . . . . . . . . . . . . . . . . . . . . . . . . . . . . . . . . . . . . . . . . . . . . . . . . . . .12
3. Attachment of the machine to the tractor/CV . . . . . . . . . . . . . . . . . . . . . . . . . . . . . . . . . . . . . . . . . . . . . . . . . . . . . . . . . . . . . 13
4. First-time operation
. . . . . . . . . . . . . . . . . . . . . . . . . . . . . . . . . . . . . . . . . . . . . . . . . . . . . . . . . . . . . . . . . . . . . . . . . . . . . . . .
13
Starting the rotor. . . . . . . . . . . . . . . . . . . . . . . . . . . . . . . . . . . . . . . . . . . . . . . . . . . . . . . . . . . . . . . . . . . . . . . . . . . . . . . . .13
Stopping the rotor . . . . . . . . . . . . . . . . . . . . . . . . . . . . . . . . . . . . . . . . . . . . . . . . . . . . . . . . . . . . . . . . . . . . . . . . . . . . . . . 13
5. Safety instructions
. . . . . . . . . . . . . . . . . . . . . . . . . . . . . . . . . . . . . . . . . . . . . . . . . . . . . . . . . . . . . . . . . . . . . . . . . . . . . . . . .
14

Operator’s manual
Axiona - Prodigia
3
CHAPTER 2: OPERATION AND MAINTENANCE . . . . . . . . . . . . . . . . . . . . . . . . . . . . . . . . . . . . . . . . . . . . . . . . . . . . . . . . . . . . . . 15
1. Description of the machine. . . . . . . . . . . . . . . . . . . . . . . . . . . . . . . . . . . . . . . . . . . . . . . . . . . . . . . . . . . . . . . . . . . . . . . . . . . . . . . . . . . . . . . 15
2. Identication of the control movement . . . . . . . . . . . . . . . . . . . . . . . . . . . . . . . . . . . . . . . . . . . . . . . . . . . . . . . . . . . . . . . . . . . . . . 16
3. Identication of control . . . . . . . . . . . . . . . . . . . . . . . . . . . . . . . . . . . . . . . . . . . . . . . . . . . . . . . . . . . . . . . . . . . . . . . . . . . . . . . . . . . . . . . . . . . . 17
4. Use of the digital controls (Start - Joystick - Initialization - Measures - Hour counter). . . . . 18
5. Operation . . . . . . . . . . . . . . . . . . . . . . . . . . . . . . . . . . . . . . . . . . . . . . . . . . . . . . . . . . . . . . . . . . . . . . . . . . . . . . . . . . . . . . . . . . . . . . . . . . . . . . . . . . . . . . . . 22
5.1 Transport position . . . . . . . . . . . . . . . . . . . . . . . . . . . . . . . . . . . . . . . . . . . . . . . . . . . . . . . . . . . . . . . . . . . . . . . . . . . 22
5.2 Working position. . . . . . . . . . . . . . . . . . . . . . . . . . . . . . . . . . . . . . . . . . . . . . . . . . . . . . . . . . . . . . . . . . . . . . . . . . . . .22
5.3 Choice of the working ground speed. . . . . . . . . . . . . . . . . . . . . . . . . . . . . . . . . . . . . . . . . . . . . . . . . . . . . . .22
5.4 Vibrations. . . . . . . . . . . . . . . . . . . . . . . . . . . . . . . . . . . . . . . . . . . . . . . . . . . . . . . . . . . . . . . . . . . . . . . . . . . . . . . . . . . . .22
5.5 Work on the ground. . . . . . . . . . . . . . . . . . . . . . . . . . . . . . . . . . . . . . . . . . . . . . . . . . . . . . . . . . . . . . . . . . . . . . . . . .22
5.6 Height work. . . . . . . . . . . . . . . . . . . . . . . . . . . . . . . . . . . . . . . . . . . . . . . . . . . . . . . . . . . . . . . . . . . . . . . . . . . . . . . . . . .22
6. Description of the machine. . . . . . . . . . . . . . . . . . . . . . . . . . . . . . . . . . . . . . . . . . . . . . . . . . . . . . . . . . . . . . . . . . . . . . . . . . . . . . . . . . . . . . . 23
6.1 Machine pressures adjustment . . . . . . . . . . . . . . . . . . . . . . . . . . . . . . . . . . . . . . . . . . . . . . . . . . . . . . . . . . . . . 23
6.2 Bolt tightening torques . . . . . . . . . . . . . . . . . . . . . . . . . . . . . . . . . . . . . . . . . . . . . . . . . . . . . . . . . . . . . . . . . . . . . . 23
7. Greasing . . . . . . . . . . . . . . . . . . . . . . . . . . . . . . . . . . . . . . . . . . . . . . . . . . . . . . . . . . . . . . . . . . . . . . . . . . . . . . . . . . . . . . . . . . . . . . . . . . . . . . . . . . . . . . . . . 24
7.1 Recommendations about greasing . . . . . . . . . . . . . . . . . . . . . . . . . . . . . . . . . . . . . . . . . . . . . . . . . . . . . . . . . 24
7.2 Greasing plan and intervals. . . . . . . . . . . . . . . . . . . . . . . . . . . . . . . . . . . . . . . . . . . . . . . . . . . . . . . . . . . . . . . . .24
7.3 PTO driveshaft greasing. . . . . . . . . . . . . . . . . . . . . . . . . . . . . . . . . . . . . . . . . . . . . . . . . . . . . . . . . . . . . . . . . . . . .25
8. Oil changes . . . . . . . . . . . . . . . . . . . . . . . . . . . . . . . . . . . . . . . . . . . . . . . . . . . . . . . . . . . . . . . . . . . . . . . . . . . . . . . . . . . . . . . . . . . . . . . . . . . . . . . . . . . . . 26
8.1 Recommendations about oil changes. . . . . . . . . . . . . . . . . . . . . . . . . . . . . . . . . . . . . . . . . . . . . . . . . . . . . .26
8.2 Hydraulic circuit oil changes. . . . . . . . . . . . . . . . . . . . . . . . . . . . . . . . . . . . . . . . . . . . . . . . . . . . . . . . . . . . . . . .26
8.3 Oil lter cartridge replacement . . . . . . . . . . . . . . . . . . . . . . . . . . . . . . . . . . . . . . . . . . . . . . . . . . . . . . . . . . . . . 27
8.4 Gearbox oil change . . . . . . . . . . . . . . . . . . . . . . . . . . . . . . . . . . . . . . . . . . . . . . . . . . . . . . . . . . . . . . . . . . . . . . . . . . 27
9. Maintenance . . . . . . . . . . . . . . . . . . . . . . . . . . . . . . . . . . . . . . . . . . . . . . . . . . . . . . . . . . . . . . . . . . . . . . . . . . . . . . . . . . . . . . . . . . . . . . . . . . . . . . . . . . . 28
9.1 Daily maintenance . . . . . . . . . . . . . . . . . . . . . . . . . . . . . . . . . . . . . . . . . . . . . . . . . . . . . . . . . . . . . . . . . . . . . . . . . . . 28
9.2 Replacement of the rotor . . . . . . . . . . . . . . . . . . . . . . . . . . . . . . . . . . . . . . . . . . . . . . . . . . . . . . . . . . . . . . . . . . . . 28
9.3 Maintenance of the cutting tool. . . . . . . . . . . . . . . . . . . . . . . . . . . . . . . . . . . . . . . . . . . . . . . . . . . . . . . . . . . . .28
9.4 Maintenance of the accumulator. . . . . . . . . . . . . . . . . . . . . . . . . . . . . . . . . . . . . . . . . . . . . . . . . . . . . . . . . . . .28
10. Attachment of the machine to the tractor/CV . . . . . . . . . . . . . . . . . . . . . . . . . . . . . . . . . . . . . . . . . . . . . . . . . . . . . . . . . . . 29
11. Removal . . . . . . . . . . . . . . . . . . . . . . . . . . . . . . . . . . . . . . . . . . . . . . . . . . . . . . . . . . . . . . . . . . . . . . . . . . . . . . . . . . . . . . . . . . . . . . . . . . . . . . . . . . . . . . . . 29
12. Storage . . . . . . . . . . . . . . . . . . . . . . . . . . . . . . . . . . . . . . . . . . . . . . . . . . . . . . . . . . . . . . . . . . . . . . . . . . . . . . . . . . . . . . . . . . . . . . . . . . . . . . . . . . . . . . . . . 30
13. Warranty . . . . . . . . . . . . . . . . . . . . . . . . . . . . . . . . . . . . . . . . . . . . . . . . . . . . . . . . . . . . . . . . . . . . . . . . . . . . . . . . . . . . . . . . . . . . . . . . . . . . . . . . . . . . . . . 32
13.1 Warranty application . . . . . . . . . . . . . . . . . . . . . . . . . . . . . . . . . . . . . . . . . . . . . . . . . . . . . . . . . . . . . . . . . . . . . . . 32
Notes . . . . . . . . . . . . . . . . . . . . . . . . . . . . . . . . . . . . . . . . . . . . . . . . . . . . . . . . . . . . . . . . . . . . . . . . . . . . . . . . . . . . . . . . . . . . . . . . . . . . . . . . . . . . . . . . . . . . . . . . . 33
Operator’s manual
Axiona - Prodigia
4
INTRODUCTION
Congratulations on acquiring your new side-arm mower/ail-cutter*
Model
AXIONA - PRODIGIA
From it’s introduction, this machine has given the user, greater benets of ease of operation and
operating comfort not found in a rear mounted arm machine.
We hope that it will give you the satisfaction that you justiably expect and that motivated your
choice.
SAFETY ALERT SYMBOL
This symbol identies the important safety messages in the manual. When you
see it, take note about the risks, read the accompanying message carefully and
inform other users.
This specication and operation manual contains the information that will enable you to:
1.Familiarise yourself with your machine and take full advantage of it’s technical renements
in the best usage conditions.
2.Obtain optimum performance by simple, but strict observance of
the maintenance recommendations.
3.Deal with incidents that do not require the help of a specialist, without wasting time.
For the safety of any persons nearby, it is very important to follow
the advice given in this manual.
ATTENTION
Your side arm mower must NEVER be used as a lifting device.
*To help with the reading of this manual, the terms, ail mower and articulated side-arm mower are
covered by the word ‘machine’. Terms for ‘cutting head’, reciprocating knife etc will be referred to as
the ‘tool’.
This manual consists two chapters :
- Chapter 1 : Spare parts list Page 4 to 14
- Chapter 2 : Operator’s manual Page 15 to 27

Operator’s manual
Axiona - Prodigia
5
RECOMMENDATIONS
Your machine is likely to be tted to an agricultural tractor.
NOREMAT would like to draw your attention to the following points :
- Please refer to the relevant authority in your country or state for;
-required certicates of competence to drive and use a tractor/mower combination on
the public highway or other;
-related Health and Safety regulations and requirements.
Road trafc
In France, the driving of a tractor is subject to obtaining a HGV driving licence, except for drivers
working in agricultural or forestry environments such as agricultural contractors. (art. R221-20 from
the trafc rules)
Driving of Machines (directive 98-1084 from 02/12/1998)
The driving of a tractor equipped with a side-arm ail mower is subject to the express written
authorisation of the employer. The driver must attend and satisfactorily pass a training course to
establish his/her knowledge of the machine and competency to operate it. Obtaining the CACES
(certicate of professional competency) ensures that the driver is adequately trained.
The job in hand and the use of your machine, just like the whole tractor will necessitate a period of
acclimatization.
NOREMAT will assist you with information and advice.
It is recommended that you make contact with a NOREMAT technician to establish your informational
and instructional needs in relation to the machine and it’s use.
Furthermore, it is desirable that each user can benet from the experience and expertise of
NOREMAT, your Direct-Constructor.

Operator’s manual
Axiona - Prodigia
6
RESPONSIBILITIES OF THE USER
The user is responsible to adhere strictly to the safe-use regulations
and safety points which are dened in this manual.
As with the driving of all machines, the user must match his speed
of travel in the transport position or during work, to the condition of
the roadway or terrain.
Before carrying out any operation with your machine, you are advised to read this section carefully.
All modications carried out on the machine are the sole responsibility of the person instigating them.
To use the machine for mowing (rotor turning in the opposite direction to the tractor wheels), it is
imperative that the front hood and aps are tted to avoid the risk of debris being thrown from the
rotor.
example of
hood and aps
If these regulations are not respected, responsibility lies with the user alone.
Operator’s manual
Axiona - Prodigia
7
GENERAL SAFETY RULES
It is essential to follow the instructions in this manual to ensure the
safety of persons operating or in the vicinity of the machine.
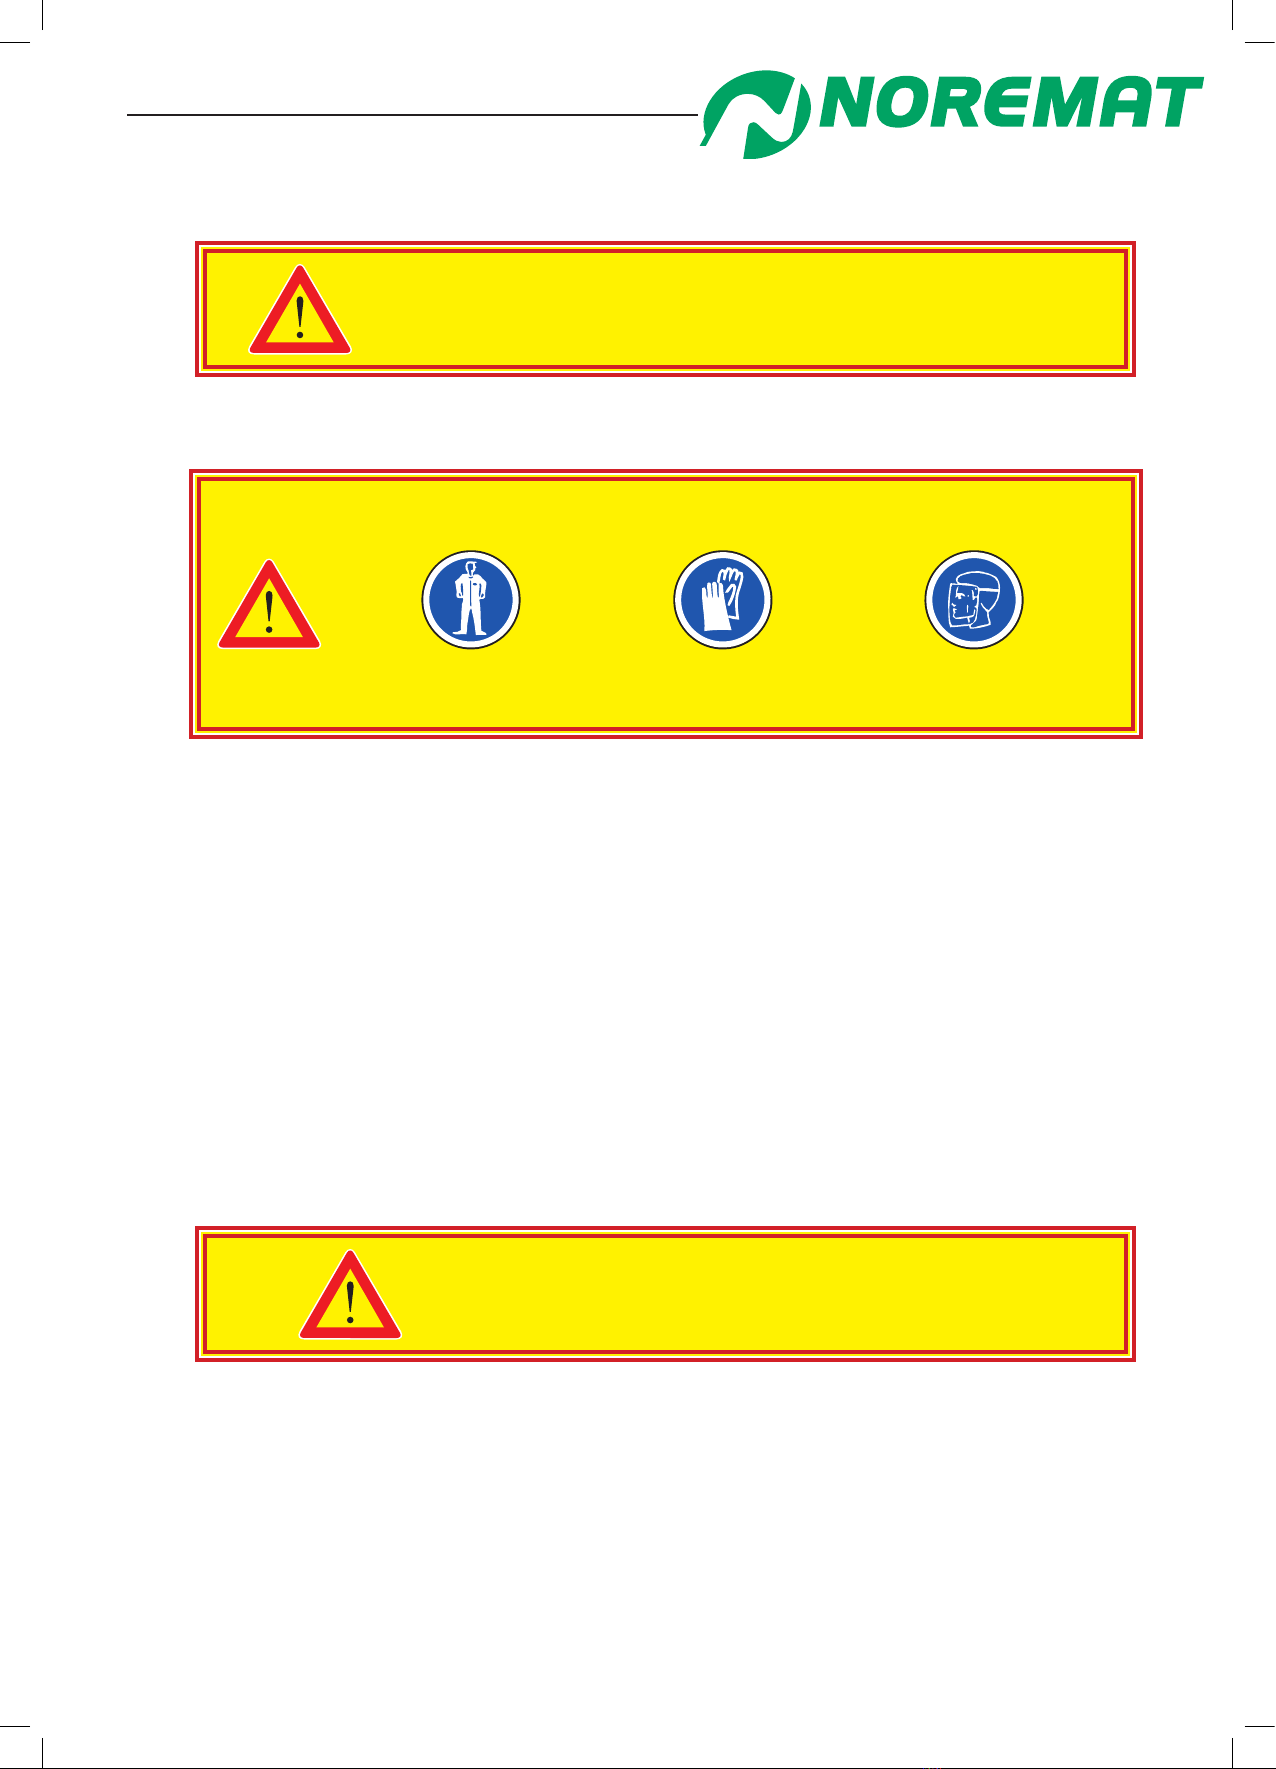
1. Contact with oil
At the time of oil changes or when working on any components which
may retain hydraulic pressure, ALWAYS wear adequate safety equipment
Body
Protection
Gloves Face
Visor
-In the event of contact with the skin:
If a high pressure jet of oil is applied to the skin there is a danger of the oil penetrating
the surface. The injured person should be taken to hospital even if no wound is apparent.
Remove all contaminated clothing. Wash the suspected area immediately with plenty of soap
and water.
-In the event of contact with the eyes:
Wash immediately with plenty of water. Hold the eyelids apart for at least 15 minutes.
-Ingestion:
Risk of vomiting and diarrhoea. Do not make the person drink to avoid the risk of inhalation by
the respiratory tracts. Do not drink water.
-Aspiration:
If there is a suspicion that the person may have inhaled oil into the lungs (when vomiting for
instance), take them to hospital immediately.
In all cases seek immediate medical attention

Operator’s manual
Axiona - Prodigia
8
2. Noise
Take necessary precautions against the risk
of exposure to noise and dust during working
and travelling periods.
Wear Ear
Defenders
3. Vibrations
To improve safety and health conditions of workers, the decree 2005-746 from July 4th, 2005 forces
the employer to evaluate the levels of exposure of its employees to the vibrations transmitted to the
whole body, and to start protection of the driver beyond exposure limit values.
These daily exposure limit values are precised in the article R 231-119 of the Labour regulation.
Noremat carried out trial runs to evaluate the level of vibrations emitted by a tractor /machine unit and
transmitted to the operator’s seat. As an indication, the median value recorded is 0.45m/s2 per eight
hours base period in normal work conditions as recommended by the manufacturer.
4. Heat
According to employment regulations, the employer must take measures to limit to the minimum,
employee’s exposure to noise.
Recommendations concerning employee’s exposure to noise.
Taking into account that the tractor cab noise level may vary;
- If the daily level of exposure to noise reaches or exceeds 80dB(A),
the employer must supply ear defenders to the driver to limit that noise.
- If the daily level of exposure to noise reaches or exceeds 85 dB(A)
the employer has to ensure that ear defenders are worn.
Take necessary precautions against the risks
due to the heat released by the hydraulic
components (hoses, pump, motor, gearbox,
valve block, rotor shaft).
Wear heat
protection
5. Delivery
Observe safety and handling rules, in particular:
-only use designated slinging points for all slings.
-never lift the machine with slings that are in poor condition or are too weak in lifting capacity.
-check that the means of lifting is satisfactory and suitable to lift the load.
-never stand or walk under the load.
-never attempt to remove the delivery supports (blue pieces) before tting
of the machine has been completed.

Operator’s manual
Axiona - Prodigia
9
6. Before tting to the tractor/cv
-It is necessary that the tractor is equipped with a cab or means of protecting the driver from possible
debris thrown from the tool.
-Check the condition of the PTO shaft guard on the tractor.
-Carefully read the tting instructions supplied with the drive shaft.
-Check all tyre pressures.
7. Before starting the rotor
-Read chapter 2, section 3, ‘Identication of controls’.
-Read the operator’s manual for the tool to be used.
-Do not start the machine in an explosive atmosphere or near inammable items.
-It is recommended that the rst trial be carried out on ground which is rm, at and without
obstacles.
-Ensure that the operator is familiar with the tractor/machine combination.
-Check that the control unit is mounted securely in the cab/on the tractor.
-Never start the rotor if anyone is standing within the trajectory of possible debris thrown from the
rotor.
-Ensure that all persons remain outside of the working area of the tractor and machine.
-Never remove the front hood of the cutting tool during work when mowing (direction of rotor opposite
to the forward motion of the carrying vehicle, see chapter ‘User responsibilities’).
8. Before leaving the tractor/cv
Before leaving that tractor/cv or allowing anyone to approach, it is imperative to:
- lower the tool to the ground.
- stop the rotor.
- stop the PTO.
- switch the machine off.
- apply the parking brake.
- stop the tractor engine.
General Safety Rules
As for all work, observe the safety instructions.At worksites it is recommended
that persons in the immediate vicinity do not approach the area of work, and in
particular from within the trajectory of possible projectiles thrown by the rotor.

10
Axiona - Prodigia
Technical Characteristics
1. Technical specications
1.1- POWER AND FEATURES :
1.2- WEIGHTS
Maximum tool weight at the end of arm : 300kg,
except with written permission from NOREMAT.
1.3- PERFORMANCES
4.5 m 5.0 m
L Maximum lateral reach* 4.5 m * 5.0 m *
VVertical reach 5.6 m * 6.1 m *
TBank reach 4.47 m * 5.0 m *
HOver-hedge reach 3.71 m 4.1 m
FDitch reach 3.0 m 3.5 m
I Minimum lateral reach 1.75 m
Orientation angle 102 °
Tool orientation 230°
Measured from the centreline of the tractor.
Average dimensions, variable according to the type of tractor.
1.4- MANOEUVRABILITY :
Type of pump 14cc geared (Axiona)
17cc geared (Prodigia)
Hydraulic ow : AXIONA 26 L/mn
PRODIGIA 36 L/mn for 540 rpm and 42 rpm for 1000 rpm
General pressure at work (pump exit) : AXIONA 210 bars
PRODIGIA 210 bars
NOTA :These indications of pressure are detailed in part 5.1, chapter 2.
1.5- STANDARD EQUIPMENT
Filtration, hydropneumatic suspension, adjustable stands, rear bumper with lights, oat.
AXIONA PRODIGIA
Gearbox ratio 3,45 4 2.5
Power Take Off speed 540 rpm 540 rpm 1000 rpm
Pump turning speed 1860 rpm 2160 rpm 2500 rpm
Type of pump Geared Axial pistons
Flow 81 L/mn 60 L/mn 70 L/mn
Maximum pressure 210 bars 345 bars
Power 31.6 kW (43 HP) 34 kW (47 HP) 40 kW (54 HP)
Tank capacity 80 L 80 L
Rotor control Mecanical Electrical
Time of rotor emergency stop Less than 3 sec.
45 Arm 50 Arm M45 Arm
850 kg 865 kg 875 kg
4.24
4.09
5.37
2.05
4.22
D
E
F
C
1
2
3
4
B
A
3
2
1
5
C
D
4
6
7
8
A
B
Echelle :1:50
Tolérance générale sauf
indications particulières :Js13
166, rue Ampère - ZI - BP 93
54714 LUDRES CEDEX
Tel: 03.83.25.69.60
Fax: 03.83.26.12.85
Ce plan est la propriété de la société NOREMATet ne
peut être reproduit ou communiqué sans son autorisation.
Désignation :
Format: A3
Planche: 1/1
Code :
Matière:
Date:
Poids: 6028.59 kg
C_PR2_MAN001
Indice:
E
F
5
6
7
8
Dess :
VOIR
DETAILS

Technical Characteristics
11
Axiona - Prodigia
2. Transport of the machine by lorry
The machine should be secured to the lorry in such a way as to
guarantee absolute safety for nearby persons and equipment.
See Safety Rules on Page 5.
Precautions for carriage when not tted to a tractor or carrying vehicle:
It is essential to lock the arm with the locking kit (blue supports)
supplied with the machine.
Contact NOREMAT who can supply you with the correct locking kit.
For safety reasons, the equipment is delivered in the ‘delivery’ position. In this position, machine
movements are locked by supports that serve both for lifting the machine and for anchoring it
to the lorry.
These supports are identied by their unusual blue colour.
When it is delivered, the machine is unloaded and placed on the ground on it’s stands at the correct
height to be tted to a standard tractor.
The supports should not be moved until the machine is tted to the tractor and started.
The locking bar may be equipped with a shackle (adapted to the weight it will lift).
Use only the indicated lifting point to lift the machine, necessary lifting capacity at that point is 1000kg
(1250kg with mowing head)
Loading:
- Move the arm to the back
- Place the mowing head in the recommended position.
- Place the rst-, and second arms so that you can install the locking bar.
- Adjust stands and then dismount the machine from the tractor
- Install parts tted for forklift ( kit available as an option)
- Lift the machine by the designated lifting point.
- Turn the stands to 90°, machine can then be loaded.
General Safety Rules

Technical Characteristics
12
Axiona - Prodigia
Unloading :
□ Lift the machine with the help of a suitable gantry crane (fork truck : use only if the necessary kit is
tted to the machine)
□ Move clear of the lorry and t the adjustable stands to the machine.
□ Lower the machine slowly. Before it touches the ground, adjust the stands so that it will remain
level.
□ Place the machine on the ground.
□ Remove the parts tted for adapting it to the fork truck lifting means.
□ Mount the machine on the tractor (stands can be removed, see procedure).
□ Remove locking kit (if necessary by moving lightly the arm).
Forklift kit : 109997
PRODIGIA M45 AXIONA-PRODIGIA 45/50
Lifting-means Lifting-means
Locking kit
110017

Technical Characteristics
13
Axiona - Prodigia
3. Attachment of the machine to the tractor/CV
See chapter 2, part 9, page 25.
4. First-time operation
As for all work, observe the safety instructions.
It is desirable for a new operator who may already be familiar with the operation of the tractor/cv to
acquire experience in an area which is smooth, at and free of obstacles where he may concentrate
fully on the operation of the machine.
It is essential to stop the rotor before stopping the PTO shaft (no warranty claims will
be considered if this procedure is not strictly adhered to).
PRODIGIA AXIONA
Starting the rotor
Engage the PTO.
Start the engine and set to a speed
approximately 500 rpm below the required
speed for your choice of PTO speed.
Extend the arm and lower the tool to the
ground in the working position.
Select the direction of rotation and engage
the rotor. Allow a warm up time of several
minutes.
Allow the machine to run at the speed
recommended by your NOREMAT technician
for several minutes. This is very important in
temperatures of less than 5 degrees C.
Increase the engine speed
PROGRESSIVELY to the gure given by
your NOREMAT technician at the time of
installation/test.
No warranty claims will be considered
if this procedure is not strictly adhered to.
Engage the PTO.
Extend the arm and lower the tool to the
ground in the working position..
Select the direction of rotation to the right
(scrub clearing) to the left (grass cutting), with
idled engine speed.
Allow the machine to run at the speed
recommended by your NOREMAT technician
for several minutes. This is very important in
temperatures of less than 5 degrees C.
Increase the engine speed
PROGRESSIVELY to the gure given by
your NOREMAT technician at the time of
installation/test.
No warranty claims will be considered
if this procedure is not strictly adhered to.
Stopping the rotor
Decrease engine speed by approximately
500 rpm.
Stop the rotor.
DECREASE the engine speed
PROGRESSIVELY until idle.
Put the rotor lever in the neutral position
(Stopping the rotor).

Technical Characteristics
14
Axiona - Prodigia
5. Safety instructions
□ Ensure that the operator knows and understands the operation of the machine and tractor.
The two have to be operated simultaneously what requires practice. If this is not the case, the operator
should choose a piece of at ground without people or obstacles on it to practice.
□ Never work in an explosive or inammable atmosphere.
□ Only work with good lighting, natural or articial.
□ Never work with any safety guards or covers removed.
□ Never start the machine if it is not in good working order and especially if any safety guards or covers are not
in place.
□ When using the machine for mowing. (ie rotor turning in opposite direction to forward travel of tractor wheels)
it is essential that the front hood and aps be tted to prevent the risk of any material being thrown by the
rotor.
□ Never leave the rotor turning if a person could be in the path of any material that could be thrown out by it.
□ Never move the arm if any person could be within the machine’s operating area.
□ Do not stand or walk under the machine.
□ Never insert branches or objects by hand during operation of the rotor.
□ Always make sure that all hydraulic components and ttings are not under pressure before removal.
BEFORE DOING ANY WORK ON THE MACHINE :
- lower the tool to the ground
- stop the rotor.
- stop the PTO.
- stop the tractor / cv’s engine.
- place the gear lever in neutral and apply the parking brake.
- ensure that all hydraulic cylinders, hoses etc are not under pressure.
- to be sure, operate all sections on the main valve block in both directions
with the manual lever provided.
Relieve any pressure in the accumulator before carrying out any maintenance.
To be sure, open the valve situated behind the reservoir in the case of machines not equipped with electric
accumulator command.
For machines equipped with electric command, the procedure is as follows:
- start the engine and engage the PTO.
- switch on the machine.
- lower the tool to the ground.
- switch on the <ACCU> switch on the control panel.
- move the control lever forward as if to lower the rst-arm.
- switch off the <ACCU> switch on the control panel.
ANY OTHER PROCEDURE IS NOT ACCEPTABLE OR SAFE
The oil tank is under 0.3 bar of pressure. Before any work on the machine, please make sure components are
no more under pressure by removing the tank cap, taking care about temperature and pressure.
ATTENTION, the machine uses a hydraulic accumulator which may still be under pressure
Before using your mower/ail-mower it is important to read these safety rules.

Operation and Maintenance
15
Axiona - Prodigia
1 - Frame
2 - Arm pivot assembly
3 - First-arm
4 - Second-arm
5 - Tool pivot bracket
6 - Transfer link bracket
7 - Angle transfer bracket
8 - Cutting tool
9 - Machine orientation cylinder
10 - First-arm cylinder
11 - Second-arm cylinder
12 - Tool orientation cylinder
AXIONA - PRODIGIA
1. Description of machine
1
2
3
4
5
6
7
12
10
11 9
8
REP
Production/Quantit
é
CODE
IND
DESIGNATION
EXTENSION
11
bati-s
21
pivot-s
31
fleche-s
41
balancier-s
51
pivot
groupe-s
61
116560-s
---
CONTREBIELLE
MOULEE
72
114061-s
---
DESI
-----
81
118827-s
---
DESI
-----
92
116615-s
10 2
116616-s
11 2
116617-s
12 2
116626-s
13 1
Reform
mounty
Pneus 425-55
R17
---
DESI
-----
D
E
F
C
1
2
3
4
B
A
3
2
1
5
C
D
4
6
7
8
A
B
Echelle :1:20
Tolérance générale sauf
indications particulières :Js13
166, rue Ampère - ZI - BP 93
54714 LUDRES CEDEX
Tel: 03.83.25.69.60
Fax: 03.83.26.12.85
Ce plan est la propriété de la société NOREMATet ne
peut être reproduit ou communiqué sans son autorisation.
Désignation :
Format: A3
Planche: 1/1
Code :
Matière:
Date:
Poids: 5977.88 kg
C_PR2_MAN002
Indice:
E
F
5
6
7
8
Dess :
VOIR
DETAILS
Operation and Maintenance
16
Axiona - Prodigia
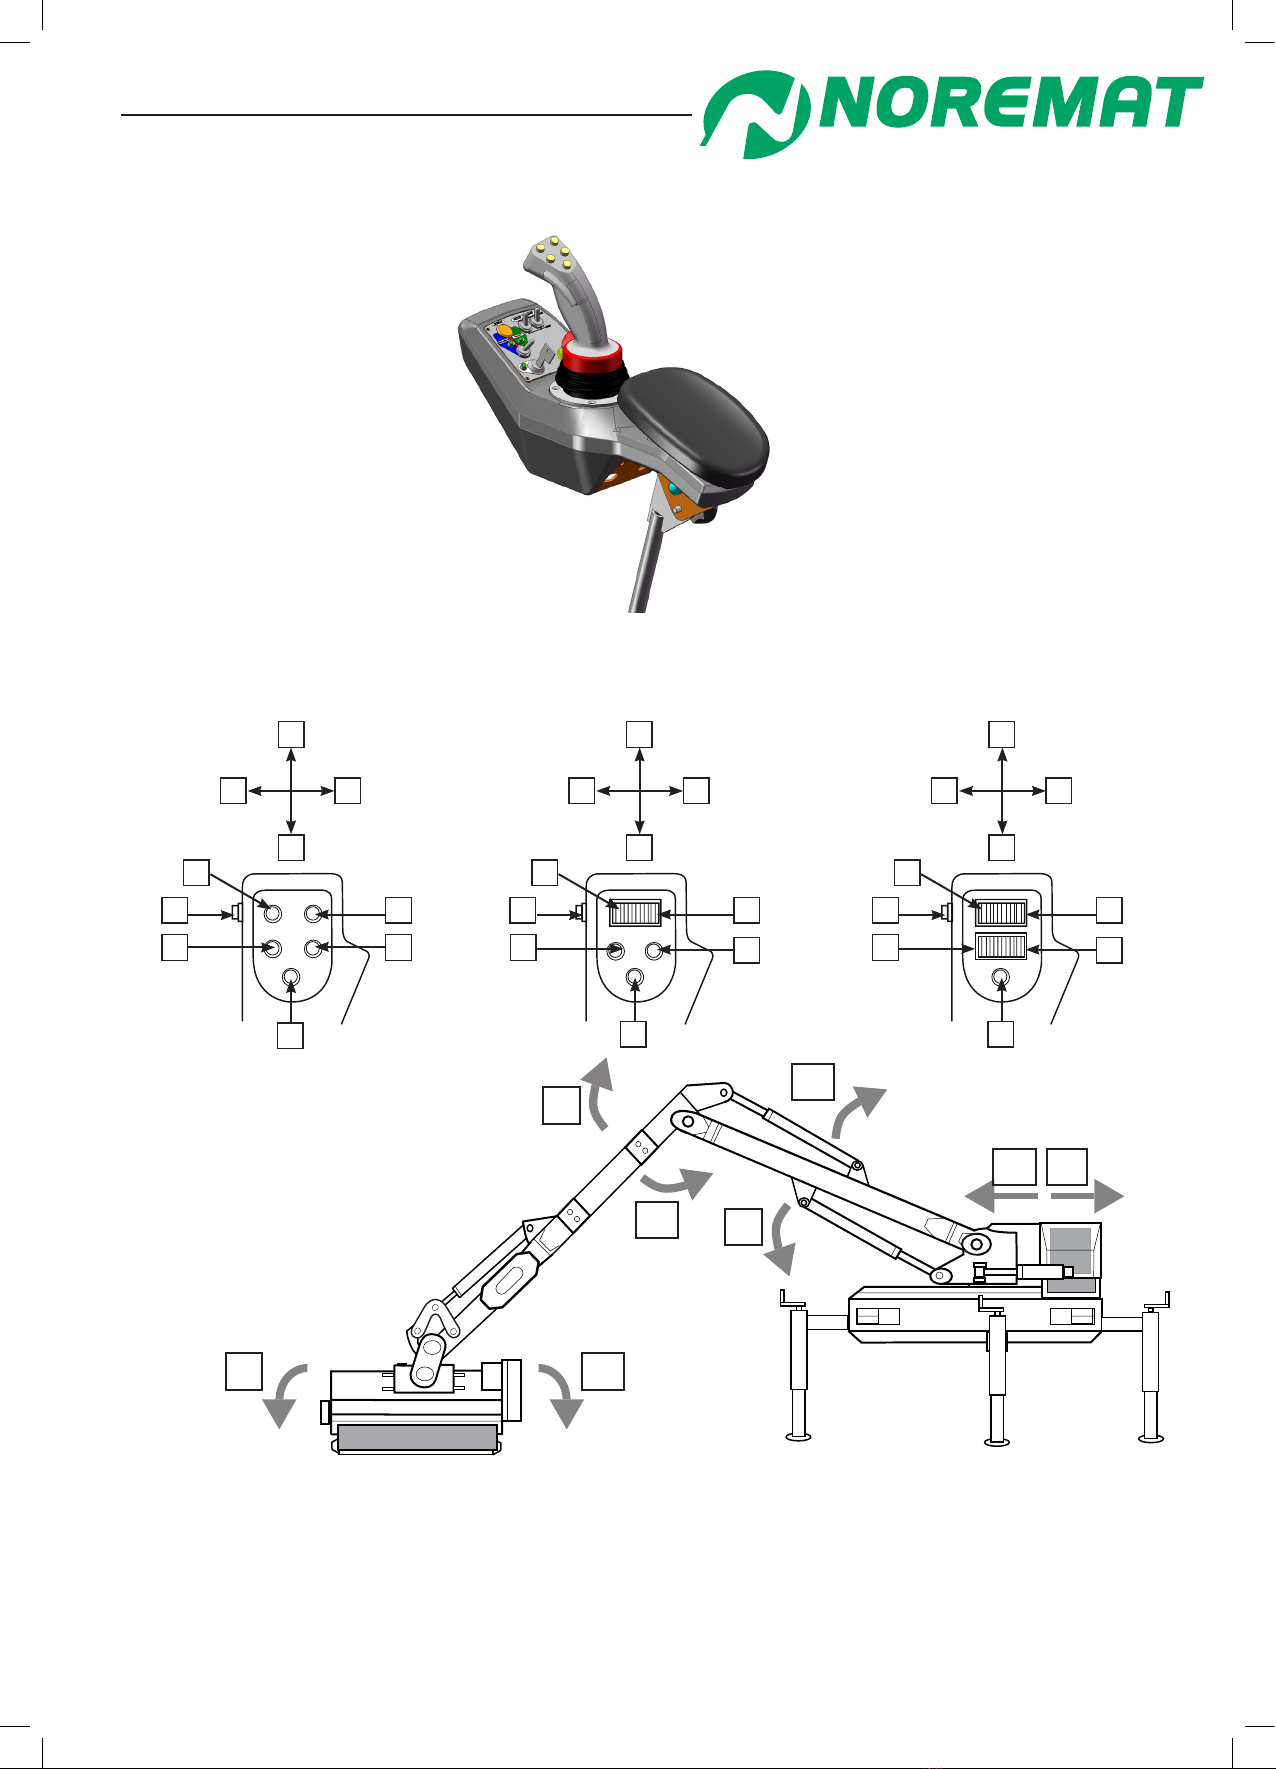
2. Identication of the control movement
3B
3A
4B 4B 4B5A 5A
5A
4A 4A 4A
3A 3A 3A3B 3B 3B
2B 2B 2B
2A 2A 2A
1B 1B 1B
5B 5B5B
1A 1A 1A
4A 4B
2B
2A
1B 1A
Digital control
2 proportional
movements
Digital control*
3 proportional
movements
Digital control**
4 proportional
movements
*option : Thumbwheel for the head proportional movement (4A/4B)

Operation and Maintenance
17
Axiona - Prodigia
3. Identication of control
1 13
2
14
3
15
4
16
5
17
6
18
7
19
8
20
9
21
10
11
12
9
8
7
5
21
20
16
15
14 13 12 11 10
18
2
13 3
19
4
6
17
Power up light
Green = correct battery
Orange = low battery
Red = polarity inversion
Ignition
Option B light
Float light
Display
Accumulator switch
Float switch
Option B switch
Rotor switch
Option A switch
Sustentation switch
Rotor direction light
Rotor direction selection
Emergency stop
Fault indicator light
Sustentation adjustment
Buttons to browse in the menu
Selection and conrmation button
Sustentation light
Option A light
Accumulator light

Operation and Maintenance
18
Axiona - Prodigia
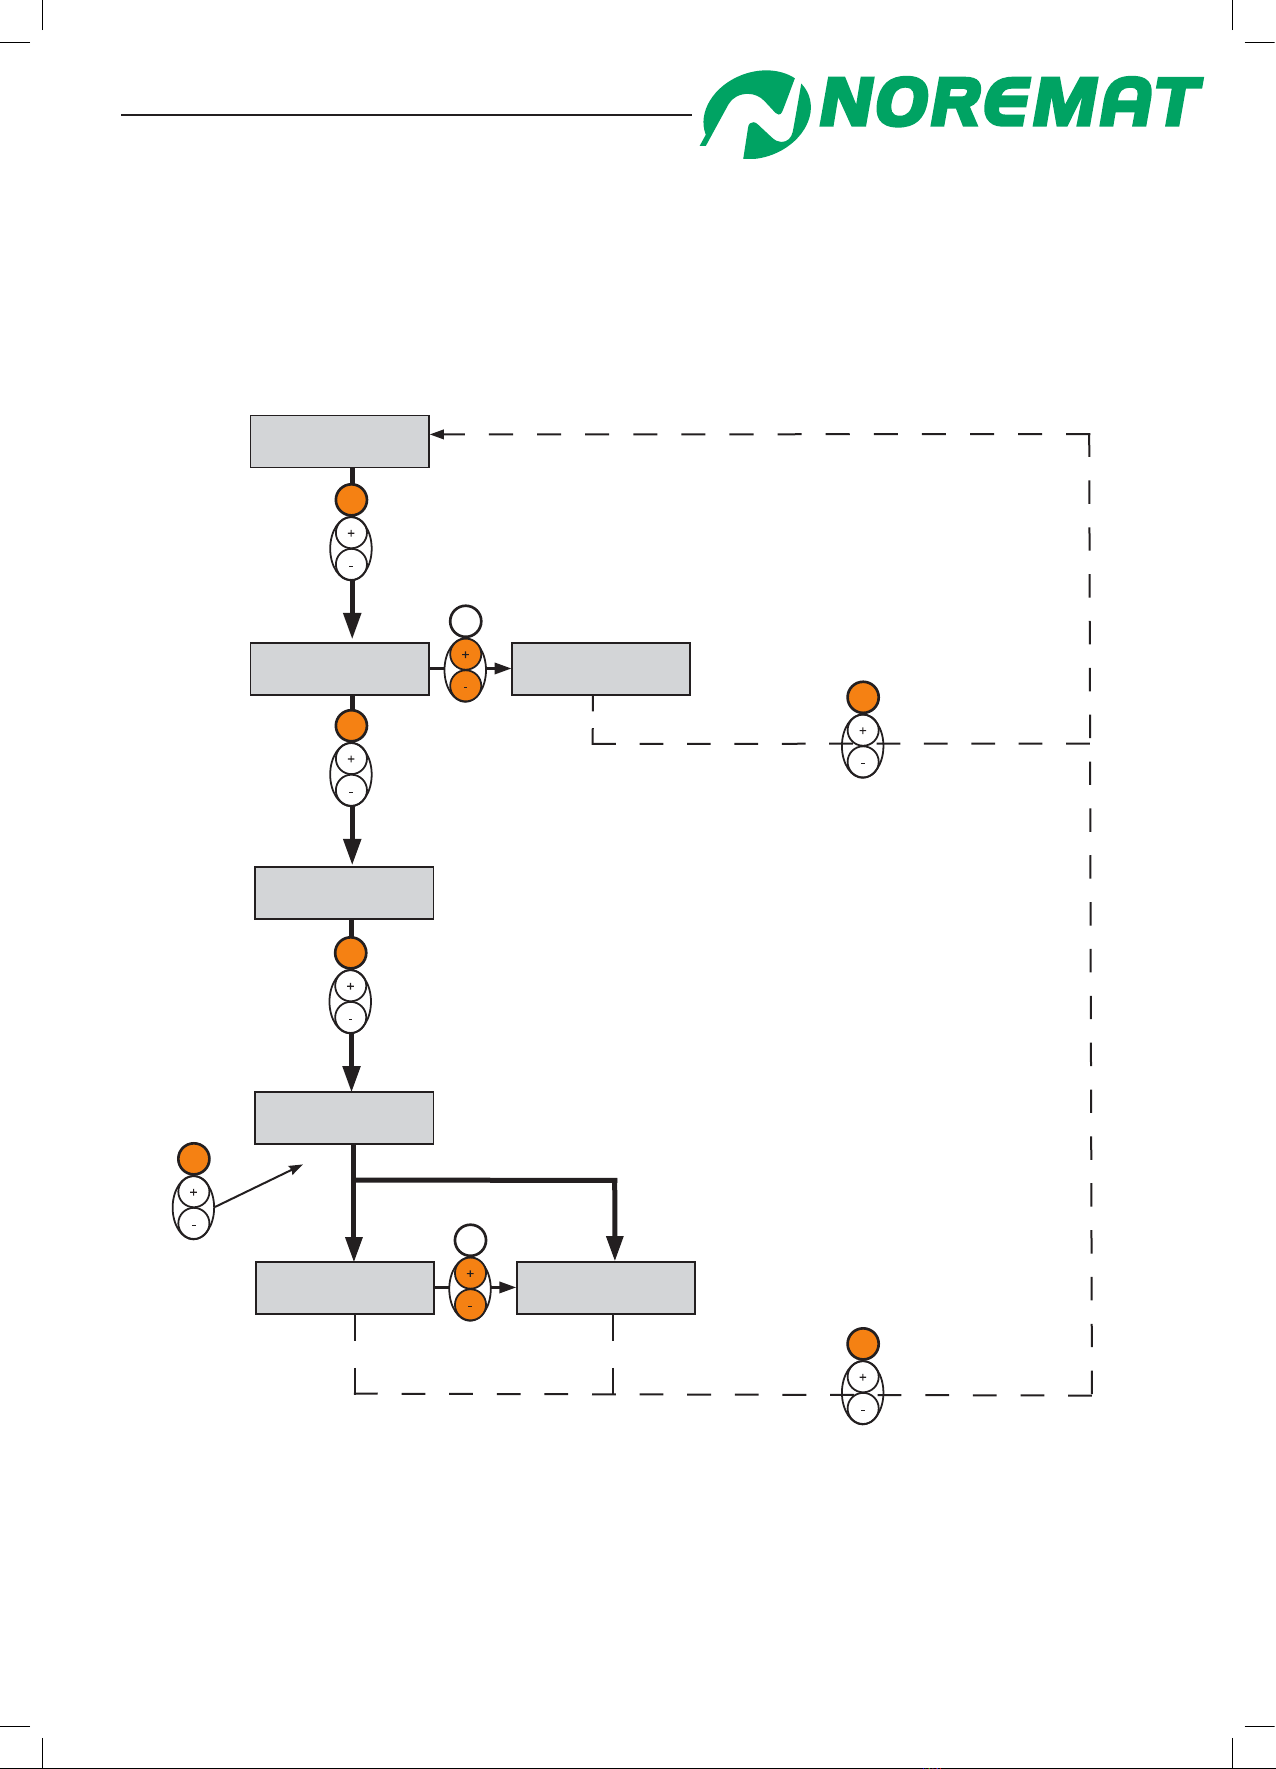
The use of your control is made by the Menu/OK button and the + and – scroll buttons.
Remark: At the rst start or by the change of a component, the joystick is maybe not initialized, there cane b an
error. Do not force the start (risk of uncontrolled movement). Follow the procedure «Joystick initialization»
START
Turn the ignition key. An auto-test is running to check the system, wait.
Before forcing the start, check the reason of the error by looking the events list and try to x it.
The 256 last events are viewable by browsing with the buttons + and -.
In case of problem, take contact with your NOREMAT technician/dealer to organize a visit.
*
There are 3 main check points with message change every 3 seconds.
*
4. Use of the controls
NOREMAT
VERSION 1.73
AUTO-TEST
RUNNING .A1
AUTO-TEST
OK .A3
VOLTAGE .C1
12.1 Volts
OIL T° .C3
23°C
AUTOMATIC RETURN
ON .R6
AUTO-TEST
ERROR .A2
FORCE START
A4
QUIT
B7
OK
OK
OK
OROR
OK OK
Operation and Maintenance
19
Axiona - Prodigia
JOYSTICK INITIALIZATION
It is necessary to initialize the joystick when it’s replaced or one of the components (thumbwheel).
To do this, the user access code (1111) has to be previously entered.
Move the joystick and the
optional thumbwheel.
SET UP
A6
JOYSTICK
INIT. .D8
KEEP IN NEUTRAL
AND CONFIRM .D8
MOVE PROP
AND CONFIRM .D9
CANCEL
B6
SAVE
B9
CANCEL
B6
OK
OK
OK
OK
OK
OK
OK
OK

Operation and Maintenance
20
Axiona - Prodigia
MEASURES (DEpENDINg ON OpTION)
It is possible to make some measures coming from the different sensors tted on the machine.
See details
page 23
Options
MEASURES
A5
HOUR COUNTER
A8
BATTERY VOLTAGE
MEASURE .CO
VOLTAGE .C1
14.20 VOLTS
OIL T°
MEASURE .C2
OIL T° .C3
00.0°C
OIL PRESSURE
MEASURE .C4
ROTOR PRESSURE
MEASURE .C5
ROTOR P .C6
BARS
MVT P .C8
BARS
MVT PRESSURE
MEASURE .C7
OK
OK
OK
OK
OK
OK
OK
OK OK
This manual suits for next models
6
Table of contents
Popular Lawn Mower manuals by other brands


Cub Cadet
Cub Cadet RZT 54 Limited warranty

AMBROGIO
AMBROGIO BASIC user manual

Walker Rider Lawnmowers
Walker Rider Lawnmowers MBS26 owner's manual

Cub Cadet
Cub Cadet CC 46 ES Operator's manual

Dixie Chopper
Dixie Chopper Vortex 2008 Installation & owner's manual

AGCO Allis
AGCO Allis 1691815 Operator's manual


