Norland Elite 437A150 Manual
DXA Bone Densitometer
Operator’s Guide
Elite Model 437A150
Operator's Guide
437D140 Rev. I

NOTICE TO USERS OF THE BONE ASSESSMENT PRODUCT
DESCRIPTIONS NOT INTENDED FOR DIAGNOSTIC PURPOSES. The descriptions and narratives in this
Operator’s Guide and other written materials provided to Licensee with this Bone Assessment Product are inten-
ded to provide a foundation for use of the Bone Assessment Product along with host computer and printer.
Actual printout images and any depictions of these images in the Operator’s Guide and accompanying written
materials are not intended for diagnostic purposes.
X-RAY DEVICE REGISTRATION. The Bone Assessment Product is an x-ray device that emits small
amounts of radiation to acquire bone density and / or other information. Although the dose is very small, some
countries and all states in the United States require registration of such devices, regardless of dose. It is the pur-
chaser’s responsibility to contact the government agency responsible for x-ray devices and to comply with any
specific information concerning device registration and operation for the area in which the system is to be oper-
ated.
CHANGES IN SPECIFICATIONS FOR BONE ASSESSMENT PRODUCT. All specifications for the Bone
Assessment Product are subject to change without notice.
Copyright © 2016-2018 Norland, Fort Atkinson, WI USA.
Contents of this Operator’s Guide and other written materials provided to Licensee with the Bone Assessment
Product may not be reproduced by any means whatsoever without prior written permission from Norland. All
products mentioned in this Operator’s Guide and related written materials are trademarked or copyrighted by
their manufacturers.
All Norland Products are covered by U.S. and other patents and/or patents pending. All product names are
trademarks of Norland. All trademarks and the rights of the trademarks owned by the companies referred to in
this Operator’s Guide and other written materials provided to Licensee with the Bone Assessment Product are
acknowledged.
WARRANTY FOR BONE ASSESSMENT PRODUCT
The Bone Assessment Product manufactured by Norland is warranted against defects in material and work-
manship for twelve (12) months from date of installation. During the warranty period, Norland will repair or
replace (at its option) a Bone Assessment Product proven to be defective. Warranty repairs may be performed
on site, at the factory, or at a Norland-approved service center without charge, provided the Bone Assessment
Product was not subjected to misuse, theft, neglect, fire, Acts of God, lightning strikes, or deterioration caused
by chemicals that are not used for normal unit operation. Any modifications of the Bone Assessment Product in
any manner, including but not limited to relocation or installation of the Bone Assessment Product without prior
Norland Customer Service authorization, shall void all associated warranties or service contracts. Prior to pre-
paid return of products for repair, the Bone Assessment Product must have a Return Authorization Number
(obtainable from Norland Customer Service) attached to it.
BEYOND THE WARRANTIES STATED ABOVE, THERE ARE NO OTHER WARRANTIES OF ANY KIND,
EXPRESS, IMPLIED OR STATUTORY (INCLUDING, WITHOUT LIMITATION, TIMELINESS,
TRUTHFULNESS, SEQUENCE, COMPLETENESS, ACCURACY, FREEDOM FROM INTERRUPTION),
ANY IMPLIED WARRANTIES ARISING FROM TRADE USAGE, COURSE OF DEALING, OR COURSE
OF PERFORMANCE, OR THE IMPLIED WARRANTIES OF MERCHANTABILITY OR FITNESS FOR A
PARTICULAR USE OR PURPOSE. LICENSEE’S EXCLUSIVE REMEDY FOR BREACH OF WARRANTY
OR BREACH OF CONTRACT, NEGLIGENCE OR PRODUCTS LIABILITY SHALL BE THE REPAIR OR
REPLACEMENT OF DEFECTIVE OR DAMAGED GOODS.
Operator's Guide
437D140 Rev. I

SOFTWARE LICENSE AGREEMENT
PLEASE READ THIS SOFTWARE LICENSE AGREEMENT CAREFULLY BEFORE USING THE
SOFTWARE. BY USING THE SOFTWARE, YOU ARE AGREEING THAT THIS SOFTWARE LICENSE
AGREEMENT FORMS A LEGALLY BINDING CONTRACT BETWEEN YOU AND NORLAND AND THAT
THIS AGREEMENT CONSTITUTES A “WRITING SIGNED BY YOU” UNDER ANY APPLICABLE LAW
OR REGULATION. ANY RIGHTS NOT EXPRESSLY GRANTED HEREIN ARE RESERVED BY
NORLAND. IF YOU DO NOT AGREE TO THE TERMS OF THIS LICENSE, DO NOT USE THE
SOFTWARE AND RETURN THE BONE ASSESSMENT PRODUCT TO NORLAND.
1. DEFINITIONS. The word “Software” means the software in object code form and any documentation which
you have received from Norland in connection with the Norland Bone Assessment Product, whether incor-
porated into the Product or not. The phrase “Claims or Losses” means any and all liabilities, obligations,
losses, damages, penalties, claims, actions, suits, costs, judgments, settlements, and expenses of
whatever nature, whether incurred by or issued against an indemnified party or a third party, including,
without limitation: (a) indirect, special, punitive, consequential or incidental loss or damage (including, but
not limited to, trading losses, loss of anticipated profits, loss by reason of shutdown in operation or increased
expenses of operation, or other indirect loss or damage) and (b) administrative costs, investigatory costs, lit-
igation costs, and auditors’ and attorneys’ fees and disbursements (including in-house personnel). The word
“Licensee” or “you” shall mean you, the individual or entity which has purchased the Bone Assessment
Product and accompanying Software, and has agreed to this License by using the Software and has not
returned the Bone Assessment Product to Norland.
2. LICENSE; INTELLECTUAL PROPERTY RIGHTS. Norland grants to Licensee a nonexclusive, royalty-
free, non-transferable license during the term of the Agreement to receive and use the Software solely in con-
nection with Licensee's use of the Bone Assessment Product. The Software is licensed only for the internal
use of Licensee and its employees. Licensee may not sell, lease, furnish, redistribute, retransmit, or oth-
erwise permit or provide access to the Software to any other person. Licensee will not engage in the oper-
ation of any illegal business or use or permit anyone else to use the Software, or any part thereof, for any
illegal purpose. Licensee shall take reasonable security precautions to prevent unauthorized persons from
gaining access to the Software. Licensee acknowledges that Norland retains proprietary rights in the Soft-
ware. In the event of any misappropriation or misuse, in addition to its right to damages Norland shall have
the right to obtain injunctive relief. Licensee agrees not to decompile, disassemble or reverse engineer the
Software.
3. NORLAND’S WARRANTIES/DISCLAIMER OF WARRANTIES. The Software is designated for use with
the Norland Bone Assessment Product and is warranted to execute its programming instructions when prop-
erly installed in that product. Accessory products, including software, not manufactured by Norland carry the
warranties of their respective manufacturers. Norland does not warrant that the operation of the Software
shall be uninterrupted or error free. BEYOND THE WARRANTIES STATED IN THIS SECTION, THERE
ARE NO OTHER WARRANTIES OF ANY KIND, EXPRESS, IMPLIED OR STATUTORY (INCLUDING,
WITHOUT LIMITATION, TIMELINESS, TRUTHFULNESS, SEQUENCE, COMPLETENESS,
ACCURACY, FREEDOM FROM INTERRUPTION), ANY IMPLIED WARRANTIES ARISING FROM
TRADE USAGE, COURSE OF DEALING, OR COURSE OF PERFORMANCE, OR THE IMPLIED
WARRANTIES OF MERCHANTABILITY OR FITNESS FOR A PARTICULAR USE OR PURPOSE.
4. NORLAND’S LIMITATION OF LIABILITY.
a. Under no circumstances, including negligence, shall Norland shall be liable to Licensee or any other per-
son for indirect, special, punitive, consequential or incidental loss or damage (including, but not limited to
trading losses, loss of anticipated profits, loss by reason of shutdown in operation or increased
expenses of operation, cost of cover, or other indirect loss or damage) of any nature arising from any
cause whatsoever, even if Norland has been advised of the possibility of such damages. In no event
shall Norland’s total liability to you or any other person for all damages exceed fifty dollars ($50).
b. Norland shall not be liable to Licensee or any other person for any unavailability, interruption, delay,
incompleteness, or inaccuracy of the Software.
Operator's Guide
437D140 Rev. I

c. The Parties acknowledge that the terms of this section reflect a reasonable allocation of risk and lim-
itation of liability.
5. FORCE MAJEURE. Notwithstanding any other term or condition of this Agreement, Norland or Licensee
shall not be obligated to perform or observe their respective obligations undertaken in this Agreement (except
for obligations to make payments hereunder and regulatory obligations) if prevented or hindered from doing
so by any circumstances found to be beyond their control.
6. LICENSEE INDEMNITY. Licensee will indemnify and hold harmless Norland and its employees, officers,
directors, and other agents from any and all Claims or Losses imposed on, incurred by or asserted as a result
of or relating to: (a) any noncompliance by Licensee with the terms and conditions hereof; or (b) any third-
party actions related to Licensee’s receipt and use of the Software, whether authorized or unauthorized
under the Agreement.
7. ENFORCEMENT. Norland may enforce the terms of this Agreement against Licensee itself or against any
person, whether or not Licensee is a party to such action. In any action there shall be available injunctive
relief or damages, with the prevailing party being awarded costs and attorneys’ fees (including in-house coun-
sel).
8. TERMINATION In the event of (a) Licensee breach or (b) where directed to do so by any person in its reg-
ulatory authority, Norland may terminate this Agreement at any time immediately upon written notice to
Licensee provided by Norland.
9. MISCELLANEOUS. Except as otherwise provided herein, no provision of this Agreement may be amended,
modified, or waived, unless by an instrument in writing executed by a duly authorized officer of the party
against whom enforcement of such amendment, modification or waiver is sought. No failure on the part of
Norland or Licensee to exercise any right, power or privilege under this Agreement shall operate as a waiver
thereof, nor shall any single or partial exercise of such right, power or privilege preclude any other or further
exercise thereof or the exercise of any other right, power or privilege under this Agreement. If any of the pro-
visions of this Agreement, or application thereof to any person or circumstance, shall to any extent be held
invalid or unenforceable, the remainder of this Agreement, or the application of such terms or provisions to
persons or circumstances other than those as to which they are held invalid or unenforceable, shall not be
affected thereby and each such term and provision of this Agreement shall be valid and enforceable to the
fullest extent permitted by law.
10. SURVIVAL. The terms of this relating to intellectual property and indemnification shall survive termination of
this Agreement.
11. GOVERNING LAW AND FORUM. Each party hereby irrevocably and unconditionally submits for itself and
its property, to the jurisdiction of any New York State court or federal court of the United States of America
sitting in New York County and to any other court in any jurisdiction in which an action is brought against a
party to this agreement by a third party asserting a claim against which Norland is entitled under this agree-
ment to be indemnified. In any action or proceeding arising out of or relating to this agreement or for recog-
nition or enforcement of any judgment, all claims in respect of any such action or proceeding may be heard
and determined in any such New York State court or by such federal or other court. A final judgment in any
such action or proceeding shall be conclusive and may be enforced in other jurisdictions by suit on the judg-
ment or in any other manner provided by law.
Each party irrevocably and unconditionally waives, to the fullest extent it may legally and effectively do so, any
objection that it may have or hereafter have to the laying of venue of any suit, action or proceeding arising out of
or relating to this agreement in any New York State or federal court sitting in New York County or such other
court. Each party irrevocably waives to the fullest extent permitted by law, the defense of an inconvenient
forum to the maintenance of such action or proceeding in any such court.
Operator's Guide
437D140 Rev. I

Operator's Guide
437D140 Rev. I
Contents
Contents
Introduction
Indications for Use 1-2
Contraindications 1-2
X-Ray Device Registration 1-2
Customer Service Contact Information 1-3
About This Manual 1-4
Symbols List 1-6
ON/OFF Power Switch 1-6
Scanner Arm Touch Pad Symbols 1-7
General Information
Radiation Safety Precautions 2-2
Stay Out of the Beam 2-2
Avoid Scatter Radiation 2-2
State Requirements 2-2
Control General Access 2-2
Radiation Safety Features 2-3
Exposure Control 2-3
Technique Factors 2-3
Communication Watchdog 2-3
Exposure Indicators 2-3
Radiation Shielding 2-3
Audible Indicator 2-3
Scanner Features 2-3
Dual Energy X-Ray Absorptiometry (DXA) 2-4
Dynamic Filtering 2-4
System Components 2-5
Scanner Unit 2-5
Scanner Arm Touch Pad 2-5
Laser Positioning Aid 2-6
Computer/Controller 2-6
Software 2-6
Accessories 2-6
QA Calibration Standard 2-6
QC Phantom 2-6
Patient Positioning Aids 2-7
Quality Assurance Program 2-8
Patient Comparison 2-8
Trend Comparison 2-9
Precision 2-9
Accuracy 2-10
Standard Deviation (S.D.) 2-10
Coefficient of Variation (C.V.) 2-10
Reference Set Comparison 2-10
Scan Reports 2-12
Generating a Report 2-12
The “Reports” Tab 2-14

Editing the Patient Letter or Referral Letter 2-16
Sample Scan Reports 2-17
The Bone Exam Report 2-17
1: A Sample “Bone Exam Report” 2-18
2: A Sample “Bone Exam Report - 1 Page” 2-20
3: A Sample “Combined Report” 2-21
4: A Sample “Patient Letter” 2-22
5: A Sample “Referral Letter” 2-24
6: A Sample “Ten Year Fracture Risk Report” 2-26
7: A Sample “Body Composition Report” 2-28
Quality Assurance Reports 2-30
Sample Reports: Quality Assurance Report - BMD 2-31
Sample Reports: Quality Assurance Report - Fat 2-32
Sample Reports: Quality Assurance Report - Lean 2-33
Installation and Setup
Software Installation Instructions 3-2
Installing the IlluminatusDXA Software 3-2
Configuring Backup for Windows 10 3-5
Configuring Backup for Windows 7 3-6
Installing the Microphone 3-6
Uninstalling the Software 3-8
Logging into the Illuminatus DXA Software 3-11
Examining the Software 3-12
Database Navigator Window 3-13
Database Navigator Window Description 3-14
Menu Commands Overview 3-15
File Command 3-16
Quick Descriptions: File drop-down list 3-16
Edit Command 3-17
Quick Descriptions: Edit drop-down list 3-17
User Preferences 3-17
Scanner Preferences 3-17
Advanced Preferences 3-17
Users and Groups 3-17
User Preferences Command 3-19
Scanner Preferences Command 3-20
Site Tab Setup 3-21
Scanning Tab Setup 3-22
Analysis Tab Setup 3-30
Service Tab Setup 3-38
Advanced Preferences Command 3-39
System Tab (under the Basic Settings tab) 3-39
Customer Info Tab (under the Basic Settings tab) 3-39
Printing Tab (under the Reporting tab) 3-40
Directories Tab 3-41
Directory Settings for the MAPI Server Type 3-41
Network Tab 3-42
Users and Groups Command 3-44
Calibration Command 3-46
Quick Descriptions: “Calibration” drop-down list 3-46
Tools Command 3-47
Operator's Guide
437D140 Rev. I
iv Contents

Quick Descriptions: “Tools” drop-down list 3-47
Find Origin 3-48
Table Limits 3-49
Begin Initial Calibration 3-50
Help Command 3-51
Quick Descriptions: “Help” drop-down list 3-51
Basic Operation
Patient Scanning Procedure Overview 4-2
Guidelines for Attaining Precision and Accuracy 4-2
Powering Up the System 4-3
Logging into the Norland Software 4-4
Daily Calibration Procedure 4-6
1. Check the Standard and QC Phantom for Damage 4-6
2. Position the Standard and the Phantom on the Scanner 4-7
3. Calibrate the System Using the QA Calibration Standard 4-8
4. Calibrate Using the QC Phantom 4-10
5. Automatic System Diagnostic Tests 4-11
6. Verify the Calibration 4-13
7. View and Print Calibration Results Reports 4-14
Sample Printed QA Results Report 4-16
When to Repeat the Calibration 4-17
To Stop the Calibration 4-17
QA Results tab Window Interpretation 4-18
QC Results Statistics Messages 4-19
Preparing Patient Records 4-21
Creating a New Record for a New Patient 4-21
Locating a Record for an Existing Patient 4-22
A: Search in the “Patient Name” Column 4-22
B: “Quick Search” by Last Name 4-22
C: “Quick Search” by Patient ID 4-23
Enter Data into the Existing Patient’s Record 4-24
Patient Demographics Window Details 4-25
Button Functions 4-25
Field Entry Details 4-25
How to Customize a “Drop-Down List” Field 4-30
Beginning the Patient Scan 4-33
System Shutdown 4-34
Scanning Whole Body
Scan Specifications 5-2
Patient Dose 5-2
Operator Dose 5-2
Maintaining High Quality Whole Body Scans 5-3
General Patient Scanning Cautions 5-4
Quick Reference - Whole Body Scan 5-5
Scan Procedures 5-6
Checklist 5-6
Preparing the Patient for Scanning 5-6
Update (or Create) the Patient’s Record 5-6
Setting the Scan Parameters 5-7
Positioning the Patient 5-9
Operator's Guide
437D140 Rev. I
Contents v

Marking the Scan Region 5-10
Starting the Measure Scan 5-13
Analyzing the Scan 5-15
Viewing the Scan Results Tab 5-18
Generate and Print a Report 5-20
A Sample Bone Exam Report 5-22
Soft Tissue Composition
Introduction 6-2
Tissue Composition Standards 6-2
Scan Specifications 6-3
Whole Body Scans 6-4
Soft Tissue Composition - Whole Body Scans 6-4
Results - Whole Body Scan 6-4
Body Fat Charts - Whole Body Scan 6-5
Research & Small Subject Scans 6-6
Soft Tissue Composition - Research & Small Subject Scans 6-6
Results - Research & Small Subject Scans 6-6
Generate and Print a Report 6-7
A Sample Bone Exam Report 6-9
A Sample Body Composition Report 6-11
Scanning AP Spine
Scan Specifications 7-2
Patient Dose 7-3
Operator Dose 7-3
Maintaining High Quality AP Spine Scans 7-4
General Patient Scanning Cautions 7-5
Quick Reference - AP Spine Scan 7-6
Scan Procedures 7-7
Checklist 7-7
Preparing the Patient for Scanning 7-7
Update (or Create) the Patient’s Record 7-7
Setting the Scan Parameters 7-8
Positioning the Patient 7-10
Marking the Scan Region 7-12
Starting the Measure Scan 7-14
Analyzing the Scan 7-17
Viewing the Scan Results Tab 7-21
Definitions of Scan Results 7-23
Fracture Risk Assessment 7-23
Generate and Print a Report 7-24
A Sample Bone Exam Report 7-26
Scanning Hip
Scan Specifications 8-2
Patient Dose 8-3
Operator Dose 8-3
Maintaining High Quality Hip Scans 8-4
General Patient Scanning Cautions 8-5
Quick Reference - Hip Scan 8-6
Scan Procedures 8-7
Operator's Guide
437D140 Rev. I
vi Contents

Checklist 8-7
Preparing the Patient for Scanning 8-7
Update (or Create) the Patient’s Record 8-7
Setting the Scan Parameters 8-8
Positioning the Patient 8-10
Marking the Scan Region 8-16
Starting the Scout Scan 8-18
Starting the Measure Scan 8-21
Analyzing the Scan 8-23
Viewing the Scan Results Tab 8-26
Definitions of Scan Results 8-28
Fracture Risk Assessment 8-28
Generate and Print a Report 8-29
A Sample Bone Exam Report 8-31
Research & Small Subject Scan
Introduction 9-2
Scan Specifications 9-2
Patient Dose 9-3
Operator Dose 9-3
Maintaining High Quality Research Scans 9-4
General Patient Scanning Cautions 9-5
Quick Reference Guide - Research/Small Subject 9-6
Scan Procedures 9-7
Checklist 9-7
Preparing the Patient for Scanning 9-7
Update (or Create) the Patient’s Record 9-7
Setting the Scan Parameters 9-8
Positioning the Patient/Subject 9-10
Marking the Scan Region 9-11
Starting the Scout Scan 9-12
Starting the Measure Scan 9-14
Analyzing the Scan 9-16
Viewing the Scan Results Tab 9-18
Generate and Print a Report 9-20
A Sample Bone Exam Report - 1 Page 9-22
Scanning Lateral Spine
Scan Specifications 10-2
Patient Dose 10-3
Operator Dose 10-3
Maintaining High Quality Lateral Spine Scans 10-4
General Patient Scanning Cautions 10-5
Quick Reference Guide - Lateral Spine Scan 10-6
Scan Procedures 10-7
Checklist 10-7
Preparing the Patient for Scanning 10-7
Update (or Create) the Patient’s Record 10-7
Setting the Scan Parameters 10-8
Positioning the Patient 10-10
Marking the Scan Region 10-13
Starting the Scout Scan 10-16
Operator's Guide
437D140 Rev. I
Contents vii

Starting the Measure Scan 10-19
Analyzing the Scan 10-21
Viewing the Scan Results Tab 10-24
Generate and Print a Report 10-26
A Sample Bone Exam Report 10-28
Additional Techniques
Adding Audio to a Patient Record 11-2
Using the Voice Note Option 11-3
How to Record a Voice Note 11-3
How to Play a Voice Note 11-4
How to Delete a Voice Note 11-4
Using the Audio Dictation Option 11-5
Overview of the Audio Dictation Buttons 11-5
How to Record an Audio Dictation 11-5
How to Play Back (or Add to) a Recording 11-6
How to Delete an Audio Dictation 11-7
How to Export a Report to PDF 11-7
FolderMAIL 11-9
Requirements 11-9
How to Send FolderMAIL 11-9
How to Add Names to the Address Book 11-12
How to Import FolderMAIL to a Database 11-13
Database Management 11-14
Creating a Database Folder 11-15
Active Database > Remove From List 11-16
Active Database > Add to List 11-17
Importing a Database 11-18
Exporting a Database 11-20
Deleting Patient Files and Scan Files 11-22
Deleting a Patient File 11-22
Deleting a Patient Visit 11-23
Deleting a Scan Image 11-24
Working with Reference Sets 11-26
To Create a Reference Set 11-27
To Get a Reference Set 11-29
To Edit a Reference Set 11-31
To Delete a Reference Set 11-32
To Send a Reference Set 11-33
To Print a Reference Set 11-34
Reference Set Selection 11-35
Pressing the Emergency Stop Button 11-37
Special Region Cursors 11-38
Number of Special Regions Permitted 11-38
Add a Special Region 11-39
Modify an Existing Special Region 11-41
Delete a Special Region 11-43
Rename a Special Region 11-44
Include/Exclude 11-45
Include 11-45
Exclude 11-49
Using the Ruler Tool 11-52
Operator's Guide
437D140 Rev. I
viii Contents

Comparison Image 11-54
Image Composition and Image Mode 11-56
Analyzing Saved Scan Data 11-59
Reanalyzing Scan Data 11-61
Changing Height or Weight on the Report 11-62
AP Spine Techniques 11-63
Changing the Scan ParametersPrior to Scanning 11-63
Unsatisfactory Measure Scan (AP Spine) 11-64
Auto Centering Mode 11-65
Force Mark Points On-Axis 11-66
Angulated Cursors 11-67
Hip Techniques 11-69
Changing the Scan ParametersPrior to Scanning 11-69
Unsatisfactory Scout Scan (Hip) 11-70
Option 1:Extend the Scout Scan 11-70
Option 2: Reposition the Scout Box and Rescan 11-70
Option 3: Cancel the Scout Scan and Remark 11-70
Alternate R-Value Analysis 11-71
View in the Baseline Mode 11-71
Reanalyze with Alternate R Value 11-72
Forearm Analysis Techniques 11-74
Conversion of Comac Forearm Scans 11-74
Whole Body Scanning Techniques 11-75
Changing the Scan Parameters Prior to Scanning 11-75
Lateral Spine Scanning Techniques 11-76
Changing the Scan Parameters Prior to Scanning 11-76
Unsatisfactory Scout Scan (Lateral Spine) 11-77
Research and Small Subject Techniques 11-78
Changing the Scan Parameters Prior to Scanning 11-78
Ten Year Fracture Risk
Ten Year Fracture Risk Demographics 12-2
Ten Year Fracture Risk Questionnaire 12-3
Ethnic Group 12-3
Risk Factors 12-3
Ten Year Fracture Risk Confirmation 12-5
Generate and Print a Report 12-6
A Sample Ten Year Fracture Risk Report 12-9
DICOM Interface
Terms 13-2
Requirements 13-2
Network Address 13-2
OAC Code 13-2
PACS and Worklist Server Setup 13-2
Exploring the DICOM Interface 13-3
How to Invoke the DICOM Interface 13-3
DICOM Preferences Dialog Box: the Site Tab 13-4
The “Site Information” Section 13-4
The “Modality Worklist” Section 13-5
DICOM Preferences Dialog Box: the DICOM Devices Tab 13-6
Advanced Preferences 13-7
Operator's Guide
437D140 Rev. I
Contents ix

Modality Value 13-8
Quick Reference - DICOM Interface 13-9
Patient Worklist 13-9
Exporting and Pushing DICOM Reports 13-9
Patient Worklist 13-10
Query / Cancel 13-11
1. No Results 13-11
2. Error in Query 13-11
3. Query Results Area 13-11
Data Patient Conflict 13-13
Exporting DICOM Images 13-14
Pushing and Deleting DICOM Files 13-15
The Push Operation 13-16
1. No Devices Configured 13-16
2. Single Device Configured 13-16
3. Multiple Devices Configured 13-16
The Delete Operation 13-17
Refresh 13-17
DICOM Job Queue 13-18
DB Extract
Opening DB Extract 14-2
Selecting Export Parameters 14-3
Source Database 14-3
Patient, Scan, and Region Parameters 14-4
Patient Filtering 14-5
Loading and Saving Setups 14-7
Exporting Data 14-8
Patient Personal and Scan Export Parameters 14-9
General Maintenance
Routine Maintenance 15-2
Cleaning Scanner Exterior 15-2
Cleaning Table Top Pad 15-2
Cleaning Positioning Aids 15-2
Cleaning QC Phantom 15-2
Preventative Maintenance Schedule 15-2
Quick Reference Guide - System Backup with EaseUSTodo Backup 15-3
Quick Reference Guide - System Backup for Windows 7 15-4
System Maintenance 15-5
Computer Maintenance 15-5
Printer Maintenance 15-5
Corrective Procedures 15-5
Performing Multiple QC Phantom Scans 15-5
Marking the QC Phantom 15-6
Troubleshooting
Startup 16-2
Startup Faults 16-2
Software Installation Faults 16-2
Scanner Operation 16-3
Software Operation 16-4
Operator's Guide
437D140 Rev. I
x Contents

Calibration 16-6
Printer 16-7
Reference/Trend Chart Display 16-8
Height and Weight on Reports 16-9
FolderMAIL 16-9
Technical Reference
Norland Bone Densitometer System Specifications 17-2
DXA System Description 17-2
Electrical Requirements 17-2
Environmental 17-2
X-Ray Detector Assembly 17-2
Scanner Arm Drive 17-2
Laser 17-2
Computer Description 17-2
IMPSO Power 17-2
Expected Useful Life 17-2
Operational Features 17-2
Performance 17-3
Scan Times 17-3
Dose Values 17-3
Spatial Resolution 17-3
Miscellaneous 17-3
Dimensions 17-3
Technical Description 17-4
Significant Zone of Occupancy/Patient Environment 17-4
Focal Spot to Image Receptor Distance (SID) 17-4
X-ray Generator 17-4
Classification 17-4
Cooling Curves & Tube Rating Charts 17-5
Duty Cycle 17-5
Technique (or Loading) Factors 17-5
Electrical Requirements 17-5
Installations 17-5
Service 17-5
FCC EMC Statement 17-6
IEC 60601-1-2 EMC Information 17-6
IEC 60601-1-6 Usability Information 17-10
Usability Characteristics 17-10
Operator Profile 17-10
Fuse Information 17-11
Beam Quality Information 17-11
Position of X-ray Beam 17-12
Cautions 17-13
General Cautions 17-13
Cautions for the Isolated Multiple Portable Socket-Outlet (IMPSO) 17-14
Specific Cautions 17-15
Stray Radiation 17-16
Label Locations 17-17
Scanner Labels 17-19
Controller Certification Label 17-22
Power Entry Module Labels 17-22
Operator's Guide
437D140 Rev. I
Contents xi

Tube Housing and High Voltage Generator Labels 17-22
Reference Data Sets
Data Collection Sites 18-2
Data Gathering Process 18-2
Medical History Form Review Criteria 18-3
Osteoporosis 18-3
Other Bone-Active Diseases and Conditions 18-3
Medications Affecting Bone 18-4
Statistical Methods 18-5
Reference Sets Data Entry 18-5
WHO Criteria 18-6
Norland Fracture Risk 18-6
Excerpt from Calcified Tissue International 18-7
Excerpt from the Journal of Bone and Mineral Research 18-8
Norland Reference Data Set Values 18-10
NHANES III Reference Data Set Values 18-15
Index
Quick Reference - AP Spine Scan
Quick Reference - Hip Scan
Quick Reference - Whole Body Scan
Quick Reference - DICOM Interface
Patient Worklist Q-4
Exporting and Pushing DICOM Reports Q-4
Quick Reference - QA Calibration
Quick Reference - System Backup with EaseUSTodo Backup
Operator's Guide
437D140 Rev. I
xii Contents
CHAPTER 1
Introduction
Congratulations on purchasing the Norland Elite Dual Energy X-ray Absorptiometry
(DXA) Bone Densitometer. Expect the Bone Densitometer to be a valuable aid to the
physician in the estimation of bone density and soft tissue, the assessment of frac-
ture risk and trend analysis of patient results.
ISO 13485 Certified: Norland’s Quality Management System is certified to ISO
13485:2003. Norland is dedicated to providing a quality product, on time delivery, and
exceptional customer service.
Caution: State law requires all scans to be prescribed by a physician.
Caution: Federal law restricts this device to sale by or on the order of a phys-
ician.
This chapter discusses the following.
Indications for Use 1-2
X-Ray Device Registration 1-2
Customer Service Contact Information 1-3
About This Manual 1-4
Symbols List 1-6
Operator's Guide
437D140 Rev. I

Indications for Use
The Norland Bone Densitometer is a prescription device used to perform non-invasive estimates of bone min-
eral density (BMD). It performs DXA scans of the AP Spine, Hip, Lateral Spine, Research, Small Subject, and
Whole Body.
The scan provides the BMD (g/cm2), BMC (g), and the Area (cm2) values. These values are then compared to
sex and ethnic matched reference populations to provide the T-Score, % Young Reference, Z-Score, % Age
Matched, and the Short Term and Long Term change values. Included in this calculation is the sBMD (mg/cm2)
values, where applicable.
The Norland Bone Densitometer also performs a soft tissue assessment and provides values for the Lean
Mass, Fat Mass, % Total Fat, and the % Soft Tissue Fat for the Whole Body, Research and Small Subject
scans. It also provides Siri and Brozek (underwater weighing) % Fat equivalent values.
The bone density measurements from the Norland Bone Densitometer can be an aid to physicians in determ-
ining a patient’s risk of fractures.
Contraindications
Caution: Do not perform a x-ray bone density scan on a pregnant subject. X-rays may be harmful to
developing fetuses.
A bone density study should not be performed within 10 half-lives of a radionuclide uptake procedure. The sys-
tem detectors may misinterpret residual emissions from recent radionuclide uptake procedures as energy gen-
erated by the Norland x-ray source.
Special scanning techniques are required when scanning patients with prosthetic devices, implants, or other
sub-dermal metallic objects. Some examples are hip prosthetics, pins, or staples. Refer to the section on
"Include/Exclude" on page11-45 for details.
Scanning patients with external opaque (metal and plastic) objects, jewelry, buttons, zippers, rivets, buckles,
pens, keys etc. can affect the results if they are in the scanning region.
X-Ray Device Registration
Caution: The Norland Bone Densitometer is an x-ray device that emits small amounts of radiation to
acquire bone and soft tissue information. Although the dose is very small, some countries and all
states in the United States require registration of such devices, regardless of dose.
It is the purchaser’s responsibility to contact the appropriate government agency and comply with their reg-
ulations. Norland’s Customer Service can provide assistance in finding the appropriate government agency.
Operator's Guide
437D140 Rev. I
1-2 Introduction

Operator's Guide
437D140 Rev. I
Introduction 1-3
Customer Service Contact Information
All requests for replacement parts, service or product related information should be directed to one of the fol-
lowing worldwide locations. To help the Norland representatives provide prompt and efficient service, please
have the serial number of the instrument available. See the figure on on page17-17 (of the Technical Reference
chapter) for the label location. The figure on on page17-19 (Scanner Labels) shows the Identification Label,
which has the instrument serial number on it.
Domestic / North America / Latin America
Norland
W6340 Hackbarth Road
Fort Atkinson, WI 53538 USA
Phone (Toll Free) 1-888-741-0413
Phone (International) +1-920-563-8456
Fax +1-920-542-4274
Email norland@swissray.com
Authorized European Representative
Swissray Medical AG
Turbistrasse 25-27
CH-6280 Hochdorf, Switzerland
Phone +4141 914 1212
Fax +4141 914 1201
Rest of World
Mr. Tom Sanchez
212 Mt. Carmel
Socorro, NM 87801 USA
Phone +1-505-838-0167
Fax +1-505-838-0638
Manufacturer
Norland
W6340 Hackbarth Road
Fort Atkinson, WI 53538 USA

About This Manual
This manual was originally drafted, approved, and supplied in the English language. A copy of this document
can be obtained by contacting Norland.
This manual contains information and operating procedures for bone densitometry acquisition and analysis
using the Norland DXA Bone Densitometer. The operator should become familiar with the Operator's Guide
prior to patient scanning.
The original software disk is located in the back of this manual. Store the software disk in a safe place. Soft-
ware updates are provided free of charge under initial warranty (12 month period after date of installation) and in
conjunction with extended warranty contracts. Installation instructions will accompany any software upgrade.
Chapter 1, Introduction: presents an overview of this Operator’s Guide. Customer Service contact inform-
ation is also included here.
Chapter 2, General Information: discusses some of the features of the Norland DXA Bone Densitometer.
System radiation safety precautions and safety features are discussed in detail. (NOTE: additional information
on radiation safety is found in the Technical Reference chapter.) The chapter goes on to discuss the system
components, which includes the scanner unit, the computer, the windows software, and the accessories. A
Quality Assurance program is reviewed. The patient comparison section talks about trend comparison and ref-
erence set comparison. The five different Reports are examined: Bone Exam Report; Bone Exam Report - 1
Page; Combined Report; Patients Letter; and the Referral Letter. Print-outs of the sample Reports are also
included here.
Chapter 3, Installation and Setup: contains the information for installing and setting up the windows soft-
ware, drivers, microphone and databases. Next is the login instructions and an intensive examination of the five
software menu commands:
File
,
Edit
,
Calibration
,
Tools
, and
Help
. Scanner and operating settings are made at
this time.
Chapter 4, Basic Operation: discusses the basic patient scanning procedure. The steps for starting up the
system are next. The daily System Quality Assurance Calibration procedure is discussed in detail as well. The
QA results window is analyzed next. The chapter goes on to explain how to prepare a new patient database
record, as well as how to edit an existing patient’s record. Next, the Patient Demographics window is dis-
cussed in detail. And finally, the chapter wraps up with how to back up the system and shut it down.
Chapter 7, Scanning AP Spine
and
Chapter 8, Scanning Hip: discusses scanning the AP Spine and the
Hip. The chapters start out with the scan specifications. Tips on maintaining high quality scans are given next.
General patient scanning cautions are given. Next are the actual scan procedures, beginning with the checklist,
patient information update, patient positioning procedures, marking the scan region, and starting the actual
Measure scan. Scan Analysis and Results are discussed at the end, along with instructions on how to generate
and print a Report.
Chapter 10, Scanning Lateral Spine: discusses the scan procedure to estimate bone mineral in the lumbar
spine using a lateral projection. The chapter starts out with the scan specifications. Tips on maintaining high
quality scans are given next. General patient scanning cautions are given. Next are the actual scan procedures,
beginning with the checklist, patient information update, patient positioning procedures, marking the scan
region, and starting the actual Measure scan. Scan Analysis and Results are discussed at the end, along with
instructions on generating and printing a Report.
Chapter 5, Scanning Whole Body: this option quantifies bone mineral for a subject’s entire body. The chapter
starts out with the scan specifications. Tips on maintaining high quality scans are given next. General patient
scanning cautions are given. Next are the actual scan procedures, beginning with the checklist, patient inform-
ation update, patient positioning procedures, marking the scan region, and starting the actual Measure scan.
Scan Analysis and Results are discussed at the end, along with instructions on generating and printing a
Report.
Chapter 9, Research & Small Subject Scan: as options, these two types of scans are very similar, and are
therefore combined into one chapter. The Norland software quantifies bone mineral in any user-defined region of
a patient or subject anywhere within the scanner’s active scanning area. The subject of a Research or Small
Subject scan could be human, animal, or an inanimate object. Initial setup, patient/subject positioning, scan
Operator's Guide
437D140 Rev. I
1-4 Introduction

Operator's Guide
437D140 Rev. I
Introduction 1-5
procedures and result analysis are also discussed. Instructions to generate and print a Report are included at
the end of the chapter.
Chapter 6, Soft Tissue Composition: this option estimates the lean and fat composition of the soft tissue in
the Whole Body, and special regions of Research and Small Subject scans. It works in conjunction with the
Whole Body, Research, and Small Subject scans to provide lean and fat soft tissue mass values in addition to
the bone density values. The chapter discusses Tissue Composition Standards, Soft Tissue Composition and
Results. Instructions to generate and print a Report are included at the end of the chapter.
Chapter 11, Additional Techniques: discusses audio dictation, FolderMail, Special Region Cursors,
Include/Exclude, Ruler Tool, Reanalyzing Scan Data, Comparison Image, Analyzing Saved Scan Data and
other scan techniques. Database management, as well as Reference Set maintenance is also detailed in this
chapter.
Chapter 12, Ten Year Fracture Risk: contains information about generating Ten Year Fracture Risk Assess-
ment reports.
Chapter 13, DICOM Interface: contains information on using this feature. DICOM (Digital Imaging and Com-
munications in Medicine) is a global IT standard that is used in hospitals to “control” medical images and
derived structured documents as well as to manage related workflow.
Chapter 14, DB Extract: contains information about exporting patient and scan information to a format that
can be imported into a spreadsheet or database program.
Chapter 15, General Maintenance: contains routine maintenance information. This typically involves basic
cleaning and operational checks. Corrective scan procedures and system maintenance are also detailed in this
chapter.
Chapter 16, Troubleshooting: contains basic troubleshooting procedures to assist the operator.
Chapter 17, Technical Reference: contains a Technical Reference guide. Equipment specifications and
other regulatory information will be found in this chapter. Labels are discussed in detail.
Chapter 18, Reference Data Sets: contains information about the Norland Reference Data Sets, including
the data collection process and criteria. Alisting of the values of each Reference Data Set is also included in
this chapter.
The Index is included at the end of the Operator’s Guide.
Symbols List
Indicates information, general caution or possible safety hazard.
Indicates helpful notes or additional procedure steps.
Indicates radiation from laser positioning aid.
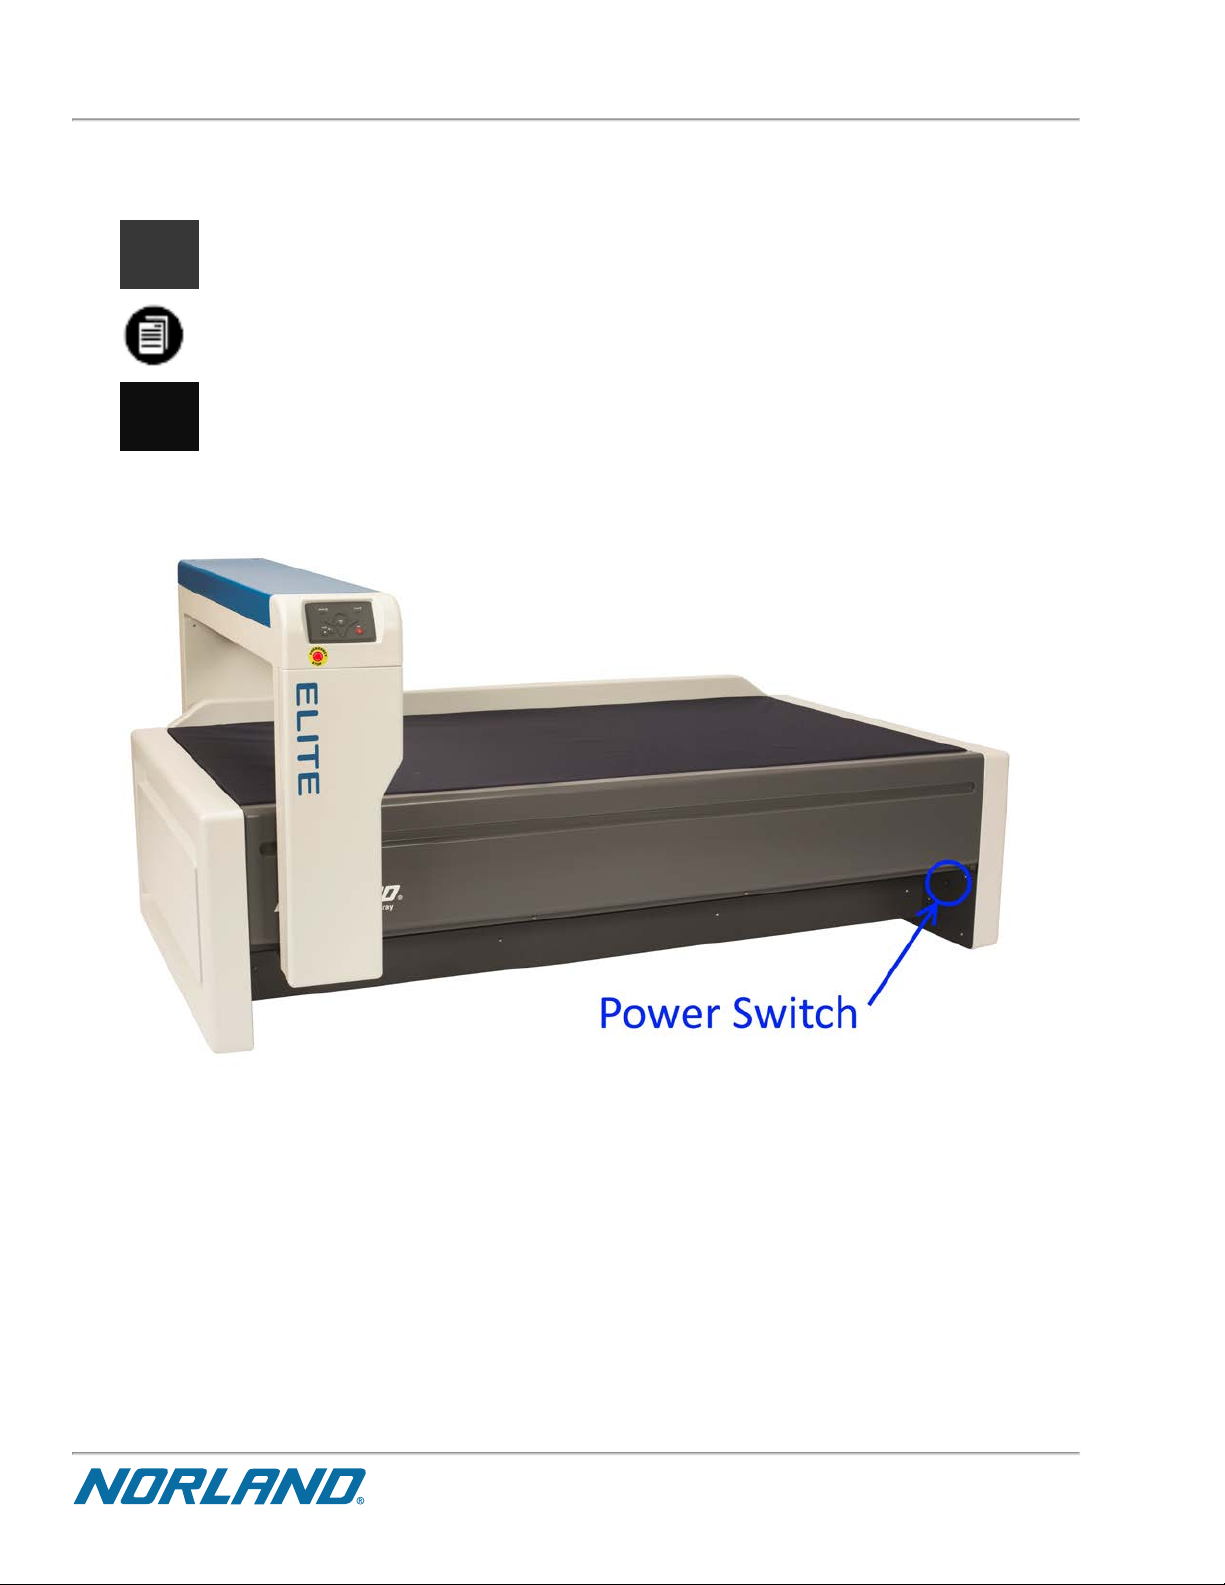
ON/OFF Power Switch
Turn the scanner ON and OFF by depressing the power switch located on the lower inside right panel.
Figure 1-1:
Power Switch location
Operator's Guide
437D140 Rev. I
1-6 Introduction
Table of contents
Other Norland Measuring Instrument manuals


Popular Measuring Instrument manuals by other brands


terrapin
terrapin X Connecting guide

Bove Technology
Bove Technology B39 VW Bulk Installation & user guide

Automation Solutions
Automation Solutions microAmper manual

Kusam-meco
Kusam-meco KM 035 Operation manual

Veris Industries
Veris Industries HW2 Series installation guide

NIEUWKOOP
NIEUWKOOP RE1500 user manual

Hanna Instruments
Hanna Instruments HI 991001 instruction manual

SUKU
SUKU 3321 operating manual

Hanna Instruments
Hanna Instruments HI 931100 instruction manual

Projecta
Projecta BLT700 instruction manual

ADA INSTRUMENTS
ADA INSTRUMENTS ProDigit MICRO operating manual

Greyline Instruments
Greyline Instruments AVMS 5.1 user guide