Norsjö Carrier User manual

Instruction manual version 6, 2008
Norsjö Carrier 4-Stroke
Short and Long version

Norsjö Carrier 4-Stroke
Model Post Petrol Short and Long version
CONTENTS
INTRODUCTION ................................................................................. 1
IDENTIFICATION of MOPED ................................................................. 2
SAFETY INSTRUCTIONS ...................................................................... 3
INSTRUMENT AND CONTROLS ............................................................. 4
DRIVING POSITION ............................................................................ 10
FUEL ................................................................................................. 11
MOTOR OIL ....................................................................................... 12
PRIOR TO START, DAILY CHECKS ......................................................... 12
STARTING AND STOPPING THE ENGINE ................................................. 13
DRIVING DURING THE WINTER ............................................................ 14
CHANGING GEAR ............................................................................... 15
BRAKES ............................................................................................ 16
LOADING PLATFORM ......................................................................... 18
SERVICE AND MAINTENANCE .............................................................. 20
TOWING THE MOPED .......................................................................... 25
LONG-TERM STORAGE OF MOPED ....................................................... 26
FAULT FINDING .................................................................................. 27
TECHNICAL DATA ............................................................................... 29

Norsjö Carrier 4-Stroke
Model Post Petrol Short and Long version
INTRODUCTION
We thank you for the trust you have shown us by buying a Norsjö Carrier 4-Stroke.
We hope that this manual will help you quickly get to know your new moped.
Read through this instruction manual from beginning to end before you start to use
your moped. Any queries will be answered by Norsjö Mekaniska AB.
About this instruction manual
This instruction manual describes how your carrier moped should be used, how service
and inspections should be carried out to make sure that the moped operates correctly
and safely. This instruction manual covers instructions for normal use and maintenance
which can be carried out by the driver. More in-depth fault fi nding and maintenance
should be carried out by qualifi ed service personnel. Remember that a well-maintained
moped will make your work more enjoyable and safer and will also lead to lower
maintenance costs and maintain a high second-hand value for your moped!
Guarantee
Even with a quality product, on the odd occasion, material or manufacturing faults
arise which are covered by the guarantee. Contact Norsjö Mekaniska AB if such a
fault occurs.
Do not modify the moped
The moped is designed and type-approved so that it complies with current legal
requirements. No modifi cations may be carried out on the moped to change the engine’s
power or increase its speed. In order to ensure correct working order and maintain a
roadworthy moped, it is important that you always use original spare parts. A modern
carrier moped is a technically advanced product. Always turn to a qualifi ed specialist if
the moped needs to be repaired or adjusted.
Running-in
Every engine needs a certain amount of time to wear in the moving parts against each
other. It is therefore important that during the fi rst 500 kms, the engine is not run too
hard. You should therefore change down when going uphill or if the conditions are poor
(uneven road surface for example). Do not use full acceleration except for short periods
during the run-in period. Furthermore, avoid using full throttle while the engine is cold
or when driving downhill. The moped requires service and inspection in connection
with the run-in period. For further information, see page 20. ”Service in connection with
run-in period”.
Page
1 of 30
Norsjö Carrier 4-Stroke
Model Post Petrol Short and Long version
IDENTIFICATION of MOPED
Registration number
The moped’s primary identity is its registration number. When ordering spare parts,
the moped’s registration number should always be quoted. The registration number
can be found on the moped’s rear fender.
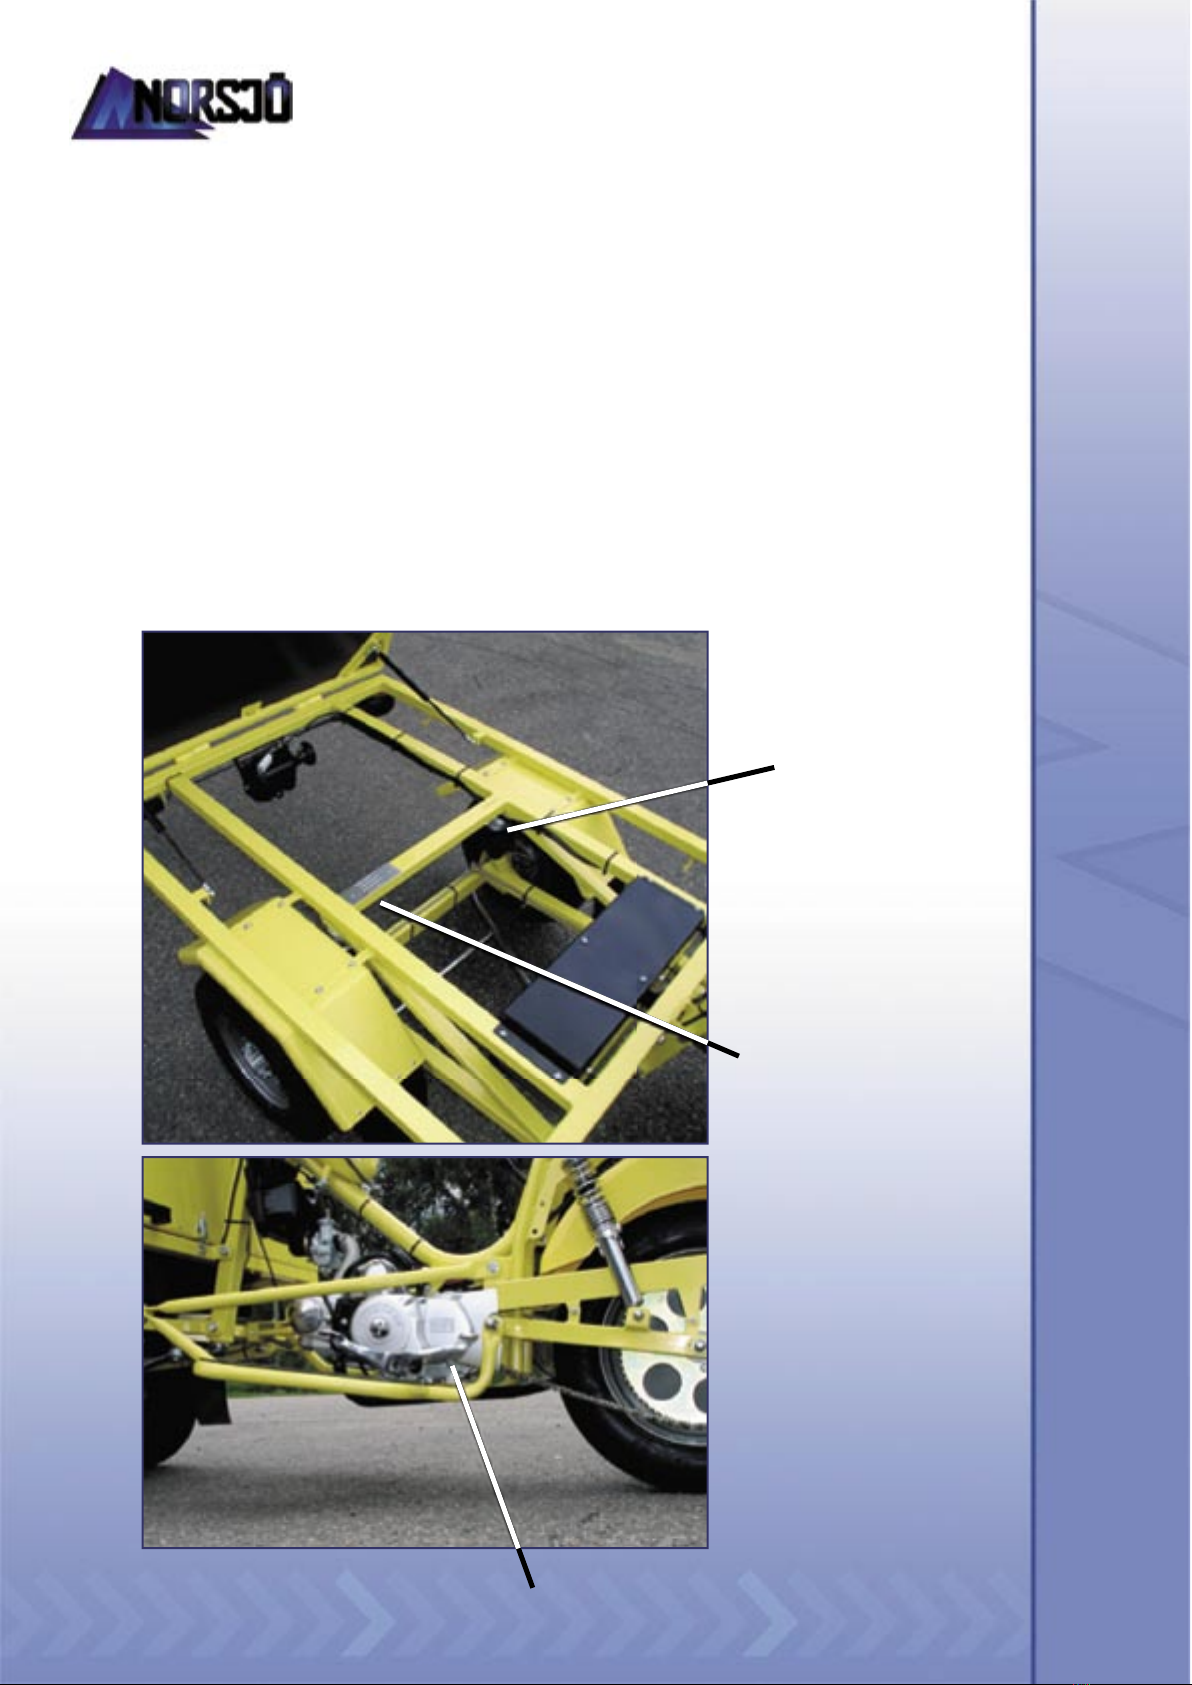
Type plate and frame number
The moped’s type plate and frame number are situated under the platform.
Engine number
The engine number can be found on the engine’s left side under the gear lever.
Page
2 of 30
Engine number
Type plate
Frame number

Norsjö Carrier 4-Stroke
Model Post Petrol Short and Long version
SAFETY INSTRUCTIONS
Risk of carbon monoxide poisoning
Exhaust fumes from internal combustion engines contain carbon monoxide.
Breathing in the exhaust fumes can be lethal!
You should therefore consider the following:
• Never start the moped in a closed area which lacks good ventilation.
• Never breathe in the exhaust fumes.
• Always ensure that the exhaust pipe is free of obstruction.
Handling and fi lling up with fuel - fi re risk
• Never fi ll the moped up with fuel when the engine is running.
• Never overfi ll the tank.
• If a spillage does arise when fi lling up with petrol, wipe away the petrol carefully
and then wait 5-10 minutes until any petrol that remains has evaporated.
• Do not fi ll up in the proximity of fi re.
• Never use a petrol-driven moped in an environment that is explosive or fl ammable.
• If there is a leakage in the fuel line, tank or any other part of the fuel system,
the engine should be stopped immediately and the fault should be rectifi ed
immediately.
• Avoid breathing in petrol fumes.
• Avoid skin contact with petrol.
Work with the moped’s battery
When working on the moped’s battery, special safety precautions must be taken.
See further, page 24, “The starter battery”.
Page
3 of 30
Norsjö Carrier 4-Stroke
Model Post Petrol Short and Long version
INSTRUMENT AND CONTROLS
Instrument
Ignition switch
The ignition switch has three positions, of which two of them are identical.
The three positions are:
• Position 1 = Locked
• Position 2 = Drive
• Position 3 = Drive
The ignition switch’s Locked position can be obtained by turning the key counter clockwise as
far as it will go. In this position, all electrical functions, except for the indicators are switched
off and the ignition key can be taken out.
The ignition switch’s Drive position can be obtained by turning the key to the middle position,
or as far clockwise as it will go. In this position, the engine’s ignition system and the moped’s
electrical system except for the lights are operating.
Power to the lights takes place via a generator which is completely separate from the battery
and the lights may therefore only be used when the engine is running.
Never leave the ignition switch in the Drive position when the engine is switched
off as this will discharge the battery. If left on for longer periods, the ignition sys-
tem may also be damaged.
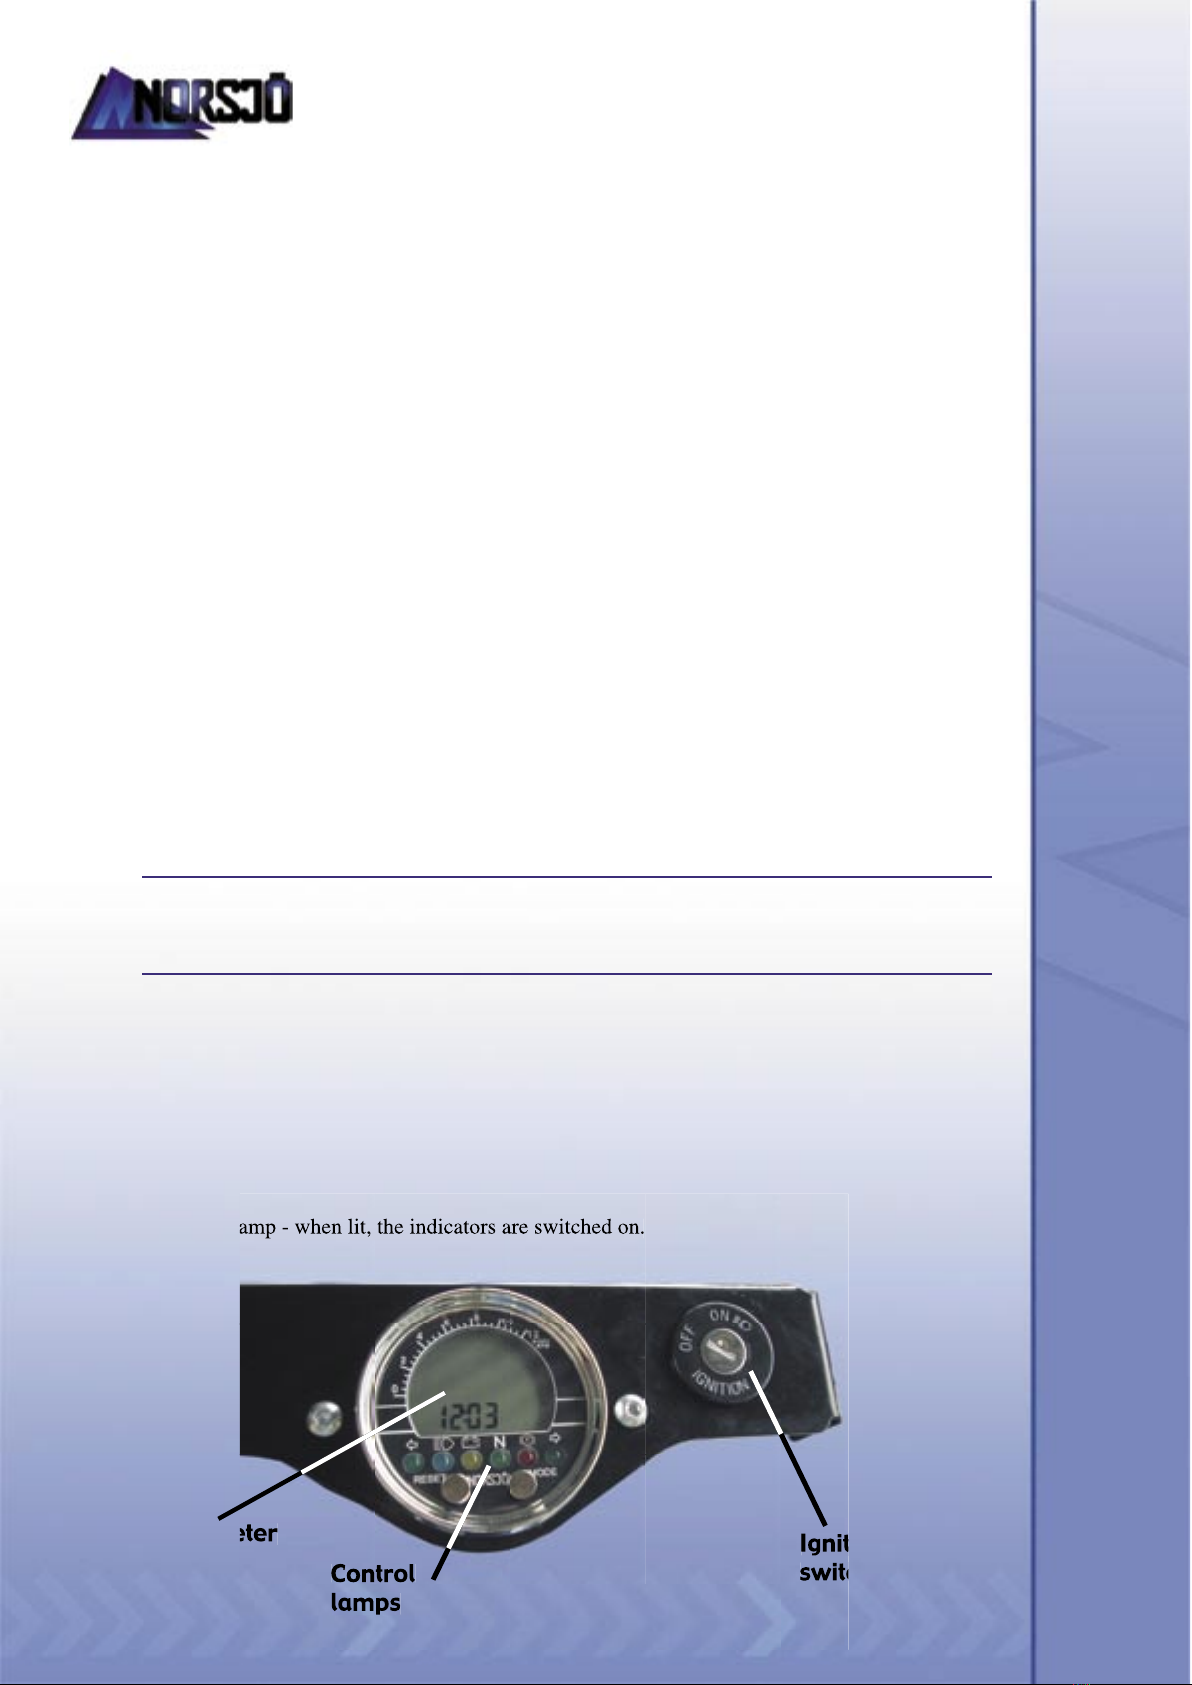
Control lamps
On the instrument panel, there are control lamps:
• Green lamp - when lit, the gearbox is in neutral.
• Blue lamp - when lit, the main beam is switched on.
• Green lamp - when lit, the indicators are switched on.
Page
4 of 30
Speedometer
Control
lamps
Ignition
switch
• Green lamp - when lit, the indicators are switched on.
Speedometer
Control
lamps
Ignition
switch
Norsjö Carrier 4-Stroke
Model Post Petrol Short and Long version
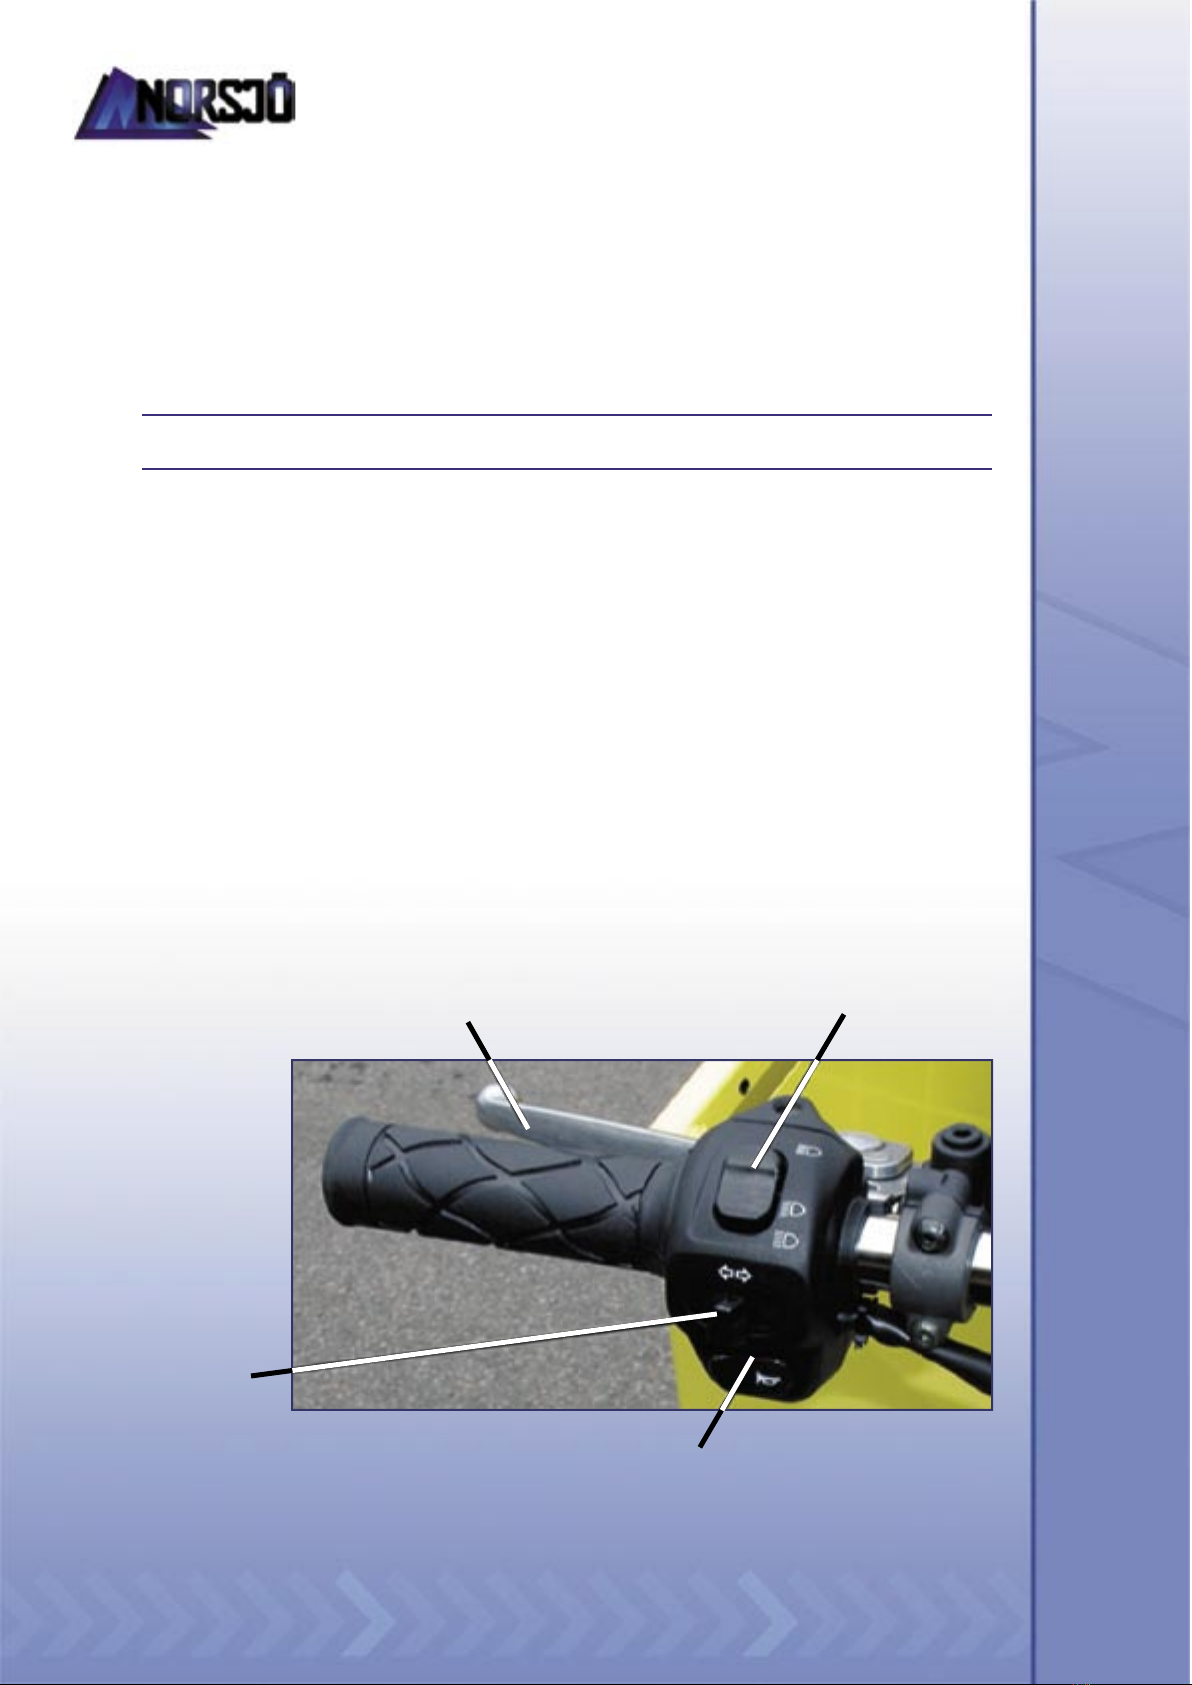
Handlebar controls - left side
Functions which can be found on the handlebar’s left side are:
Full/half beam switch and full beam fl ash.
Full/half beam switch has two fi xed positions which switch on the full beam/half beam.
There is also a spring-back position which switches the full beam on (fl ash).
Half beam must be switched on when driving during daytime!
Horn
When the spring-cushioned switch is pressed in, the moped’s horn sounds.
Indicator switch
If the direction indicator control is pushed to the left, the left indicator light starts to
blink. If the direction indicator control is pushed to the right, the right indicator light
starts to blink. To reset the direction indicator control to its neutral position, press it in.
Brake handle
The control for the rear wheel brake is on the left-hand side of the handlebar.
Page
5 of 30
Horn
Brake handle
Full beam fl ash
Full/half beam switch
Indicators
Norsjö Carrier 4-Stroke
Model Post Petrol Short and Long version
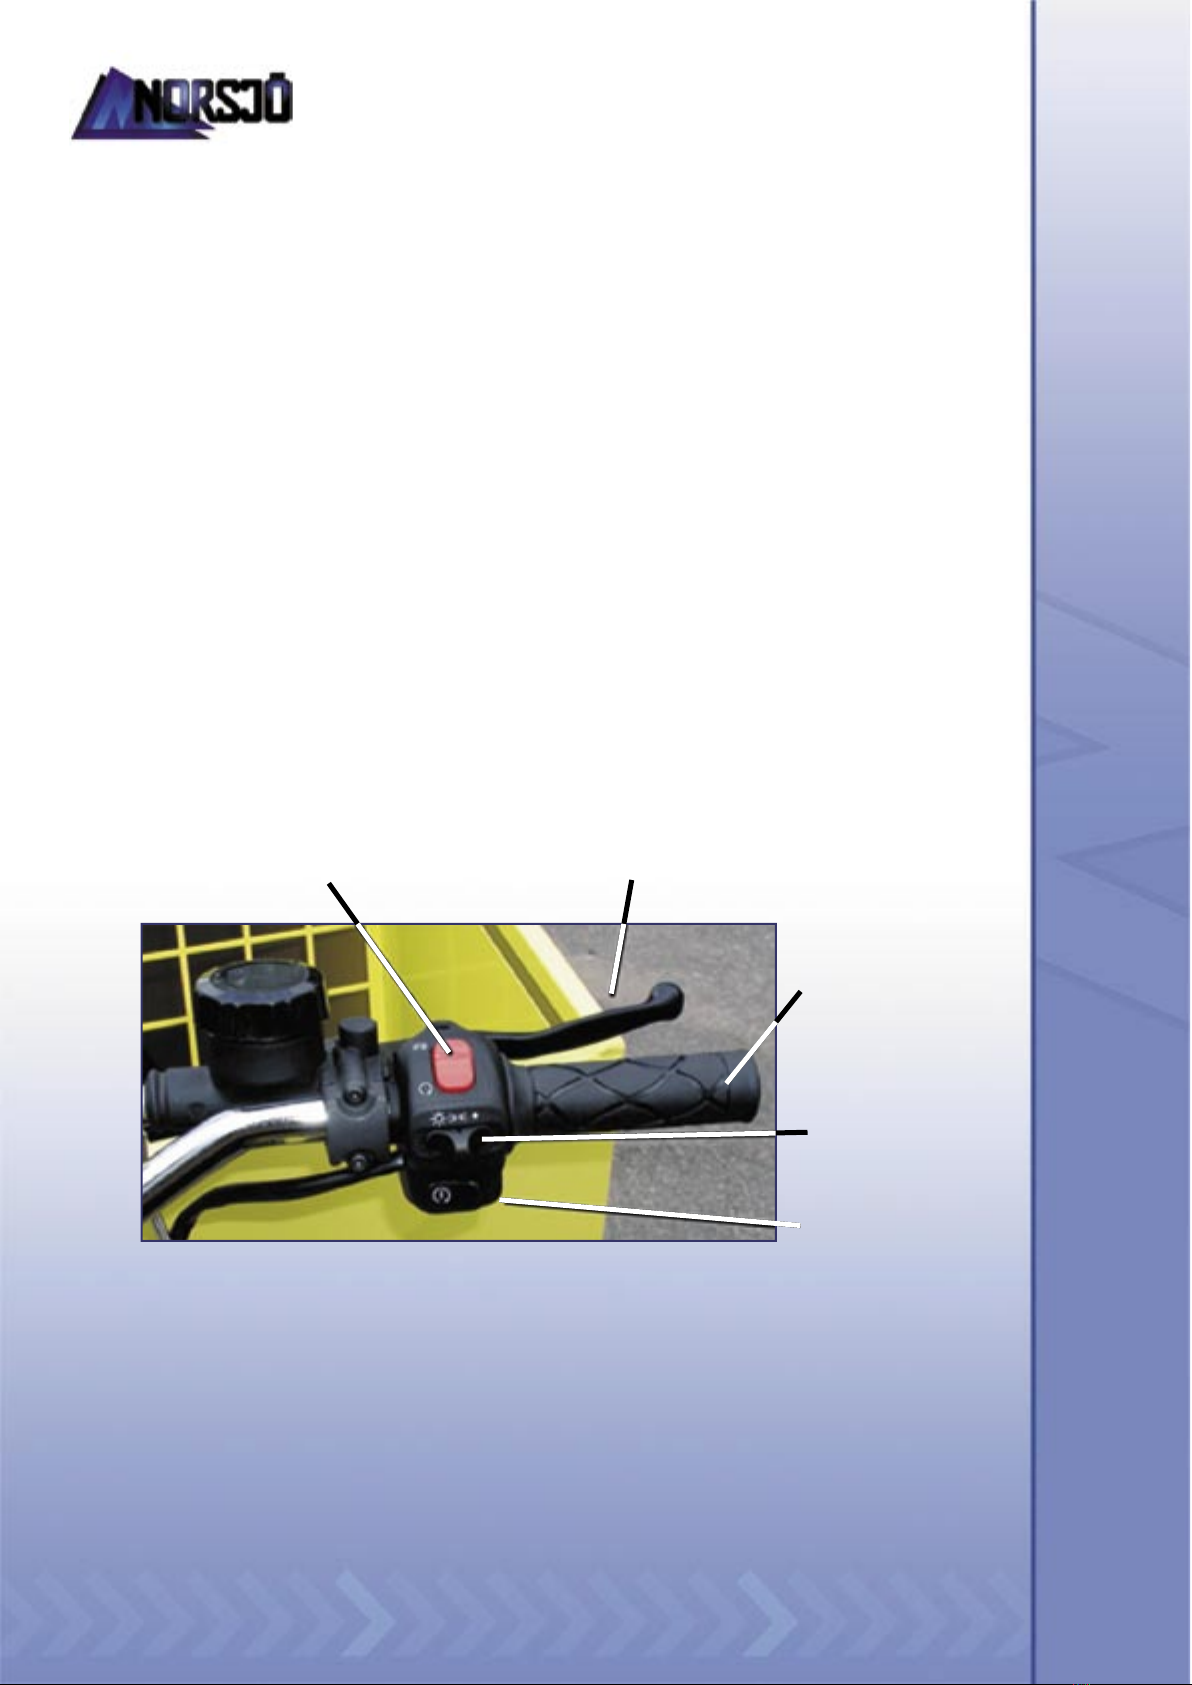
Handlebar controls – right-hand side
Emergency stop
The emergency stop may only be used in case of emergencies. If the emergency stop is
used on a daily basis to stop the engine, it may result in damage to the ignition system’s
electronics.
Brake handle
The control for the front wheel brakes is on the right-hand side of the handlebar.
Headlamp and parking lights
The sliding selector switch has 3 positions. The lights are fully switched off when
the selector switch is moved to the right. In the middle position, the parking light is
switched on, while full/half beam is activated when the selector switch is moved
to the left.
Start button
Starts the engine when the start button is pressed in at the same time as one of the
handbrakes is pressed in.
Page
6 of 30
Start button
Headlamp and
parking lights
Emergency
shutdown Brake handle
Gasreglage
Norsjö Carrier 4-Stroke
Model Post Petrol Short and Long version
Foot controls - left side
Gear lever
The gearbox has 4 gears and is manoeuvred with the left foot. The gears are placed with
fi rst gear, in the down position from neutral. The other gears are placed upwards.
Foot control – right-hand side
Kick-start
Is used as an alternative to the electrical start.
Accelerator pedal
This control is used to accelerate and is foot-manoeuvred with the right foot.
Page
7 of 30
Gear lever
Kick-start
Accelerator pedal
Kick-start

Norsjö Carrier 4-Stroke
Model Post Petrol Short and Long version
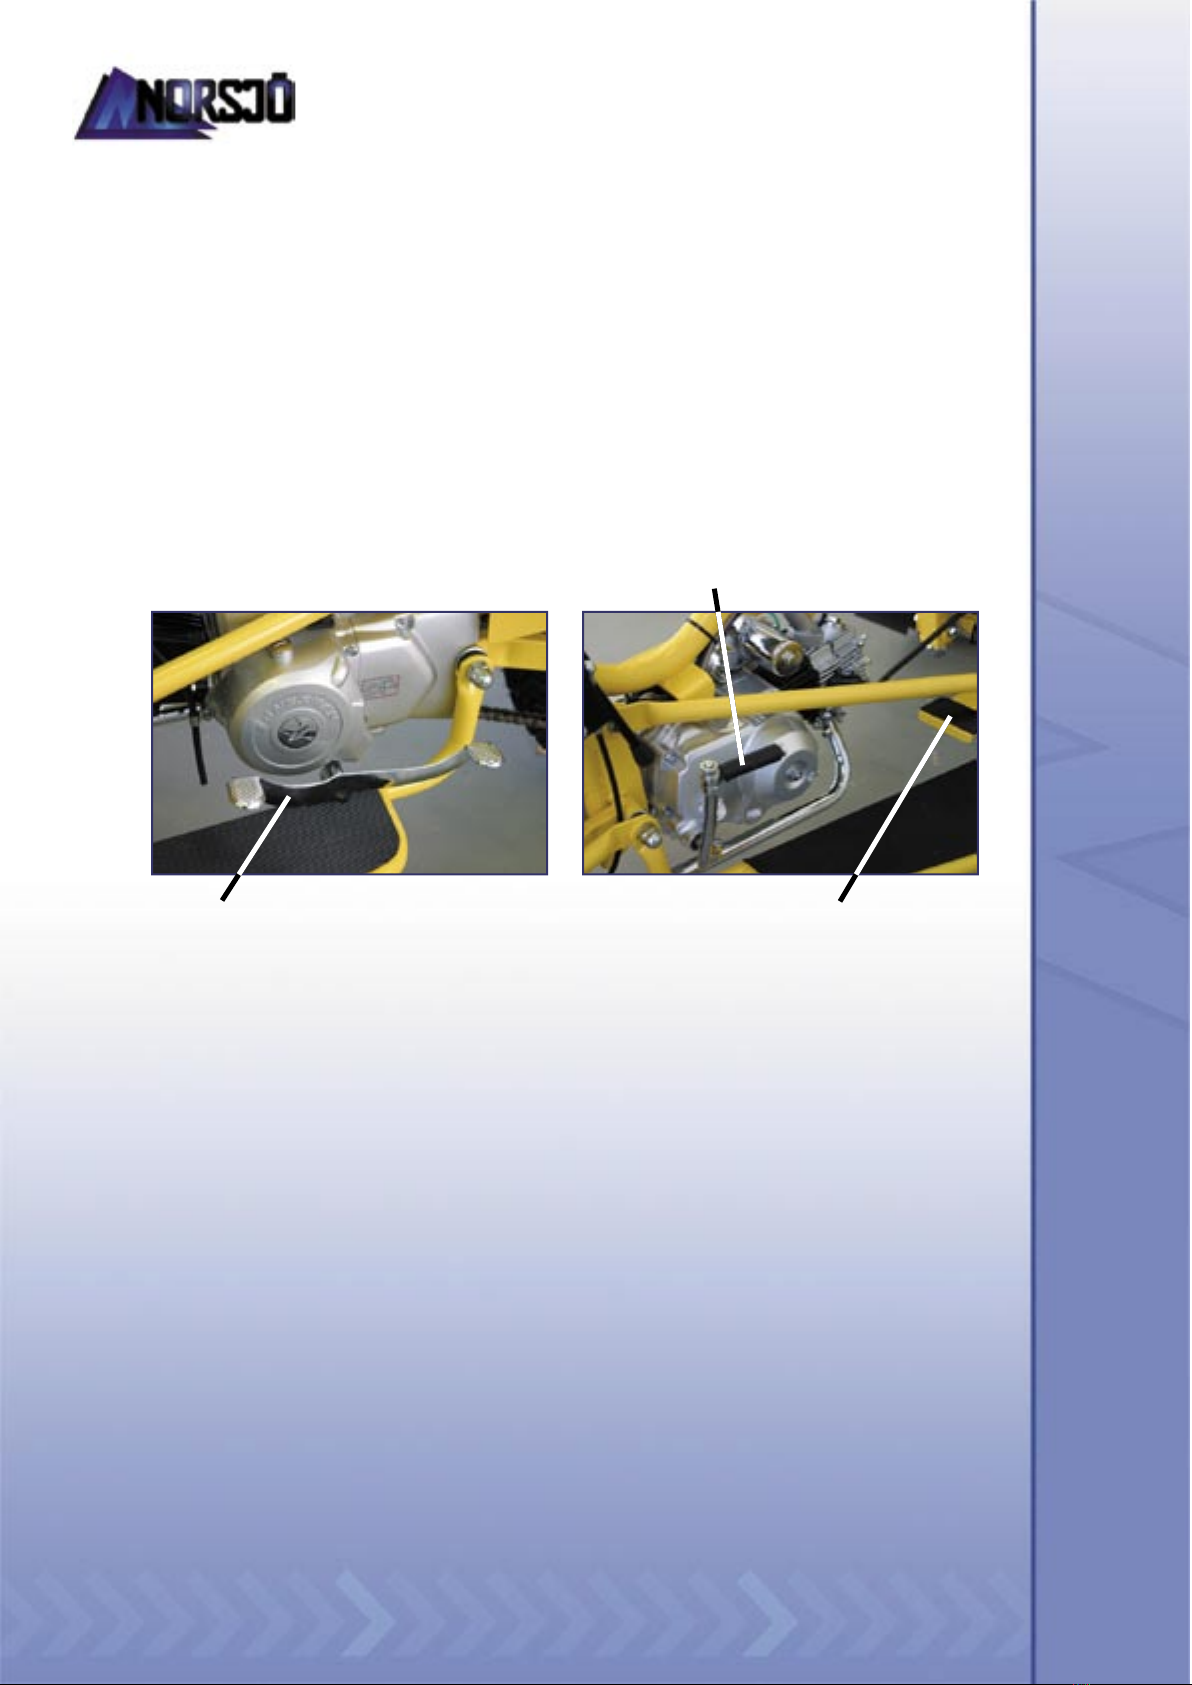
Parking brake
The moped is fi tted with a mechanically manoeuvred parking brake which operates on
the rear wheel. It is operated with a lever placed on the frame tube underneath the
saddle. The handbrake comes on when the lever is pulled upwards.
If the lever is pressed downwards, the handbrake is switched off/remains in
the off position.
Petrol shutoff valve
The petrol shutoff valve is situated on the tank’s left side. There are 3 positions:
• OFF -The petrol shutoff valve is
switched off.
• ON -normal position.
• RESERV - this position provides
a petrol reserve of approximately
0.5 litres. Only use this position on
your way to a petrol station after
you have run out of petrol.
Do not forget to change to the ”ON”
position after you have fi lled up
with petrol!
Page
8 of 30
Parking brake
Petrol shutoff valve
Norsjö Carrier 4-Stroke
Model Post Petrol Short and Long version
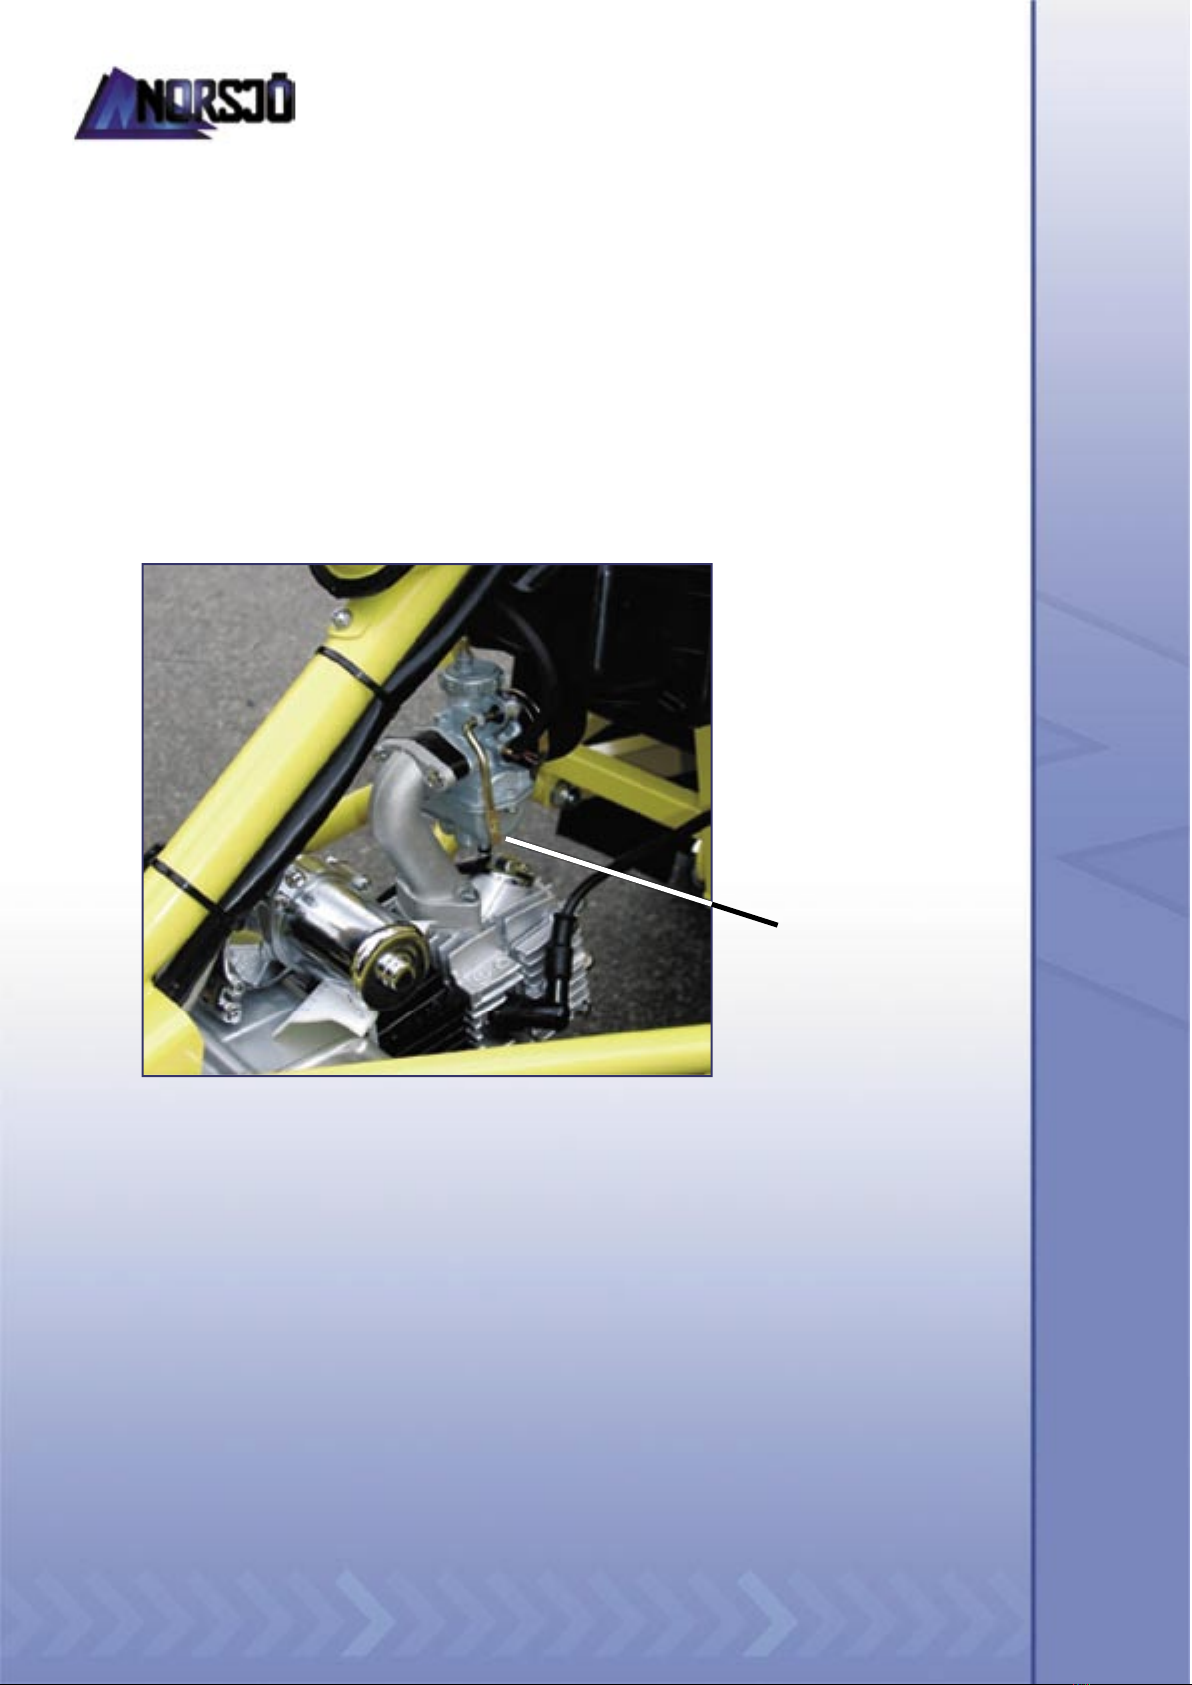
Choke
A cold engine needs a richer mixture of fuel and air in order to start. This can be
achieved by using the choke which is placed on the carburettor. Return the choke to its
original position when the engine has become warm.
Page
9 of 30
Choke

Norsjö Carrier 4-Stroke
Model Post Petrol Short and Long version Page
10 of 30
DRIVING POSITION
Positioning the saddle
Height of saddle
Position required height of saddle by loosening both of the saddle seat screws.
Ensure that both of the saddle seat screws are tightly secured on the saddle post’s
fl at surface.
Saddle tilt
To change the saddle tilt, loosen the saddle bolt. Adjust the saddle to the required tilt
and tighten the saddle bolt so that the saddle sits securely in position.
Height adjustment of saddle
Loosen the saddle bolt and move the saddle backwards or forwards. After adjustment,
tighten the saddle bolt so that the saddle sits securely in position.
Saddle post
screws
Saddle bolt

Norsjö Carrier 4-Stroke
Model Post Petrol Short and Long version
Adjustment of rear shock absorbers (hardness)
Use universal pliers on the shock absorbers’ adjustment tube to adjust the rear shock
absorbers’ hardness. Turn in the required direction to adjust the suspension,
harder or softer.
When adjusting the shock absorbers, it is extremely important that both shock absorbers
have the same adjustment (hardness/softness) on both sides.
FUEL
The moped is equipped with a modern 4-stroke engine which is fi tted with a catalytic
converter which means that it should be run on lead-free petrol, at least 95 octane.
Normally, no additives are needed in the fuel - see Page 14, ”DRIVING DURING
THE WINTER”.
Always switch off the engine before fi lling up with petrol. Ensure that the area where
you are fi lling up with petrol is well-ventilated and avoid breathing in petrol fumes.
Also avoid skin contact with petrol. Do not smoke and ensure that there are no fl ames
or sparks in the vicinity of the moped when fi lling up.
Open the petrol cap by turning it counter clockwise. Close the petrol cap by turning it
clockwise. Both opening and closing the petrol cap is made easier if you press the petrol
cap lightly against the tank at the same time as it is turned.
To avoid leaks, the petrol tank must not be fi lled completely up to the top. This gives the
petrol the possibility of expanding a little after fi lling up. Fuel at petrol stations often
has a lower temperature than the moped’s ambient temperature so the volume of the fuel
will increase when it warms up in the tank.
When fi lling up, it is important to ensure that no water or other substances enter
the tank.
Page
11 of 30

Norsjö Carrier 4-Stroke
Model Post Petrol Short and Long version
MOTOR OIL
All motor oils have different types of additives to comply with requirements regarding
function and longevity. The quality requirements and range of application which the oil
is suitable for is specifi ed by indicating which norm the oil fulfi ls.
The moped is equipped with an air-cooled 4-stroke engine. The motor oil must also
lubricate the gearbox, the clutch as well as the engine. The standards which the oil must
meet in order to do this are designated JASO MA and API SG.
Only use oils which comply with both of the above norms. Only use oils from
known quality manufacturers. Incorrect oil or oil that is of low quality may lead
to the risk of incorrect functioning of the gearbox and clutch and may also
result in serious engine damage.
PRIOR TO START, DAILY CHECKS
Make it a habit to check the moped every day. Faults that are discovered and rectifi ed
early, keep maintenance costs low.
During the daily inspection, the following should be checked:
• Check the engine so that it is clean of dust and oil. If there is an oil leak,
the reason must be investigated and rectifi ed.
• Check the oil level in the engine and top up if required. When driving on
hot days and when driving hard, an increase in oil consumption is normal.
• Check that the moped’s lights, indicators, brake light and horn work as intended.
• Ensure that all of the moped’s brakes function as intended.
• Check the brake fl uid level in both containers.
• Check that the driving chain is correctly tightened and oiled.
• Check that the accelerator pedal moves easily and springs back to its
original position.
• Check that the tyres are not damaged and that the air pressure is correctly adjusted.
Page
12 of 30

Norsjö Carrier 4-Stroke
Model Post Petrol Short and Long version
STARTING AND STOPPING THE ENGINE
Ensure that the gearbox is in its neutral position before the engine is started.
This is indicated when the red lamp on the instrument panel is lit.
Using the electric starter motor
The moped is equipped with a push-button operated starter motor. So that the starter
motor is not activated unintentionally, the moped’s rear brake (left brake handle) or
front brake (right brake handle) should be pressed in.
Release the starter button immediately after the engine has started. The starter motor
must not be initiated when the engine is running, this can cause damage.
In order not to overload the starter motor, it is important that it is not used for more than
three seconds at a time. On repeated start attempts, the starter motor must be allowed
to rest for at least 10 seconds between every start attempt. This will provide the starter
motor with the possibility of cooling down at the same time as the starter battery can
recover for the next start attempt.
Normally, the engine will start after 1 - 2 seconds of running the starter motor.
If the engine does not start immediately, Check:
• that the emergency stop is not activated.
• that there is petrol and the petrol shutoff valve is open.
Use of kick-start
The moped is equipped with a foot-operated kick-start. Fold out the top part of the
kick-start lever and press the kick-start down until the connecting mechanism moves
into it operating position. Kick down calmly and resolutely with requisite force.
When the kick-start has reached its lowest position, it must be returned immediately to
its original position. Carry out this procedure with your foot still on the kick-start lever.
Holding down the kick-start in its lowest position after the engine has
started or releasing the kick-start in an uncontrolled manner leads to
an abnormal amount of wear.
Starting a cold engine
Activate the choke by pulling the choke upwards. Turn the ignition key clockwise to
position 2 or 3. Start the engine by pressing in the start button at the same time as the
brake handle is press the end. Use little or no throttle during the starter. After the engine
has started, open the throttle up a little.
Run the engine until it is warm and then activate the choke by pressing downwards.
Page
13 of 30

Norsjö Carrier 4-Stroke
Model Post Petrol Short and Long version
Starting the engine when the engine is warm
A warm engine is started in the same way as a cold engine, with the exception that the
choke is not used.
Stopping the engine
The engine is stopped by turning the ignition switch counter clockwise to position 1.
Make it a habit to always switch off the petrol shutoff valve when driving has been
completed.
Running the engine warm/hot
All parts of the engine expand when they are heated up. They are therefore
manufactured so that they fi t together optimally when the engine has reached its
correct working temperature.
In order to ensure long working life, do not overload or rev up the engine before it has
reached its correct working temperature.
The engine will reach its optimal working temperature when it is run with a light
load 1-3 minutes dependent upon ambient temperature. The engine has reached its
correct working temperature when it responds to the throttle without the choke
having to be used.
DRIVING DURING THE WINTER
Risk of ice forming in the fuel system
When driving during the winter, considerable condensation may build up in the petrol tank.
This is particularly so for vehicles which are exposed to great variations in temperature due to
changes in the weather or if the vehicle is moved in and out of heated premises.
Condensation water can then freeze to ice and produce operating disturbances in the form of
uneven running of the engine; in worst cases the engine will stop completely. Avoid this:
• Keep the petrol tank well-fi lled to avoid condensation.
• Add suitable amounts of carburettor spirits.
Check wires and the chain more often when it is cold.
Both the wires and the chain need extra attention during the winter period. This is particularly
important when driving through areas where road salt has been used. You should therefore make
it a habit to clean the chain and lubricate both the chain and wires more and at more regular
intervals during the winter.
Use the right oil type to make it easier to start when the engine is cold.
Ordinary mineral oil is more viscous when the temperature drops which leads to the engine
being more diffi cult to start during the winter. Half or fully synthetic oils have however
excellent cold-start characteristics and are a more suitable choice of oil for the winter period.
Page
14 of 30

Norsjö Carrier 4-Stroke
Model Post Petrol Short and Long version
CHANGING GEAR
The moped is equipped with a semi-automatic 4-speed gearbox. The gearbox is
semi-automatic which means that it is equipped with a centrifugal clutch which
is controlled by the engine speed. The engine is engaged when the accelerator pedal
is pressed; this takes place at an engine speed which is a little greater than the
engine’s idle speed.
All gear changing must take place when the engine is idling.
Gear changing with the throttle open may cause serious damage to the gearbox!
Starting from rest
When starting from rest, engage fi rst gear when the engine is idling. The moped will
move forwards by calmly and slowly engaging the throttle.
If the moped is used on a fl at and hard surface such as asphalt, use second gear to start.
This can still be an advantage when driving short distances between mailboxes,
as there will be no need to change up and down between each stop.
Changing gear up and down
Changing up to a higher gear is done by reducing the throttle so that the engine speed
drops down to the idle speed. Engage the next gear by pressing with your heel on the
gear lever’s rear part.
When changing down, this should be done in a similar manner. Ensure however that
the moped’s speed has dropped to a suitable level for the gear you are going to engage
before the gear-change is carried out.
Temporary stops
For short stops, for example when stopping at traffi c lights, fi rst gear may be engaged.
For longer stops, the gearbox should be placed in neutral; for environmental reasons,
you should also consider switching off the engine.
Never leave the moped with the engine running and in gear.
Page
15 of 30

Norsjö Carrier 4-Stroke
Model Post Petrol Short and Long version
BRAKES
The moped is equipped with:
• a hydraulic brake which operates on both of the front wheels.
• a hydraulic brake which operates on the rear wheel.
• a mechanically operated parking brake.
Use both the front brake and the rear brake at the same time to ensure safe and effi cient
braking. Get to know how the brakes work by ”test driving” in a secluded area away
from normal traffi c.
Use of the hydraulic brakes should produce an ”immediate” effect. If the brake handle
however feels as though there is too much or too little play, the brakes must be inspected
immediately by a specialist.
Please note!
It is extremely important that the brakes work properly and effi ciently.
In order to ensure that they work properly,
all service and repairs must be carried out by an expert.
Page
16 of 30

Norsjö Carrier 4-Stroke
Model Post Petrol Short and Long version
Checking the brake fl uid
If the brake fl uid level is too low, air can enter the system which will either reduce the
brakes’ effi ciency or cause them to stop functioning. Before you drive, always check the
brake fl uid level on both hand-operated brakes.
Important:
• There must be no impurities in the brake fl uid. Before you fi ll up with brake fl uid,
ensure that the area around the fi ller cap is clean. Filling up with brake fl uid
must also take place in an area where the air is free from airborne pollutants.
• Used only recommended brake fl uid. Incorrect brake fl uid can damage rubber
seals and hoses which will cause leakages and ineffi cient braking.
• Ensure that no water is mixed in with the brake fl uid,
as this will lower its boiling point.
Vaporisation which occurs when brake fl uid boils leads to ineffi cient braking
or no braking effect at all.
• Brake fl uid is highly corrosive on paint and plastic and spilled brake fl uid
must therefore be wiped away immediately.
Changing the brake fl uid
Brake fl uid is a hygroscopic fl uid which means that it absorbs water from the ambient
air. As already mentioned, this will cause a reduction in the boiling point for the brake
fl uid. Furthermore, water mixed in with brake fl uid leads to corrosion in the
braking system. For these reasons, brake fl uid must be changed every two years.
This should be carried out by an expert.
Page
17 of 30

Norsjö Carrier 4-Stroke
Model Post Petrol Short and Long version
PLATFORM LOADS
Loading
Ensure that the load is as evenly distributed over the loading area as possible.
Also ensure that the centre of gravity is low by placing heavy objects as low-down as
possible. If possible, position the load so that it cannot move when you are driving.
Always adjust your speed based on the load you are carrying, this is of particular
importance when you’re driving round curves and on uneven ground.
Page
18 of 30
The lockable hatch
door is kept in the
open position by
two gas springs.
Lockable box
for helmet
Placing of the lock
The weather protection in the up position
functions as a windbreak for the driver.
Weather protection in down position.
Table of contents


