NorthCape NC5314R-42 User manual
North Cape
0
,
B
0
,
B
,
B
,
B
,
B
,
B
,
B
,
B
,
B
,
B
INSTALLATION PRECAUTION

!
!! !!!"#$%&!
!
If you smell gas:
!
!
!!'"&#(#$!
!
!
!
!
!
!
!!!"#$%&!! ! )"&*+#,-+#+.(!%,/"0"&!,
,
1234,56673589:,958,6;<=>9:,95;?<8,@<8<A3=:,
B2392,254,8<,<=<;C,
,
D438E,3F,38,58,:897<4:=,4659:,958,G377,H<>C,
,
#:I:;,>4:,F234,56673589:,38,58,:897<4:=,4659:,
4>92,54,5,95@6:;J,F:8FJ,95;,<;,2<@:C,
'"&#(#$-!!"#!03)!2/#%1(,02%/!2/!03)')!2/'01&902%/'!2'!/%0!#%**%?)7!)@,90*$A!,!#21)!%1!
)@6*%'2%/!(,$!1)'&*0!9,&'2/+!61%6)10$!7,(,+)A!6)1'%/,*!2/B&1$!%1!7),03:!
!
K+&,L+D&,M"K%1L,
.%!/%!'0%1)!%1!&')!+,'%*2/)!%1!%03)1!#*,((,4*)!5,6%1'!,/7!*28&27'!2/!03)!5292/20$!%#!
032'!%1!,/%03)1!,66*2,/9):!
!
!
!! !!'"&#(#$!
!
'"&#(#$,
.%!/%0!*),5)!&/,00)/7)7!7&12/+!&'):!
.%!/%0!&')!#%1!9%%D2/+:!
E%**%?!,**!+,'!*),D!61%9)7&1)'!2/!032'!
(,/&,*!612%1!0%!%6)1,02%/:!
Do not store or use gasoline,or other
flammable vapors and liquids, in the
vicinity of this or any other appliance.
An LP-cylinder not connected for use
shall not be stored in the vicinity of
this or any other appliance.
1. Shut off gas to the appliance.
2. Extinguish any open flame.
3. If odor continues, keep away
from the appliance and
immediately call your gas
supplier or fire department.
Importer installation, adjustment,
alteration, service or maintenance
can cause injury or property damage.
Read the installation, operating, and
maintenance instructions throughly
before installing or servicing this
equipment.
SPECIFICATIONS
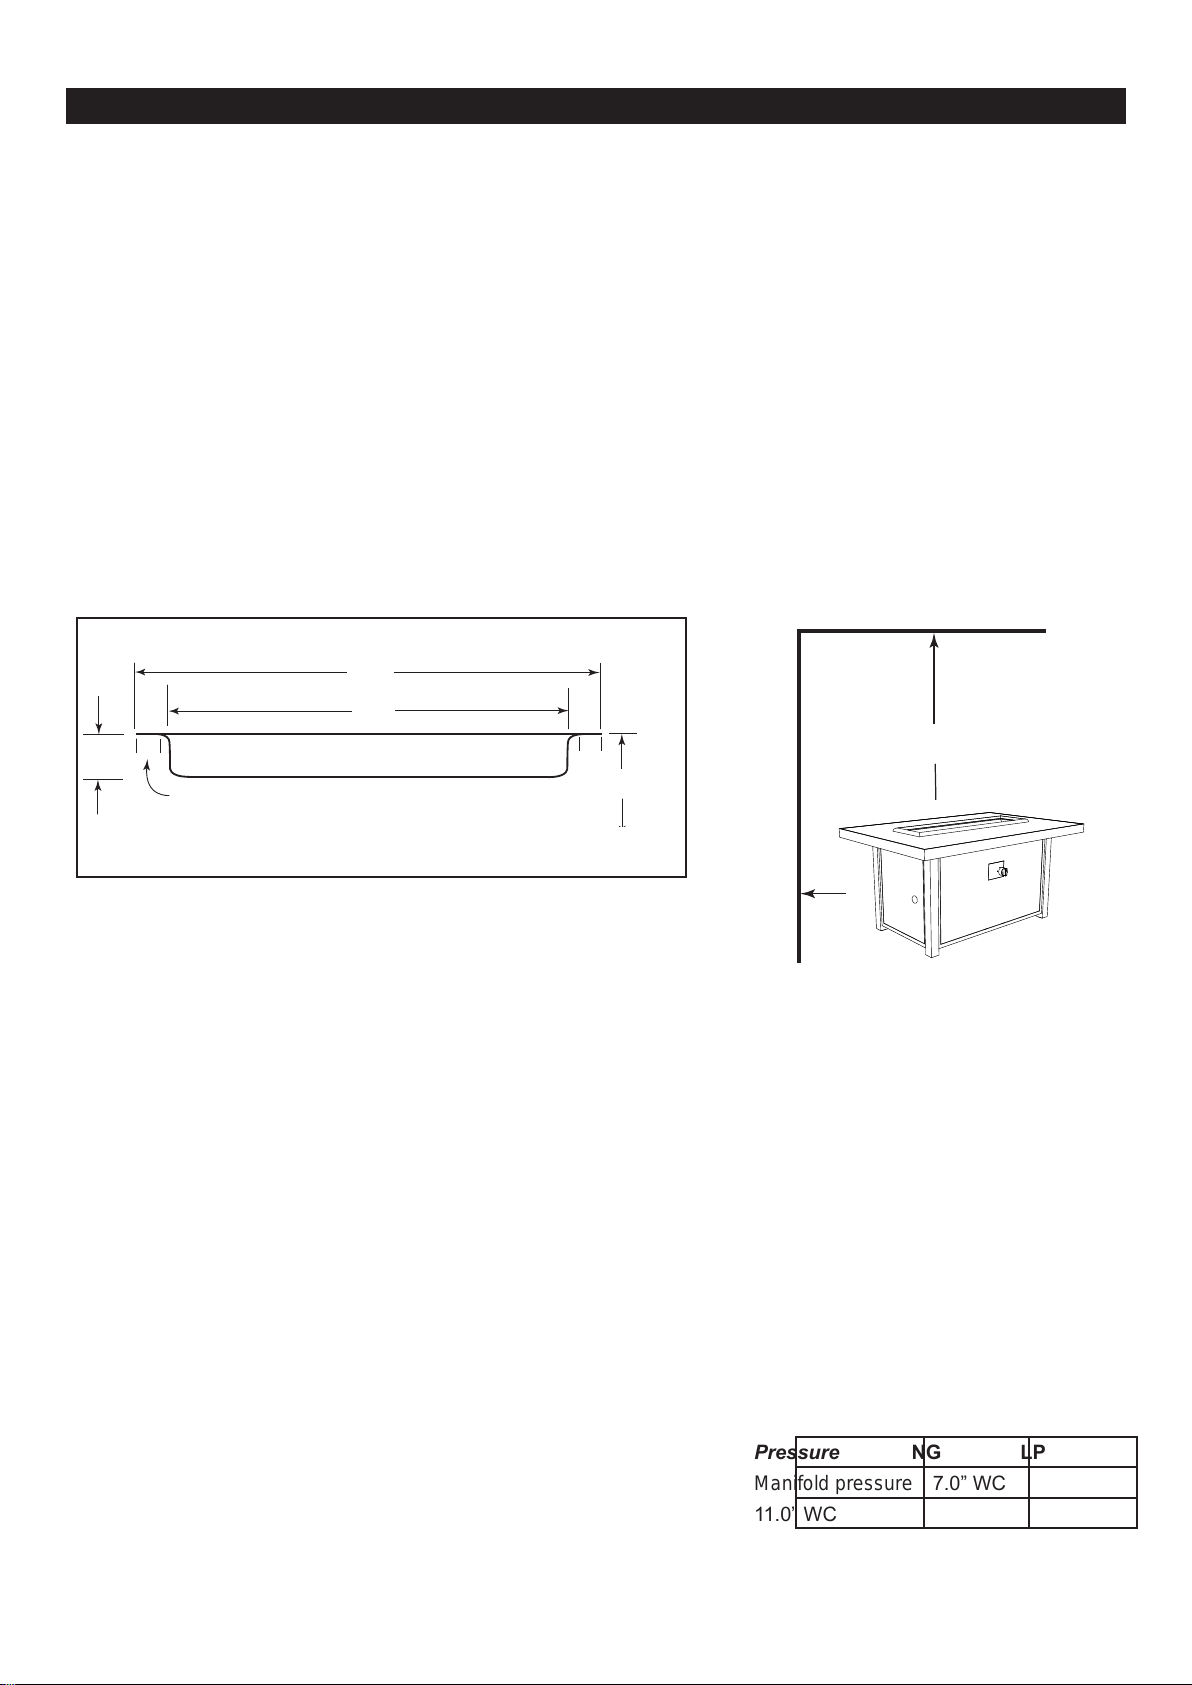
Table1. Fire Pit Dimensions
A
B
C
.875 TYP. (usable flat lip)
*
*D
Ground Level (Earth)
Figure 1. Fire Pit Dimensions; refer to Table 1.
(Dimensions applicable to round or square pans)
Pressure NG LP
Manifold pressure 7.0” WC
11.0” WC
Table 3. Gas Pressures
Disclaimer: Btu listings are based on 7.0”WC for Natural Gas and 11.0”WC
for Liquid Propane (LP) at the inlet side of the gas valve. Flex line size and
proper gas pipe sizing will also affect Btu’s. As a result your Btu’s may vary
slightly from Table 2 specications.
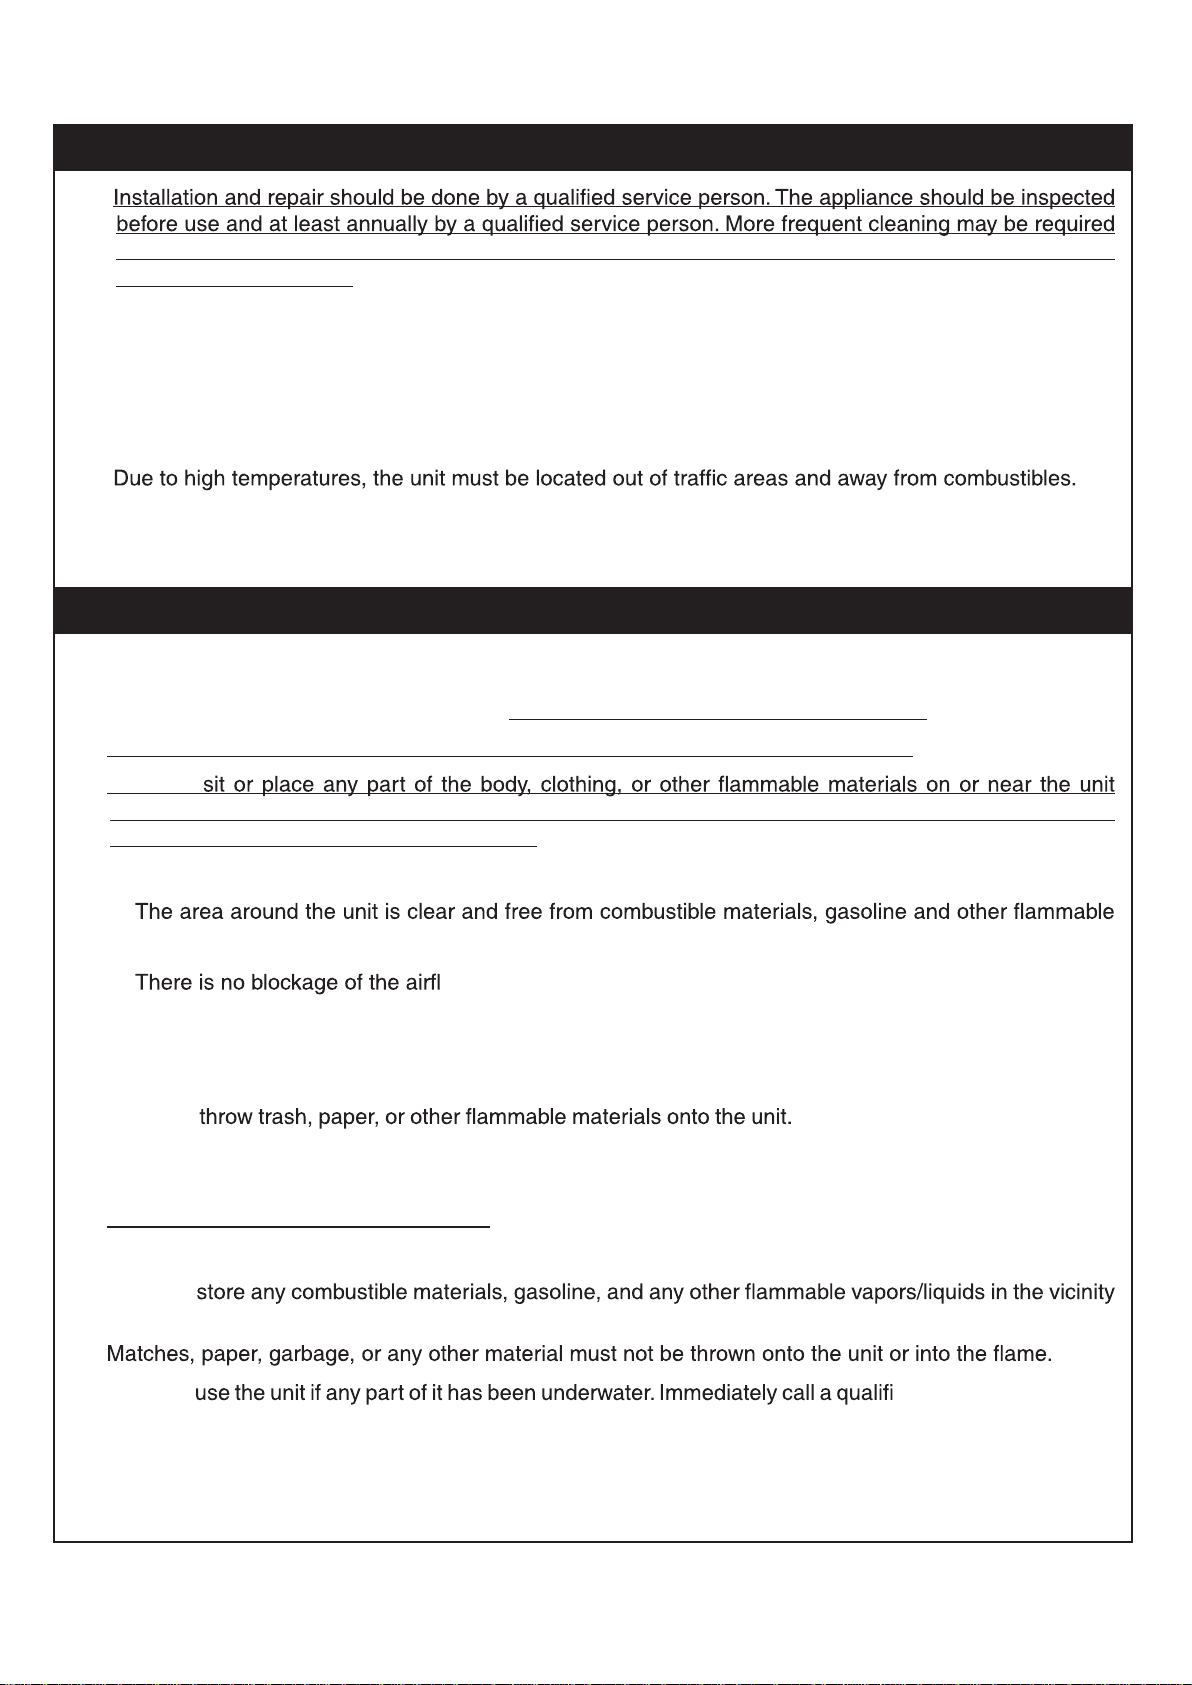
Figure 2. Clearance to Combustibles
(Not to be used in an enclosed space)
F
E
A.
as necessary. It is imperative that control compartment, burners and circulating air passageways of the
appliance be kept clean.
B. Carefully inspect for shipping damage. If any parts are damaged, call the dealer.
C. Correct installation and proper placement of the unit and decorative media is crucial to the safe performance
of the unit. See installation instructions for further information.
D. Ensure that the unit is installed in such amanner that the vent opening at the base of the unit remains
obstacle-free at all times and during all weather conditions.
E.
OPERATING THE UNIT SAFELY AND CORRECTLY
INSTALLATION SAFETY GUIDELINES
A. This appliance is only intented for operation in temperatures above 32°F.
B. When shutting the unit down—be sure to TURN THE CONTROL VALVE FULLY OFF.
C. Children MUST be carefully supervised when they are in the area of this appliance.
D. DO NOT
surround. Children and adults should be alerted to the hazard of high surface temperatures and should
stay away to avoid burns or clothing ignition.
E. Every time you use the unit, make sure that:
1.
vapors and liquids.
2. ow through the vent openings located on the bottom of the unit.
3. The hose is inspected (if applicable). See the SAFE USE &MAINTENANCE OF PROPANE-GAS
CYLINDERS section.
F. WARNING: HOT WHILE IN OPERATION AND FOLLOWING OPERATION. Serious injury can occur!
DO NOT DO NOT leave in operation when
unattended.
WARNING: DO NOT operate this unit in the rain.
G. SOLID FUEL MUST NOT BE BURNED in the unit.
H. DO NOT continue using if you smell unusual odors, or have headaches, nausea, or dizziness.
I. DO NOT
of the unit. Provide adequate clearance for servicing and operation.
J.
K. DO NOT ed professional service
technician to inspect the set and to replace any part of the control system that has been underwater.
L.
The burner must to be replaced if it has evident damage before the appliance being put into operation
and the replacement burner shall be specified by the manufacturer.
M. Any guard or other protective device removed for servicing the appliance shall be replaced prior to
operating the appliance.

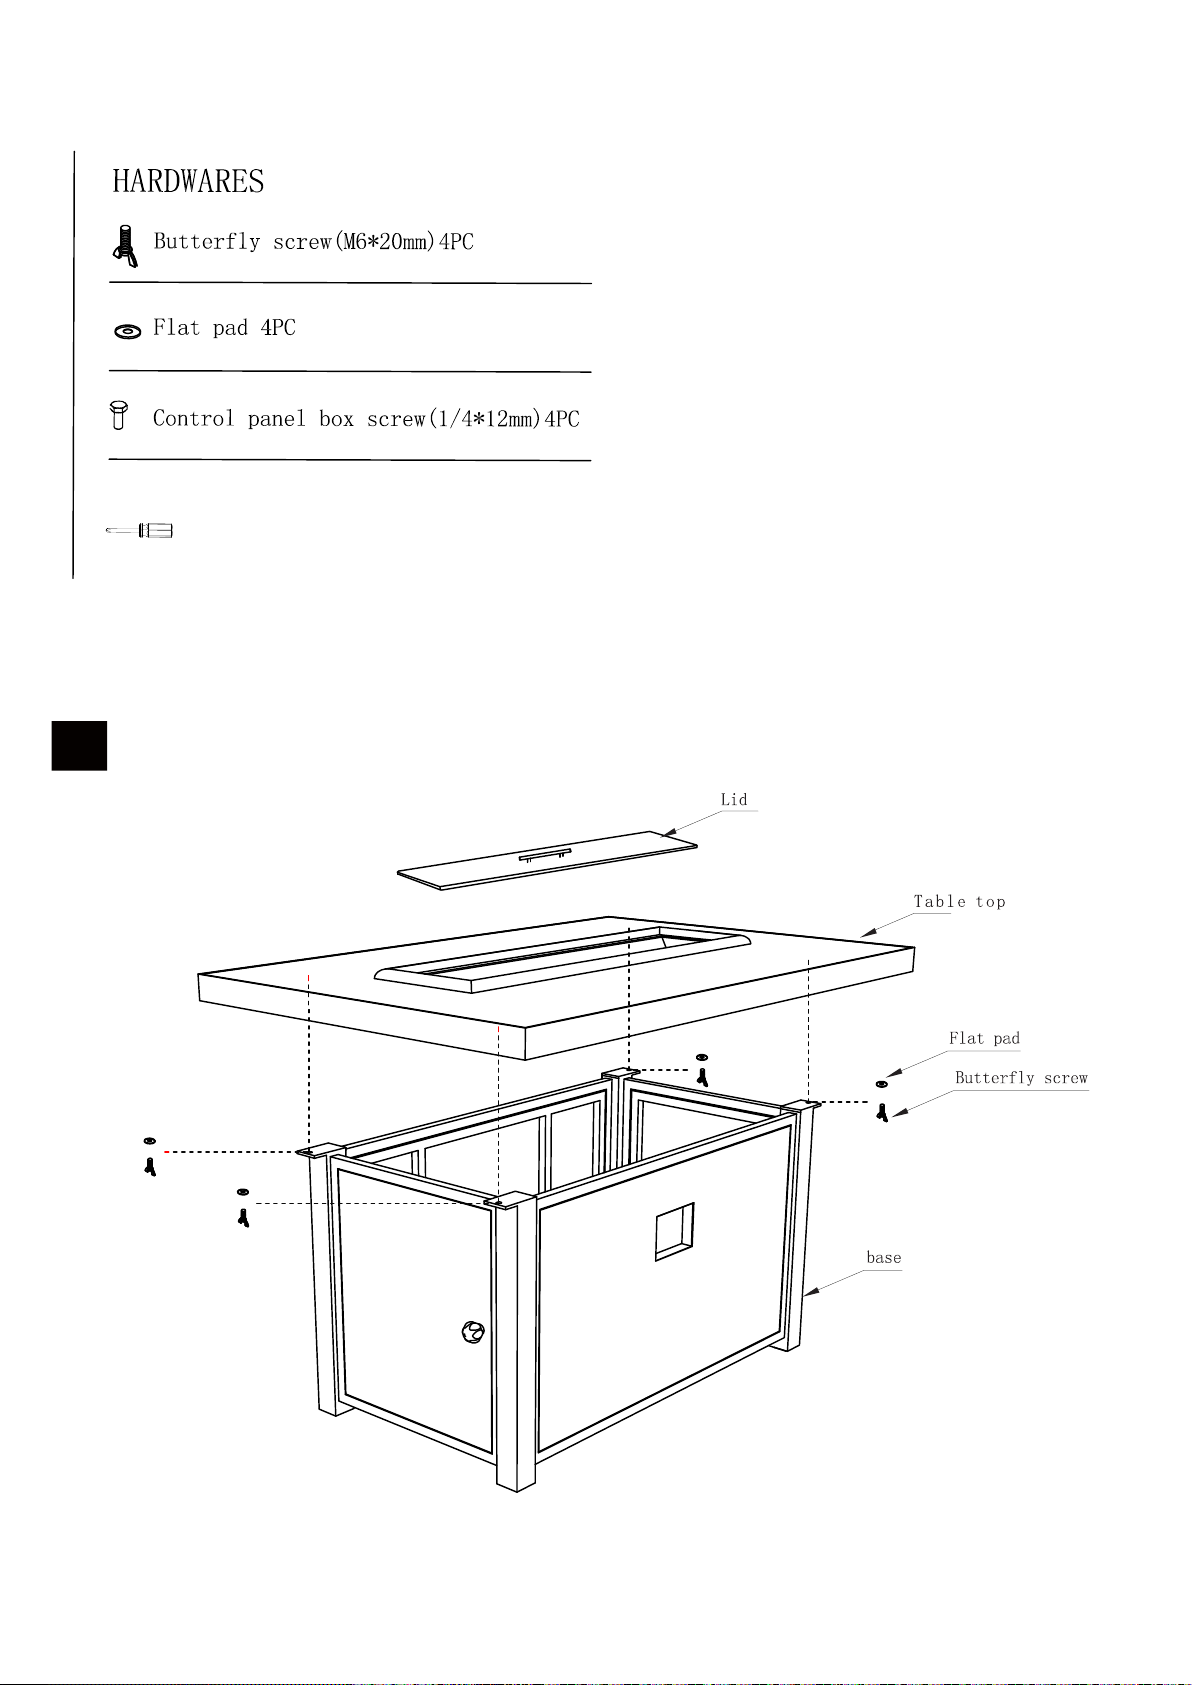
Part list:
For Rectangle Cal Sil fire pit table
1
Phillips screwdriver
2
3
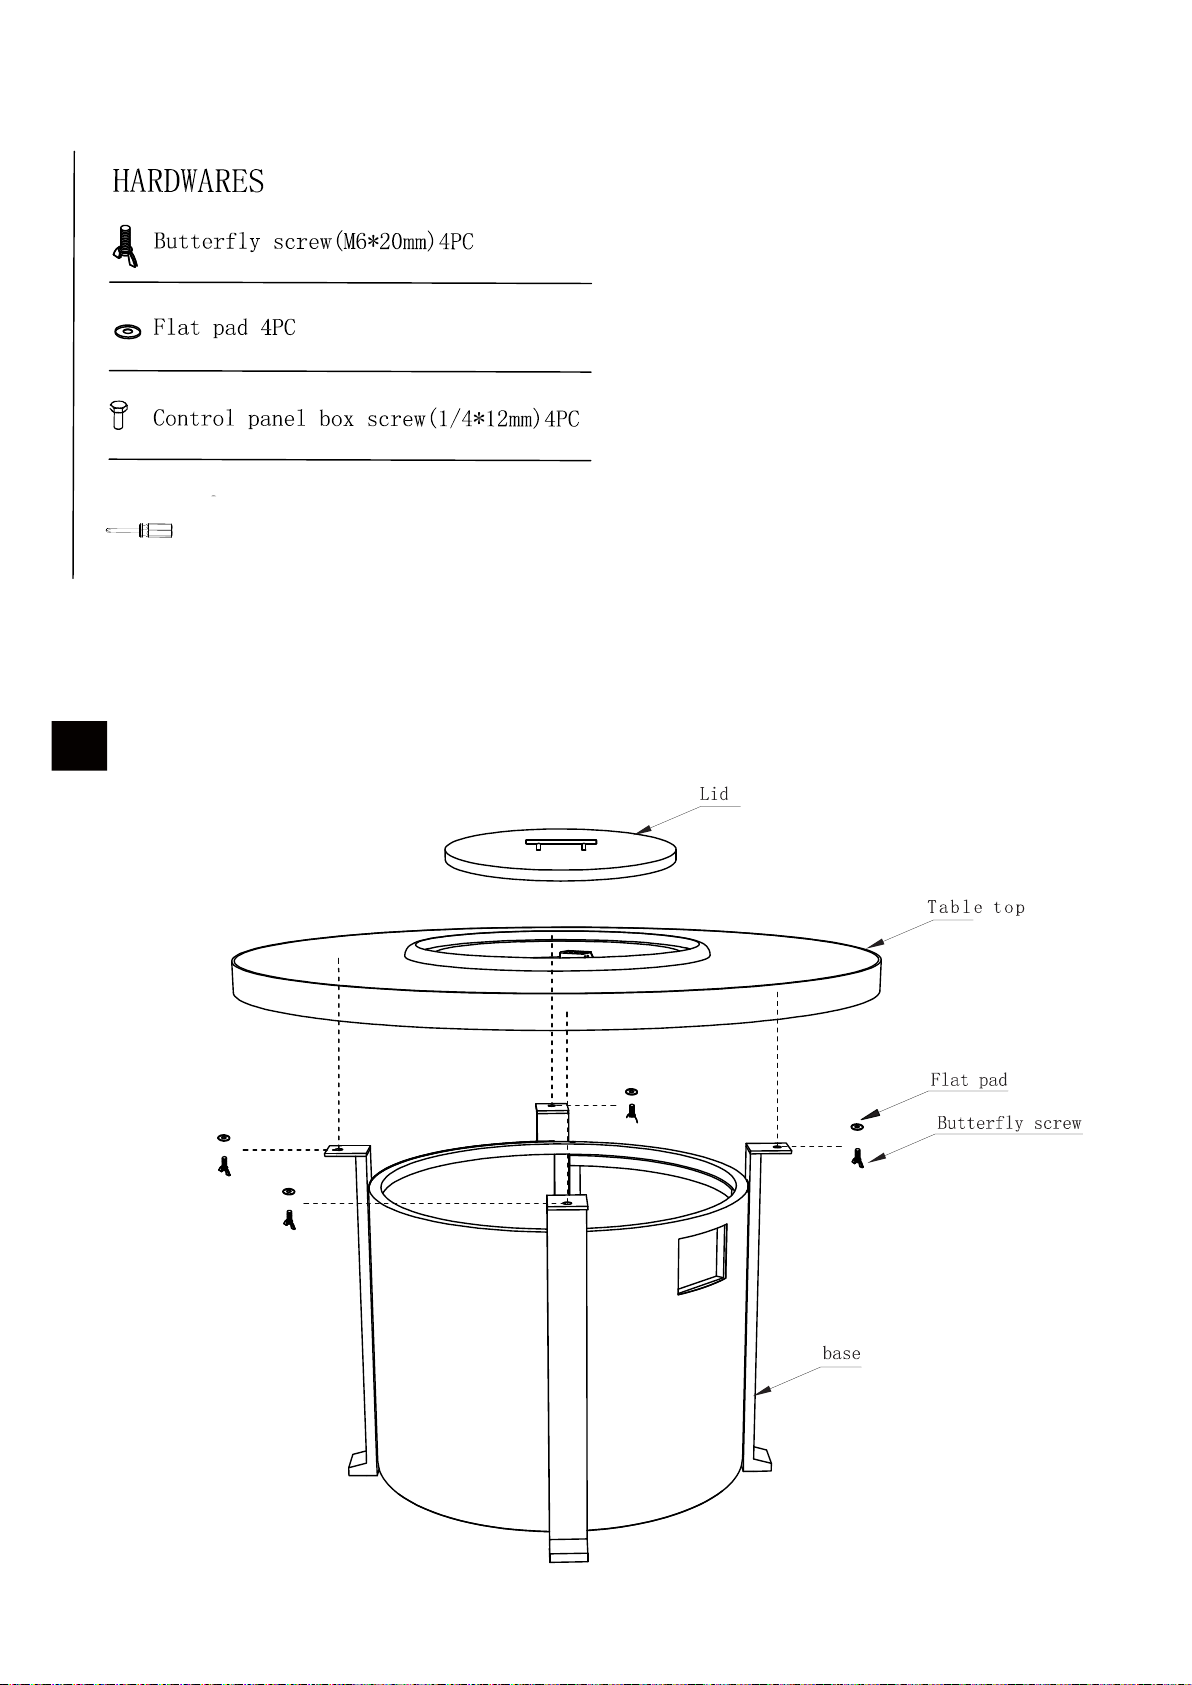
Part list:
For Round Cal Sil fire pit table
1
Phillips screwdriver

2
3
A. Carefully inspect the carton for shipping damage. If any parts are missing or damaged, call your dealer.
Do not attempt to install the appliance unless all parts are in good condition.
B. Correct installation is crucial to safe performance of your Outdoor Fire Pit.
C. Due to high temperatures, the Fire Pit must be located out of traffic areas and away from combustibles.
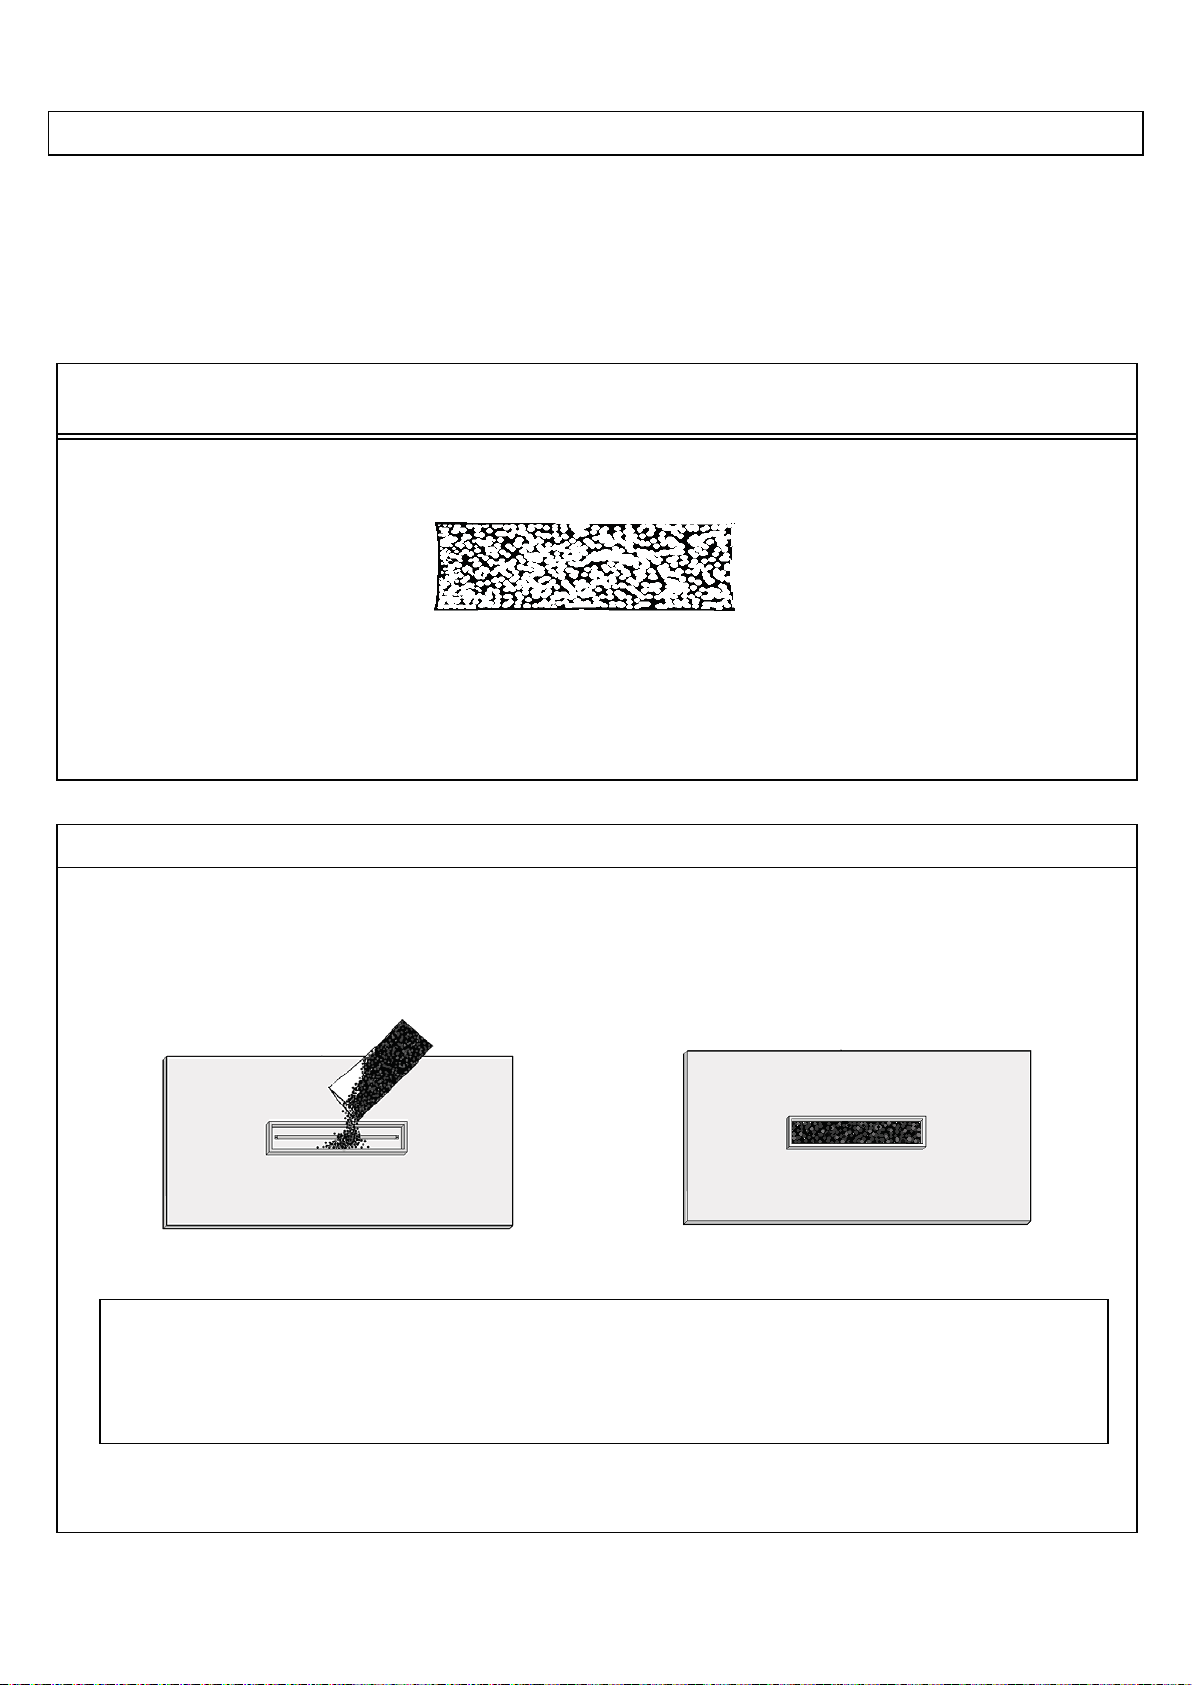
CAUTION – Cuts may occur from the sharp edges on glass. Use safety gloves during the
placement of glass.
Pour the bag of glass crystals into the Outdoor Fire Pit so that the burner is completely covered.
(See figures #1 and #2). These instructions apply to both round and rectangular burners.
Top View
GLASS CRYSTAL PLACEMENT
CAUTION: BURN HAZARD. GLASS CRYSTALS
WILL REMAIN HOT FOR SOME TIME AFTER USE.
YOU MUST MAINTAIN THE LAYOUT AS SHOWN TO ENSURE PROPER OPERATION OF YOUR FIRE
PIT. IF YOU NEED TO REPOSITION ANY MATERIAL TO MAINTAIN THE PROPER LAYOUT, USE HEAT
RESISTANT GLOVES OR ALLOW MATERIAL ADEQUATE TIME TO COOL BEFORE HANDLING.
Figure 2Figure 1
PARTS LIST
Replacement parts available from your local retailer
GLASS CRYSTAL INSTALLATION GUIDELINES
#1
decorative glass with a glass stone: 10KG

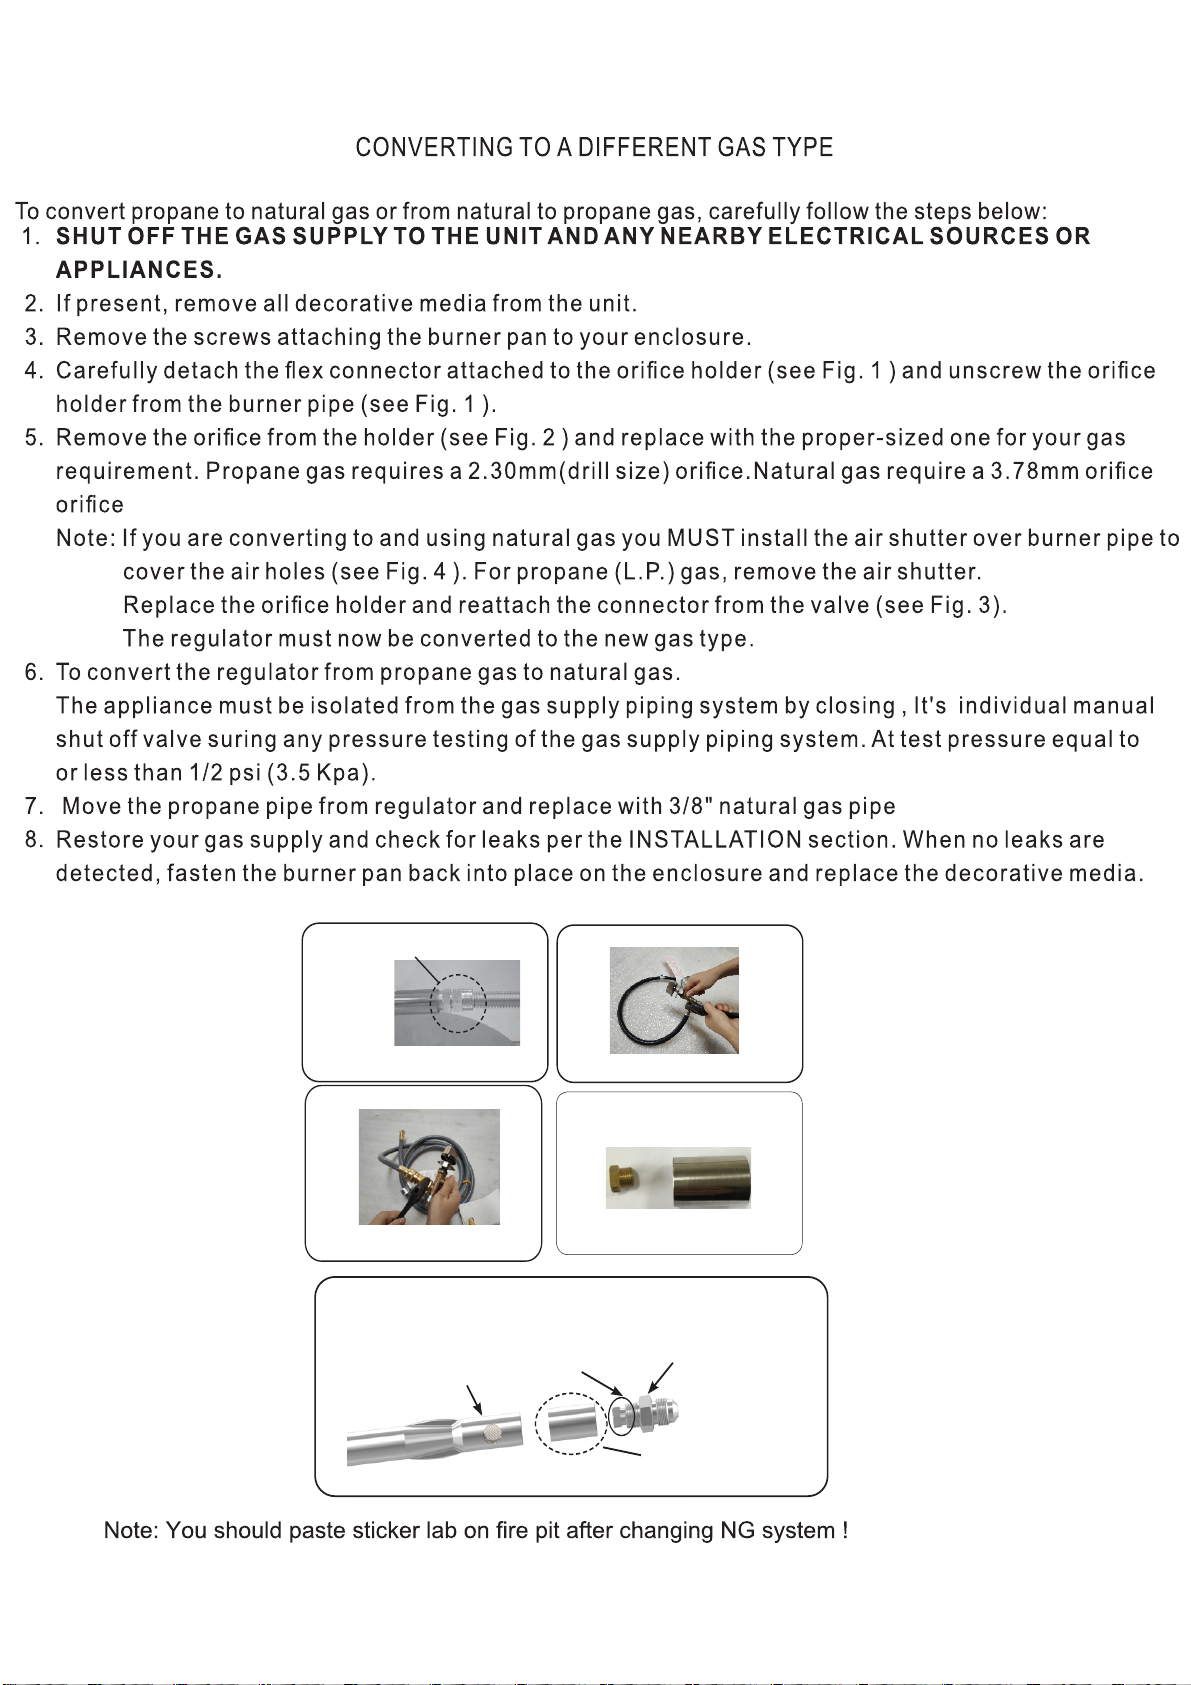
Fig. 1
Fig. 4 Burner
pipe
Air shutter (Used only with
natural gas. Removed for
ORIFICE
(Remove to change to a different
gas type)
2.30mm-propane gas
3.78mm-natural gas
Connector from valve attached to
orifice holder on burner pipe
Detach connector from orifice holder when
changing orifice to a different gas type.
Fig. 2
Fig. 3
Remove propane pipe.
Install gas pipe.
propane gas.)
NO. OA01
NG Orifice & Air Shutter
NG orifice size: 3.78mm
(Natural Gas (NG) Conversion Kit Not Included)

Note: NG Conversion Kits & Hose are not
included with this unit.
Please contact the local dealer r NG
Conversion Kits.
Natural Gas
(
NG) Conversion Kit
-
I
ncludes
NG
O
ri
f
ice and Gas Pi
p
e: NC
5
3
14
CN
V
)
RNING
Item:
(OA04)
Orifice
Labels
L shutter
Model:
Ulc-FNC42-C-M series/Ulc-FNC48N-C-M series
Ulc-PNC32N-J-N/Ulc-PNC 18S-C-M/Ulc-PNC38S-Y-M
NG Conversion Kit No.OA04
This conversion kit can be use on models:
IMPORTANT NOTICE


REQUIREMENTS
1. Only non-combustible materials should come in direct contact with any part of the Fire Pit. Underneath area should
be non-combustible as well.
2. Only use ¾” gas supply line to the Fire Pit. Based on the selection of the re pit size, the proper brass ttings should
be used to ensure a proper installation.
3. Determine the size of the round or square Fire Pit you are preparing to install (Refer to page 3).
4. You must provide a round or square cut out to place the re pit into the non-combustible enclosure surround. Use
the pattern from the shipping carton for sizing.
5. Follow the local code requirements for the gas type being used. This Fire Pit should be installed in accordance with
local codes and ordinances or in the absence of local codes, with the latest National Fuel Gas Code, ANSI Z223.1
NFPA54 or CSA B149.1, Natural and Propane Installation Code in Canada.
6. Fire Pits create high temperatures, it is very important to have any combustibles at a safe distance.
7. Normal operation of the Fire Pit is with a battery box that is supplied with your system (Fig 4). The battery box has
12-feet of black sleeved wire that is to be passed through the junction box provided. This wire should not be cut or
spliced and the junction box can be placed in the facing of the vertical nish of the re pit, if you place the wire under
ground you should install those wires into an approved protective conduit/sleeve material.
8. If (optional) 120VAC adapter (Pg.13) is going to be used to power this system it is required to follow all local codes
or National Electrical Code ANSI/NFPA 70 for installation of this electrical outlet. A breaker on wall switch with
approved outdoor outlet must be used to insure safety to this Fire Pit. When not in use the breaker should be in the
OFF position.
9. Fire pit should never be left unattended while in operation. It should always be a safe distance from all trees and
combustible landscape materials.
10. Construction of the nished re pit should be stable and solid. From the bottom of the control box that houses the
gas valve and module, it should be a minimum if of 4-inches to the ground level. See gure #1. Drainage is critical to
ensure that water does not damage and valve components. Never install the re ring system below grade.
11. CAUTION: A minimum of 18 square inches of cross ventilation (2 sides) is required to keep the components
in good working order.
12. The insulation square pad provided with the Fire Pit is to be placed foil up toward the bottom of pan on top of the
valve box.
13. Never ll the cavity under and around the valve box with any material, this is a provided air space necessary for
ventilation.
14. These products are designed for outdoor use only. Not approved for any indoor use.
15. This Fire Pit is designed to have decorative rock, covering the spoke burner. Optional concrete
logs can be added to consumers taste. Decorative Rock is not provided. When purchasing decorative rock it is
recommended to use minimum of 1-inch diameter rock as a base to ll the burner pan. Decorative glass cover
ing may be loosely scattered on top of rock if desired or non-combustible logs may be added for a campre look.
NOTE: If using all glass media, glass must be a minimum of 1/4-inch diameter or larger.
16. Gas lines and ttings must be installed in to the non-combustible structure. All gas connections must be leak tested
before installation of the re pit. Soapy water leak detection is required before regular use of the re pit.
17. Do not use material that will absorb moisture over time and will not release this moisture quickly. Moisture can boil
in this material and can rapidly break apart and cause damage or personal injury.
18. Never leave any other combustible material on top of the re pit. This could cause unsafe operation of this system
and damage to the component that will not be covered under our warranty.
19. Cover the complete burner with decorative Rock material (min. 1-inch diameter). Completely cover the spoke burner,
no more than 1 inch above the burner.
INSTALLATION OF FIRE PIT INTO AN APPROVED ENCLOSURE

*Do not rest feet on the fire pit.
*Please take out the battery when not using the fire pit for an extended length of time.
*Do not enlarge valve orifices or burner ports when cleaning the valve or burner.
*Cylinder supply system must be arranged for vapor withdrawal
*LP Tank used must include a collar to protect the cylinder valve
*Never fill the cylinder beyond 80% full
*Liquid propane gas is not natural gas. Only use propane for this fire pit.
*The conversion or attempted use of natural gas in a liquid propane unit or liquid propane gas in a natural gas unit is dangerous.
*Do not use this fire pit on vehicles or boats. Always operate the appliance on flat ground outdoors.
*Keep any electrical supply cord and the fuel supply hose away from any heated surfaces.
*Do not use this fire pit unless all parts are in place.
*Do not use this fire pit for cooking.
*Do not burn any other materials than are supplied with and intended for use in this fire pit.
*Do not pour water into fire pit.
*The installation of this product must conform with local codes.
*Do not use this fire pit if any part has been under water.
*Do not store a spare or disconnected liquid propane cylinder under or near this fire pit.
*After a period of storage, and/or non use, the propane fire pit should be checked for gas leaks and burner obstructions before use.
*Do not operate the propane fire pit if there is a gas leak present.
*Never use a flame to check for gas leaks.
*Combustible materials should never be within 10 feet of the top, back or sides of your propane fire pit.
*Do not put any other fire pit cover or anything flammable on, or beneath the fire pit.
*The propane fire pit should never be used by children. Children must be supervised when they are anywhere near the appliance.
*Users should be alerted to the hazards of high surface temperatures and keep a safe distance to avoid burning or clothing ignition.
*Pay attention when operating the fire pit. It is hot in use and should never be left unattended. Do not transit it while in operation.
*Should fire go out while burning, turn the gas valve off. Follow the instruction and wait five minutes before attempting to relight.
*Never use charcoal or any other solid fuel in the fire pit. Never parch clothing or other flammable materials on or near the fire pit.
*Never lean over the open fire pit or place hands or fingers on the upper portion of an operational unit.
*Keep ventilation openings in cylinder enclosure(FIRE PIT BODY) free and clear of debris.
WARNING WARNING:
*Keep the appliance area clear and free from combustible materials, gasoline, and other flammable vapors and liquids.
*Inspect the hose before each use of the appliance
*The hose assembly must be replaced prior to the appliance being put into operation
if there is evidence of excessive abrasion or wear or if the hose is damaged.
* Locating the hose out of pathways where people may trip over it or in areas where the hose may be subject to accidental damage.
* the burner must be replaced prior to the appliance being put into operation if it is evident that the burner is damaged.
The LP-gas supply cylinder to be used must be:
2) provided with a listed overfilling prevention device; and
3) provided with a cylinder connection device compatible with the connection for the appliance.
1) constructed and marked in accordance with the U.S. Department of Transportation(D.O.T.)
Specificat ions for LP-Gas Cylinders, or the Standard for Cylinders, Spheres and Tubes for
Transportation of Dangerous Goods and Commission, CAN/CSA-B339, as applicable;
Troubleshooting
Below are some potential causes and countermeasures to the symptoms indicated in bold. Please contact your retailer or
certified technician for service & repair.
Below are some potential causes and countermeasures to the symptoms indicated in bold. If still unable to resolve issue, please
contact your retailer or certified technician.
Will Not Light
1. Air in gas line. If anew install, may take several attempts to purge air
2. Debris in gas line. Confirm gas line is clear (insulation, dirt, plastic, excessive pipe sealer etc..)
3. Gas Pressure Improper Confirm proper gas pressure found (Section 1)
4. Spark Igniter needs adjusted Spark Igniter Must be correctly aligned with burner holes.
5. Weak Batteries Replace batteries.
6. Wire is shorted Re-route wire away from conductive materials.
Will Not Stay Lit
1. Gas Pressure Improper Confirm proper gas pressure found (Section 1)
2. Improperly applied media Review Media in (Section 5)
Noise
1. Whistling Sound Change Flex line routing.
This manual suits for next models
9
Table of contents
Popular Outdoor Fireplace manuals by other brands

tiki
tiki Patio Torch instructions

Westin Outdoor
Westin Outdoor MONTEREY HJ-1288-1 user guide

RealFlame
RealFlame Baltic 9750NG owner's manual

Watkins
Watkins Summit Stone Round Fire Pit Kit installation guide

Endless Summer
Endless Summer Cayden owner's manual

MODENO
MODENO Ridgefield OFG150NG owner's manual


Outdoor Plus
Outdoor Plus REGAL OPT-RGL Series manual

Fire Island
Fire Island GAD15307M owner's manual

Ciays
Ciays ETFPT2 instruction manual

supremo LEISURE
supremo LEISURE PORTOBLELLO LS-059-C Assembly instruction

BOND MANUFACTURING
BOND MANUFACTURING HYFP50085-1 owner's manual

Outdoor GreatRoom Company
Outdoor GreatRoom Company Montego installation instructions