novasmart Smartband RunR II User manual

GB
USER GUIDE
runR II
Fitness Tracker
Smartband

2
GETTING STARTED
Read this user guide carefully before using the
product. lt contains important information for your
safety as well as use and maintenance advice.
Keep this user guide for future reference. lf this
product is passed to a third party, this user guide
must be included.
SAFETY ADVICES
■ The product contains electrical components that
could cause injury if not handled properly.
■ Do not open the enclosure or disassemble the
product.
■ Do not use the product if the screen is cracked
or damaged.
■ Do not expose the product to extremely high or
low temperatures.
■ Do not use the product in a sauna or steam room.
■ Do not leave the product in direct sunlight for an
extended period of time.
■ Do not dispose the product in a fire. Built-in
battery could explode.

3
■ The product features a built-in battery, which is
not user replaceable.
■ Do not check call notifications or other data on
the product‘s screen while driving or in other
situations where distractions could be hazardous.
■ This product is not a toy and should not be used
by children.
■ This product is not a medical device and is not
intended to diagnose, treat, cure, or prevent any
disease.
■ The distance travelled may be inaccurate. lt is
for reference only and should not be used as any
navigational reference.
■ Wearing the product snugly can lead to skin
irritation due to rubbing and friction. Remove the
product periodically to allow your skin to dry and
breathe.
■ Do not wear the product too tight. This might
restricts blood flow, potentially affecting the
heart rate signal.
■ The product should usually rest a finger‘s width
below the wrist bone, as you would normally
wear a watch.
■ This product has been classified as IP67 and
is protected against the effects of temporary
immersion in water.

4
Consult your doctor prior to use if you
■ Have a medical or heart condition or any preexist-
ing conditions that might be affected by your use
of this product.
■ Are taking any photosensitive medicine.
■ Have epilepsy or are sensitive to flashing lights.
■ Have reduced circulation or bruise easily.
■ Begin or modify any exercise program.
Prolonged contact may contribute to skin irritation
or allergies in some users. lf you notice any signs
of skin redness, swelling, itchiness or other skin
irritation, please discontinue using the product.
Continued use, even after symptoms subside, may
result in renewed or increased irritation. lf symp-
toms persist, consult your doctor.
CAUTION
The device may cause skin irritation.
!

5
Blood pressure notice
■ Blood pressure can be subjected to wide fluctua-
tions in a short period of time as its level depends
on many factors. Usually the level of blood
pressure is lower in summer and higher in winter.
lt can change with atmospheric pressure and if
affected by many factors, e.g. physical work, emo-
tional state, stress, meals, dietary pattern, etc.
■ Different medicines, alcohol and smoking can
exert a large influence on the level of blood pres-
sure. Do not smoke, drink caffeinated beverages
or exercise within the 30 minutes before measur-
ing your blood pressure.
CAUTION
Only a medical practitioner is quali-
fied to interpret your blood pressure
measurements. Use of this Smartband
should not replace regular medical
examinations.
!
6
INTENDED USE
This Smartband is intended for monitoring fitness-
related metrics such as heart-rate, blood pressure,
distance walked or run, calorie consumption,
menstrual cycle tracking and quality of sleep. Data
measured should not be used for any medical,
ambulatory or dietary reference.
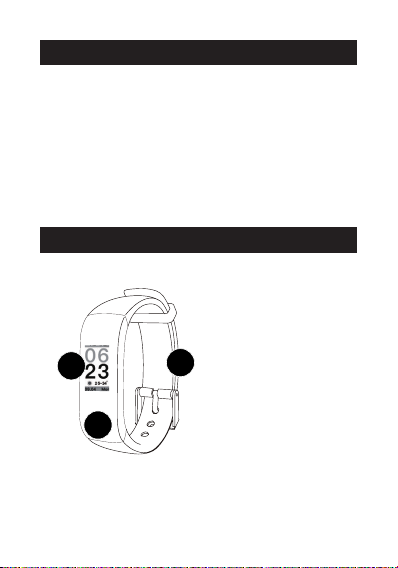
YOUR PRODUCT
11. Bracelet
2. Screen
3. Function key
3
2
7
7. Charging clip
with USB cable
4. Blood pressure sensor
5. Heart rate sensor
6. Charging plates
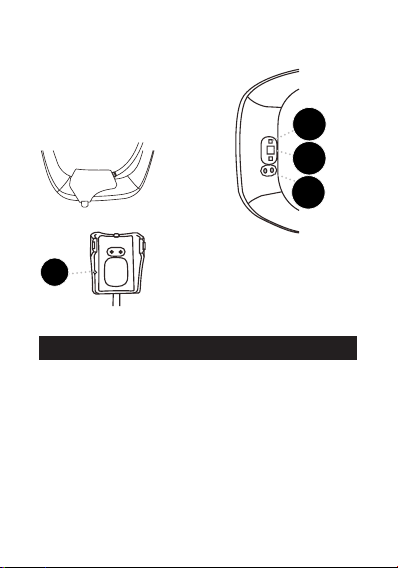
CHARGING
■ Plug the charging cable into the USB port on
your computer or mains charger with 5 V charg-
ing output. Charging range: from 200 mA to 2 A.
■ Connect the charging clip to the charging plates
located on the back of the product. Make sure
the charging plates are aligned with the pins on
the charging cable.
■ Average charging time should take ca. 2 hours.
4
5
6
7
8
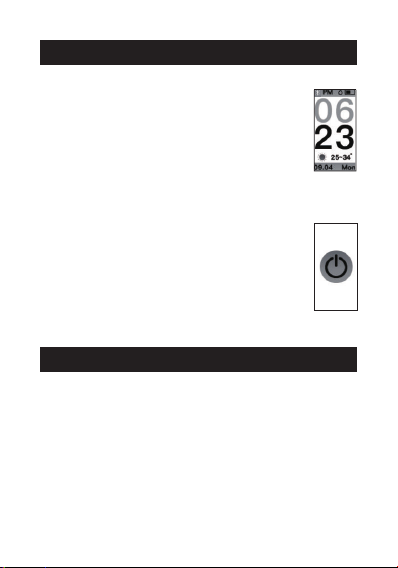
TURNING ON AND OFF
To turn on
■ Press and hold function key for 3
seconds.
■ The Smartband vibrates, turns on and
a main screen with a time and date
is shown.
To turn off
■ Go to the turning off menu as shown.
■ Press and hold function key for 3
seconds.
■ The Smartband vibrates and turns off.
“H BAND” APP
For the best experience download and install the
“H Band” app on the App Store, Google Play or by
scanning the following QR code.

9
App Store Google Play
“H Band” app allows to use additional features,
such as
■ Synchronization of date and time with your
phone
■ Dashboard with overview of all data measured
■ Continuous heart rate and blood pressure mon-
itoring
■ Heart rate alarm
■ Setting personal sport and sleep goals
■ Running tracker with GPS map support
■ Overview of sleeping patterns
■ Notifications for incoming calls, text messages,
Facebook, Twitter, WhatsApp, WeChat, etc.
■ Alarm settings
■ Sedentary settings

10
■ Turn on the Smartband.
■ Activate Bluetooth connection on your phone.
■ Open “H Band” app.
■ Go to “Settings” > “My device” and from the list of
devices select Smartband name to pair with.
■ Once Smartband and Smartphone are paired,
the Bluetooth symbol appears on the date and
time screen.
PAIRING
TIP
You can use “H Band” app by either cre-
ating new user account or by using guest
account. After installing “H Band” app you
may be required to enter user information,
such as height, weight, skin tone, age and
gender. Once Smartband and Smart-
phone are paired, the app automatically
starts data synchronization.
i

11
WAKING UP SCREEN
To preserve battery screen goes off when not in use.
lt wakes up automatically when you turn your wrist
towards you. To disable waking up feature or to set
a specific time frame when it is disabled (e.g. to
stop screen from going on at night) open “H Band”
app and go to “Settings” > “My device” and then
“Turn wrist detection”.
TIP
The time at night can be still checked by
single-tapping function key.
i
TOGGLING THROUGH MENUS
The default or “home” screen is the time and date
screen. Press function key to move to through the
menus.
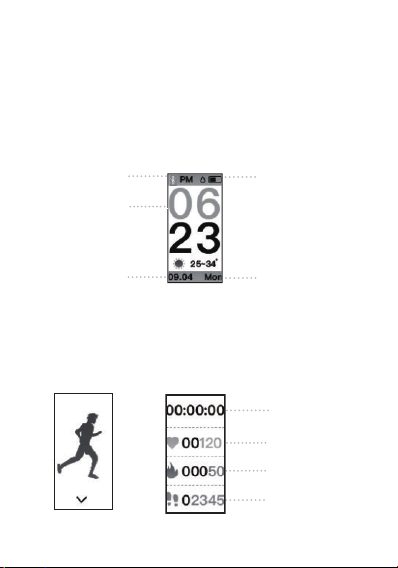
12
1. Time and date screen
Once Smartband and Smartphone are paired,
the time and date is automatically synchronized.
lf the synchronization fails, open “H Band” app,
go to “Dashboard” and swipe the screen down.
2. Sport mode
When in sport menu, press and hold function key
for 3 seconds to enter sport mode.
>
Bluetooth
connection
Current date
Battery level
Current day
Current time
Exercise time
Heart rate
Calories burnt
Steps taken

13
During the exercise, tap an function key to
Pause training session
Resume training session
Exit training session
To confirm the action, press and hold function key
for 3 seconds.
TIP
The heart rate measurements taken in
sport mode are not synchronized with “H
Band”app.
i
3. Pedometer mode
Shows steps taken during the day. The steps will
not be counted if you do not swing your arms
during the walk or exercise session.
4. Distance counter mode
By default, distance walked or run is shown in
kilometres. To change the unit to imperial “foot”,
open “H Band” app and go to “Settings”> “Unit
setting”.

14
5. Calorie count mode
TIP
In order to most accurately count calories
burnt, open “H Band” app and enter user
information, such as height, weight, age
and gender. lt is necessary for determin-
ing your personal *BMI.
i
* Body mass index (BMI) is a measure of body fat
based on your weight in relation to your height
and applies to most adult men and women aged
20 and over.
CAUTION
Data shown are for reference only and
should not be used as any medical or
dietary reference.
!
Steps taken Calories burnt
Distance walked

15
6. Blood pressure monitor
Measures your current blood pressure.
One-time measurements
To make a quick and one time measure-
ment, simply go to blood pressure menu
as show, rest your arm on a table so the
Smartband is at about the same height
as your heart and wait ca. 1 minute.
TIP
One-time measurements are not synchro-
nized with “H Band” app.
i
Regular blood pressure measurements
To save all your blood pressure measurements
made on regular basis, the measurements have to
be initiated from “H Band” app.
To do so
1. Open “H Band” app and go to “Dashboard”,
scroll down and click on icon.
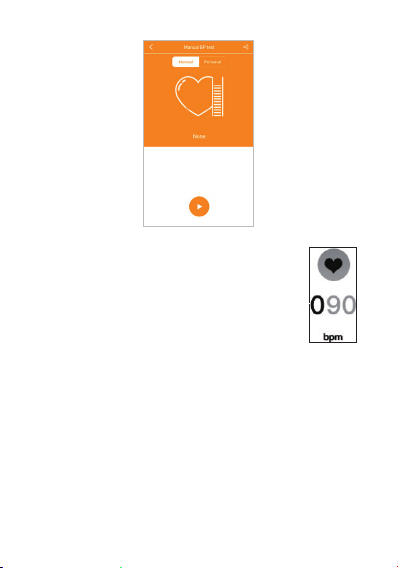
2. Select either “Normal mode” or “Personal
mode”.
3. Start the measurement by pressing the start
key .

16
NOTE
The Smartband automatically monitors
your blood pressure in 1 hour intervals,
then it synchronizes the measured value
with “H Band” app every 1 hour. To turn
an automatic blood pressure monitoring
open “H Band” app and go to “Settings” >
“My device” > “Switch setting” and tap on
“BP automatic monitoring”.
i
TIP
“Personal mode” is recommended for
people suffering from hypertension or hy-
potension. lt allows for more accurate data
benchmarks based on pre-measured per-
sonal blood pressure (in “normal” idle body
mode; so called hypotension). To set your
personal blood pressure go to “Dashboard”
> > “Personal mode” > “Personal BP test
mode setting“ menu.
lt is important to take the blood pressure
readings at the same time each day, such
as morning and evening.
i
17
7. Heart rate monitor
Measures your current heart rate.
To start manual measurement sim-
ply go to heart rate menu as show
and wait ca. 10 seconds.
One-time measurements
Manual measurements from that menu are not
synchronized with “H Band” app. lnstead the
Smartband automatically monitors your heart
rate in 10 minute intervals, then it synchronizes
the measured value with “H Band” app every 30
minutes. To turn on automatic heart rate mon-
itoring open “H Band” app and go to “Settings”
> “My device” > “Switch setting” and tap on “HR
automatic monitoring”.

1818
Regular heart rate measurements
To save all your heart rate measurements made
on regular basis, the measurements have to be
initiated from “H Band” app.
To do so
1. Open “H Band” app and go to “Dashboard”,
scroll down and click on icon.
2. Start the measurement by pressing the start
key .
8. Sleep monitor
Monitor your last sleep times on daily
basis. To view your sleep records, open
“H Band” app and go to “Dashboard” >
“Sleep” menu.
19
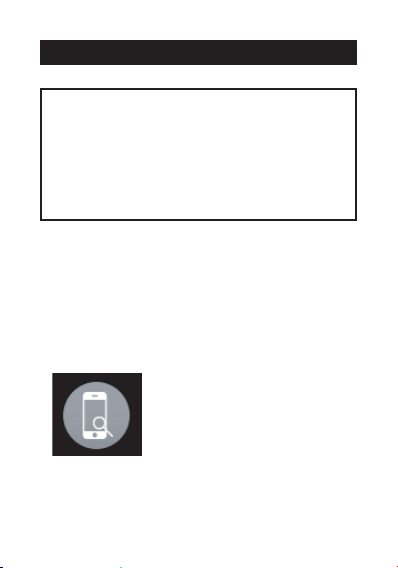
To find lost Smartphone
1. Go to the finding lost Smartphone menu as
shown.
2. Press and hold function key for ca. 4 seconds.
3. lf the Smartphone is within the Bluetooth con-
nection range, it will ring.
FINDING SMARTPHONE
TIP
The “Finding lost phone” feature needs to
be first activated from app settings menu.
Open “H Band” app and go to “Settings” >
“My device” > “Switch setting” menu and
tap on “Find cell phone”.
i
20
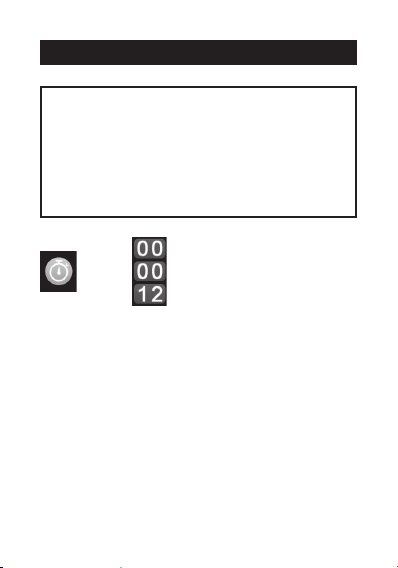
■ When in stopwatch menu as shown, press and
hold function key for ca. 3 seconds to enter stop-
watch mode.
■ Tap function key to start stopwatch and tap again
to pause.
■ Press and hold function key for ca. 3 seconds
again to exit stopwatch mode.
USING STOPWATCH
TIP
The “stopwatch” feature needs to be first
activated from app settings menu. Open
“H Band” app and go to “Settings” > “My
device” > “Switch setting” menu and tap on
“Stopwatch function”.
i
>
Other novasmart Fitness Tracker manuals


