NOVOLUX Viena 569E-L0105B-02 User manual

IP 44/65
Apparecchio adatto al montaggio su superfici normalmente infiammabili - Luminaires suitable for
mounting on normally flammable surfaces - Appareil indiqué pour le montage sur des surfaces
normalement inflammables - Leuchte geeignet zur Montage in normal entflammbaren Flächen - Aparato
apto por el montaje sobre superficies normalmente inflamables - Apparaat geschikt voor de montage
op normaal brandbare oppervlakken - Aparelho apto para a montagem em superfícies normalmente
inflamáveis - Urządzenie nadające się do montażu na powierzchniach normalnie nie palnych
Gruppo di Rischio 1 secondo norma EN 62471: 2008 - Risk Group 1 in accordance with EN 62471:
2008 - Groupe de Risque 1 selon la Norme EN 62471:2008 - Gefahrgruppe 1 nach der Norm EN
62471:2008 - Grupo de riesgo 1 segùn la Norma EN 62471:2008 - Risico groep 1 in conformiteit
Richtlijn EN 62471: 2008 - Grupo de risco 1 de acordo com norma EN 62471: 2008 - Grupa ryzyko 1
zgodnie z norma EN 62471: 2008.
I
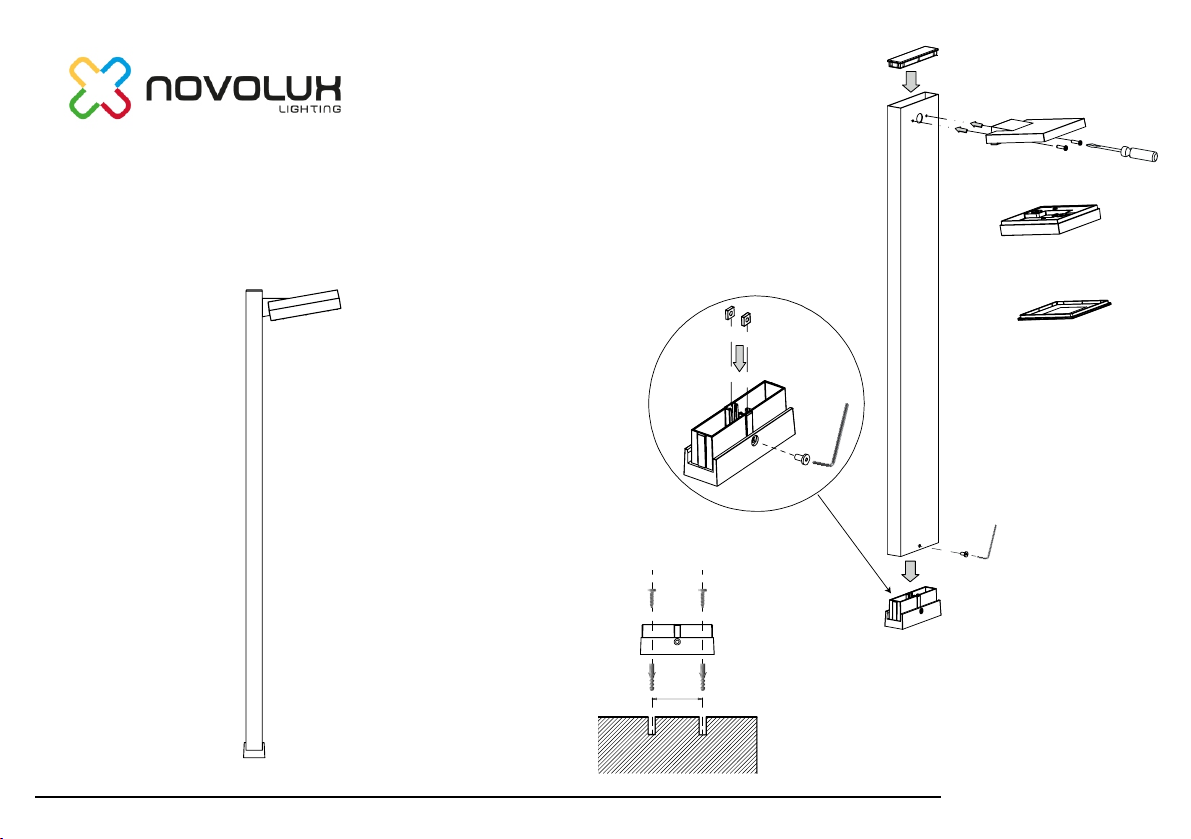
MONTAGGIO pAreTe/plAfONe
Applicazione a parete: vedere fig. 1.
Per collegare l’apparecchio utilizzare un cavo in
gomma H05RN-F, facendolo passare attraverso
il foro A (fig. 2).
Far passare il cavo d’alimentazione attraverso il
pressacavo di gomma e fissarlo sulla base.
Fissare la base a muro (fig. 2-3).
Attenzione a collegare il cavo giallo-verde al
morsetto contrassegnato con il simbolo di
terra
MANUTeNZIONe
Interventi sull’impianto elettrico sono consentiti
solo a personale qualificato legalmente
riconosciuto.
Conservare questo foglio d’istruzioni
Installare/utilizzare il prodotto in modo diverso
da quanto prescritto comporta la perdita
delle caratteristiche tecniche/meccaniche, di
conseguenza il decadimento della garanzia e si
declina ogni responsabilità.
UK
INSTAllATION WAll/CeIlING
Mounting on the wall: see pic. 1.
To connect the fitting use a rubber cable
H05RN-F and let it pass through the hole A
(pic. 2).
Let the supply cable pass through the rubber
grummet, then fix it to the bas
Secure the base to the wall (pic. 2-3).
Pay attention to connect the yellow-green cable
to the terminal block marked with the earth
symbol
MAINTeNANCe
All fittings must be connected by a qualified
electrician.
Keep this instruction sheet.
Installing / using the product other than required
involves the loss of technical / mechanical
features, consequently cancelling the warranty
and we declines all responsibility.
F
INSTAllATION MUr/plAfOND
Application au mur: voir fig. 1.
Pour le branchement de l’appreil employer un
câble en caoutchouc H05RN-F, et le passer à
travers le trou A (fig. 2).
Passer le câble d’alimentation par le presse-
étoupe en caoutchuc, et après le fixer sur la bas
Fixer la base au mur (fig. 2-3).
Faisant attention à brancher le câble jaune et
vert au bornier marquée par le symbole de la
masse
eNTreTIeN
Toute intervention sur l’installation èlectricque
est consentie eulement à des électriciens
qualifiés.
Conserver ce feuillet d’instructions.
Installer/utiliser le produit d’une façon différente
de ce qui est indiqué implique la perte des
caractéristiques techniques/méchaniques et par
conséquent l’annulation de la garantie et nous
décline toute responsabilité.
D
MONTAGe INNeNWäNDe UND DeCke
Montage an der Wand: siehen Sie Bild 1.
Um das Apparat zu verbinden, verwenden Sie
das Gummikabel H05RN-F, indem Sie es durch
das Loch A führen (Bild 2).
Führen Sie das stromversorgende Kabel durch
den Gummischlauch, dann befestigen Sie es an
der Grundplatte.
Befestigen Sie den Sockel an der Wand (Bild
2-3).
Indem Sie achtgeben, daß das gelbe-grüne
Kabel zur Klemme verbunden wird, die mit dem
Symbol der Erdung kenngezeichnet ist
WArTUNG
Eingriffe in die Elektroanlage ist nur rechtlich
qualifiziertem Fachpersonal erlaubt.
Anleitung aufheben.
Installieren/Benutzen Sie das Produkt anders
als verschrieben Beinhaltet den Verlust von
technischen/mechanischen Eigenschaften,
damit die Garantie erlischtund wir lehnt jede
Verantwortung.
E
MONTAJe pAreD/TeCHO
Aplicaciòn a pared (véase fig. 1)
Para conectar el aparato, utilizar un cable da
caucho H05RN-F, haciéndolo pasar a través del
orificio A (fig. 2).
Hacer pasar el cable de alimentaciòn a través
del presancable de caucho y fijarlo sobre la
base.
Asegurar la base a la pared (fig. 2-3).
Poniendo atenciòn en conectar el cable
amarillo-verde al borne marcado con el simbolo
de tierra
MANTeNIMIeNTO
Está permitido intervenir sobre la instalación
eléctrica solamente a personal competente
legalmente reconocido.
Instalar/usar el producto que no sea como
prescrito implica la pérdida de las características
técnicas/mecánicas, por tanto se invalida la
garantía y que declina toda responsabilidad.
NL
MONTAGe WAND / plAfOND
Op de wand aanbrengen: zie fig. 1.
Om het apparaat aan te sluiten con rubber snoer
H05RN-F gebruiken en dit door gat A laten
lopen (fig. 2).
Het eletrische snoer door de rubber kabelpere
laten lopen en aan de basis vastzetten.
Bevestig de basis aan de muur (fig. 2-3).
En erop letten het geel-groene snoer aan de met
het aardingssymbool gekenmerkte klem te
bevestigen
ONDerHOUD
Het is alleen aan wettelijk erkend, gekwalificeerd
personeel toegestaan aan de electrische
installatie te werken.
Dit instructieblad bewaren.
Installeer/gebruik het product op andere wijze
dan voorgeschreven, betrekt het verlies van
technische/mechanische eigenschappen, dan
vervalt de garantie en wij niet aansprakelijk
gesteld worden.
P
INSTAlACION pAreDe/plAfONe
Montaje a pared: ver fig. 1.
Para conectar el aparato, utilizar un cable de
goma H05RN-F, pasandolo a traves del agujero
A (fig. 2).
Pasar el cable de alimentaciòn a traves del
manguito de goma y fijarlo a la base.
Fixar a base à parede (fig. 2-3).
Ponendo atenciòn a conectar el cable amarillo
y verde a la regleta de conexiòn contraseñada
con el sìmbolo de tierra
MANUTeNÇÃO
Todas as ligações eléctricas devem ser
efectuadas apenas por pessoas qualificadas e
legalmente reconhecidas.
Conservar esta folha de instruções.
Instalar/utilizar o produto de forma
diferente, como prescrito envolve a perda
de características técnicas/mecânica,
conseqüentemente invalidam a garantia e que
declina qualquer responsabilidade.
PL
WALL INSTALACJA / SUFITOWY
Montaż na ścianie: patrz pic. 1.
Aby podłączyć łącznik do wykorzystania
gumowy przewód H05RN-F i niech przechodzi
przez otwór (rys. 2).
Przepuścić kabla zasilającego przez Grummet
gumy, a następnie przymocować go do bas
Przykręć podstawę do ściany (rys. 2-3).
Należy zwrócić uwagę na podłączenie żółto-
zielony przewód do zacisku oznaczonego
symbolem ziemi
KONSERWACJA
Interwencje na instalacji elektrycznej są
dozwolone tylko dla autoryzowanego
wykwalifikowanego personelu
Przechowywać niniejszą instrukcję użytkowania.
Zainstalować/używać produktu, inne niż
przepisywany wiąże się z utratą właściwości
techniczne/mechaniczne, aw konsekwencji
utratę gwarancji i nie ponosi żadnej
odpowiedzialności.
ARTICOLO
ITEM
ARTICLE
ARTIKEL
ARTICULO
ARTIKEL
ARTIGO
ARTYKUŁ
TENSIONE
VOLTAGE
TENSION
SPANNUNG
TENSION
SPANNING
TENSÃO
NAPIĘCIE
TIPO E POTENZA DI LAMPADA
TYPE AND POWER OF BULB
TYPE ET PUISSANCE DEL’AMPOULE
TYP UND LAMPENSTÄRKE
TIPO E POTENCIA DE LA LAMPARA
LAMPTYPE EN VERMOGEN
TIPO E POTÊNCIA DE LÂMPADA
RODZAJ I MOC LAMPY
220/240 V
LED 4,3 W
Ip 65
Ip 44
CLASSE I
CLASS I KLASSE I
CLASE I KLASA I
ATTENZIONE, rischio di scossa elettrica - CAUTION, risk of electric shock - ATTENTION , risque de
choc électrique. - VORSICHT, Stromsschlaggefahr - CUIdAdO , riesgo de descarga eléctrica. - LET
OP, het risico van een elektrische schok - CUIdAdO, risco de choque elétrico - UWAGA, ryzyko
porażenia prądem
569E-L0105B-02
569E-L0105B-90

32 mm
69 mm
Rondella in metallo
Metal washer
Rondelle en métal
Metallscheibe
Arandela en metal
Metalen ring
Arruela de metal
Podkładka metalowa
Rondella in gomma
Rubber washer
Rondelle en caoutchouc
Kunststoffscheibe
Arandela en goma
Rubberen ring
Arruela de borracha
Podkładka gumowa
Anello decorativo
Decorative ring
Anneau décoratif
Dekoring
Anillo decorativo
Decoratieve ring
Anel decorativo
Pierścień dekoracyjny
N. 12 punti di pressione
N. 12 pressure points.
N. 12 points de pression
12 Stk Druckpunkte
N. 12 puntos de presiòn
N. 12 drukpunten
N. 12 pontos de pressão
N. 12 punktów nacisku
B
B
A
SeqUeNZA DI CHIUSUrA
ClOSING SeqUeNCe
SéqUeNCe De ferMeTUre
SCHlIeSSfOlGe
SeCUeNCIA De CIerre
SlUITvOlGOrDereGelING
feCHO
Zamknięcie sekwencji
Schiacciare lo schermo nella sequenza illustrata facendo pressione in tutti i
punti evidenziati
Insert the screen as from the picture, pushing at all the specific points
Insérer l’écran comme dans la séquence illustrée, faisant pression à tous les
points mis en évidence
Zerquetschen den Bildschirm in der Sequenz durch Anwenden von Druck an
allen Punkten markiert dargestellten
Insertar el difusor como en la secuencia ilustrada, presionando a en todos los
puntos marcados
Plet het scherm in de volgorde geïllustreerd door druk op alle punten
gemarkeerd
Esmagar a tela na seqüência ilustrada pela aplicação de pressão em todos os
pontos destacados
Włóż ekran z obrazka, spychając na konkretnych punktach
Crush ekran w kolejności przedstawionej przez przyłożenie ciśnienia we
wszystkich punktach wyróżnionych
x 2
NB: Assicurarsi che tutti gli incastri siano chiusi – Make sure that all joints
are closed – Assurez-vous que tous les joints sont fermés – Stellen Sie
sicher, dass alle Fugen geschlossen sind – Asegúrese de que todas las
juntas están cerrados – Zorg ervoor dat alle verbindingen zijn gesloten
– Certifique-se de que todas as juntas estão fechados – Upewnij się, że
wszystkie połączenia są zamknięte -
1
2
3
4

Max 1,2 Nm
75 mm
x 2
This manual suits for next models
1


