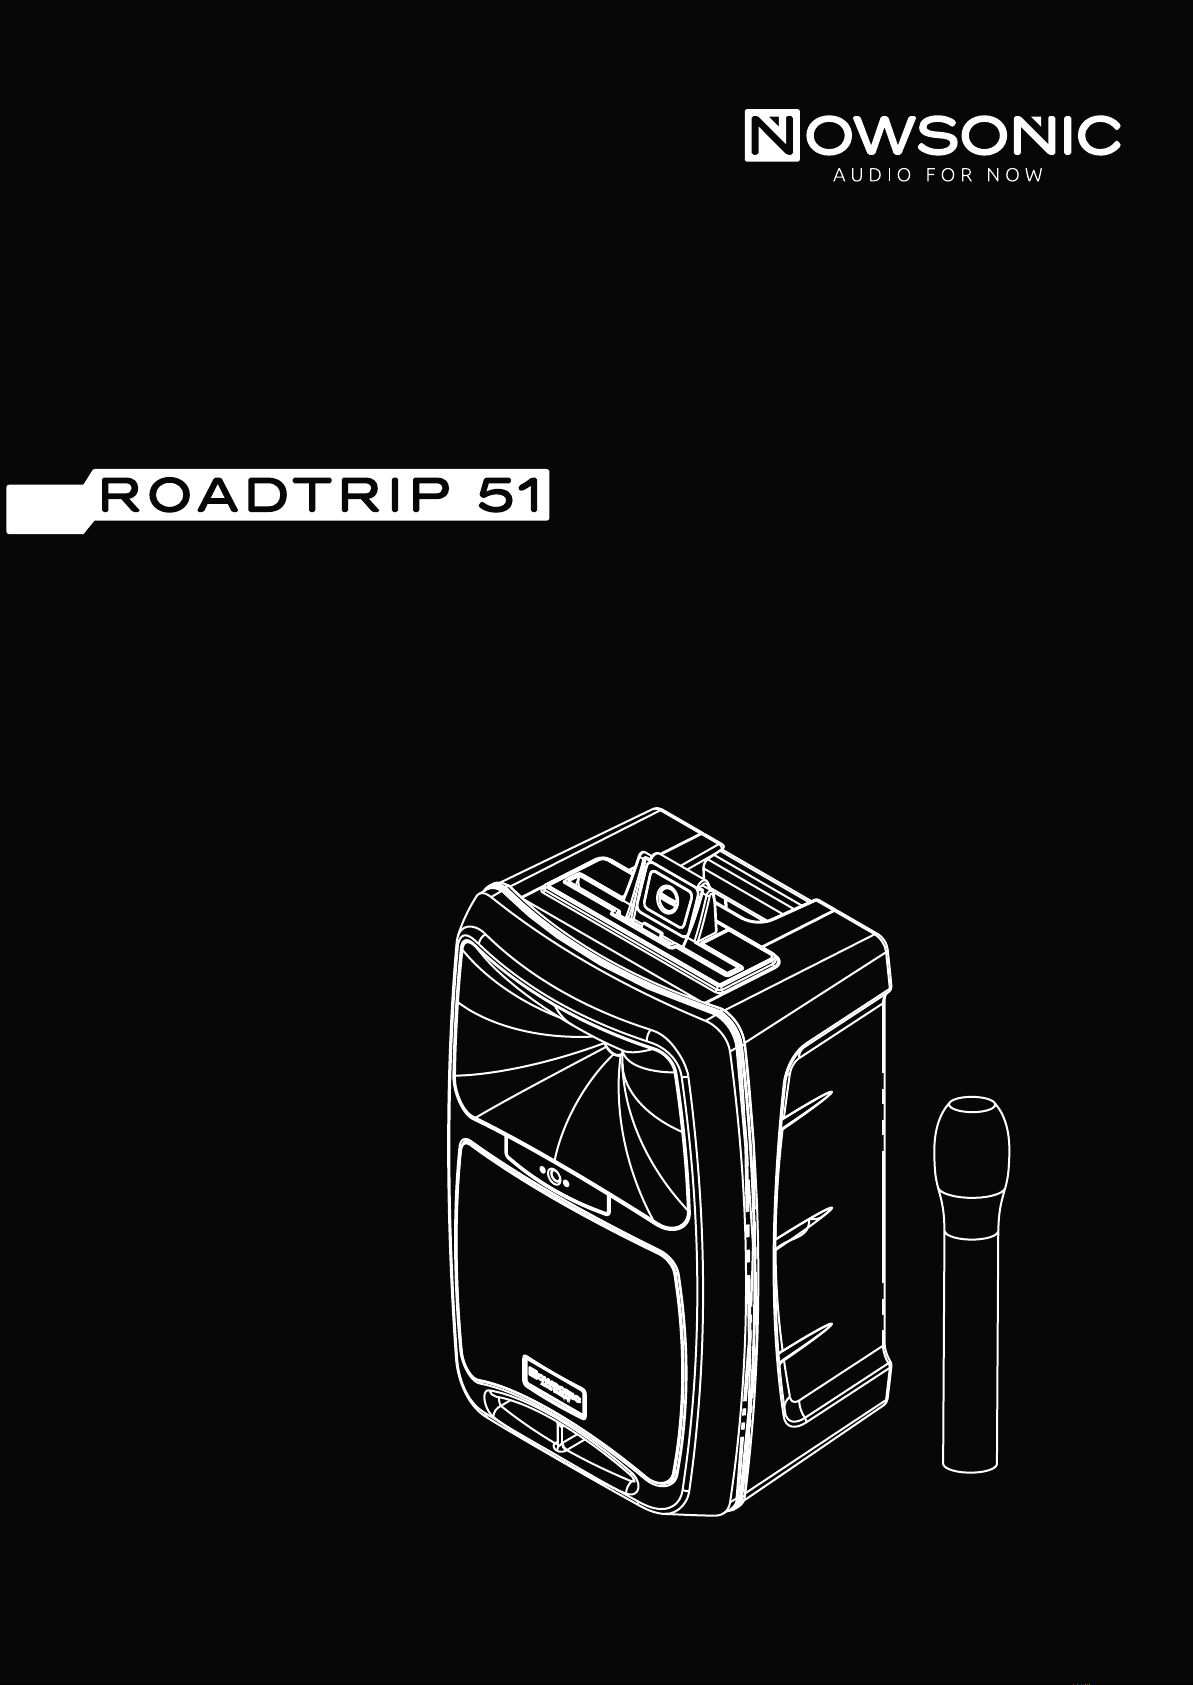
Nowsonic ROADTRIP 51 User manual
C
www.nowsonic.com
Mobile PA-System
User manual
Bedienungsanleitung
Mode d‘emploi
Instrucciones de uso
Instrukcja obsługi

User manual 4
Bedienungsanleitung 11
Mode d‘emploi 18
Instrucciones de uso 25
Podręcznik użytkownika 32
Block diagram 39
Blockschaltbild
Schéma synoptique
Diagrama de bloques
Blokowy schemat połączeń

4
www.nowsonic.com
ROADTRIP 51
User manual
GB
1) Read these instructions.
2) Keep these instructions.
3) Heed all warnings.
4) Follow all instructions.
5) Do not use this apparatus near water.
6) Clean only with dry cloth.
7) Do not block any of the ventilation openings! Install in accordance
with the manufacturer’s instructions.
8) Do not install near any heat sources such as radiators, heat regis-
ters, stoves, or other apparatus (including amplifiers) that produce
heat.
9) Do not defeat the safety purpose of the polarized or grounding-
type plug. A polarized plug has two blades with one wider than
the other. A grounding type plug has two blades and a third
grounding prong. The wide blade or the third prong is provided
for your safety. If the provided plug does not fit into your outlet,
consult an electrician for replacement of the obsolete outlet.
10) Protect the power cord from being walked on or pinched, par-
ticularly at plugs, convenience receptacles, and the point where
they exit from the apparatus.
11) Only use attachments/accessories specified by the manufacturer.
12) Use only with a cart, stand, tripod, bracket, or
table specified by the manufacturer, or sold with
the apparatus. When a cart is used, use caution
when moving the cart/apparatus combination to
avoid injury from tip-over.
13) Unplug this apparatus during lightning storms or when unused
for long periods of time.
14) Refer all servicing to qualified service personnel. Servicing is
required when the apparatus has been damaged in any way, such
as power-supply cord or plug is damaged, liquid has been spilled
or objects have fallen into the apparatus, the apparatus has been
exposed to rain or moisture, does not operate normally, or has
been dropped.
WARNiNG:
To reduce the risk of fire or electric shock, do not expose this appara-
tus to rain or moisture.
Do not expose this equipment to dripping or splashing and ensure
that no objects filled with liquids, such as vases, are placed on the
equipment.
This apparatus must be earthed.
Use a three-wire grounding type line cord like the one supplied with
the product.
Be advised that different operating voltages require the use of diffe-
rent types of line cord and attachment plugs.
Always observe the local safety regulations. Ensure that the factory-
set power requirements for the device (refer to the label on the rear
panel) corresponds to the mains supply in your region.
This equipment should be installed near the socket outlet and discon-
nection of the device should be easily accessible.
To completely disconnect this equipment from the AC Mains, discon-
nect the power supply cord plug from the AC receptacle.
Please follow all instructions of the manufacturer for installation.
Do not install in a confined space.
Do not open the unit - risk of electric shock.
CAUTION!
Please note: Changes or modifications to the device not expressly
approved in this manual could void your authority to operate the
instrument.
The powered speaker system Roadtrip 51 is capable of generating sound
pressure levels (SPL) sufficient to cause permanent hearing damage.
Caution should be taken to avoid prolonged exposure to SPL in excess
of 90 dB.
Servicing
There are no user-serviceable parts inside.
All service must be performed by qualified personnel.
CAUTION: TO REDUCE THE RISK OF ELECTRIC SHOCK, DO NOT
REMOVE THE COVER. NO USER SERVICEABLE PARTS INSIDE.
REFER SERVICING TO QUALIFIED PERSONNEL ONLY.
Warning: To reduce the risk of fire or electric shock, do not
expose the device to rain or moisture.
IMPORTANT SAFETY INSTRUCTIONS
The lightning flash with an arrowhead symbol within an equi-
lateral triangle is intended to alert the user to the presence of
uninsulated“dangerous voltage”within the product’s enclosu-
re that may be of sufficient magnitude to constitute a risk of
electric shock to persons.
The exclamation point within an equilateral triangle is inten-
ded to alert the user to the presence of important operating
and maintenance(servicing) instructions in the literature
accompanying the product.

5
www.nowsonic.com
Contents
IMPORTANT SAFETY INSTRUCTIONS
Introduction
Features
Application
Features and Startup
UHF wireless section
Bluetooth section
Microphone / instrument section
Line In section
Master section
Information on battery operation
Connection examples
Specifications
Scope of supply
Disclaimer
Servicing
Legal information
Introduction
Thank you very much for purchasing the Nowsonic Roadtrip 51! Roadt-
rip 51 is an extremely compact and portable sound system with an in-
tegrated 4 channel mixer that can also be powered via internal battery
modules instead of the mains supply. The audio sources for the mi-
xer are the supplied UHF wireless microphone, the internal Bluetooth
receiver, a stereo line device and a mono feed like a microphone or
instrument.
Roadtrip 51 is equipped with an UHF receiver that is perfectly mat-
ched to the supplied UHF wireless microphone. In addition, Roadtrip
51 integrates a Bluetooth receiver for wireless reception of audio data
from any external Bluetooth devices like an iPhone, iPad, or Android
smartphone. A microphone or an instrument can be connected as well
as a stereo source via two RCA sockets and amplified via the internal
high-efficiency class D amplifier and the speaker. Thanks to the built-
in battery modules you can use Roadtrip 51 for sound reinforcement
even when no power supply is available. The enclosure is made of
rugged ABS plastic and features a metal grille on the front to protect
the 8“ full range speaker.
Whether you are a musician looking for a compact solution for small
gigs or a portable amplifier for presentation or educational applica-
tions – Roadtrip 51 is always the right choice.
Please take your time to read these instructions carefully in order to
operate Roadtrip 51 properly.
Please check the unit after unpacking for any damages. In case the
housing is visibly damaged, please do not operate the unit, but con-
tact your local dealer from whom you have purchased it.
Roadtrip 51 has the following features
Portable amplifier/speaker configuration with a maximum power of
80 watts
UHF handheld microphone included, ISM frequency: 863 MHz
Wireless receiver integrated to the Mixer section
TALKOVER feature for microphone applications
Built-in Bluetooth receiver for receiving audio data from an external
device
Stereo input channel for connecting an iPod or CD player
Separate volume control for the UHF, Bluetooth, microphone/instru-
ment and line input sections
Master volume control
Rechargeable battery with 2 x 12V 4AH
Up to 12 hours of operation with 75% power
Internal class D amplifier module with 80 watts
Rugged ABS plastic enclosure
8”full range speaker
Roadtrip 51 is recommended for the following applications
sound reinforcement for small concerts as a powered FOH system
sound reinforcement for lectures, parties and celebrations
portable sound system for educational purposes—thanks to the
built-in battery module even when no power supply is available
ROADTRIP 51
User manual
GB
6
www.nowsonic.com
Features and Startup
Roadtrip 51 is a self-contained system that is to say that the mixer, the
class D amplifier as well as the 8“ speaker are installed in a common
enclosure. Roadtrip 51 is ready for use straight from the box.
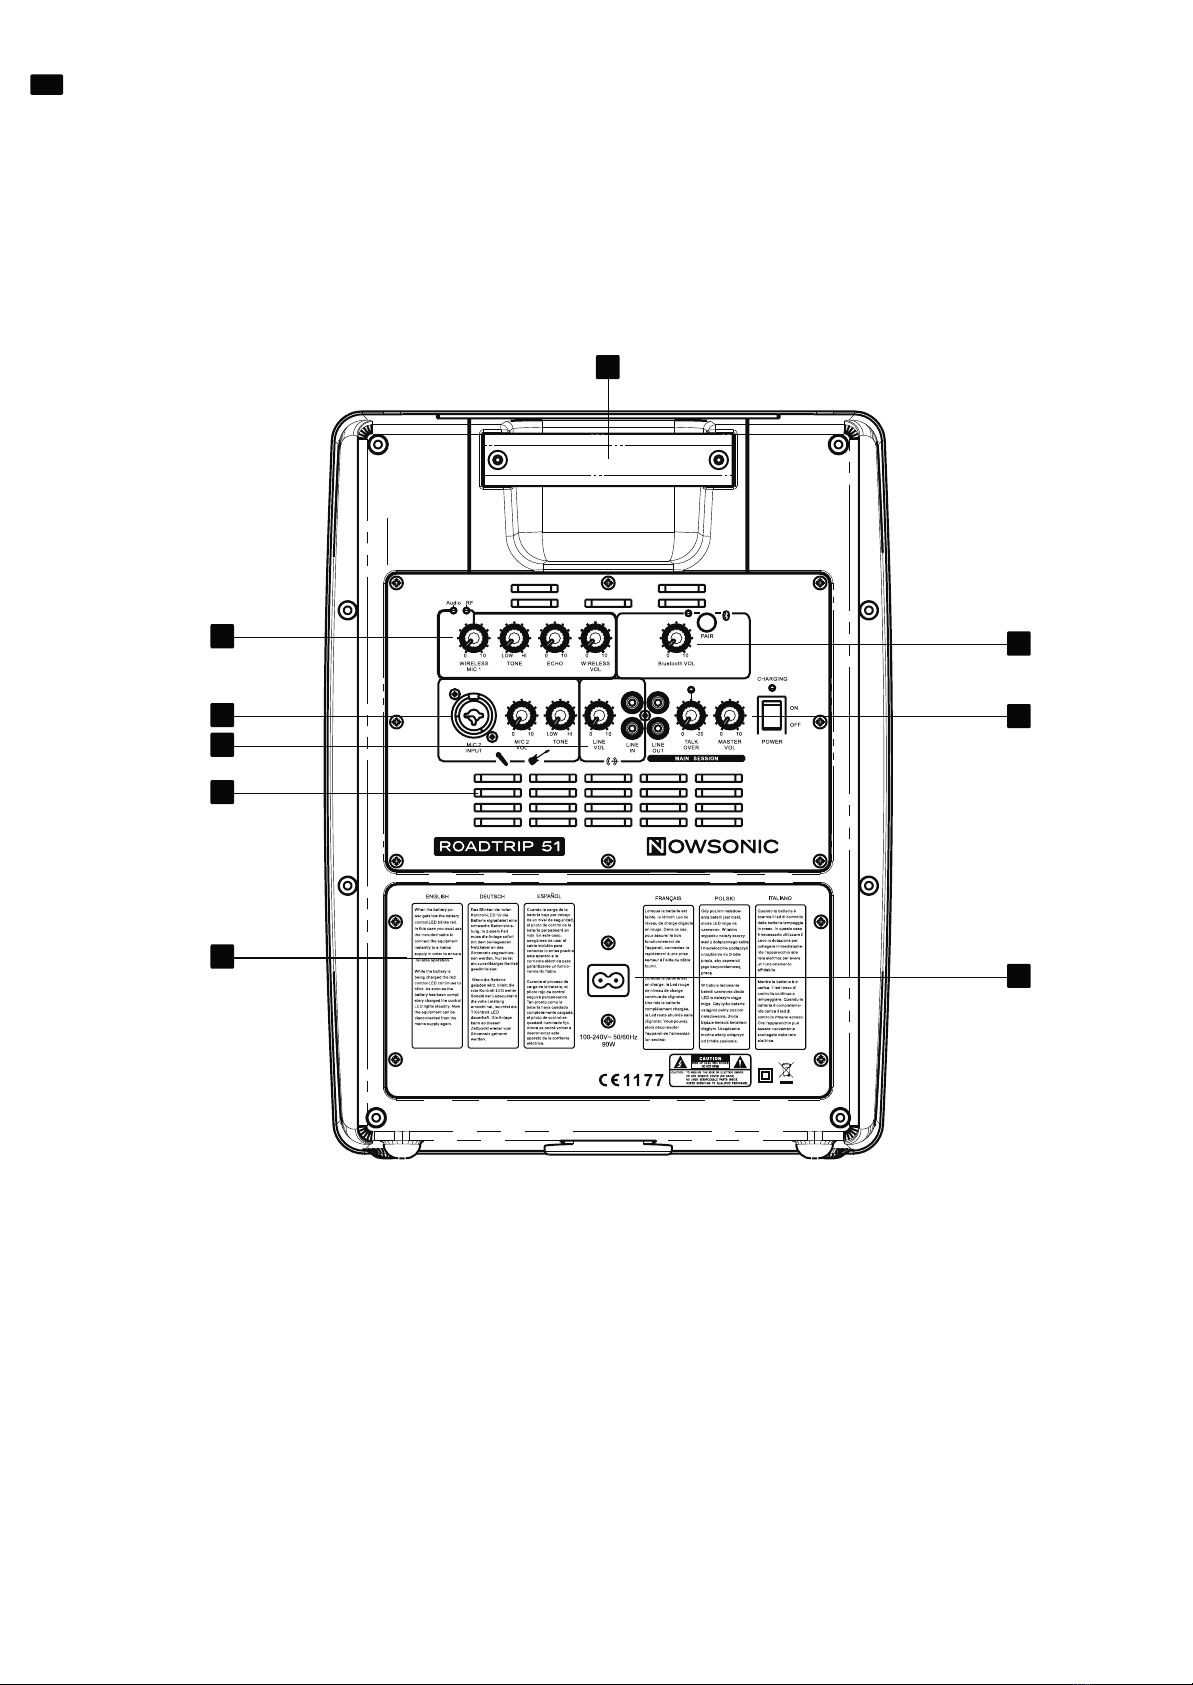
All sockets for the external sources and the microphones/instruments
as well as the mains socket and the power switch are located on the
rear of Roadtrip 51.
1) EZ Grip handle
2) Bluetooth section
3) UHF wireless section
4) Microphone / instrument section (mono)
5) Line In section (stereo)
6) ventilation openings
7) Battery compartment
8) mains socket (100 to 240 VAC, 50/60Hz)
9) Master section
On the bottom of Roadtrip 51 you will find a standard pole holder
(35mm) for installation on a speaker stand (not included).
NOTE: If Roadtrip 51 is installed on a speaker stand, please make sure
that the stand is stable and cannot tip over.
ROADTRIP 51
User manual
GB
1
32
9
8
4
5
6
7

8
7
7
www.nowsonic.com
UHF-wireless-section
Roadtrip 51 is supplied with a handheld microphone for wireless opera-
tion. The handheld transmitter operates in the UHF range at the ISM fre-
quency 863 Mhz and is perfectly tuned to the UHF receiver of Roadtrip 51.
The transmitter in the wireless microphone is supplied via two 1,5V bat-
teries (type AA). To extend the life and capacity of the battery, turn off the
wireless microphone via the ON / OFF switch when you do not use it.
However, when the batteries are exhausted, replace them with standard
type AA or rechargeable batteries. Proceed as follows:
1) Remove the transmitter at the bottom of the microphone.
2) Remove the exhausted batteries.
3) Insert the new batteries: Please take care of connecting the battery
terminals correctly.
4) Reattach the transmitter at the base of the microphone.
When you turn on the microphone via the ON / OFF switch, the Roadtrip
51 UHF receiver automatically connects to the wireless handheld trans-
mitter. Now the RF LED (2) in the UHF section lights up: The AUDIO LED
(1) shows that the wireless microphone transmits an audio signal.
NOTE: If the RF LED (2) does not light, the receiver is actually not connec-
ted. Reduce the distance between the wireless microphone and Roadt-
rip 51 and make sure that the transmission is not blocked by any objects.
Also make sure that the internal batteries of the wireless microphone are
not exhausted.
With the WIRELESS MIC 1 control (3) you adjust the gain of the UHF wirel-
ess microphone. Turning the knob clockwise increases the gain.
With the TONE control (4) you can easily alter the sound of the wireless
microphone: Turn the knob counterclockwise to attenuate the high fre-
quencies and to emphasize the lows. Turn the knob clockwise to em-
phasize the high frequencies and to attenuate the lows. With the ECHO
control (5) you can set the volume of an internal delay effect: Turning
the knob clockwise increases the level of the delay effect relative to the
microphone signal. The WIRELESS VOL control (6) adjusts the volume of
the UHF receiver in the Master section.
Bluetooth-section
Roadtrip 51 is equipped with a Bluetooth receiver for wireless reception
of audio data from any external devices like laptops and smartphones.
Before Roadtrip 51 can receive any data, you must pair the devices.
Proceed as follows:
1) Place the external Bluetooth-enabled device next to Roadtrip 51
(<10m).
2) Press and hold the PAIR button (8) for about 10 seconds.
3) Next, enter the Roadtrip 51 password in the other device to pair
both devices. The password is preset to„0000“.
Now Roadtrip 51 can pair with the external device. As soon as the con-
nection is established, the LED next to the PAIR button permanently
lights green.
Now you can set the volume of the Bluetooth device in the Master sec-
tion with the BLUETOOTH VOL control (7).
In order to terminate the connection, press the PAIR button (8) again:
The LED goes out and Roadtrip 51 is no longer receiving data from the
external Bluetooth device.
NOTE: Roadtrip 51 can only be paired with a single Bluetooth device at
the same time. The distance from the Bluetooth source must not exceed
10 meters. If no connection can be established, reduce the distance and
try again. The transport functions are controlled via the external Blue-
tooth device.
ROADTRIP 51
User manual
GB
1
3 4 5 6
2
8
www.nowsonic.com
Microphone / instrument section (mono)
The microphone / instrument section of Roadtrip 51 serves for connec-
ting a wired microphone, an instrument, or a monophonic line device.
This section has the MIC 2 INPUT Combo socket (1) that can be connec-
ted with either a balanced XLR or an unbalanced 1/4“ TS cable.
NOTE: The XLR connectors of the Combo socket do not provide phan-
tom power. Therefore you can connect only dynamic or self powered
condenser microphones.
With the MIC 2 VOL (2) control you can adjust the level of the connected
source in the Master section.With theTONE control (3) you can easily alter
the sound of the connected source: Turn the knob counterclockwise to
attenuate the high frequencies and to emphasize the lows.Turn the knob
clockwise to emphasize the high frequencies and to attenuate the lows.
Line-In-section
This section serves for connecting an external stereo device with line
level (e.g. a CD player or even a keyboard).
Connect the external device to the LINE IN sockets (5) using RCA cables.
Next adjust the volume of the connected source in the Master section
using the LINE VOL (4) control.
Master-section
In the Master section you turn Roadtrip 51 on and off and set the level
of the stereo buss that is sent to the internal class D amplifier and the 8“
full range speaker.
The LINE OUT (6) RCA outputs allow for tapping the signal in the stereo
buss before the MASTER VOL (8) and the class D amplifier. Via these out-
puts you can feed the stereo signal of Roadtrip 51 to a subsequent mixer,
a recording device (e.g. a MD recorder) or to another Roadtrip 51.
With the TALKOVER control (7) you can set an attenuation (0 to -20dB) for
signals from the Bluetooth and line sections: the signals are attenuated
by this amount when the UHF receiver receives a signal from the wirel-
ess microphone or a microphone / instrument signal is present in the
microphone / line section. Thanks to this auto mix function microphone
announcements are transmitted with high intelligibility over the back-
ground music.
The MASTERVOL knob (8) controls the level of the stereo buss that is sent
to the internal amplifier and the 8“ full range speaker. Turning the knob
clockwise increases the gain.
Finally, use the POWER switch (9) to turn Roadtrip 51 on or off. In order to
avoid any damages to the internal speaker, first turn down the MASTER
VOL control (8).
NOTE: The internal battery of Roadtrip 51 is only charged when the PO-
WER switch is set to ON.The battery will not be charged when the power
cord is connected, but Roadtrip is not turned on.
ROADTRIP 51
User manual
GB
176
28
39
4
5

9
www.nowsonic.com
ROADTRIP 51
User manual
GB
Operation
Roadtrip 51 is ready for use straight from the box when powering it via
the mains supply. For battery operation Roadtrip must first be charged
for at least 8 hours. After this charging time, the internal battery modu-
les reach their maximum capacity. Next, proceed as follows:
1) Next connect your external sources like a microphone or instrument
and/or a stereo line source with the Combo and RCA inputs on the
rear of Roadtrip 51. Please note that the input cables are not supplied
with the unit.
2) If required, pair Roadtrip 51 with an external Bluetooth device.
3) Turn on the UHF wireless microphone if necessary.
4) Connect the supplied power cord to the mains. Finally, use the
POWER switch to turn Roadtrip 51 on or off.
NOTE: Before you turn on or off Roadtrip 51, make sure to completely
pull down the MASTER VOL control to avoid any damages to the inter-
nal speaker due to turn-on/off pulses.
Information on battery operation
You can operate Roadtrip 51 while it is powered either by the mains
supply or the internal battery modules. When Roadtrip is connected to
the mains supply, the battery modules are automatically charged. The
CHARGING LED informs you about the current charging status:
If the battery modules are charging, the CHARGING LED flashes.
If the battery modules are fully charged, the CHARGING LED is
constantly lit.
Before operating Roadtrip 51 with batteries for the first time, you have
to charge the device for at least 48 hours: this will optimize the charging
capacity and extends the battery‘s life.
If the capacity of the internal battery modules is too low, Roadtrip 51
automatically switches off. In this case connect Roadtrip 51 to the mains
supply using the supplied power cord.
The battery modules may not be fully discharged. When not using your
sound system for a longer period, please fully charge the batteries befo-
re. Roadtrip 51 must never be left in a discharged state for a long time.
NOTE: When Roadtrip 51 has not been used for 2 months, please con-
nect it to the AC mains to charge the battery for at least 8 hours. The
battery shall not be exposed to excessive heat. Avoid direct sunlight and
do not operate Roadtrip 51 next to any heat sources.
WARNING!
Please do not attempt to open the back cover or power adapter
as opening or removing the covers may expose you to dangerous
voltage or other hazards. In addition, this will void the warranty.
There are no user serviceable parts inside.
10
www.nowsonic.com
ROADTRIP 51
User manual
GB
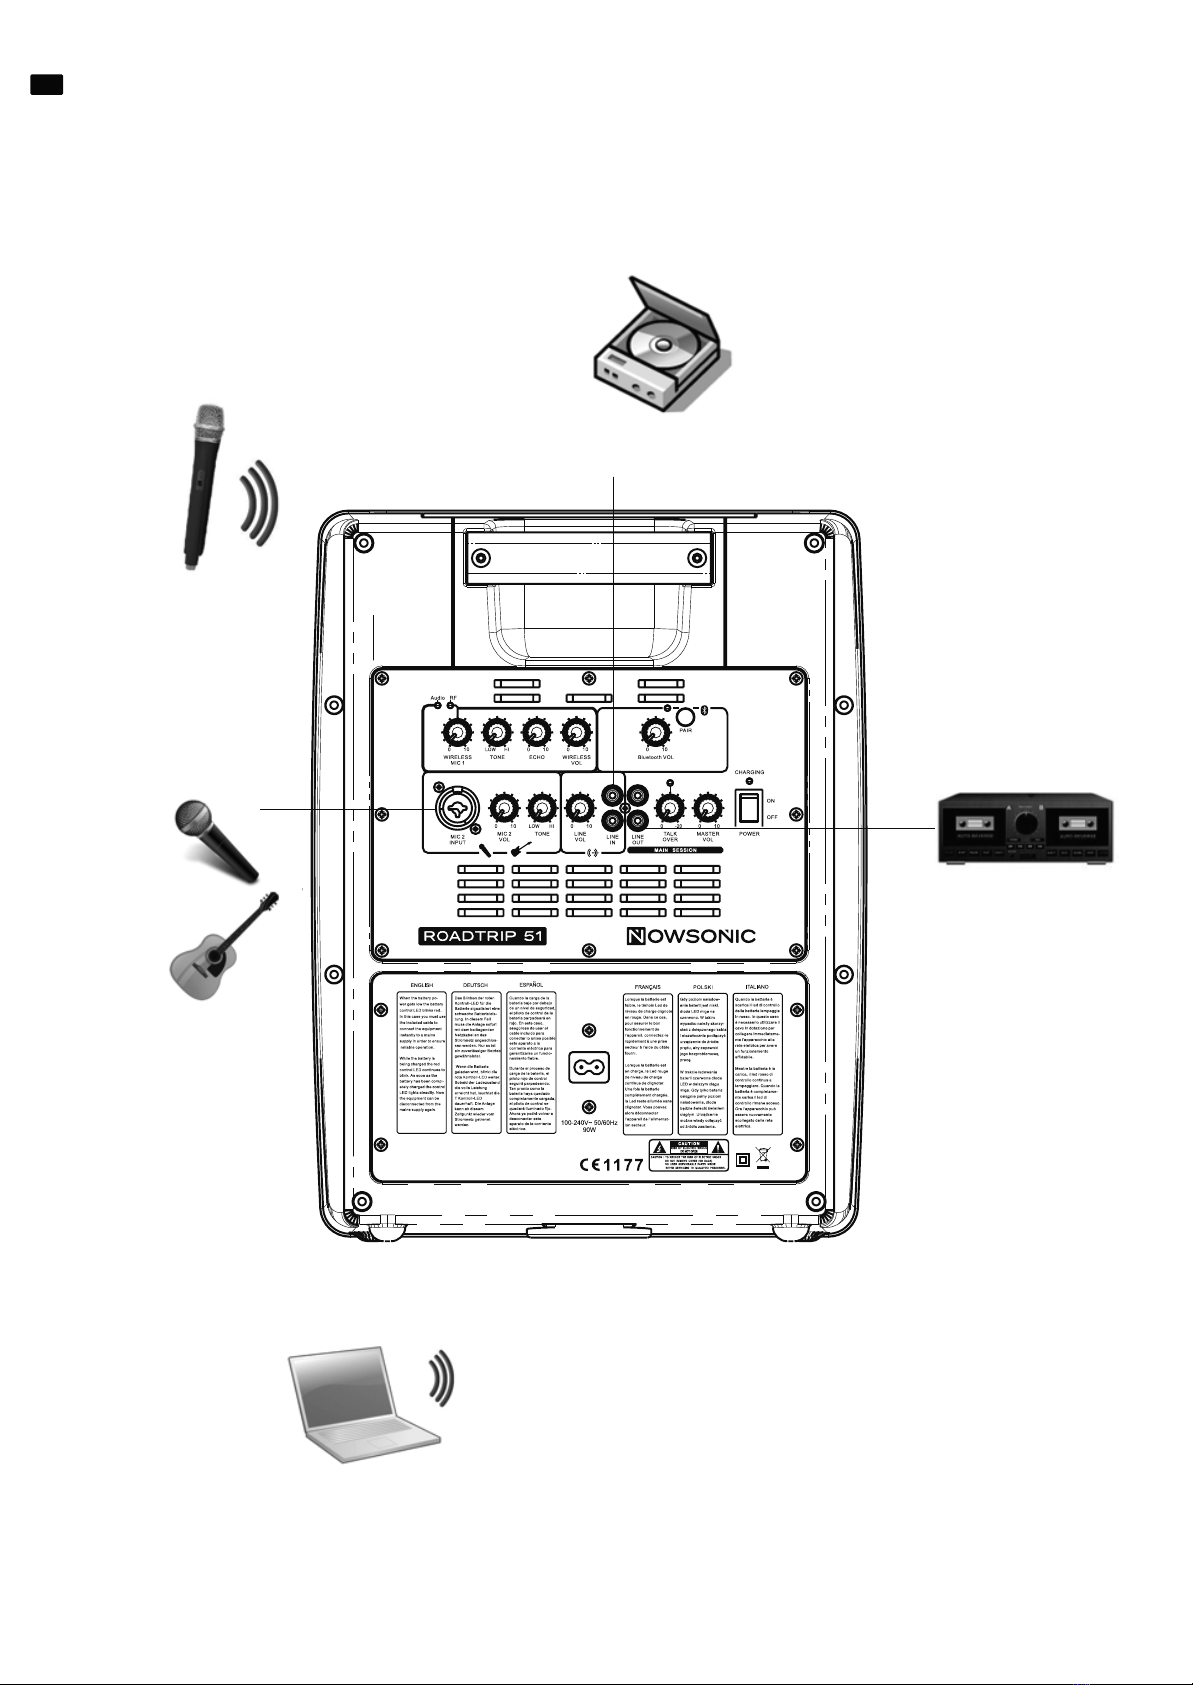
Connection examples
Tape recorder or other
recording device
External Bluetooth device
(e.g. laptop or smartphone)
UHF wireless
microphone
wired microphone
or guitar
CD Player

11
www.nowsonic.com ROADTRIP 51
User manual
GB
Specications
Speaker: 8“ full range, 8 ohm
Maximum output: 32 watts (with storage battery and
power supplied cell, THD = 1%)
50 watts (AC power consumption,
THD = 1%)
Receiver: UHF
ISM frequency band: 863Mhz
Polar pattern: cardioid (supplied wireless microphone)
THD: ≤ 0.5 %
Frequency response: 30 Hz – 20KHz
SNR: ≥ 80dB
Input sensitivity: 500 mV (line source)
10 mV (microphone)
Bluetooth password: 0000 (default)
Battery: 2 x 12V 4AH, rechargeable
Material: ABS plastic, metal grille
Handle: 1 x on the top
Power supply: 100 - 230VAC, 50/60Hz
Power consumption: 60 watts
Dimensions: 256 x 308 x 458mm
Weight: 12.3 kg
Scope of supply
Roadtrip 51: 1 pc
Power cord: 1 pc
Wireless microphone: 1 pc
Disclaimer
Nowsonic has taken all possible steps to ensure that the information
given here is both correct and complete.
In no event can Nowsonic accept any liability or responsibility for any
loss or damage to the owner of the equipment, any third party, or any
equipment which may result from use of this manual or the equip-
ment which it describes.
Servicing
If you have any question or encounter technical issues with your
Roadtrip 51, please first contact your local dealer from whom you have
purchased the device.
In case servicing is required, please contact your local dealer. Other-
wise you may contact us directly. Please find our contact data on our
website under www.nowsonic.com.
Bei einem Service-Fall wenden Sie sich bitte ebenfalls an Ihren lokalen
Händler. Andernfalls können Sie uns auch direkt kontaktieren. Sie finden
unsere Kontaktdaten auf unserer Webseite unter www.nowsonic.com.
NOTE: We take great care in packing the device in a well protected
box at the factory, so any shipping damage is very unlikely. However,
should this happen please contact your supplier immediately to report
the damage. We recommend keeping the original packing materials in
case you need to ship or transport the device at a later date.
Disposal of Old Electrical & Electronic Equipment
(Applicable in European countries with separate collection systems)
This symbol on the product or on its packaging indicates that this pro-
duct shall not be treated as household waste. Instead it shall be han-
ded over to the applicable collection point for the recycling of elec-
trical and electronic equipment. By ensuring this product is disposed
of correctly, you will help prevent potential negative consequences
for the environment and human health, which could otherwise be
caused by inappropriate waste handling of this product. The recycling
of materials will help to conserve natural resources. For more detailed
information about recycling of this product, please contact your local
city office, your household waste disposal service or the shop where
you purchased the product.
Legal information
Copyright for this user manual © 2013: Nowsonic
Product features, specifications and availability are subject to change
without prior notice.
Edition v1.0, 07/2013

12
www.nowsonic.com
ROADTRIP 51
Bedienungsanleitung
DE
1) Lesen Sie diese Anleitung.
2) Bewahren Sie diese Anleitung auf.
3) Beachten Sie alle Warnungen.
4) Befolgen Sie alle Anweisungen.
5) Betreiben Sie dieses Gerät nicht in unmittelbarer Nähe von Wasser.
6) Verwenden Sie zum Reinigen des Geräts ausschließlich ein
trockenes Tuch.
7) Halten Sie die Lüftungsschlitze frei! Folgen Sie bei der Installation
den Anweisungen des Herstellers.
8) Stellen Sie das Gerät nicht in der Nähe von Heizkörpern, Wärme
speichern, Öfen oder anderer Wärmequellen auf.
9) Kleben Sie in keinem Fall den Schutzkontakt des Steckers ab.
Ein verpolungssicherer Stecker besitzt zwei Kontakte, von denen
ein Kontakt breiter ist als der andere. Ein Schukostecker besitzt
zwei Kontakte und einen dritten Erdungskontakt. Der breitere
Kontakt des verpolungssicheren Steckers bzw. der Erdungskon
takt des Schukosteckers dient Ihrer Sicherheit. Sollte der Stecker
des mitgelieferten Netzkabels nicht in Ihre Steckdose passen,
besorgen Sie sich im Fachhandel ein passendes Kabel.
10) Treten Sie nicht auf das Kabel, knicken Sie das Kabel nicht und
behandeln Sie Stecker und Buchsen besonders vorsichtig.
11) Verwenden Sie ausschließlich Zubehör, das
vom Hersteller für das Gerät vorgesehen ist.
12) Verwenden Sie nur Ständer, Stative oder
Tische, die den Anforderungen des Herstellers
entsprechen oder die zum Lieferumfang des
Geräts gehören. Seien Sie beim Transport vorsichtig, um Ver
letzungen durch verrutschende oder fallende Gegenstände zu
vermeiden.
13) Ziehen Sie während eines Gewitters den Netzstecker; ziehen
Sie den Netzstecker auch, wenn Sie das Gerät längere Zeit nicht
verwenden.
14) Wenden Sie sich im Service-Fall an qualifiziertes Personal. Lassen
Sie das Gerät von einem Fachmann überprüfen, wenn z.B.
Netzkabel oder -stecker beschädigt sind, wenn Flüssigkeit oder
Gegenstände in das Gehäuse gelangt sind, das Gerät Regen oder
Feuchtigkeit ausgesetzt war, das Gerät fallen gelassen wurde, nicht
ordnungsgemäß funktioniert oder anderweitig beschädigt wurde.
WARNUNG:
Verringern Sie die Gefahr von Feuer und elektrischen Stromschlägen,
indem Sie das Gerät nicht Regen oder Feuchtigkeit aussetzen.
Stellen Sie keine Behälter mit Flüssigkeiten auf das Gerät, da diese
umkippen könnten und Wasser in das Gerät gelangen könnte.
Dieses Gerät muss geerdet sein.
Verwenden Sie ein geschirmtes Netzkabel mit drei Leitern wie das
mit dem Gerät ausgelieferte Netzkabel.
Beachten Sie, dass bei unterschiedlichen Betriebsspannungen unter-
schiedliche Netzkabel und/oder Netzstecker benötigt werden.
Beachten Sie zu jeder Zeit Ihre lokalen Sicherheitsvorschriften. Stellen
Sie sicher, dass die für die Monitore ab Werk eingestellte Werte (siehe
Aufkleber auf der Rückseite) mit Ihrer lokalen Netzspannung überein
stimmen.
Stellen Sie das Gerät in der Nähe einer Netzsteckdose auf. Die Steck-
dose sollte immer leicht zugänglich sein.
Um das Gerät völlig stromlos zu machen, ziehen Sie den Netzstecker
aus der Steckdose.
Befolgen Sie bei der Aufstellung immer alle Hinweise des Herstellers.
Betreiben Sie das Gerät nicht unter beengten Platzverhältnissen.
Öffnen Sie das Gerät nicht – Gefahr eines Stromschlags.
VORSICHT!
Beachten Sie, dass alle Änderungen oder Modifikationen am Gerät, die
nicht ausdrücklich in diesem Handbuch eingeräumt werden, Ihre Be-
rechtigung zum Betrieb dieses Gerät aufheben können
Das aktive Lautsprechersystem Roadtrip 51 kann unter Umständen
einen Schalldruckpegel erzeugen, der zu Hörschäden führen kann.
Vermeiden Sie es, sich dauerhaft einem Schalldruckpegel von 90 dB
oder höher auszusetzen.
Wartung
Es befinden sich keine vom Anwender zu wartenden Teile im Gerät.
Lassen Sie das Gerät nur von qualifiziertem Fachpersonal reparieren.
VORSICHT: ZUM SCHUTZ VOR STROMSCHLÄGEN DARF DAS GEHÄUSE
NICHT GEÖFFNET WERDEN. ES BEFINDEN SICH KEINE VOM ANWENDER
TAIUSCHBAREN BAUTEILE IM GERÄT. WENDEN SIE SICH IM SERVICE-
FALL AN QUALIFIZIERTES FACHPERSONAL.
Warnung: Zum Schutz vor Brand oder Stromschlag darf dieses Gerät
weder Regen noch Feuchtigkeit ausgesetzt sein.
WICHTIGE SICHERHEITSHINWEISE!
Le symbole d‘éclair à tête de flèche dans un triangle équila-
téral sert à prévenir l‘utilisateur de la présence dans l‘enceinte
du produit d‘une tension dangereuse non isolée d‘une gran-
deur suffisante pour constituer un risque d‘électrocution pour
les personnes.
Le point d‘exclamation dans un triangle équilatéral sert à pré-
venir l‘utilisateur de la présence d‘instructions importantes de
fonctionnement et de maintenance (entretien) dans les docu-
ments accompagnant l‘appareil.

13
www.nowsonic.com
Inhalt
WICHTIGE SICHERHEITSHINWEISE
Einleitung
Merkmale
Anwendungsbereich
Funktionen und Inbetriebnahme
UHF-Wireless-Sektion
Bluetooth-Sektion
Mikrofon-/Instrument-Sektion
Line-In-Sektion
Master-Sektion
Informationen zum Batteriebetrieb
Anschlussbeispiele
Spezifikationen
Lieferumfang
Haftungsausschluss
Service
Rechtliche Hinweise
Einleitung
Vielen Dank, dass Sie sich für Nowsonic Roadtrip 51 entschieden haben.
Roadtrip 51 ist ein extrem kompaktes und mobiles Sound-System mit
einem integriertem 4-Kanal-Mixer, das sich auch ohne Stromnetz über
integrierte Batteriemodule betreiben lässt. Als Quellen für den Mixer
dienen das mitgelieferte UHF-Funkmikrofon, der integrierte Bluetooth-
Empfänger, ein stereophones Line-Gerät und eine monophone Quelle
wie ein Mikrofon oder Instrument.
Roadtrip 51 verfügt über einen integrierten UHF-Empfänger, der per-
fekt auf das mitgelieferte UHF-Funkmikrofon abgestimmt ist. Zudem
integriert Roadtrip 51 einen Bluetooth-Empfänger, über den sich Au-
diodaten von einem externen Bluetooth-Gerät wie einem iPhone, iPad
oder Android-Smartphone streamen lassen. Zusätzlich lassen sich eine
Stereoquelle über zwei Cinch-Buchsen sowie eine Mikrofon oder In-
strument anschließen und über den internen hocheffizienten Class-
D-Lautsprecher verstärken. Dank dem integrierten Batteriemodul
können Sie Roadtrip 51 auch dann zur Verstärkung der Musiksignale
nutzen, wenn kein Stromnetz zur Verfügung steht. Das Gehäuse ist aus
stabilem ABS-Kunststoff gefertigt und verfügt auf der Front über ein
Metallgitter zum Schutz des 8“ Fullrange-Lautsprechers.
Egal ob Sie Musiker sind und eine kompakte Lösung für kleinere Auf-
tritte suchen oder einen mobilen Verstärker für Präsentationen oder
den Unterricht suchen – Roadtrip 51 ist in jedem Fall die richtige Wahl.
Bitte nehmen Sie sich Zeit und lesen Sie diese Bedienungsanleitung
sorgfältigdurch,damitSieRoadtrip51richtiginBetriebnehmenkönnen.
Bitte überprüfen Sie das Gerät nach dem Auspacken auf etwaige Schä-
den: Sofern Schäden am Gehäuse sichtbar sind, nehmen Sie das Ge-
rät bitte nicht in Betrieb, sondern wenden sich sofort an Ihren lokalen
Händler, bei dem Sie das Gerät gekauft haben.
Roadtrip 51 bietet folgende Merkmale
Mobile Verstärker-/Lautsprecherkombination mit einer maximalen
Leistung von 80 Watt
UHF-Handmikrofon im Lieferumfang
Funkempfänger in Mixer-Sektion integriert
TALKOVER-Funktion im Betrieb mit einem Mikrofon
Integrierter Bluetooth-Empfänger für den Empfang von Audiodaten
von externen Geräten
Stereo-Eingangskanal zum Anschluss eines iPods oder CD-Players
Lautstärke für die Eingangsbereiche UHF, Bluetooth, Mikrofon/Instru-
ment und Line getrennt regelbar
Master-Lautstärkeregler
Wiederaufladbare Batterie mit 2 x 12V 4AH
Bis zu 12 Stunden Spieldauer bei ca. 75% Leistung
Integriertes Class-D-Verstärkermodul mit 80 Watt
Stabiles Gehäuse aus ABS-Kunststoff
8”Fullrange-Lautsprecher
Roadtrip 51 empehlt sich für folgende Anwendungsbereiche
Beschallung für kleinere Konzerte als aktive FOH-Anlage
Beschallung für Vorträge, Feste und Feiern
Tragbares Sound-System für den Unterricht – dank wiederaufladbarer
Batteriemodule auch dann, wenn kein Stromnetz zur Verfügung steht
ROADTRIP 51
Bedienungsanleitung
DE

1
32
9
8
4
5
6
7
14
www.nowsonic.com
Funktionen und Inbetriebnahme
Roadtrip 51 ist ein in sich geschlossenes System, d. h., dass der Mixer,
der Class-D-Verstärker sowie der 8“ Lautsprecher in einem gemeinsa-
men Gehäuse verbaut sind. Roadtrip 51 ist direkt nach dem Auspacken
einsatzbereit. Alle Anschlüsse für externe Zuspieler und Mikrofone/In-
strumente befinden sich ebenso wie die Netzbuchse und der POWER-
Schalter auf der Rückseite von Roadtrip 51.
1) EZ Grip Tragegriff
2) Bluetooth-Sektion
3) UHF-Drahtlos-Sektion
4) Mikrofon-/Instrument-Sektion (mono)
5) Line-In-Sektion (stereo)
6) Belüftungsschlitze
7) Batterieabdeckung
8) Netzanschlussbuchse (100 bis 240 V, 50/60Hz)
9) Master-Sektion
Auf der Unterseite bietet Roadtrip 51 zudem einen Stativflansch (35
mm) zur Montage auf einem (optional erhältlichen) Lautsprecherstativ.
ANMERKUNG: Wenn Sie Roadtrip 51 auf einem Lautsprecherstativ
betreiben, achten Sie darauf, dass das Stativ sicher steht und nicht
umkippen kann.
ROADTRIP 51
Bedienungsanleitung
DE

1
3 4 5 6
2
8
7
15
www.nowsonic.com
UHF-Wireless-Sektion
Roadtrip 51 wird mit einem Funkmikrofon für den drahtlosen Betrieb aus-
geliefert. Der Handsender arbeitet im UHF-Bereich und ist optimalauf
dem UHF-Empfänger von Roadtrip 51 abgestimmt.
Für den Sendebetrieb wird das Funkmikrofon über zwei handelsübliche
1,5 Volt Batterien (Typ AA) mit Spannung versorgt. Um die Betriebsdauer
zu verlängern und die Kapazität der Batterie zu schonen, sollten Sie das
Funkmikrofon immer über den ON/OFF-Schalter ausschalten, wenn Sie
Mikrofon nicht verwenden. Wenn die Kapazität der Batterien dennoch
erschöpft ist, können Sie die Batterien durch handelsübliche Typ AA Bat-
terien oder wiederaufladbare Batterien austauschen.
Gehen Sie dazu wie folgt vor:
1) Schrauben Sie das Sende-Modul am Fuß des Mikrofons
vorsichtig ab.
2) Entnehmen Sie die entladenen Batterien.
3) Setzen Sie die neuen Batterien ein: Achten Sie dabei auf die
korrekte Polarität der Batterien!
4) Schrauben Sie das Sende-Modul wieder am Fuß des Mikrofons auf.
Wenn Sie das Funkmikrofon über den ON/OFF-Schalter einschalten,
verbindet sich der UHF-Receiver in Roadtrip 51 automatisch mit dem
Handsender. In diesem Fall leuchtet die LED RF (2) in der UHF-Sektion:
Die LED AUDIO (1) zeigt zudem an, dass das Funkmikrofon ein Audiosi-
gnal übermittelt.
ANMERKUNG: Sofern die LED RF (2) nicht leuchtet, ist der Empfang im
Moment nicht möglich. Verringern Sie in diesem Fall den Abstand zwi-
schen dem Funkmikrofon und Roadtrip 51 und sorgen Sie dafür, dass der
Funkempfang nicht massive Gegenstände blockiert wird.
Stellen Sie zudem sicher, dass die internen Batterien des Funkmikrofons
nicht entladen sind. Mit dem Regler WIRELESS MIC 1 (3) passen Sie die
Vorverstärkung für das UHF-Funkmikrofon an. Im Uhrzeigersinn heben
Sie die Verstärkung an. Mit dem Regler TONE (4) können Sie den Klang
des Funkmikrofons einfach verändern: Drehen Sie den Regler gegen den
Uhrzeigersinn, um die Höhen zu dämpfen und den Bassbereich zu ver-
stärken. Drehen Sie den Regler im Uhrzeigersinn, um die Höhen anzuhe-
ben und den Bassbereich abzusenken. Mit dem Regler ECHO (5) können
Sie die Lautstärke eines internen Delay-Effekts anpassen: Im Uhrzeiger-
sinn heben Sie den Pegel des Delay-Effekts im Verhältnis zum Mikrofonsi-
gnal an. Mit dem Regler WIRELESS VOL (6) steuern Sie die Lautstärke des
UHF-Empfängers auf die Master-Sektion aus.
Bluetooth-Sektion
Roadtrip 51 integriert einen Bluetooth-Empfänger für den drahtlosen
Empfang von Audiodaten von externen Geräten wie Laptops oder
Smartphones. Bevor Roadtrip 51 Daten empfangen kann, müssen Sie die
Geräte zuerst miteinander„paaren“. Gehen Sie dazu wie folgt vor:
1) Platzieren Sie das externe Bluetooth-fähige Gerät in der Nähe von
Roadtrip 51 (< 10 m).
2) Drücken und halten Sie die Taste PAIR (8) etwa 10 Sekunden
gedrückt.
3) Zum Paaren der beiden Geräte geben Sie nun das Passwort von
Roadtrip 51 in dem anderen Gerät ein. Das Passwort ist auf„0000“
voreingestellt.
Nun kann sich Roadtrip 51 mit dem externen Gerät paaren: Wenn die
Verbindung eingerichtet ist, leuchtet die LED neben der Taste PAIR grün.
Nachdem die Verbindung eingerichtet ist, können Sie die Lautstärke des
Bluetooth-Geräts über den Regler BLUETOOTH VOL (7) auf die Master-
Sektion aussteuern.
Sofern Sie die Verbindung beenden möchten, drücken Sie die Taste PAIR
(8) erneut: Die LED erlischt und Roadtrip 51 empfängt keine Daten mehr
von dem externen Bluetooth-Gerät.
ANMERKUNG: Roadtrip 51 kann immer nur mit einem Bluetooth-Gerät
verbunden sein. Der Abstand zur Bluetooth-Quelle darf maximal 10 Me-
ter betragen. Sofern keine Verbindung hergestellt werden kann, verrin-
gern Sie den Abstand und versuchen Sie es erneut. Die Steuerung der
Transport-Funktionen nehmen Sie am externen Bluetooth-Gerät vor.
ROADTRIP 51
Bedienungsanleitung
DE

176
28
39
4
5
16
www.nowsonic.com
ROADTRIP 51
User manual
DE
Mikrofon-/Instrument-Sektion
Die Mikrofon-/Instrument-Sektion von Roadtrip 51 dient zum Anschluss
eines kabelgebundenen Mikrofons, eines hochohmigen Instruments
oder eines monophonen Line-Geräts. Die Sektion verfügt über die Com-
bo-Buchse MIC 2 INPUT (1), die wahlweise mit einem symmetrischen XLR-
oder einem unsymmetrischen 6,3 mm TS-Kabel belegt werden kann.
ANMERKUNG: Die Ausgabe einer Phantomspeisung über die XLR-
Anschlüsse der Combo-Buchse ist nicht vorgesehen. Daher können nur
dynamische oder Kondensatormikrofone mit einer internen Speisung
angeschlossen werden.
Mit dem Regler MIC 2 VOL (2) passen Sie die Verstärkung für die ange-
schlossene Quelle auf die Master-Sektion aus. Mit dem Regler TONE (3)
können Sie den Klang der angeschlossenen Quelle einfach verändern:
Drehen Sie den Regler gegen den Uhrzeigersinn, um die Höhen zu dämp-
fen und den Bassbereich zu verstärken. Drehen Sie den Regler im Uhrzei-
gersinn, um die Höhen anzuheben und den Bassbereich abzusenken.
Line-In-Sektion
In diesem Abschnitt können Sie ein externes stereophones Gerät mit
Linepegel (z. B. einen CD-Spieler oder auch ein Keyboard) anschließen.
Verbinden Sie das externe Gerät mit Cinch-Kabeln mit den Buchsen LINE
IN (5). Anschließend steuern Sie die Lautstärke der angeschlossenen
Quelle mit dem Regler LINE VOL (4) auf die Master-Sektion aus.
Master-Sektion
In der Master-Sektion schalten Sie Roadtrip 51 ein bzw. aus und steuern
den Summenbus auf die interne Class-D-Endstufe und den 8“ Fullrange-
Lautsprecher aus.
Über die Cinch-Ausgänge LINE OUT (6) können Sie das Signal im Sum-
menbus vor dem Regler MASTER VOL (8) und vor der Class-D-Endstufe
abgreifen. Verwenden Sie diese Ausgänge, um das Summensignal von
Roadtrip 51 auf einen nachfolgenden Mixer, auf ein Aufnahmegerät (wie
z. B. einen MD-Recorder) oder einen weiteren Roadtrip 51 zu speisen.
Mit dem Regler TALKOVER (7) können Sie eine Dämpfung für die Signale
der Bluetooth- und Line-Sektion im Bereich von 0 bis -20 dB voreinstel-
len: Die Signale werden automatisch um den eingestellten Pegel abge-
senkt, sobald ein Signal des Funkmikrofons im UHF-Empfänger oder ein
Mikrofon-/Instrumenten-Signal in der Mikrofon-/Line-Sektion anliegt.
Dank dieser Auto-Mischfunktion können Mikrofon-Durchsagen zu jeder
Zeit verständlich vor der Hintergrundmusik übertragen werden.
Mit dem Regler MASTER VOL (8) steuern Sie den Summenbus auf den
internen Class-D-Leistungsverstärker und damit auf den 8“ Fullrange-
Lautsprecher aus. Im Uhrzeigersinn heben Sie die Verstärkung an.
Mit dem POWER-Schalter (9) schalten Sie Roadtrip 51 schließlich ein bzw.
aus: Drehen Sie dazu den Regler MASTER VOL (8) jeweils vollständig he-
runter, um etwaige Schäden am internen Lautsprecher zu vermeiden.
ANMERKUNG: Die interne Batterie von Roadtrip 51 wird nur dann gela-
den, wenn der POWER-Schalter auf ON gestellt ist. Es reicht zum Laden
also nicht, wenn zwar das Netzkabel angeschlossen ist, Roadtrip 51 aber
nicht eingeschaltet ist.

17
www.nowsonic.com ROADTRIP 51
User manual
DE
Inbetriebnahme
Roadtrip 51 ist direkt nach dem Auspacken betriebsbereit, wenn Sie das
Gerät am Stromnetz betreiben möchten. Für den Batteriebetrieb müssen
Sie Roadtrip 51 zunächst für 8 Stunden laden: Die internen Batteriemo-
dule erreichen ihre maximale Kapazität erst nach dieser Ladedauer. Ge-
hen Sie anschließend wie folgt vor:
1) Verkabeln Sie nun externe Quellen wie ein Mikrofon oder Instrument
und/oder eine stereophone Line-Quelle mit den Combo- und Cinch-
Eingängen auf der Rückseite von Roadtrip 51: Etwaige Anschlusska-
bel sind nicht im Lieferumfang enthalten.
2) Paaren Sie Roadtrip 51 bei Bedarf mit einem externen Bluetooth-
Gerät.
3) Schalten Sie das UHF-Funkmikrofon bei Bedarf ein.
4) Schließen Sie das mitgelieferte Netzkabel am Stromnetz an. Mit dem
POWER-Schalter schalten Sie Roadtrip 51 schließlich ein und aus.
ANMERKUNG: Vor dem Ein- und Ausschalten sollten Sie den Regler
MASTER VOL jedes Mal ganz herunter ziehen, um Schäden am internen
Lautsprecher durch etwaige Ein- oder Ausschaltimpulse zu vermeiden.
Informationen zum Batteriebetrieb
Roadtrip 51 kann wahlweise über das mitgelieferte Netzkabel mit dem
Stromnetz verbunden oder über die internen Batteriemodule betrieben
werden. Wenn Sie Roadtrip 51 mit dem Stromnetz verbinden, werden
die Batteriemodule automatisch geladen. Die LED CHARGING informiert
Sie dabei über den aktuellen Ladestand:
Wenn die Batteriemodule geladen werden, blinkt die LED CHARGING.
Wenn die Batteriemodule vollständig geladen sind, leuchtet die LED
CHARGING durchgehend.
Bevor Sie Roadtrip 51 zum ersten Mal nur mit den internen Batterien
betreiben können, müssen Sie das Gerät zuerst 48 Stunden aufladen:
Dadurch wird die Ladekapazität der Batterie optimiert und ihre Lebens-
dauer verlängert.
Wenn die Kapazität der internen Batteriemodule zu niedrig ist, schaltet
sich Roadtrip 51 automatisch ab: In diesem Fall müssen Sie Roadtrip 51
mit dem mitgelieferten Netzkabel mit dem Stromnetz verbinden.
Die Batteriemodule dürfen nicht vollständig entladen werden. Wenn Sie
das Sound-System für längere Zeit nicht nutzen, laden Sie in jedem Fall
vorher die Batterien vollständig auf: Roadtrip 51 darf nicht mit entlade-
nen Batterien gelagert werden.
ANMERKUNG: Wenn Roadtrip 51 für zwei Monate nicht benutzt wurde,
müssen Sie das Gerät am Stromnetz anschließen und für wenigstens 8
Stunden aufladen. Das Batteriemodul darf nicht extremer Hitze ausge-
setzt werden: Vermeiden Sie direkte Sonneneinstrahlung und betreiben
Sie Roadtrip 51 nicht in unmittelbarer Nähe von Hitzequellen.
WARNUNG!
Versuchen Sie in keinem Fall, die rückseitige Gehäuseabdeckung
zu öffnen: Die Abdeckung schützt Sie vor gefährlichen Spannun-
gen und anderen Gefahrenquellen. Zudem stellt das einen Verstoß
gegen die Garantiebestimmungen dar: Es befinden sich keine vom
Anwender tauschbaren Bauteile im Gerät.

Tape-Recorder oder
anderesAufnahmegerät
Kabelgebundenes
Mikrofon oder Gitarre
UHF-�Funkmikrofon
Kabelgebundenes
Mikrofon oder
Gitarre
CD Spieler
18
www.nowsonic.com
ROADTRIP 51
User manual
DE
Anschlussbeispiele

19
www.nowsonic.com
ROADTRIP 51
Bedienungsanleitung
DE
Specicationen
Lautsprecher: 8“ Fullrange, 8 Ohm
Maximale Ausgangsleistung: 32 Watt (Betrieb über interne Batterie
oder Akkus, THD = 1%)
50 Watt (Betrieb an der Netzsteckdose,
THD = 1%)
Funkempfänger: UHF
ISM-Frequenzband: 863 MHz
Richtcharakteristik: Niere (mitgeliefertes Funkmikrofon)
Klirrfaktor: ≤ 0,5 %
Frequenzgang: 30 Hz – 20 kHz
Signalrauschabstand: ≥ 80 dB
Eingangsempfindlichkeit: 500 mV (Line-Quelle)
10 mV (Mikrofon)
Bluetooth-Passwort: 0000 (Voreinstellung)
Batterie: 2 x 12V 4AH, wiederaufladbar
Material: ABS-Kunststoff, Metallgitter
Tragegriff: 1 x auf der Oberseite
Stromversorgung: 100 - 240 VAC, 50/60 Hz
Leistungsaufnahme: 60 Watt
Abmessungen: 256 x 308 x 458 mm
Gewicht: 12,3 kg
Lieferumfang
Roadtrip 51: 1x
Netzkabel: 1x
Funk-Mikrofon: 1x
Haftungsausschluss
Nowsonic hat höchstmögliche Sorgfalt darauf verwendet, alle in die-
sem Handbuch enthaltenen Informationen so korrekt und vollständig
wie möglich wiederzugeben.
Nowsonic übernimmt keinerlei Haftung oder Verantwortung für Ver-
luste oder Schäden, die dem Eigentümer des Geräts, Dritten oder an
anderen Geräten durch die Informationen in diesem Handbuch oder
das darin beschriebene Gerät entstehen.
Service
Wenn Sie Probleme oder technische Fragen zu Roadtrip 51 haben,
wenden Sie sich bitte zuerst an Ihren lokalen Händler, bei dem Sie das
Gerät gekauft haben.
website under www.nowsonic.com.
Bei einem Service-Fall wenden Sie sich bitte ebenfalls an Ihren lokalen
Händler. Andernfalls können Sie uns auch direkt kontaktieren. Sie finden
unsere Kontaktdaten auf unserer Webseite unter www.nowsonic.com.
ANMERKUNG: Das Gerät wurde ab Werk so verpackt, dass ein aus-
reichend hoher Schutz gegen Transportschäden besteht. Sofern es
dennoch zu einem Transportschaden gekommen sein sollte, wenden
Sie sich bitte unmittelbar an den Lieferanten, der das Gerät an Sie aus-
geliefert hat, und zeigen Sie den Schaden an. Wir möchten Ihnen emp-
fehlen, das originale Verpackungsmaterial für den Fall aufzubewahren,
das Sie das Gerät zu einem späteren Zeitpunkt verschicken müssen.
Entsorgung alter elektrischer und elektronischer Geräte
(gültig für europäische Länder mit Mülltrennung)
Dieses Symbol auf dem Produkt oder der Verpackung weist darauf
hin, dass dieses Produkt nicht als Hausmüll entsorgt werden darf.
Stattdessen muss es an einer Entsorgungsstelle für elektrischen/ elek-
tronischen Müll abgegeben werden. Durch die korrekte Entsorgung
werden mögliche negative Auswirkungen auf die Umwelt und die
Gesundheit vermieden, die andernfalls durch unsachgemäße Abfall-
beseitigung auftreten können. Die Wiederverwertung der Materialien
hilft dabei, natürliche Rohstoffe zu erhalten. Weitere Informationen zur
Wiederverwertung dieses Produkts erhalten Sie bei Ihrer Stadtverwal-
tung, der für Sie zuständigen Müllumladestation sowie von dem Händ-
ler, bei dem Sie dieses Produkt gekauft haben.
Rechtliche Hinweise
Copyright für diese Bedienungsanleitung © 2013: Nowsonic
Produktmerkmale, Spezifikationen und die Verfügbarkeit können ohne
vorherige Ankündigung geändert werden.
Ausgabe v 1.0, 07/2013

20
www.nowsonic.com
FR ROADTRIP 51
Mode d‘emploi
Le symbole d‘éclair à tête de flèche dans un triangle équila-
téral sert à prévenir l‘utilisateur de la présence dans l‘enceinte
du produit d‘une tension dangereuse non isolée d‘une gran-
deur suffisante pour constituer un risque d‘électrocution pour
les personnes.
Le point d‘exclamation dans un triangle équilatéral sert à pré-
venir l‘utilisateur de la présence d‘instructions importantes de
fonctionnement et de maintenance (entretien) dans les docu-
ments accompagnant l‘appareil.
1) Lisez ces indications.
2) Conservez ces indications.
3) Respectez tous les avertissements.
4) Suivez toutes les instructions.
5) N‘utilisez pas cet appareil avec de l‘eau à proximité.
6) Nettoyez-le uniquement avec un chiffon sec.
7) N‘obstruez aucune ouverture de ventilation ! Installez-le conformé-
ment aux instructions du fabricant.
8) N‘installez pas l‘appareil près de radiateurs, bouches de chauffage,
poêles ou autres sources de chaleur.
9) Ne neutralisez jamais la broche de terre. Une fiche polarisée possè-
de deux broches, l‘une plus large que l‘autre. Une fiche de terre a
deux broches identiques et une troisième broche pour la mise à la
terre. La broche plus large de la fiche polarisée ou la troisième bro-
che de la fiche de terre servent à votre sécurité. Si la fiche du câble
d‘alimentation fourni n‘entre pas dans votre prise, procurez-vous
un câble approprié chez un revendeur spécialisé.
10) Évitez de marcher sur le cordon d‘alimentation et de le plier, et
soyez particulièrement délicat avec les fiches et les prises.
11) N‘utilisez que des accessoires conçus pour l‘appareil par le
fabricant.
12) Utilisez-le uniquement avec un support,
trépied ou table répondant aux spécifications du
fabricant ou fourni avec l‘appareil. Soyez prudent
lors du transport pour éviter toute blessure due
au glissement à ou la chute d‘objets.
13) Débranchez le cordon d‘alimentation en cas d‘orage ou de non
utilisation prolongée.
14) Confiez toute réparation à des techniciens de maintenance quali-
fiés. Faites-le vérifier par un technicien, par exemple si le cordon ou
la fiche d‘alimentation est endommagé, si du liquide a été renversé
sur l‘appareil ou si des objets sont tombés dedans, si l‘appareil a
été exposé à la pluie ou à l‘humidité, s‘il ne fonctionne pas norma-
lement, ou s‘il est endommagé.
AVERTISSEMENT:
Réduisez le risque d‘incendie ou d‘électrocution en n‘exposant pas
le produit à la pluie ni à l‘humidité.
Ne placez pas d‘objet rempli de liquide sur l‘appareil, car il pourrait
se renverser et le liquide pénétrer dans l‘appareil.
Cet appareil doit être mis à la terre.
Utilisez un câble d‘alimentation blindé à trois conducteurs comme
celui fourni avec l‘appareil.
Notez qu‘en fonction de la tension d‘alimentation nécessaire, les
cordons et/ou fiches d‘alimentation nécessaires sont différents.
Respectez toujours les réglementations de sécurité locales.
Assurez-vous que les moniteurs ont été réglés en usine (voir
l‘autocollant à l‘arrière) sur la tension correspondant à votre réseau
électrique local.
Placez l‘appareil à proximité d‘une prise de courant. La prise doit
toujours être facilement accessible.
Pour totalement isoler l‘appareil du secteur, débranchez le cordon
d‘alimentation de la prise.
Suivez toujours toutes les instructions du fabricant pour
l‘installation.
Ne faites pas fonctionner l‘appareil dans un espace confiné.
N‘ouvrez pas l‘appareil – Risque d‘électrocution.
ATTENTION !
Notez que tous les changements ou modifications apportés à
l‘appareil qui ne sont pas expressément indiqués dans le présent
mode d‘emploi peuvent annuler votre droit à utiliser cet appareil.
La sonorisation Roadtrip 51 est capable de produire un niveau de pres-
sion sonore qui peut endommager votre audition. Évitez l‘exposition
prolongée à un niveau de pression sonore de 90 dB ou plus.
Entretien
Aucune pièce de l‘appareil n‘est réparable par l‘utilisateur.
Confiez toute réparation à un technicien qualifié.
ATTENTION : POUR ÉVITER TOUT CHOC ÉLECTRIQUE, NE PAS OUVRIR
LE BOÎTIER. AUCUN COMPOSANT DE L‘APPAREIL N‘EST REMPLAÇABLE
PAR L‘UTILISATEUR. CONFIEZ TOUTE RÉPARATION À DES TECHNICIENS
DE MAINTENANCE QUALIFIÉS.
Avertissement: pour se protéger d‘un incendie ou d‘une électro-
cution, cet appareil ne doit pas être exposé à la pluie ni à l‘humidité.
DIRECTIVES DE SÉCURITÉ IMPORTANTES!

21
www.nowsonic.com
Sommaire
DIRECTIVES DE SÉCURITÉ IMPORTANTES
Introduction
Caractéristiques
Domaine d‘application
Fonctions et mise en service
Section sans fil UHF
Section Bluetooth
Section microphone/instrument
Section d‘entrée de niveau ligne
Section Master
Informations concernant le fonctionnement sur batteries
Exemples de branchement
Caractéristiques techniques
Contenu
Clause de non responsabilité
Maintenance
Mentions légales
Introduction
Merci beaucoup d‘avoir choisi le Roadtrip 51 Nowsonic. Le Roadtrip
51 est une sonorisation portable extrêmement compacte, avec tab-
le de mixage 4 canaux intégrée, qui peut également être alimentée
sans raccordement électrique par son module de batteries interne. Les
sources de la table de mixage sont le microphone sans fil UHF fourni,
le récepteur Bluetooth intégré, un appareil stéréophonique de niveau
ligne et une source monophonique comme un microphone ou un
instrument. Le Roadtrip 51 est doté d‘un récepteur UHF intégré qui
est parfaitement adapté au microphone sans fil UHF fourni. De plus, le
Roadtrip 51 intègre un récepteur Bluetooth grâce auquel peuvent être
écoutées les données audio d‘un périphérique Bluetooth tel qu‘un
iPhone, iPad ou smartphone Android. En outre, vous pouvez brancher
une source stéréo à deux prises RCA ainsi qu‘un microphone ou un
autre instrument et les amplifier via l‘amplificateur interne de Classe D
à haut rendement. Grâce au module de batteries intégré, vous pouvez
également utiliser le Roadtrip 51 pour amplifier des signaux musicaux
lorsque aucune alimentation secteur n‘est disponible. Le boîtier est en
plastique ABS robuste et dispose à l‘avant d‘une grille métallique pour
protéger le haut-parleur large bande de 20,3 cm.
Que vous soyez un musicien ayant besoin d‘une solution compacte
pour les petites prestations ou que vous cherchiez un amplificateur
portable pour les présentations ou l‘enseignement, le Roadtrip 51 est
en l‘occurrence le bon choix.
Veuillez prendre le temps de lire attentivement ce mode d‘emploi afin
de pouvoir assurer une mise en service correcte du Roadtrip 51.
Veuillez contrôler tout éventuel dommage de l‘appareil au déballage :
si le boîtier présente des dommages visibles, ne mettez pas l‘appareil
en service mais contactez immédiatement le revendeur chez qui vous
avez acheté l‘appareil.
Le Roadtrip 51 ore les caractéristiques suivantes
Ensemble portable amplificateur/enceinte avec une puissance maxi-
male de 80 watts
Microphone UHF à main inclus, fréquence ISM : 863 MHz
Récepteur sans fil intégré à la section de mixage
Fonction TALKOVER (priorité à la parole) pendant le fonctionnement
avec un microphone
Récepteur Bluetooth intégré pour recevoir les données audio d‘un
appareil externe
Canal d‘entrée stéréo pour brancher un iPod ou un lecteur de CD
Volume réglable séparément pour les entrées UHF, Bluetooth, micro/
instrument et de niveau ligne
Commande de volume général
Batteries rechargeables 2 x 12 V, 4 Ah
Jusqu‘à 12 heures d‘autonomie avec environ 75 % de la charge
Module amplificateur intégré de Classe D de 80 watts
Boîtier robuste en plastique ABS
Haut-parleur large bande de 20,3 cm
Le Roadtrip 51 est recommandé pour les applications suivantes
Sonorisation active de façade pour petits concerts
Sonorisation pour discours, fêtes et célébrations
Système audio portable pour l‘enseignement – utilisable même si
aucune alimentation secteur n‘est disponible grâce au module de
batteries rechargeable
ROADTRIP 51
Mode d‘emploi
FR
Table of contents
Languages:


