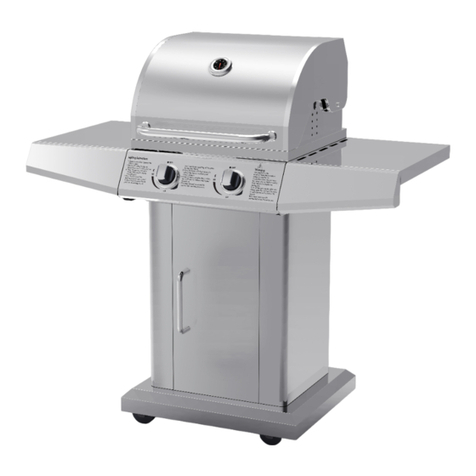
NS International G3594 Installation guide

Assembly & Instruction Manual
G3594 GAS BARBECUE
If a part needs replacing, please contact our customer service department or your distributor.
The use of non-approved parts could present a safety risk when using the barbecue and a risk
to the environment.
Product illustration

Technical specifications:
PRODUCT
MANUFACTURED BY:
Jiang Men City Hong Hua BBQ Grill Co., Limited
PRODUCT CODE:
G3594
TOTAL HEAT OUTPUT:
(ALL GAS
CATEGORIES)
14 kW (1000 g per hr)
GAS CATEGORY
I3+(28-30/37)
I3B/P(30)
TYPES OF GAS:
Butane
Propane
LPG GAS MIXTURES
GAS PRESSURE
28-30 mbar
37 mbar
30 mbar
INJECTOR SIZE
Main: 0.90 mm
Main: 0.90 mm
IDENTIFICATION
CODE:
0359BU1047
USE OUTDOOR ONLY.
READ THE INSTRUCTIONS BEFORE USING THE APPLIANCE.
WARNING : ACCESSIBLE PARTS MAY BE VERY HOT.
KEEP YOUNG CHILDREN AT AWAY.
Lighting :Main Burner: Single shot piezo ignition unit
IMPORTANT:
Read the following instructions carefully and ensure that your barbecue is correctly installed,
assembled and maintained. Failure to follow these instructions could cause serious injury
and/or damage to property
Use outdoor only.
Read the instructions before using the appliance.
WARNING: accessible parts may be very hot. Keep young children away.
This appliance must be kept away from flammable materials during use
Do not move the appliance during use.
Turn off the gas supply at the gas cylinder after use.
Do not modify the appliance.
Turn off the gas supply at the gas cylinder after use.
This appliance must be kept away from flammable materials during use.
Always use protective gloves when handling particularly hot components.
For any question concerning the assembly or operation of the appliance, please contact your
retailer or LPG distributor.
When choosing a site for use, always position the appliance and gas cylinder on a flat surface.
Never light the appliance with the LID closed.
Your barbecue uses an 11 or 15 kg gas cylinder. Your barbecue's performance will be
improved by the use of propane or LPG mixtures. Butane can be used but, due to the
appliance's power, the cylinder will tend to seize and produce low pressure gas, which will
affect your barbecue's performance.
When choosing a location for your barbecue, the following criteria should be taken into
consideration.
Both sides and behind the barbecue: the sides and rear of the barbecue should be 1 metre
away from any item likely to impede its operation.
Above the barbecue: THERE SHOULD BE NOTHING ABOVE THE BARBECUE.
NOTE TO THE CONSUMER:
Please keep these instructions for future reference.

24
15
16
17
18
19
20
21
22
23
14
13
12
11
10
09
08
07
06
05
04
03
02
01
25

2
Screw(M3X10)
E
18
1
Magnet
Side Shelf 1
16
17
20
19
21
22
B
A
24
25
23
D
C
15
14
12
13
07
09
08
10
11
06
05
03
04
02
01
Q'TY
Figure
Description
NO.
Q'TY
Figure
Description
NO.
1
1
1
2
4
1
1
1
Warming Rack
Cooking Plate
Cooking grid
Flame Tamer
Door Axle 2
1
1
2
Caster
2
Body
Grease Tray
Left front leg
Trolley back tray
1
Right back leg
2
Trolley
doorknob
Trolley side tray
Trolley bottom
tray 1
Right front leg
2
Caster with brake
Screw(M6X35)
Screw(M6X10)
Screw(M4X10)
8
21
32
1
1
Side Burner
Shelf (Front)
Side Burner
Shelf (Back)
Side Shelf (Back)
Side Shelf (Front)
M3Nut 2
1Left back leg 1
1
2
Trolley door
Door Support

12
10
13 09
18 16
22
21
E
B
C
CC
C
C
C
C
CCC
B
B
C
CM4X10 12Pcs
M6X10 3Pcs
B
STEP 2
A
A
A
A
Back(right)
Front(right)
Back(left)
Front(left)
AM6X35 4Pcs
STEP 1
D
2Pcs
EM3 Nut
2Pcs
DM3X10

15
15
14
14
20
STEP 3
STEP 4
M6X35 4Pcs
A
A
A

04
11
17
19
STEP 5
STEP 6
M6X10 4Pcs
B
B
B
B
B
M6X10 4Pcs
B
1
1
2
2
B
B
B
B

06
07
08
STEP 7
B
B
B
B
3-4MM
M6X10 4Pcs
B
STEP 8
C
C
C
C
C
C
CM4X10 10Pcs

24
25
07
STEP 9
C
C
CC
C
C
M4X10 10Pcs
C
STEP 10

23
05
03
02
01
BM6X10 6Pcs
B
B
B
B
STEP 11
STEP 12

CONNECTING THE GAS CYLINDER TO THE APPLIANCE
The appliance may only be used with butane, propane or a low pressure LPG mixture and with
a suitable low pressure regulator and a flexible hose. The hose must be securely connected to
the regulator and the appliance with hose clips. The barbecue operates with a 29 mbar
regulator for butane, 37 mbar for propane and 30 mbar for an LPG gas mixture. Use a suitable
regulator certified to BSEN 16129: 2013. Contact your LPG supplier for further information on
suitable regulators for gas cylinders.
Before connection, ensure that nothing is obstructing the top of the cylinder, the regulator,
burner or burner ports. Spiders and insects can get into and obstruct the burner's supply tube
orifice. An obstructed burner could cause a fire under the appliance.
Clean the burner orifices using a stout pipe cleaner.
When replacing the hose, it should be fixed to the appliance and to the regulator using hose
clips. Disconnect the regulator from the cylinder (following the instructions supplied with the
regulator) when the barbecue is not in use.
REGULATOR & HOSE
It is recommended that you change the regulator 10 years after its date of manufacture.
The hose should be changed when national regulations require.
It is recommended that you change the hose 5 years after its date of manufacture.
Using an unsuitable regulator or hose is dangerous. Ensure that the products that you have are
suitable for use with your barbecue.
The hose used must comply with the standards in force in the country of use. The hose must
be a minimum of 0.6 metres long and a maximum of 1.5 metres. A damaged regulator or hose
must be replaced. Ensure that the hose is not blocked, kinked or in contact with any part of the
barbecue other than the connection point.
STORAGE AFTER USE
Store the appliance indoors only if the cylinder has been disconnected and removed. If the
appliance is not used for a long period, it should be stored in its original packaging, in a dry,
dust-free location.
Gas cylinder
The barbecue may be used with 11 or 15 kg cylinders. The maximum size is 310 mm
(diameter) x 600 mm (height). The barbecue will run better if propane or LPG mixtures are
used. Butane can be used but, due to the appliance's power, the cylinder will have a tendency
to freeze and supply gas at a lower pressure, thus affecting the barbecue's performance. The
gas cylinder must be outside the barbecue.
The gas cylinder should be handled with care! Always disconnect the gas cylinder when not
using the barbecue. Replace the protective cap on the cylinder when not connected to the
appliance.
Keep any source of ignition well away when changing the gas cylinder.
Cylinders should always be stored outdoors, vertically and out of the reach of children.
Cylinders should never be stored in temperatures in excess of 50°C. Never store gas
cylinders close to flames, burners or other heat sources.
NEVER SMOKE NEAR A GAS CYLINDER
This barbecue is designed for outdoor use, well away from any flammable material. Ensure that
any item located above the appliance cannot obstruct it and that both sides and the front of the
appliance are at least 1 metre from any item that could impede its operation. Ensure that the
appliance's ventilation holes are not obstructed. The barbecue should be place on a flat, stable
surface. The appliance should be protected from direct draughts and bad weather (rain, etc.).

Parts sealed by the manufacturer or its agent should not be disassembled by the user. Do
not modify any part of the barbecue. Repairs and maintenance should only be carried out
by an accredited technician.
The barbecue should be used in a well ventilated area. Do not obstruct the flow if combustion air to
the burner when using the barbecue. THIS BARBECUE IS ONLY FOR OUTDOOR USE.
IDENTIFY ANY LEAKS BEFORE USE.
Never look for leaks with a naked light; always use soapy water.
TAKE GREAT CARE!!!
If there is a gas leak, switch off the gas supply immediately.
LEAK TEST
Mix one part washing up liquid to three parts water to make 60 to 90 ml of leak finding solution.
Ensure that the control valve is closed.
Connect the regulator to the cylinder and the open/close valve to the burner. Ensure that
connections are correctly made and then open the gas inlet valve.
Spread the solution over the hose and all joins with a brush. If any bubbles appear, then there
is a leak, which must be repaired before the barbecue is used.
Test again, once the leak is repaired.
Close the gas inlet valve on the cylinder, when the test is complete.
If a leak is detected which cannot be repaired, do not attempt any other action but contact your
distributor.
Lighting Instruction for Main Burner
1. Raise the lid.
2. Turn the control knobs clockwise to the off position.
3. Connect the regulator to the gas cylinder. Open the gas inlet valve on the cylinder. Using a
soap solution, look for any gas leak between the cylinder and the regulator.
4. Push down the second control knob and turn it anti-clockwise to the HI position, this will
light the second burner. Always turn on the second burner first.
5. Turn other burners on by turning the control knob to HI position. They will be light through
flame channel. Always start from left side to right side.
6. Adjust the power of the flame by turning the knob to the High/Low position.
7. If the burner does not light, light it with a match in the orifice at the side of the appliance.
Contact your gas distributor to have the ignition system repaired.
8. To switch the barbecue off, close the valve on the cylinder or the switch on the regulator if
you have finished using the barbecue, then turn the appliance's control knobs clockwise to
“OFF“position.
Warning : Only barbecue at a LO setting if the hood is closed !
Notice for first time using
Turn on the barbecue following above instructions.
Close the hood and left the gas burn at LO setting for 15 minutes.
The smells from the treated surface are eliminated by the high temperature.

Warning: If the burner does not light, turn the appliance's control button clockwise to the off
position and close the valve on the cylinder. Wait five minutes and try again.
CLEANING & MAINTENANCE
General Warning
Before cleaning, wait until the gas barbecue has cool down sufficiently.
Before cleaning, remove the gas cylinder.
Do not use any flammable detergents.
Do not use wire brush or other abrasive utensils for cleaning.
Do not use any oven cleaners. Oven cleaner attacks painted surface.
Clean the barbecue after each use.
Exterior surface
Use mild detergents, caustic soda and hot water.
Mild abrasive agents can be used for stubborn stains.
Following this, rinse thoroughly with water.
Interior surface
Does the inner surface of the grill lid looks as paint may flake? There is burnt-on grease which is
flaking.
Clean the surface thoroughly with highly concentrated , hot soap suds.
Rinse thoroughly with water and allow the lid to dry.
Interior surface of the barbecue bottom
Remove residue with a brush or a scraper.
Using soap suds and a sponge, finish by washing the surface.
Rinse thoroughly with water and allow the surface to dry.
Cooking grid & Warming Rack
Use mild soap suds.
Mild abrasive agents can be used for stubborn stains.
Following this, rinse thoroughly with water.
Clean the burner
Turn the gas OFF at the control knob and disconnect the cylinder.
Remove cooling grate.
Clean the burner with a soft brush or blow clean with compressed air and wipe with a cloth.
Clean any clogged ports with a pipe cleaner or stiff wire (such as an opened paper clip).
Inspect burner for any damage (cracks or holes). If damage is found, replace with a new
burner. Reinstall the burner, check to ensure that the Gas valve orifices are correctly
positioned and secured inside the burner inlet (venturi).
Store the gas barbecue
Before storage, please ensure the barbecue is clean and dry.
Store the barbecue in a dust-free, dry room.
Always use a cover to protect the barbecue to avoid rust.

SERVICING
Your gas barbecue should be serviced annually by a competent registered person
Table of contents
Other NS International Grill manuals
Popular Grill manuals by other brands

Fiesta
Fiesta ESD45055-BC347 Assembly manual

SilverBac
SilverBac SB-700-C Operation manual

cecotec
cecotec CHEESE&GRILL 6000 BLACK instruction manual

Sytech
Sytech SY-PN4 user manual

oklahoma joes
oklahoma joes Firecraft 23302166 Assembly guide

Cuisinart
Cuisinart Chef's Style CGG-306 Assembly and operating instructions