NSdio Miau-PA User manual

80x120mm
QUICK START GUIDE

80x120mm
2
Parts description on Front Panel
* NOTE
1
4
5
6
2
3
7
1. Power On/Standby button : Turns the Miau-MA on and off.
2. Power lamp : When the Miau-MA is turned on, this lamp lights up in red.
The lamp lights up in blue when the Miau-MA is in standby mode.
3. Remote control sensor
4. Standby button : Turns the Miau-PA on and off in AUX1, 2 and MINI input mode.
Cancel the Bluetooth connectivity activated in Bluetooth mode.
5. Input Selector button : Press the button repeatedly to select an input source.
6. Input Indicator lamp : The lamp lights up when the input source selected.
( Red – AUX1, Green – AUX2, Amber – MINI, Blue – B/T)
7. Volume +/- control : Adjusts the volume.
You may turn On or Off Miau system by pressing Power On/Standby
button of Miau-PA or Miau-MA either.

80x120mm
3
AUX 1
Miau-PA
Miau-MA
B/T
MINI
AUX 2
IN
OUT
IN
IN
OUT
OUT
IN
OUT
DC 18V/4A
INPUT FUN REMOTE
REMOTE
PRE OUT
PRE IN
DC 18V/4A
SPEAKER OUT
IMPEDANCE 6( )
Parts description on Rear Panel
1. Speakers (speaker output) L/R Terminal
2. Remote In/Out Terminal (Miau-MA)
3. PRE In L/R jacks
4. DC (18V/4A) Out jack
5. AC In jack
6. Bluetooth Signal Receiver
7. Input Terminals (AUX 1 & 2, MINI)
8. Remote In/Out Terminal (Miau-PA)
9. PRE Out L/R jacks
10. DC In/Out jacks
1
6
7 8 9 10
2 3 4 5

80x120mm
4
Parts description on Remote Controller
1
5
4
2
3
1. Power On/Standby button : Turns the Miau on and off.
2. MUTE button : Mutes the sound. To deactivate the muting, press the MUTE button
again or press the volume +/- button.
3. Volume +/- button : Adjusts the volume.
4. Input Selector buttons : Press the button to select the input source.
5. Controlling Music Playback Function Operation
CD
TIME
AUX2
Mono ST VOL
JUMP DEL
AM/FM SD/USB
Function Operation
Back to the starting point of track Short Press button
Previous track Short Press button again
Next track Short Press button
Stop Short Press button
Play / Pause Short Press button

80x120mm
5
Preparing the remote controller
NOTE
Before using the remote controller for the first time, remove the
insulation film.
Insert the battery enclosed following
procedure below.
1. Take out the battery case as shown above.
2. Insert the lithium battery CR2025 with the + side facing up.
3. Place the battery case back in position.
1. The working distance of the remote controller shortens as the battery
becomes exhausted.
2. Keep the lithium battery out of the reach of children.
3. Should the battery be swallowed, immediately consult a doctor.

80x120mm
6
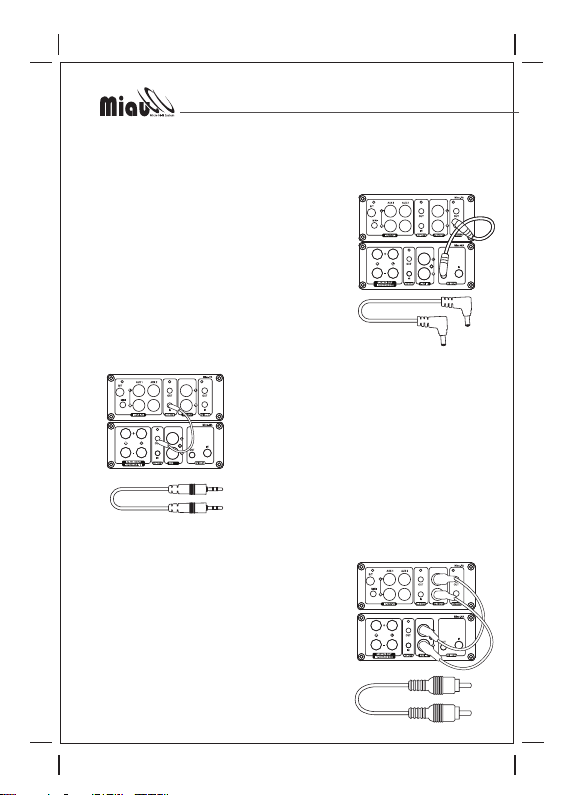
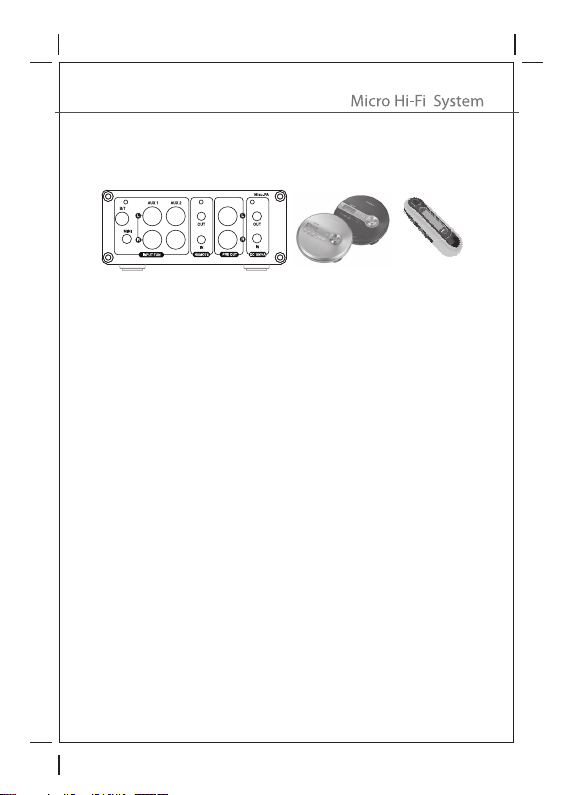
Connecting Miau-MA and Miau-PA
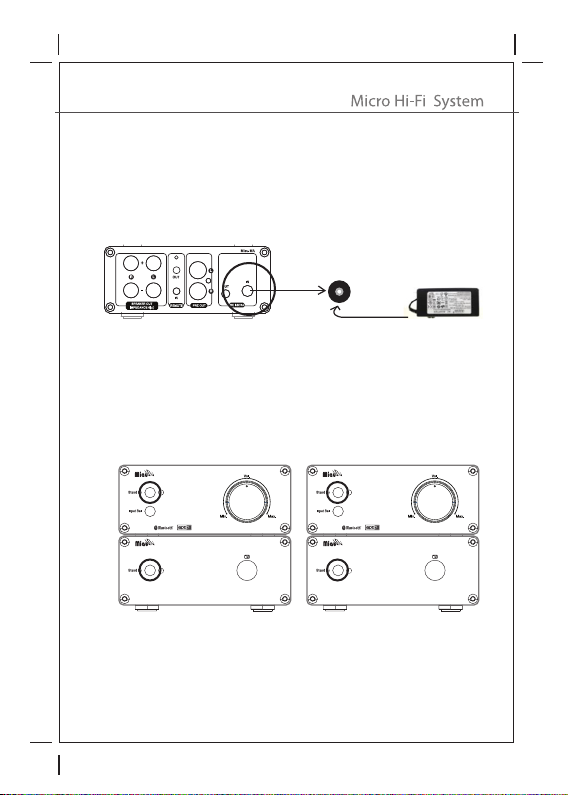
- Connecting the Power cable between Miau-MA and Miau-PA
- Connecting the Remote cable between Miau-MA and Miau-PA
Firmly and tightly connect the supplied remote cable
from REMOTE OUT of Miau-MA to REMOTE IN of
Miau-PA.
When the cable is connected incorrectly, the Remote
controller does not work.
- Connecting the Audio cable between
Miau
-MA and
Miau
-PA
Firmly and tightly connect the supplied audio cable
from PRE IN “L” and “R” of Miau-MA to PRE OUT
“L” and “R” of Miau-PA.
When the cable is connected incorrectly, no sound
is output.
Firmly and tightly connect the supplied power cable
from DC OUT of Miau-MA to DC IN of Miau-PA.
When the cable is connected incorrectly, the lamp
of Miau-PA does not light up.

80x120mm
7
- Connecting the External devices through Input terminals
You may connect the External devices such as MP3, CDP, PC, Smartphone etc…
through AUX1, AUX2, MINI jack.
Make sure that the AC power cord of Miau system is unplugged when connecting
any other cables.
NOTE

80x120mm
8
Connecting Speaker
Firmly connect speakers to the speaker terminal of Miau-MA as shown on the
illustration below.
ASpeakers L/R Terminal
BSpeaker (R)
CSpeaker (L)
Speaker Cable (supplied)
D
D
1. In case the other branded speakers are used with Miau amplifier, check the
impedance of your speakers. Make sure the impedance is between 6 and
8 ohms.
2. Make sure correct polarity is maintained at each speaker connector.
The red colored speaker is positive (+) and the black is negative (-)
NOTE
IN
A
C
B

80x120mm
9
Turning on the Miau system
Firmly connect the supplied AC power cord (mains lead) to the AC In jack of
Miau-MA as shown on the illustration below, then connect the plug to a wall
outlet (mains).
When you have made all connections with the other devices, then the lamp of
Miau-MA and Miau-PA lights up in blue. (Standby Mode)
Press the power button to turn on the Miau, then the lamp lights up in red.
To switch to standby mode, press the power button again.
Now you are ready to enjoy the music through Miau system.
IN

80x120mm
10
Enjoy the music through Bluetooth operation
1. Prior to Bluetooth pairing, verify your device supports Bluetooth function.
2. Turn on the Miau system.
Press INPUT SEL button of Miau-PA or B/T on remote controller, then the Lamp
flashes to Blue colored.
3. Turn the volume up of Miau-PA about ¼ to start.
4. Turn On the Bluetooth wireless technology on your enabled device.
(You may refer to the owner’s manual of Bluetooth device provided from
manufacturer)
5. Select ‘Miau-Bluetooth (Not Paired)’ when it appears on your device’s screen
to initiate searching. Some devices may prompt you for a PIN. If so, enter ‘0000’
or certain code preset on device. ‘Miau-Bluetooth’ will change from ‘Not Paired’
to ‘Connected’.
6. When the connection is completed, the Lamp of Miau-PA lights up in Blue.
7. Select the music files on your device and adjust the volume level on your device.
CD
TIME
AUX2
Mono ST VOL
JUMP DEL
AM/FM SD/USB

80x120mm
11
NOTE
1. The Bluetooth operating range is within maximum 8M according to usage
environment.
2. The Bluetooth can be connected with only single device, not available with multi
devices at the same time.
3. When its connection is failed, try to repeat the above procedures.
4. If you want to connect newly the Bluetooth to another device, also try to
repeat the above procedures.
5. The Miau system remember the last connected device and automatically
connect to Bluetooth device activated lastly when selecting other input source
or power on.
8 M

80x120mm
This manual suits for next models
1
Table of contents