manuals.online logo
Brands
  1. Home
  2. •
  3. Brands
  4. •
  5. Nubert
  6. •
  7. Subwoofer
  8. •
  9. Nubert nuSub XW-800 slim User manual

Nubert nuSub XW-800 slim User manual

Active Subwoofer
Quick Start Guide
Instruction manual
1. Placement
First, place the subwoofer at the intended location.
With the XW-800 slim, there are the following possibilities:
Flat
The XW-800 slim was primarily developed as a downfire subwoofer for
hidden use under furniture. Therefore, it is equipped with metal rails on
the underside to create the necessary clearance.
Notes: Be careful not to damage the cables and the rubber feet
on the underside of the metal rails when you slide the subwoofer
over the floor.
Upright
As an alternative to the setup as a downfire subwoofer, the XW-800 slim
can also be placed upright. For example, it can be placed behind a sofa.
The metal rails ensure sufficient distance to the wall or the back of the
sofa also in this setup. The placement can be done either horizontally or
vertically.
Notes:
• Make sure that nothing can get inside the subwoofer through the bass
reflex port!
• To prevent scratching of the subwoofer and the floor, the supplied elas-
tic buffers should be attached to the contact surface of the subwoofer
towards the floor! Attach the elastic buffers to the outermost corners of
the subwoofer to ensure a stable stand!
Wall mounted
The subwoofer can also be installed hanging on a wall both vertically or
horizontally. No accessories are required for regular on-wall installation,
as there are keyhole hangers integrated in the mounting rails.
Use screws with a diameter of 5mm for mounting!
Mounting in landscape format: Install screws at a distance of 480 mm.
Mounting in portrait format: Install screws at a distance of 166 mm.
Notes:
• Due to the high power of the subwoofer, the wall and the mounting
elements are exposed to strong vibrations and mechanical loads.
Therefore, proceed with extreme care when mounting the subwoofer
on a wall! The installation can only be recommended for solid, strong
walls that can withstand this load. We do not recommend mounting
on drywall, as it tends to absorb the vibrations.
• Make sure that nothing can get inside the subwoofer through the bass
reflex port!
• Ceiling installation is not possible!
Risk of injury or damage!
A falling subwoofer can cause serious injuries and damage.
• Only use fasteners and screws that are suitable for your specific wall type.
• Make sure that the subwoofer is solidly mounted.
• Be careful not to install the subwoofer where it is possible for it to fall
onto people! In particular, do not install the subwoofer at a height of
more than two meters without further measures. 1
02/2022 EN
Use screws and dowels
according to the wall
condition!
Ø 5 mm
480 mm
nuSub XW-800 slim
3. Wireless connection
Press and hold the SOURCE/PAIR button for 3 seconds to start the
pairing-process.
The Subwoofer will begin searching for a compatible wireless Master
(e.g. nuPro X loudspeakers or nuConnect ampX). The Subwoofer will
search for two minutes; the search is indicated by the white LED flashing
rapidly.
You can now start the pairing procedure on the transmitter. This is
normally done by selecting wls master in the setup menu. Please refer
to the user’s manual of your Master-appliance.
The two devices now connect to each other. When the connection
is established, the white LED will light permanently.
Note: When connected wirelessly to nuPro X loudspeakers or
nuConnect ampX, the subwoofer receives an unfiltered, full-range
signal and the crossover frequency must be set on the subwoofer.
4. Source Selection
Briefly pressing the SOURCE/PAIR button changes between the
two sources
LINE IN:
• LED lights orange: factory default setting
• Standby power consumption: 0.5 Watts
• Automatic switch-off:
If LINE IN is selected as the input, the subwoofer switches to standby
mode after no more than 20 minutes without a signal. For this input,
the automatic switch-off can be deactivated via app.
• Automatic switch-on:
If the stand-by state was initiated by the automatic switch-off, the
subwoofer is automatically switched on again when an audio signal is
detected at the LINE IN input.
If the stand-by mode was initiated manually by pressing the on/off
button in the app, the automatic switch-on function is deactivated.
WIRELESS IN:
• LED lights white: Connection established
• LED flashes slowly: No connection to Master
• LED flashes rapidly: Pairing mode active
• Standby power consumption: < 2 Watts
• Automatic stand-by:
If WIRELESS IN is selected as the input, the subwoofer will directly
follow the wireless transmitter which acts as the master.
This function cannot be deactivated.
2
nuSub XW-800 slim ·02/2022 EN
2. Cable connections
Always connect all cables before turning on the subwoofer!
LINE-connection
If you want to use a wired connection, connect a phono cable between
the source and the subwoofer.
If you want to connect the subwoofer wirelessly, you can skip this step.
Power connection
The supplied power cable is connected to the subwoofer in order
to provide connection to the power grid.
Turn on the subwoofer by switching the power-switch to the ON
position. If necessary, the subwoofer can be switched on by pressing
one of the two buttons on the amplifier module.
LINE IN
LEVEL (green)
FREQ (blue)
L_in
R_in SERVICE
-8
-6 -4 -2
0
(70)
-10 (60)
(50)
(80) (90) (100)
(110)
(120) +2
(130)
(140) Hz(40) Hz
-12
-14 dB +6 dB
+4
SOURCE/PAIR
LINE IN
LEVEL (green)
FREQ (blue)
L_in
R_in SERVICE
-8
-6 -4 -2
0
(70)
-10 (60)
(50)
(80) (90) (100)
(110)
(120) +2
(130)
(140) Hz(40) Hz
-12
-14 dB +6 dB
+4
SOURCE/PAIR
ON
5. Settings
You can set the crossover frequency and relative level of the subwoofer
with the rotary encoder on the backside of the subwoofer. Settings are
made and saved for each source.
Push
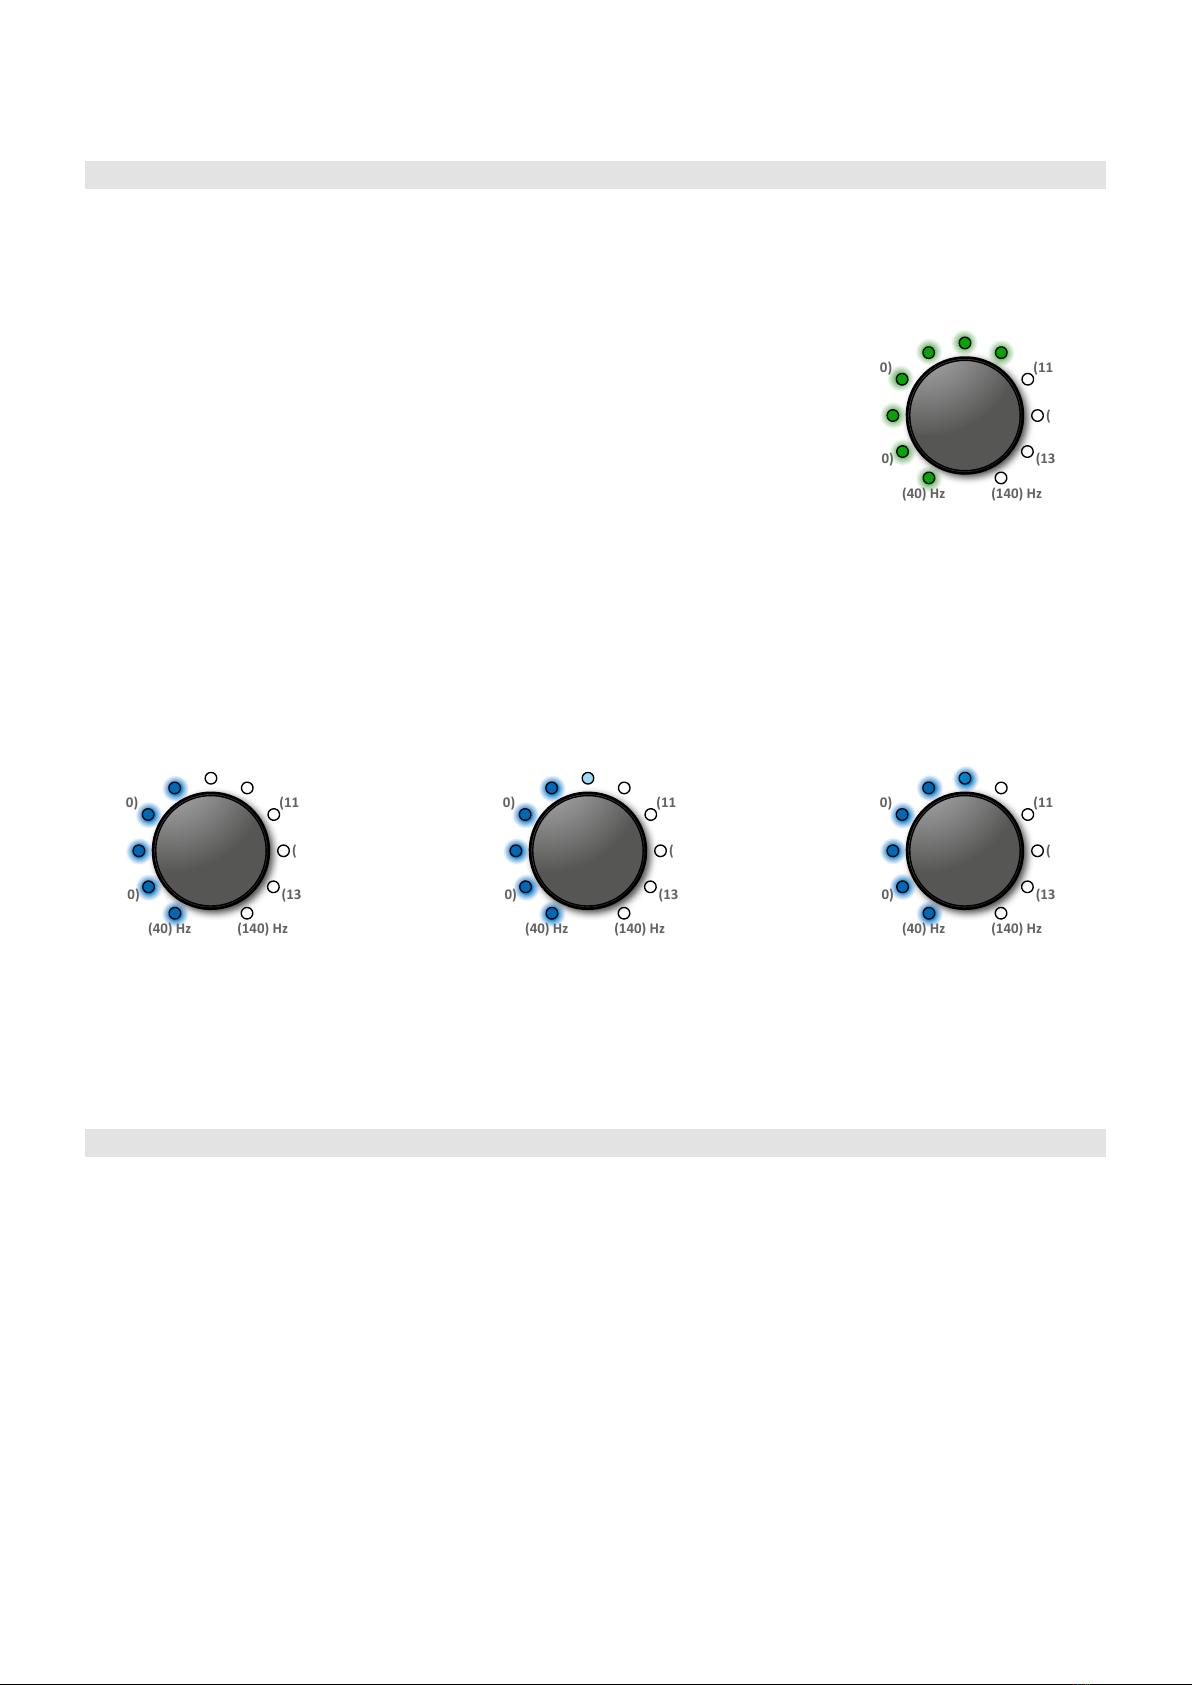
Press the encoder briefly to toggle between LEVEL and FREQ:
• LEVEL The LED lights green
• FREQ The LED lights blue
Turn
By turning the encoder, you adjust the selected parameter:
• LEVEL -15 dB to +6 dB, 1 dB steps
• FREQ 35 to 140 Hz, 5 Hz steps
The set value is shown by the LED ring. The last LED has two different
brightness levels that allow the precise read-out of the set value. If the
last LED lights with full brightness, the set value is the exact value of the
markings next to the encoder. If the LED lights with reduced brightness,
the set value is the lower intermediate value not shown by the markings.
6. Application Examples
Example 1: Wirelessly connecting a nuSub XW-800 slim
to a pair of nuPro X-3000 loudspeakers
When connected wirelessly, the subwoofer receives an unfiltered,
full-range signal and the crossover frequency must be set on the
subwoofer.
• System HP in the loudspeaker-menu sets the High-pass crossover
frequency of the loudspeaker, e.g. 80 Hz.
• FREQ setting on the subwoofer: sets the low-pass crossover
frequency for the subwoofer, e.g. 80 Hz.
• LEVEL setting on the subwoofer: sets the relative level of the
subwoofer, e.g. 0dB.
Example 2: Wired connection between a nuSub XW-800 slim
and an AV-receiver (LINE IN)
The crossover frequency and relative level settings can be set on
the AV-receiver or automatically by the room-calibration of the AV-
receiver. On the subwoofer itself, the crossover should be set to the
maximum value. The relative level (LEVEL) on the other hand, should
be set as low as possible. This causes the AV-receiver to provide a
strong signal, which will allow the auto on-/off function to work
reliably.
If both X-Room Calibration and the receiver’s calibration system are
to be used, it is recommended to run the X-Room Calibration first.
• FREQ setting on the subwoofer: sets the low-pass crossover
frequency for the subwoofer, e.g. 140 Hz.
• LEVEL setting on the subwoofer: sets the relative level of the
subwoofer, e.g. -6 dB.
FREQ example:
crossover frequency 85 Hz
FREQ example:
crossover frequency 90 Hz
LEVEL example:
relative volume -2 dB
FREQ example:
crossover frequency 80 Hz
3
EN 02/2022 ·nuSub XW-800 slim
LEVEL (green)
FREQ (blue)
-8
-6 -4 -2
0
(70)
-10 (60)
(50)
(80) (90) (100)
(110)
(120) +2
(130)
(140) Hz(40) Hz
-12
-14 dB +6 dB
+4
LEVEL (green)
FREQ (blue)
-8
-6 -4 -2
0
(70)
-10 (60)
(50)
(80) (90) (100)
(110)
(120) +2
(130)
(140) Hz(40) Hz
-12
-14 dB +6 dB
+4
LEVEL (green)
FREQ (blue)
-8
-6 -4 -2
0
(70)
-10 (60)
(50)
(80) (90) (100)
(110)
(120) +2
(130)
(140) Hz(40) Hz
-12
-14 dB +6 dB
+4
LEVEL (green)
FREQ (blue)
-8
-6 -4 -2
0
(70)
-10 (60)
(50)
(80) (90) (100)
(110)
(120) +2
(130)
(140) Hz(40) Hz
-12
-14 dB +6 dB
+4
7. Using the Nubert X-Remote App
You can also use the Nubert X-Remote App to set up and adjust the
subwoofer. The app is available for free at the Google Play Store or at
the Apple App Store. The app offers more settings and a graphical
user interface and is recommended for everyone that would like to
make detailed adjustments and have access to more parameters than
available on the subwoofer itself.
Connecting the X-Remote App with the subwoofer
Download the app from the Google Play Store or the Apple App
Store and install it. On Android devices, you must allow the app to
access the device’s location.
The app communicates with the subwoofer via Bluetooth LE. Use the
app to connect to the subwoofer! Do not connect to the subwoofer
using the settings of your device!
If no device has been connected to the X-Remote app yet, the
available devices are displayed directly after starting X-Remote. Alter-
natively, you can also access the device-selection-screen by tapping
the Devices icon (at the bottom center of the home screen). Tap on
the subwoofer, to connect it to the app. The connection is confirmed
in the app by displaying the device background in yellow. If neces-
sary, you will be prompted to enter a password. In the factory setting
the password is 0000.
Tapping the home icon at the bottom left takes you to the home
screen. This screen provides direct access to the basic functions, such
as input selection.
Tapping the Speaker settings tile takes you to the menu for
more advanced settings of the subwoofer. For example, you can con-
figure the behaviour of the status LED here.
8. Factory Reset
To reset the subwoofer to the factory settings, it must first be
switched off at the power switch on the back of the unit.
Wait 10 seconds and switch it on again.
Within 7 seconds after switching it on, both buttons on the back of
the device (SOURCE/PAIR and the rotary encoder) must be pressed
and held for 3 seconds.
The subwoofer confirms the input by flashing the SOURCE/
PAIR LED. All settings are now restored to the default state.
nuSub XW-800 slim ·02/2022 EN
Nubert electronic GmbH
Goethestr. 69
73525 Schwäbisch Gmünd
Germany
E-Mail: [email protected]
Hotline: +49 (0)7171 8712-0
www.nubert.de
LINE IN
LEVEL (green)
FREQ (blue)
L_in
R_in SERVICE
-8
-6 -4 -2
0
(70)
-10 (60)
(50)
(80) (90) (100)
(110)
(120) +2
(130)
(140) Hz(40) Hz
-12
-14 dB +6 dB
+4
SOURCE/PAIR

Other Nubert Subwoofer manuals

Nubert nuSub XW-1200 User manual

Nubert

Nubert nuSub XW-1200 User manual

Nubert nuSub XW-700 User manual

Nubert

Nubert nuSub XW-700 User manual

Nubert nuSub XW-800 slim User manual

Nubert

Nubert nuSub XW-800 slim User manual

Popular Subwoofer manuals by other brands

Samson Auro D1200 owner's manual

Samson

Samson Auro D1200 owner's manual

Kicker SOLO-BARIC S10L3 owner's manual

Kicker

Kicker SOLO-BARIC S10L3 owner's manual

Sony SA-WM200 user manual

Sony

Sony SA-WM200 user manual

Axiom SW2100P user manual

Axiom

Axiom SW2100P user manual

Velodyne CT-I00 owner's manual

Velodyne

Velodyne CT-I00 owner's manual

K&F 'SW' Series user manual

K&F

K&F 'SW' Series user manual

REVELL CONCERTA 2 B10 owner's manual

REVELL

REVELL CONCERTA 2 B10 owner's manual

Samson Mediaone10S owner's manual

Samson

Samson Mediaone10S owner's manual

Klipsch Reference Series RW-5802 owner's manual

Klipsch

Klipsch Reference Series RW-5802 owner's manual

Sony SA-WX900 Service manual

Sony

Sony SA-WX900 Service manual

Kicker CompC8 manual

Kicker

Kicker CompC8 manual

Sony XS-L81P5 Product guide

Sony

Sony XS-L81P5 Product guide

K-array KS5 user guide

K-array

K-array KS5 user guide

JBL S2-1024SS owner's manual

JBL

JBL S2-1024SS owner's manual

AudioBahn AWP210T operating instructions

AudioBahn

AudioBahn AWP210T operating instructions

Mackie HD 1801 Specifications

Mackie

Mackie HD 1801 Specifications

Velodyne MiniVee datasheet

Velodyne

Velodyne MiniVee datasheet

Boston Acoustics PV350 user manual

Boston Acoustics

Boston Acoustics PV350 user manual

manuals.online logo
manuals.online logoBrands
  • About & Mission
  • Contact us
  • Privacy Policy
  • Terms and Conditions

Copyright 2025 Manuals.Online. All Rights Reserved.