Numark cdmix usb User manual

User Guide
English ( 3 – 9 )
Guía del usuario
Español ( 10 – 17 )
Guide d'utilisation
Français ( 18 – 25 )
Guida per l'uso
Italiano ( 26 – 32 )
Benutzerhandbuch
Deutsch ( 33 – 41 )
Appendix
English ( 42 )


3
User Guide (English)
Introduction
Box Contents
CDMix USB
Power Cable
User Guide
Safety & Warranty Information Booklet
Support
For the latest information about this product (system requirements, compatibility information, etc.) and
product registration, visit numark.com.
For additional product support, visit numark.com/support.
Quick Start / Connection Diagram
1. Make sure all items listed in the BOX CONTENTS section are included in the box.
2. READ SAFETY & WARRANTY INFORMATION BOOKLET BEFORE USING THE PRODUCT.
3. Study the connection diagram in this guide.
4. Place CDMix USB in an appropriate position for operation.
5. Make sure all devices are turned off and all faders and gain knobs are set to "zero."
6. Connect all stereo input sources as indicated in the diagram.
7. Connect the stereo outputs to power amplifier(s), tape decks, and/or other audio sources.
8. Plug all devices into AC power.
9. Switch everything on in the following order:
•Audio input sources (i.e. turntables, CD players, etc.)
•Mixer
•Last, any amplifiers or output devices
10. When turning off, always reverse this operation by turning off:
•Amplifiers
•Mixer
•Last, any input devices
Items not listed under the Box Contents are sold separately.
POWER
HOUSE
MONITORS
MP3 PLAYER
MICROPHONE
BOOTH
MONITORS

4
Features
Top Panel
1. EJECT –Press this button to open or close the CD disc tray.
2. JOG WHEEL –The jog wheel functions differently depending on its current mode.
a) If a track is not playing, the JOG WHEEL will search slowly through a track's frames. To set a new cue
point, rotate the JOG WHEEL then begin playback when you have determined the proper position.
Press CUE to return to that cue point.
b) If a track is playing, the JOG WHEEL will temporarily bend the pitch of the track. Rotating the JOG
WHEEL clockwise temporarily speeds it up while rotating it counter-clockwise slows it down. This is
useful for beat-matching.
c) When the SEARCH button has been activated, rotating the JOG WHEEL will move rapidly through the
track.
d) When the SCRATCH button has been activated, rotating the JOG WHEEL will "scratch" over the audio
of the track, like a needle on a record.
Note: The JOG WHEEL is not touch-sensitive.
3. SCRATCH – Activates or deactivates Scratch Mode. While activated, rotating the JOG WHEEL creates a
'scratch' effect.
Note: This feature is not optimal for searching through long audio passages. For longer searches, activate the
SEARCH function.
4. REVERSE – Press this button to reverse playback of the track (the button will be lit). Press it again to return to
normal playback.
5. BRAKE – Press this button to activate braking (the button will be lit). When braking is activated, pausing the
track will cause playback to slow down before stopping, simulating the effect of stopping the motor of a
turntable. Braking will also affect the startup time when pressing PLAY. Adjust the braking time by holding
BRAKE and turning the JOG WHEEL.
6. SEARCH – Activates or deactivates Search Mode. Press this
button to use the JOG WHEEL to rapidly scan through the
track. The LED indicator will be red when Search Mode is
active.
7. CUE –During playback, press CUE to return to the cue point
and pause the track. Hold down CUE to start playback from
the cue point, and release CUE to return to that point and pause the track. If the track is paused, use the JOG
WHEEL to locate a new cue point.
8. PLAY / PAUSE – Plays or pauses the track.
Note: When paused, pressing PLAY will only set a new cue point if the JOG WHEEL has been moved.
To create a cue point, move the JOG
WHEEL when the track is paused. The
cue point will be set once you start
playback from that point (by pressing
PLAY / PAUSE).
11
22
345345
66
77 8
9 9
10 10
11 11
12 13 14 12 13 14
15 15
16
16
17 17
18 18
19 19
20
20
21 21
2222 23 2222 23
24 24
25
26
26
26
27
28
29
29
27 26 27
28
29
27
29
30
31 31 3131
32
33
34
35
36
37
38
39
40
8
30

5
9. TRACK SELECT – Selects the track to be played. Press and hold either of the TRACK SELECT knobs to
rapidly change tracks.
10. FOLDER – Press this button to enter Folder Mode. The folder name will be displayed on the LCD. Here, you
can press and hold the FOLDER button and use the TRACK SELECT knob to select a folder. Release FOLDER
to enter the selected folder. When inside a folder, use the TRACK SELECT knob to select the track. Press
FOLDER again to exit Folder Mode.
11. +10 – Press the TRACK SELECT knob to skip through the CD track listing 10 tracks at a time.
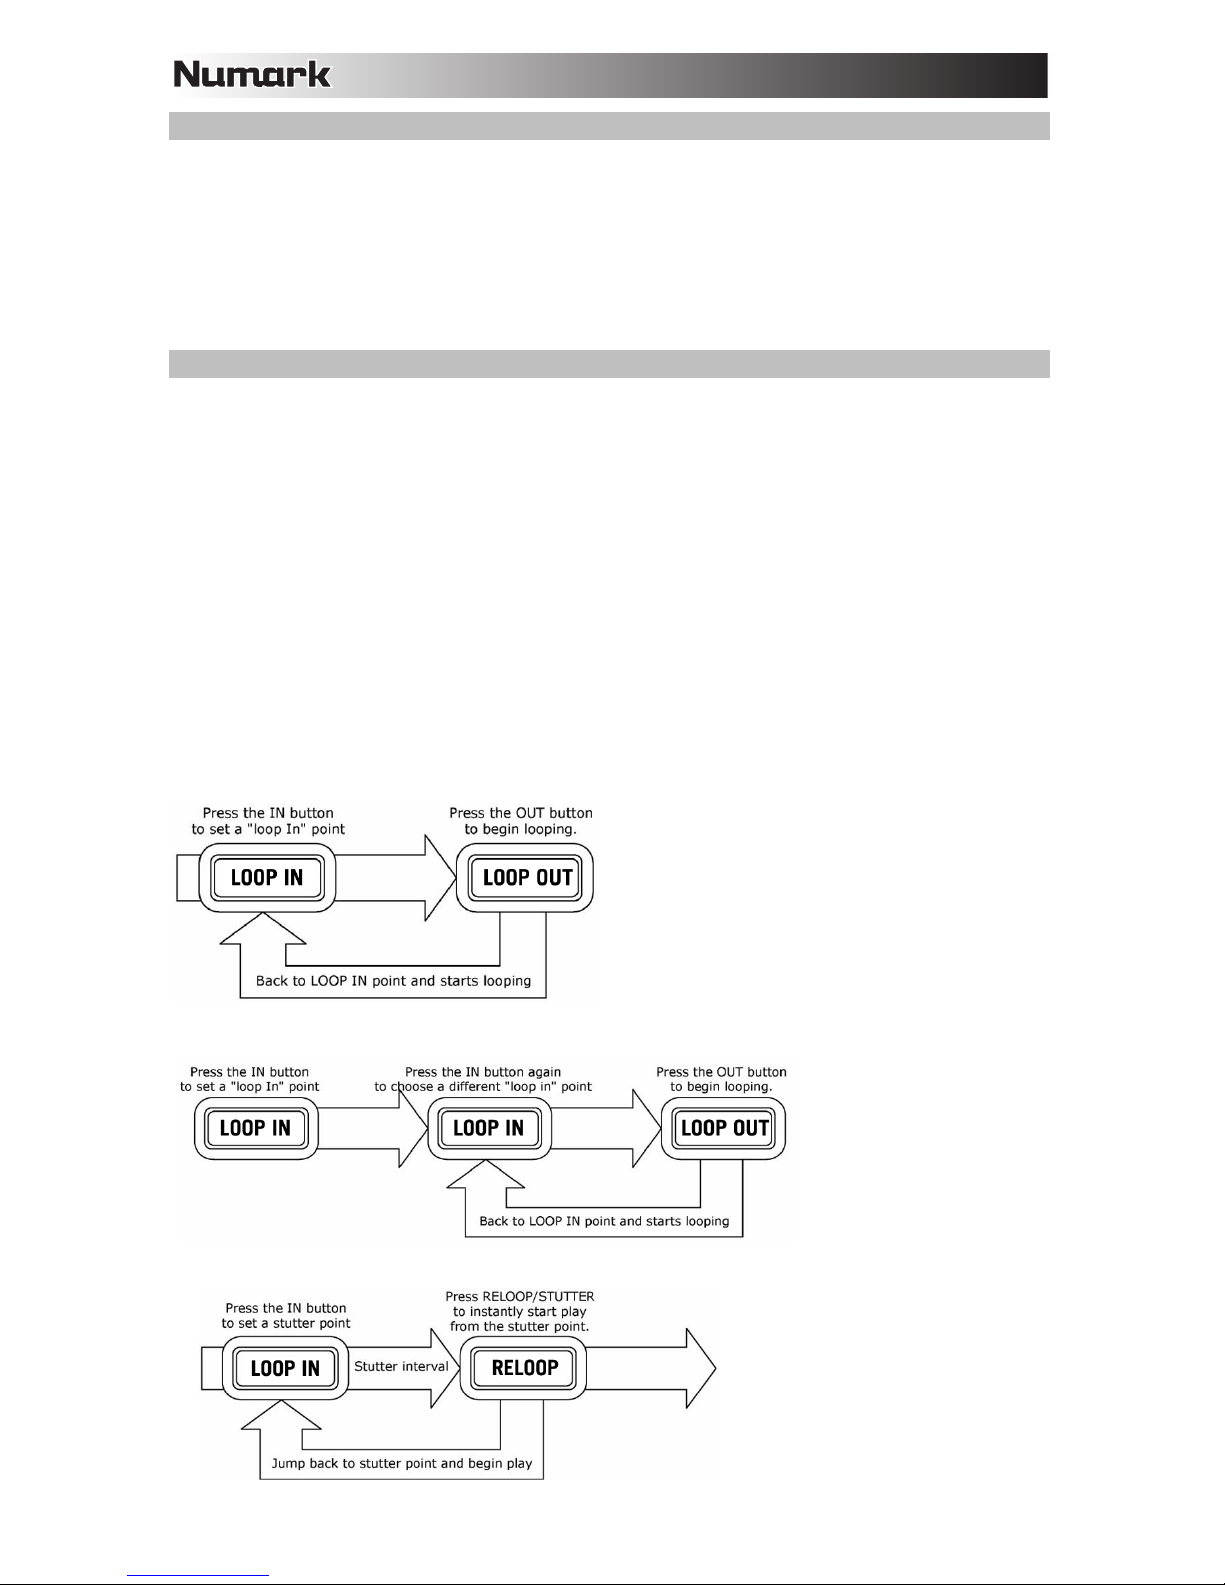
12. LOOP IN – Sets a new cue point or the start point of a loop (a "Loop In" point) during playback.
13. LOOP OUT – Sets the end point of a loop (a "Loop Out" point) and starts playing the loop. While playing a
loop, press LOOP OUT to release it from the loop and continue normal playback.
14. RELOOP – Plays the track immediately from the beginning of a loop (and reactivates the loop).
15. PITCH – Activates or deactivates the PITCH FADER. Press to cycle through the available pitch ranges (±4%,
8%, 16%, and 100%). The current range will be indicated on the LCD and by pitch percentage LED indicators.
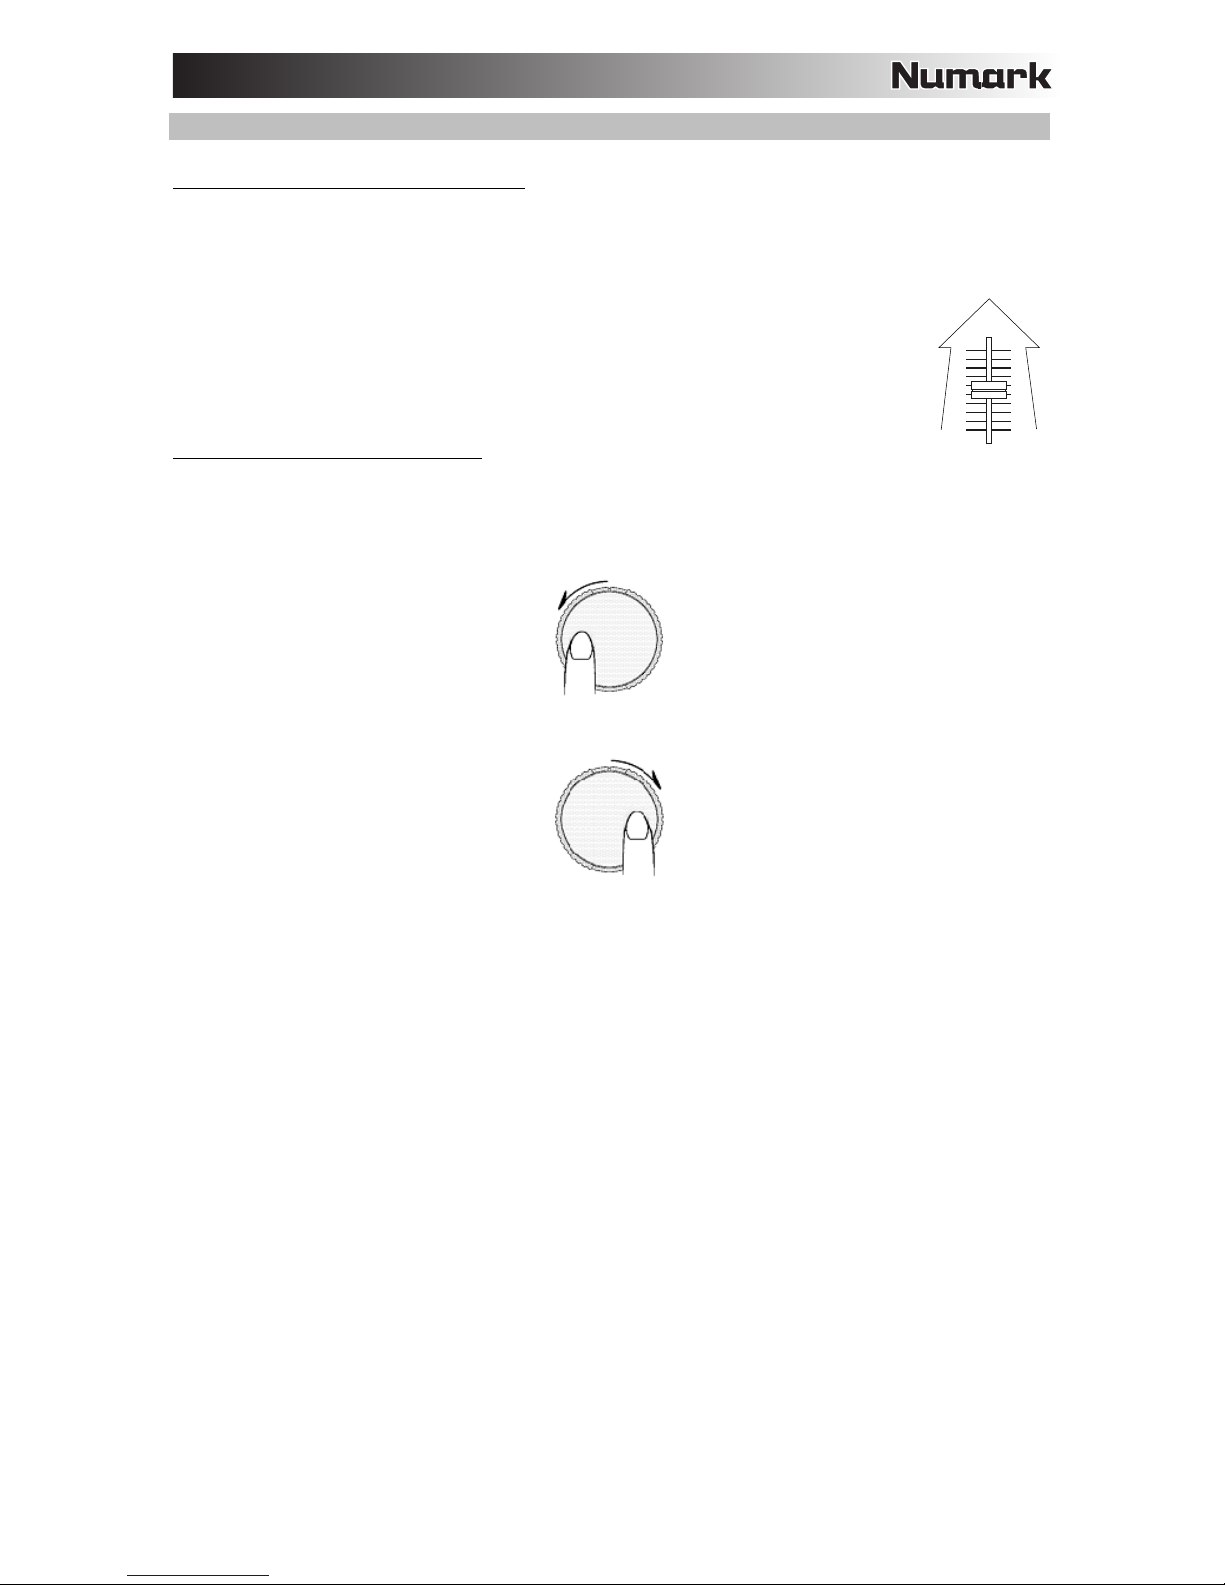
16. PITCH FADER – The pitch can be changed by pressing the PITCH button, lighting the PITCH LED, and then
move the fader. The pitch will not be changed if the PITCH LED is off.
17. PITCH BEND -/+ – You can use these two pitch bend buttons to temporarily adjust the pitch and tempo of
the music.
18. TAP – Press the TAP button once to activate Auto BPM mode and show the BPM reading for the track on the
LCD. Press the TAP button repeatedly in time with the beats of the music on that deck to enter Manual BPM
mode. To go back to AUTO BPM mode, hold the TAP button for 2 seconds.
19. MASTER TEMPO – When the Master Tempo is activated, this will lock the track to its original tempo.
20. SOURCE – Press to select USB A, USB B, or CD audio source.
21. TIME / ID3 TAG – Press and release this button to switch the time display between "ELAPSED" playing time,
"REMAINING" time on the track, and "TOTAL" remaining time on the entire CD. To access the available ID3
tag information, hold the TIME / ID3 TAG button, and rotate TRACK button. The ID3 tag information will
appear, such as the TITLE, ALBUM, and ARTIST. The ID3 tag will be shown for tracks on the MP3 CD or USB
thumb drive that were created with this information added to them.
22. SINGLE – Press this button to toggle between Single Play (the deck will stop at the end of each track) or
Continuous Play (the entire disc will be played without interruption).
23. PROGRAM – This button helps you create a program – a sequence of tracks to play continuously:
•IMPORTANT: Before performing any program functions below, pause playback by pressing PLAY /
PAUSE.
•To create a program:
1. Press PROGRAM. "P–##" will flash on the LCD ("##" indicates what number that track occupies
in the program – "P–01," "P–02," etc.)
2. Turn the TRACK SELECT knob to select a track then press the TRACK SELECT knob to enter it
into the program. Repeat this process to add more songs to the program.
3. When finished, press PLAY to play the program or press PROGRAM to exit and return to normal
play mode. (When a program is stored, "PG" will be shown on the LCD.)
•To play the program:
1. With a program stored, press PROGRAM. "P–##" will flash on the LCD. The total number of
tracks in the program will be displayed to the left of the LCD (as "P##").
2. Press PLAY to play the first track of the program. When playing a program, "PG" will flash on the
LCD.
•To exit a program (without deleting it), if you are playing track within the program, pause it, then
press and hold PROGRAM.
•To add tracks to your stored program:
1. If you were playing your program (if "PG" is flashing), press and hold PROGRAM. You will return
to the first track of that program. If you were not playing your program (if "PG" is solid), skip to the
next step.
2. Press PROGRAM. The next available slot of the program will flash in the LCD (as "P–##"). The
total number of tracks in the program will be displayed to the left of the LCD (as "P##").
3. Turn the TRACK SELECT knob to select a track then press the TRACK SELECT knob to enter it
into the program. Repeat this process to add more songs to the program.
4. When finished, press PLAY to play the program or press PROGRAM to exit and return to normal
play mode. (When a program is stored, "PG" will be shown on the LCD.)
•To delete a program:
1. Press PROGRAM. "P–##" will flash in the LCD.
2. Press and hold PROGRAM. "PG" will disappear from the LCD and you will return to the first
playable track on your CD/device.
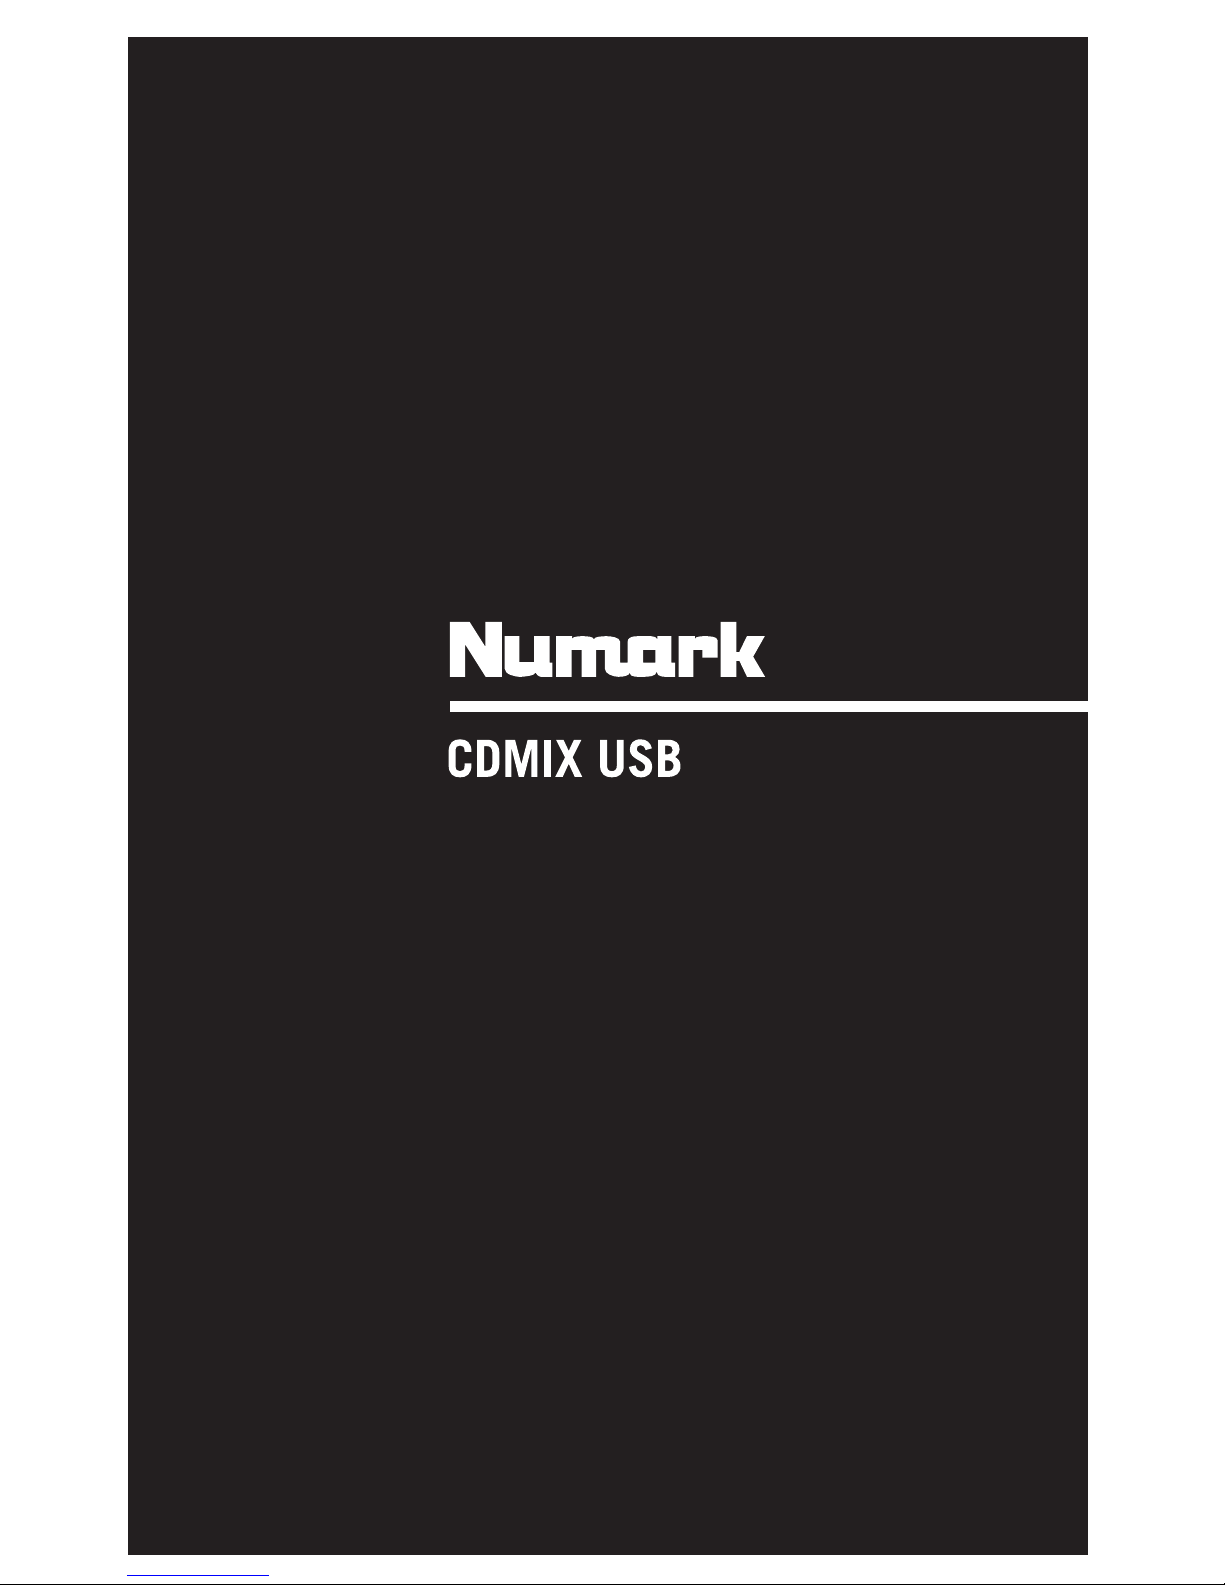
24. LCD –Indicates all the functions, as they are occurring, with the CD.

6
25. USB – You can connect USB thumb drives (with a FAT16 or FAT32 file system) with MP3s here. To view their
contents, use the SOURCE button and TRACK SELECT knob to select "USB A" or "USB B" as your source.
(Both decks can play tracks from the same USB device simultaneously.)
26. CHANNEL GAIN – Adjusts the channel's pre-fader and pre-EQ gain level.
27. CHANNEL TREBLE – Adjusts the high (treble) frequencies of the corresponding channel.
28. CHANNEL MID – Adjusts the mid-range frequencies of the corresponding channel.
29. CHANNEL BASS – Adjusts the low (bass) frequencies of the corresponding channel.
30. CHANNEL FADER – Adjusts the audio level on the corresponding channel.
31. CHANNEL CUE – Sends pre-fader audio to the Cue Channel for headphone monitoring.
32. CUE MIX – Turn to mix between Cue and Program in the Headphone channel. When all the way to the left,
only channels routed to CUE will be heard. When all the way right, only the Program mix will be heard.
33. CUE GAIN – Adjusts the volume for headphone cueing.
34. HEADPHONES – Connect your 1/4" or 1/8" headphones to
this output for cueing and mix monitoring.
35. MIC ON / OFF – Mutes and unmutes the microphone signal.
When muted, the microphone signal will not be routed to the
Master mix.
36. CROSSFADER – Blends audio playing between Channels 1 and 2. Slide this to the left to play Channel 1 and
slide to the right to play Channel 2.
Note: The crossfader is user replaceable. Simply unscrew the screws which hold it in place, lift it out and
disconnect the cable. Re-attach the new crossfader and screw the mounting plate back onto the unit. Test
and confirm new crossfader is working as intended.
37. STEREO LEVEL INDICATOR – Displays the audio level of the Program mix.
38. MASTER VOLUME – Adjusts the output volume of the Program mix.
39. MONO / STEREO – Adjusts the Program mix for stereo or mono operation.
40. MIC 2/AUX (2 way toggle switch) – Selects Mic 2 or Auxiliary input for this channel.
Rear Panel
1. POWER CONNECTOR –Connect the supplied power cable here.
2. POWER SWITCH –Turns the machine on and off. The unit should always be shut down with this switch first
before any external power is removed.
3. AUX INPUT (RCA) – Connect an additional line-level audio source to this input. To route the AUX signal to the
mix, you will need to flip the AUX channel's input selector (located on the top panel) to "AUX."
4. MIC 1 INPUT – Connect a microphone to this input with an XLR
or 1/4" cable.
5. MIC 2 INPUT – Connect a 1/4” microphone to this input if you
would like to use an additional microphone on the Aux channel.
To route the MIC2 signal to the mix, flip the AUX channel's INPUT
SELECTOR (located on the top panel) to "MIC."
6. MASTER OUTPUT (XLR) – Connect this low-impedance XLR output to a PA system or powered monitors.
Control the level of this output with the MASTER fader on the top panel.
7. MASTER OUTPUT (RCA) – Use standard RCA cables to connect this output to a speaker or amplifier system.
Control the level of this output by using the MASTER knob on the top panel.
8. USB JACK – You can connect USB thumb drives (with a FAT16 or FAT32 file system) with MP3s here. To
view their contents, use the SOURCE button and TRACK SELECT knob to select "USB A" or "USB B" as your
source. (Both decks can play tracks from the same USB device simultaneously.)
Note: When connecting microphones,
make sure the mic channel's gain knob is
at the lowest setting before connecting it.
Note: When connecting microphones,
make sure the mic channel's gain
knob is at the lowest setting.
1
2
34
5
67
8

7
LCD
1. PLAY – This shows when the unit is playing.
2. CUE – Lit continuously when the unit is paused
at a cue point.
3. CD / USB – Indicates whether you are playing
tracks from a loaded CD or a connected USB
device.
4. TRACK / FOLDER NUMBER – Shows the
current track or folder number. When viewing or
playing a program, the number will have a "P"
in front of it ("P01," "P02," etc.), indicating the number of that track in the program.
5. TOTAL TRACK – Displays the total number of tracks available on the CD or USB device. (When in Folder
View, it will display the total number of folders available on the USB device.)
6. MINUTES – Shows the minutes elapsed or remaining depending on mode setting.
7. SECONDS – Shows the seconds elapsed or remaining depending on mode setting.
8. FRAMES – The CD player breaks down a second into 75 frames for accurate cueing. This shows the frames
elapsed or remaining depending on mode setting.
9. TIME MODE – Indicates whether the time shown on the LCD is the elapsed time for the track, remaining time
for the track, or total remaining time for the entire CD.
10. TIME BAR – Shows either time remaining or elapsed depending on the setting of the TIME button.
11. PLAY MODE – Shows when the unit is set to Single Mode (the deck will stop at the end of each track) or
Continuous Play Mode (the entire disc will be played without interruption). This function is controlled by the
SINGLE button.
12. RELOOP – Indicates when a loop is programmed.
13. BPM – Displays the tempo in BPM (beats per minute) for the current track. When "AUTO BPM" is displayed,
the automatically detected tempo will be lit solid on the LCD. When Manual BPM has been calculated, the
BPM will flicker on the LCD.
14. PITCH – Shows the percentage change in pitch.
15. MT (MASTER TEMPO) – Indicates that the MASTER TEMPO button is engaged.
16. PG (PROGRAM) – Indicates that a program is playing.
17. TEXT DISPLAY – Displays the folder name or file name when navigating MP3s.
18. ID3 TAG – Displays what kind of ID3 tag is shown in the text display.
Cue Points
Setting Cue Points:
To locate a new cue point during playback, first press the “PLAY/PAUSE” button (pausing the track) and turn the
JOG WHEEL for the CD player to repeatedly play small parts (frames) of the CD as you move to the desired position.
To set the new cue point position, press “PLAY/PAUSE” (resuming playback).
Note: When paused, pressing PLAY will only set a new cue point if the JOG WHEEL has been moved.
Back Cue Operation:
1. Press the “PLAY/PAUSE” button to start the disc.
2. Press the “CUE” button to return the disc to the last position (cue point) where it was started from.
A
djust the "CUE" point
with the JOG WHEEL
Play Interval Position on Disc
Press “PLAY/PAUSE” to
start the music Press “CUE” to return to the
last starting point
Position on Disc
Back Cue Operation
Play interval
TRACK
FOLDER
Total
PG
MT
RELOOP
TITLE
ALBUM
ARTIST
Single Cont. Elapsed Total Remain
1
2
78
910
11
12
13
14
1
6
1718
15
4
56
3

8
Navigating MP3 Folders
One way to organize MP3 files is by putting them into separate folders. Folders make it easier to quickly find the music you
want.
1. Connect a USB thumb drive to one of the USB ports on CDMix USB.
2. When the USB thumb drive is ready, the LCD display will change from “SCAN” to displaying the folder name.
3. Press the FOLDER button.
4. Use the TRACK SELECT knob to scan through the named folders contained on the drive. Press the TRACK SELECT
knob to open a folder.
5. Use the TRACK SELECT knob to scan through the tracks contained within the folder.
6. Press the TRACK SELECT knob to play a track.
Looping
The CDMix USB has a seamless looping feature, which means that if you define a loop, there is no delay when the music
loops back to the beginning. This looping feature allows you to be very creative with your mixes, allowing you to extend
desired sections of a song for as long as you want, or create remixes on the fly!
There are three buttons used for looping:
LOOP IN: This is the point where you would like a loop to start. By default, a "loop in" point is automatically set at the
beginning of the song. To define a new "loop in" point, press the LOOP IN button when the song reaches the desired point
where you would like a loop to begin. The LOOP IN button will light, indicating a new "loop in" point has been set. The
RELOOP/STUTTER button will also illuminate indicating that you can now press it to immediately go back to the "loop in"
point and begin playing. If you wish to change the "loop in" point, just press the LOOP IN button again.
LOOP OUT: Sets the end point of the loop. The first time you press LOOP OUT while a song is playing, the LOOP OUT button
will blink, and the song will begin playing in a seamless loop, starting from the "loop in" point and ending at the "loop out"
point. To release, or end the loop, press LOOP OUT a second time and play will continue forward when the song passes the
previously set loop out point. The LOOP OUT button will then be continuously lit, indicating that the loop is now in memory for
re-looping purposes.
RELOOP / STUTTER: Repeats play or "stutters" (if repeatedly tapped) from the loop in point. If a loop has previously been
set, it plays and repeats that loop, until the loop is released by pressing the LOOP OUT button.
Press LOOP IN to set the beginning of the loop, then
press LOOP OUT to set the end point of the loop. Once
you press LOOP out, the CDMix USB will loop between
these two points. If you press LOOP OUT again, the
CDMix USB will exit the loop and continue playing
normally.
If you press LOOP IN but then
decide you want to set a
different "loop in" point, just
press LOOP IN again. Then
press LOOP OUT to start
looping between the IN and OUT
points.
The "loop in" point can also be used as a
way to "stutter" play beginning from a
certain point in a song. Just press LOOP IN
to set the "stutter point", then press
RELOOP to begin play from the stutter
point. Each time you press RELOOP the
CDMix USB will jump back to the stutter
point and play from that point.

9
BPM (Beats Per Minute)
MATCHING THE BPM (BEATS PER MINUTE)
Match the tempo by hearing the music of PLAYER 1 and PLAYER 2 and adjusting the pitch. When the tempo of the
music of the selected CD player is slow compared to the tempo of the other player, move the slider to the ( + ) side
and match the tempo. When faster, move the pitch slider to the ( - ) side. The following illustration shows the case of
matching the pitch of PLAYER 2 to the pitch of the music being played on PLAYER 1.
1. Press PLAY/PAUSE to start PLAYER 1.
2. Press PLAY/PAUSE to start PLAYER 2.
3. Listen to PLAYER 2 in your headphones. If the beat of Channel 2 (in the headphones) is
faster than Channel 1, slow down the beat of Channel 2 using the pitch control.
4. If the beat of Channel 2 (in the headphones) is slower than the beat of Channel 1, speed up
the beat using the pitch control.
BEAT-MATCHING USING PITCH BEND
If you find the BPMs (beats per minute or tempo) are the same but the drum beats are not matched, you will need to
temporarily change the pitch. After matching the BPMs, adjust the pitch temporarily as follows:
1. When PLAYER 2 is ahead, rotate its JOG WHEEL counter-clockwise.
2. When PLAYER 2 is behind, rotate its JOG WHEEL clockwise.
3. The pitch changes automatically while the JOG WHEEL is rotated. The faster you rotate the wheel, the more
the pitch is changed. Releasing the wheel results in a return to the original pitch with the BPMs once again the
same.

10
Guía del usuario (Español)
Introducción
Contenido de la caja
CDMix USB
Cable de alimentación
Guía del usuario
Folleto de información sobre la seguridad y la garantía
Soporte
Para obtener la información más completa acerca de este product (los requisitos del sistema, compatibilidad, etc) y
registro del producto, visite numark.com.
Para soporte adicional del producto, visite numark.com/support.
Instalación rápida / diagrama de conexión
1. Asegúrese de que todos los artículos indicados en CONTENIDO DE LA CAJA estén incluidos en la misma.
2. LEA EL FOLLETO DE INFORMACIÓN SOBRE LA SEGURIDAD Y LA GARANTÍA ANTES DE UTILIZAR EL
PRODUCTO.
3. Estudie el diagrama de conexión incluido en esta guía.
4. Coloque el CDMix USB en una posición adecuada para su funcionamiento.
5. Asegúrese que todos los dispositivos estén apagados y que todos los faders y perillas de ganancia estén en
posición “cero".
6. Conecte todas las fuentes de entrada estéreo como se indica en el diagrama.
7. Conecte las salidas estéreo a los amplificadores de potencia, bandejas de cinta magnética y/u otras fuentes
de audio.
8. Enchufe todos los dispositivos al suministro de CA.
9. Encienda todo en el siguiente orden:
•Fuentes de entrada de audio (por ejemplo, giradiscos, reproductores de CD, etc.)
•Mezclador
•Por último, cualquier amplificador o dispositivo de salida
10. Al apagar, realice siempre esta operación en sentido inverso, apagando:
•Amplificadores
•Mezclador
•Finalmente, cualquier dispositivo de entrada
Los elementos que no se enumeran en Contenido de la caja se venden por separado.
SUMINISTRO
ELÉCTRICO
MONITORES
DEL AUDITORIO
REPRODUCTOR
DE MP3
MICRÓFONO
MONITORES
DE CABINA

11
Características
Panel superior
1. EXPULSAR –Pulse este botón para abrir o cerrar la bandeja del disco CD.
2. RUEDA DE AVANCE POR PASOS –Esta rueda cumple distintas funciones que dependen del modo
en que se encuentra.
a) Si no se está reproduciendo una pista, la RUEDA DE AVANCE POR PASOS busca lentamente a
lo largo de los frames de la pista. Para determinar un nuevo punto de cue, gire la RUEDA DE
AVANCE POR PASOS y comience a reproducir una vez que haya determinado la posición
adecuada. Pulse CUE para volver a ese punto de cue.
b) Si se está reproduciendo una pista, la RUEDA DE AVANCE POR PASOS inflexiona
temporalmente el pitch de la misma. Al girar la RUEDA DE AVANCE POR PASOS en sentido
horario, se la acelera temporalmente, mientras que si se gira en sentido antihorario se la
desacelera. Esto es útil para la igualación de beats.
c) Cuando está activado el botón SEARCH (Buscar), al girar la RUEDA DE AVANCE POR PASOS
se mueve rápidamente a lo largo de la pista.
d) Cuando está activado el botón SCRATCH (Rayar), al girar la RUEDA DE AVANCE POR PASOS
se “raya” el audio de una pista, como una púa en un disco.
Nota: La RUEDA DE AVANCE POR PASOS no es sensible al tacto.
3. RAYAR – Activa o desactiva el modo de rayado. Cuando se activa, al girar la RUEDA DE AVANCE
POR PASOS se crea un efecto 'scratch' (Rayado).
Nota: Esta característica no resulta óptima para buscar a
lo largo de pasajes de audio prolongados. Para realizar
búsquedas más prolongadas, active la función SEARCH
(Buscar).
4. REVERSA – Pulse este botón para reproducir la pista en
sentido inverso (se enciende el botón). Púlselo
nuevamente para volver a la reproducción normal.
5. FRENADO – Pulse este botón para activar el frenado (se enciende el botón). Cuando se activa el
frenado, al poner la pista en pausa se produce el enlentecimiento de la reproducción antes de
detenerse, simulando el efecto de parar el motor de un giradiscos. El frenado también afecta al
tiempo de arranque cuando se pulsa REPRODUCIR. Ajuste el tiempo de frenado manteniendo
pulsado BRAKE y girando la RUEDA DE AVANCE POR PASOS.
Para crear un punto de cue, mueva la RUEDA
DE AVANCE POR PASOS cuando la pista se
pone en pausa. El punto de cue se establece
una vez que comience la reproducción desde
ese punto (pulsando REPRODUCIR / PAUSA).
11
22
345345
66
77 8
9 9
10 10
11 11
12 13 14 12 13 14
15 15
16
16
17 17
18 18
19 19
20
20
21 21
2222 23 2222 23
24 24
25
26
26
26
27
28
29
29
27 26 27
28
29
27
29
30
31 31 3131
32
33
34
35
36
37
38
39
40
8
30

12
6. BUSCAR – Activa o desactiva el modo de búsqueda. Pulse este botón para usar la RUEDA DE
AVANCE POR PASOS a fin de explorar rápidamente la pista. Cuando el modo de búsqueda está
activo, el LED indicador se ilumina con luz roja.
7. CUE –Durante la reproducción, pulse CUE para volver al punto de cue y poner la pista en pausa.
Mantenga pulsado CUE para comenzar la reproducción desde el punto de cue y suéltelo para volver a
ese punto y poner la pista en pausa. Si la pista está en pausa, use la RUEDA DE AVANCE POR
PASOS para localizar un nuevo punto de cue.
8. REPRODUCIR / PAUSA – Reproduce o pone la pista en pausa.
Nota: Cuando está en pausa, al pulsar REPRODUCIR sólo se establece un nuevo punto de cue si se
ha movido la RUEDA DE AVANCE POR PASOS.
9. SELECCIÓN DE PISTA – Se utiliza para seleccionar la pista a reproducir. Pulse y retenga uno de los
PERILLA TRACK SELECT (Selección de pista) para cambiar rápidamente de pista.
10. CARPETA – Pulse este botón para entrar al modo Folder (Carpeta). El nombre de la carpeta aparece
en la pantalla LCD. Aquí, puede pulsar y retener el botón FOLDER y usar los perilla TRACK SELECT
para seleccionar una carpeta. Suelte FOLDER para entrar a la carpeta seleccionada (Cuando esté
dentro de una carpeta, use los perilla TRACK SELECT (Selección de pista) para seleccionar la pista).
Pulse FOLDER otra vez para salir del modo de carpeta.
11. +10 – Pulse TRACK SELECT perilla para saltar por la lista de pistas del CD de a 10 pistas por vez.
12. ENTRADA AL LOOP – Establece un nuevo punto de cue o el punto inicial de un loop (punto "Loop
In") durante la reproducción.
13. SALIDA DEL LOOP – Establece el punto final de un loop (punto "Loop Out") y comienza a reproducir
dicho loop. Mientras se reproduce un loop, pulse LOOP OUT para liberarlo del loop y continuar la
reproducción normal.
14. REPETICIÓN DEL LOOP – Reproduce la pista inmediatamente desde el comienzo de un loop (y
reactiva dicho loop).
15. PITCH – Se utiliza para activar o desactivar el PITCH FADER (Fader de pitch). Púlselo para recorrer
los rangos de pitch disponibles (±4%, 8%, 16%, y 100%). El rango vigente se indica en la pantalla
LCD y mediante LED de porcentaje de pitch.
16. FADER DE PITCH – Es posible cambiar el pitch pulsando el botón PITCH, que ilumina el LED PITCH,
y moviendo luego el fader. El pitch no varía si el LED PITCH está apagado.
17. INFLEXIÓN DE PITCH -/+ – Puede usar estos dos botones de inflexión de pitch para ajustar
temporalmente el pitch y el tempo de la música.
18. TAP – Pulse el botón TAP una vez para activar el modo de BPM automático y mostrar el valor de los
BPM para la pista en el LCD. Pulse el botón TAP repetidamente al ritmo de la música en esa pista
para entrar al modo de BPM manual. Para volver al modo de BPM automático, mantenga pulsado el
botón de TAP durante 2 segundos.
19. MASTER TEMPO (TEMPO PRINCIPAL) – Cuando Master Tempo está activado, fijará la pista a su
tempo original.
20. SOURCE (FUENTE) – Púlselo para seleccionar USB A, USB B, o una fuente de audio de CD.
21. TIME / ID3 TAG (TIEMPO / ETIQUETA ID3) – Pulse y suelte este botón para alternar entre la
visualización del tiempo transcurrido "ELAPSED", el tiempo restante en la pista "REMAINING" y el
tiempo restante en todo el CD "TOTAL". Para acceder a la información disponible en la etiqueta ID3,
mantenga pulsado el botón TIME / ID3 TAG y gire el botón TRACK. Aparecerá la información de la
etiqueta ID3, como por ejemplo el TÍTULO, ÁLBUM y ARTISTA. La información de etiquetas ID3 se
mostrará para aquellas pistas en el CD MP3 o la unidad de memoria USB que fueron creadas con
esta información añadida a ellas.
22. INDIVIDUAL – Pulse este botón para cambiar entre reproducción individual (la bandeja se detiene al
final de cada pista) o reproducción continua (se reproduce el disco completo sin interrupciones).

13
23. PROGRAMA – Este botón le ayuda a crear un programa —una secuencia de pistas a reproducir
continuamente.
•IMPORTANTE: Antes de realizar ninguna las funciones del programa siguientes, ponga la
reproducción en pausa pulsando REPRODUCIR / PAUSA.
•Para crear un programa:
1. Pulse PROGRAM. Destella "P–##" en la LCD ("##" indica qué numero ocupa esa pista en
el programa — "P–01," "P–02," etc.).
2. Gire la PERILLA TRACK (Pista) para seleccionar una pista y luego presione dicha perilla
para introducirlo en el programa. Repita este proceso para agregar más temas al
programa.
3. Cuando termine, pulse REPRODUCIR para reproducir el programa o PROGRAM
(Programa) para salir y volver al modo de reproducción normal. (Cuando se almacena un
programa, aparece "PG" en la LCD.)
•Para reproducir el programa:
1. Con un programa almacenado, pulse PROGRAM (Programa). Destella "P–##" en la
pantalla LCD. La cantidad total de pistas del programa aparece a la izquierda de la LCD
(como "P##").
2. Pulse REPRODUCIR para reproducir la primera pista del programa. Cuando se reproduce
un programa, destella "PG" en la pantalla LCD.
•Para salir de un programa (sin eliminarlo), si está reproduciendo una pista del programa,
póngala en pausa y pulse y retenga PROGRAM (Programa).
•Para agregar pistas a su programa almacenado:
1. Si estaba reproduciendo su programa (si destella "PG"), pulse y retenga PROGRAM
(Programa). Volverá a la primera pista de ese programa. Si no estaba reproduciendo su
programa (si "PG" está fijo), pase al paso siguiente.
2. Pulse PROGRAM. Destella en la LCD la siguiente ranura disponible del programa (como
"P–##"). La cantidad total de pistas del programa aparece a la izquierda de la LCD (como
"P##").
3. Gire la PERILLA TRACK (Pista) para seleccionar una pista y luego presione dicha perilla
para introducirlo en el programa. Repita este proceso para agregar más temas al
programa.
4. Cuando termine, pulse REPRODUCIR para reproducir el programa o PROGRAM
(Programa) para salir y volver al modo de reproducción normal. (Cuando se almacena un
programa, aparece "PG" en la LCD.)
•Para eliminar un programa:
1. Pulse PROGRAM. Destella "P–##" en la pantalla LCD.
2. Presione y retenga PROGRAM (Programa). Desaparece "PG" de la LCD y volverá a la
primera pista reproducible de su CD/dispositivo.
24. LCD –Indica todas las funciones del CD a medida que van teniendo lugar.
25. USB – Puede conectar aquí unidades de almacenamiento miniatura USB (con sistema de archivos
FAT16 o FAT32) con MP3. Para ver el contenido, use el botón SOURCE (Fuente) y la PERILLA TRACK
(Pista) para seleccionar "USB A" o "USB B" como fuente. (Ambas bandejas pueden reproducir pistas
del mismo dispositivo USB simultáneamente.)
26. GANANCIA DEL CANAL – Ajusta el nivel de ganancia pre-fader y pre-ecualización del canal.
27. AGUDOS DEL CANAL – Permite ajustar las altas frecuencias (agudos) del canal correspondiente.
28. MEDIOS DEL CANAL – Permite ajustar las frecuencias medias del canal correspondiente.
29. GRAVES DEL CANAL – Permite ajustar las frecuencias bajas (graves) del canal correspondiente.
30. FADER DE CANAL – Permite ajustar el nivel de audio del canal correspondiente.
31. CUE DE CANAL – Envía el audio pre-fader (previo al atenuador) al canal de cue para monitoreo con
los auriculares.
32. MEZCLA DE CUE – Gírelo para mezclar cue y programa en el canal de auriculares. Cuando está en el
extremo izquierdo, sólo se oyen los canales aplicados a CUE. Cuando se gira totalmente a la derecha,
se oye sólo la mezcla del programa.
33. GANANCIA DE CUE – Permite ajustar el volumen del cue
por los auriculares.
34. AURICULARES – Conecte a esta salida sus auriculares
de 1/4 pulg. o 1/8 pulg. para hacer cue y monitorear la
mezcla.
35. MICRÓFONO SI / NO – Permite silenciar y anular el silenciamiento de la señal de micrófono. Cuando
está silenciada, la señal de micrófono no se aplica a la mezcla maestra.
Nota: Si va a conectar micrófonos,
asegúrese de que la perilla de ganancia
del canal del micrófono esté en el ajuste
más bajo antes de conectarlo.

14
36. CROSSFADER – Combina la reproducción de audio entre los canales 1 y 2. Deslícelo a la izquierda
para reproducir el canal 1 y a la derecha para reproducir el canal 2.
Nota: El usuario puede reemplazar el crossfader. Simplemente, desatornille los tornillos grandes que
lo sujetan, sáquelo hacia fuera y desconecte el cable. Conecte el nuevo crossfader y atornille
nuevamente la placa de montaje en la unidad. Pruebe y confirme que el nuevo crossfader funciona de
la manera deseada.
37. INDICADOR DE NIVEL ESTÉREO – Muestra el nivel de audio de la mezcla de programa.
38. VOLUMEN MAESTRO – Permite ajustar el volumen de salida de la mezcla de programa.
39. MONO / ESTÉREO – Permite ajustar la mezcla maestra para funcionamiento mono o estéreo.
40. MIC 2/AUX (2 way toggle switch) – Selects Mic 2 or Auxiliary input for this channel.
Panel trasero
1. CONECTOR DE ALIMENTACIÓN –Conecte aquí el cable de alimentación provisto.
2. INTERRUPTOR DE ENCENDIDO –Permite encender y apagar la unidad. La unidad debe apagarse
siempre con este interruptor en primer lugar, antes de retirar cualquier fuente de alimentación externa.
3. ENTRADA AUXILIAR (RCA) – Conecte a esta entrada una fuente de audio de nivel de línea adicional.
Para aplicar la señal de la fuente auxiliar a la mezcla, debe colocar el conmutador selector de entrada
del canal auxiliar (ubicado en el panel superior) en “AUX”.
4. ENTRADA DE MICRÓFONO 1 – Conecte a esta entrada un
micrófono con un cable XLR o de 1/4 pulg.
5. ENTRADA DE MICRÓFONO 2 – Conecte a esta entrada un
micrófono de 1/4 pulg. si desea usar un micrófono adicional en
el canal auxiliar. Para aplicar la señal del MICRÓFONO 2 a la
mezcla, coloque el conmutador SELECTOR DE ENTRADA del
canal auxiliar (ubicado en el panel superior) en “MIC”.
6. SALIDA MAESTRA (XLR) – Conecte esta salida XLR de baja impedancia a un sistema de megafonía
o monitores alimentados. Controle el nivel de esta salida con el fader MASTER del panel superior.
7. SALIDA MAESTRA (RCA) – Use cables RCA estándar para conectar esta salida a un sistema de
altavoces o amplificador. Controle el nivel de esta salida utilizando la perilla MASTER del panel
superior.
8. USB – Puede conectar aquí unidades de almacenamiento miniatura USB (con sistema de archivos
FAT16 o FAT32) con MP3. Para ver el contenido, use el botón SOURCE (Fuente) y la PERILLA TRACK
(Pista) para seleccionar "USB A" o "USB B" como fuente. (Ambas bandejas pueden reproducir pistas
del mismo dispositivo USB simultáneamente.)
Nota: Si va a conectar micrófonos,
asegúrese de que la perilla de
ganancia del canal del micrófono
esté en el ajuste más bajo.
1
2
34
5
67
8

15
Pantalla LCD
1. PLAY – Está activo si la unidad está
reproduciendo una pista.
2. CUE – Se ilumina de forma continua si la unidad
está detenida en un punto cue.
3. CD / USB – Indica si está reproduciendo pistas
de un CD cargado o dispositivo USB conectado.
4. NÚMERO DE PISTA O CARPETA – Muestra el
número de la pista o carpeta actual. Cuando se
está viendo o reproduciendo un programa, el
número aparece con una "P" adelante ("P01," "P02", etc.), que indica el número de esa pista en el programa.
5. TOTAL DE PISTAS – Muestra el número total de pistas disponibles en el CD o dispositivo USB. (En la vista
Folder (Carpeta), muestra el número total de carpetas disponibles en el dispositivo USB.)
6. MINUTOS – Muestra los minutos restantes o transcurridos dependiendo de la configuración del modo.
7. SEGUNDOS – Muestra los segundos restantes o transcurridos dependiendo de la configuración del modo.
8. FRAMES – El reproductor de CD divide un segundo en 75 frames para un cueing más preciso. Muestra los
frames restantes o transcurridos dependiendo de la configuración del modo.
9. MODO DE TIEMPO – Indica cuando se visualiza el tiempo restante de la pista ("Remaining" / Restante) o el
tiempo restante de todo el CD ("Total" / Total). Esta función se controla mediante el botón de tiempo (TIME).
10. BARRA DE TIEMPO – Muestra el tiempo restante o transcurrido dependiendo de la configuración del botón
de tiempo.
11. MODO DE REPRODUCCIÓN – Muestra cuando la unidad está configurada al modo Single Play (la bandeja
se detiene al final de cada pista) o Continuous Play (se reproduce el disco entero sin interrupciones). Esta
función se controla mediante el botón SINGLE.
12. RELOOP – Esto ilumina cuando un bucle está jugando.
13. BPM – Muestra el tempo en BPM (beats por minuto) de la pista actual. Cuando se muestra "AUTO BPM", el
tempo detectado automáticamente permanecerá iluminado en el LCD. Cuando se haya calculado el BPM
manual, el BPM parpadeará en el LCD.
14. PITCH – Muestra el cambio porcentual en pitch.
15. MT (TEMPO MAESTRO) – Indica que el botón MASTER TEMPO está activado gaged.
16. PG (PROGRAMA) – Indica que se está reproduciendo un programa.
17. VISUALIZACIÓN DE TEXTO – Muestra el nombre de carpeta o archivo cuando se navega por los MP3.
18. ETIQUETA ID3 – Muestra el tipo de etiqueta ID3 que se muestra en la visualización de texto.
Puntos de cue
Establecimiento de los puntos de cue:
Para localizar un nuevo punto de cue durante la reproducción, pulse primero el botón “REPRODUCCIÓN/PAUSA” (a
fin de poner la pista en pausa) y gire la RUEDA DE AVANCE POR PASOS para reproducir repetidamente partes
(frames) pequeñas del CD a medida que se mueve a la posición deseada. Para establecer la posición del nuevo
punto de cue, pulse “REPRODUCIR/PAUSA” (a fin de reanudar la reproducción).
Nota: Cuando está en pausa, al pulsar REPRODUCIR sólo se establece un nuevo punto de cue si se ha movido la
RUEDA DE AVANCE POR PASOS.
Operación de cue de retroceso:
1. Pulse el botón REPRODUCIR/PAUSA para comenzar el disco.
2. Pulse el botón “CUE” para regresar el disco a la última posición (punto de cue) desde donde se inició.
A
juste el punto de "CUE" con
la RUEDA DE AVANCE POR
PASOS
Play Interval Position on Disc
Pulse "REPRODUCCIÓN/PAUSA"
para que comience la música Pulse “CUE” para volver al
ultimo punto de partida
Posición en el disco
Operación de cue de retroceso
Intervalo de
reproducción
TRACK
FOLDER
Total
PG
MT
RELOOP
TITLE
ALBUM
ARTIST
Single Cont. Elapsed Total Remain
1
2
78
910
11
12
13
14
1
6
1718
15
4
56
3

16
Cómo navegar por las carpetas MP3
Una forma de organizar los archivos MP3 es colocarlos en carpetas separadas. Las carpetas permiten encontrar más rápida y
fácilmente la música que desea.
1. Conecte una unidad de memoria USB a alguno de los puertos USB en el CDMix USB.
2. Cuando la unidad de memoria USB esté lista, la pantalla LCD cambiará de “SCAN” (Explorar) a mostrar el nombre de la
carpeta.
3. Pulse el botón FOLDER (Carpeta).
4. Utilice la perilla TRACK SELECT (Selección de pista) para explorar los nombres de las carpetas contenidas en la unidad.
Pulse la perilla TRACK SELECT para abrir una carpeta.
5. Utilice la perilla TRACK SELECT para recorrer las pistas contenidas dentro de la carpeta.
6. Pulse la perilla TRACK SELECT para reproducir una pista.
Looping
El CDMix USB cuenta con una función de looping (creación de ciclos) sin discontinuidades, lo que significa que si usted
define un loop, no hay retardo cuando la música vuelve al comienzo del ciclo. La función de looping le permite ser muy
creativo con las mezclas, al darle la capacidad de extender las secciones deseadas de un tema tanto tiempo como desee o
crear remezclas sobre la marcha.
Se usan para looping tres botones.
LOOP IN: Es el punto donde desea iniciar un ciclo. Por defecto, se establece automáticamente un punto "loop in" al
comienzo del tema. Para definir un nuevo punto de "loop in", pulse el botón LOOP IN cuando el tema llega al punto deseado
en el que desea que comience el ciclo. El botón LOOP IN se enciende para indicar que se estableció un nuevo punto de "loop
in". El botón RELOOP/STUTTER también se ilumina, para indicar que ahora puede pulsarlo para volver inmediatamente al
punto de "loop in" e iniciar la reproducción. Si desea cambiar el punto de "loop-in", simplemente pulse el botón LOOP IN otra
vez.
LOOP OUT: Establece el punto final del ciclo. La primera vez que pulse LOOP OUT mientras se reproduce un tema, el botón
parpadea y el tema comienza a reproducirse en un ciclo sin discontinuidades, empezando en el punto de "loop in" y
terminando en el punto de "loop out". Para soltar o terminar el ciclo, presione LOOP OUT una segunda vez y la reproducción
continuará hacia delante cuando el tema pase el punto de "loop out" establecido anteriormente. El botón LOOP OUT
permanece encendido continuamente, para indicar que el ciclo está ahora en memoria para fines de repetición.
RELOOP: Repite la reproducción o "tartamudea" (si se pulsa repetidamente) desde el punto de "loop in". Si se estableció
previamente un ciclo, lo reproduce y repite hasta que se libera el ciclo pulsando el botón LOOP OUT.
Pulse IN para establecer el comienzo del ciclo y luego LOOP
OUT para establecer el final Una vez que pulse LOOP OUT,
el CDMix USB efectuará el ciclo entre esos dos puntos. Si
pulsa LOOP OUT otra vez, el CDMix USB sale del ciclo y
continúa la reproducción normal.
Si pulsa IN pero luego decide que desea
establecer un punto de "loop in" diferernte,
simplemente pulse IN otra vez. Luego,
pulse LOOP OUT para iniciar el ciclo entre
los puntos LOOP IN y LOOP OUT.
El punto de "loop in" se puede usar como
una manera de reproducir con
"tartamudeo" a partir de un cierto punto de
un tema. Simplemente pulse IN para
establecer el "punto de tartamudeo" y
luego RELOOP para comenzar a reproducir
desde este punto. Cada vez que pulse
RELOOP el CDMix USB salta de vuelta al
punto de tartamudeo y reproduce desde
ese punto.

17
BPM (beats por minuto)
IGUALACIÓN DE LOS BEATS POR MINUTO (BPM)
Iguale el tempo escuchando la música del REPRODUCTOR 1 y 2 y ajustando el pitch. Cuando el tempo de la
música del reproductor de CD seleccionado sea lento comparado con el del otro reproductor, desplace el cursor
hacia el lado del (+) e iguale el tempo. Cuando sea más rápido, desplace el cursor pitch hacia el lado del (-). La
siguiente ilustración muestra el caso en el que se iguala el pitch del REPRODUCTOR 2 con el pitch de la música
reproducida por el REPRODUCTOR 1.
1. Pulse REPRODUCIR/PAUSA para iniciar el REPRODUCTOR 1.
2. Pulse REPRODUCIR/PAUSA para iniciar el REPRODUCTOR 2.
3. Escuche el REPRODUCTOR 2 en sus auriculares. Si el beat del canal 2 (en los auriculares) es más rápido que
el del canal 1, desacelere el beat del canal 2 por medio del control del pitch.
4. Si el beat del canal 2 (en los auriculares) es más lento que el beat del canal 1, acelere el beat por medio del
control del pitch.
IGUALACIÓN DEL BEAT HACIENDO USO DE LA INFLEXIÓN DE PITCH
Si observa que los BPM (beats por minuto o tempo) son iguales pero, sin embargo, los beats de la batería no se
corresponden, necesitará cambiar el pitch de forma temporal. Una vez haya igualado los BPM, ajuste el pitch
temporalmente como se explica a continuación:
1. Cuando el REPRODUCTOR 2 se adelanta, gire su RUEDA DE AVANCE POR PASOS en sentido antihorario.
2. Cuando el REPRODUCTOR 2 se atrasa, gire su RUEDA DE AVANCE POR PASOS en sentido horario.
3. El pitch cambia de forma automática a medida que se gira la RUEDA DE AVANCE POR PASOS. Cuanto más
rápido gira la rueda, más cambia el pitch. Al soltar la rueda, el pitch vuelve al valor original con los BPM
nuevamente iguales.

18
Guide d'utilisation (Français)
Présentation
Contenu de la boîte
CDMix USB
Câble d'alimentation
Guide d’utilisation
Livret des consignes de sécurité et des informations concernant la garantie
Assistance
Pour les dernières informations concernant ce produit (la configuration système minimale requise, la compatibilité, etc)
et l’enregistrement du produit, veuillez visitez le site numark.com.
Pour toute assistance supplémentaire, veuillez visiter le site numark.com/support.
Utilisation rapide / schéma de connexion
1. Assurez-vous que tous les articles énumérés dans le contenu de la boîte de ce guide sont inclus dans la boîte.
2. VEUILLEZ LIRE LE LIVRET DES CONSIGNES DE SÉCURITÉ ET DES INFORMATIONS SUR LA
GARANTIE AVANT D'UTILISER LE PRODUIT.
3. Examinez le schéma de connexion de ce guide.
4. Placez le CDMix USB en position de fonctionnement.
5. Assurez-vous que tous les appareils sont hors tension et que tous les atténuateurs et le gain sont réglés à
« zéro ».
6. Branchez toutes les sources d'entrées stéréo tel qu'indiqué sur le schéma.
7. Branchez toutes les sorties aux amplificateurs de puissance, aux lecteurs de cassettes et/ou aux sources
audio.
8. Branchez tous les appareils à une prise de courant alternatif (CA).
9. Mettez tous les appareils sous tension dans l'ordre suivant :
•sources d'entrée audio (c.-à-d. tourne-disques, lecteurs de disques compacts, etc.);
•console de mixage;
•en dernier, tous amplificateurs ou appareils de sortie.
10. Pour mettre hors tension, toujours inversez l'opération :
•amplificateurs;
•console de mixage;
•en dernier, tous les appareils d'entrée.
Les éléments qui ne figurent pas dans le Contenu de la boîte sont vendus séparément.
ALIMENTATION
MONITEUR DE SALLE
LECTEUR MP3
MICROPHONE
MONITEUR DE
CABINE

19
Caractéristiques
Panneau supérieur
1. EJECT – Appuyez sur cette touche pour ouvrir ou fermer le compartiment disque.
2. MOLETTE – La molette permet de commander plusieurs fonctions, selon le mode de lecture en cours.
a) Si aucune piste n'est en cours de lecture, la molette permet de parcourir toutes les trames de la
piste. Pour régler un nouveau point de repère, faites tourner la molette, puis lancez la lecture
lorsque vous avez trouvé le bon point. Appuyez sur la touche CUE pour retourner à ce point de
repérage.
b) Lorsqu’une piste est en cours de lecture, tourner la molette permet de modifier temporairement
la vitesse de lecture de la piste. Tourner la molette dans le sens horaire permet d’augmenter
temporairement la vitesse de la piste, alors que tourner dans le sens antihoraire permet de la
diminuer. Ceci est utile lors de la synchronisation du tempo.
c) Lorsque la touche SEARCH est enfoncée, tourner la molette permet de parcourir rapidement la
piste.
d) Lorsque la touche SCRATCH est enfoncée, tourner la molette permet d’ajouter un effet de
« scratch » sur la piste, comme une pointe de lecture sur un vinyle.
Remarque : La molette est sensible à la dynamique.
3. SCRATCH – Cette touche permet d'activer et de désactiver le mode scratch. Lorsqu’il est activé, la
molette permet de créer un effet de « scratch ».
Remarque : Cette fonction n’est pas optimale pour effectuer une recherche sur de longs passages
audio. Pour les longs passages, activez la fonction de recherche.
4. REVERSE – Cette touche permet de faire la lecture inversée d’une piste (la touche s’allume). Appuyez
de nouveau afin de revenir au mode de lecture normal.
5. BRAKE – Cette touche permet d’activer la fonction de freinage (la touche devrait s’allumer).
Lorsqu’elle est activée, la lecture de la piste ralentie avant de s’arrêter, simulant le moteur d’un tourne-
disque qui s’arrête. La fonction de freinage peut modifier le temps de démarrage du plateau lorsque la
touche PLAY est enfoncée. Afin de régler la durée de freinage, maintenez la touche BRAKE enfoncée
tout en tournant la molette.
6. SEARCH – Cette touche permet d'activer ou de
désactiver le Mode de recherche. Enfoncer cette touche
permet d'utiliser la molette pour parcourir rapidement la
musique. Le témoin DEL devient rouge lorsque le Mode
de recherche est activé.
Pour mémoriser un nouveau point de repère,
tournez la molette lorsque la lecture est en
mode pause. Le point de repère sera
programmé une fois que la lecture
recommencera à partir de ce point (en
appuyant sur PLAY / PAUSE).
11
22
345345
66
77 8
9 9
10 10
11 11
12 13 14 12 13 14
15 15
16
16
17 17
18 18
19 19
20
20
21 21
2222 23 2222 23
24 24
25
26
26
26
27
28
29
29
27 26 27
28
29
27
29
30
31 31 3131
32
33
34
35
36
37
38
39
40
8
30

20
7. CUE – Lorsque la touche CUE est enfoncée durant la lecture, cela permet de retourner au point de
repère et de pauser la lecture de la piste. Maintenez la touche CUE enfoncée pour lancer la lecture
d'un point de repère, et relâchez-la pour revenir à ce point de repère et pauser la piste. Lorsque la
lecture est en mode pause, la molette peut être utilisée afin de trouver un nouveau point de repère.
8. LECTURE/PAUSE – Cette touche permet de lancer ou d’arrêter la lecture de la piste.
Remarque : En mode pause, la touche de lecture permet de programmer un nouveau point de repère
seulement si la molette a été déplacée.
9. TRACK SELECT – Ces touches permettent de sélectionner la piste à jouer. Enfoncez et maintenez
une des bouton TRACK SELECT afin de changer rapidement de piste.
10. FOLDER – Cette touche permet de passer au mode dossier. Le nom du dossier s’affiche à l’écran. À
partir de ce mode, vous n’avez qu’à maintenir la touche FOLDER enfoncée et utilisez les bouton
TRACK SELECT afin de sélectionner un dossier. Relâchez la touche FOLDER afin d’accéder au
dossier sélectionné. (Une fois le dossier ouvert, utilisez les bouton TRACK SELECT afin de
sélectionner une piste). Appuyez de nouveau sur la touche FOLDER pour quitter le mode dossier.
11. +10 – Cette TRACK SELECT touche permet de parcourir les pistes du CD, 10 pistes à la fois.
12. LOOP IN – Cette touche permet de programmer un nouveau point de repère ou un point de départ
d'une boucle (loop in) durant la lecture.
13. LOOP OUT – Cette touche permet de programmer le point de sortie de boucle (loop out) et de lancer
la boucle. Lorsqu’une boucle joue, appuyer sur cette touche permet d'arrêter la boucle et de retourner
à la lecture normale.
14. RELOOP – Cette touche permet de lancer la piste immédiatement à partir du début d’une boucle (et
réactive la boucle).
15. PITCH – Cette touche permet d'activer et de désactiver le potentiomètre de la vitesse de lecture.
Appuyer sur la touche permet de faire défiler les tonalités possibles : (±4%, 8%,16%, et 100%). La
plage en cours sera indiquée à l’écran et par les indicateurs de pourcentage DEL.
16. POTENTIOMÈTRE DE LA VITESSE DE LECTURE – La vitesse de lecture peut être modifiée en
appuyant sur la touche PITCH, allumant ainsi les DEL PITCH, et puis en déplaçant le potentiomètre.
La vitesse de lecture ne sera pas modifiée si les DEL sont éteintes.
17. PITCH BEND -/+ – Ces deux touches permettent d’ajuster temporairement la vitesse de lecture et le
tempo de la musique.
18. TAP – Appuyez sur la touche TAP une fois pour activer le mode de synchronisation automatique du
BPM (AUTO BPM) et afficher le BPM pour la piste encours sur l'écran ACL. Tapez cette touche au
tempo de la musique en cours de lecture sur le module correspondant afin d'accéder au mode de
synchronisation manuelle du BPM (MANUAL BPM). Pour retourner en mode de synchronisation
automatique du BPM (AUTO BPM), maintenez la touche TAP enfoncée pendant 2 secondes.
19. MASTER TEMPO – Lorsque la fonction Master Tempo est activée, le tempo original de la piste est
verrouillé.
20. SOURCE – Cette touche permet de sélectionner la source audio : USB A, USB B ou CD.
21. TIME/ID3 TAG – Enfoncez et relâchez cette touche afin de modifier le mode d'affichage de la durée
entre le temps de lecture écoulé « ELAPSED », le temps restant de la piste « REMAINING » et le temps
restant sur le disque « TOTAL ». Pour accéder aux métadonnées ID3, maintenez la touche TIME/ID3
TAG enfoncée et tournez le bouton TRACK. Les métadonnées ID3 suivantes s’afficheront : titre
(TITLE), album (ALBUM) et artiste (ARTIST). Les métadonnées ID3 s'affichent lorsque les pistes
contenues sur le CD MP3 ou la clé USB ont été enregistrées avec ces données.
22. SINGLE – Cette touche permet de permuter entre le mode Single Play (la lecture s’arrête à la fin de
chaque piste) et le mode Continuous Play (les pistes jouent l’une après l’autre sans interruption).
Other manuals for cdmix usb
2
Table of contents
Languages:
Other Numark Dj Equipment manuals

Numark
Numark NV User manual

Numark
Numark DXM01 Technical document

Numark
Numark IDJ PRO User manual

Numark
Numark MIXSTREAM PRO User manual

Numark
Numark iDJ Live II User manual

Numark
Numark C3 User manual

Numark
Numark M2 User manual

Numark
Numark NS6 User manual

Numark
Numark NS6 User manual

Numark
Numark DJ Equipment Instruction manual

Numark
Numark MIXDECK EXPRESS BLACK User manual

Numark
Numark IDJ PRO User manual

Numark
Numark X5 User manual

Numark
Numark cdmix usb User manual

Numark
Numark NS6 II User manual

Numark
Numark iDJ3 User manual

Numark
Numark NVII User manual

Numark
Numark M4 User manual

Numark
Numark Mixtrack User manual

Numark
Numark STEALTH CONTROL Instruction manual