Numark VJ01 Technical document

Quick Start Owner’s Manual
Manual de inicio rápido del usuario (ESPAŃOL)
Kurzbedienungsanleitung (DEUTSCH)
Guide d’utilisation simplifié (FRANÇAIS)
Manuale rapido di utilizzazione (ITALIANO)
CONTENIDOS DE LA CAJA
•Unidad DVD
•Cable de alimentación
•Cables de video RCA
CONTENUTI DELLA CONFEZIONE
•Unità DVD
•Cavo di alimentazione
•cavi video RCA
CONTENU DE LA BO
Î
TE
•Lecteur DVD
•Câble d’alimentation
•Câbles vidéo RCA
I
NHALT DER VERPACKUN
G
•DVD gerät
•Stromkabel
•RCA Videokabel
BOX CONTENT
S
•DVD Main Unit
•Power Cable
•RCA Video Cables

2
Quick Setup Guide
1. Make sure all items listed on the front of this guide are included in the box.
2. READ SAFETY INSTRUCTION BOOKLET BEFORE USING THE PRODUCT
3. Study this setup diagram. There are various ways to use the product. The diagram shows ways in
which you can utilize the features of this product.
4. Place device in an appropriate position for operation.
5. Make sure all devices are turned off.
6. Connect the outputs to audio devices and video monitors.
7. Make sure that all faders on external devices are set at zero.
8. Plug your device and other devices into AC power.
9. Switch everything on in the following order.
•This device.
•Any monitors and audio devices.
10. When turning off, always reverse this operation by turning everything off in the following order:
•Any monitors and audio devices.
•This device.
11. Go to http://www.numark.com and register your product.

3
Front Panel
1. Menu Navigation Controls: Controls to
navigate through the menus on a DVD.
2. Playback control: Contains Play,
Pause, Cue, Fast Forward, Rewind, Next
Track, Previous Track, Slow Motion and
the Program Function.
3. Pitch Fader: Adjusts the playback
pitch/tempo. This feature can be
disabled by pressing the Pitch button
located at (3b).
4. Menu: Opens the menu system of a
compatible DVD.
5. Setup: This button will enter the DVD
player setup mode on the screen which
can be navigated by the ‘Menu
Navigation Controls.
6. Title: Goes to the title menu of
compatible DVD discs.
7. Subtitle: Turn subtitles on and off.
8. Function buttons: These features add
functionality to the DVD Player and are
described later in this manual.
9. Display: The DVD is displayed here.
10. Headphone Gain: Use this knob to
adjust headphone volume.
11. Pitch Bend: Use these buttons to
momentarily change the speed of a DVD.
12. Loop: This button allows you to loop a
section of a DVD. Press it once to set
the beginning of the loop, then press it
again to set the end point of the loop.
13. Open/Close: Opens and closes Disk
Tray. BE SURE TO ALWAYS USE
BUTTON TO OPEN AND CLOSE.
Rear Panel
14. S-Video Output: Output to compatible S-Video monitoring device.
15. Composite Video Output: Output to compatible video monitoring device.
16. RCA Audio Stereo Output: Plug into audio mixer or amplifier.
17. Coaxial Digital Audio Output: Commonly known as SPDIF, connect to compatible SPDIF decoder.
18. IEC Power Connector: Connect your supplied power cable here.
19. Power Switch: Use this to turn the unit on and off.

4
Menu Navigation Controls
ENTER
Pressing the ‘MENU’ button will bring the DVD
into its menu section if one exists. To select
an item on the screen press the ‘ENTER’
button.
Many DVD’s have menus where the arrows will
move to corresponding sections on the screen.
When the picture is zoomed, the viewed
section of the zoomed video can be moved
with the Menu Navigation Buttons.
Playback Controls
Play: To play any section of the DVD press
the play button on the bottom right. The
pause button is located to its left.
Pressing “Play” to start, then pressing “Pause”
and then “Play” again, a new cue point will be
set. Pressing “Cue” will return to the last
pause position and will be the new cue point
Slow: When activated, there are four different
speed settings which are displayed on the
monitor. Press the OSD button to the on
screen display on or off.
Program: To use the program function, press
the ‘PROGRAM’ button and a menu will come
up on screen where you can select the desired
tracks, or chapter (for DVDs) and put them in
the desired playback order listed on the left
side of your monitor. Use the ‘Menu
Navigation Controls’ to scroll through the
program order and the track/chapter order.
First select the desired program position by
highlighting the program number. Press the
right arrow on the ‘Menu Navigation Controls’
to then select the desired track to play by
pressing ‘ENTER’.
Fast Forward/Rewind: The fast forward and
rewind features set the speed that the media
can be searched while playing. The speeds are
X2, X4, X8, X16, and X32.
Track Forward/Back: The track change
buttons will move the media to the next track
or chapter. Pressing the ‘Back’ button will
bring the current track to the beginning. Press
‘Back’ again to go to a previous track.

5
Setup Menu
•Language Setup: (Note: Some of the settings can only be changed when the device is not
currently paying media)
oOSD: On Screen Display Language Selection.
oMenu: Language of the Menu System.
oAudio: Default Audio Language.
oSubtitle: Default Subtitle Language.
•Screen Setup:
oTV Type:
4:3 PS: Select if you have a regular television and to view 16:9 software in
the pan and scan style.
4:3 LB: Select if you have regular television and to view 16:9 in the
letterbox style.
16:9: Select if using a wide screen television.
oScreen Saver: ON/OFF.
oTV System: Select your monitor style. (usually depends on your country)
NTSC. (mostly in Americas)
PAL. (use if NTSC doesn’t work)
Auto Select.
oBrightness Control:
Normal.
Bright.
Soft.
oContrast Control.
•Audio Setup:
oDigital Out Settings: Your device has a digital out for each player. The settings for this
digital out have three options. Note: The SPDIF can not be used as a stereo audio
output. It must go to a compatible decoder.
SPDIF/PCM: Sends information to compatible decoder.
SPDIF/RAW: Separate format for sending audio information to compatible
decoder.
Off.
•Custom Setup:
oAngle Mark.
Viewing Angles Change Option Toggle.
Function Buttons
NOTE: Not all of the functions can be used with every DVD.
DISPLAY: Shows current disc information on the screen.
OSD: Toggles the on screen display on and off. When the display settings are changed while OSD is on,
the changes are indicated through the video outputs as well as on the built in display.
ZOOM: This feature allows the picture to be enlarged by a factor of x2 or x4. Pressing ‘ZOOM’ will cycle
between x2 zoom, x4 zoom and regular mode (no zoom).
ANGLE: Changes the camera angle of DVDs. The DVD must be recorded with multiple angles to use this
feature.
REPEAT: Repeats either the title, chapter, or the entire disc. The mode is shown in the ‘DISPLAY’ as well
as on screen if the on screen display ‘OSD’ is ‘ON’. The three modes are: chapter, title, disc, and off.
RNDM: Toggles random play. Plays the DVD tracks in a random order.
VOL -/+: Adjusts the output volume of the VJ01.

6
Display
1. Media Type Indicator: Displays the type of media in the player: DVD, CD, VCD.
2. Play Mode Indicator: Displays if the unit is playing, paused, and also shows the repeat
modes that are currently in use. If the unit is stopped the entire screen will display “STOP”.
3. Title Number Indicator: Shows the title number of the current media being played.
4. Chapter or Track Number Indicator: Shows the current chapter or track number.
5. Total Indicator: Indicates if the time is the total elapsed time on the media or track/chapter.
6. Program Indicator: Indicates if the unit is currently in a set program.
7. Dolby Digital and DTS indicator: Shows if a DVD has Dolby Digital or DTS audio used.
8. Angle Indicator: Indicates if a separate angle is in use while media is playing.
9. Elapsed Time Indicator: Indicates the elapsed time for the media.
10. Parental Lock Indicator: If the parental locking feature is engaged, the lock will be
displayed.
Pitch Control and Looping
Pitch: While the DVD is in the ‘PLAY’ mode, the pitch may be adjusted by the ‘PITCH FADER’
which as shown in the ‘Control Panel Overview’ earlier in this manual. The ‘PITCH FADER’ can be turned
off by pressing the pitch button.
+/- Buttons: The pitch can also be bent for fine tuning by using the ‘+’ and ‘–‘ buttons.
Loop Button: To start a loop, press the Loop button to set the start point. Press the Loop button
again to set the end point and start the loop. At this point, the video will be continuously looping until the
Loop button is pressed again.

7
Guía de instalación rápida (ESPAŃOL)
1. Asegúrese de que todos los artículos incluidos al inicio de este manual estén incluidos en la
caja.
2. LEA EL FOLLETO DE INSTRUCCIONES DE SEGURIDAD ANTES DE UTILIZAR EL
PRODUCTO.
3. Estudie este diagrama de instalación. Hay varias maneras en que puede usar el producto. El
diagrama muestra la maneras en que puede usar las características de este producto.
4. Coloque el dispositivo en una posición adecuada para su funcionamiento.
5. Asegúrese de que todos los dispositivos estén apagados.
6. Conecte las salidas a los dispositivos de audio y a los monitores de video.
7. Asegúrese de que todos los faders de los dispositivos externos estén en la posición de cero.
8. Enchufe su dispositivo y otros dispositivos a la alimentación de corriente alterna.
9. Encienda todo en el siguiente orden:
•Este dispositivo.
•Los monitores y dispositivos de audio.
10. Al apagar, realice siempre esta operación en sentido inverso apagando todo en el orden
siguiente:
•Los monitores y dispositivos de audio.
•Este dispositivo.
11. Visite http://www.numark.com y registre su producto.

8
Características del panel frontal
1. Controles de navegación de menús:
Controles para navegar por los menús de
un DVD.
2. Control de reproducción: Contiene Play
(Reproducir), Pause (Pausa), Cue
(Señalizar), Fast Forward (Avance rápido),
Rewind (Rebobinar), Next Track (Pista
siguiente), Previous Track (Pista anterior),
Slow Motion (Movimiento lento) y la
función Program (Programa).
3. Fader de pitch: Ajusta la relación
pitch/tempo de la reproducción. Esta
característica se puede desactivar
pulsando el botón Pitch ubicado en (3b).
4. Menú: Abre el sistema de menús de un
DVD compatible.
5. Ajuste: Este botón activa el modo de
ajuste del reproductor de DVD en la
pantalla, que es posible navegar con los
'controles de navegación de menús.
6. Título: Activa en menú de títulos de los
discos DVD compatibles.
7. Subtítulo: Activa y desactiva los
subtítulos.
8. Botones de funciones: Estos botones dan
funcionalidad al reproductor de DVD y se
describen más adelante en este manual.
9. Visualizador: El DVD se visualiza aquí.
10. Nivel de auriculares: Ajusta el volumen de
auriculares.
11. Pitch Bend (inflexión de pitch): Use estos
botones para variar momentáneamente la
velocidad del DVD.
12. Loop (ciclo): Este botón le permite hacer
un ciclo con una sección del DVD. Púlselo
una vez para establecer el comienzo del
ciclo y otra vez para establecer el unto
final del mismo.
13. Abrir/cerrar: Abre y cierra la bandeja para
discos. ASEGÚRESE DE USAR SIEMPRE EL
BOTÓN PARA ABRIR Y CERRAR LA
UNIDAD.
Panel posterior
1. Salida de S-Video: Salida para dispositivo de monitoreo de S-Video compatibles.
2. Salida de video compuesto: Salida para dispositivos de monitoreo de video compatibles.
3. Salida de audio estéreo RCA: Para enchufar en el mezclador o amplificador de audio.
4. Salida de audio digital coaxial: Conocida comúnmente como SPDIF, para conectar a
decodificadores SPDIF compatibles.
5. Conector de alimentación IEC: Conecte aquí el cable de alimentación provisto.
6. Interruptor de encendido: Use este interruptor para encender y apagar la unidad.

9
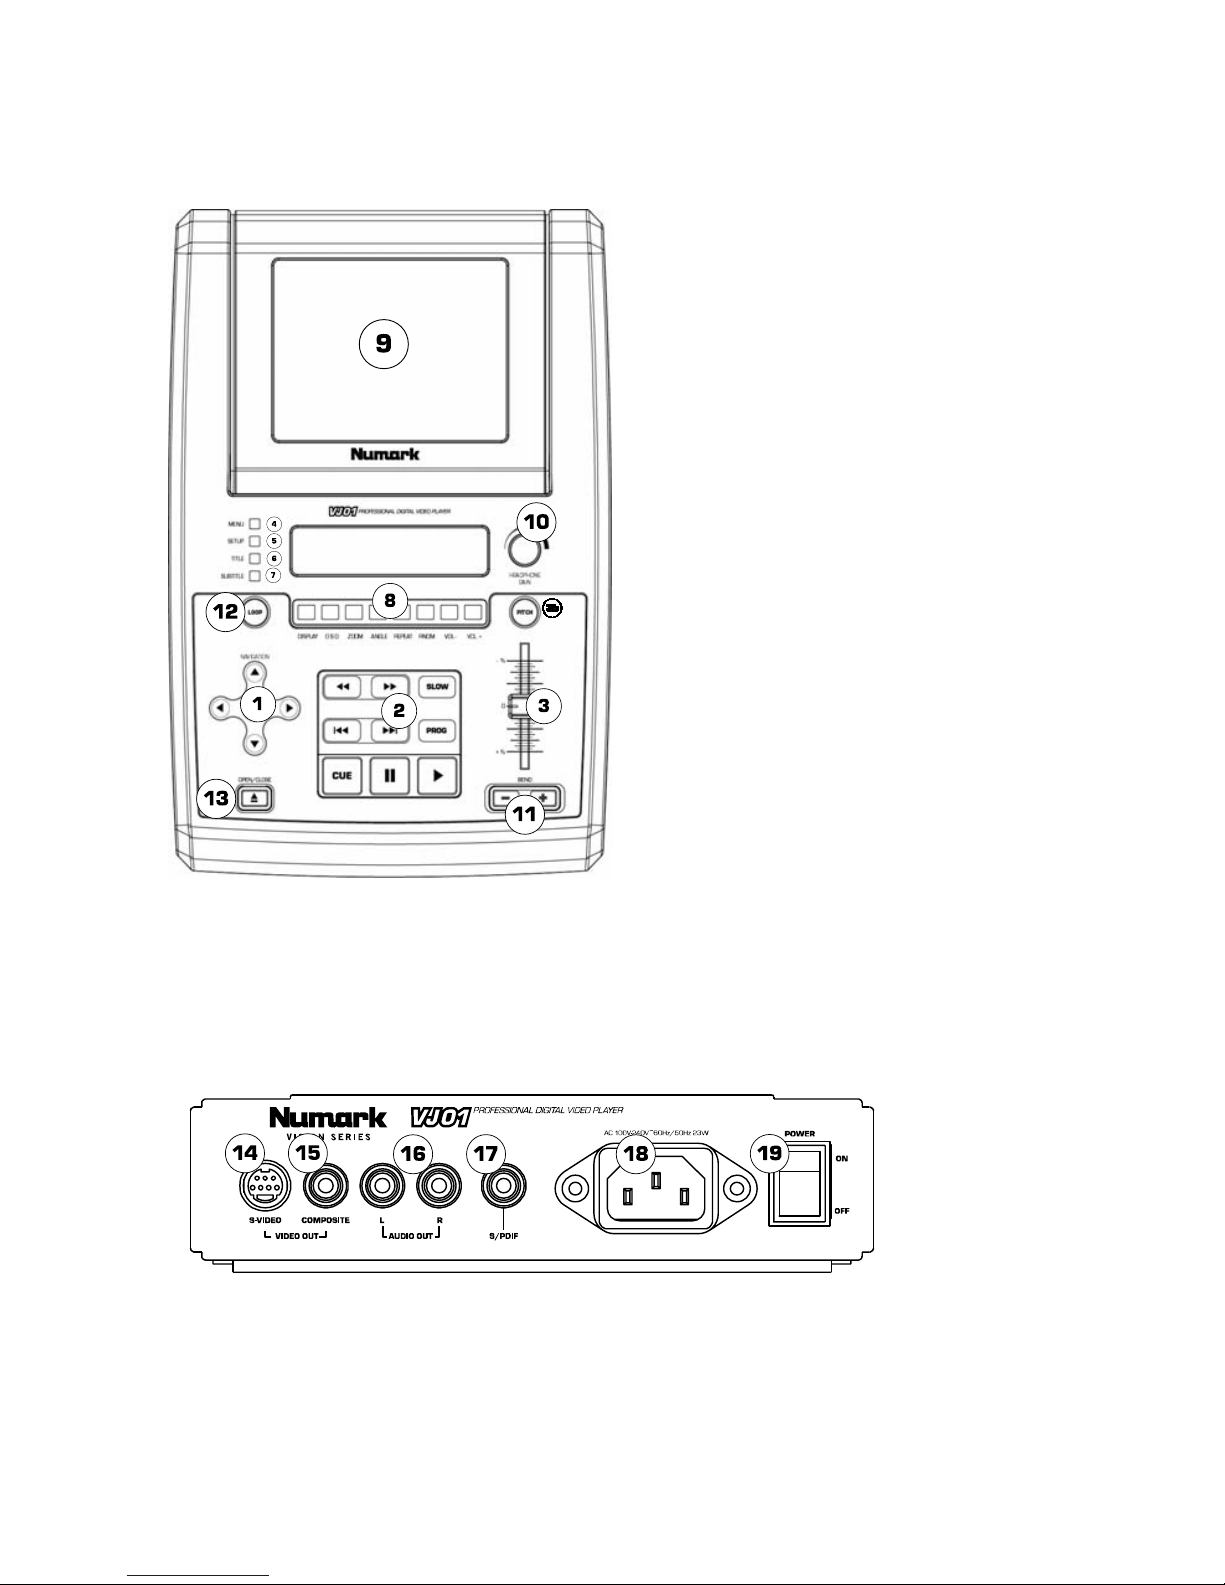
Botones de navegación del menú
ENTER
Botón del menú: Presionando el botón del
menú, accederá a la sección de menú del DVD,
si existe.
Botones de flechas: Use estos botones para
navegar por el sistema de menú del DVD.
Muchos DVD’s cuentan con menús en los que
las flechas se moverán hacia las secciones
correspondientes en la pantalla. Además,
cuando la imagen esté ampliada con zoom, la
sección del video visualizada puede moverse
con los botones de flechas.
Botón Enter (Aceptar): Para realizar una
selección en pantalla, presione el botón Enter.
Botones de Playback
Botón Play (reproducir): Comienza el playback del
DVD. Este botón se ubica en la parte inferior derecha
y está marcado por el triángulo.
Botón de pausa: Produce una pausa en la
reproducción del DVD. Este botón se ubica a la
izquierda del botón Play.
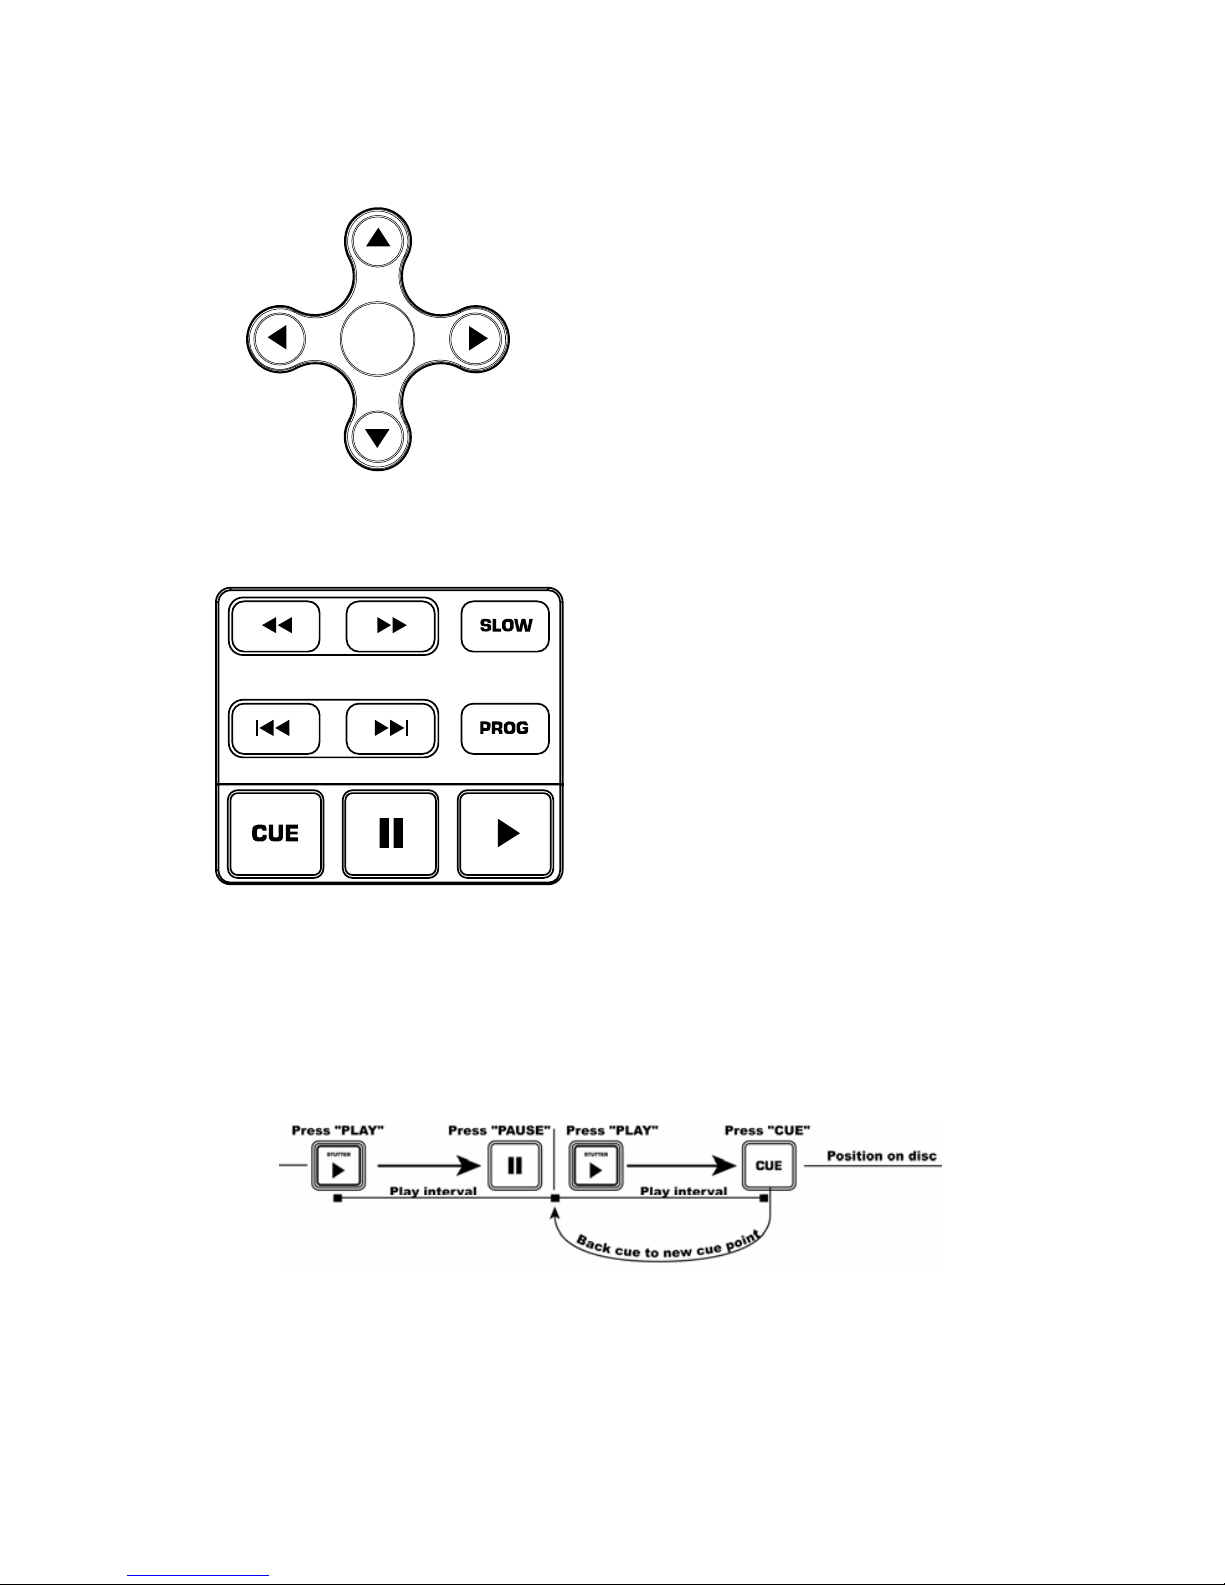
Ajuste de los puntos de Cue: Para establecer un
punto de Cue mientras el DVD está reproduciendo,
simplemente presione Pause en el punto deseado y
luego Play. De esta forma se establece un punto de
Cue (señalización) donde presionó Pause.
Botón Cue: Vuelve al último punto de Cue.
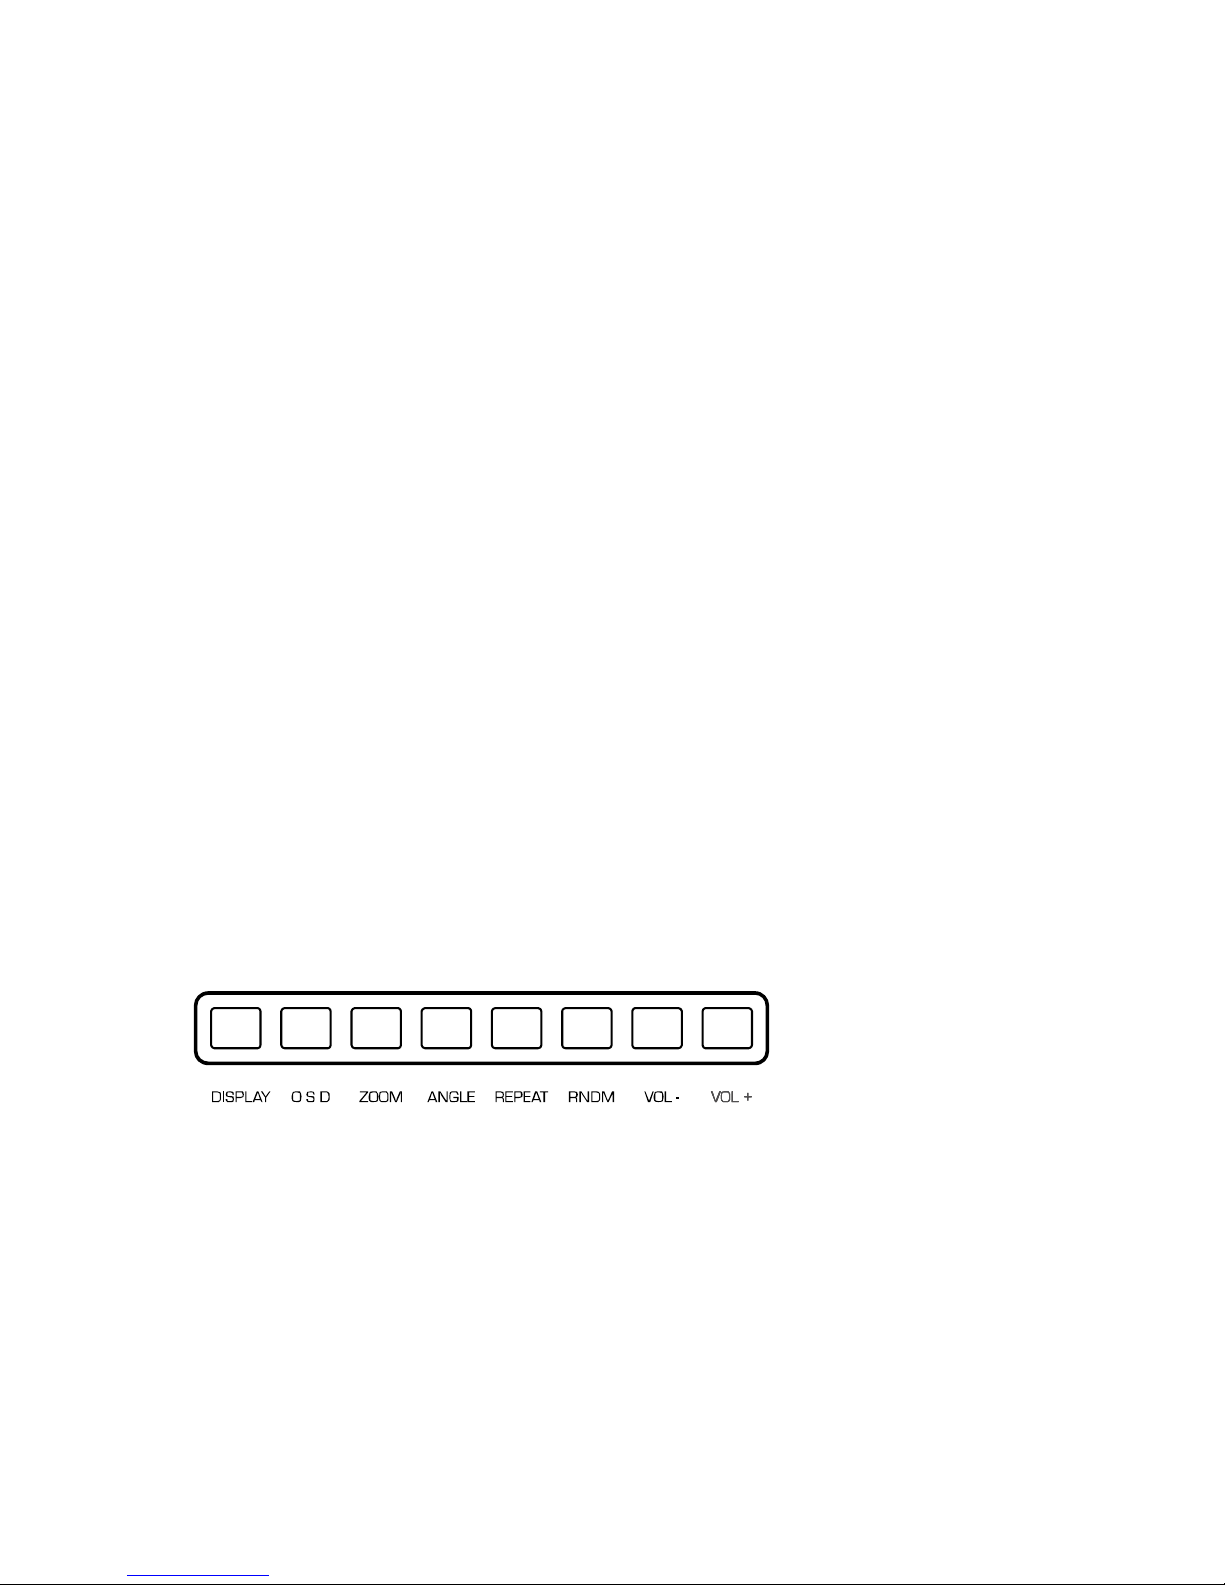
Botón de movimiento lento: Selecciona el playback
en “cámara lenta”. Hay cuatro diferentes ajustes de
velocidad que pueden seleccionarse presionando este
botón varias veces. Puede suprimir la visualización del
texto en la pantalla presionando el botón OSD.
Botón de programa: Visualiza un menú en la
pantalla donde puede seleccionar las pistas o capítulos
que desea (en los DVD) y colocarlos en el orden de
reproducción indicado en el lado izquierdo de la
pantalla. Use los controles de navegación del menú
para visualizar el orden de los programas y el orden
de las pistas/capítulos.
Primero, seleccione la posición deseada para el
programa resaltando el número del programa. Luego,
presione el botón de flecha derecha en los controles de
navegación del menú. Seleccione la pista deseada a
reproducir presionando Enter.
Botones de avance rápido/retroceso: Use estos
botones para buscar hacia delante o hacia atrás a alta
velocidad durante la reproducción. Las velocidades
son X2, X4, X8, X16, y X32.
Pista adelante/atrás: Estos controles seleccionan la
pista o capítulo a reproducir. Presione el botón de
pista atrás (Back) para iniciar la reproducción al
comienzo de la pista actual. Presionándolo otra vez
pasará a la pista anterior.
Este diagrama le muestra como establecer un punto de Cue.

10
Menú de configuración (Setup)
Para acceder el menú de ajustes, presione el botón “Setup”. Las opciones son las siguientes: Nota:
Algunos de los ajustes se pueden cambiar solamente cuando el dispositivo no está reproduciendo
audio/video)
Configuración del idioma:
•OSD: Idioma de la OSD (Visualización en pantalla).
•Menú: Idioma del sistema de menú:
•Audio: Idioma de audio predeterminado:
•Subtítulos: Idioma de subtítulos predeterminado:
Configuración de pantalla:
•Tipo de TV:
o4:3 PS: Selecciónelo si está usando un televisor normal y desea ver una imagen de
16:9 en el estilo de pan y scan.
o4:3 LB: Selecciónelo si está usando un televisor normal y desea ver una imagen de
16:9 en el estilo de buzón (letterbox).
o16:9: Selecciónelo si está usando un televisor de pantalla ancha (relación de aspecto
16:9)
•Protector de pantalla.
•Sistema de TV: Seleccione su estilo de monitor. Esto depende de su país.
oNTSC (principalmente en las Americas)
oPAL (úselo si con el sistema NTSC no funciona)
oSelección automática.
•Control de brillo:
oNormal.
oBrillante.
oSuave.
•Control de contraste.
Ajuste del audio:
•Ajustes de la salida digital: Su dispositivo cuenta con una salida de audio digital para cada
reproductor. Hay tres ajustes para las salidas digitales. Nota: la salida debe ser enviada a un
decodificador compatible.
oSPDIF/PCM: Envía información de 2 canales a un decodificador compatible.
oSPDIF/RAW: Envía la información de audio a un decodificador compatible de sonido
surround. Su amplificador debe ser capaz de decodificar el DTS u otro formato de
surround.
oApagado.
Configuración personalizada:
•Marca de ángulo.
oConmutación de la opción de ángulo de visualización.

11
Botones de funciones:
NOTA: No se pueden usar todas las funciones con todos los DVD.
VISUALIZADOR: Muestra la información del disco actual en la pantalla.
OSD: Activa y desactiva la presentación en pantalla. Cuando se cambian los parámetros de visualización
mientras la función OSD está activada, los cambios se indican a través de las salidas de video además del
visualizador incorporado.
ZOOM: Esta característica permite ampliar la imagen en un factor de x2 o x4. Al pulsar 'ZOOM' se realiza
un ciclo entre los valores x2, x4 y modo normal (sin zoom).
ÁNGULO: Cambia el ángulo de cámara del DVD. Para usar esta característica, el DVD debe estar grabado
con varios ángulos.
REPETIR: Repite ya sea el título, el capítulo o el disco completo. El modo se muestra en el
'VISUALIZADOR' como también en la presentación en pantalla si la función 'OSD' está activada. Los tres
modos son: capítulo, título, disco, y apagado.
RNDM: Conmuta la reproducción aleatoria. Reproduce las pistas del DVD en orden aleatorio.
VOL -/+: Ajusta el volumen de la salida de VJ01.
Pantalla
1. Indicador del tipo de medio (Media): Muestra el tipo de medio colocado en el reproductor.
DVD, CD, VCD.
2. Indicador de modo de reproducción: Muestra si la unidad está reproduciendo o en pausa
y muestra también los modos de repetición que se están usando actualmente. Si la unidad
está parada la pantalla entera mostrará “STOP”.
3. Indicador del número del título: Muestra el número de título del audio/video que se está
reproduciendo actualmente.
4. Indicador del número de capítulo o pista: Muestra el número de capítulo o pista actual.
5. Indicador de total: Indica si el tiempo es el total que ha transcurrido en la pista/capítulo del
medio.
6. Indicador de programa: Indica si la unidad está en un programa predeterminado.
7. Indicador de Dolby Digital y de DTS: Muestra si un DVD usa Dolby Digital o DTS.
8. Indicador de ángulo: Indica si se está usando otro ángulo mientras se reproduce un medio.
9. Indicador de tiempo transcurrido: Indica el tiempo que ha pasado en el medio.
10. Indicador de bloqueo paterno: Si se activa la característica del bloqueo paterno, se
visualizará el candado.

12
Control de Pitch y Looping
Botón de Pitch: Mientras que se reproduce el DVD, se puede ajustar el pitch usando el Pitch
Fader. Se puede desactivar el Pitch Fader presionando el botón Pitch.
Botones +/-: Se puede también producir una inflexión (bend) del pitch para afinación
fina usando los botones ‘+’ y ‘–‘
Botón de Loop: Para iniciar un loop, presione el botón de Loop para establecer el punto
de partida. Presione el botón de Loop otra vez para establecer el punto final y el punto de partida del
loop. En este punto, el video se reproducirá contínuamente en modo loop hasta que se presione el botón
de Loop otra vez.

13
Schnellaufbauanleitung (DEUTSCH)
1. Stellen Sie sicher, dass sich alle auf der Vorderseite dieser Anleitung aufgeführten Einzelteile in
der Packung befinden.
2. LESEN SIE DIE SICHERHEITSHINWEISE VOR INBETRIEBNAHME DES PRODUKTS..
3. Lesen Sie das Aufbaudiagramm. Es gibt verschiedene Möglichkeiten, dieses Produkt zu
verwenden. Das Diagramm zeigt unterschiedliche Anwendungsmöglichkeiten des Produktes an.
4. Stellen Sie den Mischer an einer geeigneten Betriebsposition auf.
5. Vergewissern Sie sich, dass alle Geräte abgeschalten sind.
6. Schließen Sie die Ausgänge an die Audiogeräte und Videomonitore an.
7. Stellen Sie sicher, dass alle Faders der externen Geräte auf Null gestellt sind.
8. Schließen Sie das Gerät und andere Geräte an den Wechselstrom an.
9. Schließen Sie alles in der folgenden Reihenfolge an:
-Dieses Gerät
-Jegliche Monitore und Audiogeräte
10. Stellen Sie sicher, dass beim Abschalten die umgekehrte Reihenfolge eingehalten wird:
-Alle Monitore und Audiogeräte
-Dieses Gerät
11. Gehen Sie zu http://www.numark.com um Ihr Produkt zu registrieren.

14
Funktionen der
Vorderseite
1. Menü Navigationstasten: Dienen zur
Navigation durch die Menüs einer DVD.
2. Wiedergabe-Tasten: Play, Pause, Cue,
Fast Forward, Rewind, Next Track,
Previous Track, Slow Motion und
Programmfunktion.
3. Pitch Fader: Stellt die Wiedergabe der
Tonhöhe/des Tempos ein. Diese Funktion
kann durch Drücken der Pitch Taste (3b)
deaktiviert werden.
4. Menu: Öffnet das Menü einer
kompatiblen DVD.
5. Setup: Wechselt in die Anzeige des DVD
Player Einstellmodus, durch den Sie sich
mit den 'Menü Navigationstasten"
bewegen können.
6. Title: Geht in das Titelmenü einer
kompatiblen DVD.
7. Subtitle: Schaltet die Anzeige von
Untertiteln ein oder aus.
8. Funktionstasten: Diese Tasten erweitern
die Funktionalität des DVD-Players und
werden später beschrieben.
9. Display: Hier wird die DVD angezeigt.
10. Kopfhörerpegel: Stellt die Cue-Lautstärke
ein.
11. Pitch Bend: Mit diesen Tasten können
Sie die Geschwindigkeit der DVD
zeitweilig verändern.
12. Loop: Diese Taste ermöglicht das
Loopen eines DVD-Bereiches. Drücken
Sie die Taste einmal, um den Anfang des
Loops zu definieren und ein weiteres Mal,
um das Ende des Loops einzustellen.
13. Open/Close: Öffnet und schließt die
Disk-Schublade. VERWENDEN SIE
IMMER DIESE TASTE ZUM ÖFFNEN UND
SCHLIESSEN!
Anschlüsse auf der Rückseite
14. S-Video Ausgang: Ausgang für kompatible S-Video Monitore.
15. Composite Video Ausgang: Ausgang an kompatible Video Monitore.
16. RCA Audio Stereoausgang: Zur Verbindung an einen Audiomixer oder -verstärker.
17. Coaxial Digital Audio Ausgang: Auch als SPDIF bekannt, zur Verbindung mit einem
kompatiblen SPDIF Gerät.
18. Netzanschluss: Schließen Sie hier das beiliegende Netzkabel an.
19. Netzschalter: Schalten Sie hiermit das Gerät ein oder aus.

15
Menü
Navigationstasten
ENTER
Menütasten: Das Drücken der Menütaste
öffnet das DVD-Menü, falls vorhanden.
Pfeiltasten: Benutzen Sie die Pfeiltasten für
das DVD-Menüsystem. Viele DVD-Player haben
Menüs, bei denen Pfeile auf die
entsprechenden Abschnitte am Bildschirm
zeigen. Zusätzlich kann der Abschnitt des
vergrößerten Bildes mit den Pfeiltasten bewegt
werden.
Enter Taste: Um ein Element auf dem
Bildschirm auszuwählen, drücken Sie die
Enter-Taste.
Playback Tasten
Play Taste: Startet die Wiedergabe der DVD.
Diese Taste befindet sich auf der rechten
Unterseite und ist an einem Dreieck zu
erkennen.
Pause Taste: Unterbricht die Wiedergabe der
DVD. Diese Taste befindet sich links von der
Play-Taste.
Setzen der Cuepunkte: Um beim Abspielen
der DVD einen Cuepunkt zu setzen, drücken
Sie Pause an dem gewünschten Punkt; dann
drücken Sie Play. Ein Cuepunkt wird dort
gesetzt, wo Sie auf Pause drücken.
Cue Taste: Kehrt zu dem zuletzt gesetzten
Cuepunkt zurück.
Slow Taste: Wählt ein langsameres Playback
aus. Es gibt vier verschiedene
Geschwindigkeiten, die angewählt werden
können, indem die Taste wiederholt gedrückt
wird. Sie können die Textanzeige
unterdrücken, indem Sie die OSD Taste
wählen.
Programmtaste: Zeigt ein Menü im
Bildschirm an, in welchem Sie die gewünschten
Tracks oder Kapitel (bei DVDs) auswählen
können, und Sie diese in die gewünschte
Playback Reihenfolge bringen, die auf der
linken Seite der Anzeige aufgelistet wird.
Benutzen Sie die Menü-Navigationssteuerung
um durch das Programm- oder die
Kapitelreihenfolge zu blättern.
Als erstes wählen sie die gewünschte
Programmposition, indem Sie die
entsprechende Programmnummer
hervorgeheben. Als nächstes drücken Sie die
rechte Pfeiltaste auf der Menü
Navigationssteuerung. Wählen Sie den
gewünschten Abschnitt aus, indem Sie Enter
drücken.
Fast Forward/Reverse Taste: Benutzen Sie
diese Taste, um das Medium während des
Spielens vorwärts oder rückwärts auf schnelle
Art zu durchsuchen. Die Geschwindigkeiten
sind X2, X4, X8, X16 und X32.
Track Forward/Back: Diese wählen den
Track oder das Kapitel aus. Das Drücken der
Track-zurück-Taste startet den Playback Modus
am Anfang des gewählten Tracks. Wiederholtes
Drücken der Taste führt zum vorherigen Track
zurück.

16
Setup-Menü
Drücken Sie die Setup-Taste, um das Menü zu öffnen. Die Optionen werden unten angezeigt.
Anmerkung: Einige der Einstellungen können nur dann geändert werden, wenn das Gerät nicht in
Gebrauch ist.
Sprach-Setup:
-OSD: On Screen Display (OSD) Sprache
-Menü: Menü Systemsprache
-Audio: Standard Audiosprache
-Untertitel: Standard Untertitelsprache
Bildschirm-Setup:
TV-Typ
- 4:3 PS: Wählen Sie dies, wenn Sie ein einfaches Fernsehgerät verwenden und eine 16:9
Abbildung in Pan- und Scan-Stil ansehen mochten
-4:3 LB: Wählen Sie dies, wenn Sie ein einfaches Fernsehgerät verwenden und eine 16:9
Abbildung in der Letterbox-Stil ansehen möchten.
-16:9: Wählen Sie dies, wenn Sie einen Wide-Screen (Längenverhältnis 16:9) verwenden.
Bildschirmschoner.
TV System: Wählt Ihren Monitortyp. Dieser hängt normalerweise von Ihrem Land ab.
-NTSC (meistens in Amerika)
-PAL (benutzen Sie dies, wenn NTSC nicht angewendet werden kann)
-Auto Select
Helligkeitsregulierung
-normal
-hell
-weich
Kontraststeuerung
Audioeinstellung:
Digitale Out-Einstellungen: Ihr Gerät verfügt über einen digitalen Audioausgang für jeden Player. Es
gibt drei Einstellungen für die Digitalausgänge. Anmerkung: der Ausgang muss zu einem
kompatiblen Decoder gehören.
-SPDIF/PCM: Sendet 2-Channel Informationen zu einem kompatiblen Decoder.
-SPDIF/RAW: Sendet Audioinformationen zu einem Surround-Sound kompatiblen Decoder. Ihr
Verstärker muss zur Decodierung von DTS oder einem anderem Surround-Sound Format fähig
sein.
-Aus.
Kundenspezifische Einstellung:
Kinderschutz.
-Betrachtung der Winkeländerung.

17
Funktionstasten
ANMERKUNG: Nicht alle Funktionen sind bei jedem DVD-Player
vorhanden.
Display: zeigt die disk-informationen der aktuellen disk im bildschirm an.
OSD: schaltet das on screen display (osd) an oder aus. Wenn die bildschirmeinstellungen bei
aktiviertem osd geändert werden, wirken sich diese an den videoausgängen und den integrierten
display aus.
Zoom: mit dieser funktion vergrößern sie das bild um den faktor x2 oder x4. Drücken sie 'zoom',
um zwischen den zoom-einstellungen x2 zoom, x4 zoom und normaler modus (keine
vergrößerung) umzuschalten.
Angle: ändert die auswahl der kamera-ansicht der dvds. Die dvd muss mehrere kamera-ansichten
enthalten, um diese funktion verwenden zu können.
Repeat: wiederholt entweder den titel, das kapitel oder die gesamte disk. Der ausgewählte modus
wird im 'display' und im bildschirm bei aktivierten 'osd' (on) eingeblendet. Die drei modi sind:
chapter, title, disc und off.
Rndm: aktiviert die zufallswiedergabe, bei der die dvd-tracks in zufälliger reihenfolge
wiedergegeben werden.
Vol -/+: stellt die ausgangslautstärke des vj01 ein.
Anzeige
1. Mediatyp-Anzeige: Zeigt die Art des Mediums im Player an: DVD, DC, VCD.
2. Play Modus-Anzeige: zeigt an, ob das Gerät spielt oder pausiert. Es zeigt die
Wiederholungsmodi an, die z.Z. in Gebrauch sind. Wenn das Gerät angehalten wird, zeigt die
gesamte Anzeige ‘STOP” an.
3. Titelnummer-Anzeige: Zeigt die Titelzahl des Mediums an, die gerade gespielt wird.
4. Kapitel- oder Track-Nummer-Anzeige: Zeigt das derzeitige Kapitel oder Track an.
5. Gesamtanzeige: Zeigt an, ob die Gesamtzeit des Mediums oder des Tracks/Kapitels
abgelaufen ist.
6. Programmanzeige: Zeigt an, ob sich das Gerät derzeit in einem eingestellten Programm
befindet.
7. Dolby Digital und DTS-Symbol: Zeigt an, ob die DVD über ein Dolby Digital oder DTS
System verfügt.
8. Kamera-Anzeivge: Zeigt an, ob ein separater Winkel in Gebrauch ist, während das Medium
spielt.
9. Zeitverbrauch-Anzeige: zeigt die Gesamtverbrauchszeit für das Medium an.
10. Kinderschutz-Anzeige: Wenn der Kinderschutz aktiviert ist, wird die Verriegelung angezeigt.

18
Pitchkontrolle und Looping
Pitch Taste: Während die DVD spielt, kann der Taktabstand mit dem Pitch Fader angepasst
werden. Der Pitch Fader kann abgestellt werden, indem man die Pitch Taste betätigt.
+/- Taste: Der Pitcher kann für die Feinabstimmung verwendet werden, indem man die
‘+’ und ‘-‘ Tasten betätigt.
Looptaste: Drücken Sie die Looptaste, um ein Loop zu erzeugen. Betätigen Sie die Looptaste
wiederholt, um den Endpunkt einzustellen und den Loop zu beginnen. An diesem Punkt wird das Video
weitergehen, bis die Looptaste wieder betätigt wird.

19
Guide d'installation rapide (FRANÇAIS)
1. Assurez-vous que tous les articles énumérés sur la page couverture de ce guide sont inclus dans la
boîte.
2. VEUILLEZ LIRE LE LIVRET DES CONSIGNES DE SÉCURITÉ AVANT D'UTILISER LE PRODUIT.
3. Examinez bien le schéma d'installation. Il y plusieurs façons d'utiliser ce produit. Le schéma illustre
plusieurs façons dont vous pouvez faire usage de ce produit.
4. Placez l'appareil en position de fonctionnement.
5. Assurez-vous que tous les appareils sont hors tension.
6. Brancher les sorties aux appareils audio et aux moniteurs vidéo.
7. Assurez-vous que tous les atténuateurs sur les appareils externes sont réglés à « zéro ».
8. Branchez l'appareil et autres dispositifs dans une prise d’alimentation CA.
9. Mettre tous les appareils sous tension dans l'ordre suivant .
•Cet appareil;
•tous moniteurs et appareils audio;
10. Pour mettre hors tension, toujours inverser l'opération :
•tous moniteurs et appareils audio;
•cet appareil.
Allez à http://www.numark.com pour enregistrer le produit.

20
Caractéristiques du panneau avant
1. Commandes de navigation du menu :
Permettent de naviguer à travers le
système menu du lecteur DVD.
2. Commandes de lecture : Inclus les fonctions
de lecture, d’arrêt, de recherche, d’avance
rapide, de marche arrière, de piste
suivante, de piste précédente, de ralenti et
de programmation.
3. Atténuateur de hauteur tonale : Permet
d'ajuster la vitesse de lecture et la tonalité
de la lecture. Cette fonction peut être
désactivée en appuyant sur la touche de
vitesse de lecture (Pitch) (3b).
4. Menu : Permet d'ouvrir le système menu
d’un lecteur DVD compatible.
5. Configuration : Cette touche permet
d'afficher le mode configuration du lecteur
DVD et de naviguer le menu à l’aide des
commandes de navigation du menu.
6. Titre : Permet d’afficher le menu titre des
DVD compatibles.
7. Sous-titre : Permet d’activer ou de
désactiver les sous-titres.
8. Touches fonctions : Ces touches permettent
d’ajouter des fonctionnalités au lecteur DVD
et seront vues plus en détail plus loin dans
ce guide.
9. Écran d’affichage : Le DVD est affiché ici.
10. Niveau du casque d’écoute : Permet de
régler le volume de pré-écoute.
11. Modification temporaire de la tonalité et de
la vitesse (PITCH BEND) : Ces touches
permettent de modifier temporairement la
vitesse de lecture du DVD.
12. Boucle : Cette touche vous permet de créer
une boucle. Appuyez une fois pour
programmer le début de la boucle et de
nouveau pour programmer le point de fin de
boucle.
13. Ouvrir/Fermer : Permet d’ouvrir et de
fermer le tiroir pour disque.
Panneau arrière
1. Sortie S Vidéo : Permet d’acheminer le signal vers un appareil de monitorage S-Vidéo.
2. Sortie composite vidéo : Permet d’acheminer le signal vers un appareil de monitorage vidéo.
3. Sortie audio stéréo RCA : Branchez à une console de mixage audio ou à un amplificateur.
4. Sorties audio numériques coaxiales : Plus connues sous le nom de sorties SPDIF, permettent
de brancher un décodeur SPDIF compatible.
5. Connecteur d'alimentation CEI : Brancher le câble d'alimentation fourni avec l'appareil dans
cette prise.
6. Interrupteur d'alimentation : Cette touche met l'appareil sous et hors tension.
Table of contents
Languages:
Other Numark DVD Player manuals