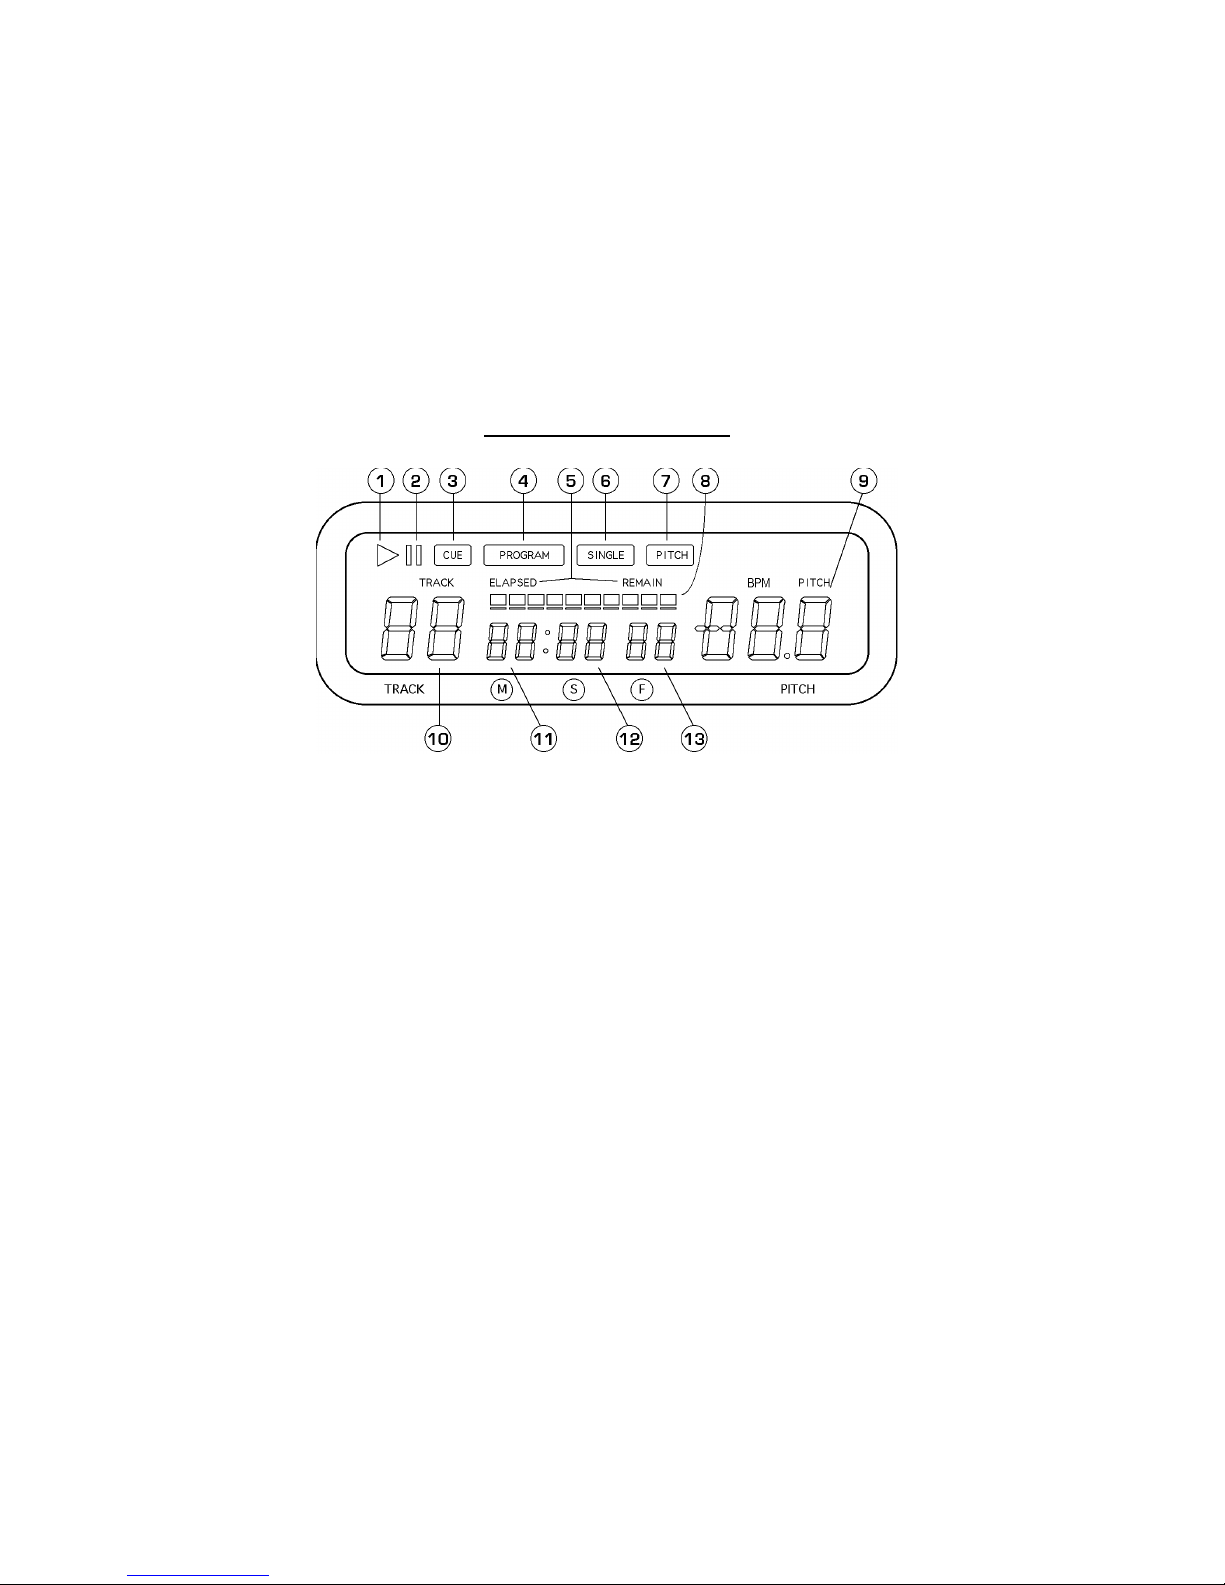
Numark Professional Karaoke Mixing Station KMX02 Technical document

1
Professional Karaoke Mixing Station
Quick Start Owner’s Manual
Manual de inicio rápido del usuario
(ESPAÑOL)
Schnellbedienungsanleitung (DEUTSCH)
Manuale Rapido di Utilizzazione (ITALIANO)
Guide d’utilisation simplifié (FRANÇAIS)
CONTENU DE LA BOÎTE
•STATION DE MIXAGE KMX02
•ADAPTATEUR DE COURANT
CONTENIDO DE LA CAJA
•ESTACIÓN DE MEZCLAS DE CD KMX02
•ADAPTADOR DE CORRIENTE
CONTENUTO DELLA CONFEZIONE
•CD MIXING STATION KMX02
•ADATTATORE
BOX CONTENTS
•KMX02 CD MIXING STATION
•POWER ADAPTE
R
BOX CONTENTS
•KMX02 CD MIXING STATION
•POWER ADAPTER

2
QUICK SETUP
1. Make sure all items listed on the
front of this guide are included in the
box.
2. READ SAFETY INSTRUCTION
BOOKLET BEFORE USING THE
PRODUCT.
3. Study this setup diagram.
4. Place mix station in an appropriate
position for operation.
5. Make sure all devices are turned off
and all faders and gain knobs are set
to “zero”
6. Connect all stereo input sources as
indicated in the diagram.
7. Connect the stereo outputs to power
amplifier(s), tape decks, and/or other
audio sources.
8. Plug all devices into AC power.
9. Switch everything on in the following
order.
•audio input sources (i.e.
turntables or CD players)
•KMX02
•last, any amplifiers or output
devices
10. When turning off, always reverse this
operation by,
•turning off amplifiers
•KMX02
•last, any input devices
11. Go to http://www.numark.com for
product registration.
More information about this product
may be found at
http://www.numark.com

3
REAR CONNECTIONS
1. Channel Inputs: Unbalanced RCA jacks
for connecting external sources. The
Phono/Line input is selected using the
toggle switch on the front panel.
Turntables, HiFi VCRs, cassette and reel-
to-reel tape decks, DAT machines, CD
players, laser discs, tuners, even
synthesizers or other mixing consoles
can be connected using these jacks.
NOTE: Plug mono audio sources into
both left and right inputs using a “Y”
cable connector.
2. GND: This screw connector should be
used to connect any turntables or other
devices that need to be grounded.
3. Input Selector Switch: Use this to
allow either line level or phono level
equipment to be plugged into your
channel inputs. When Phono input is
selected, your signal is fed directly to the
high-quality RIAA phono pre-amplifiers.
Use this position only for turntables. Line
level sources will overload the sensitive
phono pre-amps and will sound very
bad, so always be sure to toggle the
line/phono switch over to line before
connection of line sources.
4. Video OUTPUT: There are two outputs
that are connected to television monitors
to output karaoke text.
5. Master Output (RCA): This output is
for connecting an external monitoring
device such as a PA system, powered
monitors, or a home stereo. The level of
the master stereo output signal is
controlled by the master fader.
6. Stereo Balanced Master Outputs
(XLR): low-impedance XLR type
connectors controlled by the Master
fader.
7. Microphone 2 and 3 Input: Plug in
your ¼” microphones into 2 and 3.
These inputs have effects available on
the face panel.
8. AC In: This mix station is designed to
work with the power supply cord that
comes with the unit. While the power is
switched off, plug the power supply into
the mix station first, then plug it into the
outlet.
9. Power Switch: Use this switch to turn
on the mix station after all input devices
are already connected to prevent
damage to your equipment. Turn the
station on before you turn on amplifiers
and turn off amplifiers before you turn
off the mix station.
10. NTSC/PAL Switch: Selects the video
output between NTSC and PAL video
modes. NTSC is used in the United
States, while PAL is used in much of
Europe.

4
FRONT PANEL FEATURES
1. DJ Mic 1: This section has the gain
and tone controls for the ¼”/XLR
combination mic input.
2. Mic 2: This section has the gain and
tone controls for Mic 2
3. Mic 3: This section has the gain and
tone controls for Mic 3
4. Mic 2&3 Echo: This knob controls the
echo effect amount on microphones 2
and 3.
5. Mic 2&3 Delay: This knob controls the
delay time of the echo effect on
microphones 2 and 3
6. Line Faders: Control volume levels in
the mix.
7. Master Fader - Controls the overall
output level.
8. Input toggle switch - Selects which
source will be live to that channel based
on what you have connected to the rear
panel input section
9. Replaceable Crossfader - This slide
fader blends audio between channels 1
and 2. This also switches the video
when using compatible karaoke CD+G
CDs.
Note: The crossfader is user replaceable
in case of failure. Simply unscrew the
two large screws which hold it in place,
lift it out and disconnect it’s cable. Re-
attach the new crossfader and screw
the mounting plate back onto the unit -
you’re back in business!
10. Fader Start – Activation allows you to
start the CD players from you
crossfader. Travel from left to right will
start the right CD player and pause the
left CD player
11. Key Change On/Off – Pressing this
button turns the Key Change function
on and off.
12. Key – This knob allows you to adjust
the key of the music. Rotating to the
left will result in a lower key (flat),
while rotating to the right will result in
a higher key (sharp).
13. LED METER - Indicates the Master
output level.
14. Stereo/Mono toggle - Changes the
Master output between Mono and
Stereo
15. Master EQ Bass
16. Master EQ Middle
17. Master EQ Treble
18. Channel Cue Selector - Used to route
channel audio to your headphones.
19. Headphone Level – Adjusts cue
volume.
20. Headphone Jacks – Used to connect
either 1/8” or 1/4” plugs for audio
monitoring with headphones.

5
CD PLAYER FEATURES
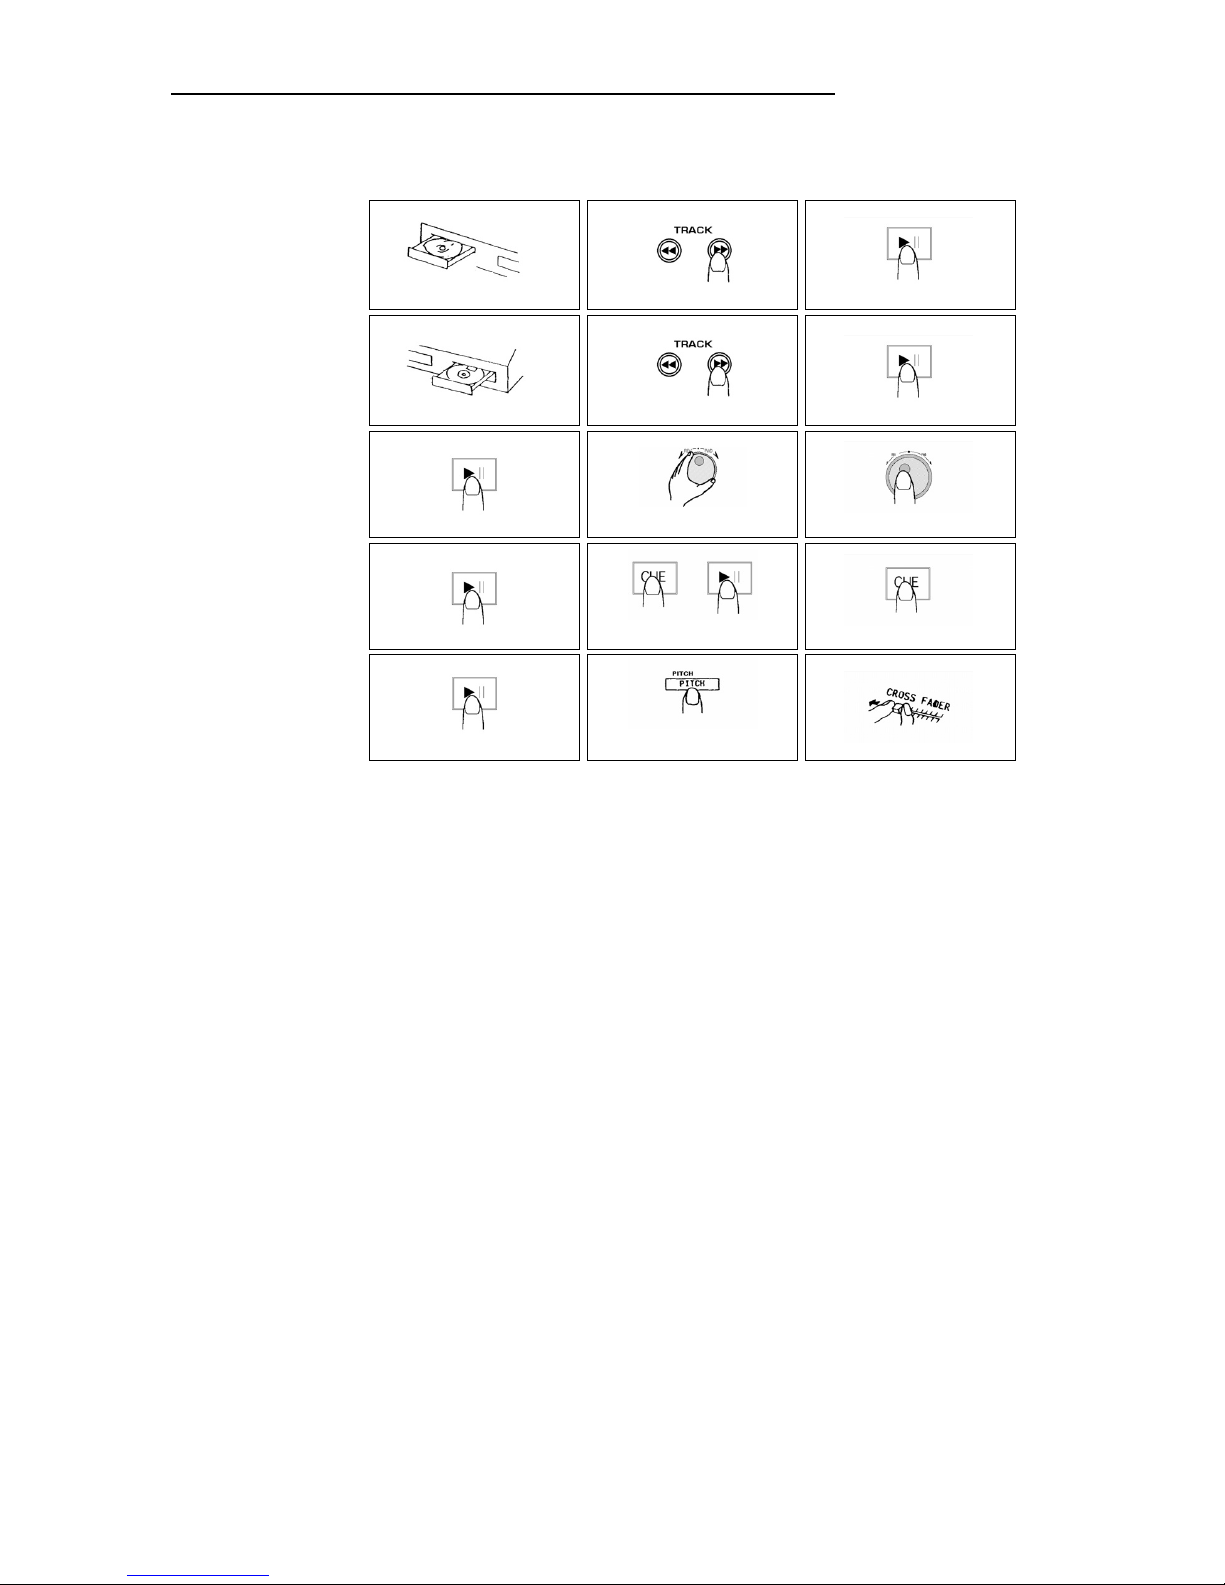
1. OPEN/CLOSE (Disc Tray
Open/Close) - Press to load or eject
the disc. Each press will open or close
the disc tray on the transport. NOTE:
Tray will not open unless the disc has
been paused. Tray will automatically
close after 30 seconds.
2. TIME (Time Button) - Switches the
time display between elapsed playing
time and remaining time on the track
and remaining time on the entire CD.
3. CONT/SING - Will cause just a single
track to play or all tracks in order by
pressing once or twice.
4. LCD DISPLAY - Indicates all the
functions, as they are occurring, with
the CD. These functions are explained
in the next section.
5. TRACK (Track Buttons) - Used to
select the track to be played.
6. Track 10 Button - This button is for
quickly advancing to higher tracks on a
CD.
7. PROGRAM - Depress this button and
the unit will stop and the program
indicator will light. Select each track to
be programmed and press the
PROGRAM button between selections.
You can program up to 20 tracks.
Press PLAY to start the program. To
exit and erase program, either hold the
program button down for more than 2
seconds while the unit is stopped, open
the disc tray, or turn off the power.
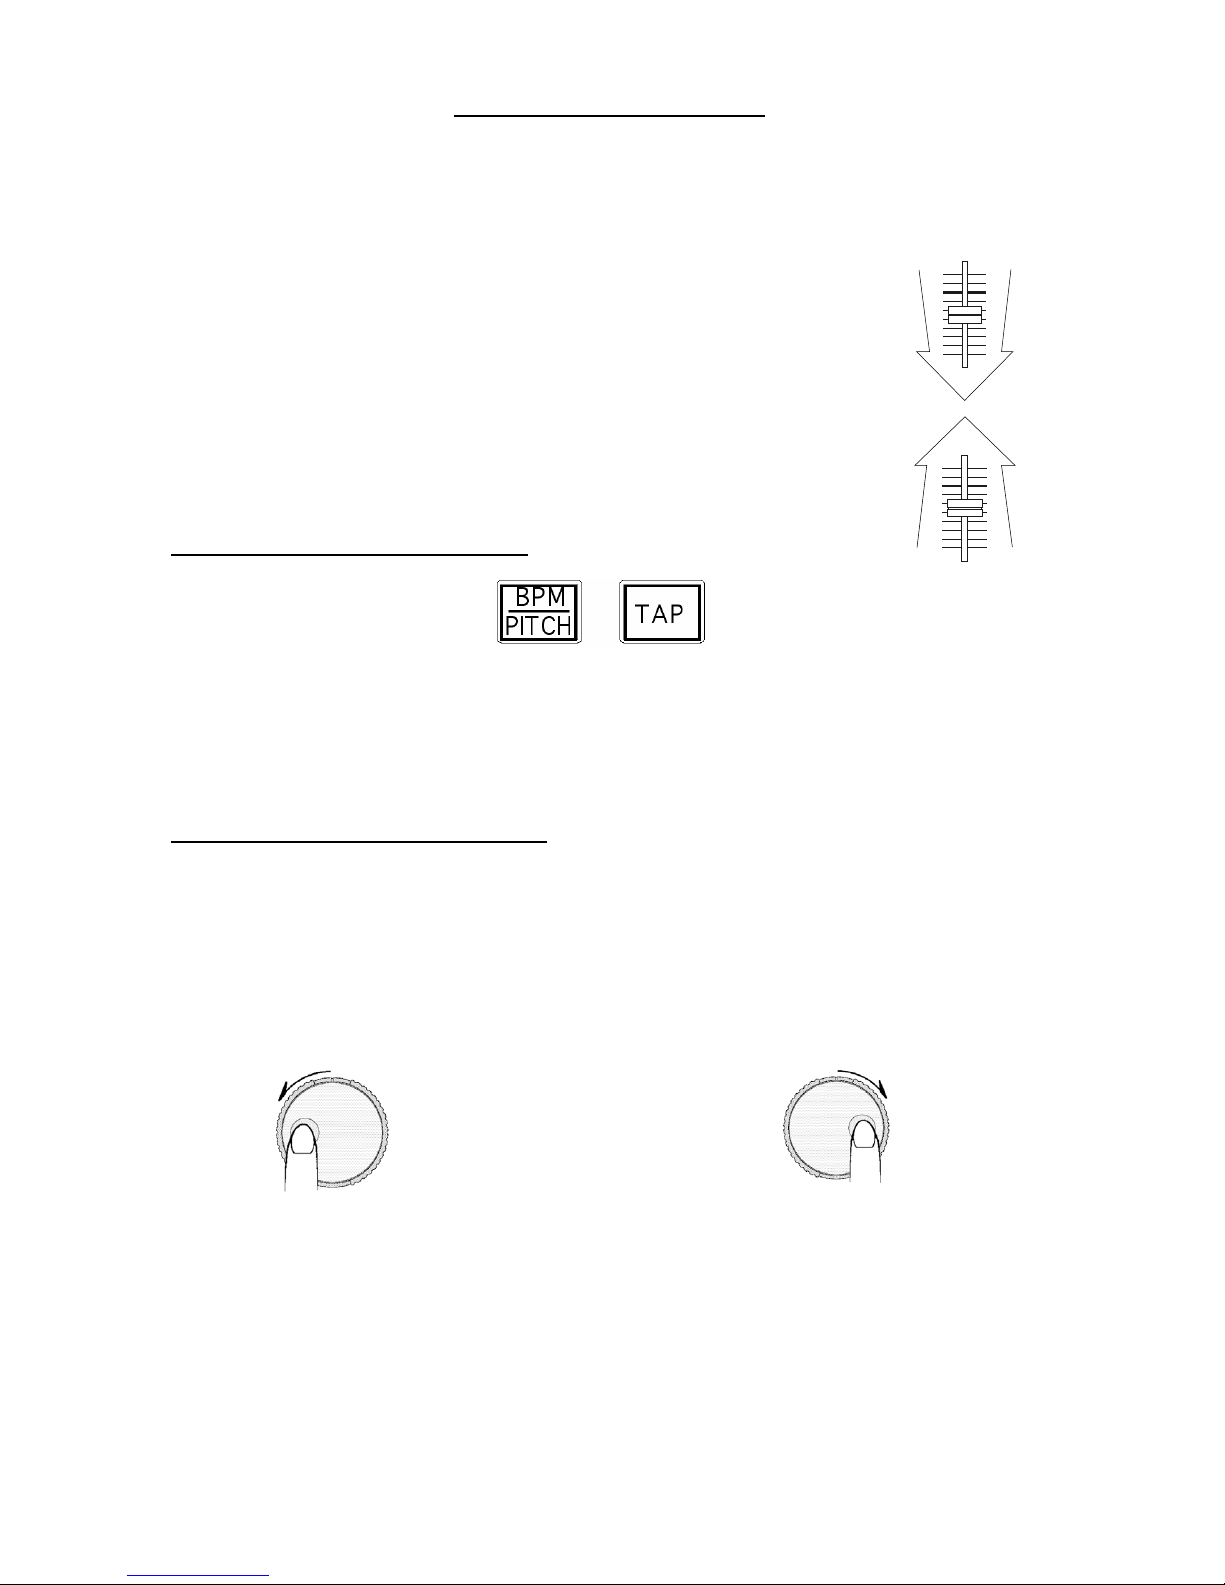
8. PITCH (Pitch Button) - Activates the
Pitch Slider.
9. PITCH SLIDER - The pitch can be
changed up to +/-16% by pressing the
PITCH button so the PITCH LED is lit,
then moving the sliding fader. The
pitch will not be changed if the PITCH
LED is off.
10. SEARCH WHEEL (OUTER RING) - 3
forward and 3 reverse speed positions
for searching through songs. The more
you turn the wheel in either direction
the faster you search through the
music.
11. PITCH BEND/JOG WHEEL (INNER
RING) - The jog wheel serves 2
functions depending on the current
mode.
a) The jog wheel will control a slow
frame search when the CD is not
playing. To set a new frame cue
point, spin the wheel then press
play when you have determined
the proper position. Press CUE to
return to the “CUE POINT”.
b) When both CD players are playing
a CD, the pitch bend function
allows the positioning of the bass
beats to be matched after the
pitch of each disc is matched.
Either player can “catch up” or
“fall back” to match the other
player. The jog wheel will
temporarily bend the pitch of the
music if the song is already
playing by rotating the wheel
clockwise to speed up or
counterclockwise to slow down. By
changing the pitch of one disc with
respect to the pitch of the other
disc, the beats can be matched.

6
12. CUE - Pressing the CUE button during
play provides a return to the position at
which play was started. If PAUSE is
used before CUE, that will become the
cue point. Alternately pressing the
PLAY button and the CUE button allows
the CD to be played from the same
position any number of times. The CUE
LED will light up from the time the CUE
button is pressed until the CD has been
reset to the position at which play was
started. Steady lighting of this LED
indicates the ready condition.
13. START/PAUSE (Play/Pause Button)
-Each press of the Play/Pause Button
causes the operation to change from
play to pause or from pause to play.
14. BPM/PITCH BUTTON - Switches the
mode of the display between showing
the BPM and the percentage change in
pitch.
15. TAP BUTTON - Tap this button with
the beat of the music to determine the
current Beats Per Minute (BPM).
LCD DISPLAY FEATURES
1. PLAY: Active while the unit is
actually playing a CD.
2. PAUSE: Active when the unit is
paused.
3. CUE: Flashing when the unit is
setting a cue point. Lit continuously
when the unit is paused at a cue
point.
4. PROGRAM: Used for pre-
programming the track order to
automatically be played by the unit.
This is a great function if you need to
leave the CD player alone.
5. TIME MODE: (Elapsed) is for
showing time as it is taking
place.(Remain) shows how much
time is left on a particular track. This
function is controlled by the TIME
BUTTON.
6. SINGLE: Shows when the unit is set
to play just one track at a time.
When this is not lit, the CD will play
continuously through all tracks. This
function is controlled by the
SING/CONT BUTTON.
7. PITCH: Is lit when the PITCH
BUTTON is active.
8. TIME BAR: Shows either time
remaining or elapsed depending on
the setting of the TIME BUTTON.
9. PITCH/BPM: Shows the percentage
change in pitch or current BPM.
10. TRACK: Shows the current track
that the unit is playing.
11. MINUTES: Shows the minutes
elapsed or remaining depending on
mode setting.
12. SECONDS: Shows the seconds
elapsed or remaining depending on
mode setting.
13. FRAMES: The CD Player breaks
down a second into 75 frames for
accurate cueing. This shows the
frames elapsed or remaining
depending on mode setting.

7
PLAY / PAUSE & CUE OPERATIONS
PLAY & CUE
Back Cue Operation
Play Interval
Press "PLAY/PAUSE"
to start music
Press "CUE" return to
last starting point
Position on Disc
Pressing the “PLAY/PAUSE” button starts the disc. Pressing the “CUE” button will reset the disc
to the last place where the disc was started. This is called the cue point. By alternately
pressing the “PLAY/PAUSE” button and the “CUE” button, the disc may be returned and played
from the cue point any number of times. This function is called back cue.
PLAY, PAUSE & CUE
Back Cue Operation
Play Interval Play Interval
Press "PLAY/PAUSE"
to start music
Press "PLAY/PAUSE"
to start music
Press "CUE" return t
o
last starting point
Press "PLAY/PAUSE"
to pause music
Position on Disc
When play has been paused and then started again, the return position for the back cue will be
updated to this new position.
EDITING CUE POINT
Back Cue Operation
Play Interval
Press "PLAY/PAUSE"
to start music
Adjust the "CUE" point
with the jog wheel
Press "CUE" return to
last starting point
Position on Disc
When the inner dial is turned while a cue point is set, a new cue point can be located. The CD player
will repeatedly play small parts of the CD as you move it to the desired position. By pressing
“PLAY/PAUSE” then “CUE” you can confirm that the new cue point is desirable.

8
Matching the Beats Per Minute
Match the tempo by monitoring the music of both PLAYER 1 and PLAYER 2 by ear and adjusting
the pitch. When the tempo of the music of the selected CD player is slow compared to the
tempo of the other player, move the slider to the ( + ) side and match the tempo. When
faster, move the pitch slider to the ( - ) side. The following illustration shows the case of
matching the pitch of PLAYER 2 to the pitch of the music being played on PLAYER 1.
1. Press PLAY/PAUSE to start PLAYER 1. PLAYER 1 is playing.
2. Press PLAY/PAUSE to start PLAYER 2. Both CD players are playing discs.
3. Listen to PLAYER 2 in your headphones. If the beat of channel 2 (in the
headphones) is faster than channel 1, slow down the beat of channel 2 using the
pitch control.
4. If the beat of channel 2 (in the headphones) slower than the beat of
channel 1, speed up the beat using the pitch control.
USING THE BPM DISPLAY FEATURE
Press the BPM button to select the BPM feature on the display on the side of the CD player
that you wish to set. Tap the Counter button to the beat of the music.
You will see the BPM number appear in the display. The more times you tap the more
accurate your number will be. When you adjust the pitch slider the display number will
change by an equal percentage.
BEAT MATCHING USING PITCH BEND
If you find the BPM’s (Beats Per Minute or Tempos) are the same, however, the drum beats
are not matched you will need to temporarily change the pitch. The illustration below shows
how to match the beat of PLAYER 2 to the beat of the music being played on PLAYER 1. (This
procedure can be done on either PLAYER).
After matching the BPM’s adjust the pitch temporarily as follows:
When PLAYER 2 is rotate the jog wheel
counter clockwise
When PLAYER 2 is behind rotate the jog
wheel clockwise
The pitch changes automatically while the jog wheel is rotated. The faster you rotate the wheel
the more you change. Releasing the wheel results in a return to the original pitch. (So the
BPM’s are once again the same.)

9
EXAMPLE OF MIXING USING BOTH PLAYERS OF YOUR CD PLAYER
While playing a disc on PLAYER 1, load a disc into PLAYER 2 and select your next track, match
its pitch to the track playing on PLAYER1 and when you are ready use the crossfader on your
mixer to fade from PLAYER 1 to PLAYER 2.
PLAYER 1
Load a disc and press the
OP EN/C LO S E butto n.
PLAYER 2
Load a disc and press the
OP EN/C LO S E bu tton .
PLAYER 2
Press the Pause button of PLAYER 2.
PLAYER 2
Lis te n with the monitor a nd
press the play button.
PLAYER 2
With a matching downbeat from
Player 1 press the play button.
PLAYER 1
S e le ct the tra ck to b e p la ye d.
PLAYER 2
S e le ct the tra ck to b e p la ye d.
PLAYER 2
Rapidly search for a cue point using
the oute r whe e l
PLAYER 2
Press the cue button then play to be
sure of the set cue point.
PLAYER 2
If you are beat mixing, turn on your
P itch a djust and follow the directions
for beat matching.
Load a disc in PLAYER 1 and
select the track and press PLAY.
Load a disc in PLAYER 2 and
select the track then play.
Set and edit a start cue point on
PLAYER 2
Check your new cue point
Do a MIX!
PLAYER 1
P re s s the P LAY b utto n
PLAYER 2
P re s s the P LAY b utto n
PLAYER 2
Slowly set the right cue point
using the inner wheel
PLAYER 2
Res e t the playe r to the Cue point
by pressing Cue
MIXE R
Whenyouarehappywithyourmix
move the c ros s fa d e r a cc ord in gly.

10
INSTALACIÓN RÁPIDA (ESPAÑOL)
1. Asegúrese de que todos los artículos
incluidos al inicio de este manual
están incluidos en la caja.
2. LEA EL FOLLETO DE
INSTRUCCIONES DE SEGURIDAD
ANTES DE UTILIZAR EL
PRODUCTO.
3. Estudie este diagrama de instalación.
4. Coloque la estación de mezclas en
una posición adecuada para su
funcionamiento.
5. Asegúrese de que todos los
dispositivos están apagados y de que
todos los faders y potenciómetros de
ganancia están en posición “cero”.
6. Conecte todas las fuentes de entrada
al estéreo como se indica en el
diagrama.
7. Conecte las salidas del estéreo a los
amplificadores de alimentación,
unidades de cinta magnética y/o
otras fuentes de audio.
8. Enchufe todos los dispositivos al
suministro de corriente alterna.
9. Prenda todo en el siguiente orden:
•fuentes de entrada de audio
(por ej. giradiscos o
reproductores de CD)
•KMX02
•por último, cualquier
amplificador o dispositivo de
salida
10. Al apagar, realice siempre esta
operación al contrario:
•apague los amplificadores
•KMX02
•por último, cualquier dispositivo
de entrada
11. Visite http://www.numark.com para
registrar el producto.
Puede encontrar más información
sobre este producto al visitar
http://www.numark.com

11
CONEXIONES TRASERAS
1. Entradas de canal: Jacks RCA no balanceados para la conexión de fuentes externas. La
salida de Phono/Línea es seleccionada utilizando el interruptor de palanca del panel
delantero. Giradiscos, reproductores de video de alta fidelidad (HiFi), casetes y unidades
de cinta magnética reel-to-reel, máquinas DAT (Digital Audio Tape), reproductores de CD,
discos láser, sintonizadores e incluso sintetizadores u otros instrumentos pueden ser
conectados utilizando estos jacks. NOTA: Enchufe las fuentes de audio mono en ambas
entradas, derecha e izquierda, usando un cable conector tipo “Y”.
2. GND: Este conector de tornillo debe ser usado para conectar cualquier giradiscos u otro
dispositivo que tiene que ser conectado a tierra.
3. Interruptor selector de entrada: Haga uso de este interruptor para dejar que el equipo
de nivel de línea o nivel de phono pueda ser enchufado en sus entradas de canal. Cuando
se seleccione la entrada de phono, su señal introducida directamente a los pre-
amplificadores phono RIAA de alta calidad. Utilice esta posición solo para giradiscos. Las
Fuentes de nivel de línea sobrecargarán los pre-amplificadores de phono sensibles y
tendrá un sonido de muy mala calidad, así que asegúrese siempre de conmutar el
interruptor de línea/phono a línea antes de conectar las fuentes de línea.
4. Salida de Video: Conecte su mezclador de video, su6. interruptor de video, TV o
monitores a estos conjuntos de salidas de video. Estas salidas estarán activadas cuando
usted toque un CD que contenga datos gráficos de CD+G. Este tipo de CD es utilizado de
forma común para la visualización de letras de karaoke.
5. Salida Master (RCA): Esta salida sirve para conectar un dispositivo de monitorización
externo como, por ejemplo, un sistema de megafonía, monitores de potencia o un
estéreo. El nivel de la señal de salida del área de estéreo está controlado por el master
fader.
6. Salidas Master Balanceadas de Estéreo (XLR): conectores tipo XLR de baja
impedancia controlados por el Master fader.
7. Entradas de micrófono 2 y 3: Los micrófonos con un conector de 6.3mm pueden
conectarse a estas terminales de entrada. Estas entradas tienen el efecto del eco.
8. AC In (Entrada de corriente alterna): Esta estación de mezclas está diseñada para
trabajar con el cable de suministro de alimentación que acompaña a la unidad. Mientras
que la alimentación esté apagada, enchufe primero el suministro de alimentación a la
estación de mezclas y luego enchúfelo a la toma de corriente.
9. Interruptor de alimentación: Use este conmutador para prender la estación de mezclas
después de que todos los dispositivos de entrada hayan sido conectados para evitar daño
a su equipo. Prenda la estación de mezclas antes de prender los amplificadores y apague
los amplificadores antes de apagar la estación de mezclas.
10. PAL/NTSC: Selecciona entre los modos del vídeo de NTSC y PAL. NTSC se utiliza en los
Estados Unidos, mientras que PAL se utiliza en mucha de Europa.

12
LAS CARACTERÍSTICAS DEL PANEL FRONTAL
1. DJ Mic 1: Esta sección tiene los controles
del aumento y del tono para la
combinación mic de 6.3mm/XLR entrado.
2. Mic 2: Esta sección tiene los controles
del aumento y del tono para Mic 2
3. Mic 3: Esta sección tiene los controles
del aumento y del tono para Mic 3
4. Mic 2&3 Eco: Esta perilla controla el
efecto del eco sobre los micrófonos 2 y 3
5. Mic 2&3 Delay: Esta perilla controla
retrasa la época del efecto del eco sobre
los micrófonos 2 y
6. Fader de entrada: Controla los niveles
de fuente individuales del mezclador.
7. Master Fader – Controla el nivel de
salida global.
8. Interruptor de palanca de entrada:
9. Crossfader reemplazable – Este fader
deslizante mezcla el audio entre canal 1
canal 2.
Nota: El crossfader puede ser
reemplazado por el usuario en caso de
fallo. Simplemente, desatornille los dos
tornillos grandes que lo sujetan,
sáquelo hacia fuera y desconecte el
cable. Vuelva a sujetar el nuevo
crossfader y atornille la placa de
montaje de nuevo en la unidad – ¡ya
puede volver al trabajo!
10. Activador del Fader (Start) – La
activación le permite poner los
reproductores de CD en funcionamiento
desde su crossfader. Al desplazarlo de
izquierda a derecha, activará el
reproductor de CD de la derecha y
desactivará el reproductor de CD de la
izquierda.
deslizante mezcla el audio entre canal 1
canal 2.
11. On/Off (Sí/No) – Pulsando este botón
se activa y desactiva la función Key
Change (Cambio de tonalidad).
12. Key (Tonalidad) – Esta perilla permite
ajustar la tonalidad de la música. Si la
perilla se gira a la izquierda, se obtiene
una tonalidad más baja (un semitono
abajo ), mientras que si se gira a la
derecha se obtiene una tonalidad más
alta (un semitono arriba).
13. MEDIDOR LED – Indica el nivel de
salida del master.
14. Palanca de estéreo/mono – Cambia
la salida del master entre mono y
estéreo. Este fader
15. Agudos de master: Este mando
giratorio ajusta el nivel del tono alto.
16. Medio de master: Este mando giratorio
ajusta el nivel del tono medio.
17. Graves de master: Este mando
giratorio ajusta el nivel del tono bajo.
18. Selector de Cue de canal – Utilizado
para enviar audio de canal a sus
auriculares.
19. Nivel de auriculares- Ajusta el
volumen de cue.
20. Conector de auriculares – Utilizado
para conectar clavijas de 1/8” o 1/4”
para el monitoreo de audio con los
auriculares.

13
Características del reproductor de CD
1. ABRIR/CERRAR (Bandeja de disco
Abrir/Cerrar) – Púlselo para introducir o
expulsar el disco. Cada vez que lo pulse se
abrirá o cerrará la bandeja del disco en la
unidad. NOTA: La bandeja no se abrirá a
menos que el disco haya sido detenido. La
bandeja se cerrará automáticamente a los 30
segundos.
2. TIME (Botón de tiempo) – Cambia la
visualización del tiempo entre el tiempo de
reproducción transcurrido y el tiempo restante
en la pista y el tiempo restante en todo el CD.
3. CONT/SING – Al pulsar una o dos veces,
hará que se reproduzcan una o todas las
pistas en orden.
4. PANTALLA LCD – Indica todas las funciones
del CD a medida que van teniendo lugar. Estas
funciones se explican en la siguiente sección.
5. TRACK (Botones de pista) – Utilizados para
seleccionar la pista que se va a reproducir.
6. Botón de pista 10 – Este botón es utilizado
para avanzar rápidamente en las pistas del
CD.
7. PROGRAMA – Pulse este botón y la unidad se
detendrá y el indicador de programa se
iluminará. Seleccione todas las pistas que
desee programar y pulse el botón de
PROGRAMA entre cada selección. Podrá
programar hasta 20 pistas. Pulse PLAY para
activar el programa. Para salir y borrar el
programa, mantenga pulsado el botón de
programa durante más de 2 segundos
mientras la unidad está parada, abra la
bandeja del disco, o apague la fuente de
alimentación.
8. PITCH (Botón de Pitch) – Activa el
deslizador de tono (pitch).
9. DESLIZADOR DEL PITCH – El pitch puede
variar hasta un +/-16% pulsando el botón del
PITCH de modo que el LED del pitch esté
iluminado; tras esto, deslizando el fader. El
pitch no variará si el LED del pitch está
apagado (OFF).
10. SEARCH WHEEL (RUEDA EXTERIOR) –
esta rueda dispone de 3 posiciones de
velocidad de avance y 3 de reverso para
buscar dentro de las canciones. Cuanto más
gire la rueda en cualquiera de las dos
direcciones, más rápida será la búsqueda.
11. PITCH BEND/JOG WHEEL (RUEDA
INTERIOR) – Esta rueda de avance lento tiene 2
funciones dependiendo del modo en el que se
encuentre.
a) La rueda de avance lento controlará una
búsqueda de frames lentos cuando el CD
no se esté reproduciendo. Para determinar
un nuevo punto cue de frame, gire la rueda
y pulse PLAY una vez que haya
determinado la posición adecuada. Pulse
CUE para volver al “PUNTO CUE”.
b) Cuando ambos reproductores de CD están
reproduciendo un CD, la función pitch bend
permite el posicionamiento de los beats de
graves para que coincidan una vez que el
pitch de cada disco coincide. Cualquiera de
los reproductores puede “adelantarse” o
“atrasarse” para coincidir con el otro
reproductor. La rueda de avance lento (jog
wheel) cambiará provisionalmente el tono
de la música si la canción se está
reproduciendo girando la rueda en el
sentido de las agujas del reloj para acelerar
o en el sentido contrario para ralentizar.
Cambiando el tono de un disco con
respecto al tono del otro disco, los beats
pueden ser igualados.
12. CUE – Al pulsar el botón de CUE durante la
reproducción, se volverá a la posición a la cual
comenzó la reproducción. Si se activa la PAUSA
antes del CUE, esto se convertirá en un punto
cue. Si se presionan alternativamente los botones
PLAY y CUE, el CD será reproducido desde la
misma posición cuantas veces se desee. El LED
del CUE se iluminará desde el momento en que
se pulse el botón de CUE hasta que el CD haya
sido reiniciado a la posición a la que se comenzó
la reproducción. Una iluminación continua de este
LED indica que el CUE está listo.
13. START/PAUSE (Botón de
reproducción/pausa) –Cada vez que se pulsa
el botón de reproducción/pausa esto hace que se
cambie de reproducción a pausa o de pausa a
reproducción.
14. BOTÓN DE BPM/PITCH – Alterna el modo de la
pantalla entre la visualización de los BPM y el
porcentaje de cambio en el tono (pitch).
15. BOTÓN DE TAP – Golpee este botón con el beat
de la música para determinar los beats por
minuto (BPM) en ese momento.

14
Características de la pantalla LCD
1. PLAY: Está activo si la unidad está
reproduciendo un CD en ese momento.
2. PAUSE: Está activo si la unidad está en
pausa.
3. CUE: Parpadea si la unidad está
determinando un punto cue. Se ilumina de
forma continua si la unidad está detenida
en un punto cue.
4. PROGRAMA: Se utiliza para programar con
antelación el orden de las pistas que van a
ser reproducidas automáticamente por la
unidad. Esta es una función de gran utilidad
si necesita dejar alejarse del reproductor de
CD.
5. MODO DE TIEMPO: “Transcurrido”
muestra el tiempo a medida que va
teniendo lugar; “restante” muestra cuánto
tiempo queda en una pista determinada.
Esta función se controla mediante el botón
de TIEMPO (TIME).
6. SINGLE: Muestra cuando la unidad está
configurada para reproducir las pistas de
una en una. Cuando no esté encendido, el
CD se reproducirá todas las pistas de forma
continua. Esta función se controla mediante
el botón de SING/CONT.
7. PITCH: Está iluminado cuando el botón de
tono (pitch) está activado.
8. BARRA DE TIEMPO: Muestra el tiempo
restante o transcurrido dependiendo de la
configuración del botón de tiempo.
9. PITCH/BPM: Muestra el porcentaje de
cambio del tono (pitch) o las BPM en ese
momento.
10. TRACK (PISTA): Muestra la pista que la
unidad está reproduciendo en ese
momento.
11. MINUTOS: Muestra los minutos restantes
o transcurridos dependiendo de la
configuración del modo.
12. SEGUNDOS: Muestra los segundos
restantes o transcurridos dependiendo de la
configuración del modo.
13. FRAMES: El reproductor de CD divide un
segundo en 75 frames para un cueing más
preciso. Muestra los frames restantes o
transcurridos dependiendo de la
configuración del modo.
OPERACIONES DE PLAY/PAUSA Y CUE
PLAY (REPRODUCCIÓN) Y CUE
Pulse "PLAY/PLAUSE" para
que comience la música
Reproduzca la música
durante cierto tiempo
Pulse "CUE" para volver al
último punto de partida
Posición en el disco
Operación de back cue
Pulsando el botón de “PLAY/PAUSE” se pondrá el disco en funcionamiento. Pulsando el botón "CUE" se el disco
comenzará de nuevo en la misma posición en la que comenzó anteriormente. Esto es lo que se llama punto
cue. Pulsando los botones de “PLAY/PAUSE” y “CUE” alternativamente, el disco podrá volver al mismo punto
cue y reproducirse cuantas veces desee. Esta función se denomina back cue.
PLAY, PAUSE Y CUE
Pulse "PLAY/PLAUSE" par
a
que comience la música
Pulse "PLAY/PLAUSE" par
a
que comience la música
Reproduzca la música
durante cierto tiempo
Reproduzca la música
durante cierto tiempo
Pulse "CUE" para volver a
l
último punto de partida
Posición en el disco
Operación de back cue
Pulse "PLAY/PLAUSE" par
a
que pare la música
Cuando la reproducción se haya detenido y comenzado de nuevo, la posición de retorno para el back cue será
actualizada a la nueva posición.

15
MODIFICACIÓN DEL PUNTO CUE
Pulse "PLAY/PLAUSE" para
que comience la música
Reproduzca la música
durante cierto tiempo
Pulse "CUE" para volver al
último punto de partida
Posición en el disco
Ajuste el punto "CUE" con la rueda
de avance lento (jog wheel).
Operación de back cue
Si la rueda interna se gira cuando se establece un punto cue, podrá hallarse un nuevo punto cue. El reproductor de
CD reproducirá repetidamente fragmentos cortos del CD a medida que lo mueve a la posición deseada. Pulsando
“PLAY/PAUSE” y luego “CUE” podrá confirmar que el nuevo punto cue es el que usted desea.
Igualar los beats por minuto
Iguale el tempo monitoreando la música del reproductor 1 y 2 de oído y ajustando el pitch. Cuando el tempo
de la música del reproductor de CD seleccionado sea lento comparado con el del otro reproductor, desplace el
deslizador hacia el (+) e iguale el tempo. Cuando sea más rápido, desplace el pitch hacia (-). La siguiente
ilustración muestra el caso en el que se iguala el pitch del reproductor 2 con el pitch de la música
reproducida por el reproductor1.
1. Pulse PLAY/PLAUSE para que comience el reproductor 1.
El reproductor 1 está en marcha.
2. Pulse PLAY/PLAUSE para que comience el reproductor 2.
Ambos reproductores de CD están en funcionamiento.
3. Escuche el reproductor 2 en sus auriculares. Si el beat del canal 2 (en los auriculares) es
más rápido que el del canal 1, ralentice el beat del canal 2 por medio del control del pitch.
4. Si el beat del canal 2 (en los auriculares) es más lento que el beat del canal 1, acelere
el beat por medio del control del pitch.
USO DE LA CARACTERÍSTICA DE VISUALIZACIÓN DE LOS BPM
Pulse el botón de BPM para seleccionar la función de BPM que desea configurar en la pantalla situada en el
lateral del reproductor de CD. Golpee el botón de Counter al ritmo (beat) de la música.
Observará que aparece el número de BPM en la pantalla. Cuantas más veces golpee, más preciso será el
número. Cuando ajuste el deslizador del pitch, el número mostrado cambiará por un porcentaje equivalente.
IGUALACIÓN DEL BEAT HACIENDO USO DEL PITCH BEND
Aunque observe que los BPM (Beats por minuto o tempos) son iguales, sin embargo, los beats de la batería
no se corresponden y necesitará cambiar el pitch provisionalmente. La ilustración siguiente muestra cómo
igualar el beat del reproductor 2 al beat de la música que está sonando en el reproductor 1. (Este
procedimiento puede realizarse en cualquiera de los reproductores).

16
Una vez haya igualado los BPM, ajuste el pitch provisionalmente como se muestra a continuación:
Cuando el reproductor 2 esté adelantado, gire la
rueda de avance lento (jog wheel) en el sentido
contrario a las agujas del reloj
Cuando el reproductor 2 esté retrasado, gire la
rueda de avance lento (jog wheel) en el sentido
de las agujas del reloj
El pitch cambia de forma automática a medida que se gira la rueda de avance lento. Cuanto más rápido gire la
rueda, más cambiará. Si se suelta la rueda, se volverá al pitch original. (De modo que los BPM son de nuevo los
mismos).
EJEMPLO DE MEZCLA UTILIZANDO AMBOS REPRODUCTORES DE SU REPRODUCTOR DE CD
Mientras reproduce un disco en el reproductor 1, inserte un disco en el reproductor 2 y seleccione la siguiente
pista, iguale el pitch con el de la pista del reproductor 1 y, cuando esté listo, use el crossfader de su mezclador
para pasar lentamente del reproductor 1 al reproductor 2.

17
KMX02 SCHNELLAUFBAU (DEUTSCH)
1. Versichern Sie sich, daß alle auf der
Vorderseite dieser Anleitung aufgeführten
Gegenstände in der Schachtel enthalten
sind.
2. LESEN SIE DIE
SICHERHEITSHINWEISE, BEVOR SIE
DAS PRODUKT IN BETRIEB NEHMEN.
3. Sehen Sie sich dieses Aufbaudiagramm
genau an.
4. Stellen Sie das CDMIX-Bedienpult an eine
für den Betrieb geeignete Stelle.
5. Stellen Sie sicher, daß alle Geräte
ausgeschaltet sind und alle Blendregler und
Drehknöpfe auf "null” stehen
6. Schließen Sie alle Stereo-Eingabequellen
wie im Diagramm gezeigt an.
7. Verbinden Sie die Stereo-Ausgabekanäle
mit dem/den Verstärker/n, Kassettendecks
und/oder anderen Tonquellen.
8. Schliessen Sie alle Geräte an den
Wechselstromkreis an.
9. Schalten Sie alles in der folgenden
Reihenfolge ein:
•Toneingabequellen (z.B.
Plattenspieler oder CD-Spieler)
•KMX02
•zuletzt jegliche Verstärker oder
Ausgabegeräte
10. Beim Ausschalten, drehen Sie diese
Reihenfolge jeweils um, indem Sie:
•die Verstärker ausschalten
•dann den KMX02
•zuletzt alle Eingabequellen
11. Besuchen Sie die Webseite
http://www.numark.com, um Ihr Produkt
zu registrieren.
Weitere Informationen über dieses Produkt
können unter der Adresse
http://www.numark.com gefunden werden

18
ANSCHLÜSSE RÜCKSEITE
1. Kanalanschlüsse: Unbalancierte RCA-
Buchsen zum Anschluss von externen
Quellen. Der Phono/Line-Anschluss wird
über den Kippschalter an der Vorderseite
des Gerätes selektiert. Plattenspieler, HiFi
VCRs, Kassetten- und Tonbanddecks, DAT-
Maschinen, CD-Spieler, Laser Discs, Tuner,
sogar Synthesizer oder andere Mix-
Bedienpulte können über diese Buchsen
angeschlossen werden. HINWEIS:
Schliessen Sie Mono-Tonquellen mit einer
"Y”-Kabelverbindung an die linken und
rechten Anschlüsse an.
2. GND: Diese Schraubverbindung sollte zum
Anschluss jeglicher Plattenspieler oder
anderer Geräte, welche geerdet weden
müssen, verwendet werden.
3. Eingabeauswahlschalter: Verwenden Sie
diesen, um entweder Line-Pegel oder
Phono-Pegel Geräte an Ihre
Kanalanschlüsse anzuschliessen. Wenn
Phonoeingabe angewählt ist, wird Ihr
Signal direkt durch die Hochqualitäts-RIAA
Phono-Vorverstärker geleitet. Verwenden
Sie diese Auswahl nur für Plattenspieler.
Line-Pegelquellen führen zu einer
Überlastung der sensiblen
Phonovorverstärker und werden sehr
schlechten Klang erzeugen, versicheren Sie
sich also, daß der Line-/Phono-Schalter auf
Line gestellt ist, bevor Sie Line-Quellen
anschliessen.
4. Video Ausgänge: Schließen Sie Ihr
Videomischpult, Ihren Videoschalter,
Fernseher oder Bildschirme an diese
Composite-Videoausgänge an. Diese
Ausgänge werden aktiviert, wenn Sie eine
CD, welche CD+G-Bilddaten enthält,
abspielen. Diese Art von CD wird
vorwiegend zur Anzeige von Karaoke-
Songtexten benutzt.
5. Master-Ausgabe (RCA): Diese Ausgabe
dient zum Anschluß von externen
Monitoren, wie z. B. einer PA,
Aktivmonitoren oder einer Heim-
Stereoanlage. Der Pegel des Master-
Stereoausgabesignals wird vom Master-
Blendregler gesteuert.
6. Stereo-Balancierte Master-Ausgaben
(XLR): Niedrig-Impedanz Verbindungen
vom Typ XLR, welche vom Master-
Blendregler gesteuert werden.
7. Mikrofonanschluß: Mikrofone mit einem
6.3mm Klinken Stecker können an diese
Anschlüsse angeschlossen werden.
8. Wechselstromanschluß: Dieses Mix-
Bedienpult ist für den Betrieb mit dem
mitgelieferten Stromkabel entworfen. Mit
dem Gerät in ausgeschaltetem Zustand,
schliessen Sie die Stromversorgung erst an
das Mix-Bedienpult und dann an die
Steckdose an.
9. EIN/AUS-Schalter: Verwenden Sie
diesen Schalter, um das Gerät
einzuschalten, nachdem alle Eingabegeräte
bereits angeschlossen sind, um Ihre
Ausrüstung vor Beschädigung zu schützen.
Schalten Sie das Bedienpult ein, bevor Sie
den/die Verstärker einschalten und
schalten Sie den/die Verstärker aus, bevor
Sie das Bedienpult ausschalten.
10. PAL/NTSC Auswahl: Dieser Schalter
wählt zwischen dem NTSC und Pal Video
Formaten. NTSC ist in Amerika verbreitet,
während PAL im grössten Teil von Europa
verwendet wird.

19
BEDIENUNGSELEMENTE VORDERSEITE
1. DJ Mikrofon 1: Dieser Bereich hat einen 6.3 mm
Klinken/XLR Kombinations Stecker mit Gainregelung und
Klangregelung.
2. Mikrofon 2: Dieser Bereich hat einen Gainregler und
eine Klangregler.
3. Mikrofon 3: Dieser Bereich hat einen Gainregler und
eine Klangregler.
4. Mikro 2 und 3 Echo: Dieser Regler kontolliert das Echo
für das Mikrofon 2 und 3.
5. Mikro 2 und 3 Delay: Dieser Regler kontolliert die
verzögerung des Echos für das Mikrofon 2 und 3.
6. Eingabe-Blendregler: Steuert die Pegel der
individuellen Quellen im Mix.
7. Master-Blendregler – Steuert den gesamten
Ausgabepegel.
8. Eingabe-Kippschalter – Selektiert die Live-Quelle für
diesen Kanal, abhängig davon, welche Geräte Sie im
Eingabebereich an der Rückseite angeschlossen haben
9. Austauschbarer Überblendregler – Ermöglicht
saubere Übergänge zwischen den zwei Eingabekanälen.
"Ganz links" wählt Kanal 1 an. "Ganz rechts" wählt Kanal 2.
Wenn der Überblendregler in der Mitte steht, sind beide
zugeordneten Kanäle live. Benutzen Sie den
Überblendregler für schnelle und nahtlose Übergänge von
einem gewählten Kanal zum anderen
HINWEIS: Der Überblendregler kann vom Benutzer bei
Defekt ausgewechselt werden. Lösen Sie lediglich die zwei
großen Befestigungsschrauben, heben Sie ihn heraus und
ziehen Sie das Kabel aus dem Regler. Stecken Sie den
neuen Überblendregler ein und schrauben Sie die
Trägerplatte wieder an das Gerät - und schon geht’s weiter!
Der Schiebe-Überblendregler steuert den Ton zwischen
dem linken (Kanal 1) und dem rechten (Kanal 2) Kanal.
Dieser schaltet auch das Video Signal wenn adäquate
CD+G CD’s verwendet werden.
10. Blendregler-Start – Falls dieser aktiviert ist, können
Sie die CD-Spieler von Ihrem Überblendregler aus starten.
Wenn von links nach rechts geschoben wird, wird der
rechte CD-Spieler gestartet und der linke CD-Spieler
pausiert
11. On/Off – Durch das Drücken dieses Tasters schalten
Sie die Key Change Funktion an oder aus.
12. Key – Dieser Regler ermöglicht es, die Tonhöhe der
Musik zu ändern. Wenn Sie ihn nach links drehen,
verstimmt sich die Tonhöhe nach unten. Wird der Regler
nach rechts gedreht ist das Resultat eine höhere
Stimmung.
13. LED ANZEIGE – Zeigt den Pegel der Master-Ausgabe
an.
14. Stereo/Mono-Umschalter – Umschalten der Master-
Ausgabe zwischen Mono und Stereo
15, 16, 17 Stereo-EQ – Einstellung der Entzerrung von
Höhen, Mitten und Bässen für die endgültige Master-
Ausgabe.
18. Kanal-Cue-Auswahlschalter – Wird dazu benutzt,
den Kanal auf Ihrem Kopfhörer hörbar zu machen.
19. Kopfhörerpegel – Stellt die Cue-Lautstärkeein.
20. Kopfhörerbuchsen – Werden zum Anschluss von
entweder 1/8” oder 1/4” Steckverbindungen zum Ton-
Monitoring mit Kopfhörer verwendet.

20
CD-Spieler Bedienelemente
1. AUF/ZU (Disc-Einlegevorrichtung Auf/Zu) –
Drücken Sie hier, um die Disc einzulegen oder
herauszunehmen. Jedes Betätigen wird die
Einlegevorrichtung auf der Schiene öffnen oder
schliessen. HINWEIS: Die Einlegevorrichtung öffnet
nur dann, wenn die CD pausiert ist. Die
Einlegevorrichtung schliesst nach 30 Sekunden
automatisch.
2. ZEIT (Zeittaste) – Schaltet die Zeitanzeige
zwischen vergangener Abspielzeit, verbleibender
Abspielzeit des Titels und verbleibender Abspielzeit
der gesamten CD..
3. KONT/EINZ – Bei einmaligem oder mehrfachem
Drücken, spielt das Gerät nur einen Titel oder alle
Titel nacheinander ab.
4. LCD-ANZEIGE- Zeigt alle CD-Funktionen
während des Ablaufs an. Diese Funktionen
werden im nächsten Abschnitt erläutert.
5. TITEL (Titeltasten) - Diese Tasten werden
benutzt, um den Titel, welcher gespielt werden soll,
auszuwählen.
6. Titel-10-Taste – Diese Taste dient zum schnellen
Anwählen von höher numerierten Titeln auf der CD.
7. PROGRAMM – Drücken Sie diese Taste herunter,
wird das Gerät anhalten und die Programmanzeige
leuchtet auf. Wählen Sie alle Titel, welche in das
Programm aufgenommen werden sollen, aus und
drücken Sie die PROGRAMM-Taste nach jeder Wahl.
Sie können bis zu 20 Titel vorprogrammieren.
Drücken Sie PLAY, um das Programm zu starten.
Um aus dem Programm auszusteigen oder es zu
löschen, halten Sie entweder die Programmtaste für
mehr als 2 Sekunden gedrückt während das Gerät
gestoppt ist, öffnen die Einlegevorrichtung oder
schalten den Strom ab.
8. TONLAGE (Tonlagentaste) – Aktiviert den
Tonlagenschieberegler.
9. TONLAGEN-SCHIEBEREGLER – Die Tonlage kann
bis zu +/-16% verändert werden, indem man die
TONLAGE-Taste drückt, so daß das TONLAGE LED
aufleuchtet und dann den Schiebeblendregler
bewegt. Die Tonlage wird nicht verändert, wenn
das TONLAGE LED nicht aufleuhtet.
10. SUCHRAD (ÄUßERER RING) - 3 vorwärts und 3
rückwärts Geschwindigkeitsstellungen um
Musikstücke zu durchsuchen. Je mehr das Rad in
die eine oder andere Richtung gedreht wird, umso
schneller wird das Musikstück durchsucht.
11. TONLAGE VERÄNDERUNG/JOG-RAD (INNERER
RING) – Das Jog-Rad hat, abhängig von der
augenblicklichen Betriebsart, 2 Funktionen.
a) Während die CD nicht abgespielt wird, kann
das Jog-Rad eine langsame Rahmensuche
ausführen. Um einen neuen Rahmen-Cue-
Punkt zu setzen, drehen Sie das Rad und
drücken Sie dann Play, sobald Sie die genaue
Position bestimmt haben. Drücken Sie CUE,
um zum “CUE POINT” zurückzukehren.
b) Falls beide CD-Spieler eine CD abspielen,
ermöglicht es die
Tonlageveränderungsfunktion, die Position
der Basstakte anzugleichen, nachdem die
Tonlage beider Discs angeglichen wurde.
Jeder der beiden Spieler kann “aufholen”
oder “zurückfallen” um dem jeweils anderen
Spieler gleichzukommen. Das Jog-Rad wird
vorübergehend die Tonlage des Musikstücks
verändern, wenn dieses bereits abgespielt
wird, durch Drehen des Rads im
Uhrzeigersinn um schneller zu werden oder
gegen den Uhrzeigersinn, um langsamer zu
werden. Die Takte können angeglichen
werden, indem die Tonlage einer Disc unter
Berücksichtigung der Tonlage der anderen
Disc verändert wird.
12. CUE – Drücken der CUE-Taste während des
Abspielens erzeugt eine Rückkehr zur anfänglichen
Abspielposition. Falls PAUSE vor CUE gedrückt wird,
wird dies der neue Cue-Punkt. Abwechselndes
Drücken der Tasten PLAY und CUE führt zum
beliebig oftmaligen Abspielen der CD, angefangen
von derselben Position. Das CUE LED leuchtet ab
dem Zeitpunkt auf, in dem die CUE-Taste gedrückt
wurde, bis die CD wieder auf die Position, an
welcher das Abspielen begann, zurückgesetzt
wurde. Falls dieses LED ständig aufleuchtet, zeigt
dies Betriebsbereitschaft an.
13. START/PAUSE (Play/Pause-Taste) – Jedes
Drücken der Play/Pause-Taste schaltet zwischen
Abspielen und Pausieren und umgekehrt um.
14. TPM/TONLAGE-TASTE – Schaltet zwischen
Anzeigeart TPM und prozentuale Veränderung der
Tonlage um.
15. TAP TASTE – Antippen dieses Knopfes im Takt der
Musik führt zur Errechnung der augenblicklichen
Takte Pro Minute (TPM).
Table of contents
Languages:
Other Numark Karaoke System manuals