NutriChief PKRT12WT User manual

VERTICAL COUNTERTOP
ROTISSERIE ROTATING OVEN
MODELS: PKRT12WT
PKRT13BK
USER MANUAL

2
Introduction
Congratulations on your purchase of a Rotisserie. With this uniquely designed
appliance, you will join the thousands of people who have discovered the
delicious, convenience of rotisserie cooking.
This innovative, one of a kind rotisserie will not only produce mouth watering
roasts and poultry with less fat, but will save you energy and will reduce food
(meat) shrinkage.
Before you get started, take a few minutes to read this booklet. It is full of helpful
tips and information that will help you to fully enjoy your rotisserie.
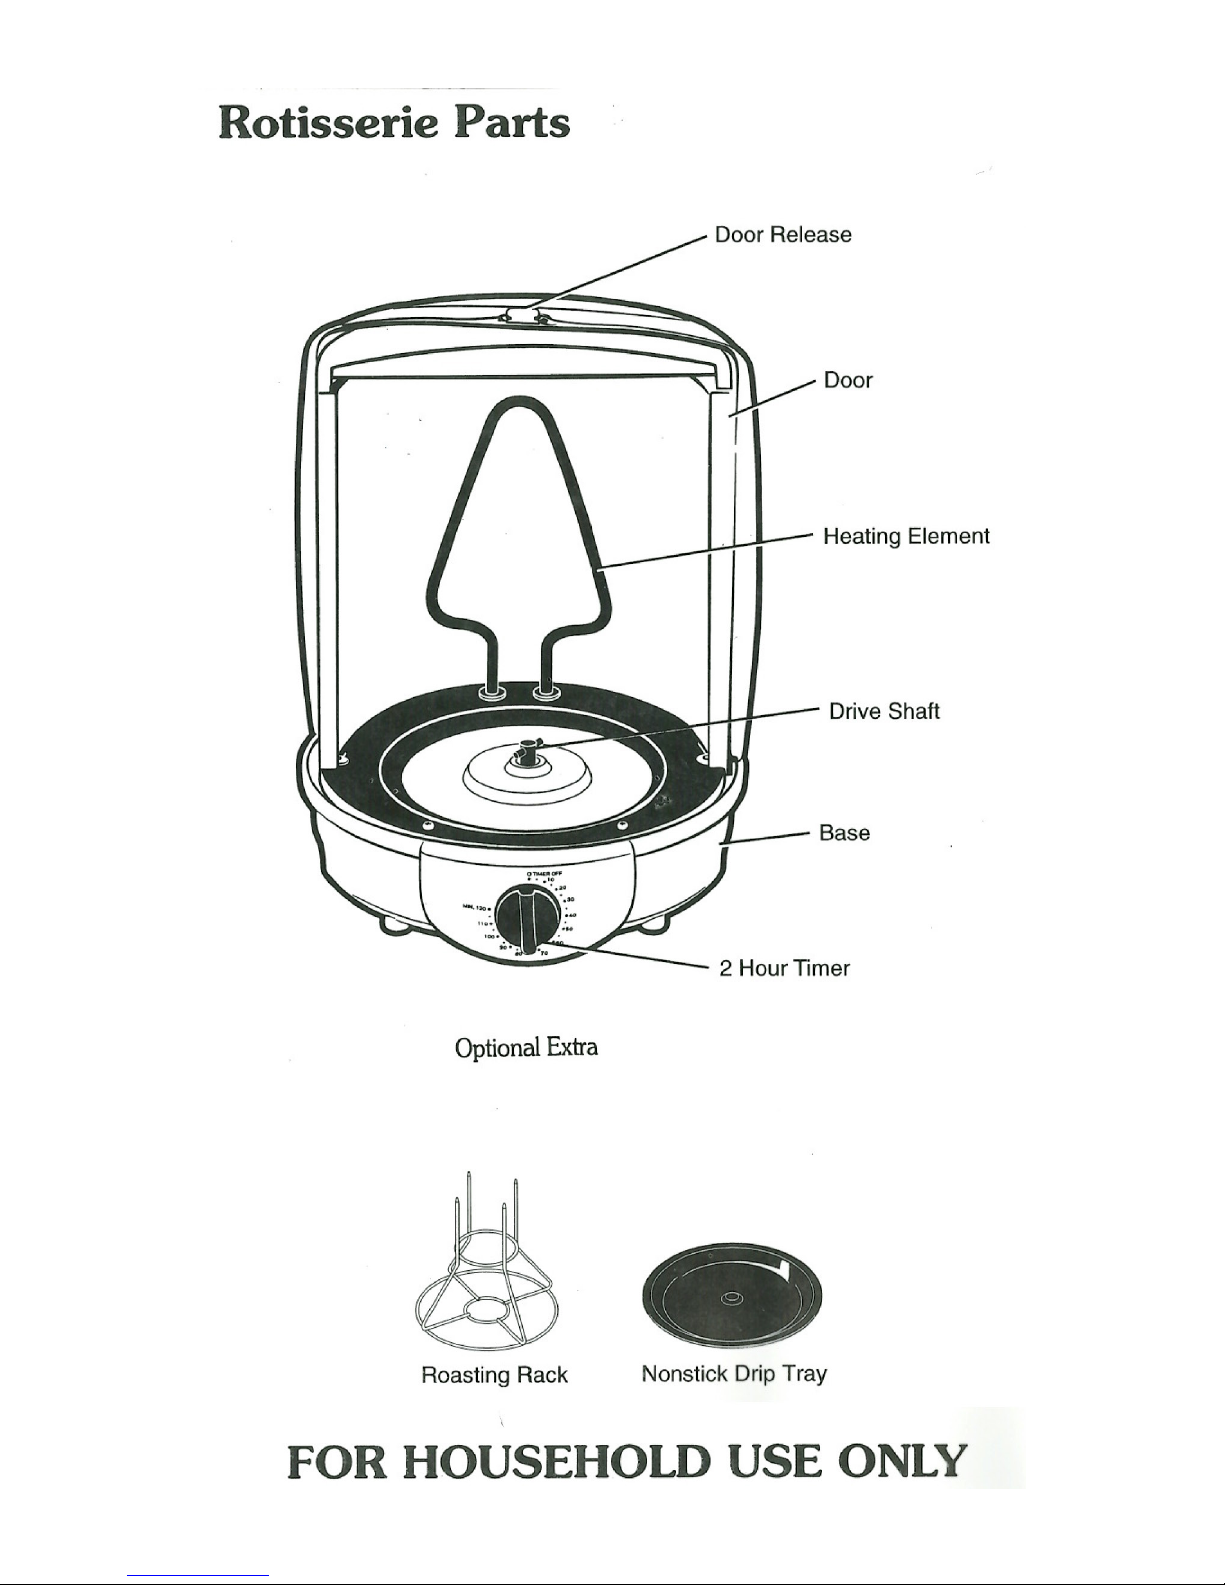
Facts about your Rotisserie
Some of the highlighted features of your Rotisserie include:
• a large viewing window which remains clear during operation
• a two hour timer with audible shut-off signal
• a cover that rotates a full 180° for easy loading and unloading
• a cover that easily lifts off and is dishwasher safe
• Poultrytower-cooksawholebirduptovepounds
The Rotisserie cooking utensils are centered inside the rotisserie
to maximize uniform cooking. Food rotates on a motor-driven
turntable and is cooked to a tender consistency. While cooking,
roasts and poultry self-baste, sealing in their own natural juices
while unwanted fats drain off and collect in the drip tray.
Cooking times in the rotisserie are very comparable to oven roasting, only the
rotisserie requires less energy. The heating element radiates heat (1,200°F/648°C
to 1,500°F/815°C) directly into the food each time it rotates past the elements.
Thepolishedinteriorwallsreectandredirecttherefractedheatwhichisthen
absorbed into food. As a result of this unique pulse-type cooking system, the
actual cooking chamber only reaches 250°F /121 oc to 275°F /135°C. This lower
chambertemperaturebenetsyouinseveralways:
1. It preserves important vitamins that are often destroyed through constant
high temperature cooking. Constant high temperature cooking also makes
proteins less digestible which is not the case with the rotisserie.
2. It reduces meat shrinkage when compared to conventional roasting.
3. It eliminates cooked-on and baked-on grease. For cleaning, simply wipe
off with warm sudsy water. The internal chamber temperature doesn't
reach the high temperature where grease begins to break down into the
"tacky tar" residue we see in conventional ovens. The heatinq element is
self-cleaning.

3
Specs
Roasting Rack 1
Roasting Rack 2

4
IMPORTANT SAFEGUARDS
When using electrical appliances, basic safety precautions should be followed,
including the following:
1. READ ALL INSTRUCTIONS.
2. To protect against electrical hazards, do not immerse cord, plug or base in
water or other liquids.
3. Do not touch hot surfaces. Always use pot holders or oven mitts to handle
hot cover or to check foods.
4. Close supervision is necessary when any appliance is used by or near
children.
5. Unplug from outlet when not in use and before cleaning. Allow to cool
before putting on or taking off parts.
6. Do not operate any appliance with a damaged cord or plug, or after appliance
malfunctions, or has been damaged in any manner. Return appliance to
nearest authorized service facility, for examination, repair or adjustment.
7. Do not use attachments not recommended, or not sold by the appliance
manufacturer.Thismaycausere,electricalshockorinjury.
8. Do not use appliance outdoors.
9. Do not let cord hang over edge of table or counter, or touch hot surface.
10. Do not place appliance on or near a hot gas or electric burner, or in a heated
oven.
11. To disconnect, turn control to off, then grip plug and pull from wall outlet.
Never pull on the cord.
12. Do not use appliance for other than its intended household use.
13. Use extreme caution when removing tray or disposing of hot grease.
14. Do not clean with a metal scouring pad. Pieces can break off the pad and
touch electrical parts, creating a shock hazard.

5

6
Cleaning
To keep your Rotisserie looking good and functioning properly, you
willwanttocleanitbeforeyouuseitforthersttimeandaftereachuse.
Before using the Rotisserie for the rst time: Wash the Roasting Rack, Nonstick
Drip Tray and Tray Support in hot, soapy water, rinse and dry or simply wash
the parts in the dishwasher.
The door can be removed for easy cleaning. Slide door open from left to right
all the way around to the back of the unit. The hole in the cover should line up
with the notch on top of the unit. The Cover can then be lifted off. Wash Cover
in hot, soapy water, rinse and dry or wash in the dishwasher (top rack only).
With a damp cloth or sponge, wipe base inside and outside. Do not immerse
base or cord in water. The heating element is self-cleaning.
After each use: Unplug rotisserie and allow to cool. Wash all parts used as
instructed above.
No other home maintenance is necessary. Any necessary repairs should be
handled only by an authorized service facility.

7
Assembly and Operation
Assembly:
To open the Door, slide counter clockwise. Position Tray Support in the
base of Rotisserie. Secure Drip Tray on Tray Support, lining up the drive
shaft with the impression on the underside. Important: If it is not properly
secured, the Drip Tray will
not rotate correctly.
IMPORTANT: Never operate
the rotisserie without a food
load.
Make sure unit is on a clean,
dry surface with at least six
inches of clearance on all
sides. (Do not place under
cabinets.) Plug cord into 2 3 0
volt outlet.
Place desired food on
appropriate utensil (tower or
rack) and position the drip
tray.
Accessories
Roasting Rack - The Roasting Rack has four
prongs which are made to secure a roast for
rotisserie cooking. Center the roast vertically
over the prongs and slide it down until the
meat rests on the center support. Refer to
recipes using the meat rack and chart for
cooking times.

8
Trim excess fat before cooking. Rub body cavity with salt if desired.
Fold wings across back. Place thawed bird on Poultry Tower with the neck
end at the top (legs down). Pull legs over rings so they are extended.
Place Poultry Tower into the Rotisserie. Do not cover the poultry. Do not
add water to Drip Tray. Slide the door clockwise to shut. Unstuffed
poultry requires about 20 to 25 minutes per pound. Cooking times vary
by the size and type of bird. The bird is cooked when the white meat
reaches 180-185°F/82-85°C on a meat thermometer and the juices run
clear not pink. Approximately 20-25 minutes per pound.
Easy Marinades for Poultry
Marinadesareanexcellentwaytoenhance,tenderizeandaddavorto
your favorite poultry. You can make great marinades in minutes, in fact,
many prepared sauces and dressings make excellent marinades. Try Italian
dressing made with vinegar, oil and spices or try teriyaki sauce. Both
make excellent marinades. Marinade in a covered glass dish or plastic
storage bag with excess air removed. Refrigerate for one to two hours or
overnight. Baste every 10-15 minutes while cooking.
Barbeque saucecanbeappliedduringthenal30minutesofcooking
togiveyourpoultrythatoutdoorbarbequeavor.Mostbarbequesauces
have a tomato and sugar base which can burn easily. Therefore, brush
sauce on during the last 30 minutes of cooking.
Roasting Rack Tips 1
The Rotisserie has been designed to cook
poultn; at the ideal temperature, removing most
of the unwanted fat and grease. Poultry will
self-baste while it cooks, sealing in the natural
moisture and nutritional goodness found in the
bird.
POULTRY SELECTION
Use the following weight guides for optimum
cooking performance.
Cornish Hen
Broiler Fryer or Roasting Chicken
l Y-1 pounds
3-5 pounds

9

10
Roasting Rack Tips 2
Made for cooking tender, juicy roasts that are lean
and deiicious. Rack promotes even cooking. Start by
trimming excess fat, then season. Place seasoned
roast securely on prongs of rack and place on drip
tray in unit. Cook to desired doneness. For variety,
try one of the marinades, rubs or, spice mixtures that
follow. See chart for cooking times.
MARINADES, RUBS AND
SPICE MIXTURES
Marinades
Marinadesaddinterestingavorstomeats.Marinadesusuallyconsistofliquid
ingredients. such as fruit or vegetable juices, wine, water and oil in combination
with seasoning and herbs. Meat is soaked in the marinade mixture for several
hoursoraslongasovernighttoavorand/ortenderizeit.
Guidelines for Marinating
• Foravor,marinate2to3hours.
• For tenderization to take place, meat must be marinated at least 6 hours, or
aslongasovernight.Marinatinglongerthan24hourscausesthemeatbers
on the surface to break down, resulting in a "mushy" texture.
• The tenderizing effect of a marinade is usually concentrated about 1/4 inch
from the cut surface of the meat.
• Turn meat occasionally during marinating so that all sides are equally
exposed to the marinade.
• Always marinate meat in refrigerator, never at room temperature.
• A heavy-duty plastic bag is convenient for marinating; combine ingredients,
remove excess air and close tightly. A glass utility dish may also be used;
selectdishesinwhichthemeatwilltsnuglybutlieat.
• Allow 1/4 to 1/2 cup of marinade for each pound of meat.
• Marinades may be cooked or uncooked. Cooked marinades add the most
avorandarepreferredwhenmarinatingformorethan12hours.
• Cooked marinades should be completely cooled before adding to meat.
• Remaining marinade may be brushed on during cooking. It may also be
served on the side only after it has been heated to the boiling point.
• If marinade is not used for bastinq or as a sauce. it should be discarded.

11

12

13

14

15
Cooking Times
The times provided in this book are only a guide to the approximate cooking
times and are averages of many tests. Cooking time also varies because of
differences in meat, in procedure and in equipment. The size and shape of meat
and the amount of fat and bone are major factors. The starting temperature of
the roast and the accuracy of the equipment used are examples of procedure
and equipment variables. Remember too, that meat temperatures will usually
rise approximately 5°F/-15°C after the roast is removed from the rotisserie
during the 10 to 15 minutes allowed for standing time before carving.
A meat thermometer is the most accurate guide to measure the desired
doneness. The thermometer should be inserted into the meat surface at a slight
angle or through the end of a roast so the tip of the thermometer is in the thickest
portion of the cut, but not resting in fat or against the bone. The thermometer
must clear the heating elements while rotating. See chart on page 16 for a
temperature guide for degree of doneness.
Cooking times given on the charts that follow are based on refrigerated
temperatures. These times are provided as a guide and may vary with food
thickness and the food temperature.
SUGGESTED SERVINGS BY POUND
Boneless meats-tenderloin
Boneless roasts-beef-pork
Small bone-in rib roasts
Large-bone-in rib roasts
1/4 pound
1/ 4 pound
1/2 pound
3/4 pound

16
A Note on Carving
Whether it be lamb, beef, pork or a whole chicken, allow meat to sit after
removing from the rotisserie. It will continue to cook once it is removed from
the rotisserie, so you will want to remove it when it is 5 to 10°F/-15 to -12°C
short of the desired end temperature. A roast that is cut when fresh from the
rotisserie will not be as juicy as one that has been allowed to sit f or 5 to 10
minutes before carving. Use a good, sharp knife when carving.
Suggested Cooking Times (by pound)
CUT WEIGHT RARE
140°F/60°C
MEDIUM
160°F/71°C
WELL-
DONE
170°F/76°C
Cornish
Game Hen 1.25 lbs — — 20-25 min.
Whole Roast
Chicken 3-5 lbs — — 20-25 min.
Pork Roast 2-3 lbs — — 34-45 min.
Beef Roast 2.5 - 3.5 lbs 25-30 min. 30-35 min. 35-40 min.
Beef Rib 2.5-3.5 lbs 20-25 min. 27-30 min. 30-35 min.
Lamb 3.5-4 lbs 25-30 min. 30-35 min. 35-40 min.

17
Hints and Tips
• Never operate rotisserie without a food load. Do not preheat rotisserie.
• Place the rotisserie on a clean, dry, heat proof surface where it is not directly
below cabinets.
• Meat can be seasoned before cooking without losing excess moisture or
juices.
• The most accurate method of determining the degree of doneness is with
a meat thermometer inserted into the center of the thickest portion of the
meat.
• The times given are only a guide, and are based on the temperature of
refrigerated food.
• Once the food is positioned inside the rotisserie, allow it to rotate a few
revolutions to ensure that the food and/or thermometer will clear the
heating elements.
• To prevent foods from sticking to the poultry tower or roasting rack, lightly
oil it before placing food on it.
• Do not preheat the rotisserie before cooking. When cooking is completed
turn the timer off (turn counterclockwise) to shut the rotisserie off, the
turntable will stop rotating ~md the audible signal will ring.
• Use hot pads or oven mitts when removing food or handling the racks.

18
SPECIFICATIONS:
• Heating Element Power: 650 Watt
• Adjustable Cooking Timer Selection: 2 Hour, Max
• Maximum Cooking Temperature: 185 °F
• Interior Cooking Compartment Size (W x H): 8.6’’ x 8.6’’ x 9.4’’
• Power Cord Length: 3.5’ ft.
• Power: 120V
This manual suits for next models
1
Table of contents
Other NutriChief Oven manuals