Nyne NHT5.1RGB User manual

1
Thank you for purchasing this product.
Please read this manual carefully so you will know how to operate your product
properly.
If there are any technical questions, please contact:
Customer care: (805) 751-4812 & Live chat
Online support: www.nyne.com/support
IMPORTANT
Please enter below the Serial No. which is located on the exterior of the product.
Retain this information for future reference.
Model
Serial No.
Date of Purchase

2
Table of Contents
Before Use..................................................................................................................................................................3
Important Safety Precautions .............................................................................................................................3
Care for Your Product ..........................................................................................................................................4
Care of the Environment......................................................................................................................................4
Your Home Theater....................................................................................................................................................5
Introduction..........................................................................................................................................................5
Delivery Content ..................................................................................................................................................5
Description of the Main Unit.................................................................................................................................5
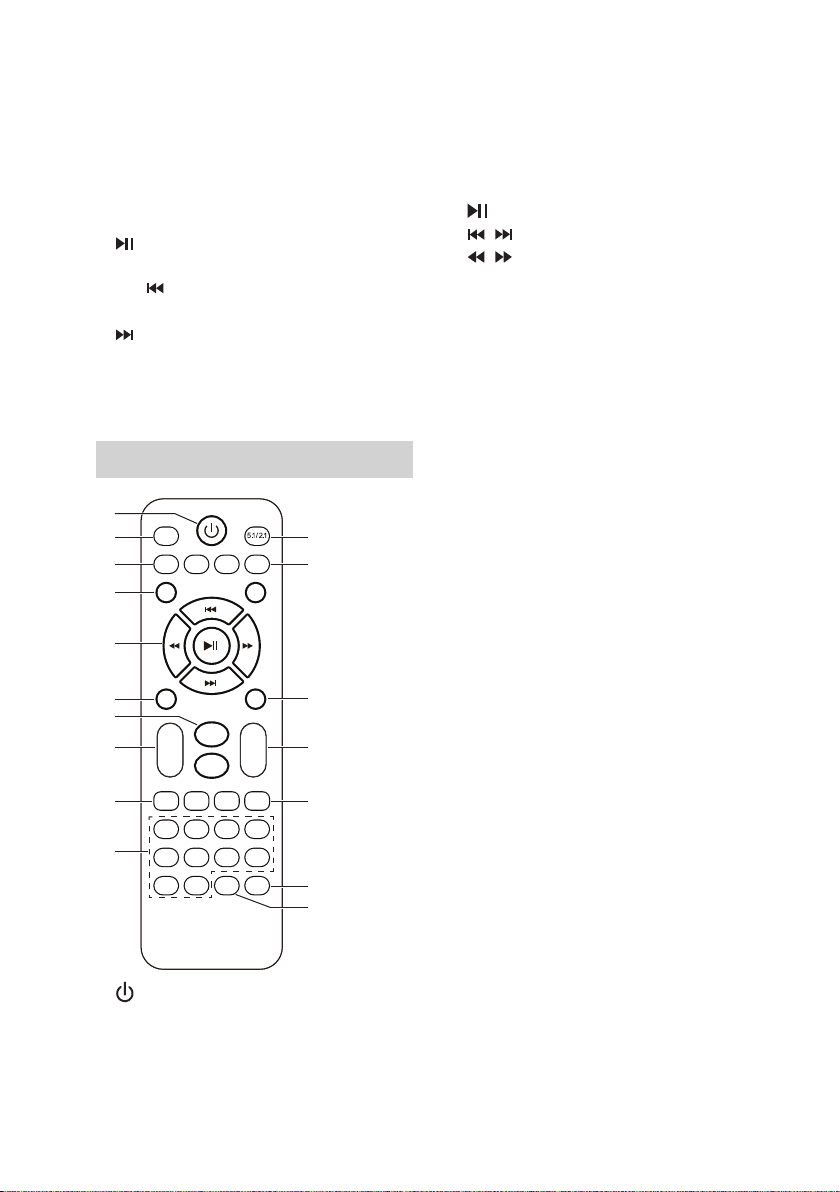
Controls on the Remote Control ..........................................................................................................................6
Get Started .................................................................................................................................................................7
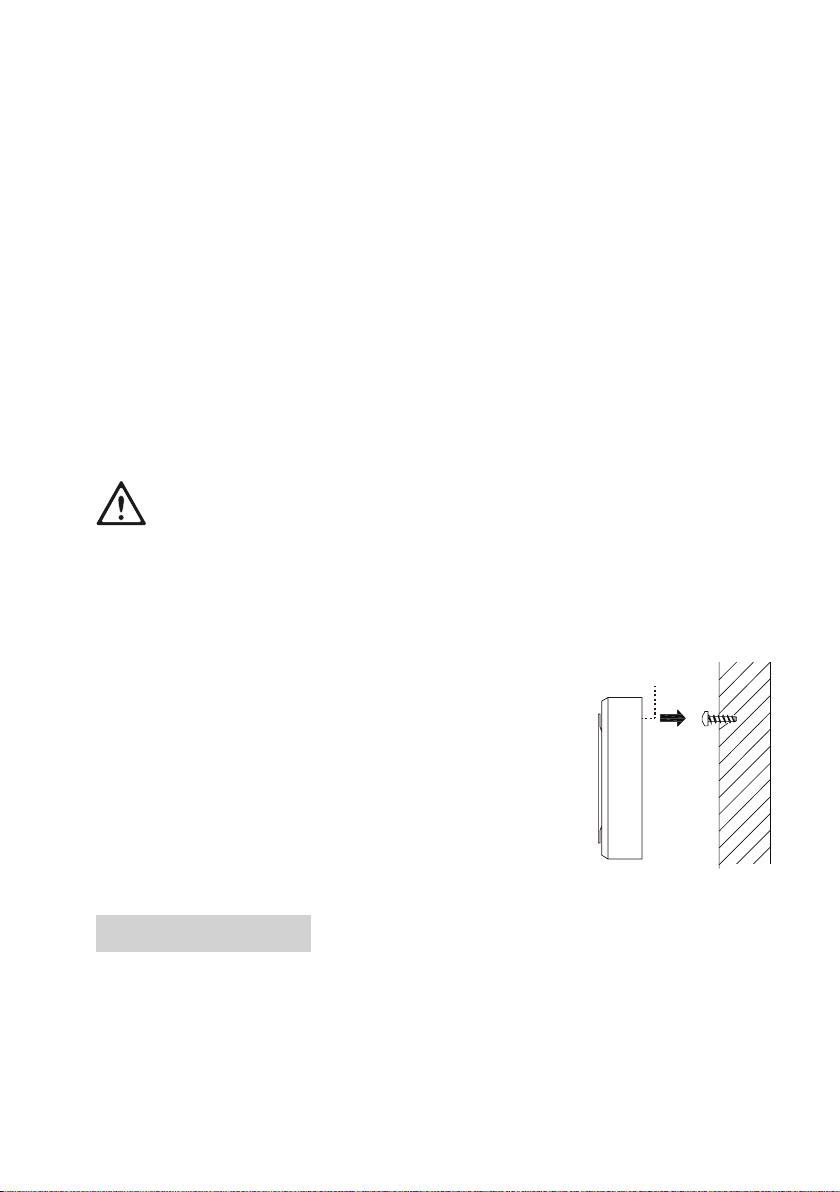
Connect Speakers ...............................................................................................................................................7
Connect FM Antenna...........................................................................................................................................8
Connect LED Power Cable..................................................................................................................................9
Connect AC Power ..............................................................................................................................................9
Prepare the Remote Control................................................................................................................................9
Use Your Home Theater ..........................................................................................................................................10
Power On/Standby.............................................................................................................................................10
Adjust Volume....................................................................................................................................................10
Select LED Light Mode......................................................................................................................................10
Select Sound Modes..........................................................................................................................................10
Enable 5.1 or 2.1 Channel Output .....................................................................................................................10
Listen to Radio................................................................................................................................................... 11
Play Audio Through Bluetooth ........................................................................................................................... 11
Play Audio From USB/SD..................................................................................................................................12
Play Audio From Other Devices.........................................................................................................................12
Troubleshooting ......................................................................................................................................................13
Product Specications............................................................................................................................................14

3
Before Use
Read and understand all instructions before you use your product. If you do not follow the instructions in
this manual, we are not responsible for injury or damage resulting from improper handling. This will also void
the warranty.
Important Safety Precautions
Risk of short circuit or re!
• Before you connect the product to the power socket, ensure that the power voltage matches the value printed on
the exterior of the product. Never connect the product to the power socket if the voltage is different.
Risk of electric shock or re!
• Never remove the casing of the product. Never rebuild and/or modify the product.
• Never expose the product and accessories to rain or water. Never place liquid containers, such as vases, near
the product. If liquids are spilt on or into the product, disconnect it from the power socket immediately. Contact our
technical support to have the product checked before use.
• Never place the product and accessories near open ames or other heat sources, including direct sunlight.
• Never insert objects into the ventilation slots or other openings on the product.
• The power socket must be in the vicinity of the product and easily accessible.
• Disconnect the product from the power socket before lightning storms.
• When you disconnect the power cord, always pull the plug, never the cord.
Risk of injury or damage to the product!
• For wall mount, use only the supplied wall mount brackets. Secure the wall mount to a wall that can support the
weight of the product. We assume no responsibility for improper wall mounting that results in accident, injury or
damage.
• Never place the product on other electrical equipment or on power cords.
• If the product is transported in temperatures below 5°C (41°), unpack the product and wait until its temperature
reaches room temperature before connecting it to the power socket.
Risk of overheating!
• Never install this product in a conned space. Always leave clearance of at least four inches around the product for
ventilation. Ensure curtains or other objects never cover the ventilation slots on the product.
Other precautions
• When setting up the product, ensure the cables are not pinched, kinked or damaged by sharp objects.
• Always lay the cables so that no one can trip over or become entangled in them.
• Do not use the power cord if it is damaged. A damaged power cord can cause hazard. The damaged power cord
can only be repaired by a qualied technician.

4
• In the event of smoke, strange noise or odor emitted from the product or any other abnormal operational signs
appearing on the product, disconnect the product from the power supply. Discontinue use and contact your dealer
or our technical support. Using the product in this condition may result in permanent damage to the system.
• Servicing must only be carried out by a technician. Contact our technical support for any service question.
Important notes on batteries
• Danger of explosion if the batteries are incorrectly replaced. Replace only with the same type or equivalent type.
Observe correct polarity while inserting the batteries.
• Do not expose the batteries to excessive heat, such as sunshine, re or the like.
• Remove the batteries from the remote control if it is not used for a long time to avoid battery leakage.
• Do not recharge, dismantle or short-circuit the batteries or throw it into re. This may cause a risk of explosion
or battery leakage. If spilled uid comes in contact with your skin or clothing, immediately rinse with water and
consult a doctor.
• Keep the batteries out of reach of children at all times! If swallowed, the battery can cause serious injury or death.
If you suspect that a battery has been swallowed, seek immediate medical attention.
Care for Your Product
• Disconnect the product from the power supply before each cleaning.
• Do not use any aggressive cleaning agents, or other chemical solutions as they can cause damage to the housing
and malfunctioning.
• Use only microber cloth to clean the product.
Care of the Environment
Product disposal
Do not throw away the product with the normal household waste at the end of its life, but hand it in at an ofcial col-
lection point or recycling. By doing this, you help to preserve the environment.
Battery disposal
Batteries must not be disposed of with normal household waste. Recycle them at the collection points provided for
this purpose. Contact the local authorities or your dealer for recycling advice. Correct disposal of old batteries helps
protect the environment and human health.

5
Your Home Theater
Introduction
Thank you for purchasing this product.
This product has ve individual speakers and the main unit with an intergrated subwoofer. This offers you 5.1 channel
sound output. You can listen to radio, and stream music from a mobile phone through Bluetooth.
You can play music from a connected USB device or SD card. You can also play music from other external device (e.g.
TV, DVD player or VCR) through 5.1 channel audio inputs or RCA AUX inputs.
The main unit and each speaker has RGB LED lights and multiple light modes available.
Please read this manual carefully so you will know how to operate your product properly. After you have nished read-
ing this manual, store it in a safe place for future reference.
Delivery Content
• Main unit (integrated with a subwoofer) x1
• Speakers x5
• Wall mount brackets x5
• Bracket screws x10
• Remote control x1
• AAA batteries x2
• Radio antenna x1
• User manual and warranty card
Description of the Main Unit
1
4
6
5
7
9
82
3
Back panel
1 POWER ON/OFF
Power the product on or off.
2 AC IN
Connect to the power supply.
3 INPUT 5.1-CH
Connect to the 5.1 channel RCA audio outputs on a
TV or playback device (e.g. DVD player or VCR).
4 AUX L/R
Connect to 2 channel RCA audio outputs on a TV or
playback device (e.g. DVD player or VCR).
5 OUTPUT 5.1-CH
Connect to ve supplied speakers to create 5.1 chan-
nel sound output (the subwoofer is built inside the
main unit).
6 ANT
Connect to the supplied FM radio antenna.
7 LED POWER
Connect to the LED power cable of each speaker.

6
8 Connectors on the side panel
USB port: Connect to a USB device for audio play.
SD slot: Connect to a SD card for audio play.
9 Controls on the top/front panel
STANDBY: Switch the product on or to standby.
MODE: Select an audio source.
/ SCAN: Pause or resume play; auto search
and store FM radio stations.
CH-/ : Select a stored FM station; select the
previous music le;
/ CH+: Select the next music le; Select a
stored FM station.
EQ: Select a preset sound mode.
Volume knob: Rotate to adjust volume.
Controls on the Remote Control
MODE
CEN-
SW-
EQ
FL+
TUNE-
1
5
90
678
234
TUNE+ CH- CH+
FR+
FR-
FL-
REP LED
VOL+
VOL-
SCAN
SW+
CEN+ SUR+SUR-
2
3
4
6
7
8
9
10
5
1
17
16
15
14
13
12
11
1
Switch the product on or to standby.
2 MODE
Select an audio source.
3 CEN+/-
Adjust volume of the connected center speaker.
4 SW+/-
Adjust volume of the subwoofer (main unit).
5 Playback control buttons
: Pause or resume play.
/ : Select the previous/next music le.
/ : Search fast forwards and backwards.
6 EQ
Select a sound mode.
7 VOL+/-
Adjust volume of all the connected speakers.
8 FL+/-
Adjust volume of the connected front left speaker.
9 TUNE+/-
Press and hold to tune to a FM station; press briey
to ne tune a station.
10 Numeric buttons
Input a number to select a stored FM station.
11 REP
Select a play mode (for USB/SD play only): repeat
one or repeat all.
12 LED
Select a RGB LED lighting mode. The display briey
shows a number (0 to 8) when a particular light
mode is selected.
13 CH+/-
Select a stored FM station.
14 FR+/-
Adjust volume of the connected front right speaker.
15 SCAN
Automatically search and store FM stations.
16 SUR+/-
Adjust volume of the connected satellite (rear)
speakers.
17 5.1/2.1
Switch between 5.1 channel and 2.1 channel for
audio output.

7
Get Started
Before you connect the AC power plug to the power socket, ensure you have completed all the other con-
nections.
Connect Speakers
The product comes with a subwoofer (built inside the main unit) and ve speakers for you to create 5.1 channel sound
output.
• Connect the RCA plug of each speaker to the corresponding RCA sockets of the OUTPUT 5.1-CH on the back
of the main unit.
Place the main unit and speakers on a at and stable surface. When standing the speakers, make sure the side
with rubber feet faces down.
Or you can mount the speakers on wall (see “Mount speakers on wall (optional)” on page 8).
Speaker
Front left Front right
Main unit (with subwoofer built in)
Rear/Satellite left
Rear/Satellite right
Speaker Speaker Speaker
Center speaker
10 ft.
12 ft. 12 ft.
24 ft. 24 ft.
For optimal sound performance, use the supplied speakers.
Do not connect speakers with an impedance lower than the speakers supplied (see “Product Specica-
tions” on page 14).

8
Tips for speakers placement
Speaker position plays a critical role in setting up an optimal sound effect. For best effect, aim all the speakers towards
the seating position and place them close to your ear level (seated).
Spread out the speakers from left to right and from front to rear. Do not stack speaker on top of each other.
Follow the general guidelines for speakers placement
• Center speaker (CENTER): Place it directly in front of the seating position.
• Front left (FRONT LEFT) and front right (FRONT RIGHT): Place the left and right speakers in front of the seating
position, at equal distance from the center speaker. Ensure the left, right and center speakers are at equal distance
from your seating position.
• Rear left (SATELLITE LEFT) and rear right (SATELLITE RIGHT): Place the rear/satellite speakers to the left and
right side of your seating position, either in line with it or slightly behind it.
• Main unit (with subwoofer integrated): Place the main unit (subwoofer) in front of the seating position, almost in line
with the front and center speakers. Leave the subwoofer at least 2-3 inches clearance from the wall to minimize
sound reection.
Mount speakers on wall (optional)
When drilling holes on wall, make sure there are no cables, wires or pipes located underneath the surface.
Inadvertently drilling through electric cables can cause life-threatening danger of an electric shock!
For wall mounting, the speakers must be securely attached to the wall. Improper wall mounting may result
in accident, injury or damage.
You can mount the speakers on wall using the supplied mounting brackets and screws.
1. Fix a supplied bracket onto the back of a speaker.
Select a top location on the back of the speaker for bracket attachment. Then x
a supplied bracket by fastening two supplied screws through two screw holes
on the bracket. Make sure the bracket is securely attached to the speaker.
Do not fasten the bracket in a low location on the back of the speaker. This can
cause instability when the speaker is mounted on wall.
2. Select a location on wall to drill a screw hole. Use a screw of suitable length
and diameter (not included) to rmly fasten it on wall. Make sure the screw is
securely attached to the wall.
Then hang the speaker on the wall using the mounting hole on the bracket.
3. Repeat the steps above to mount the other speakers on wall if needed.
Connect FM Antenna
For better FM radio reception, connect the plug of the supplied radio antenna to the ANT socket on the back of the
main unit.
Wall bracket

9
Connect LED Power Cable
You need to connect the LED power cable so that the RGB LED lights on each speaker can be powered.
• Firmly insert the power plug of a speaker to a 3.5mm jack marked LED POWER on the back of the main unit.
Repeat the step above to connect other four speakers’ LED cables to the LED POWER jacks each.
Connect the plugs of the LED power cables to LED POWER jacks only. Never connect these plugs to any
other sockets on the back of the main unit.
Connect AC Power
Risk of product damage! Ensure that the power supply voltage corresponds to the voltage printed on the
exterior of the product.
Before you connect the AC power plug to the power socket, ensure you have completed all the other con-
nections
1. Connect the power cable of the main unit to the power socket.
2. Adjust the POWER switch on the back of the main unit to the ON position.
Prepare the Remote Control
Remove the batteries from the remote control if it is not used for a long time to avoid battery leakage.
Do not mix new and old or different types of batteries in combination.
To insert the batteries in the remote control:
1. Open the battery compartment on the back of the remote control.
2. Insert two supplied AAA batteries with correct polarity as shown inside the battery compartment.
3. Close the battery compartment.
Keep the remote control and the main unit within 16 feet for effective operation range.
When using the remote control, aim it towards the main unit with 30˚ angle range for effectiveness.
16 ft. 30°
30°
-+
-
+

10
Use Your Home Theater
Power On/Standby
1. Press STANDBY on the top panel (or on the remote control) to switch the product on or to standby.
When powered on, the display on the front panel shows the lasted selected source and the LED lights on
the main unit and each speaker turn on.
When switched to standby, the display shows ashing “----” and the LED lights on the main unit and each
speaker turn off.
• To completely switch the product off, adjust the POWER switch on the back of the main unit to the OFF position.
Adjust Volume
• Rotate the volume knob on the front panel (or press VOL+/- on the remote control) to increase or decrease the
volume for all the connected speakers.
• To adjust a particular volume for each connected speaker, press the corresponding volume buttons on the remote
control (e.g. FL+/-, FR+/-, CEN+/-, SUR+/-, SW+/-).
Pressing SUR+/- will adjust simultaneously the volume for the connected rear/satellite speakers (left and
right).
Select LED Light Mode
The main unit and each speaker has RGB LED lights.
• Press repeatedly LED on the remote control to toggle nine lighting modes.
The display will briey show “LEd x” (“x” indicates a number from 0 to 8) when a particular light mode is
selected.
If the LED lights on a particular speaker are not lit, check and ensure the LED power cable is rmly inserted
to the LED POWER jack on the back of the main unit.
Select Sound Modes
Select predened sound modes to suit your music or video.
• Press repeatedly EQ on the remote control to toggle four sound modes. The display will briey show “E1”, “E2” ,
“E3” or “E4” when a predened sound mode is selected.
Enable 5.1 or 2.1 Channel Output
• Press repeatedly 5.1/2.1 on the remote control to enable 5.1 channel or 2.1 channel sound ouput.
- When 5.1 channel is enabled, all the connected speakers output sound.
- When 2.1 channel is enabled, only front left and right speakers output sound with the subwoofer.

11
Listen to Radio
You can listen to FM radio on your home theater, and store all the available FM radio stations.
Tune to a radio station
1. Switch your home theater to radio source. Press MODE repeatedly until the display shows the radio frequency.
2. Press and hold TUNE+/- on the remote control. The radio automatically tunes to a station with strong reception.
3. Repeat the steps above until you nd the desired station.
To tune to a weak station
• Press briey and repeatedly TUNE+/- on the remote control to adjust radio frequency until you nd optimal recep-
tion.
Store radio stations automatically
You can store all the available FM radio stations in the memory.
• In radio source, press / SCAN on the top panel (or SCAN on the remote control).
Search of radio stations starts automatically, and the available stations are stored.
Select a stored station
• In radio source, press CH-/ or / CH+ on the top panel (or CH+/- on the remote control).
Or you can directly input a radio channel number via the numeric buttons on the remote control. After input, the
selected station will broadcast.
Play Audio Through Bluetooth
Pair with a mobile phone
Before you can stream music from your mobile device to the home theater, you must pair the home theater with your
mobile phone through Bluetooth.
1. Switch your home theater to Bluetooth source. Press MODE repeatedly until the display shows “bt”.
- “bt” ashes. This indicate that your home theater is not connected to a mobile device and currently in pairing
mode.
2. On your mobile phone, enable Bluetooth then select “NYNE NHT5.1RGB” to pair the home theater with your
mobile phone. If prompted for password input on your mobile phone, input “0000”.
- When the unit connects to your mobile phone, the “bt” on the display stops ashing and turns to solid light.
The home theater automatically connects to the last paired device each time the two are powered on. To
connect to a second device, you have to disconnect the currently connected device then repeat the steps
above to pair the device.
To disconnect the current Bluetooth connection, press and hold / SCAN on the top panel (or SCAN on
the remote control) for three seconds.

12
Playback control through Bluetooth
1. When the home theater is connected to your mobile phone, play audio les on your mobile device. Music will be
streamed and played through the speakers of the home theater.
For best sound performance, set the volume of your mobile device to maximum, then adjust the volume
through volume control on the unit.
2. Control playback as follows.
• To pause or resume play, press / SCAN on the top panel (or on the remote control).
• To select the previous/next audio le, press CH-/ or / CH+ on the top panel (or / on the remote
control).
- If there is an incoming call during play, music play will automatically pause. Music play will automatically resume
after the call ends.
Play Audio From USB/SD
Your home theater can play audio les stored on a USB storage device and SD card.
1. Insert a USB storage device to the USB port on the side panel.
Or you can insert a SD card to the CARD slot on the side panel with correct orientation. To insert a microSD card,
you need to use a SD card adapter (not included) for insertion.
2. The home theater will automatically switch to USB or SD source respectively. Audio les from the USB device or
SD card will be played automatically.
To switch to USB or SD source from other source (e.g. radio or Bluetooth), press MODE repeatedly until USB or
SD source is selected.
If the USB device or SD card is not inserted or no playable le exist in the USB or SD card, USB or SD
source will not be available for selection.
3. Control playback as follows.
• To pause or resume play, press / SCAN on the top panel (or on the remote control).
• To select the previous/next audio le, press CH-/ or / CH+ on the top panel (or / on the remote
control).
• To search fast backwards or forwards, press / on the remote control.
• To select play mode (repeat one or all), press REP on the remote control.
Play Audio From Other Devices
You can play audio from TV or a playback device (e.g. DVD player or VCR) through your home theater speakers.
1. Connect a device to the home theater.
For 5.1 channel input: using audio cables (not included), connect the device with 5.1 audio outputs to RCA jacks
marked INPUT 5.1-CH on the back of the main unit. Ensure to match the corresponding jacks.
For AUX input: using audio cable (not included), connect the device with 2 channel audio outputs to the RCA jacks
(left and right) marked AUX on the back of the main unit. Ensure to match the corresponding jacks.
2. On the home theater, press MODE repeatedly to select “dVd” for 5.1 channel input, or select “AUX” for AUX input.
Audio from the connected device will be played through the home theater speakers.

13
Troubleshooting
If you have problems using this product, check the following points before you request service. If you still have a
problem, contact our technical support.
Problem Solution
No power / no LED illumination
Make sure that the AC power cable is securely connected.
Make sure the power switch on the back of the main unit is adjusted to
the ON position.
Make sure the power plug of a speaker is fully inserted to a LED power
jack on the back of the main unit.
No sound
Make sure all the speakers are securely connected to the main unit.
Adjust volume on a particular connected speaker.
Press 5.1/2.1 button on the remote control to switch to 5.1 audio
output.
Volume of the connected device is low or muted. Increase volume on
the connected device.
Playback on the connected device pauses or stops. Resume playback
on the connected device.
Press MODE button to switch to 5.1 channel input (“dVd”) or AUX input
correspondingly.
Cannot play USB or SD card The formats of the les are not supported. Change the le formats or
try another device.
Poor radio reception.
Make sure the radio antenna is inserted and fully extended.
Increase the distance between the unit and your TV or other radiation
sources.
Cannot connect through Bluetooth
Bluetooth function on the device is disabled. Refer to the device’s user
manual on how to enable Bluetooth function.
Make sure the device is within range.
The unit is already connected with another Bluetooth device. Discon-
nect the current Bluetooth connection.
To remove the currently connected device from the connection
memory, press and hold / SCAN on the top panel for ten seconds. In
this case, the device will not automatically connect to the home theater.
Bluetooth repairing is needed

14
Product Specications
Main unit (subwoofer)
Power supply....................................................AC 110V, 60Hz
Impedance........................................................6 Ω
Speaker drivers ................................................8” active subwoofer
Dimension (W x H x D).....................................9.3” x 14.6” x 13.3”
Weight ..............................................................6.2 kg / 13.7 lbs
Speakers
Center speaker.................................................1 x center channel (3”, 4 Ω)
Front speakers..................................................2 x full range channel (3”, 4 Ω)
Rear speakers ..................................................2 x full range channel (3”, 4 Ω)
Cable length .....................................................10 ft. (center), 12 ft. (front L/R), 24 ft. (rear L/R)
Dimension (W x H x D).....................................3.9” x 15.7” x 4.1”
Weight ..............................................................1.1 kg / 2.4 lbs
Connectivity
Inputs................................................................USB port, SD card slot
5.1 channel RCA audio inputs, 2 RCA AUX inputs
Outputs.............................................................5.1 channel RCA audio outputs
Frequency response.........................................40 Hz - 20 kHz
Signal to noise..................................................≥80 dB (maximum output with THD+1 <1%)
Radio
Frequency range ..............................................FM 87.5 MHz – 107.9 MHz (100 kHz)
Frequency response.........................................40 Hz - 20 kHz
Signal to noise..................................................≥80 dB
Bluetooth
Version..............................................................v3.0
Proles..............................................................A2DP, AVRCP
Transmission frequency....................................2.402 – 2.480 GHz
Transmission power..........................................≤4 dBm
Transmission range ..........................................10 m / 32.8 ft. (line of sight)
USB/SD
USB standard ...................................................USB 2.0 (High-Speed)
USB port...........................................................Audio play only (not for charging)
File system .......................................................FAT32
Supported SD card...........................................Max 32 GB
Audio playback .................................................MP3, WAV
0521
Table of contents