Oasis MWEBQ User manual

User Guide
Modular Series
Electronic Bottle Fillers:
MWEBQ, MW8EBQ, MW12EBQ,
MWSMEBQ, MWSM8EBQ,
MWSM12EBQ, M8EBQ,
M12EBQ, MF2EBQ, MW8F2EBQ,
MW12F2EBQ, MWSMF2EBQ,
MWSM8F2EBQ, MWSM12F2EBQ,
M8F2EBQ, M12F2EBQ
Please read these instructions before installing this product

2
OASIS AQUA POINTE® ELECTRONIC BOTTLE FILLER INSTRUCTIONS
1. INSPECTION
Inspect the cartons and various components for evidence of rough handling and concealed damage.
Damage claims should be filed with the carrier.
2. INSTALLATION, PLUMBING & ELECTRICAL CONNECTIONS
a) Note: The following states require a licensed plumber to install cooler; AR, GA, MA, MI, OK, RI, SC,
SD, TX, VT and WI. CA, KS, MN, NM and OR allow for a state-registered installer or contractor as well. State
and local plumbing codes may prohibit the use of saddle tapping valves for water line connection in some
applications. All connections must conform to applicable plumbing codes.
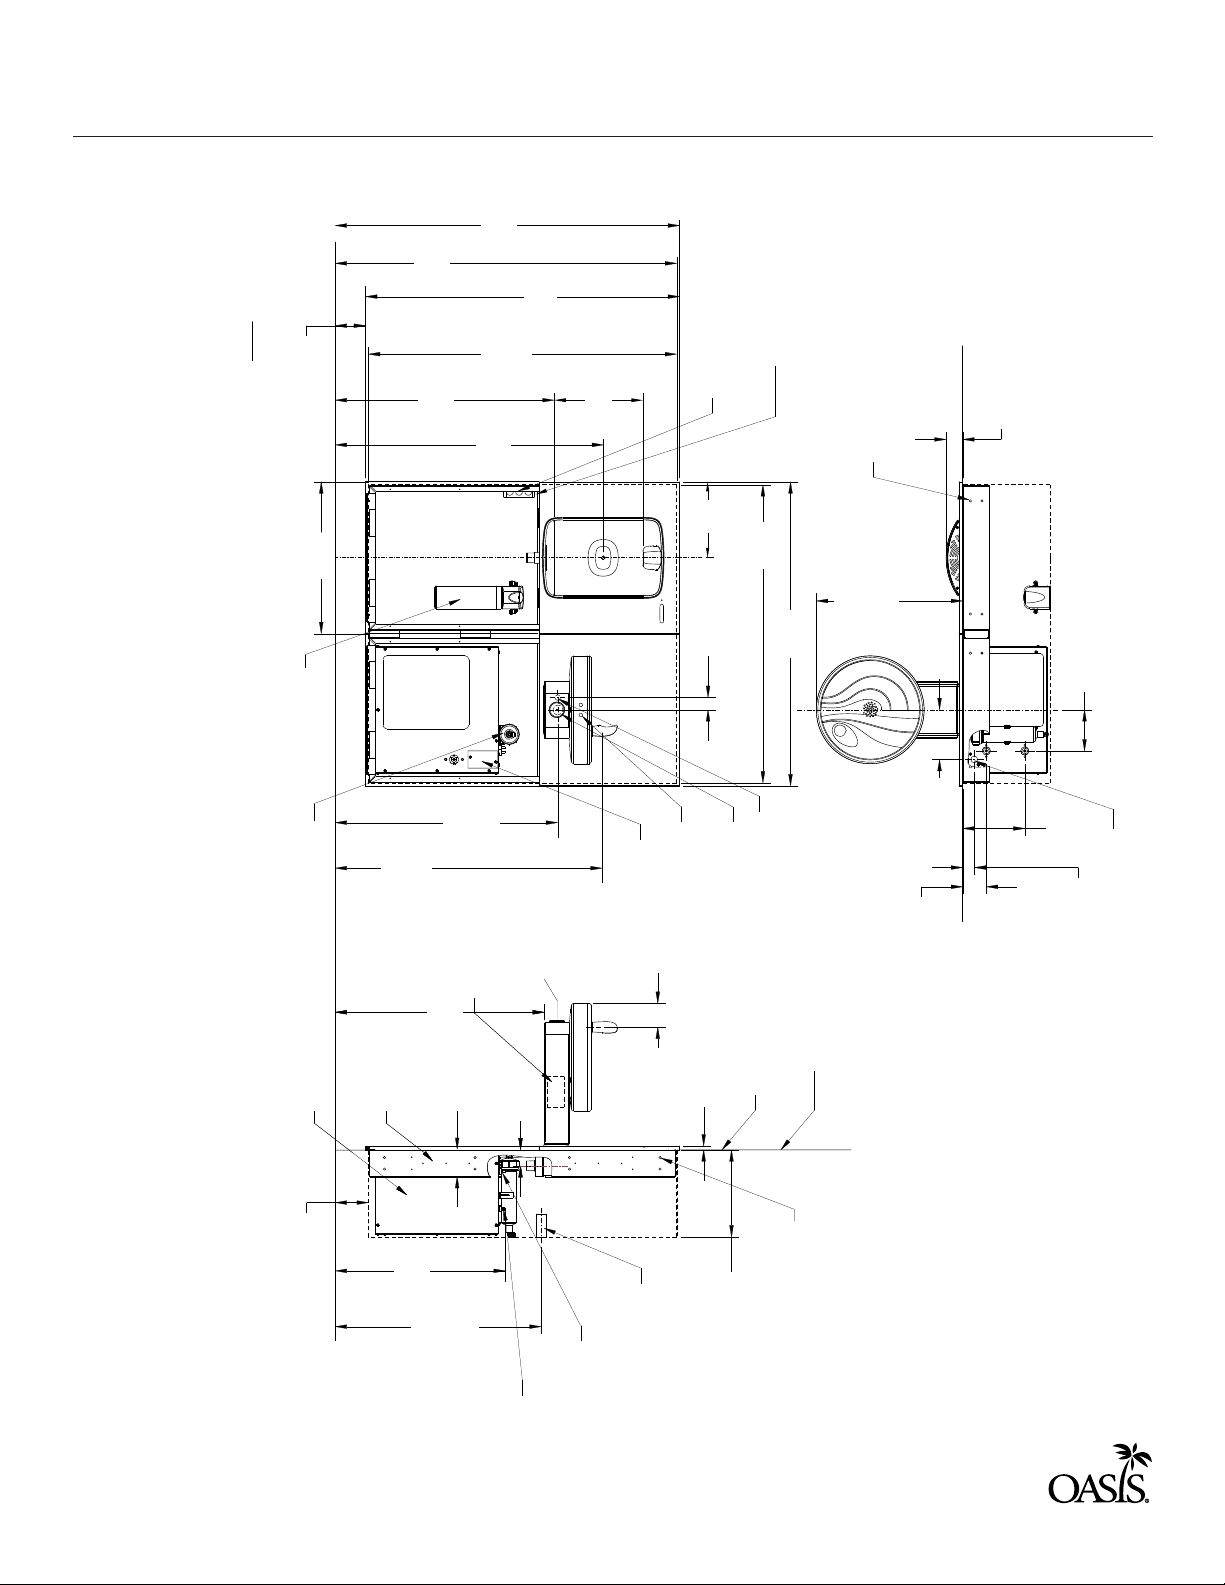
b) Plumbing rough-in and wall opening should be prepared as shown on roughing-in drawing. This
drinking water cooler is designed to be operated at a water supply line pressure of up to 100 psi (690 kPa).
A pressure regulator must be installed in front of the unit’s water inlet if the pressure (including any possible
pressure spikes) could exceed 100 psi (690 kPa).
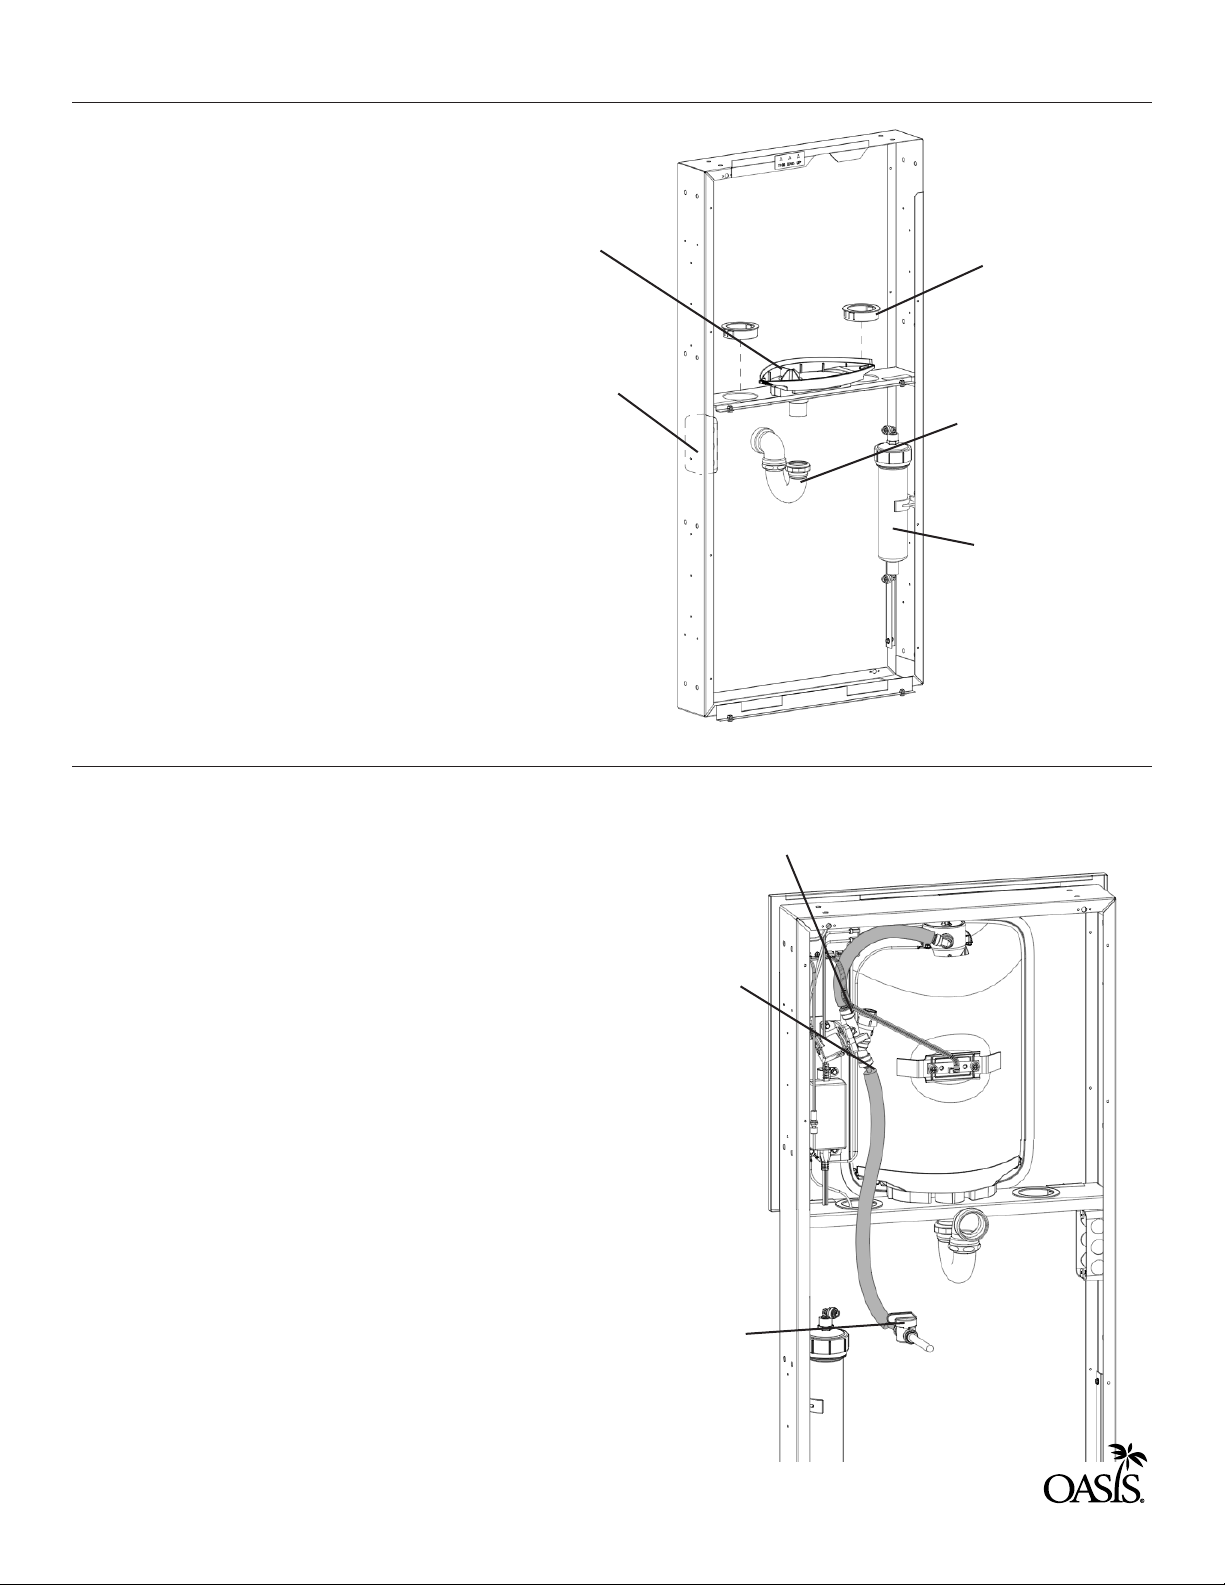
c) Insert frame assembly into wall opening and secure to studs. NOTE: FRONT FLANGE OF FRAME(S)
MUST BE FLUSH WITH THE FINISHED WALL SURFACE.
d) Install drain receptor to frame with screws provided.
e) A 2X4 junction box is provided for the installation of a 115 volt receptacle. The bottle filler is provided
with a power cord with a grounded NEMA 15 plug. This unit is intended to be connected to a ground fault
circuit interrupting (GFCI) device to meet UL requirements. It is recommended that flexible conduit be used to
supply power to the junction box and chiller if used. Check the electric current available. Type and voltage
must be the same as listed on the unit data plate.
f) As the bottle filler panel assembly is being placed on the frame assembly, feed the long green
ground wire and the terminals on the power supply cord through the bushings in the frame assembly.
g) Attach the long green ground wire to the frame assembly junction box ground, then plug in bottle
filler power cord.
h) Refer to the appropriate connection diagram for water and drain connections. Check for leaks.
i) The lower panel can be secured with the provided key locks or screws. The M8EBQ features one
lockable and one non lockable lower panel; these are interchangeable.
MODELS WITH CHILLER
j) Attach cradle mounting angles to unit mounting cradle with 4 screws provided. Slide unit mounting
cradle into frame and secure in place with 4 screws, provided. (Cradle is used only when cooling unit is to be
installed). NOTE: BOTTOM FLANGE ON CRADLE IS TO BE BEHIND FRAME FRONT FLANGE.
k) Slide cooling unit onto cradle.
M8EBQ & M12EBQ WITH FOUNTAIN
l) Install the fountain mounting plate to the frame assembly using the provided screws.
m) Place the upper panel in place on the frame top angle and fasten with 2 screws, provided, at the
bottom.
n) Remove the bottom plate from the fountain arm. Save the screws.
o) Snap the reveal gasket over the back end of the fountain arm.
p) Add compression connector, furnished by others, to the fountain waste tube and slide back
approximately 3” out of the way. Refer to the appropriate connection diagram.
q) Hang the fountain on the mounting plate studs. NOTE: AS THE FOUNTAIN IS HUNG, FEED THE WASTE
TUBE INTO THE WASTE STUB ON THE WALL SIDE.
r) Tighten the fountain to the mounting plate with the 5/16-18 nuts and washers and the 1/4-20 bolts
and washers provided.
s) Slide the reveal gasket(s) back into the notch between the panel and the arm. The gasket serves as
an appearance item only (to close up any opening around the panel and the mounting plate).

3
3. OVERLOAD PROTECTION (systems with chiller)
The compressor motor is equipped with an automatic reset protector which will disconnect the motor from
the line in case of overload.
4. LUBRICATION (systems with chiller)
This unit is equipped with a hermetically sealed compressor. No additional lubrication is required. The fan
motor installed on this unit seldom needs oiling. If required, a few drops of SAE 10 oil should be used.
5. TO DISCONTINUE USE OF SYSTEMS WITH CHILLER
Drain cooler when removed from service: (1) Remove grille, (2) Close supply valve, (3) Provide container to
catch water, and remove drain plug.
6. MAINTENANCE (systems with chiller)
The only maintenance required is the removal of dirt and lint from the condenser. Inspection should be made
at 3 month intervals. Remove the grille and clean the condenser with a vacuum attachment. WARNING: The
warranty and Underwriters’ Laboratory Listing for this machine are automatically voided if this machine is
altered, modified, or combined with any other machine or device. Alteration or modification of this machine
may cause serious flooding and/or hazardous electrical shock or fire. EXCEPT AS SET FORTH HEREIN, THE
MANUFACTURER MAKES NO OTHER WARRANTY, GUARANTEE OR AGREEMENT EXPRESSED, IMPLIED, OR
STATUTORY, INCLUDING ANY IMPLIED WARRANTY OR MERCHANTABILITY OR FITNESS FOR A PARTICULAR
PURPOSE.

4
IMPORTANT REQUIREMENTS
QUASAR UV-C LED OPERATION
CAUTION: Ensure bottle filler is properly grounded. It is required to attach the
long green ground wire to the frame assembly junction box in order for the unit
to function properly. Refer to the steps described in Step 4 on Page 12.
CAUTION: Do not activate bottle filler electric eye sensor without running
water through the UV-C module. Operating the UV-C module dry may
damage the UV-C LED’s.
A.
B.
C.
D.
E.
QUASAR is a form of dispense point water treatment that utilizes UV-C LED’s to inactivate
pathogens.
Operation:
The QUASAR activation is automatic. The UV-C LED’s turn ON when water is dispensed
and OFF when the dispense stops.
During non-use periods the QUASAR automatically cycles ON for ten seconds every ten
minutes. This keeps the dispense point more sanitary between use.
When the QUASAR is ON, the LED light on the front of the alcove near the top will turn
ON. The LED will be BLUE when the QUASAR is working properly.
If QUASAR is not working properly, then the LED light on the front of the alcove near the
top will be RED or YELLOW. The light will remain ON and the system will not allow water
to be dispensed until the problem is resolved.
IMPORTANT: Never operate the QUASAR without water connected to the system. Lack
of water can cause the QUASAR to overheat. If it is necessary to activate QUASAR to
purge the system of air, then the QUASAR will automatically shut off if it overheats. But
the module will resume operation once water begins to flow through it.

LED Color Display Condition Action
ORANGE “UVC OFF- TURN
ON WATER SUPPLY”
While dispensing, UVC
temperature is too high.
Ensure water supply is ON.
If initial start-up: Activate the bottle
ller to dispense water.
LED will turn BLUE when water
ows.
GREEN “BOTTLES SAVED” Standby mode - lter life
<80% used. No action needed.
YELLOW “BOTTLES SAVED” Standby mode - lter life
>80% used but <100%. Order new lter.
RED “BOTTLES SAVED” Standby mode - lter life
=100% used. Replace the lter.
BLUE “UVC DISINFEC-
TION IN PROCESS”
Dispensing - bottle
sensed by IR sensor and
UVC operating properly.
No action needed.
ORANGE
“UVC REQUIRES
SERVICE”
(Remains ON even
in standby)
Water cannot be
dispensed.
Check electrical connections to UVC
and resent power rst. Replace
UVC if necessary.
5
IMPORTANT REQUIREMENTS
Display
LED Indicator

44-11/16
[1135]
VERSAFILTER III
REMEDI FILTER
(IF APPLICABLE)
(IF APPLICABLE)
APPROX. LOCATION
7/8 [22] DIA. HOLE
FOR ELECTRICAL CONNECTION
6-7/16
[164]
ELECTRICAL
CONNECTIONS
40
[1016]
WALL OPENING
APPROX. WATER
SUPPLY LOCATION
40-3/4
[1035]
3-15/16
[100]
11-1/2
[292]
9-7/8
[251]
19-3/4
[502]
19
[483]
WALL OPENING
ELECTRICAL
OUTLET OPTIMUM
LOCATION
(SEE NOTE 4)
FLOOR LINE
CHILLER
JUNCTION BOX
WATER INLET
AND OUTLET
11-5/16
[288]
WALL OPENING
(ALLOW ADDITIONAL DEPTH
FOR WATER AND WASTE LINES)
2-3/32
[53]
1/2
[13]
WALL LINE
5/16[8] DIA. MOUNTING
HOLES 8 EACH SIDE
2
[51]
CHILLER
FRAME ASSY
FURNISHED
1-1/4 TAILPIECE
1/4 OD TUBE
CHILLER
WATER INLET
1-1/2 OR 1-1/4
IPS WASTE
STUB OUT
TO BOTTLE FILLER
DISPENSE FITTING
26-23/32
[679]
24-27/32
[631]
WASTE DRAIN
HEIGHT
4-5/16
[110]
21-7/32
[539]
FRAME
3-1/2
[89]
2-5/32
[55]
8-1/16
[205]
3-1/16
[78]
1-1/2
[38]
5/16[8] DIA. MOUNTING
HOLES 4 TOP AND 4 BOTTOM
NOTES:
RECOMMENDED ADULT HEIGHT INTALLATION SHOWN. ADJUST VERTICAL
DIMENSIONS AS REQUIRED T OCOMPLY WITH FEDERAL, STATE AND LOCAL
CODES.
STOP VALVE, TRAP, PIPE CONNECTOR TO WASTE LINE NOT PROVIDED. SHORT
RADIUS TRAP REQUIRED.
ALL DIMENSIONS ARE IN INCHES. DIMENSIONS IN [ ] ARE IN MILLIMETERS.
115V GROUNDED NORTH AMERICAN DUPLEX REEPTACLE REQUIRED. THIS
DRINKING WATER COOLER IS INTENDED TO BE CONNECTED TO A 20A
MINIMUM GROUND FAULT CIRCUIT INTERRUPTING (GFCI) DEVICE TO MEET
UL REQUIREMENTS.
FILTER INSTALLATION LOCATIONS WILL VARY BY MODEL.
4.
5.
1.
2.
3.
BOTTLE FILLER
JUNCTION BOX
28-13/32
[722]
FACE OF FRAME MUST
BE FLUSH WITH FINISHED
WALL LINE
6
OASIS MODULAR HANDS-FREE QUASAR VERSAFILLER (WITH OR WITHOUT VERSAFILTER III
AND REMEDI FILTER) MODELS: MWEBQ, MW8EBQ, MWF2EBQ, MW8F2EBQ, MW12F2EBQ

44-11/16
[1135]
44-5/16
[1126]
3-15/16
[100]
40-3/4
[1035]
28-13/32
[722]
40
[1016]
WALL OPENING
BOTTLE FILLER
JUNCTION BOX
(SEE NOTE 4)
4-5/16
[110]
39-1/2
[1003]
38-3/4
[984]
WALL OPENING
1-19/32
[41]
CHILLER
FLOW REGULATOR
ACCESS THROUGH
HOLE IN BUTTON
(MECH. VERSION
ONLY)
JUNCTION BOX
3/8 O.D. WATER INLET
1-1/2 OR 1-1/4 IPS WASTE
STUB OUT 2[51]
19-3/4
[502]
34-9/16
[878]
TO ORIFICE
3-3/32
[78]
TO ORIFICE
27
[690]
11-5/16
[287]
WALL OPENING
(ALLOW FOR ADDITIONAL DEPTH
FOR WATER AND WASTE LINES)
1/2
[13]
2
[51]
WALL LINE
FRAME ASSY
FURNISHED
5/16 [8] DIA. MOUNTING
HOLES 8 EACH SIDE
FACE OF FRAME MUST
BE FLUSH WITH FINISHED
WALL LINE
26-23/32
BOTTLE FILLER
STUB OUT
[679]
2
[51]
1-1/2 OR 1-1/4
IPS WASTE
STUB OUT
TO BUBBLER
VALVE
1/4 O.D. TUBE
CHILLER
WATER INLET
21-9/16
[548]
CHILLER
27
[686]
19
[483]
DISTANCE
FROM WALL
2-5/32
[55]
6-7/16
[164]
ELECTRICAL
CONNECTIONS
5/16 [8] DIA. MOUNTING HOLES
8 TOP AND 8 BOTTOM
3-1/16
[78]
8-1/16
[205]
1-1/2
[38]
ELECTRICAL
CONNECTIONS
5-11/32
[136]
3-1/2
[89]
9-7/8
[251]
ELECTRICAL OUTLET
OPTIMUM LOCATION
(SEE NOTE 4)
11-1/2
[292]
44-11/16
[1135]
VERSAFILTER III
APPROX. LOCATION
(IF APPLICABLE) (IF APPLICABLE) (IF APPLICABLE)
(IF APPLICABLE)
REMEDI FILTER
ELECTRIC EYES
SOLENOID VALVE
AND EE SENSOR
ELECTRICAL
CONNECTION
(IF APPLICABLE)
28-3/4
STUB OUT
[730]
7/8 [22] DIA. HOLE
FOR ELECTRICAL CONNECTION
NOTES:
RECOMMENDED ADULT HEIGHT INSTALLATION SHOWN. ADJUST VERTICAL
DIMENSIONS AS REQUIRED TO COMPLY WITH FEDERAL, STATE AND LOCAL
CODES.
STOP VALVE, TRAP, PIPE CONNECTOR TO WASTE LINE NOT PROVIDED. SHORT
RADIUS TRAP REQUIRED.
ALL DIMENSIONS ARE IN INCHES. DIMENSIONS IN [ ] ARE IN MILLIMETERS.
115V GROUNDED NORTH AMERICAN DUPLEX RECEPTACLE REQUIRED. THIS
DRINKING WATER COOLER IS INTENDED TO BE CONNECTED TO A 20A
MINIMUM GROUND FAULT CIRCUIT INTERRUPTING (GFCI) DEVICE TO MEET
UL REQUIREMENTS.
FILTER INSTALLATION LOCATIONS WILL VARY BY MODEL.
4.
5.
1.
2.
3.
7
OASIS MODULAR HANDS-FREE QUASAR VERSAFILLER (WITH OR WITHOUT VERSAFILTER II
AND REMEDI FILTER) MODELS: M8EBQ, M12EBQ, M8F2EBQ, M12F2EBQ

2-5/8
[67]
TYP
TYP
1-1/4
[32]
10-1/8
[257]
20-5/16
24-3/8
[644]
23-3/8
[594]
7.00
[178]
FLOOR LINE
DRAIN LOCATION
(IF APPLICABLE)
REMEDI FILTER
5/16[8] DIA. MOUNTING HOLES,
2 TOP AND 2 BOTTOM
28-13/32
[722]
41-5/16
[1049]
7
[178]
3-9/16
[90]
BOTTLE FILLER
JUNCTION BOX
(SEE NOTE 4)
1/2
[13]
2
[51]
5-21/32
[143]
WALL LINE
24-27/32
[631]
WASTE DRAIN
HEIGHT
3-1/2
[89]
FRAME ASSY
WITH BEZEL
FURNISHED
1-1/4 TAILPIECE
1-1/2 OR 1-1/4
IPS WASTE
STUB OUT
1/4 OR 3/8 OD TUBE
WATER INLET
THROUGH WALL
WATER INLET
LOCATION
11-1/2
[292]
NOTES:
RECOMMENDED ADULT HEIGHT INSTALLATION SHOWN. ADJUST VERTICAL
DIMENSIONS AS REQUIRED TO COMPLY WITH FEDERAL, STATE AND LOCAL
CODES.
STOP VALVE, TRAP, PIPE CONNECTOR TO WASTE LINE NOT PROVIDED. SHORT
RADIUS TRAP REQUIRED.
ALL DIMENSIONS ARE IN INCHES. DIMENSIONS IN [ ] ARE IN MILLIMETERS.
115V GROUNDED NORTH AMERICAN DUPLEX RECEPTACLE REQUIRED. THIS
DRINKING WATER COOLER IS INTENDED TO BE CONNECTED TO A 20A
MINIMUM GROUND FAULT CIRCUIT INTERRUPTING (GFCI) DEVICE TO MEET
UL REQUIREMENTS.
CHILLER, IF APPLICABLE, MUST BE ADEQUATELY SUPPORTED BY SOMETHING
OTHER THAN THE FRAME.
FILTER INSTALLATION LOCATIONS WILL VARY BY MODEL.
4.
5.
6.
1.
2.
3.
(IF APPLICABLE)
VERSAFILTER III
APPROX. LOCATION
8
OASIS MODULAR HANDS-FREE QUASAR VERSAFILLER (WITH OR WITHOUT VERSAFILTER
III AND REMEDI FILTER) MODELS: MWSMEBQ, MWSM8EBQ, MWSM12EBQ, MWSMF2EBQ,
MWSM8F2EBQ, MWSM12F2EBQ

9
SECTION 1: BOTTLE FILLER ASSEMBLY WITH CHILLER OVERVIEW
Wall mounting frame secures
into wall with face flush to
the finished wall.
Optional
VersaFilter III
Upper front panel mounts to
frame with bottom screws.
Cooling Unit
mounting cradle
Cradle mounting
angles
(2 provided)
Cooling Unit mounts
inside cradle.
Lower Front Panel mounts
to frame with bottom
screws or optional locks
(2 provided)
Trim Bezel - accessory on surface
mount models only: MWSMEBQ,
MWSM8EBQ, MWSM12EBQ,
MWSMF2EBQ, MWSM8F2EBQ,
MWSM12F2EBQ
(See page 11)
Secure cradle mounting angles
to frame flange using screws
provided. Do not tighten screws.
Slide cradle between angles and
attach to angles with screws
provided. Tighten all screws.
Optional Filter

10
SECTION 2: INSTALLATION
STEP 1: INSTALL MOUNTING FRAME
STEP 2: MWEBQ (WITHOUT CHILLER ONLY)
Drip Tray
Solenoid
Valve Out
Solenoid
Valve In
Provided Ball
Valve and 3/8”
O.D. Copper to
building water
supply
Snap
Bushings
2x4
Junction
Box
Short Radius
P-Trap
(Not Included)
Optional Filter
Location Less
Chiller
A.
B.
C.
A.
B.
C.
D.
E.
F.
G.
Install Frame per rough-in
drawing. Note: If applicable,
refer to trim bezel installation
instructions on page 11 before
continuing with step 1B.
Place drip tray in frame but do
NOT fasten in place. Do NOT
place grille on tray until last step
(Section 6).
Install snap bushings.
Install provided ball valve and 3/8”
O.D. copper tube to building water
supply.
Install tubing as shown before
mounting the panel assembly.
Uncoil EBQ push button wire lead
and route through same opening in
frame as the tubing.
Install upper panel assembly
(screws provided)
Install lower louver panel using
supplied locks or screws.
Install drip tray grille using 3
flathead screws, provided.
IMPORTANT: Refer to Electrical
Connections on page 12, step 4 for
proper grounding instructions.

11
STEP 3A: FILTER INSTALLATION (WITHOUT CHILLER)
Stem
Elbow
A.
B.
C.
D.
E.
Mount Filter Clip To Frame.
Install Provided Stem Elbows
Cut water line shown from solenoid valve out to
bottle filler delivery fitting. Squeeze end of tube
back to round shape as needed.
Connect tube from solenoid valve out to filter in.
Connect filter out to filler delivery fitting.
Stem
Elbow
Filter Clip
Filter
Clip
INLET
0UTLET

12
STEP 3B: FILTER INSTALLATION (WITHOUT CHILLER)
STEP 4: Electrical Connections
A.
B.
C.
A.
B.
C.
D.
Plumbing rough-in and wall opening should be prepared as shown in the rough-in
drawing. This drinking water cooler is designed to be operated at a water supply line
pressure of up to 100 PSI (690 kPa). A pressure regulator must be installed in front of the
unit’s water inlet if the pressure (including any possible pressure spikes) could exceed 100
PSI (690 kPa).
Install provided 3/8” O.D. copper tube, strainer, ball valve, and reducer to the building
water supply.
Install tubing as shown above.
A 2 x 4 junction box is provided for the installation of 115V receptacle. This unit is
intended to be connected to a ground fault circuit interrupting (GFCI) device to meet UL
requirements. It is recommended that a flexible conduit be used to supply power to the
junction box and chiller if used. Check the electric current available. Type and voltage
must be the same as listed on the product data plate.
As you put the bottle filler panel assembly in place on the frame assembly, feed the long
green ground wire and the terminals on the power supply cord through the bushings in
the frame assembly.
Attach the long green ground wire to the frame assembly junction box ground then plug
in the bottle filler power cord.
IMPORTANT: Review page 4: QUASAR UV-C LED Operation before proceeding. Failure
to follow the instructions on page 4 can damage the QUASAR module.
Optional In-Line
Filter
Optional
Versafilter III
Inlet Ball Valve
Assy. with
Strainer
Solenoid
Valve
UV-C LED

13
SECTION 3: MW8EBQ, MW12EBQ
Solenoid Valve
Out
Solenoid Valve
In
Not Included
Chiller Water in
Chiller Water Out
Provided Ball Valve
and 3/8” O.D. copper
to building water
supply
Insulated Tube
Connections to Filler
Fitting
Strainer Inside
A.
B.
C.
D.
E.
Attach cradle to frame per rough-in drawing. (Screws Provided - 4)
Place chiller in frame.
Install 1/4” union fittings on chiller inlet and outlet.
Connect water line from bottle filler solenoid valve out to chiller water in. Connect chiller
water out to bottle filler delivery fitting. Note: squeeze ends of tubes back to round shape
as needed after cutting.
IMPORTANT: Refer to Electrical Connections on page 12, step 4 for proper grounding
instructions.
STEP 1 : FILTER INSTALLATION (WITH CHILLER)

14
STEP 2A: FILTER INSTALLATION (WITH CHILLER)
STEP 2B: INSTALLATION
A.
B.
C.
A.
B.
Screw filter clip to the chiller in the location shown
below. (Screw provided)
Install the 1/4” stem elbows (provided) in filter Inlet
and outlet.
Place the filter in clip as shown.
Cut water line from buttle filler solenoid valve out
to connect to filter in. Squeeze tube ends to round
shape as needed.
Filter outlet will be connected to chiller inlet.
Stem
Elbow
INLET 0UTLET
Stem
Elbow
Filter
Clip

15
Chiller
Optional In-Line
Filter
Optional
Versafilter III
Inlet Ball Valve
Assy. with
Strainer
Solenoid
Valve
In Out
UV-C LED
A.
B.
C.
D.
E.
F.
G.
H.
Plumbing rough-in and wall opening should be prepared as shown in the rough-in
drawing. This drinking water cooler is designed to be operated at a water supply line
pressure of up to 100 PSI (690 kPa). A pressure regulator must be installed in front of the
unit’s water inlet if the pressure (including any possible pressure spikes) could exceed 100
PSI (690 kPa).
Assemble the optional inline filter clip to the chiller in the location shown on PAGE:
Install stem elbows (provided) on the in-line filter and place in the in-line filter in the
previously installed clip.
Mount the VersaFilter III in the location shown on page 15 and install the stem elbows
provided.
Install 1/4” union fittings (provided) on the chiller unit inlet and outlet water lines.
Install provided 3/8” O.D. copper tube, strainer, ball valve and reducer to the building
water supply.
Install the water tubing as shown above.
Note the tubing from the chiller outlet fitting to the solenoid valve inlet fitting should be
insulated (provided). The tubing from the solenoid valve outlet fitting to the UV-C LED inlet
fitting should also be insulated.
STEP 3: FILTER INSTALLATION (WITH CHILLER)

16
SECTION 4: M8EBQ/M12EBQ CHILLER AND FOUNTAIN CONNECTIONS
A.
B.
C.
D.
E.
F.
G.
H.
I.
Install Chiller in Frame.
Install 1/4” Union on Chiller inlet.
Connect 1/4” Union Tee to Chiller Outlet.
Determine tube length needed to
connect bottle filler solenoid “in” to chiller
tee. (Use line with attached ball valve)
Cut 1/4” O.D. tube and connect to branch
of tee. Squeeze tube end back to round
shape as needed before connecting.
Attach remaining tubing from ball valve
to chiller inlet.
Remove reducer fitting and copper tube
from fountain water line. Install provided
1/4” union.
Determine length of tube needed to
connect bottle filler solenoid “out” to
bottle filler delivery fitting. Cut off excess.
Squeeze tube end back to round shape
as needed.
Use excess tube to connect fountain to
chiller tee.
IMPORTANT: Refer to Electrical
Connections on page 12, step 4 for
proper grounding instructions.
Provided Ball
Valve and 3/8”
O.D. Copper to
building water
supply
Solenoid Valve
Out
1/4” Union
Fitting
1/4” Union
Fitting
1/4” Tee
Fitting
Solenoid Valve
In

17
SECTION 5: TRIM BEZEL INSTALLATION (FOR SURFACE MOUNT MODELS)
A.
B.
C.
D.
A.
B.
Install frame assembly to a flat surface. Use appropriate fastening hardware (not
included). Refer to rough-in for correct installation height.
Remove Bottom Plate from Trim Bezel (4 screws)
Install Trim Bezel around the Frame Assembly and replace Bottom Plate with screws.
Place drip tray in frame but do NOT fasten in place. Do NOT place grille on tray at this
time. Install Snap Bushing and any other accessories included.
Uncoil EBQ push button wire lead and route through same opening in frame as the tubing.
Install Upper and Lower Front Panel. Install drip tray grille using 3 flathead screws,
provided.
Optional
Filters
Trim Bezel
(For Surface Mount
Units Only) Upper Front
Panel
Frame
Assembly
Lower Front
Panel
Trim Bezel
Bottom Plate
with Screws
Fastening points on frame
(four, 5/16” mounting holes
on top and bottom rear
flanges
*
*
*
*
*
*
SECTION 6: PANEL INSTALLATION

Display Action
000000000
BOTTLES REUSED
(Home Screen)
Depress button for 3 seconds to enter into the following menu settings and make changes.
Note: at any time it will exit menu and save settings when idle for 10 seconds (no button
press) and revert back to Home Screen.
LTR/GAL
GAL[LTR]
Depress button 3 seconds to change from Gallons to Liters, or momentarily press to
advance to the next menu.
UNFILT/FILT?
UNFILTERED UNIT
[FILTERED UNIT]
Depress button 3 seconds to change from Unfiltered to Filtered unit, or momentarily press
to advance to next menu.
SELECT RATE
1.0 GPM UNIT
[3.8 LPM UNI]
To change flow rate, momentarily depress button to change whole gallon digit. Hold
button 3 seconds to advance to TENTHS of gallon digit. Depress momentarily to change
the digit. Hold button 3 seconds to advance to the next menu.
SELECT RATE
1.0 GPM UNIT
[3.8 LPM UNIT]
To change flow rate, momentarily depress button to change whole gallon digit. Hold
button 3 seconds to advance to TENTHS of a gallon digit. Depress momentarily to change
the digit. Hold button 3 seconds to advance to next menu.
RESET 0000000000
GALLON COUNT?
[LTR COUNT?]
Depress button for 3 seconds to reset Gallon or Liter count, or momentarily press to
advance to next menu.
FILT CAPAC
OF 4750 GAL
[18000 LTR]
Depress button for 3 seconds to change filter capacity to 1250 GAL [5000 LTR] for
VersaFilter I.
Depress button for 3 seconds to change filter capacity to 3000 GAL [11000 LTR] for
VersaFilter II
3 SEC RULE?
3 sec
[0.5L]
Depress button for 3 seconds to switch from 3 sec rule to 0.5L bottle, or momentarily press
to advance to next menu.
RESET 000000000
BOT COUNT?
Depress button for 3 seconds to switch from 3 sec rule to 0.5L bottle, or momentarily press
to advance to next menu. (The 3 sec rule increases the bottle count based on a 3 second
dispense.
BOT FILLER
SET TIME: 20 S
Depress button for 3 seconds to change maximum dispense time to 10, 20 or 30 seconds, or
momentary press to advance to next menu.
RUN CAL
AGAIN?
Depress button 3 seconds to run calibration again, or momentarily press to advance to
next menu.
18
SECTION 7: SET-UP GUIDE FOR BOTTLE FILLER ELECTRONICS
Factory Default Program Settings Are:
Units - Gallons
Unfiltered Unit
Filter Capacity = 4750 gal (18000L) for a VersaFilter III
For Hands-Free Aqua Pointe Models: Remove lower front panel (if applicable) or lift out lower edge of upper
panel to reach remote push button.
Bottle Count = 0.5L (1 Bottle)
Flow Rate = 1.0GPM
20 sec. Maximum Dispense Time
a.
b.
c.
d.
e.
f.

19
SECTION 8: PARTS BREAKDOWN
1
2
8
3
4
6
5
7
28
9
10
15
16
18 24 20
21
17
22
11
12
13
19
23 14
25
26
27

20
SECTION 9: PARTS BREAKDOWN
ITEM DESC. PART # QTY
1 BUSHING, SNAP 2.5” 027189-012 2
2 GRILLE, DRIPTRAY 042374-001 1
3 SCREW, FLAT HD TAPPING 026675-003 3
4ASM, VHB ALCOVE 041405-001 1
5 ASM, VHB PCB BRACKET 041405-002 1
6 ASM, VHB IR BRACKET 041405-003 1
7 BUTTON ASSY - EBF 042067-001 1
8 COVER, FRONT 042370-001 1
9 ASSY, LED - EBF 042068-001 1
10 PANEL, EBF UPPER OASIS 041374-101 1
11 PANEL, MWSBF LOWER LOUVER 027697-005 1
12 LOCK ASSY 031657-006 2
13 POWER SUPPLY, 12VDC 038036-003 1
14 PCB, IR SENSOR 042065-001 1
15 LENS, PWEBF LCD 042575-001 1
16 SPOUT 042368-001 1
17 LEAD WIRE ASSY 10FR (BLACK) 017340-512 1
18 LEAD WIRE ASSY 10FR (RED) 021929-129 1
19 SOLENOID VALVE 12VDC 038030-002 1
20 FTG, PP REDUCING ELBOW 029962-103 1
21 UV-C LED 9C+ VIS POD, THERMAL
SNS
041411-002 1
22 PCB, MAIN ARF 042064-003 1
23 LENS, IR BOTTLE FILLER 038027-001 1
24 LEAD WIRE ASSY 16GG (GREEN) 021339-177 1
25 LEAD WIRE ASSY 24GG (GREEN) 021339-149 1
26 DRIPTRAY, SURFM 042372-001 1
27 ANGLE, CRADLE MTG 026210 2
28 CORD ASSY, DC POWER SUPPLY 038168-001 1
This manual suits for next models
16
Table of contents
Other Oasis Water System manuals
Popular Water System manuals by other brands

LifeSource
LifeSource 810 Series Installation and operation guide

Wilo
Wilo Star E 21 Installation and operating instructions

Clean Water Systems
Clean Water Systems Pro-OX 7800 Installation & start?up guide

XpressFill
XpressFill XF4100 manual

Kenmore
Kenmore 625.347050 manual

Everpure
Everpure Insurice Triple-i40002 Specification sheet

Real Spirit
Real Spirit Advanced Pure Air H2O owner's manual

RephiLe
RephiLe Genie PURIST RG0S00000 user manual

A.O. Smith
A.O. Smith LILY user manual

Taco
Taco 00e Series instruction sheet

Pattfield
Pattfield PE-HWA 630 Translation of the original instructions

Everpure
Everpure Dual Gradient Prefilter Cartridge DEV9108-37 Specification sheet