OHAUS RS232 User manual

RS232 Interface
INSTRUCTION MANUAL
Interfaz RS232
MANUAL DE INSTRUCCIONES
Interface RS232
MODE D’EMPLOI
RS232-Schnittstelle
BEDIENUNGSANLEITUNG
Interfaccia RS232
MANUALE D’ISTRUZIONI
RS232 㓺
㓺Ԭ
ֵ⭞䈪᱄Ҝ
RS232
ࣥࢱ࣮ࣇ࢙ࢫ
ྲྀᢅㄝ᭩
RS232
넭뫥뵍넩걙
ꩡ끞ꐺ
Интерфейс RS232
РУКОВОДСТВО ПО ЭКСПЛУАТАЦИИ


RS232 Interface EN-1
INTRODUCTION
This Interface Kit is for use with OHAUS Scout STX, SPX, SKX, SJX series and
PJX series products.
INTERFACE INSTALLATION
Install the Interface module on the mini DIN port (round connector) located at the
rear side of the balance as shown. During this process, please make sure the
balance is powered off.
Notes:
x Please make sure the small triangle mark (▲) on the round connector is at
the bottom and then plug in.
x The appearance of your model may be different.
SETUP
A) The OHAUS Interface is preset to communicate using the following settings:
9600 baud, 8 bit, no parity, no handshake. Determine the RS232 parameters
required for the printer or computer that is to be connected. See computer or
printer documentation if assistance is required. If the parameters do not match,
it will be necessary to change either the balance settings, or the computer /
printer settings.
B) Upon installation of the interface, the balance will recognize the RS232
Interface and add relevant items to the menu. Configure the balance to the
desired RS232 and printing parameters; refer to the balance Instruction Manual
for assistance in using the menus.
Mini DIN port
(Round connector)

EN-2 RS232 Interface
For SPX, SKX and SJX Balances:
Upon installation, the balance will show [r.S.2.3.2] during the power sequence.
PRINT
Reset: no, yes
Stable: off, on
A.Print: off
On.Stable
interval
accept
continuous
Content: Result (-> off, on)
Gross (-> off, on)
Net (-> off, on)
Tare (-> off, on)
Header (-> off, on)
Footer (-> off, on)
Mode (-> off, on)
Unit (-> off, on)
Info (-> off, on)
Layout: Format (->Single,Multi)
Feed (->Line, 4 Lines, Form)
End Print: Exit menu
RS232
Reset: no, yes
Baud Rate: 1200…9600…115200
Parity: 7 even, 7 odd, 7 none,
8 none
Stop bit: 1, 2
Handshake: none, XOn-XOff
Alternate command: Print (A…P…Z)
Tare (A…T…Z)
Zero (A…Z)
End RS232: Exit menu
Note: Items with bold font are default settings.
SETUP DEFINITIONS
Menu Settings
Explanation
PRINT / A. Print
– Off
Only sends data when PRINT is pr
essed.
PRINT / A.Print / On.Stable
– Load,
Load.Zero
Balance only transmits stable data.
Load
: Print stable value excluding zero
Load.Zero: Print stable value including zero
PRINT / A.Print / interval
- (xx) sec
Balance sends data every (xx) seconds.
PR
INT / Auto Print – accept
Balance only sends stable accept data in
Check mode.
PRINT / A.Print
– Continuous
Balance repeatedly sends data as fast as
possible.
PRINT / Content
On: print relevant content after weighing data
Gross – on: G; Net – on: N; Tare –
on: T;
Info – on: balance will print application
mode setting parameters
PRINT / Layout / Format - (Single,
Multi)
Single: print all data in one line
Multi: print all data in multiple lines
PRINT / Layout / Feed
-
(Line, 4 Lines,
Form)
Line: feed one line after printing
4 Lines
: feed four lines after printing
Form: feed one page after printing (move to the
top of next page after printing)

RS232 Interface EN-3
For STX Balances:
Upon installation, the STX balance will show RS232 icon ( ) in the upper right
corner.
Menu added
Function
Communication
|--
RS232
|--Baud Rate
|--Transmission
|--Handshake
|--
Print Settings
Set the baud rate (bits per second).
Set the data bits, stop bit, and parity.
Set the flow control method.
For more info, please refer to the STX instruction
manual.

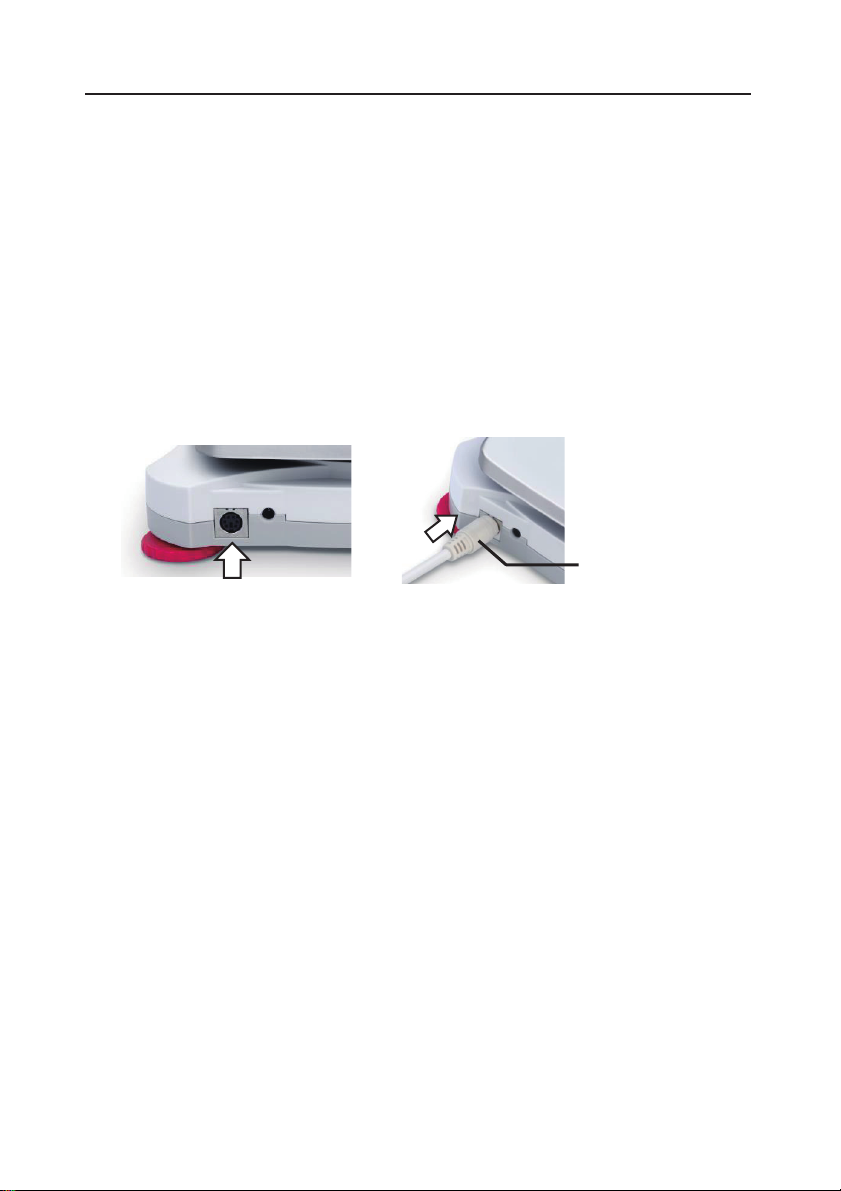
EN-4 RS232 Interface
For PJX Balances:
Menu Navigation
PRINT
Header
Date and Time
Balance ID
Balance Name
User Name
Project Name
Application Name
Result
Gross Weight
Net Weight
Tare Weight
Line Feed
RS232
Baud Rate
Transmission
Handshake
Menu Settings
RS232 Interface Setup
--Baud Rate
--Transmission
--Handshake
Enter this sub-menu to customize RS232 standard settings.
Data may be output to either a printer or a PC.
Set the baud rate (bits per second).
1200 = 1200 bps
2400 = 2400 bps
4800 = 4800 bps
9600 = 9600 bps
19200 = 19200 bps
38400 = 38400 bps
Set the data bits, stop bit, and parity.
8-N-1 = 8 data bits, no parity, stop bit 1
8-N-2 = 8 data bits, no parity, stop bit 2
7-E-1 = 7 data bits, even parity, stop bit 1
7-E-2 = 7 data bits, even parity, stop bit 2
7-N-1 = 7 data bits, no parity, stop bit 1
7-N-2 = 7 data bits, no parity, stop bit 2
7-O-1 = 7 data bits, odd parity, stop bit 1
7-O-2 = 7 data bits, odd parity, stop bit 2
Set the flow control method.
NONE = no handshaking
XON-XOFF = XON/XOFF handshaking
HARDWARE = hardware handshaking
Print Settings
For more info, please refer to the PJX instruction manual.

RS232 Interface EN-5
RS232 (DB9) Pin Connections
The RS232 Interface Kit cable terminates with a 9 pin Sub-D female connector.
Active pins: Pin 2 = TXD, Pin 3 = RXD, Pin 5 = Ground.
The Interface connector can connect directly to a computer, an OHAUS printer and
other printers.
Diagram
Type
Description
Note: RTS
, CTS and
RT_CTL signal pins are only
available for PJX
balances
.
Interface type
Voltage interface conforming to EIA RS-
232C/DIN 66020 (CCITT V24/V.28)
Max. cable length
15 m
Signal level
Output:
+5 V ... +15 V (RL = 3 – 7kΩ)
-5 V ... -15 V (RL = 3 - 7 kΩ)
Input:
+3 V ... +25 V
-3 V ... -25 V
Connector
Sub-D, 9-pole, female
Operating mode
Full duplex
Transmission mode
Bit-serial, asynchronous
Transmission code
ASCII
Baud rates
Scout STX, SPX, SKX, SJX balances:
1200, 2400, 4800, 9600,
19200, 38400, 57600, 115200
(firmware selectable)
PJX balances:
1200, 2400, 4800, 9600, 19200, 38400
(firmware selectable)
Bits/parity
7-bit/even, 7-bit/odd, 7-bit/none, 8-bit/none
(firmware selectable)
Stop bits
Stop bit 1, 2
Handshake
None, XON/XOFF, RTS/CTS (selectable)
End-of-line
Not selectable

EN-6 RS232 Interface
RS232 OUTPUT
With the interface installed the balance will operate in several ways according to the
settings.
Print format can be switched by xFMT user command (see command table in
RS232 INPUT section).
New Scout Print Format (Default Format):
Output String (Non Check Weighing Applications):
[weight] 11 characters (right justified)
[space] 1 character
[unit] 5 characters (right justified)
[space] 1 character
[stability indicator] 1 character; "?" when unstable, space when stable
[space] 1 character
[T/N/G/PT] 2 characters (right justified)
[Term] 2 characters
Note: All of the fields have fixed length.
Output example:
*****192.21_****g_*_**
*******0.01_****g_?_**
*******95.0_****g_*_*N
******169.6_****g_*_*G
*******95.0_****g_*_*N
*******74.6_****g_*_*T
A.Print: off; Stable: off
Stable reading
unstable reading
A.Print: off; Stable: on
Content / Result -> on
Content / Gross -> on
Content / Net -> on
Content / Tare -> on
Output String (Check Weighing Application):
[weight] 11 characters (right justified)
[space] 1 character
[unit] 5 characters (right justified)
[space] 1 character
[stability indicator] 1 character; "?" when unstable, space when stable
[space] 1 character
[T/N/G/PT] 2 characters (right justified)
[space] 1 character
[application status] 6 characters (right justified)
[Term] 2 characters
Example:

RS232 Interface EN-7
*****
192.21_****
g_*_**_Accept
******
*0.01_****g_
?_**__Under
A.Print: off; Stable: off
Stable reading,
Unstable reading
Scout Pro Print Format 1 (for the models 303/123/202/402/602/2001/6001/
401FZH/601FZH/6000FZH):
Output String:
[weight] 12 characters (right justified)
[space] 1 character
[unit] 5 characters (left justified)
[space] 1 character
[stability indicator] 1 character; "?" when unstable, space when stable
[Legend] 1~10 characters
Output example:
********0.00_g****_*
*******12.73_g****_?
********0.85_oz***_WET
*WT
Scout Pro Print Format 2 (for the models 401/601/6000):
Output String:
[weight] 11 or 12 characters (right justified)
[space] 1 character
[unit] 1~5 characters
[space] 1 character
[stability indicator] 1 character; "?" when unstable, space when stable
[space] 1 character
[Legend] 1~10 characters
Note: The unit field length varies with different units. The weight field could be
11 or 12, depending on if the weight string has a dot or not.
Output example:
*********100_g_*_
*********
273_g_?_
*********8.5_oz***_WET*WT

EN-8 RS232 Interface
Print Format 3 (for Certain POS Systems):
Output String:
[weight] 11 characters (right justified)
[space] 1 character
[unit] 5 characters (right justified)
[stability indicator] 1 character; "?" when unstable, space when stable
[Term] 2 characters
Note: All of the fields have fixed length.
Output example:
PJX Print Format˖
˖
The Result Data, and G/N/T data, is output in the following format.
Field:
Label
Space
Weight
Space
Unit
Space
Stability
Space
G/N
Space
Term.
Characters
Length:
1
11
1
5
1
d 1
d 1
d 3
0
d 8
*******0.00_****g*
******12.73_****g?

RS232 Interface EN-9
RS232 INPUT
The following interface commands will be acknowledged by the Balance. They are
case sensitive. The balance will return “ES” for invalid commands.
For SPX, SKX, SJX and STX Balances:
Command
Function
IP
Immediate Print of displayed weight (stable or unstable).
P
Print displayed weight (stable or unstable).
CP
Continuous Print.
SP
Print on Stability.
SLP
Auto Print stable non-zero displayed weight.
SLZP
Auto Print stable non-zero weight and stable zero reading.
xP
Interval Print x = Print Interval (1-3600 sec) 0P ends interval Print
0P
Turn off Auto Print
H
H x “text” Enter Header line , where x = line number 1 to 5, “text” = header text up to 24 alphanumeric
characters
F
F x “text” Enter Footer line , where x = line number 1 to 2, “text” = footer text up to 24 alphanumeric
characters
Z
Same as pressing Zero Key
T
Same as pressing Tare Key.
xT
Establish a preset Tare value in displayed unit. x = preset tare value. Sending 0T clears tare (if allowed).
PT
Prints Tare weight stored in memory.
PM
Print current application mode (weighing mode).
xM
Set current application mode to x. x depends on application
1M: WEIGH, 2M: COUNT,3M: PERCENT, 4M: CHECK, 5M: DYNAMIC, 6M: TOTAL, 7M:DENSITY, 8M:
HOLD, 9M:MOLE
M
Scroll to the next enabled mode.
PU
Print Current weighing unit: g, kg, lb, oz, etc….
xU
Set balance to unit x: g, kg etc.
1U: g, 2U: kg,3U: ct, 4U: N, 5U: oz, 6U: ozt, 7U: dwt, 8U: lb, 9U:lb:oz, 10U: grn, 11U: thk, 12U: tsg,
13U:ttw , 14U: tola, 15U:c
U
Scroll to the next enabled unit.
ON
Brings out of Standby
OFF
Goes to Standby.
C
Begin Span Calibration
AC
Abort Calibration.
PSN
Print Serial Number.
PV
Print Version: print name, software revision and LFT ON (if LFT is set ON).
x#
Set Counting APW (x) in grams. (must have APW stored)
P#
Print Counting application APW.
x%
Set Percent application reference weight (x) in grams. (must have reference weight stored)
P%
Print Percent application reference weight.
xCO
Set Checkweighing Over Limit in grams x.
xCU
Set Checkweighing Under Limit in grams x.
PCO
Print Checkweighing Over Limit.
PCU
Print Checkweighing Under Limit.
xMM
Set Molar Mass in g/mol .
PMM
Print Molar Mass
xS
0 = print unstable data, 1 = print stable only
xFMT
0= New Scout print format (default) ; 1 = Scout Pro print format 1;
2 = Scout Pro print format 2; 3 = for certain POS system.
xRL
0 = disable response; 1 = enable response.

EN-10 RS232 Interface
For PJX balances:
Command
Function
IP
Immediate Print of displayed weight (stable or unstable).
P
Print displayed weight (stable or unstable).
CP
Continuous Print.
SP
Print on Stability.
SLP
Set Auto Print to On Stability, allow non-zero displayed weight be printed.
SLZP
Set Auto Print to On Stability, allow both stable non-zero weight and stable zero reading printed.
xP
Set Auto Print to Interval Print, x = print interval (1-3600 sec), 0P disable the interval Print
0P
0P disable interval print, continuous print or print on stability
H
Enter Print Header Lines, the format is: H x "header string".
Where x = line number 1 to 3, “header string” can be up to 24 alphanumeric characters.
If no string in the command, "H x" will read the stored header x.
Z
Same as pressing Zero Key.
T
Same as pressing Tare Key.
xT
Establish a preset Tare value in displayed unit. x = preset tare value. Sending 0T clears tare (if allowed).
PT
Prints Tare weight stored in memory.
PM
Print current application mode (weighing mode).
xM
Set current application mode to x. x depends on applications
1 – Weigh
2 – Count
3 – Percent
4 – Density
M
Scroll to the next enabled mode.
PU
Print Current weighing unit: g, kg, lb, oz, etc….
xU
Set balance to unit x: g, kg etc.
1 – g
2 – kg
3 – mg
4 – ct
…
U
Scroll to the next enabled unit.
ON
Brings out of Standby
OFF
Goes to Standby.
C
Begin Span Calibration
IC
Begin Internal Calibration.
AC
Abort Calibration.
PSN
Print Serial Number.
PV
Print Version: print name, software revision and LFT ON (if LFT is set ON).
x#
Set Counting APW (x) in grams. (must have APW stored)
P#
Print Counting application APW.
x%
Set Percent application reference weight (x) in grams. (must have reference weight stored)
P%
Print Percent application reference weight.
PTIME
Print current time.
PDATE
Print current date.
xTIME
Set Time x format: hh:mm:ss
xDATE
Set Date x format: mm/dd/yyyy
xS
0 = print unstable data, 1 = print stable only
xRL
Enable or disable OK response to non-print commands: x=0 to disable, x=1 to enable.
xT
Pre-tare the container weight (x) in grams.

RS232 Interface EN-11
ACCESSORIES
For a complete listing of OHAUS printers and other accessories, contact OHAUS
Corporation or visit www.ohaus.com.
COMPLIANCE
This device complies with Part 15 of the FCC Rules. Operation is subject to the
following two conditions: (1) this device may not cause harmful interference, and (2)
this device must accept any interference received, including interference that may
cause undesired operation.
This equipment has been tested and found to comply with the limits for a Class B
digital device, pursuant to Part 15 of the FCC Rules. These limits are designed to
provide reasonable protection against harmful interference in a residential
installation. This equipment generates, uses and can radiate radio frequency
energy and, if not installed and used in accordance with the instructions, may cause
harmful interference to radio communications. However, there is no guarantee that
interference will not occur in a particular installation. If this equipment does cause
harmful interference to radio or television reception, which can be determined by
turning the equipment off and on, the user is encouraged to try to correct the
interference by one or more of the following measures:
- Reorient or relocate the receiving antenna.
- Increase the separation between the equipment and receiver.
- Connect the equipment into an outlet on a circuit different from that to which the
receiver is connected.
- Consult the dealer or an experienced radio/TV technician for help.
Please note that changes or modifications not expressly approved by the party
responsible for compliance could void the user’s authority to operate the equipment.
DISPOSAL
In conformance with the European Directive 2002/96/EC on Waste
Electrical and Electronic Equipment (WEEE) this device may not be
disposed of in domestic waste. This also applies to countries outside
the EU, per their specific requirements.
Please dispose of this product in accordance with local regulations at
the collecting point specified for electrical and electronic equipment. If
you have any questions, please contact the responsible authority or
the distributor from which you purchased this device.
Should this device be passed on to other parties (for private or
professional use), the content of this regulation must also be related.
For disposal instructions in Europe, refer to www.OHAUS.com/weee.
Thank you for your contribution to environmental protection.


Interfaz RS232 ES-1
INTRODUCCIÓN
Este Kit de Interfaz ha sido diseñado para ser utilizado con los siguientes equipos :
Productos de la gama Ohaus Scout STX, SPX, SKX, SJX series y PJX series.
INSTALACIÓN DEL INTERFAZ
Instalar el módulo del interfaz en el puerto mini-DIN (conector redondo) situado en
la parte posterior de la balanza como se muestra a continuación. Durante este
proceso, por favor asegúrese de que la balanza está apagada.
Notas:
x Asegúrese de que la pequeña marca triangular (▲) situada en el conector
redondo se halla situada hacia abajo y entonces proceda a conectarlo.
x El aspecto visual en el modelo su modelo puede ser diferente.
CONFIGURACIÓN
A) El interfaz OHAUS se halla configurado para comunicarse por medio de la
siguiente configuración : 9600 baudios, 8 bits, sin paridad, sin handshake
(comprobación del protocolo de comunicación entre los dispositivos).
Establecer los parámetros RS232 exigidos para la impresora o el ordenador
que debe de contactarse. Consultar la documentación del ordenador y/o de la
impresora si necesita ayuda. En caso de no corresponderse los parámetros,
será necesario proceder a modificar o bien la configuración de la balanza, o la
configuración del ordenador / de la impresora.
B) En el momento de efectuarse la instalación del interfaz, la balanza reconocerá
el interfaz RS232 y procederá a añadir al menú los elementos relevantes.
Proceda a configurar la balanza a con los parámetros RS232 y de impresión
deseados ; consulte el Manual de Instrucciones si necesita de ayuda para
hacer uso de los menús.
Puerto mini DIN
(Conector redondo)

ES-2 Interfaz RS232
Para las balanzas SPX, SKX y SJX :
En el momento de llevarse a cabo la instalación, la balanza mostrará [r.S.2.3.2]
durante la secuencia de encendido.
Impresión
Reconfigurar : no, sí
Estable: off - apagado, on - encendido
Impresión A : off - apagado
On.stable - Encendido.Estable
intervalo
aceptar
continuo
Contenido : Resultado (-> apagado, encendido)
Bruto (-> apagado, encendido)
Neto (-> apagado, encendido)
Tara (-> apagado, encendido)
Encabezado (-> apagado, encendido)
Pie de página (-> apagado, encendido)
Modo (-> apagado, encendido)
Unidad (-> apagado, encendido)
Info (-> apagado, encendido)
Formato : Formato (->Single - único, Multi)
Feed – alimentación (->Línea, 4 Líneas,
Formulario)
Finalizar impresión : Salir del Menú
RS232
Re-configuración : no, sí
Velocidad de transmisión: 1200…9600…115200
Paridad : 7 par, 7 impar, 7 ninguna,
8 ninguna
Bit de Stop : 1, 2
Handshake : ninguna, XOn-XOff
Comandos alternativos : Imprimir (A…P…Z)
Tara (A…T…Z)
Cero (A…Z)
End – fin - RS232 : Exit menu – Salir del Menú
Nota : Los elementos que aparecen en negrita se corresponden a la configuración por defecto.
DEFINICIONES DE CONFIGURACIÓN
Menú de Configuración
Explicación
PRINT / A. Print – Off
IMPRIMIR / Imprimir A. - Apagado
Envía datos únicamente cuando se pulsa el botón
IMPRIMIR / PRINT.
PRINT / A.Print / On.Stable
– Load,
Load.Zero
IMPRIMIR / Imprimir A.
– Carga,
Carga.Cero
La balanza transmitirá únicamente datos estables.
Load / Carga
: Imprimirá valores estables, con
exclusión de cero
Load.Zero / Carga.Cero : Imprimirá valores estables,
incluido el cero
PRINT / A.Print / interval - (xx) sec
IMPRIMIR / imprimir A. / intervalo
– (xx)
segs.
La
balanza enviará datos cada (xx) segundos.
PRINT / Auto Print – accept
IMPRIMIR / Impresión Automática - aceptar
La balanza enviará únicamente datos estables
aceptados en modo de comprobación (Check mode).
PRINT / A.Print – Continuous
IMPRIMIR / imprimir A - Continuo
La balanza enviará datos repetidamente, tan
rápidamente como resulte posible.
PRINT / Content
IMPRIMIR / Contenido
On – encendido : imprime todos los datos relevantes
después de efectuar el pesaje
Bruto – on / encendido : [G]; Neto – on /
encendido : [N]; Tara – on / encendido : [T] ;
Info – on / encendido : la balanza imprimirá los
parámetros del configuración en el modo de
aplicación
PRINT / Layout / Format
- (Single, Multi)
IMPRIMIR / Formato / Formato
-
(Single -
única, Multi
- múltiple)
Single –único : imprimirá todos los datos en una única
línea
Multi
–múltiple
: imprimirá todos los datos en múltiples
líneas
PRINT / Layout / Feed
- (Line, 4 Lines,
Form)
IMPRIMIR / Formato / Alimentación
–
(Línea, 4 líneas, Formulario)
Line –Línea : Alimenta / añade una línea adicional tras
cada impresión
4 Líneas
: Añade cuatro líneas adicionales tras cada
impresión
Form
–formulario : Añade una página tras cada
impresión (se desplaza hacia la parte superior de la
página siguiente tras cada impresión)

Interfaz RS232 ES-3
Para las balanzas STX :
En el momento de llevarse a cabo la instalación, la balanza STX mostrará el icono
RS232 ( ) en la parte superior derecha.
Menú añadido
Función
Communication - Comunicación
|--
RS232
|--Baud Rate – Velocidad de
Transmisión
|--Transmisión
|--Handshake – Comprobación del
protocolo de C
omunicación entre
dispositivos
|--
Configuración de la Impresión
Configurar la velocidad de transmisión (bits por
se
gundo).
Configurar los bits de datos, el bit
de stop, y la
paridad
.
Configurar el método de control del flujo de
datos
.
Para obtener más información sobre este
particular, consulte el manual de instrucciones
de la balanza
STX.

ES-4 Interfaz RS232
Para las balanzas PJX:
Menú de navegación
PRINT
Header
Date and Time
Balance ID
Balance Name
User Name
Project Name
Application Name
Result
Gross Weight
Net Weight
Tare Weight
Line Feed
RS232
Baud Rate
Transmission
Handshake
CONFIGURACIÓN DEL MENÚ
Configuración de la interfaz
RS232
--Velocidad en baudios
--Transmissión
--Handshake
Acceda a este menú para personalizar la configuración
estándar de RS232. Los datos pueden pasarse a una
impresora o un ordenador.
Configura la velocidad en baudios (bits por segundo).
1200 = 1200 bps
2400 = 2400 bps
4800 = 4800 bps
9600 = 9600 bps
19200 = 19200 bps
38400 = 38400 bps
Configura los bits de datos, bit de parada y paridad.
8-N-1 = 8 bits de datos, sin paridad, bit de parada 1
8-N-2 = 8 bits de datos, sin paridad, bit de parada 2
7-E-1 = 7 bits de datos, paridad par, bit de parada 1
7-E-2 = 7 bits de datos, paridad par, bit de parada 2
7-N-1 = 7 bits de datos, sin paridad, bit de parada 1
7-N-2 = 7 bits de datos, sin paridad, bit de parada 2
7-O-1 = 7 bits de datos, paridad impar, bit de parada 1
7-O-2 = 7 bits de datos, paridad impar, bit de parada 2
Configura el método de control de intercambio.
NONE = no hay intercambio
XON-XOFF = intercambio XON/XOFF
HARDWARE = intercambio de hardware
Configuración de impresión
Para obtener más información sobre este particular,
consulte el manual de instrucciones de la balanza PJX.

Interfaz RS232 ES-5
RS232 (DB9) Conexiones pin
El cable del kit del interfaz RS232 termina en un conector Sub-D hembra de 9 pins.
Pins activos : Pin 2 = TXD, Pin 3 = RXD, Pin 5 = Toma de tierra.
El conector del Interfaz puede conectarse directamente a un ordenador, a una
impresora OHAUS y/o a otras impresoras.
Diagrama
Tipo
Descripción
Nota: Los pines de señal
RTS, CTS y RT_CTL solo
están disponibles para PJX.
Tipo de interfaz
Interfaz de voltaje cumple con la norma
EIA RS-232C/DIN 66020 (CCITT
V24/V.28)
Longitud máxima del
cable
15 m
Relación señal/ruido
Salida:
+5 V ... +15 V (RL = 3 – 7kΩ)
-5 V ... -15 V (RL = 3 - 7 kΩ)
Entrada:
+3 V ... +25 V
-3 V ... -25 V
Conector
Sub-D, 9-polos, hembra
Modo de funcionamiento
Dúplex completo
modo de transmisión
Bit en serie, asíncrono
Código de transmisión
ASCII
Velocidad en baudios
Las balanzas STX, SPX, SKX y SJX:
1200, 2400, 4800, 9600,
19200, 38400, 57600, 115200
(firmware seleccionable)
Las balanzas PJX:
1200, 2400, 4800, 9600, 19200, 38400
(firmware seleccionable)
Bits/paridad
7-bit/par, 7-bit/impar, 7-bit/ninguno,
8-bit/ninguno (firmware seleccionable)
Bits de parada
Bit de parada 1, 2
Handshake
Ninguno, XON/XOFF, RTS/CTS
(seleccionable)
Fin de línea
No seleccionable

ES-6 Interfaz RS232
SALIDA RS232
Una vez instalado el interfaz, la balanza puede funcionar de diversos modos de
acuerdo con la configuración efectuada.
Formato de impresión puede cambiarse por un comando del usuario xfmt (véase el
cuadro de mando en la sección de entrada RS232).
Nuevo formato de impresión Scout (formato predeterminado):
Cadena de salida (no Pesaje de Aplicaciones):
[Peso] 11 caracteres (justificado a la derecha)
[Espacio] 1 carácter
[Unidad] 5 caracteres (justificado a la derecha)
[Espacio] 1 carácter
[Indicador de estabilidad] 1 carácter; "?" cuando inestable, espacio cuando
estables
[Espacio] 1 carácter
[N / T / G / PT] 2 caracteres (justificado a la derecha)
[plazo] 2 caracteres
Nota: Todos los campos tienen una longitud fija.
Ejemplo de salida:
*****192.21_****g_*_**
*******0.01_****g_?_**
*******95.0_****g_*_*N
******169.6_****g_*_*G
*******95.0_****g_*_*N
*******74.6_****g_*_*T
A.Print: apagado; Estable: off
lectura estable
lectura inestable
A.Print: apaga
do; Estable: el
Contenido / Resultado
-> en
Contenido / Bruto
-> en
Contenido / Net
-> en
Contenido / Tara -> en
String salida (verificación de la aplicación de pesaje):
[Peso] 11 caracteres (justificado a la derecha)
[Espacio] 1 carácter
[Unidad] 5 caracteres (justificado a la derecha)
[Espacio] 1 carácter
[Indicador de estabilidad] 1 carácter; "?" cuando inestable, espacio cuando
estables
[Espacio] 1 carácter
[N / T / G / PT] 2 caracteres (justificado a la derecha)
[Espacio] 1 carácter
[Estado de la aplicación] 6 caracteres (justificado a la derecha)
[plazo] 2 caracteres
Other manuals for RS232
5
Table of contents
Languages:
Other OHAUS Adapter manuals