OKE HD KARAOKE User manual

噢奇高清卡拉OK前置混音器
使用手冊
Professional Home KTV
User Menu
OKE HD KARAOKE
PRE AMP MIXER

Front Control Panel
Rear Control Panel
Installation Overview
Main Menu Intro.
System Settings
Remote Control
Song Selection
Echo Mixer Intro.
Microphone Settings
Specification
Note
BOX
OKE HD KARAOKE PRE AMP MIXER
Creartive Digital Home Entertainment
Full HD video songs, Sigma Designs HD chip, top U.S. high
definition technology. 1080p video resolution display is fine;
vivid; smooth and stable. Clarity of old video is improved a lot.
The latest Japan YAMAHA high-end digital 3D audio with Digi-
tal Sound Processing (DSP) effects provides 8 modes of ste-
reo 3D mixing effect to replace the old existing unidirectional
vocal mixing. Professional mic. tuning is unnecessary, just
plug and play. Convenient and affordable.
Audio output is automatically balanced, problem of different
soundtrack volume level from various production companies
is thus solved.
Independent built-in Wi-fi module requires no additional router.
Direct connection to iPhone;iPad and Android App enables
mobile VOD. Remote controller also allows song selection on
the TV screen. Three platforms of VOD system operate simul-
taneously. Picking favorite song is as easy as ABC.
The headphone audio output port is K fans favorite. Practice
singing skill with your headphone on; connecting to recording
device, and sharing with your family are more fun and con-
venient.
Eng
26
27
28
29
30
31
32
33
34
35
36
37
P.25

Eng
P.26
Front Control Panel
1. Power Light On / Off Button
Power light in Red indicating
the power is OFF. Power light in
Blue indicating the power is ON.
Press power light button once,
power light changes from Red
to Blue. System loading
screen is displayed, wait for the
Main Menu to be displayed on
the TV screen for selection.
2. Remote Control Signal Receiver
Aim the remote controller to-
wards this sensor spot.
3. Microphone Input Jack
Dynamic microphone input jacks
x 2.
4. Microphone Volume Knob
The factory default microphone
volume is indicated by a small
circular white dot on the front
panel.
5. Earphone Jack
Plug in a set of headphones into
3.5mm mini-jack socket to enjoy
your private listening or singing
fun.
6. USB Port
External mass storage devices
can be used via connecting them
to the USB port.
7. Hard Disk Slot
Make sure the power is Off when
you insert or detach a hard drive.
Turn the two screws anticlock-
wise to release the metal cover.
Insert your hard drive into the
slot with hard drive’s connector
end facing inwards.

Eng
P.27
Rear Control Panel
1. 12 v. Power Supply Jack
Power light in Red indicating
the power is OFF. Power light
in Blue indicating the power is
ON.
2. HDMI Digital A/V Output
Provide 1080p video signal.
Connect to flat-panel TV with
HDMI cable.
3. Composite Video Output
4. RCA Left / Right Audio Output
5. Optical Digital Audio Output
6. USB Port x 2
7. Component Video (YPbPr)
Output.
8. Coaxial Digital Audio Output
9. RJ45 Network Port
10. Wi-Fi Antenna port

Wi-Fi installation: (POWCHIP Pow-A5 USB Wi-Fi)
Power off the okebox before insert the WiFi USD adapter in the appropriate USB
port of okebox.
Power on okeboxIf WiFi USB already connected to okebox, WiFi will be automati-
cally active.
Press ipad /iPhone /android device’s wifi setting and select oke’s WiFi SSID before
press okemixer.app.
1.
2.
3.
Eng
P.28
Installation Overview
Amplifier
Front Panel
Back Panel
Microphone
Headphone
Router NAS
Power

Eng
Main Menu Introduction
Music Icon; Movie Icon and Photo Icon allow user
to plug in USB memory stick (FAT32) or other mass
storage devices through either one of the USB ports
for photos / music / video files playback.
Operating as follows:
Connect a USB device to OKE Box.
Press ←/→ to select Music icon/Movie icon/
Photo icon on the Menu, then press OK.
Press ↑/ ↓to select the USB device, then
press OK.
Press ↑/ ↓to select a file or folder. Press OK
to start the playback
OKE Song Selection System
Select icon to enter into karaoke mode. The
Song Selection System and microphone function
are now activated.
System Settings
P.29
1.
2.
3.
4.

Eng
P.30
Play
Select Songs
Audio and Video
Network
System WIFI Settings
Every time you turn, whether to retain the selected
songs not broadcast.
Allow iPad / iPhone / Android APP to control.
Title Description Settings
Selected songs Save not play selected song
/Clear all selected song after restart
Insert Off / On
Delete Off / On
Repeat O ff / On
Stop Off / On
USB Add Songs OK
Auto Play Off / On
: Max. / Large / Middle / Small / Min.
: White / Yellow / Blue / Green / Red
: Top / Bottom
: Normal / Continuously
: 3 sec / 5 sec / 10 sec / 30 sec
Subtitle Size
Subtitle Color
Subtitle Position
Video Mode
Slide Show Time
: AV / HDMI
: 480 / 480p / 720p /1080i / 1080p
: NTSC / PAL
: DTS Dolby Digital/ HDMI /DTS
Dolby Digital D+
: 3 sec / 5 sec / 10 sec / 30 sec
Video Output
Display Resolution
TV System
Audio Output
Slide Show Time
: LAN Information; IP Address; IP Mask; IP Router; Main DNS
: Wired / Wireless Client Mode; Wireless AP mode
: Static IP / DHCP
: 192.168.X.XXX
: 255.255.255.0
: 192.168.X.X
: 192.168.X.X
: 202.XX.XXX.XX
: OK
Network Information
Submit gateway
IP Access Method
IP Address
IP Mask
IP Router
Main dns
Second dns
Network Refresh
: 000D4C1A0EF9
: OPEN / WEP/ WPA / WPA2
: 1234567890
: 192.168.X.X
: OK
: Chinese / Traditional Chinese / English
: OK / Existing firmware ..version..date
: OK
: Close / 3Min / 5 Min / 10 Min
: System Default / Custom Setting
WIFI SSID
WIFI Security
WIFI Password
WIFI Subnet
Connect Wifi
Language
Firmware Update
Factory Setting
Screensaver
Desktop Theme
System Settings

Mark: 3A Battery x 2
Eng
Remote Control
Power On / Off
Karaoke: Delete
Volume +
Volume –
Mic. Effect + (echo+)
Mic. Effect – (echo–)
Back
OK
Karaoke : Page Up
Karaoke : Repeat
A/V Mode : Subtitle
Karaoke : Playlist Of The Selected
A/V Mode : Infomation
Karaoke;A/V Mode : Stop
A/V Mode : Fast Forward
Karaoke: My Favorite Song List
Karaoke;A/V Mode : Mute
Main Menu
Karaoke : Insert A Song For 1st Priority
A/V Mode : Select Audio track
Mic. + (Impedence)
Mic. – (Impedence)
Karaoke : Select Main Menu
(Press twice OSD vanish)
Karaoke : Page Down
Karaoke : The Vocal Sound Tracks
A/V Mode : Search
Karaoke;A/V Mode : Pause
A/V Mode : Fast Reverse
P.31

Eng
P.32
Song Selection
2. Apple / Android Apps – External Karaoke System
Independent Wi-Fi facilitates mobile connectivity with iPhones; iPads and Android
Pads. Apps supports multi-access and full mobility of VOD system without
limiting VOD to a specified location. If you wish to experience the potable fun, login
www.okemixer.com website for detail.
1. TV screen-Song Selection System (OSD Selection System)
Song Selection System is fully embedded and occupied a half display on TV screen.
Besides all the features of a commercial Karaoke system, it congregates new
functions to meet demanding customer needs. possesses the following com-
mercial karaoke elements: simple remote controller operation; simultaneous dis-
play of singer photo and name and fast-paced selection flow. Professional Karaoke
system is now simplified. Singing while picking songs on-screen;no computer moni-
tor required anymore;money saving and furnishings space saving make
the
only choice of a new generation home entertainment product.
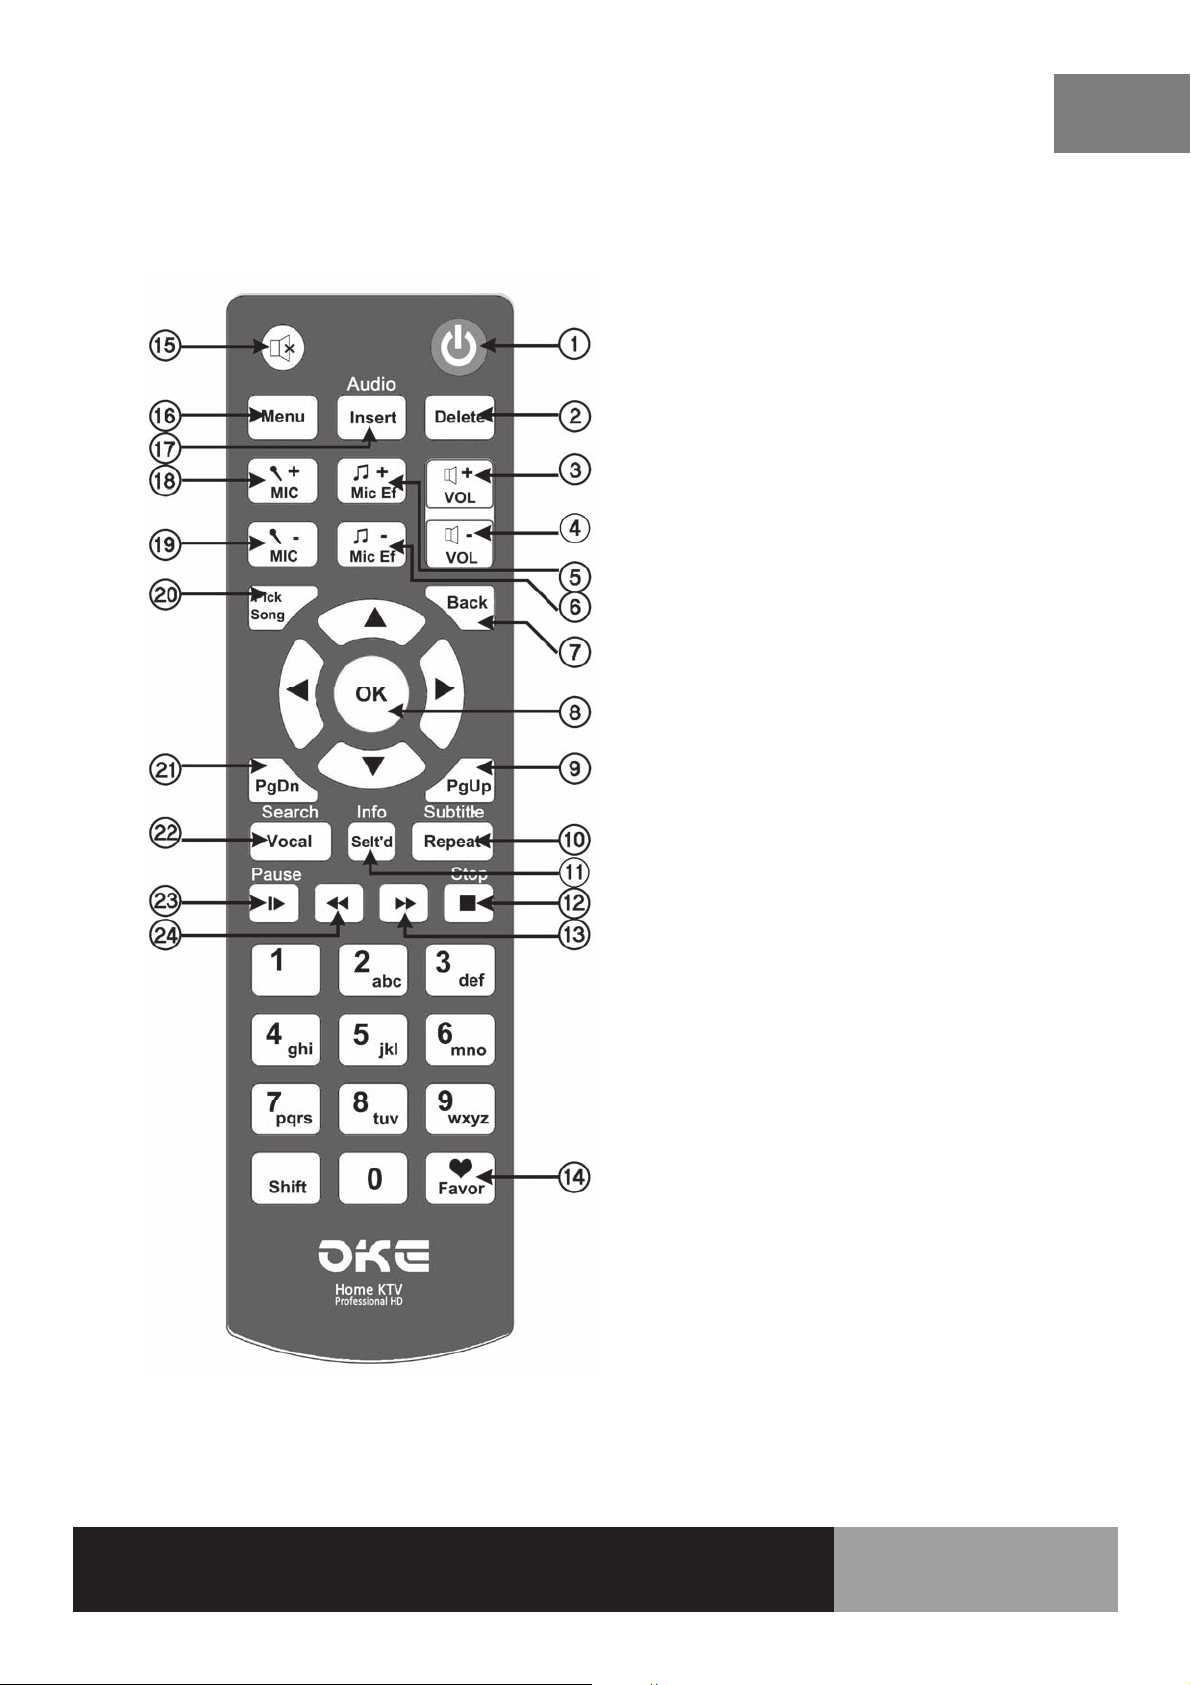
Select icon in the Main menu, then press OK to enter into the Karoake
system, press Pick on the remote controller. Song Selection main page will be dis-
played on the TV screen. Go ahead to pick your favorite.
OSD vanishes automati-
cally in 12 seconds. Press Pick key twice to quit OSD immediately.
The Song Selection system has a choice of My Favorite folder which con-
tains a list of your Favorite Songs and a list of your Favorite Singers.
My Favorite Song: Enter the number adjacent to the desired song, a translucent bar will
appear, press OK and a red heart icon will appear confirming that the song has been stored
into My Favorite song list.
My Favorite Singer: Enter into the singer page of your favorite, press 1 to function the
confirmation of storing into My Favorite singer list. You can retrieve and access your stor-
age by pressing the Favor button on the remote controller.

Eng
Microphone Sound Field (Reverb/ECHO) Mixer
Echo Mixer Introduction
Karaoke 3D Echo Mix Reference:
Latest High-End 3D Digital Audio DSP Mixer Processor from YAMAHA Japan
is applied. Main DSP (MDSP) + Sub DSP (SDSP) + FM synthesizer are inte-
grated to deal with both the microphone vocal and music channels simultane-
ously creating different sound field effects and achieving superb professional
reverb / echo effects.
MDSP:
Operating frequency 49.152MHz
Data bus width 32bits Floating point operations
Multiplier: 32bits Floating point x 16bits (Fix point) + 49 bits 49bits
Microphone signal level detector
To create the early reflections sound
3D Sound
3-band parametric equalizer(PEQ)
5-band graphic equalizer(GEQ)
Crossover filter
SDSP:
Sample Rate Converter(SRC)
10-Band Parametric Equalizer(PEQ)
De-emphasis Filter
ı ijı ĵı ķı Ĺı IJıı IJijı
ŔűŦŦŤũ
ŃŦŨŪůůŦų
ŔŶűŦųġņŤũŰ
ńŰůŤŦųŵ
ŔŵŢůťŢųť
őųŰįġŔŰŶůť
ńũŶųŤũ
ʼnŢŭŭ
ŋŢŻŻ
ŔŰŶůťġŇŪŦŭť
œŦŷŦųţ
ŅŦŭŢź
P.32

NAS network storage server connection
NAS network storage server to create a new shared folder named “oke”
Check the IP address of the NAS
Used network cable to connect okebox on the same group of router.
Choose “media” / “Music” / “Phone” icon from main menu and then press
“My network Share” , select NAS IP address.
1.
2.
3.
Eng
P.36
Microphone Settings
Microphone volume knobs are used to adjust the volume of the respective
microphone. Turning clockwise is to increase the volume while anti-clock-
wise is to decrease. The factory default microphone volume is indicated by
a small circular white dot on the front panel. It’s advised that microphone
volume knobs should always be set at the factory default position, in other
words, the indicator on the microphone volume knob should be set pointing
towards the circular white dot.
If wireless microphone is used, ensure the final vocal output from the re-
ceiver is no greater than the output of a wired microphone.
The impedance of most vocal microphones are rated at 75 to 300 ohms;
which falls in the range of OKE Box Mic.+ / Mic.- level 5 or 6.
Inappropriate setting may either cause annoying howling feedback or attenu-
ation of vocal bass. It is strongly recommended to use the factory default
level “5” or “6”. If the default level is difficult to match the impedance with
your microphone, it is advised that you should better change for another mi-
crophone of good quality.

Eng
Specification
Technical Specifications
Media Processor
Audio DSP Processor
Video Output Connection
Audio Output Connection
Lan
Storage
Extenal Storage
Headphone
Microphone
Video format support
Audio format support
Photo format support
Product Dimension
Weight
Accessories
Packaging
Warranty
U.S.A Sigma Designs HD (SoC) Media Processor
Japan Yamaha Digital 3D Audio DSP Effects Processor
HDMI v1.3a
YPbPr Video Out Jack
CVBS Video Out Jack
S/PDIF Optical Audio Out Jack
Coaxial Digital Audio Output
R / L RCA Audio Out Jack
RJ45 10M/100M x 1; embedded Wi-Fi, 802.11 g/n Standard
3.5” SATA HDD, Capacity to support 500GB - 4TB
USB 2.0 Drive (Front) x 1; USB 2.0 Drive (Back) x 2
3.5mm Stereo Headphone Audio Out Jack (Front) x 1
6.3mm Microphone Input Jack (Front) x 2
MPEG-1 ; MPEG-2 ; MPEG-4.2 ; H.264 ; AVI ; MPG ; VOB ;
MKV ; TS ; M2V ; VC-1 ; WMV9 ; AVS
DV; MPEG ; WMA ; AAC ; HE-AAC ; FLAC ; WAV ; MP3 ; PCM
JPEG ; M-JPEG ; BMP ; GIF ; PNG ; TIFF
350(W) x 260(D) x 70(H) mm
2.6 Kg. (without hard drive)
Remote controller with battery x 1 ; HDMI Cable x 1 ; RCA Cable
x 1 ; AC/DC 12V Adapter ; User Menu
460(W) x 410(D) x 130(H)mm
One Year
P.37

Eng
P.38
System Firmware Update:
Download the latest version of the system firmware program from
OKE website (www.okemixer.com) and save the file in a USB
memory stick (FAT32).
Turn off the OKE Box. Red power light indicates the Box is in off
position. Insert the USB into the relative port of the Box and then
switch it on.
A message “Upgrade in progress. Do not power off” will be displayed
on the TV screen.
Upon successful completion of the firmware update, the system will
automatically enter into the Menu page.
Never remove or replace the hard drive while the power light is Blue or
the hard drive and the OKE System will be damaged.
If the OKE Box cannot read the hard drive files, switch off the Box first
and check if the hard drive is properly inserted into the hard disk slot.
Never cover the ventilation holes or insert anything in the cabinet. To
ensure proper ventilation, never place any objects on the top of the
Box as overheating and auto shut-down may be resulted, especially
when room temperature is higher than 30°C (> 30°C).
To avoid damage to your hard drive and the OKE Box, place the Box
on a stable, level surface.
Sudden power interruption will cause damages to your hard drive and
the OKE Box. Do not use the Box when power supply is not stable.
To avoid damage to your loud speakers, turn down the volume of your
amplifier to the minimum level when inserting your wireless microphone
/ wired microphone. Adjust the volume slowly to the appropriate level.
To prevent internal electronic components from getting damp and the
risk of circuit-short in high humidity environment, switch on the OKE
Box for several minutes bi-weekly and habitually, heat from the moth-
erboard helps moisture evaporation.
Note
1.
2.
3.
4.
1.
2.
3.
4.
5.
6.
7.
Table of contents
Popular Karaoke System manuals by other brands

TJ Media
TJ Media TKR-304E manual

The Singing Machine
The Singing Machine SML625BTBK instruction manual

The Singing Machine
The Singing Machine iSM1028XI instruction manual

The Singing Machine
The Singing Machine STVG-700 owner's manual

VocoPro
VocoPro WANDERER user guide

Optimus
Optimus Stereo Dual-Cassette Karaoke Center owner's manual