okejeye OK900 User manual

Content
Foreword.................................................................................................................. 2
Safety Guide............................................................................................................ 3
Packing List.............................................................................................................. 4
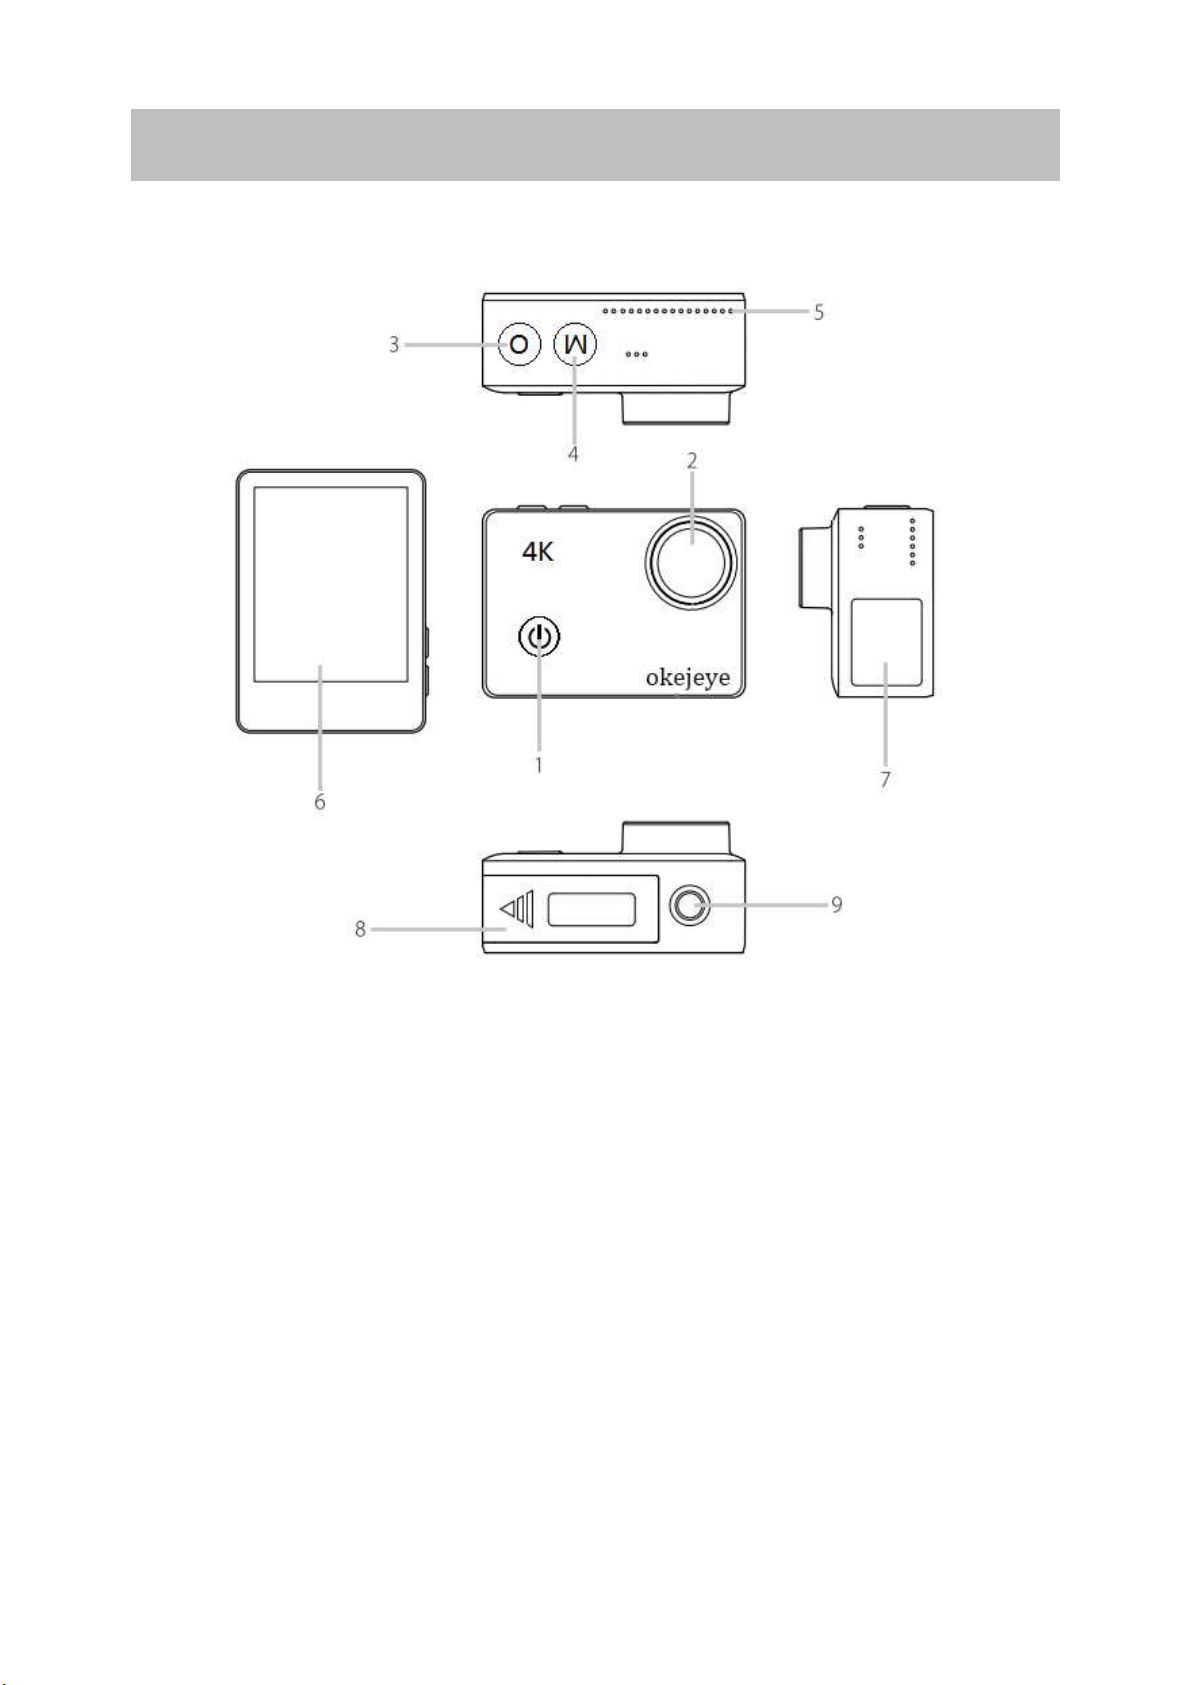
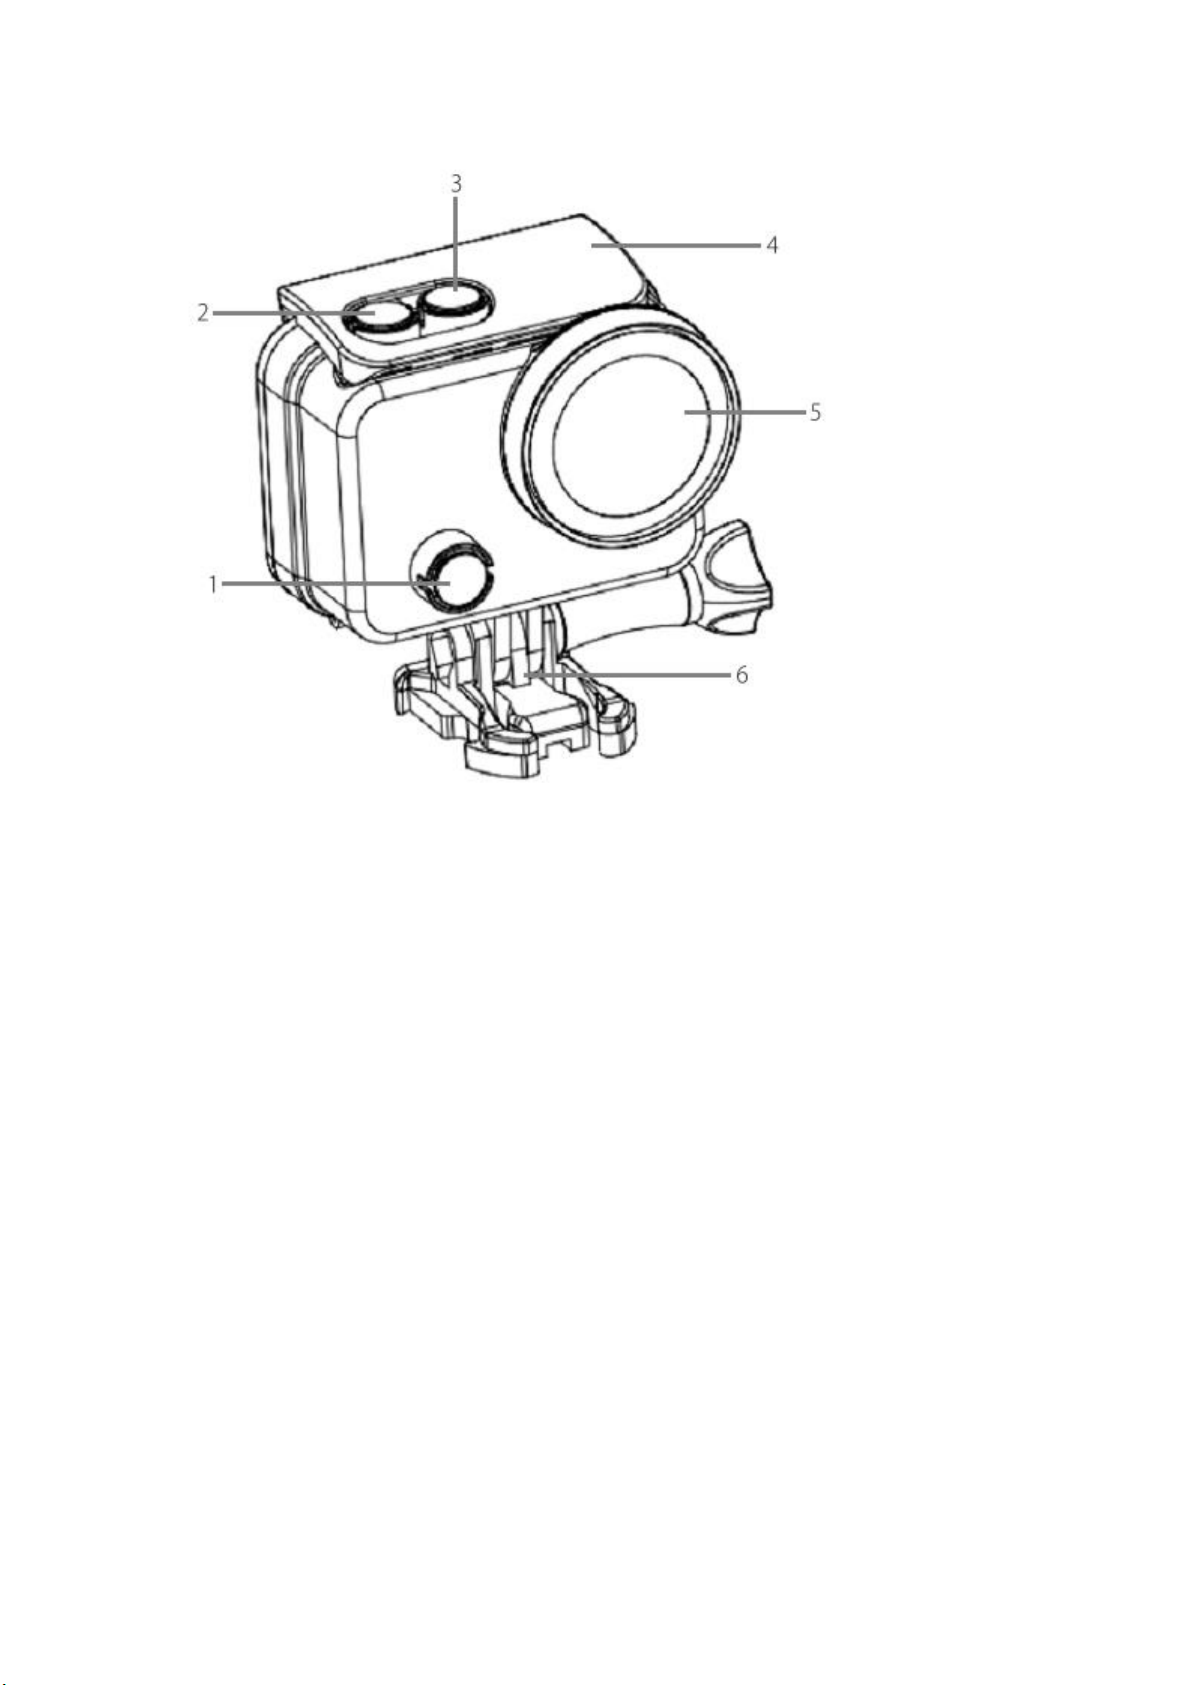
Camera Structure................................................................................................... 5
Specifications .......................................................................................................... 7
Operation Instructions.......................................................................................... 8
Video Settings................................................................................................. 11
Photo Settings ................................................................................................14
System Settings ..............................................................................................15
Remote Control Pairing .......................................................................................13
Remote control structure ........................................... 错误!未定义书签。
How to pair the camera with remote control watch错误!未定义书签。
Computer Connecting........................................................................................20
Wi-Fi Connecting................................................................................................ 171
Battery Charging..................................................................................................24
Files Transferring...................................................................................................25
FQA .........................................................................................................................25
Warranty.................................................................................................................28

2
Thank you for your purchase of okejeye action camera and
welcome to okejeye world of photography. The okejeye
series action camera adopted 7-layer optical lens to record
4K P30 Ultra HD videos, shoot maximum 24MP high quality
pictures and equipped with new designed 2.0 inch full HD
touch screen.
okejeye consistently attaches great importance to product
quality and high customer satisfaction. We sincerely hope
you can make a few suggestions during your use to help us
improve our products. Your precious suggestions will help us
shape our products to perfectly fit your standards. Please
note that all items purchased from okejeye are covered by 1
year warranty from the date of purchase.
If you encounter any problem during your use, please
contact us at [email protected]
There will be seller support reaching to you as soon as we
can.
Best regards,
okejeye Support Team
Foreword

3
Safety Guide
Please read the instruction manual carefully before using the
camera for the first time.
1. It’s a high-precision product, do not drop or crash it.
2. Never make the products exposed to high temperatures
and direct sunlight.
3. Use original batteries of okejeye to make sure the camera
work/charge properly.
4. Please do not throw the device and the battery into the
garbage directly, choose the specific place for its
recycling.
5. Please choose brand micro SD card suggested in this
manual, to make sure the camera work properly.
6. In case of overheating, smoke or foul smell in the process
of charging, unplug your device immediately to prevent
fire hazard.
7. While charging, keep the product away from children in
case of accidental suffocation or electric shock happen.
8. Keep the device in a cool, dry and dust-free place.

4
Camera Structure
1. Power Button/Video,Photo Switch Button
2. Lens
3. OK Button
4. Mode Button
5. Heat Emission Hole
6. Touch Screen
7. USB Port/Micro SD Card Slot
8. Battery Compartment
9. Suitable with selfie stick or tripod

5
1. Power Button/Switch Button
2. OK Button
3. Mode Button
4. Waterproof Case Switch
5. Lens
6. Waterproof Case Holder

6
Specifications
Model
OK900
CPU
Novatek9668x
Image Sensor
Sony 16MP Sensor
Angle
Adjustable Wide Angle 170°
Diaphragm
F/2.8, 7 glasses
Waterproof Grade
IP68, 40M/131ft
Video Resolution
4K P50/ P30, 2.7K P60/P30
1080P/60 1080P/30
720P/240 720P/120 720P/60
Photo Resolution
16M,20M,24M,40M,60M
Micro SD Card
U3(Warning: low speed card may cause
unstable working)
Format micro SD card for the first use
Micro SD card U3(Not Included 32GB SD
card), Max Support 128G
Wi-Fi + Remote
Control
Yes
LCD Screen Size
2 inch Full HD touch screen 960*240
Battery Capacity
Removable 1350mAh/3.7V Li-ion battery
Battery Working Time
Around 1 hour( In 25℃environment)
Charging Time
Around 3 hours (Use 5V 1A power supply and
in mode of power off)
Compressed Format
MP4/H.264/H.265
Video/Photo Format
*.MP4 / *.JPG
Power Supply
5V/1A
Size
60*42*29MM
Weight
70g

7
Operation Instructions
⚫
Interface Selection:
Interface display:
➢Touch “setting icon” in the lower right corner of the
interface display to enter video setting menu:

8
In the current interface, touch the “camera icon” to enter
photo setting menu and touch the “setting icon” to enter
general setting.
➢Touch the “M icon” in the lower left corner of the initial
interface display to enter six-square grid function.
Movie: Touch to enter ordinary video mode.

9
Slow Motion: Touch to enter slow motion mode, in this
mode special effect video can be shot. That is, playback will
be slow down. Slow motion video can only be recorded at
the resolution of 720P 240fps.
Photo: Touch to enter ordinary photo mode.
Photo Burst: Touch to enter Photo Burst mode. In this mode,
several photos can be taken within one second and the
number of photos can be adjusted by touching the “Burst”
option after touching the lower right corner setting mark
icon in this mode.
Time-lapse: Touch to enter time-lapse mode. In this mode, a
photo is automatically taken at intervals. Interval time can be
adjusted by touching the “Time-lapse photo” option after
touching the icon in the lower right corner of the mode.
Timing Mode: Touch to enter timing mode. In this mode, it
will count down a few seconds and then take a photo. It’s an

10
automatic shooting mode.
Underwater: This mode attempts to adjust the camera's
white balance to compensate for the loss of color
underwater without the need for an artificial light source. For
the most part, it works best in shallow depths where plenty
of sunlight still exists in the water column.
Playback: Touch to enter Playback mode to check the videos
or photos.
⚫Video Settings:
Resolution: 4K 50fps, 4K 30fps, 2.7K 60/30fps, 1080P 60fps,
1080P 30fps, 720P 240fps/120fps, 720P 60fps,.
Loop recording: off, 30 seconds, 1 minutes, 3 minutes.
If loop recording mode is selected, the video will be cut into
setting-minute segments. The earliest files will be covered

11
when the Micro SD card is full. (This mode is suggested to
use in vehicle monitoring)
Time-lapse Record: off, 0.5 second, 1 second, 3 seconds, 5
seconds, 10 seconds, 30 seconds, 1 minute.
Note: this function will make video a fast forward effect
video.
Auto recording: Off/On.
Note: The camera will turn on and record automatically
without pressing button.When you stop recording, you need
to press the record button. When the power is suddenly cut
off or the stop recording button is not pressed, the file will
be damaged. You need to use the keyboard to enter the
playback mode. When you play back the damaged file, the
file will be repaired automatically.
Sound: Off/On.
WDR: Off/On.
Note: When this function is turned on, the image will not

12
become dark even toward the sun. The image would not
looks so clear if this function is ON sometimes. As a FPV cam,
this function should be turned ON.
Angle: Large/Medium/Small.
Field of view of the video. Crop the edges of the video to
avoid capturing the propellers.
Motion Detection: Off/On.
Moving objects in front of the lens will be automatically
detected and recorded, mostly used in car driving recorders.
Auto snapshots: off, 5 seconds, 10 seconds, 15 seconds.
Date Stamp: Off/On.
Set the day time on the image.
⚫Photo Settings:

13
Image size: 90M 60M 40M 24M, 20M, 16M
Self Timer: Off, 3 seconds, 10 seconds, 30 seconds.
Photo Burst: Burst 3, Burst 10.
Auto Photo: Off, 3 seconds, 5 seconds, 10 seconds.
Photo Quality: Fine, Normal, Economy.
Stamp: Off, Date, Date/Time
⚫
System Settings:
Wi-Fi: Off/On.
Note: Turn off Wi-Fi can make work time of camera last
longer and it is recommended to turn off.
Date/Time:
◆Date: Touch the ‘+’ and ‘-’ keys to adjust the year, month

14
and day.
◆Time: Touch the ‘+’ and ‘-’ keys to adjust the hour, minute
and second.
◆Touch the ‘+’ and ‘-’ keys to adjust the date/time
representation method.
Auto Power Off: Off, 1 minute, 2 minutes, 3 minutes, 5
minutes, 10 minutes.
The camera will turn off when there’s no operation.
Beep Sound: Off/On.
The beep sound when turn on and off the device.
Language: English, French, Spanish, Portuguese, Dutch,
Italian, Simplified Chinese, Traditional Chinese, Russian,
Japanese, Korean.
Light Frequency: 50Hz,60Hz.
Light frequency indoor. When the video flickers indoor,
change this setting.

15
White Balance: Auto, Daylight, Cloudy, Tungsten, Fluorescent,
Underwater.
ISO: Auto, 100, 200, 400, 800, 1600, 3200
The term was carried over from film, when the ISO rating
was known as the “film speed” and “ASA.” Having a standard
of sensitivity is important, as it allows you to shoot the same
ISO on different cameras and trust that the exposure value
will be equal. Lower ISO, darker image, less noise.
Color: Color, Black&White, Sepia.
Sharpness: Strong, Normal, Soft.
Exposure: +2.0, +5/3, +4/3, +1.0, +2/3, +1/3, 0.0, -1/3, -2/3,
-1.0, -4/3, -5/3, -2.0.
Note: Higher value for brighter image. If you want brighter
image, set this value higher. If the image is over exposure,
set the value smaller.

16
Screen Saver: Off, 30 seconds, 1minute, 5minutes.
Car DVR:On/Off.
Image Rotation: On/Off.
Image will rotate 180 degrees(Only available in some
resolutions).
Anti-Shaking:On/Off.
Format: All data will be deleted: Yes/No.
Select “Yes” to format all the data of the Micro SD card.
Note: Make a backup before formatting. If you want to
change micro SD card , please format it before the first use.
Default Setting: Return menu setting to defaults: Yes/No.
This operation will reset the settings to default settings.
Note: if the camera has any problems, you could use this
function.

17
Version: Display the version number and help updating the
software.
Computer Connecting
There are two options when you connect your camera to
computer with the included TYPE-C 2.0 USB Cable: Mass
Storage and PC Camera
Mass Storage: Access to the files stored in the camera’s
micro SD card to copy or view them on a computer. This
function can also be achieved by a micro SD card reader
PC Camera: Use as a web cam for video chats and video
recording on your computer. You may need to allow Adobe
Flash Player to run in your video chat software before videos
will be displayed
Wi-Fi Connecting
You can operate the camera and watch the video files in
your phone or tablet when the Wi-Fi is connected.

18
1. Download the app, please search:
Apple Store: OKJ (for iOS)
Google Play: YKJ (for Android)
2. Connecting to the Wi-Fi(Turn on Wi-Fi via 3 ways)
1)open Wi-Fi in setting.
2)Long press the M button on the top of camera

19
3)Swipe down the top of screen to show a drop-down
menu
3. Check the Wi-Fi okejeye-xxxx in your phone (If there is not,
please refresh your Wi-Fi interface to find it). Then enter the
default password: 12345678.
Table of contents