Oleo-Mac WP 30 Manual

WP 30 (30.5 cm3) Euro 1*
WP 300 (30.5 cm3) Euro 2
IMANUALE DI USO E MANUTENZIONE
GB OPERATOR’S INSTRUCTION BOOK
FMANUEL D’UTILISATION ET D’ENTRETIEN
DBEDIENUNGSANLEITUNG
EMANUAL DE INSTRUCCIONES
SK
NÁVOD NA POUŽITIE A ÚDRŽBU
*
I-Modello non disponibile per i mercati UE
GB - Model not available for EU markets
F-Modèle non disponible pour les pays UE
D-Modell nicht für EU-Markt verfügbar
E-Modelo no disponible para los mercados UE
SK - Model nie je k dispozícii pre trhy EÚ
Mod. 55020041A - Nov/2011 - CENTROFFSET - Printed in Italy

2
ATTENZIONE!!! ACHTUNG!!!
RISCHIO DI DANNO UDITIVO
NELLE NORMALI CONDIZIONI DI UTILIZZO,
QUESTA MACCHINA PUÒ COMPORTARE
PER L’OPERATORE ADDETTO, UN LIVELLO DI
ESPOSIZIONE PERSONALE E GIORNALIERO
A RUMORE PARI O SUPERIORE A
85 dB(A)
HÖRSCHADEN - RISIKO
UNTER NORMALEN ANWENDUNGSBEDIGUNGEN
KANN DIESES GERÄT DIE BEDIENUNGSPERSON
EINEM TÄGLICHEN GERÄUSCHPEGEL VON
85 dB(A)
ODER MEHR AUSSETZEN
WARNING!!! ATENCION!!!
RISK OF DAMAGING HEARING
IN NORMAL CONDITIONS OF USE,
THIS MACHINE MAY INVOLVE A DAILY LEVEL
OF PERSONAL EXPOSURE TO NOISE
FOR THE OPERATOR EQUAL TO
OR GREATER THAN
85 dB(A)
RIESGO DE DAÑO AUDITIVO
EN NORMALES CONDICIONES DE UTILIZACIÓN,
ESTA MAQUINA PUEDE TOLERAR,
PARA EL OPERADOR ENCARGADO,
UN NIVEL DE EXPOSICÍON DIARIO
A RUIDO EQUIVALENTE O SUPERIOR A
85 dB(A)
ATTENTION!!!
POZOR!!!
DANGER D’ATTEINTE A L’OUIE
L’OPERATEUR UTILISANT NORMALEMENT
CETTE MACHINE PEUTS S’EXPOSER
QUOTIDIENNEMENT A UN BRUIT
EGAL OU DEPASSANT
85 dB(A)
RIZIKO POŠKODENIA SLUCHU
ZA BEŽNÝCH PRACOVNÝCH PODMIENOK
MÔŽE TENTO STROJ PREDSTAVOVAŤ
PRE PRACOVNÍKA VYSTAVENIE DENNEJ HLADINE
A OSOBNEJ HLADINE
HLUKU ROVNAJÚCEJ SA ALEBO VYŠŠEJ AKO
85 dB(A)
IINTRODUZIONE
ISTRUZIONI ORIGINALI
Per un corretto impiego della motopompa e per evitare incidenti, non iniziare il lavoro
senza aver letto questo manuale con la massima attenzione. Su questo manuale sono
indicate le spiegazioni di funzionamento dei vari componenti e le istruzioni per i necessari
controlli e per la manutenzione.
N.B. Le descrizioni e le illustrazioni contenute nel presente manuale si intendono non
rigorosamente impegnative. La Ditta si riserva il diritto di apportare eventuali
modifiche senza impegnarsi ad aggiornare di volta in volta questo manuale.
GB INTRODUCTION
TRANSLATION OF ORIGINAL INSTRUCTIONS
To correctly use the pump and prevent accidents, do not start work without having first
carefully read this manual. You will find explanations concerning the operation of the
various parts plus instructions for necessary checks and relative maintenance.
Note: Illustrations and specifications in this manual may vary according to Country
requirements and are subject to change without notice by the manufacturer.
FINTRODUCTION
TRADUCTION DES INSTRUCTIONS ORIGINALES
Pour un emploi correct de la motopompe et pour éviter les accidents, ne commencez pas le
travail sans avoir d’abord lu attentivement le manuel. Vous trouverez les descriptions du
fonctionnement des divers composants et les instructions pour les contrôles nécessaires et
pour l’entretien.
N.B. Les descriptions et les illustrations contenues dans ce manuel n’engagent pas
rigoureusement le constructeur. La société se réserve le droit d’apporter d’éventuelles
modifications sans devoir mettre à jour à chaque fois le manuel.
DEINLEITUNG
ÜBERSETZUNG DER ORIGINALANLEITUNGEN
Lesen Sie diese Broschüre vor Arbeitsbeginn aufmerksam durch, um mit die Motorpumpe
richtig umgehen zu können und Unfälle zu vermeiden. In dieser Bedienungsanleitung
finden Sie die Erklärung der Funktionsweise der verschiedenen Bauteile und Hinweise zu
den anfallenden Kontroll- und Wartungsarbeiten.
Anm.: Die in dieser Broschüre enthaltenen Beschreibungen und Abbildungen sind
unverbindlich. Der Hersteller behält sich das Recht vor, eventuelle Veränderungen
vorzunehmen, ohne jeweils vorher eine Anpassung der vorliegenden
Bedienungsanleitung vorzunehmen.
EINTRODUCCION
TRADUCCIÓN DE LAS INSTRUCCIONES ORIGINALES
Para una correcta utilización de la motobomba y para evitar accidentes, no empiece a
trabajar sin haber leído atentamente este manual. Ud. encontrará las explicaciones de
funcionamiento de los diferentes componentes y las instruccciones para el control y
mantenimiento de la motobomba.
P.D. Las descripciones contenidas en el presente manual no se consideran
rigurosamente obligatorias. La empresa se reserva el derecho de aportar eventuales
modificaciones sin obligarse a poner al día este manual.
SK ÚVOD
PREKLAD PÔVODNÉHO NÁVODU NA POUŽITIE
Aby ste správne používali motorové čerpadlo a predišli nehodám, nezačínajte prácu bez
toho, že by ste si veľmi pozorne prečítali návod na používanie. V tomto návode nájdete
vysvetlenia činnosti rôznych častí, ako aj pokyny pre nevyhnutné kontroly a údržbu.
Pozn. Popisy a ilustrácie uvedené v tomto návode nie sú prísne záväzné. Výrobca si
vyhradzuje právo na vykonávanie zmien bez predchádzajúceho upozornenia.

3
IINDICE DINHALT
INTRODUZIONE ___________________ 2
SPIEGAZIONE SIMBOLI E
AVVERTENZE DI SICUREZZA__________ 4
COMPONENTI DELLA MOTOPOMPA ___ 5
NORME DI SICUREZZA ______________ 6
PRIMA DELL'USO___________________ 12
AVVIAMENTO _____________________ 14
UTILIZZO_________________________ 22
ARRESTO MOTORE _________________ 24
MANUTENZIONE___________________ 24
RIMESSAGGIO_____________________ 30
DATI TECNICI ______________________ 34
DICHIARAZIONE DI CONFORMITÀ _____ 36
TABELLA DI MANUTENZIONE_________ 38
RISOLUZIONE DEI PROBLEMI _________ 41
CERTIFICATO DI GARANZIA __________ 44
ENLEITUNG _______________________ 2
ERLAUTERUNG DER SYMBOLE UND
SICHERHEITSHINWEISE______________ 4
BAUTEILE DEN MOTORPUMPE________ 5
SICHERHEITSVORKERUNGEN _________ 8
VOR DER BENUTZUNG ______________ 13
ANLASSEN________________________ 15
GEBRAUCH _______________________ 23
MOTOR ABSTELLEN ________________ 25
INSTANDHAL______________________ 25
LÄNGERUNG______________________ 31
TECHNISCHE ANGABEN _____________ 34
KONFORMITATS-ERKLARUNG ________ 36
WARTUNGSTABELLE________________ 39
STÖRUNGSBEHEBUNG ______________ 42
GARANTIE-ZERTIFICAT ______________ 45
GB CONTENTS EINDICE
INTRODUCTION ___________________ 2
EXPLANATION OF SYMBOLS AND
SAFETY WARNINGS_________________ 4
PUMP SET COMPONENTS____________ 5
SAFETY PRECAUTION _______________ 6
BEFORE USE ______________________ 12
STARTING ________________________ 14
USE _____________________________ 22
STOPPING THE ENGINE______________ 24
MAINTENANCE ____________________ 24
STORAGE_________________________ 30
TECHNICAL DATA __________________ 34
DECLARATION OF CONFORMITY ______ 36
MAINTENANCE CHART______________ 38
USING TROUBLE SHOOTING CHART ___ 41
WARRENTY CERTIFICATE ____________ 44
INTRODUCCION ___________________ 2
EXPLICACION SIMBOLOS Y
ADVERTENCIÂS DE SEGURIDAD ______ 4
COMPONENTES DE LA MOTOBOMBA __ 5
NORMAS DE SEGURIDAD____________ 8
ANTES DEL USO ___________________ 13
PUESTA EN MARCHA _______________ 15
UTILIZACION______________________ 23
PARADA DEL MOTOR _______________ 25
MANTENIMIENTO __________________ 25
ALMACENAJE _____________________ 31
DATOS TECNICOS __________________ 34
DECLARACION DE CONFORMIDAD ____ 36
TABLA DE MANTENIMIENTO _________ 40
RESOLUCIÓN DE PROBLEMAS ________ 43
CERTIFICADO DE GARANTIA _________ 45
FINDEX SK OBSAH
INTRODUCTION ___________________ 2
EXPLICATION DES SYMBOLES ET
REGLES DE SECURITE_______________ 4
COMPOSANTS DE LA MOTOPOMPE ___ 5
NORMES DE SECURITE ______________ 7
AVANT L'USAGE____________________ 12
MISE IN ROUTE ____________________ 14
UTILISATION ______________________ 22
ARRET DU MOTEUR ________________ 24
ENTRETIEN _______________________ 24
REMISSAGE _______________________ 30
DONNEES TECHNIQUES _____________ 34
DECLARATION DE CONFORMITÉ ______ 36
TABLEAU D'ENTRETIEN______________ 39
RÉSOLUTION DES PROBLÈMES________ 42
CERTIFICAT DE GARANTIE ___________ 44
ÚVOD ___________________________ 2
POPIS SYMBOLOV A
BEZPEČNOSTNÝCH UPOZORNENÍ _____ 4
ČASTI MOTOROVÉHO ČERPADLA _____ 5
BEZPEČNOSTNÉ PREDPISY __________ 9
PRED POUŽITÍM ___________________ 13
ŠTARTOVANIE _____________________ 15
POUŽITIE_________________________ 23
ZASTAVENIE MOTORA ______________ 25
ÚDRŽBA _________________________ 25
SKLADOVANIE_____________________ 31
TECHNICKÉ ÚDAJE _________________ 34
ES VYHLÁSENIE O ZHODE ___________ 36
TABUĽKA ÚDRŽBY _________________ 40
RIEŠENIE PROBLÉMOV ______________ 43
ZÁRUKA _________________________ 45

4
no qp
r
s
u
(WP 300)
t
s
ISPIEGAZIONE SIMBOLI E AVVERTENZE DI SICUREZZA DERLÄUTERUNG DER SYMBOLE-UND SICHERHEITSHINWEISE
GB EXPLANATION OF SYMBOLS AND SAFETY WARNINGS EEXPLICACION SIMBOLOS Y ADVERTENCIAS DE SEGURIDAD
FEXPLICATION DES SYMBOLES ET REGLES DE SECURITE SK VYSVETLIVKY A BEZPEČNOSTNÉ UPOZORNENIA
ILeggere il manuale di uso e manutenzione prima di utilizzare1 - questa macchina.
Indossare casco, occhiali e cuffie di protezione.2 -
Tipo di macchina:3 - MOTOPOMPA.
Livello di potenza acustica garantita4 -
Numero di serie5 -
Marchio CE di conformità.6 -
Anno di fabbricazione7 -
ATTENZIONE!8 - Le superfici possono essere calde.
GB Read operator’s instruction book before operating this machine.1 -
Wear head, eye and ear protection.2 -
Type of machine:3 - WATER PUMP.
Guaranteed sound power level4 -
Serial number5 -
CE conformity marking.6 -
Year of manufacture7 -
8 - WARNING! The surface can be hot!.
FLire le manuel avant d’utiliser cette machine.1 -
Porter casque, visière et protège-oreilles.2 -
Type de machine :3 - MOTOPOMPE.
Niveau de puissance acoustique garanti.4 -
Numéro de série5 -
Label CE de conformité.6 -
Année de construction7 -
ATTENTION:8 - Les surfaces risquent d'être très chaudes.
DBetriebsanleitung vor der Inbetriebnahme lesen.1 -
Immer Helm, Schutzbrille und Geräuschschutz tragen.2 -
Gerät:3 - MOTORPUMPEN.
Garantierter akustischer Schalleistungspegel.4 -
Seriennummer5 -
CE-Zeichen.6 -
Baujahr7 -
8 - ACHTUNG! Heiße Oberflächen.
EAntes de utilizar esta máquina, leer el manual de instrucciones.1 -
Llevar casco, gafas y auriculares de protección.2 -
Tipo de máquina:3 - MOTOBOMBA.
Nivel de potencia acústica garantizado.4 -
Número de serie5 -
Marcha CE de conformidad.6 -
Año de fabricación7 -
¡ATENCIÓN!8 - Las superficies pueden estar calientes.
SK Pred prácou s týmto prístrojom si prečítajte návod na použitie a1 - údržbu.
Používajte ochrannú prilbu, okuliare a slúchadlá2 -
Druh stroja:3 - MOTOROVÉ ČERPADLO
Zaručená hladina akustického výkonu4 -
Číslo série5 -
Značka zhody CE6 -
Rok výroby7 -
POZOR! -8 - Povrch môže byť horúci!

5
ICOMPONENTI DELLA MOTOPOMPA
Interruttore di massa1 -
Protezione marmitta2 -
Filtro aria3 -
Leva comando starter4 -
Leva acceleratore5 -
Serbatoio carburante6 -
Tappo serbatoio7 - carburante
Bulbo primer8 -
Impugnatura9 - avviamento
Tappo di carico10 -
Tappo di scarico11 -
Raccordo aspirazione12 -
Raccordo di mandata13 -
Maniglia di trasporto14 -
GB PUMP SET COMPONENTS
On/Off switch1 -
Muffler guard2 -
Air filter3 -
Choke lever4 -
Throttle lever5 -
Fuel tank6 -
Fuel tank cap7 -
Primer bulb8 -
Starter handle9 -
Pump load plug10 -
Pump drain plug11 -
Intake union12 -
Delivery union13 -
Carrying handle14 -
FCOMPOSANTS DE LA MOTOPOMPE
Interrupteur d’arrêt du1 - moteur
Protection du pot2 - d’échappemen
Filtre à air3 -
Levier starter4 -
Levier du5 - l’accélérateur
Réservoir de carburant6 -
Bouchon du réservoir7 - de carburant
Pompe primer8 -
Poignée démarrage9 -
Bouchon de charge10 -
pompe
Bouchon de vidange11 -
pompe
Raccord d’aspiration12 -
Raccord de13 -
refoulement
Poignée de transport14 -
DBAUTEILE DEN MOTORPUMPE
Eim-/Aus- Schalter1 -
Hitzeschutzgitter2 -
Luftfilter3 -
Chokehebel4 -
Gashebel5 -
Kraftstofftank6 -
Kraftstofftankdechel7 -
Starterpumpe8 -
Startergriff9 -
Einfüllstopfen Pumpe10 -
Ablassstopfen Pumpe11 -
Ansauganschluss12 -
Auslassanschluss13 -
Tragegriff14 -
ECOMPONENTES DE LA MOTOBOMBA
Interruptor de parada1 - del motor
Protección del2 - silenciador
Filtro de aire3 -
Palanca cebador4 -
Palanca del acelerador5 -
Depósito combustible6 -
Tapón depósito7 - combustible
Burbuja primer8 -
Empuñadura9 -
Tapón de carga de la10 - bomba
Tapón de descarga de11 - la bomba
Empalme de12 - aspiración
Empalme de caudal13 -
Asa de transporte14 -
SK ČASTI MOTOROVÉHO ČERPADLA
Spínač zapaľovania1 -
Kryt tlmiča výfuku2 -
Vzduchový filter3 -
Páčka štartéra4 -
Páčka plynu5 -
Palivová nádrž6 -
Uzáver palivovej7 - nádrže
Vstrekovač8 - paliva
Rukoväť štartovacieho9 - lanka
Uzáver plniaceho10 - hrdla
Uzáver vypustenia11 -
Spojka nasávania12 -
Spojka výstupu13 -
Rukoväť na prenos14 -

6
1234
Italiano English
NORME DI SICUREZZA SAFETY PRECAUTIONS
ATTENZIONE - La macchina, se ben usata, è uno
strumento di lavoro rapido comodo ed efficace; se usata
in modo non corretto o senza le dovute precauzioni
potrebbe diventare un attrezzo pericoloso. Perchè il
vostro lavoro sia sempre piacevole e sicuro, rispettare
scrupolosamente le norme di sicurezza riportate qui di
seguito e nel corso del manuale.
ATTENZIONE: Il sistema di accensione della vostra unità,
produce un campo elettromagnetico di intensità molto
bassa. Questo campo può interferire con alcuni
pacemaker. Per ridurre il rischio di lesioni gravi o
mortali, le persone con pacemaker dovrebbero
consultare il proprio medico e il costruttore del
pacemaker prima di utilizzare questa macchina.
ATTENZIONE! – Regolamenti nazionali possono limitare
l’uso della macchina.
Non utilizzare la macchina prima di essere istruiti in modo1 - specifico sull’uso. L’operatore alla prima esperienza deve
esercitarsi prima dell’utilizzo sul campo.
La macchina deve essere usata solo da persone adulte, in2 - buone condizioni fisiche e a conoscenza delle norme d’uso.
Non usare la macchina in condizioni di affaticamento fisico3 - o sotto l’effetto di alcool o droghe (Fig.1).
Indossare i DPI con particolare riferimento a guanti, occhiali4 - protettivi e cuffia (vedi pag. 10-11).
Non permettere ad altre persone o animali di restare entro5 - il raggio d’azione della macchina durante l’avviamento e
l’uso (Fig.2).
Posizionare la macchina in posizione stabile (Fig.3).6 -
Non fare manutenzione quando il motore è in moto.7 -
Controllare giornalmente la macchina per assicurarsi che8 - ogni dispositivo, di sicurezza e non, sia funzionante.
Non lavorare con una macchina danneggiata, mal riparata,9 - mal montata o modificata arbitrariamente. Non togliere o
danneggiare o rendere inefficace alcun dispositivo di
sicurezza.
Usare la macchina solo in luoghi ben ventilati. Non utilizzare10 -
in atmosfera esplosiva, in ambienti chiusi o in prossimità di
sostanze infiammabili (Fig. 4).
È proibito applicare alla presa di forza della macchina una11 - girante che non sia quella fornita dal costruttore.
In caso di necessità della messa fuori servizio della12 - macchina, non abbandonarla nell’ambiente, ma
consegnarla o al Rivenditore o a un centro raccolta rifiuti.
Consegnate o prestate la macchina soltanto a persone13 - esperte e a conoscenza del funzionamento e del corretto
utilizzo della stessa. Consegnate anche il manuale con le
istruzioni d’uso, da leggere prima di iniziare il lavoro.
Conservare con cura il seguente Manuale e consultarlo14 - prima di ogni utilizzo della macchina.
Mantenere tutte le etichette con i segnali di pericolo e di15 - sicurezza in perfette condizioni. In caso di danneggiamenti
o deterioramenti occorre sostituirle tempestivamente
(Vedi pag. 4).
Si raccomanda di16 - non avviare mai la macchina senza la
girante. Ciò può causare danni importanti alle parti del
motore e l’immediato decadimento della garanzia.
Non utilizzare la macchina in vicinanza di apparecchiature17 - elettriche e linee elettriche (Fig.5).
Non urtare o forzare le pale della girante; non lavorare con18 - la girante danneggiata.
Non impiegare la macchina con sostanze19 - infiammabili e/o
corrosive.
Non montare la girante o il corpo pompa su altri motori o20 - trasmissioni di potenza.
Verificare che tutti i bulloni ed altri elementi di fissaggio21 - non siano allentati o mancanti.
Non utilizzare la macchina per usi diversi da quelli indicati22 - dal manuale (vedi pag. 22).
RivolgeteVi sempre al Vostro rivenditore per qualsiasi altro23 - chiarimento o intervento prioritario.
Ricordare che il proprietario o l’operatore è responsabile24 - degli incidenti o dei rischi subiti da terzi o da beni di loro
proprietà.
WARNING - The machine, when used correctly, is a
useful and effective tool; if used improperly or without
the due precautions it could become a dangerous tool.
For pleasant and safe work,always strictly comply with
the safety rules that follow and throughout this manual.
WARNING: The ignition system of your machine
produces an electromagnetic field of very low intensity.
This field could interfere with certain pacemakers. To
reduce the risk of serious or fatal injury, persons with
pacemakers should consult their doctor or the
manufacturer of the pacemaker before using this
machine.
WARNING: – National regulations could limit use of the
machine.
Do not operate the machine unless you have received1 - specific instruction on its use. First time users must
familiarize themselves thoroughly with the operation of the
machine before working in the field.
The machine must only be used by adults in good physical2 - condition who are familiar with the operating instructions.
Do not use the machine when you are tired or under the3 - influence of alcohol, drugs or medication (Fig.1).
Wear suitable protective gear (PPDs), especially gloves,4 - overalls, goggles and ear defenders (see pag. 10-11).
Do not allow other persons or animals near when starting5 - or using the machine (Fig.2).
Place the machine in a stable position (Fig.3).6 -
Do not perform maintenance work when the engine is7 - running.
Check the machine daily to ensure that all safety and other8 - devices are perfectly functional.
Do not use a machine that has been damaged, badly9 - repaired, improperly assembled or modified. Do not
remove, damage or disactivate any of the safety devices.
Only use the machine in well-ventilated areas. Do not10 - operate the mistblower in explosive atmospheres, in closed
environments or near inflammable substances (Fig. 4).

7
5
English Français
SAFETY PRECAUTIONS NORMES DE SECURITE
It is prohibited to fit an impeller other than that supplied by11 - the manufacturer.
When the machine is at the end of its useful life, do not12 - simply dump it; either return it to the dealer or take it to a
waste collection and recycling centre.
Only experienced persons who are familiar with the13 - operation and safe use of this machine should use it. Give
other users the manual with operating instructions, which
they should read before using the mistblower.
Keep this manual on hand and consult it before each use of14 - the tool.
All labels with health hazards must be kept in good15 - conditions. In case of damage or deterioration, immediately
substitute them (see pag.4).
16 - Never start the machine without rotor. It will cause serious
demages to the engine parts as well as the withdrawal of
the guarantee.
Do not use the machine near electrical equipment or power17 - leads (Fig.5).
Do not knock or force the rotor blades; never work with18 - damaged rotors.
Do not use the machine with19 - inflammable and/or
corrosive substances.
Do not fit the impeller or pump casing to other engines or20 - transmissions.
Be sure to check bolts and other fasteners to see if any of21 - them have become loose or missing.
Do not utilize the machine for uses different from the ones22 - specified in the manual (see pag. 22).
But take it to your dealer who will dispose of it properly.23 - Always call your dealer for any clarification or priority
action.
Please note that the owner or the user is responsible for any24 - accidents or damage to third parties or their property.
ATTENTION - Bien utilisée, la motopompe est un outil
de travail rapide, pratique et efficace ; utilisé de façon
non correcte ou sans adopter les précautions
nécessaires, cet instrument pourrait s’avérer dangereux.
Pour que votre travail soit toujours agréable et sûr,
respectez scrupuleusement les mesures de sécurité
reportées ici et au cours du manuel.
ATTENTION : Le système de mise en marche de l'unité
produit un champ électromagnétique de très basse
intensité. Ce champ peut créer des interférences avec
certains pacemakers. Pour réduire le risque de lésions
graves ou mortelles, les porteurs de pacemaker
devraient consulter leur médecin et le fabricant du
pacemaker avant d'utiliser cette machine.
ATTENTION ! – Certains règlements nationaux
pourraient limiter l’utilisation de la tronçonneuse.
Ne pas utiliser la motopompe avant de s'être informé des1 - modalités spécifiques d'utilisation. L'opérateur inexpert
devrait s'exercer avant d'utiliser la machine sur le terrain.
La motopompe ne peut être utilisée que par des personnes2 - majeures en bonne condition physique et bien informées
de son mode d'emploi.
Ne pas utiliser la motopompe en conditions de fatigue3 - physique ou sous l'effet de l'alcool ou de drogues (Fig.1).
Porter les EPI et plus particulièrement des gants, une4 - combinaison, des lunettes de protection et un casque pour
les oreilles (pag. 10-11).
Éviter que des personnes non autorisées ou des animaux5 - ne se trouvent dans le rayon d'action de la motopompe au
démarrage et durant l'utilisation (Fig.2).
Installer la motopompe sur une position stable (Fig.3).6 - Ne pas procéder à l'entretien lorsque le moteur tourne.7 - Contrôler quotidiennement la motopompe pour s'assurer8 - que chaque dispositif, de sécurité et autre, fonctionne
correctement.
Ne pas utiliser la motopompe si elle est endommagée, mal9 - réparée, mal montée ou modifiée de façon arbitraire. Évitez
d'enlever, de détériorer ou de neutraliser les dispositifs de
sécurité.
Utiliser la motopompe uniquement dans des lieux bien10 - aérés. Ne l’utilisez pas dans des atmosphères explosives ou
dans des endroits clos ou à proximité de substances
inflammables (Fig. 4).
Il est interdit d'appliquer sur la prise de force de la11 - motopompe une turbine non fournie par le constructeur.
Ne pas abandonner la motopompe dans l'environnement12 - en cas de mise hors service mais la remettre au revendeur
ou à un centre de collecte des déchets.
Ne confier ou prêter la motopompe qu'à des personnes13 - qualifiées et au courant du fonctionnement correct de
l'appareil. Donnez-leur aussi le manuel avec le mode
d’emploi à lire avant de commencer à travailler.
Conservez ce manuel soigneusement et consultez-le à14 - chaque foisque vous devrez utiliser la machine.
Veillez à ce que les étiquettes portant les signaux de danger15 - et de sécurité soient toujours en parfait état. Si elles sont
détériorées, remplacez-les sans délai (voir pag.4).
16 - Ne jamais faire tourner l’atomiseur sans la roue sous
peine de détérioration immediate. Dans ce cas les pieces
déterioreés ne sont pas couvertes par la garantie.
17 - Ne pas utiliser la motopompe à proximité d’appareils
électriques et de lignes électriques (Fig.5).
Ne pas heurter ni forcer les ailettes de la roue; ne pas utiliser18 - la roue si elle est endommagée.
Ne pas utiliser la motopompe avec des substances19 - inflammables et/ou corrosives.
Ne pas monter le dispositif mobile ou le carter de pompe20 - sur d'autres moteurs ou transmissions de puissance.
Vérifier l’intégrité et le serrage des boulons, écrous et vis de21 - l’ensemble motopompe.
N'utilisez pas l'atomiseur dans un but autre que ceux22 - indiqués dans le manuel (voir pag. 22).
Addressez-vous toujours à votre revendeur habituel pour23 - tout autre application ou intervention importante.
Se rappeler que le propriétaire ou l’opérateur sont24 - responsables des accidents ou des dommages à tiers, aux
biens de leur propriété.

8
1234
Deutsch Español
SICHERHEITSVORKERUNGEN NORMAS DE SEGURIDAD
ACHTUNG - Bei richtigem Einsatz ist die Maschine ein
schnelles, praktisches und leistungsfähiges
Arbeitsgerät; falls Sie sie falsch oder ohne die nötige
Vorsicht einsetzen, kann sie zu einer Gefahr werden.
Beachten Sie bitte daher unbedingt die
Sicherheitsvorschriften die Sie nachstehend in der
Betriebsanleitung finden, damit ihre Arbeit immer
angenehm und sicher ist.
ACHTUNG: Das Zündsystem Ihres Geräts erzeugt ein
elektromagnetisches Feld geringer Stärke. Dieses Feld
kann unter Umständen Herzschrittmacher beeinflussen.
Um die Gefahr ernster oder gar tödlicher Unfälle zu
reduzieren, sollten Personen mit Herzschrittmachern
vor Benutzung dieser Maschine ihren Arzt und den
Hersteller des Herzschrittmachers zu Rate ziehen.
ACHTUNG! – Nationale Verordnungen können den
Gebrauch des Geräts einschränken.
Verwenden Sie die Maschine erst, wenn Sie mit ihrem1 - Betrieb vertraut sind. Unerfahrene Benutzer müssen sich
vor dem Arbeitseinsatz mit dem Gerät vertraut machen und
dessen Gebrauch üben.
Die Maschine darf nur von Erwachsenen in guter2 - körperlicher Verfassung verwendet werden, die darüber
hinaus in die Gebrauchsanleitungen eingewiesen sind.
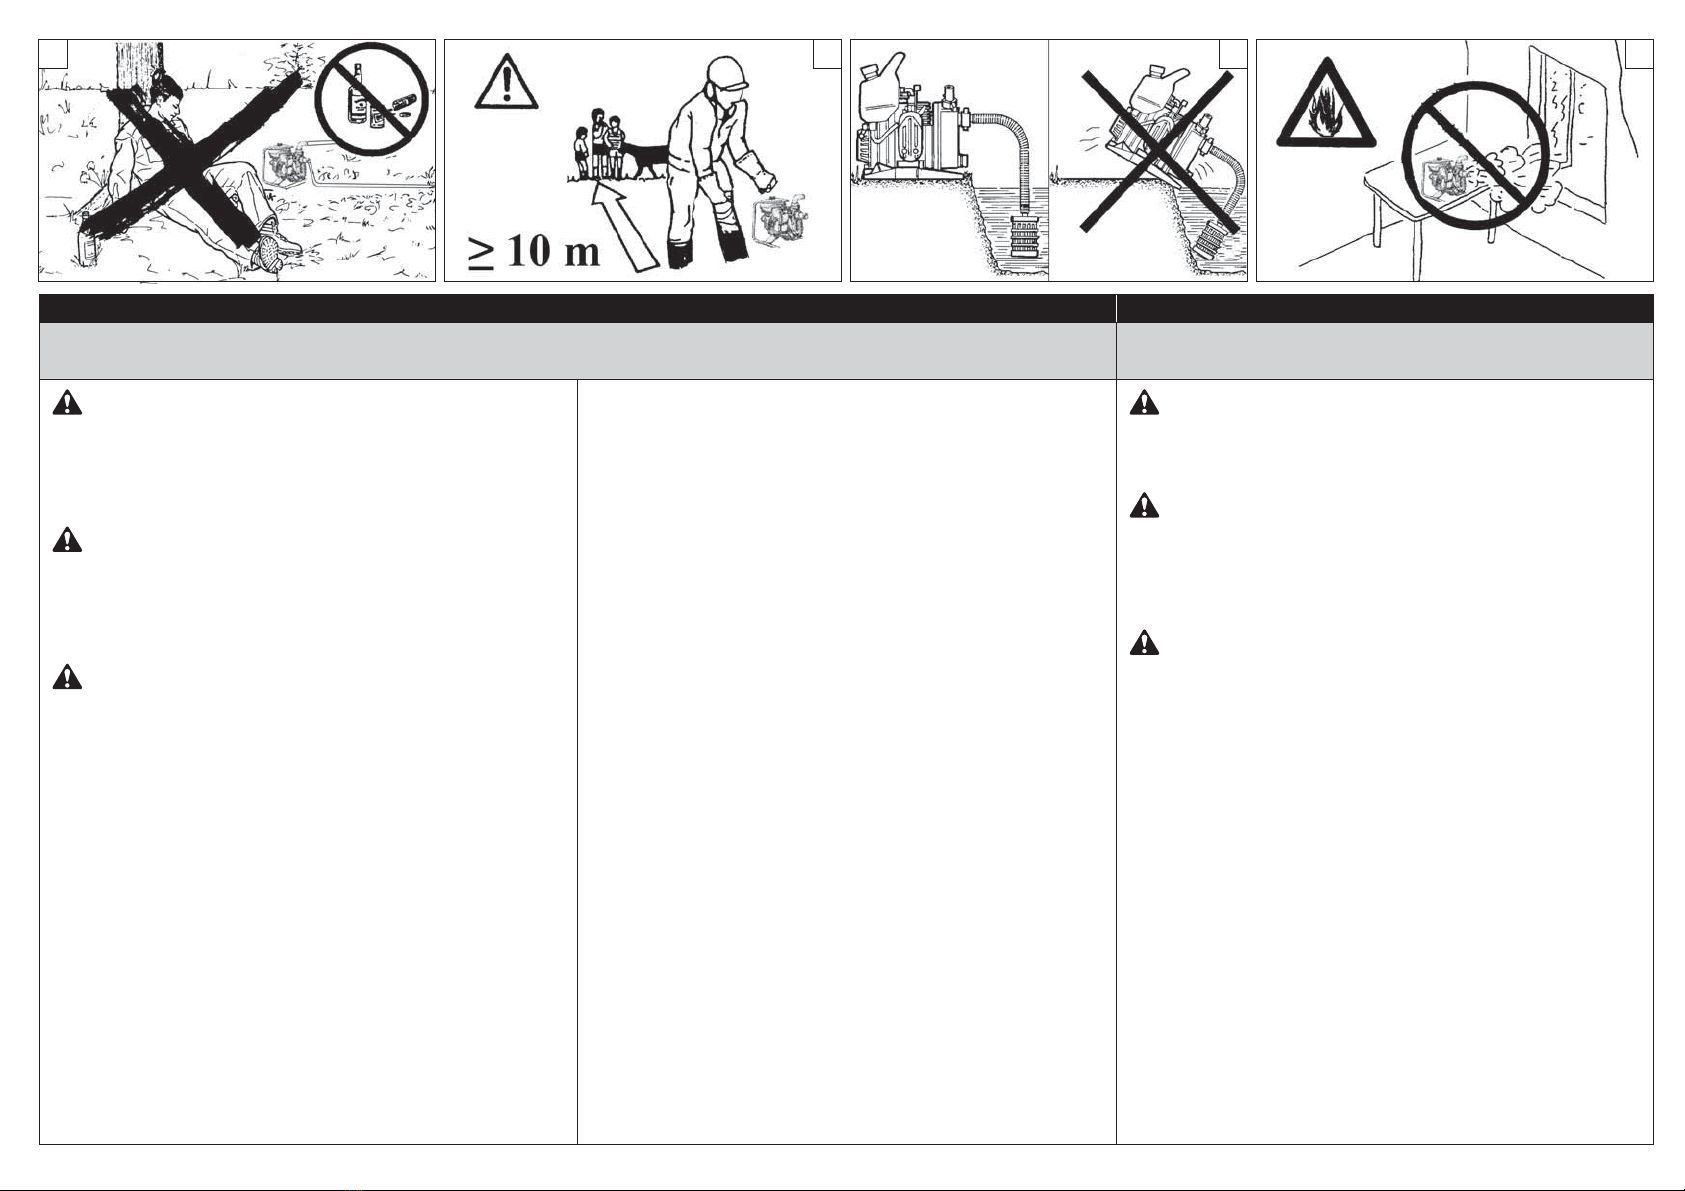
Benutzen Sie die Maschine nicht bei Müdigkeit oder unter3 - Einfluss von Alkohol oder Rauschmitteln (Abb.1).
Immer eine PSA tragen, bestehend aus Handschuhen,4 - Anzug, Schutzbrille und Gehörschutz (S. 10-11).
Halten Sie andere Personen oder Tiere beim Start und5 - Gebrauch der Maschine in einem ausreichenden
Sicherheitsabstand (Abb.2).
Sorgen Sie für eine standfeste Aufstellung der Maschine6 - (Abb.3).
Führen Sie keine Wartung bei laufendem Motor aus.7 - Überprüfen Sie die Maschine täglich auf die einwandfreie8 - Funktion der Sicherheits- und anderen Vorrichtungen.
Arbeiten Sie nicht mit einer beschädigten, behelfsweise9 - reparierten, falsch montierten oder eigenmächtig
umgerüsteten Maschine. Entfernen, beschädigen oder
ändern Sie nie die Schutzvorrichtungen.
Verwenden Sie die Maschine nur in ausreichend belüfteter10 - Umgebung. Benutzen Sie das Gerät nicht in der Nähe von
explosiven oder brennbaren Stoffen, in geschlossenen
Räumen oder in der Nähe von entflammbaren Substanzen
(Abb. 4).
Rüsten Sie den Abtrieb der Maschine ausschließlich mit11 - dem Originallaufrad des Herstellers aus.
Lassen Sie stillgelegte Maschinen unbedingt durch den12 - Fachhändler oder eine Wertstoffstelle umweltgerecht
entsorgen.
Geben bzw. borgen Sie die Maschine nur Personen, die13 - über Funktionsweise und Gebrauch genau informiert sind.
Geben Sie den Benutzern der trennschleifer stets die
Gebrauchsanweisung, die vor Arbeitsbeginn gelesen
werden sollte.
Bewahren Sie dieses Handbuch sorgfältig auf und lasen Sie14 - es vor jeder Inbetriebnahme der Maschine.
Sämtliche Schilder mit den Gefahrensymbolen und15 - Sicherheitszeichen müssen sich in einwandfreiem Zustand
befinden. Bei Beschädigung oder Unleserlichkeit müssen
sie rechtzeitig ersetzt werden (siehe Seite 4).
Die Maschine16 - nie ohne Laufrad. Es können sonst
beträchtliche Schäden am Motor enstehen. Der Hersteller
kann in diesem Falle keine Garantie übernehmen.
Arbeiten Sie mit der Maschine nicht in der Nähe von17 - elektrischen Geräten oder Stromleitungen (Abb.5).
Die Laufradflügel sind vor Stößen und Krafteinwirkungen18 - zu schützen; ein beschädigtes Laufrad darf nie zum Einsatz
kommen.
Verwenden Sie die Maschine nicht mit entzündlichen19 - bzw.
korrodierenden Stoffen.
Bauen Sie das Laufrad bzw. Pumpengehäuse nicht in20 - andere Motoren oder Antriebe ein.
Allen Schrauben und sonstigen Befestigungsmitteln21 - nachprüfen. Nichts darf locker sein.
Das Gerät darf ausschließlich für die in der Betriebsanleitung22 - angegebenen Zwecke verwendet werden (siehe seite 23).
Wenden Sie sich füe eventuelle Klärungen oder Eingriffe23 - immer an den Händler hres Vetrauens.
Der Besitzer bzw. Bediener ist in jedem Fall für die Unfälle24 - oder Risiken gegenüber Dritten oder deren Besitz
verantwortlich.
ATENCION - Si se utiliza correctamente, la máquina es
un instrumento de trabajo rápido, cómodo y eficaz; si se
usa incorrectamente o sin las debidas precauciones
puede convertirse en un instrumento peligroso. Para
que su trabajo sea siempre agradable y seguro, respete
escrupulosamente las normas de seguridad indicadas a
continuación en el presente manual.
ATENCIÓN: El sistema de encendido de su unidad
produce un campo electromagnético de muy baja
intensidad. Este campo puede interferir con algunos
marcapasos. Para reducir el riesgo de lesiones graves o
mortales, las personas con marcapasos deberían
consultar a su médico y al fabricante del marcapasos
antes de utilizar esta máquina.
¡ATENCIÓN! – El uso de la máquina puede estar limitado
por reglamentos nacionales.
No utilizar la máquina sin antes instruirse sobre el modo de1 - uso. El operador deberá ejercitarse antes de utilizar la
máquina por primera vez.
La máquina debe ser utilizada por personas adultas en2 - buenas condiciones físicas e instruidas sobre las normas de
uso.
No utilizar la máquina en condiciones de fatiga física o bajo3 - el efecto de alcohol o drogas (Fig.1).
Utilice los dispositivos de protección individual (DPI)4 - necesarios, en particular guantes, mono de trabajo, gafas
de protección y auriculares (pág. 10-11).
No permitir la presencia de personas o animales en el radio5 - de acción de la máquina durante el arranque y el uso
(Fig.2).
Situar la máquina en una posición estable (Fig.3).6 - No hacer mantenimiento con el motor en marcha.7 - Controlar la máquina a diario para asegurarse del buen8 - funcionamiento de todos los dispositivos, ya sean de
seguridad u otros.
No trabajar con la máquina dañada, mal reparada, mal9 - montada o modificada arbitrariamente. No quite, dañe, o
vuelva ineficaz ningún dispositivo de seguridad.

9
5
Español Slovensky
NORMAS DE SEGURIDAD BEZPEČNOSTNÉ PREDPISY
Utilizar la máquina sólo en lugares bien ventilados. No usar10 - en atmósfera explosiva, en ambientes cerrados o cerca de
sustancias inflamables (Fig. 4).
Está prohibido aplicar a la toma de fuerza de la máquina un11 - rotor que no sea aquel suministrado por el fabricante.
Cuando la máquina se retire del uso, no abandonarla en el12 - medio ambiente sino entregarla al revendedor o a un
centro de recogida de desechos.
Entregar o prestar la máquina sólo a personas expertas y13 - conocedoras del funcionamiento y del uso correcto. Prestar
conjuntamente el manual de instrucciones de uso, que se
deberá leer antes de comenzar el trabajo.
Conservar cuidadosamente el presente manual de14 - instrucciones y consultarlo en cada ocasión en que la
máquina sea utilizada.
Mantenga todas las etiquetas con las señales de peligro y15 - seguridad en perfectas condiciones. Si alguna se estropea,
sustitúyala de inmediato (vea pag.4).
16 - Nunca ponga en marcha la máquina sin el rotor. Tal
descuido ocasionará serios daños en las piezas del motor, y
la garantia quedará anulada en tal caso.
No utilizar la máquina cerca de aparatos eléctricos y líneas17 - eléctricas (Fig.5).
Evite golpear o forzar los álabes del rotor; no use nunca el18 - atomizador con el rotor deformado.
No emplear la máquina con sustancias19 - inflamables y/o
corrosivas.
No montar el rotor o el cuerpo de la bomba en otros20 - motores o transmisiones de potencia.
Revise todos los tornillos y tuercas para comprobar que no21 - haya piezas sueltas o faltantes.
No utilice la máquina para una aplicación distinta de las22 - que se indican en el manual (vea pag. 23).
Dirigirse siempre al distribudor para cuaquier tipo de23 - aclaración o intervención prioritaria.
El propietario o el usuario es responsable de los riesgos y24 - accidentes sufridos por terceros y de los daños sufridos por
bienes.
POZOR - Pri správnom používaní je stroj pohodlným a
účinným pracovným nástrojom; ak sa však používa
nesprávne alebo bez dodržiavania bezpečnostných
predpisov, mohol by sa stať nebezpečným zariadením.
Aby bola vaša práca vždy príjemná a bezpečná,
dodržiavajte prísne bezpečnostné pravidlá, ktoré sú
uvedené v tomto návode na použitie.
POZOR: Štartovací systém jednotky produkuje
elektromagnetické pole veľmi nízkej intenzity. Toto
pole môže rušiť činnosť niektorých kardiostimulátorov
(pacemakerov). Na zníženie rizika vážnych alebo
smrteľných poranení, by sa osoby s kardiostimulátorom
mali poradiť so svojím lekárom a výrobcom
kardiostimulátora ešte pred používaním tohto stroja.
UPOZORNENIE! – Používanie stroja môžu obmedzovať
vnútroštátne predpisy.
Stroj nepoužívajte skôr, ako sa oboznámite s jeho obsluhou.1 - Začiatočníci by si mali pred prácou použitie stroja vyskúšať.
Stroj smú používať iba dospelé osoby, v dobrom fyzickom2 - stave, ktoré sú oboznámené s jeho obsluhou.
Nepoužívajte stroj, keď ste unavení alebo pod vplyvom3 - drog, liekov, alkoholu alebo omamných látok (Obr.1)
Vždy noste osobné ochranné prostriedky, hlavne rukavice,4 - ochranné okuliare a slúchadlá (str. 10-11).
Nedovoľte, aby sa v pracovnom okruhu stroja počas jeho5 - štartovania a používania zdržiavali iné osoby alebo zvieratá
(Obr.2).
Stroj umiestnite do stabilnej polohy (Obr.3).6 -
Nevykonávajte údržbu, kým je motor v chode.7 -
Stroj kontrolujte každý deň, aby ste sa uistili, že všetky8 - zariadenia, bezpečnostné aj iné, sú funkčné.
So strojom nepracujte, ak je poškodený, nesprávne9 - opravený, nesprávne zmontovaný alebo upravený bez
povolenia.V žiadnom prípade neodstraňujte, nepoškodzujte
a nevyraďujte žiadne bezpečnostné zariadenie.
Stroj používajte iba v dobre vetraných priestoroch.10 -
Nepoužívajte ho vo výbušnom prostredí, v uzavretých
priestoroch, ani v blízkosti horľavých látok (Obr.4).
Na vývodový hriadeľ sa nesmie namontovať žiadny rotor,11 - ktorý nie je dodaný výrobcom.
V prípade nevyhnutnosti vyradenia stroja ho nevyhadzujte12 - voľne, ale odovzdajte ho v predajni, kde ste ho kúpili alebo
v zbernom stredisku odpadov.
Stroj odovzdajte alebo požičiavajte len skúseným osobám,13 - ktoré sú oboznámené s jeho správnym používaním.
Odovzdajte ďalším užívateľom návod na používanie, aby si
ho mohli pred použitím stroja prečítať.
Tento návod starostlivo uschovajte a pred každým použitím14 - stroja ho konzultujte.
Všetky štítky a nálepky s výstražnou signalizáciou15 - udržiavajte v dokonalom stave. V prípade poškodenia alebo
opotrebovania ich treba včas vymeniť (Pozrite str. 4).
Nie je dovolené16 - štartovať stroj bez rotora. Toto môže
spôsobiť vážne poškodenie častí motora, ako aj stratu
nároku na uplatnenie záruky.
Stroj nepoužívajte v blízkosti elektrických zariadení, ani17 - elektrického vedenia (Obr.5).
Neudierajte na lopatky rotora, ani ich nepresiľujte; stroj18 - nepoužívajte, ak je rotor poškodený.
Stroj nepoužívajte s19 - horľavými a/alebo korozívnymi
látkami.
Nemontujte rotor alebo telo čerpadla na iné motory alebo20 - silové prevody.
Skontrolujte všetky skrutky a ostatné upevnenia, či nie sú21 - uvoľňené alebo či nechýbajú.
Stroj nepoužívajte na iné účely ako je uvedené v návode22 - (str. 23).
V prípade potreby akéhokoľvek ďalšieho objasnenia alebo23 - zásahu sa vždy obráťte na vášho predajcu.
Nezabudnite, že majiteľ alebo obsluhujúci pracovník nesú24 - zodpovednosť za úrazy alebo riziká pre iné osoby, ako aj za
ich majetok.

10
2
Size 41 p.n. 001001079A
Size 42 p.n. 001001080A
Size 43 p.n. 001001081A
Size 44 p.n. 001001082A
Size 45 p.n. 001001083A
Size 41 p.n. 001000975B
Size 42 p.n. 001000976B
Size 43 p.n. 001000977B
Size 44 p.n. 001000978B
Size 45 p.n. 001000979B
13
p.n. 001000835
Italiano English Français
ABBIGLIAMENTO PROTETTIVO DI SICUREZZA SAFETY PROTECTIVE CLOTHING VÊTEMENTS DE PROTECTION
Quando si lavora con la motopompa usare sempre
un abbigliamento protettivo di sicurezza
omologato. L’uso dell’abbigliamento protettivo
non elimina i rischi di lesione, ma riduce gli effetti
del danno in caso di incidente. Fatevi consigliare
dal vostro rivenditore di fiducia per la scelta
dell’abbigliamento adeguato.
L’abbigliamento deve essere adatto e non d’impaccio.
Indossare scarpe o stivali di sicurezza muniti di
suole antisdrucciolo e puntali d’acciaio (Fig. 1-2).
Applicare protezioni dai rumori; per esempio le
cuffie (Fig. 3) o i tappi. L’uso delle protezioni per
l’udito richiede maggior attenzione e prudenza, perché
la percezione di segnali acustici di pericolo (grida,
allarmi, ecc.) è limitata.
Calzare guanti (Fig. 4) che permettano il massimo
assorbimento delle vibrazione.
Oleo-Mac offre una gamma completa di
equipaggiamento per la sicurezza.
While working with the pump, always use safety
protective approved clothing.The use of protective
clothing does not eliminate injury risks, but
reduces injury effects in case of accident. Consult
your trusted supplier to choose an adequate
equipment.
The clothing must be proper and not an obstacle.
Safety shoes or boots having skid-proof sole and
anti-piercing insert (Fig. 1-2).
Use protections against noises; for example noise
reduction ear guards (Fig. 3) or earplugs. The use of
protections for the ear requests much more attention
and caution, because the perception of danger audio
signals (screaming, alarms, etc.) is limited.
Wear gloves (Fig. 4) that permit the maximum
absorption of vibrations.
Oleo-Mac offers a complete range of safety
equipments.
Toujours porter des vêtements de protection
homologués pour utiliser de la motopompe. Le
port de vêtements de protection n'élimine pas les
risques de blessure mais il peut en réduire les
effets en cas d'accident. Demandez conseil à votre
revendeur habituel pour choisir le vêtement qui
répond le mieux à vos exigences.
Assurez-vous que le vêtement choisi ne gêne pas les
mouvements.
Portez des chaussures ou des bottes de protection
avec semelles antiglisse et pointes en acier (Fig. 1-2).
Utilisez des dispositifs protégeant contre les
émissions sonores; casque (Fig. 3) ou boules dans
les oreilles. Rappelez-vous d'être extrêmement
prudents lorsque vous utilisez ce genre de protection
car la perception des signaux acoustiques de danger
(cris, alarmes, etc. ..) est réduite.
Portez des gants (Fig. 4) qui absorbent le plus
possible les vibrations.
Oleo-Mac offre une gamme complète
d’équipements de sécurité.

11
Size S p.n. 001001377
Size M p.n. 001001378
Size L p.n. 001001379
Size XL p.n. 001001380
Size XXL p.n. 001001381
4
Deutsch Español Slovensky
SICHERHEITS-/SCHUTZKLEIDUNG INDUMENTOS DE SEGURIDAD OCHRANNÝ BEZPEČNOSTNÝ ODEV
Bei der Arbeit mit den Motorpumpe muss der
Bediener daher immer zugelassene Sicherheits-/
Schutzkleidung tragen. Durch die Benutzung der
Schutzkleidung wird die Verletzungsgefahr zwar
nicht beseitigt, aber die Auswirkungen des
Schadens im Falle eines Unfalls reduziert. Ihr
Fachhändler berät Sie gern bei der Wahl der
richtigen Schutzkleidung.
Die Kleidung muss geeignet sein und darf die Arbeit
nicht behindern.
Tragen Sie Sicherheitsschuhe oder -stiefel mit
rutschfesten Sohlen und Stahlkappen (Abb. 1-2).
Benutzen Sie einen Gehörschutz; zum Beispiel den
Gehörschutz mit Bügel (Abb. 3) oder die
Gehörschutzstöpsel. Die Verwendung eines
Gehörschutzes erfordert erhöhte Aufmerksamkeit und
Vorsicht, denn die Wahrnehmung akustischer
Warnsignale (Rufe, Alarme usw.) wird dadurch
eingeschränkt.
Tragen Sie Handschuhe (Abb. 4), mit denen die
Vibrationen maximal gedämpft werden.
Oleo-Mac bietet ein komplettes Sortiment von
Sicherheitsausrüstungen.
Para trabajar con la motobomba, colocarse
siempre indumentos de seguridad homologados.
El uso de elementos de seguridad no elimina los
riesgos de lesiones pero reduce los daños en caso
de accidente. Consultar con el vendedor de la
máquina sobre los indumentos adecuados.
La ropa debe ser cumplir su función de protección y ser
cómoda.
Utilizar zapatos o botas de seguridad con suela
antideslizante y punteras de acero (Fig. 1-2).
Emplear elementos de protección contra el ruido,
como auriculares (Fig. 3) o tapones. El uso de las
protecciones para el oído exige mayor atención y
prudencia porque se reduce la percepción de las
señales sonoras de peligro (gritos, alarmas, etc.).
Ponerse guantes (Fig. 4) que absorban el máximo
posible las vibraciones.
Oleo-Mac ofrece un equipamiento de seguridad
completo.
Pri práci s motorovým čerpadlom vždy používajte
homologizovaný bezpečnostný ochranný odev.
Použitím ochranného odevu sa neodstráni
nebezpečenstvo úrazu, ale v prípade nehody zníži
jeho dôsledky. Pri výbere vhodného odevu si nechajte
poradiť svojím predajcom.
Odev musí byť vhodný pre prácu a byť pohodlný.
Noste ochranné topánky alebo čižmy vybavené
protišmykovou podrážkou a oceľovými špičkami
(Obr. 1-2).
Používajte chrániče proti hluku, napr. slúchadlá (Obr. 3)
alebo ušné tampóny. Používanie pomôcok na ochranu
sluchu vyžaduje väčšiu pozornosť a opatrnosť, pretože
pracovník vníma výstražné zvukové signály (krik, zvukové
výstrahy a pod.) horšie.
Používajte rukavice (Obr. 4), ktoré umožňujú maximálne
pohltenie vibrácií.
Oleo-Mac ponúka kompletný sortiment bezpečnostných
vybavení.

12
1234
Italiano English Français
PRIMA DELL’USO BEFORE USE AVANT L’USAGE
Assicurarsi della perfetta tenuta dei raccordi serrandoli a
fondo.
Collegare il tubo di aspirazione e il tubo di mandata. Nel
collegamento tubo-raccordo usare una fascetta ben stretta
(Fig. 1-2).
ATTENZIONE: Non sostituire i raccordi originali (in
dotazione) con altri di differente materiale per
evitare di danneggiare il corpo pompa.
Tubo di aspirazione
Deve essere del tipo rigido non collassabile (per esempio
spiralato) (B, Fig. 3).
Deve essere munito di filtro o di filtro con valvola di fondo
ben serrati con fascetta (C, Fig. 3). Così facendo si evita
l'entrata di corpi estranei nella pompa, e possibili danni alla
girante.
ADESCAMENTO
- Piazzare la pompa il più vicino possibile all'acqua.
- Posizionare in modo corretto (vedi Fig. 5).
- Riempire completamente la pompa (Fig. 6).
ATTENZIONE: Se per una pompa l’erogazione non è
immediata o richiede più di 4 minuti, la causa
probabile va ricercata nello riempimento non
completo del tubo di aspirazione o in una
aspirazione d’aria, riempire quindi completamente
la pompa attraverso il foro di caricamento (Fig. 6) o,
nell’altra ipotesi, controllare tutte le tenute e il
serraggio dei raccordi.
Il valore della portata (si regola da min. a max) agendo sul
comando acceleratore del carburatore (B, Fig. 4).
Si raccomanda di non avviare mai la macchina senza
l'acqua di adescamento nella pompa. Ciò può causare
danni importanti alle parti del motore e l'immediato
decadimento della garanzia.
CAUTELA – Non superare la profondità di adescamento
indicata nella tabella a pag.34.
Ensure that all fittings are tighten and that their gaskets are
in place.
Connect the suction hose and the delivery hose.
Connect the hoses to the fittings using the hose bands
(Fig. 1-2).
WARNING - Do not replace the genuine fittings
(supplied) with others of different material in order
to avoid damaging the pump casing.
Suction hose
It should be of the non-colapsible type (such as spiral PVC)
(B, Fig. 3).
It should be securely fitted with strainer provided, by means
of a hose band (C, Fig. 3). To prevent debris from entering the
pump body, and causing possible damage to the impeller.
PRIMING
- Place the pump as close as possible to the water.
- Install the pump in the correct position (see figure 5).
- Fill the pump completely (Fig. 6).
WARNING - Delivery of water should be immediate o
takes more 4 minutes for a pump. If delivery of water
fails to occur as explained above, check that all
gaskets and connections are tight so as no air
leaking is possible and that the pump body is filled
with water (Fig. 6). In the particular case of a pump,
check that the suction hose is also full of water and
connections are tight.
The flow rate value (from min. to max.) is adjusted with the
accelerator control of the carburettor (B, Fig. 4).
Never start the machine without priming water in the
pump. It will cause serious damages to the engine parts as
well as the withdrawal of the guarantee.
CAUTION – Do not exceed the priming depth indicated
in the table on page 34.
S’assurer de la parfaite étanchéité des raccords en les serrant
à fond.
Reliez le tube d’aspiration et la tubulure de refoulement.
Bien fixer le tuyau aux raccords d’aspiration et de
refoulement au moyen des colliers (Fig. 1-2).
ATTENTION - Afin d’éviter d’endommager le corps
de la pompe, ne remplacez pas les raccords
originaux (compris dans l’équipment) par d’autres
raccords de matériau différent.
Tuyau d’aspiration
Il doit être du type rigide (par example à spirale interne
(B, Fig. 3).
Il doit être muni de crépine ou de crépine avec clapet
antiretour bien serrée au moyen du collier (C, Fig.3). Pour
empêcher tous débris de pénétrer dans le corps de la pompe
et causer des dégâts éventuels au rotor.
AMORÇAGE
- Placer la pompe le plus près possible de l’eau.
- Positionner de façon correcte (voir Fig. 5).
- Riemplir complètement la pompe (Fig. 6).
ATTENTION - Si une pompe ne distribue pas
immédiatement le liquide qu’elle contient ou
nécessite plus de 4 minutes pour le faire, le
problème peut être dû au tuyau d’aspiration mal
rempli ou à uneentrée d’air; remplir par à fond la
pompe à travers l’orificede remplissage (Fig. 6) ou,
dans l’autre cas, contrôler tous les joints d’étanchéité
et vérifier si les raccords sont serrés correctement.
Le valeur du débit (de min. à max.) se règle en intervenant
sur la commande d’accélération du carburateur (B, Fig. 4).
Ne jamais faire tourner la pompe sans eau dans le corps
sous peine de détérioration immediate du joint
d’etanchéité. Dans ce cas les pieces déterioreés ne sont pas
couvertes par la garantie.
PRUDENCE – Ne pas dépasser la profondeur
d'amorçage indiquée sur le tableau page 34.

13
5 6
Deutsch Español Slovensky
VOR DER BENUTZUNG ANTES DEL USO PRED POUŽITÍM
Sicherstellen, daß Anschlüsse dicht sind und fest angezogen
worden sind.
Schließen Sie Ansaug- und Auslaßleitung.
An den Übergangsstellen von Rohrstutzen zu Schlauch eine
fest sitzende Schlauchschelle anbringen (Abb. 1-2).
ACHTUNG - Die (mitgelieferten) Originalanschlüsse
nicht gegen andere, aus unterschiedlichem Material
auswechseln, um Beschädigungen der Pumpe zu
vermeiden.
Saugrohr
Hierfür ist ein steifer, nicht zusammendrückbarer Schlauch
zu verwenden (z.B. mit Spiralversteifung) (B, Abb. 3).
Das Saugrohr muß mit Filter oder mit Filter und Bodenventil
versehen sein, die mit einer Schelle gut befestigt werden
(C, Abb. 3). Da mit kein Schlamm in das Pumpengehäuse
dringt, was zu einer Beschädigung der Flügel führen könnte.
FÜLLEN
- Die Pumpe so nah wie möglich am Wasser aufstellen.
- Richting positionieren (Abb. 5).
- Die Pump ganz anfüllen (Abb. 6).
ACHTUNG - Wenn an einer Pumpe nicht sofort
Flüssigkeit austritt oder die Abgabe länger als 4
Minuten braucht, ist die wahrscheinliche Ursache
die unvollständige Füllung des Saugrohrs oder
angesaugte Luft, füllen Sie die Pumpe daher über
den Füllstutzen vollständig (Abb.6) oder
kontrollieren Sie im anderen Fall sämtliche
Dichtungen und den Anzug der Anschlüsse.
Der Wert der Förderleistung (von min. bis max.) wird mit
dem Gashebel am Vergaser eingestellt (B, Abb. 4).
Die Maschine nie ohne füllwaser in der Pumpe
einschalten. Es können sonst beträchtliche Schäden am
Motor enstehen. Der Hersteller kann in diesem Falle keine
Garantie übernehmen.
WARNUNG – Die in Tabelle auf Seite 34 angegebene
Ansaugtiefe nicht überschreiten.
Asegurarse del perfecto hermetismo de las conexiones
ajustàndoles a fondo.
Conectar el tubo de aspiración y el tubo de alimentación.
En el empalme tubo-conexiòn, usar una abrazadera bien
éestrecha (Fig. 1-2).
ATENCION - no sustituir las juntas originales (en
dotación) con otras realizadas en un material
diferente para evitar que se dañe el cuerpo de la
bomba
Tubo de aspiracion
Debe ser de tipo rigido (por ejemplo espiral) (B, Fig. 3).
Debe estar provisto de filtro o de filtro con valvula de fondo
ajustado con abrazadera (C, Fig. 3). A fin de evitar la entrada
de impurezas en el cuerpo de la bomba y posibles daños en
la turbina.
MODO DE CEBAR
- Colocar la bomba lo màs cerca posible del agua.
- Ubicar en modo correcto (ver figura 5).
- Cargar completamente la bomba a travès del tapòn de
carga (Fig. 6).
ATENCIÓN - Si la emisión de una bomba no es
inmediata o requiere más de 4 minutos, es probable
que no se haya llenado completamente el tubo de
aspiración, o que se haya aspirado aire. Llenar
totalmente la bomba por el orificio de carga (Fig.6)
o, en el segundo caso, comprobar la estanqueidad y
el apriete de los empalmes.
El valor del caudal (de min. a max.) se regula mediante el
mando acelerador del carburador (B, Fig. 4).
Nunca ponga en marcha la máquina sin agua de purga en
la bomba. Tal descuido ocasionará serios daños en las piezas
del motor, y la garantia quedará anulada en tal caso.
CUIDADO – No superar la profundidad de cebado
indicada en la tabla de la pág. 34.
Skontrolujte, či sú spojenia pevné, poriadne ich utiahnite.
Pripojte nasávaciu a odtokovú hadicu. Pri napojení hadice na
prípojku použite pevnú svorku (Obr. 1-2).
UPOZORNENIE: Nevymieňajte originálne prípojky (súčasť
výbavy) za iné z iného materiálu, predídete tak možným
poškodeniam telesa čerpadla.
Nasávacia hadica
Musí byť z materiálu, ktorý nedovolí aby sa zalomila (napríklad
špirálovitá) (B, Obr. 3).
Musí byť vybavená filtrom alebo ventilovým nasávacím košom,
dobre upevneným svorkou (C, Obr. 3). Týmto spôsobom zabránite
prieniku cudzích predmetov do čerpadla a možnému poškodeniu
obežného kolesa čerpadla.
ZAVODNENIE
- Umiestnite čerpadlo čo najbližšie k vode.
- Umiestnite ho správnym spôsobom (pozri Obr. 5).
- Čerpadlo úplne naplňte vodou cez plniace hrdlo (Obr. 6).
UPOZORNENIE: Ak z ãerpadla nevevyteká voda
okamÏite alebo musíte ãakaÈ dlh‰ie ako 4 minúty,
príãinou je zvyãajne neúplné naplnenie nasávacej
hadice alebo nasávanie vzduchu, preto ãerpadlo
naplÀte doplna cez plniaci otvor (Obr.6) alebo, v
inom prípade, skontrolujte v‰etky tesnenia a spojky.
Prietokové množstvo (od min. po max.) sa reguluje pomocou
ovládania plynu na karburátore (B, Obr. 4).
Odporúčame Vám neštartovať čerpadlo, ak nie je zaliate vodou.
Toto môže spôsobiť vážne poškodenie častí motora, ako aj stratu
nároku na uplatnenie záruky.
UPOZORNENIE – Neprekračujte hĺbku nasávania uvedenú v
tabuľke na str. 34.

14
14 15 16
Italiano English Français
AVVIAMENTO STARTING MISE IN ROUTE
CARBURANTE
ATTENZIONE: la benzina è un carburante
estremamente infiammabile. Usare estrema cautela
quando si manipola la benzina o una miscela di
combustibili. Non fumare o portare fuoco o fiamme
vicino al carburante o alla macchina (Fig.14).
Per ridurre il rischio di incendio e di farsi bruciature,·maneggiare con cura il carburante. È altamente
infiammabile.
Agitare e mettere il combustibile in un contenitore· approvato per il carburante (Fig.15).
Miscelare di combustibile all'aperto dove non ci siano· scintille o fiamme.
Posizionare in terra, fermare il motore e lasciare raffreddare· prima di effettuare il rifornimento.
Allentare il tappo del carburante lentamente per rilasciare· la pressione e per evitare la fuoriuscita di carburante.
Serrare saldamente il tappo carburante dopo il· rifornimento. Le vibrazioni possono causare un
allentamento del tappo e la fuoriuscita di carburante.
Asciugare il combustibile fuoriuscito dall'unità. Spostare· la macchina a 3 metri di distanza dal sito di rifornimento
prima di avviare il motore (Fig.16).
Non tentare mai di bruciare combustibile fuoriuscito in· qualsiasi circostanza.
Stoccare il carburante in un luogo fresco, asciutto e ben· ventilato.
Non stoccare il combustibile in luoghi con foglie secche,· paglia, carta, ecc.
Conservare l'unità e il carburante in luoghi in cui i vapori di· carburante non vengano a contatto con scintille o fiamme
libere, bollitori di acqua per riscaldamento, motori elettrici
o interruttori, forni, ecc.
Non togliere il tappo del serbatoio quando il motore è in· funzione.
Non utilizzare combustibile per operazioni di pulizia.· Fare attenzione a non spargere carburante sul proprio· abbigliamento.
FUELING
WARNING: Gasoline is an extremely flammable fuel.
Use extreme caution when handling gasoline or fuel
mix. Do not smoke or bring any fire or flame near
the fuel or the machine (Fig. 14).
To reduce the risk of fire and burn injury, handle fuel·with care. It is highly flammable.
Mix and store fuel in a container approved for gasoline·
(Fig.15).
Mix fuel outdoors where there are no sparks or flames.·
Select bare ground, stop engine, and allow to cool before·
refueling.
Loosen fuel cap slowly to release pressure and to keep fuel·
from escaping around the cap.
Tighten fuel cap securely after refueling. Unit vibration can·
cause an improperly tightened fuel cap to loosen or come
off and spill quantities of fuel.
Wipe spilled fuel from the unit. Move 3 metre away from·
refueling site before starting engine (Fig.16).
Never attempt to burn off spilled fuel under any·
circumstances.
Store fuel in a cool, dry, well ventilated place.·
Never place the mitblower in a combustible area such as·
dry leaves, straw, paper, etc.
Store the unit and fuel in an area where fuel vapors cannot·
reach sparks or open flames from water heaters, electric
motors or switches, furnaces, etc.
Never take the cap off the tank when the engine is·
running.
Never use fuel for cleaning operations.·
Take care not to get fuel on your clothing.·
CARBURANT
ATTENTION : l'essence est un carburant extrêmement
inflammable. Manipulez l'essence ou le mélange de
carburant avec une extrême précaution. Ne fumez
pas ou ne produisez pas de flammes à proximité du
carburant ou de la machine (Fig.14).
Pour réduire le risque d'incendie et de brûlures,·manipulez le carburant avec précaution. Il est
extrêmement inflammable.
Secouez et mettez le carburant dans un récipient· homologué (Fig.15).
Mélangez le carburant en plein air dans un endroit sans· risque d'étincelles ou de flammes.
Placez au sol, coupez le moteur et laissez-le refroidir avant· de procéder au ravitaillement.
Desserrez lentement le bouchon du carburant pour· évacuer la pression et pour éviter que le carburant ne se
déverse.
Serrez fermement le bouchon après le ravitaillement. Sous· l'effet des vibrations, le bouchon risque de se desserrer et
le carburant de s'échapper.
Essuyez le carburant qui aurait pu s'échapper. Écartez· l'outil à 3 m du lieu de ravitaillement avant de démarrer le
moteur (Fig.16).
Ne tentez en aucun cas de brûler le carburant déversé.· Stockez le carburant dans un endroit frais, sec et bien aéré.· Ne stockez pas le carburant dans un endroit présentant· des feuilles sèches, de la paille, du papier, etc.
Conservez l'outil et le carburant dans un endroit où les· vapeurs de carburant n'entreront pas en contact avec des
étincelles ou des flammes libres, des ballons d'eau pour le
chauffage, des moteurs électriques ou des interrupteurs,
des fours, etc.
N'ôtez pas le bouchon du réservoir lorsque le moteur· tourne.
N'utilisez pas de carburant pour les opérations de· nettoyage.
Assurez-vous de ne pas déverser de carburant sur vos· vêtements.

15
Deutsch Español Slovensky
ANLASSEN PUESTA EN MARCIA ŠTARTOVANIE
KRAFTSTOFF
ACHTUNG: Benzin ist ein hochentzündlicher
Kraftstoff. Gehen Sie bei der Handhabung von Benzin
oder Kraftstoffgemisch immer mit größter Vorsicht
vor. In der Nähe des Kraftstoffs oder der Maschine
sind offene Flammen und Rauchen verboten
(Abb.14).
Um Brand- und Verbrennungsgefahr zu reduzieren,·vorsichtig mit dem Kraftstoff umgehen. Er ist
hochentzündlich.
Schütteln und den Kraftstoff in einen hierfür zugelassenen· Behälter füllen (Abb.15).
Den Kraftstoff im Freien mischen, wo keine Funken oder· Flammen vorhanden sind.
Auf dem Boden abstellen, Motor ausschalten und vor dem· Tanken abkühlen lassen.
Den Tankdeckel langsam aufdrehen, um den Druck· entweichen zu lassen und damit kein Kraftstoff austreten
kann.
Den Tankdeckel nach dem Tanken wieder fest zudrehen.· Durch Vibrationen kann sich der Deckel lockern und
Kraftstoff austreten.
Trocknen Sie eventuell aus dem Gerät ausgelaufenen· Kraftstoff ab. Bringen Sie die Maschine in 3 Meter
Entfernung von der Stelle, an der Sie getankt haben, bevor
Sie den Motor starten (Abb.16).
Versuchen Sie unter keinen Umständen, ausgelaufenen· Kraftstoff zu verbrennen.
Bewahren Sie den Kraftstoff an einem kühlen, trockenen· und gut belüfteten Ort auf.
Der Kraftstoff darf nicht in einer Umgebung mit trockenem· Lauf, Stroh, Papier usw. aufbewahrt werden.
Bewahren Sie das Gerät und den Kraftstoff an einem Ort· auf, an dem die Kraftstoffdämpfe keine Funken oder offene
Flammen, Heizungsboiler, Elektromotoren, Schalter, Öfen
usw. erreichen können.
Solange der Motor läuft, darf der Tankdeckel nicht geöffnet· werden.
Verwenden zur Reinigung niemals Kraftstoff.· Achten Sie darauf, keinen Kraftstoff auf Ihre Kleidung zu· verschütten.
COMBUSTIBLE
ATENCIÓN: la gasolina es un combustible
extremadamente inflamable. Poner mucho cuidado
a la hora de manipular gasolina o una mezcla de
combustibles. No fumar ni acercar fuego o llamas al
combustible o la máquina (Fig.14).
Manipular el combustible con cuidado para reducir·el riesgo de incendio o quemadura. El combustible es
altamente inflamable.
Agitar y poner el combustible en un recipiente aprobado· para el combustible (Fig.15).
Mezclar el combustible al aire libre y en ausencia de· chispas o llamas.
Apoyar en el suelo, parar el motor y dejar enfriar antes del· llenado.
Aflojar el tapón del combustible lentamente para aliviar la· presión y evitar fugas de combustible.
Apretar firmemente el tapón de combustible después del· llenado. Las vibraciones pueden causar un aflojamiento
del tapón y fugas de combustible.
Secar el combustible de las fugas de la unidad. Desplazar· la máquina a 3 metros de distancia del sitio de llenado
antes de poner el motor en marcha (Fig.16).
No intentar en ninguna circunstancia quemar el· combustible de las fugas.
Almacenar el combustible en un lugar fresco, seco y bien· ventilado.
No almacenar el combustible en lugares con hojas secas,· paja, papel, etc.
Conservar la unidad y el combustible en lugares donde los· vapores del combustible no puedan entrar en contacto
con chispas o llamas libres, calentadores de agua, motores
eléctricos o interruptores, hornos, etc.
No quitar el tapón del depósito cuando el motor esté en· funcionamiento.
No utilizar combustible para la limpieza.· Prestar atención para no ensuciarse la ropa con· combustible.
PALIVO
POZOR: benzín je mimoriadne horľavé palivo. Pri
manipulácii s benzínom alebo zmesou paliva dávajte
veľký pozor. Nefajčite ani sa nepribližujte ku palivu
ani ku stroju s otvoreným plameňom (obr.14).
Aby sa znížilo nebezpečenstvo požiaru a popálenia sa,·zaobchádzajte s palivom opatrne. Je veľmi horľavé.
Palivo premiešajte a naplňte ním nádobu vhodnú na· uchovávanie paliva (obr.15).
Palivo miešajte vonku, mimo dosahu iskier alebo· plameňov.
Pred dopĺňaním paliva stroj položte na zem.· Uzáver palivovej nádrže odskrutkujte pomaly, aby sa· uvoľnil tlak a zabránilo sa úniku paliva.
Po doplnení paliva pevne uzatvorte uzáver. Vibrácie by· mohli spôsobiť jeho uvoľnenie a únik paliva.
Palivo uniknuté z jednotky osušte. Presuňte stroj o· približne 3 metre od miesta, kde ste dopĺňali palivo, až
potom naštartujte motor (obr.16).
Nikdy a za žiadnych okolností sa nepokúšajte zapáliť· uniknuté palivo.
Palivo skladujte na čerstvom, suchom a dobre vetranom· mieste.
Neskladujte palivo na miestach, kde je suché lístie, slama,· papier a pod.
Jednotku a palivo uchovávajte na miestach, kde výpary· paliva neprídu do kontaktu s iskrami alebo otvoreným
plameňom, ohrievačmi vody a kotlami, elektrickými
motormi alebo spínačmi, sporákmi a pod.
Pokiaľ je motor v chode, neotvárajte uzáver palivovej· nádrže.
Palivo nepoužívajte na čistenie.· Dávajte pozor, aby ste si palivom nezašpinili odev.·

16
19
2% - 50:1 4% - 25:1
ℓℓ
(cm3)ℓ(cm3)
1
5
10
15
20
25
0,02
0,10
0,20
0,30
0,40
0,50
(20)
(100)
(200)
(300)
(400)
(500)
0,04
0,20
0,40
0,60
0,80
1,00
(40)
(200)
(400)
(600)
(800)
(1000)
2017
p.n. 4175158
18 001001535 001001362
001001361
001001536
Italiano English Français
AVVIAMENTO STARTING MISE EN ROUTE
CARBURANTE
Questo prodotto è azionato da un motore a 2 tempi e richiede la
premiscelazione di benzina e olio per motori a 2 tempi. Premiscelare la
benzina senza piombo e l’olio per motori a due tempi in un contenitore
pulito approvato per la benzina (Fig.17).
CARBURANTE CONSIGLIATO: QUESTO MOTORE È CERTIFICATO PER
FUNZIONARE CON BENZINA SENZA PIOMBO PER USO AUTOMOBILISTICO A
89 OTTANI ([R + M] / 2) O CON UN NUMERO MAGGIORE DI OTTANI (Fig.18).
Miscelare l’olio per motori a 2 tempi con la benzina secondo le istruzioni
sulla confezione.
Consigliamo di usare olio per motori a 2 tempi Oleo-Mac al 2% (1:50)
formulato specificamente per tutti i motori a due tempi raffreddati ad aria
Oleo-Mac.
Le proporzioni corrette di olio/carburante indicate nel prospetto (Fig.19)
sono idonee quando si usa olio per motori Oleo-Mac PROSINT 2 e
EUROSINT 2 (Fig.20) o un olio motore di alta qualità equivalente (specifiche
JASO FD o ISO L-EGD). Quando le specifiche dell’olio NON sono equivalenti
o non sono note, usare un rapporto di miscelazione olio/carburante del 4%
(1:25).
CAUTELA: NON USARE OLIO PER AUTOVEICOLI O OLIO PER
MOTORI FUORIBORDO A 2 TEMPI.
CAUTELA: non usare mai un carburante con una percentuale
di alcool maggiore del 10%; sono accettabili gasohol con una
percentuale di alcool fino al 10% o carburante E10.
CAUTELA:
Acquistare solo il quantitativo di carburante necessario in base- ai propri consumi; non acquistarne più di quanto se ne userà in
uno o due mesi;
Conservare la benzina in un contenitore chiuso ermeticamente,- in un luogo fresco e asciutto.
NOTA: l’olio per motori a due tempi contiene stabilizzatore per carburante
e rimane fresco per 30 giorni. NON miscelare quantitativi maggiori di quelli
utilizzabili in un periodo di 30 giorni. Si consiglia olio per motori a 2 tempi
contenente stabilizzatore per carburante (Emak ADDITIX 2000 - cod. art.
001000972 – Fig.21).
RIFORNIMENTO (Fig.24)
Agitare la tanica della miscela prima di procedere al rifornimento (Fig.22).
FUELING
This product is powered by a 2-cycle engine and requires pre-mixing
gasoline and 2-cycle oil. Pre-mix unleaded gasoline and 2-cycle engine oil
in a clean container approved for gasoline (Fig.17).
RECOMMENDED FUEL: THIS ENGINE IS CERTIFIED TO OPERATE ON
UNLEADED GASOLINE INTENDED FOR AUTOMOTIVE USE WITH AN OCTANE
RATING OF 89 ([R + M] / 2) OR HIGHER (Fig.18).
Mix 2-cycle engine oil with gasoline according to the instructions on the
package.
We strongly recommend the use of 2% (1:50) Oleo-Mac two cycle engine
oil, which is specifically formulated for all Oleo-Mac air-cooled two-stroke
engines.
The correct oil / fuel proportions shown in the table (Fig.19) are suitable
when using the Oleo-Mac PROSINT 2 and EUROSINT 2 (Fig.20) or
an equivalent high-quality engine oil (JASO specification FD or ISO
specification L-EGD).When oil specifications are NOT equivalent or
unknown use 4% (1:25) oil / fuel mixing ratio.
CAUTION: DO NOT USE AUTOMOTIVE OIL OR 2-CYCLE OUTBOARD
OIL.
CAUTION: Never use a fuel with an alcohol percentage higher
than 10%; gasohol up to 10% alcohol or E10 fuel are acceptable.
CAUTION:
Match your fuel purchases to your consumption; don’t buy-
more than you will use in one or two months;
Store gasoline in a tightly-closed container in a cool, dry place.-
NOTE: 2-cycle engine oil contains a fuel stabilizer and will stay fresh up
to 30 days. DO NOT mix quantities larger than usable in a 30 day period.
A 2-cycle oil containing a fuel stabilizer is recommended (Emak ADDITIX
2000 p.n. 001000972 – Fig.21).
FILLING THE TANK (Fig.24)
Stir the mixture well before refuelling (Fig.22).
CARBURANT
Cet appareil est actionné par un moteur 2 temps et nécessite le prémélange
d'essence et d'huile pour moteurs 2 temps. Prémélangez l'essence sans
plomb et l'huile pour moteurs 2 temps dans un récipient propre homologué
pour contenir de l'essence (Fig.17).
CARBURANT CONSEILLÉ : CE MOTEUR EST CERTIFIÉ POUR ÊTRE ALIMENTÉ
EN ESSENCE SANS PLOMB POUR USAGE AUTOMOBILIE AVEC NIVEAU
D'OCTANES 89 ([R + M] / 2) OU SUPÉRIEUR (Fig.18).
Mélangez l'huile pour moteurs 2 temps avec l'essence en suivant les
instructions sur l'emballage.
Il est conseillé d'utiliser de l'huile pour moteurs 2 temps Oleo-Mac à 2%
(1:50) spécialement formulée pour tous les moteurs 2 temps refroidis par
air Oleo-Mac.
Les proportions correctes huile/essence illustrées dans la notice (Fig.19)
sont adaptées à l'utilisation d'huile pour moteurs Oleo-Mac PROSINT 2
et EUROSINT 2 (Fig.20) ou d'huile moteur de haute qualité équivalente
(spécifications JASO FD ou ISO L-EGD). Quand les spécifications de l'huile
NE SONT PAS équivalentes ou ne sont pas connues, utilisez un rapport de
mélange huile/essence de 4% (1:25).
ATTENTION : NE PAS UTILISER D'HUILE POUR AUTOMOBILES OU
POUR MOTEURS HORS-BORD 2 TEMPS.
ATTENTION : N'utilisez jamais de carburant dont le pourcentage
d'alcool dépasse 10% ; le gazole avec pourcentage d'alcool
jusqu'à 10% ou l'essence E10 sont acceptés.
ATTENTION :
N'achetez que la quantité de carburant nécessaire en fonction- des consommations personnelles ; n'en achetez pas plus qu'il
n'en sera utilisé en un ou deux mois ;
Conservez l'essence dans un récipient hermétique, dans un- endroit frais et sec.
REMARQUE : l'huile pour moteurs 2 temps contient un stabilisateur
pour carburant et reste fraîche pendant 30 jours. NE mélangez PAS des
quantités supérieures à celles utilisables sur une période de 30 jours. Il
est recommandé d'utiliser une huile pour moteurs 2 temps contenant un
stabilisateur pour carburant (Emak ADDITIX 2000 - réf. art. 001000972 –
Fig.21).
RAVITAILLEMENT (Fig.24)
Secouez le jerrycan du mélange avant de procéder au ravitaillement
(Fig.22).
BENZINA - ESSENCE
GASOLINE - BENZIN
GASOLINA - BENZÍN
OLIO - HUILE - OIL
ÖL - ACEITE - OLEJ

17
21 22 23 24
Deutsch Español Slovensky
ANLASSEN PUESTA EN MARCHA ŠTARTOVANIE
TREIBSTOFF
Dieses Gerät wird von einem 2-Takt-Motor angetrieben, der die Vormischung
von Benzin und Öl für 2-Takt-Motoren erfordert. Bleifreies Benzin und Öl
für 2-Takt-Motoren in einem sauberen, für Motor zugelassenen Behälter
vormischen (Abb.17).
EMPFOHLENER TREIBSTOFF:
DIESER MOTOR IST FÜR DEN BETRIEB MIT
BLEIFREIEM BENZIN FÜR FAHRZEUGE MIT OKTANZAHL 89 ([R + M] / 2) ODER
HÖHER ZERTIFIZIERT (Abb.18).
Mischen Sie das Öl für 2-Takt-Motoren gemäß den Anleitungen auf der
Packung mit Benzin.
Wir empfehlen die Verwendung von Öl für 2-Takt-Motoren Oleo-Mac
2%
(1:50)
, das speziell für alle luftgekühlten 2-Takt-Motoren Oleo-Mac ausgelegt
ist.
Das im Prospekt (Abb.19) angegebene korrekte Öl-/Treibstoff-Mischverhältnis
gilt sowohl bei der Verwendung von Oleo-Mac
PROSINT 2
und
EUROSINT 2
(Abb.20) als auch eines gleichwertigen Motoröls hoher Qualität
(
Spezifikationen JASO FD oder ISO L-EGD
). Wenn die Spezifikationen
des Öls NICHT gleichwertig oder nicht bekannt sind, ein Öl-/Treibstoff-
Mischverhältnis von
4% (1:25)
verwenden.
WARNUNG: KEIN ÖL FÜR FAHRZEUGE ODER ÖL FÜR 2-TAKT-
AUSSENBORDMOTOREN VERWENDEN
WARNUNG: Auf keinen Fall Treibstoff mit einem höheren
Alkoholanteil als 10% verwenden; Gasohol mit einem
Akoholanteil bis 10% oderTreibstoff E10 sind akzeptabel.
WARNUNG:
Nur so viel Treibstoff beschaffen, der für den eigenen Bedarf-
notwendig ist; kaufen Sie niemals mehr Treibstoff, als Sie in
ein, zwei Monaten verbrauchen,
Lagern Sie das Benzin in einem gut verschlossenen Behälter an-
einem kühlen, trockenen Ort
HINWEIS:
Das Öl für 2-Takt-Motoren enthält Kraftstoffstabilisator und bleibt
30 Tage lang frisch. Mischen Sie KEINE höheren Mengen als Sie innerhalb
30 Tagen verbrauchen können. Wir empfehlen Öl für 2-Takt-Motoren mit
Kraftstoffstabilisator (
Emak ADDITIX 2000 - Art. Nr. 001000972 – Abb.21
).
AUFTANKEN (Abb.24)
Schütteln Sie den Gemischkanister vor dem Auftanken (Abb.22).
COMBUSTIBLE
Este producto se acciona con un motor de 2 tiempos y requiere la premezcla
de gasolina con aceite para motores de 2 tiempos. Premezclar la gasolina sin
plomo con el aceite para motores de dos tiempos en un recipiente limpio
aprobado para la gasolina (Fig.17).
COMBUSTIBLE ACONSEJADO: ESTE MOTOR ESTÁ CERTIFICADO PARA
FUNCIONAR CON GASOLINA SIN PLOMO PARA USO AUTOMOVILÍSTICO CON
89 OCTANOS ([R + M] / 2) O CON UN NÚMERO MAYOR DE OCTANOS (Fig.18).
Mezclar el aceite para motores de 2 tiempos con la gasolina siguiendo las
instrucciones del envase.
Recomendamos utilizar aceite para motores de 2 tiempos Oleo-Mac al 2%
(1:50), formulado específicamente para todos los motores de dos tiempos
enfriados por aire Oleo-Mac.
Las proporciones correctas de aceite y combustible indicadas en el
prospecto (Fig.19) son adecuadas cuando se utiliza aceite para motores
Oleo-Mac PROSINT 2 y EUROSINT 2 (Fig.20) o un aceite para motor de
alta calidad equivalente (especificaciones JASO FD o ISO L-EGD). Si las
especificaciones del aceite no se conocen o NO son equivalentes, utilizar
una relación de mezcla aceite/combustible del 4% (1:25).
PRECAUCIÓN: NO UTILIZAR ACEITE PARA VEHÍCULOS O ACEITE
PARA MOTORES FUERA DE BORDA DE 2 TIEMPOS.
PRECAUCIÓN: no utilizar combustibles con porcentajes de alcohol
superiores al 10%; se admite el uso de gasohol con un porcentaje
de alcohol de hasta el 10% o combustible E10.
PRECAUCIÓN:
Comprar sólo la cantidad de combustible necesaria en base al- consumo; no comprar más de lo que se utilizará en uno o dos
meses;
Conservar la gasolina en un recipiente cerrado herméticamente,- en un lugar fresco y seco.
NOTA: el aceite para motores de dos tiempos contiene estabilizador para
combustible y permanece fresco durante 30 días. NO mezclar más cantidad
de la que se va a utilizar en 30 días. Se recomienda utilizar aceite para
motores de 2 tiempos con estabilizador para combustible (Emak ADDITIX
2000 - cód. art. 001000972 – Fig.21).
LLENADO (Fig.24)
Agitar el bidón de la mezcla antes del llenado (Fig.22).
PALIVO
Tento stroj je poháňaný dvojtaktným motorom a vyžaduje
prípravu zmesi benzínu a oleja pre 2-taktné motory. Pripravte
zmes bezolovnatého benzínu a oleja pre dvojtaktné motory v čistej
nádobe, ktorá je vhodná na uchovávanie benzínu (obr.17).
ODPORÚČANÉ PALIVO: TENTO MOTOR JE SCHVÁLENÝ NA
PREVÁDZKU S BEZOLOVNATÝM MIN. 89 a VYŠŠÍM OKTÁNOVÝM
BENZÍNOM PRE MOTOROVÉ VOZIDLÁ ([R + M] / 2) (Obr.18).
Zmiešajte olej pre dvojtaktné motory s benzínom podľa pokynov
na obale.
Odporúčame vám používať olej pre 2-taktné motory Oleo-Mac
v pomere 2% (1:50), vyvinutý špeciálne pre všetky dvojtaktné
motory chladené vzduchom Oleo-Mac.
Správne pomery zmesi olej/palivo sú uvedené v tabuľke (obr.19) a
vzťahujú sa na motorový olej Oleo-Mac PROSINT 2 a EUROSINT 2
(obr. 20) alebo na rovnocenný kvalitný olej (špecifikácie JASO FD
alebo ISO L-EGD). Keď špecifikácie oleja NIE SÚ rovnocenné alebo
nie sú známe, použite zmes v pomere 4% (1:25).
UPOZORNENIE: NEPOUŽÍVAJTE OLEJ PRE MOTOROVÉ
VOZIDLÁ ANI PRE 2-TAKTNÉ LODNÉ MOTORY.
UPOZORNENIE: nikdy nepoužívajte palivo s
percentuálnym podielom alkoholu vyšším ako 10%; smie
sa použiť gasohol s percentuálnym podielom až do 10%
alebo palivo E10.
UPOZORNENIE:
Kupujte iba také množstvo paliva, ktoré spotrebujete;- nekupujte viac, ako spotrebujete počas jedného alebo
dvoch mesiacov;
Benzín uchovávajte v hermeticky uzavretej nádrži, na- chladnom a suchom mieste.
POZN: olej pre dvojtaktné motory obsahuje stabilizátor paliva,
ktorý ostane čerstvý 30 dní. NEMIEŠAJTE SI väčšie množstvá
zmesi ako použijete počas 30 dní. Odporúča sa olej pre 2-taktné
motory obsahujúci stabilizátor paliva (Emak ADDITIX 2000 -
kód art. 001000972 – obr.21).
DOPĹŇANIE PALIVA (Obr.24)
Pred dopĺňaním zmesi paliva, najskôr potraste bandaskou, aby sa
zmes dôkladne premiešala (obr.22).

18
25
Italiano English Français
AVVIAMENTO STARTING MISE EN ROUTE
ATTENZIONE: osservare le istruzioni di sicurezza per
la manipolazione del carburante. Spegnere sempre il
motore prima di fare rifornimento. Non aggiungere
mai carburante a una macchina con il motore
in funzione o caldo. Spostarsi almeno 3 m dalla
posizione in cui è stato effettuato il rifornimento
prima di avviare il motore (Fig.23). NON FUMARE!
Pulire la superficie attorno al tappo del carburante per1. evitare contaminazioni.
Allentare lentamente il tappo del carburante.2. Versare con attenzione la miscela di carburante nel3. serbatoio. Evitare versamenti.
Prima di rimettere il tappo del carburante, pulire e4. controllare la guarnizione.
Rimettere immediatamente il tappo del carburante5. stringendolo manualmente. Rimuovere eventuali
versamenti di carburante.
ATTENZIONE: controllare se vi sono perdite di
carburante e, ove presenti, eliminarle prima dell’uso.
Se necessario, contattare il servizio assistenza del
proprio rivenditore.
Motore ingolfato
- Posizionare l’interruttore di massa su STOP.
- Applicare uno strumento idoneo al cappuccio della
candela (A, Fig. 25).
- Sollevare il cappuccio della candela.
- Svitare e asciugare la candela.
- Aprire completamente la farfalla.
- Tirare diverse volte la fune di avviamento per svuotare la
camera di combustione.
- Riapplicare la candela e collegare il cappuccio premendolo
con decisione.
- Posizionare l’interruttore di funzionamento su I, posizione
di avviamento.
- Portare la leva starter nella posizione OPEN, anche se il
motore è freddo.
- Avviare ora il motore.
WARNING: Follow safety instruction for fuel
handling. Always shut off engine before fuelling.
Never add fuel to a machine with a running or hot
engine. Move at least 3 m from refuelling site before
starting engine (Fig.23). DO NOT SMOKE!
Clean surface around fuel cap to prevent contamination.1.
Loosen fuel cap slowly.2.
Carefully pour fuel mixture into the tank. Avoid spillage.3.
Prior to replacing the fuel cap, clean and inspect the4.
gasket.
Immediately replace fuel cap and hand tighten. Wipe up5.
any fuel spillage.
WARNING: Check for fuel leaks, if any are found,
correct before use. Contact a Servicing Dealer if
necessary.
Engine is Flooded
- Set the on/off switch to STOP.
- Engage a suitable tool in the spark plug boot (A, Fig. 25).
- Pry off the spark plug boot.
- Unscrew and dry off the spark plug.
- Open the throttle wide.
- Pull the starter rope several times to clear the combustion
chamber.
- Refit the spark plug and connect the spark plug boot,
press it down firmly.
- Set the on/off switch to I, the starting position.
- Set the choke lever to OPEN position – even if engine is
cold.
- Now start the engine.
ATTENTION : respectez les consignes de sécurité
sur la manipulation du carburant. Coupez toujours
le moteur avant de procéder au ravitaillement.
Ne faites jamais l'appoint de carburant lorsque le
moteur tourne ou s'il est encore chaud. Restez à au
moins 3 m de la zone de ravitaillement avant de
démarrer le moteur (Fig.23). NE FUMEZ PAS !
Nettoyez la surface autour du bouchon de carburant afin1. d'éviter toute contamination.
Dévissez lentement le bouchon de carburant.2. Versez soigneusement le mélange de carburant dans le3. réservoir. Évitez de renverser du carburant.
Avant de remonter le bouchon de carburant, nettoyez et4. inspectez le joint d'étanchéité.
Remontez immédiatement le bouchon de carburant et5. serrez-le manuellement. Essuyez tout déversement de
carburant
ATTENTION : vérifiez si le carburant fuit et, le
cas échéant, éliminez les fuites avant d'utiliser
la machine. Si nécessaire, faites appel au service
d'assistance auprès de votre revendeur.
Moteur noyé
- Basculez l’interrupteur de marche/arrêt sur la position
STOP.
- Insérez un outil adapté dans la coiffe de bougie (A, Fig.
25).
- Faites levier sur la coiffe de bougie et retirez-la.
- Dévissez et séchez la bougie.
- Ouvrez l’accélérateur à fond.
- Actionnez le lanceur à plusieurs reprises de façon à vider la
chambre de combustion.
- Remontez la bougie et connectez la coiffe en l’enfonçant
fermement.
- Basculer l’interrupteur de marche/arrêt sur I, la position de
démarrage.
- Passez le levier d’étrangleur sur la position OUVRIR, même
si le moteur est froid.
- Démarrez à présent le moteur.

19
Deutsch Español Slovensky
ANLASSEN PUESTA EN MARCHA ŠTARTOVANIE
ACHTUNG: Befolgen Sie die Sicherheitsvorschriften
für die Handhabung von Treibstoff. Stellen Sie den
Motor vor dem Tanken unbedingt ab. Füllen Sie
niemals Treibstoff in eine Maschine mit laufendem
oder heißem Motor. Entfernen Sie sich mindestens 3
m von der Stelle, an der Sie aufgetankt haben, bevor
Sie den Motor starten (Abb.23). NICHT RAUCHEN!
Säubern Sie die Umgebung des Tankdeckels, um1. Verschmutzungen des Treibstoffs zu vermeiden.
Drehen Sie den Tankdeckel langsam auf.2. Füllen Sie das Treibstoffgemisch vorsichtig in den Tank.3. Möglichst keinen Treibstoff verschütten.
Säubern und kontrollieren Sie die Dichtung, bevor Sie den4. Tankdeckel wieder aufsetzen.
Setzen Sie den Tankdeckel sofort wieder auf und5. drehen Sie ihn von Hand fest zu. Entfernen Sie eventuell
verschütteten Treibstoff.
ACHTUNG: Kontrollieren Sie, ob Treibstoff austritt;
Leckstellen vor dem Gebrauch beseitigen.
Falls erforderlich verständigen Sie bitte Ihren
Fachhändler.
Motor ist ersoffen
- Bringen Sie den Ein-/Ausschalter in Stellung STOPP.
- Setzen Sie ein geeignetes Werkzeug in die Fassung der
Zündkerze ein (A, Abb. 25).
- Hebeln Sie die Zündkerzenfassung ab.
- Schrauben Sie die Zündkerze heraus und trocknen Sie sie.
- Ziehen Sie den Gashebel bis zum Anschlag.
- Ziehen Sie das Anwerfseil mehrmals durch, um die
Vergaserkammer zu lüften.
- Setzen Sie die Zündkerze wieder ein und setzen Sie die
Zündkerzenfassung auf; drücken Sie sie fest nach unten.
- Bringen Sie den Ein-/Ausschalter in Position I, die
Startposition.
- Bringen Sie den Chokehabel in der Stellung OFFEN, und
zwar auch bei kaltem Motor.
- Werfen Sie jetzt den Motor wieder an.
ATENCIÓN: seguir las instrucciones de seguridad al
manipular el combustible. Apagar el motor antes
del llenado. No añadir combustible a una máquina
con el motor caliente o en funcionamiento. Alejarse
3 m del punto de llenado antes de poner el motor en
marcha (Fig.23). ¡NO FUMAR!
Limpiar la superficie en torno al tapón del combustible1. para evitar contaminaciones.
Aflojar lentamente el tapón del combustible.2. Verter la mezcla de combustible con cuidado en el3. depósito. Evitar que el combustible se derrame.
Antes de volver a poner el tapón del combustible, limpiar4. e inspeccionar la junta.
Colocar inmediatamente el tapón y apretarlo a mano.5. Eliminar todo eventual residuo de combustible.
ATENCIÓN: comprobar que no haya fugas de
combustible; si las hay, eliminarlas antes del uso. Si
es necesario, contactar con el servicio de asistencia
del revendedor.
Motor ahogado
- Ajuste el interruptor de activación/desactivación en la
posición STOP.
- Acople una herramienta adecuada en la funda de la bujía
(A, Fig. 25).
- Haga palanca para sacar la funda de la bujía.
- Desenrosque la bujía y séquela.
- Abra el acelerador por completo.
- Tire de la cuerda del motor de arranque varias veces para
desahogar la cámara de combustión.
- Vuelva a poner la bujía y conecte su funda; presione
firmemente hacia abajo.
- Ajuste el interruptor de activación/desactivación en la
posición de arranque I.
- Ponga la palanca de estrangulación en la posición OPEN,
aunque el motor esté frío.
- Ahora, arranque el motor.
POZOR: dodržiavajte bezpečnostné predpisy o
manipulácii s palivom. Pred dopĺňaním paliva vždy
vypnite motor. Palivo nikdy nedopĺňajte, keď je stroj
alebo motor v činnosti a/alebo kým sú časti horúce.
Pred naštartovaním motora sa presuňte aspoň o
3 m od miesta, kde ste dopĺňali palivo (obr.23).
NEFAJČITE! (obr. 22).
Očistite okolie uzáveru paliva, aby ste predišli znečisteniu1. nádrže.
Uzáver palivovej nádrže uvoľnite pomaly.2. Opatrne nalejte palivovú zmes do nádrže. Zabráňte3. rozliatiu.
Pred vrátením uzáveru na hrdlo palivovej nádrže očistite a4. skontrolujte tesnenie.
Uzáver palivovej nádrže naskrutkujte na hrdlo palivovej5. nádrže a silno, utiahnite. Prípadné rozliate palivo
poutierajte.
POZOR: skontrolujte, či nedochádza k únikom
paliva. Pokiaľ k nim dochádza, odstráňte ich ešte
pred použitím. V prípade potreby zavolajte servisné
stredisko predajcu.
Motor je zahltený
- Prepnite spínač zapaľovania Zap./Vyp. do polohy STOP.
- Vsuňte vhodný nástroj pod káblovú koncovku sviečky
(A, Obr.25).
- Vypáčte káblovú koncovku sviečky.
- Sviečku odskrutkujte a osušte.
- Plynovú páčku úplne stlačte.
- Potiahnite štartovacie lanko niekoľkokrát, aby sa vyčistila
spaľovacia komora.
- Sviečku naskrutkujte späť a nasaďte na ňu pevne káblovú
koncovku – zmontujte ostatné časti.
- Prepnite spínač zapaľovania Zap./Vyp. do štartovacej
polohy I.
- Páčku sýtiča nastavte do OTVORENEJ polohy – aj keď je
motor studený.
- Teraz naštartujte motor.

20
26 27 28 29
Italiano English Français
AVVIAMENTO STARTING MISE EN ROUTE
AVVIAMENTO MOTORE
Caricare il carburatore premendo il bulbo (A, Fig.26).
Assicurarsi che l’acceleratore (B, Fig.28) funzioni bene,
ruotandolo tra MIN e MAX. Portare l’interruttore in
posizione ON/MIN (B, Fig.27). Mettere la leva starter
(C, Fig.26) in posizione CLOSE (solo per partenze a
motore freddo). Tenendo ben ferma la macchina, tirare
lentamente l'impugnatura avviamento fino a che si
incontra resistenza, poi tirare energicamente fino a che
il motore inizia a dare qualche scoppio. A questo punto
riportare la leva starter (C, Fig.29) in posizione OPEN e
dare alcuni strappi decisi fino ad ottenere l'avviamento
del motore. Dopo l'avviamento, riscaldare il motore
prima di aumentare il numero di giri al valore richiesto:
quando durante l'uso non è più necessario un alto
numero di giri, riportare l’acceleratore (B, Fig.27) al
minimo (MIN).
ATTENZIONE! - Quando il motore è già caldo,
non usare lo starter (C, Fig. 26) per
l’avviamento.
RODAGGIO MOTORE
Il motore raggiunge la sua massima potenza dopo 5÷8
ore di lavoro.
Durante questo periodo di rodaggio non fare
funzionare il motore a vuoto al massimo numero di giri
per evitare eccessive sollecitazioni.
ATTENZIONE! - Durante il rodaggio non variare
la carburazione per ottenere un presunto
incremento di potenza; il motore potrebbe
esserne danneggiato.
NOTA: è normale che un motore nuovo emetta fumo
durante e dopo il primo utilizzo.
STARTING THE ENGINE
Fill the carburettor by pushing primer bulb (A, Fig.26).
Make sure that the throttle (B, Fig.28) works properly,
rotating between MIN and MAX. Put the ON/OFF switch
in the ON/MIN position (B, Fig.27). Put choke lever
(C, Fig.26) on CLOSE position (only for cold engine).
Holding the unit firmly, pull the starter handle until you
meet resistance, then pull quickly with a short sharp
stroke. Repeat this until the engine fires. Put then the
choke lever (C, Fig.29) in OPEN position and pull the
starter handle again till the engine starts. After starting,
warm up the motor before increasing the RPM to the
required value. During use, when a high number of
RPM is no longer necessary, move the accelerator
(B, Fig.27) to the minimum (MIN).
WARNING! - Do not use the choke (C, Fig. 26)
when starting a hot engine.
BREAKING-IN THE ENGINE
The engine reaches the maximum power after 5÷8
hours of activity.
During this period of breaking-in do not make use the
engine at wide open throttle without load, to avoid
excessive functioning stress.
WARNING! - During the breaking-in period do
not vary the carburetion to obtain a presumed
power increment; the engine can be damaged.
NOTE: It is normal for smoke to be emitted from a
new engine during and after first use.
DEMARRAGE DU MOTEUR
Remplir le carburateur en agissant sur la pompe
(A, Fig.26). S’assurer que l’accélérateur (B, Fig.28)
fonctionne correctement, tournante entre MIN et MAX.
Tournez l’interrupteur sur la position ON/MIN (B, Fig.27).
Positionner le levier du starter (C, Fig.26) dans la
position CLOSE (seulement pour démarrage à froid).
Tenir fermement la pompe et tirer la corde du
démarreur jusqu’à ce que le moteur démarre. Placer le
levier du starter (C, Fig.29) dans la position OPEN et, si
nécessaire, actionnez à nouveau le lanceur, et laissez
chauffer le moteur avant de travailler. Après le
démarrage, faites chauffer le moteur avant
d’augmenter la quantité de tours jusqu’à la valeur
requise: lorsqu’un nombre élevé de tours n’est plus
nécessaire pendant l’usage, reportez l’accélérateur
(B, Fig.27) au minimum (MIN).
ATTENTION! - Lorsque le moteur est chaud
n’utilisez pas le starter (C, Fig. 26) pour
démarrer.
RODAGE MOTEUR
Le moteur atteint sa puissance maximale au bout de 5
à 8 heures de travail.
Au cours de cette période de rodage, ne faites pas
tourner le moteur à vide au régime maxi pour lui éviter
excessif efforts de fonctionnement.
ATTENTION! - Durant le rodage, ne modifiez pas
la carburation en vue d'augmenter la puissance;
vous risquez seulement d'endommager le
moteur.
REMARQUE : il est normal qu'un moteur neuf
dégage de la fumée durant et après la première
utilisation.
This manual suits for next models
1
Other Oleo-Mac Water Pump manuals
Popular Water Pump manuals by other brands

Bosch
Bosch Rexroth 63 Series instruction manual

SHURflo
SHURflo 166-269 Series Technical Service

dosatron
dosatron D40MZ3000 manual

Simer
Simer 3985C Installation, operation & parts

Gardner Denver
Gardner Denver STP 125 Operation, maintenance and installation manual

Pennington
Pennington Aquagarden 80-160 quick start guide

Central Machinery
Central Machinery CENTRAL MACHINERY 92274 Assembly and operating instructions

North Star
North Star S 10633 owner's manual

Oase
Oase ProMax MudDrain 20000 operating instructions

Renkforce
Renkforce 1526584 operating instructions

KSB
KSB Movitec VCI Installation & operating manual

Yoshitake
Yoshitake PF-7000 instruction manual