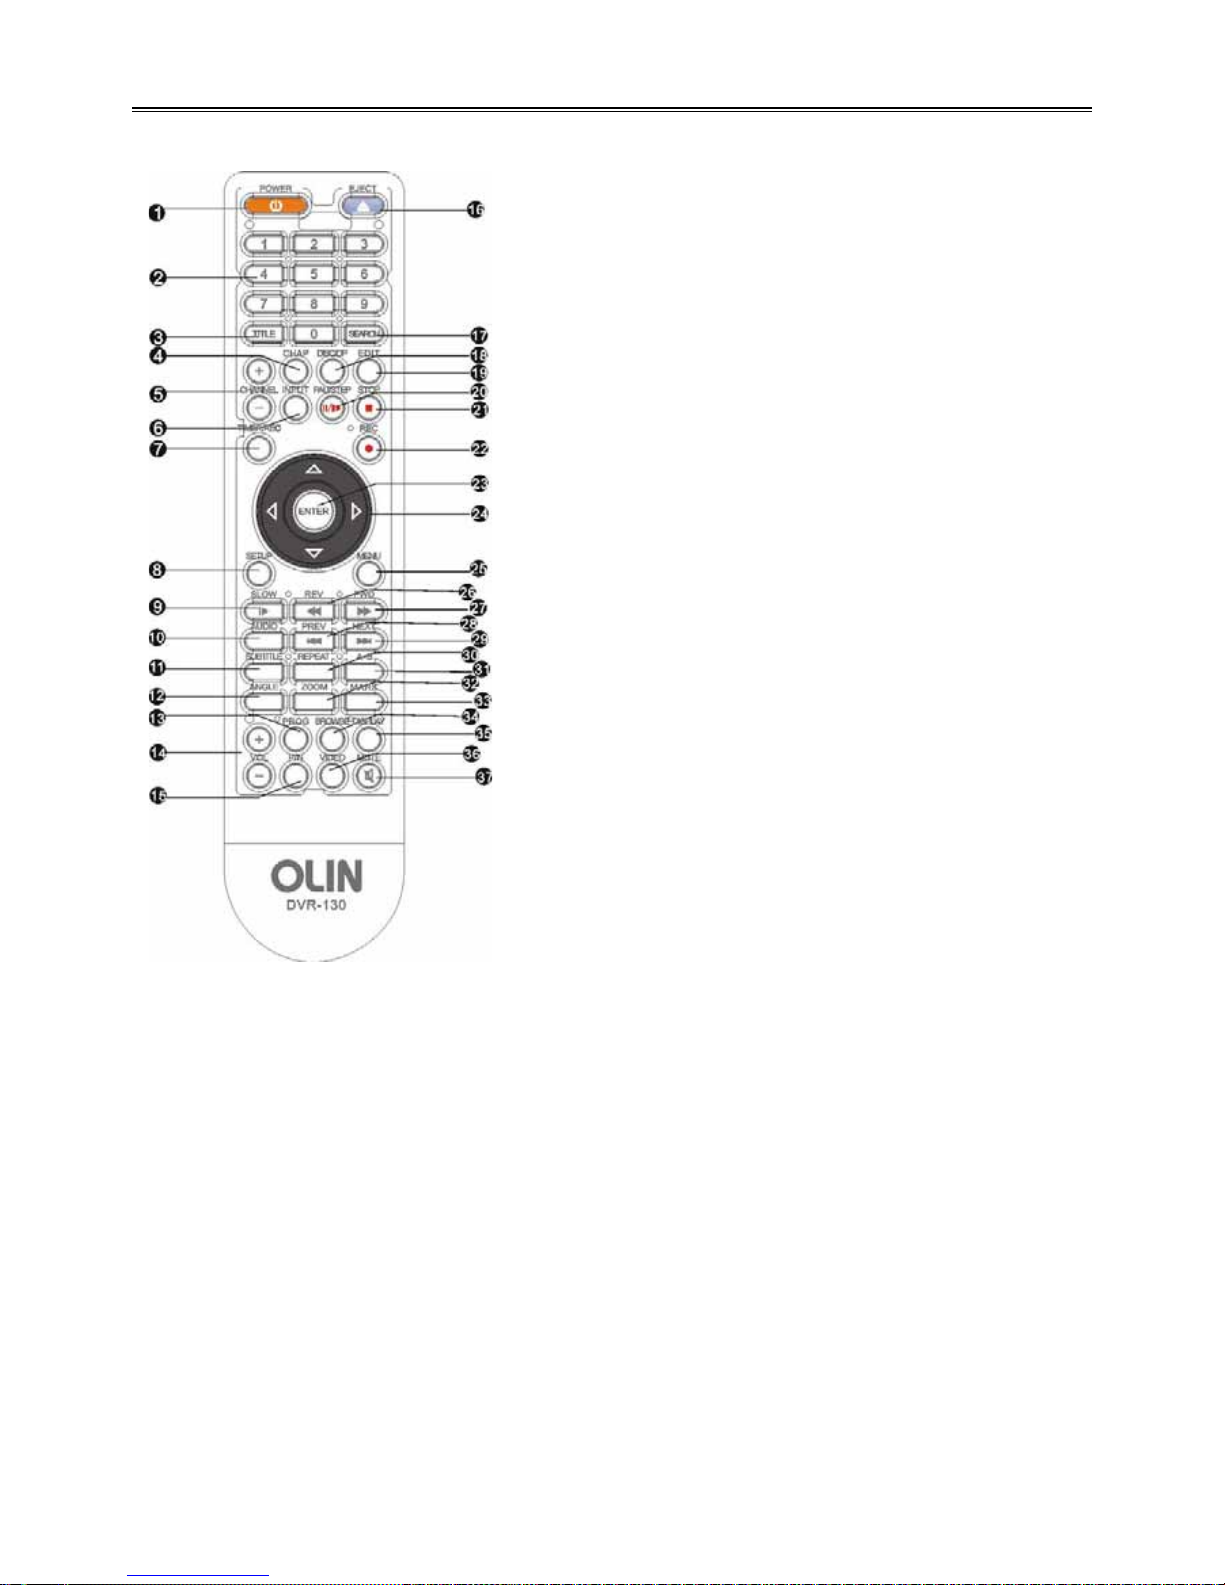
Olin DVR-130 User manual


1
CONTENTS
Safety Warning ---------------------------------------------------------------------------------- 2
Product Features -------------------------------------------------------------------------------- 3
Discs Information ------------------------------------------------------------------------------ 4
Parts Introduction -------------------------------------------------------------------------------- 5
System Connection ---------------------------------------------------------------------------- 8
Function Operations -------------------------------------------------------------------- 12
Disc Recording ------------------------------------------------------------ 16
System Setup ------------------------------------------------------------------------------------ 21
Trouble Shooting ----------------------------------------------------------------------------- 38
Specifications ------------------------------------------------------------------------------------ 39

2
IMPORTANT FOR LASER PRODUCTS
1. CLASS 1 LASER PRODUCT
2. DANGER
Visible laser radiation when open and
interlock failed or defeated. Avoid direct
exposure to beam.
3. CAUTION
Do not open the top cover. There are no
user service-able parts inside the unit,
leave all servicing to qualified service
personnel.
SAFETYWARNING
Precaution Notes:
1) Read this manual carefully before use this product.
2) Keep this manual for late reference.
3) Heed all warnings, and follow all instructions.
4) Do not place this apparatus near water.
5) Clean only with dry cloth.
6) Do not block any ventilation openings. Install it in
accordance with the manufacturer’s instructions.
7) Do not install this product near any heat sources
such as radiators, heat registers, stoves, or other
apparatus (including amplifiers) that produce heat.
8) Do not defeat the safety purpose of the polarized
or grounding-type plug. A polarized plug has two
blades with one wider than the other. A grounding type plug has two blades and a third grounding prong.
The wide blade or the third prong are provided for your safety. If the provided plug does not fit into your
outlet, consult an electrician for replacement of the obsolete outlet.
9) Protect the power cord from being walked on or pinched particularly at plugs, convenience receptacles,
and the point where they exit from the apparatus.
10) Only use accessories specified by the manufacturer.
11) Use only with the cart, stand, tripod, bracket, or table specified by the manufacturer, or sold with the
apparatus. When a cart is used, use caution when moving the cart/apparatus combination to avoid injury
from tip-over.
12) Unplug this apparatus during lightning storms or when unused for long periods of time.
13) Refer all servicing to qualified service personnel. Servicing is required when the apparatus has been
damaged in any way, such as power supply cord or plug is damaged, liquid has been spilled or objects
have fallen into the apparatus, the apparatus has been exposed to rain or moisture, does not operate
normally, or has been dropped.
14) Apparatus shall not be exposed to dripping or splashing and no objects filled with liquids, such as vases,
shall be placed on the apparatus.
WARNING: To reduce the risk of fire
or electric shock , DO NOT expose
this product to rain or moisture !
The lighting Flash with arrowhead symbol within a triangle, Alerts the user to “dangerous
Voltage” which could cause electric shock.
The exclamation point within a triangle indicates to the user to read important operating
and maintenance instructions in the manual

3
PRODUCTFEATURES
Main features of product :
ƽFully compatible with DVD/VCD/CD/MP3/ PICTURE-CD/CD-R/CD-RW/DVD-R/DVD-RW/DVD+R/
DVD+RW/HDCD
ƽCompatible with MPEG4/DivX3.11/ DivX4/DivX5 and Xvid,
ƽBuild-in Dolby AC-3 decoder
ƽAdvanced MDDi TM Progressive scan output
ƽFull function remote control
ƽAutomatic screen protection
ƽPAL/AUTO/NTSC optional
ƽUniversal power supply:AC110-240V 50/60HZ
Operation Functions:
ƽUp to 32 language subtitles and 8 different sound languages
ƽMemory stopping, A-B play function
ƽMagnified and mobile picture, High clarity multi-level picture zoom
ƽMulti -grade fast or slow motions, Multi-angle play
ƽAdjustable screen aspect ratio(4:3 or 16:9)
ƽFWD/FFD, slow motion and single-step play
ƽResume/memory play function
Special Functions:
ƽDV mode record
Immediate manual record DV digital camera and other input signal. Automatic and time record of outside
signal input. Setup multi-disc edit selection of multi-period of time, multi-quality grade and user
individuation.
ƽFull frequency TV receiver
With TV full frequency you can select channel through channel scan, and storage. Setup frequency
amendment menu, use to revise channel information that have received. If revised channel name᧨channel
frequency is changed little. Setup the channel compositor menu to adjust the sequence of program.
Output Terminals:
ƽVideo/S-video/YUV output
ƽCoaxial and optical output
ƽ5.1 channel output
ƽVGA connector
Input Terminals:
ƽDV digital camera input
ƽ2 Composite video input
ƽ2 audio input
ƽS-video input
ƽCable TV input
Accessories
1, DVD Player
2, Remote Control
3, User’s Manual
4, AAABattery
5, AV Cable
6, Warranty Certificate
1 PC
1 PC
1 PC
1 Pair
1 Pair
1 PC

4
DISCSINFORMATION
DISC FORMATS SUPPORTED BY THIS PLAYER
Disc Sort Disc Logo Disc Contents Disc Size
DVD Video
(Active Picture) 12cm
CD Audio
12cm
8cm
MP3 Audio 12cm
JPEG Video
(Static Picture) 12cm
SVCD
Audio+Video 12cm
MPEG4 Audio+Video 12cm
DVD+R Can use just once 12cm
DVD+RW Can repeated use 12cm
ƹSoftware maker specifies the operation method of some DVD discs ,please refer to the instruction manual of
disc.
Disc Using
About Disc Terms
- Title: contents compressed on a DVD are divided into several sections which is called “TITLE”
- Chapter: the TITLE is comprised of one or more small sections called “Chapter”, which is numbered for
easily searching. But some discs may not have a recording chapter.
- Track: a segment of contents on a SVCD,VCD or CD. Each track is numbered for easily searching.
- Scene: contents in a VCD with playback control function be divided into certain portion is called scene, and
every scene will be showed on screen menu with a scene number, which can be easily searching
while playing. A scene usually is formed with one or several tracks
PBC function (Only for SVCD,VCD)
When playing SVCD or VCD discs, a content menu may be showed on screen, this is what we Called “Play
back control “ viz. PBC function.
Disc sort Functions
VCD without PBC function (1.1 version) Exhibiting both music and images.
SVCD/VCD with PBC function
(2.0 version)
The repeat playback can be performed to super VCD or
VCD2.0 only when the PBC is OFF.
1. Using of Discs
- Do not touch the playing surface of the disc.
- Do not stick paper and label on the disc.
- Do not expose discs to direct sunlight.
- Do not place discs near water or in dusty place.
2. Cleaning of Discs
- when clean a disc, lightly wipe it with soft cloth from
the center of the disc outward in a radial manner.
-Never use record cleaning sprays, benzene, thinner,
static electricity prevention liquids or any other
solvents to clean your discs.

5
Parts Introduction
Front panel drawing
Function Key introduction:
Display screen drawing
Display Logo introduction
8 Display Screen.
9 DV Signal Input Jack
10 Video Input Jack
11 Audio Input Jack
12 INPUT: Press to choose the input source.
13 Channel -/+ key: Press to select channel.
14 Record: Press to start recording
15 Open: Press to open the cover.
1 Power: Press to turn on/off power.
2 Eject: Press to open/close the disc tray.
3 Play: Press to play the disc.
4 Pause: Press to pause playback.
5 Stop: Press to stop playback.
6 Disc Tray
7 Remote control signal receive window.
1 Input source indicator
2 Search progress indicator
3 Recording progress indicator
4 Play status indicator
5 Pause status indicator
6 Playing time indicator
7 DOLBY mark indicator
8 Playing disc status indicator
9 Playing disc type indicator

6
Parts Introduction
Rear panel drawing
1. Cable TV or Antenna signal Input Jack
2. Cable TV Signal Output Jack
3. YUV Output Jacks
4. S-video Output Jack
5. Coaxial Digital Output Jack
6. S-video Input Jack
7. Optical Digital Output Jack
8. VGA Output Jack
9. Power Cord
10. Power Switch
11. 5.1CH Audio Output Jacks
12. Video Output Jack
13. 2CH Audio Input Jacks
14. Video Input Jack

7
Parts Introduction
Remote control function key introduction
11. SUBTITLE-When playing DVD disc, press to
select a subtitle language.
12. ANGLE -Press to access various camera
angles.
13. PROG -Press to set the Disc in programming
play mode.
14. Volume +/- -Press to increase or decrease the
DVD volume level slightly.
15. P/N-Press to shift PAL/AUTO/NTSC Mode.
16. EJECT -Press to open or close the disc tray.
17. SEARCH-Allows you to select the desired disc
starting time, track or title.
18. DISC/OP - When playing a DVD+R/RW disc
press it to edit the disc.
19. EDIT-Press it to exit the chapter edit menu
when playing a DVD+R/RW disc.
20. PAUSE/STEP –Press one time as pause, press
again as step; During recording process, press
to stop the recording.
21. STOP -Press to stop playback.
22. REC- Press to recording.
23. ENTER - Press to enter or get into play mode.
24. Direction Buttons (///) -Use to select
menu items or settings.
25. MENU – Press to turn on/off the menu.
26. REV -Press to fast backward.
27. FWD –Press to search forward.
28. PREV -Press to skip to the previous chapter.
29. NEXT -Press to skip to the next chapter.
30. REPEAT-Press to repeat a chapter, track, title,
or all content.
31.A-B-Press to mark a segment to repeat between
A and B.
32.ZOOM - When playing DVD disc, press this
button to activate zoom.
33.MARK-Press to memory some playing frame,
stored for selecting.
34. BROWSE-Press to look through in advance
and can select the content you want.
35. DISPLAY-Press to show the elapsed playback
time or the track number, press to cancel
onscreen text.
36. VIDEO-Press to switch Interlace and
Progressive Mode.
37. MUTE-Press to turn on/off the speaker output.
1. POWER -Press to turn the DVD player on or off.
2. Number Buttons - 0-9 are used for direct access
of title, chapter ,track and time.
3. TITLE -Press to display titles.
4. CHAP - In chapter edit menu, press it to separate
the chapter, repeat the operation to divide the title
into multi-chapters.
5. CHANNEL +/- -Press to choose the TV channel.
6. INPUT -Press to shift different input source.
7.TIMER/REC– Use this key to realize timer
recording function.
8.SETUP -Press to access the player’s Setup menu.
9.SLOW -Press to slow down playback.
10.AUDIO – when play multi language disc, press it
to select different audio language.

8
SystemConnections
Precaution: Do not turn on the power of the player before all connections have been correctly done.
Important Remark: The pictures maybe different from your DVD PLAYER ,the connections only for your
reference.
Connecting to TV
The video output connector of the player include: Video output, S-video output, and component output, VGA
output, you can select any one of them to connect refer to your connecting apparatus correspondingly. Correct
connection way as shown in the figure below:
Setup DVD Player Video Output Mode
-Setup your DVD player video output mode correctly refer to your connected TV system, Press P/N button on
remote control to select the same mode as TV system mode such as “PAL/AUTO/NTSC”.
For example: if the TV system is NTSC mode, press the P/N button to setup the player under “NTSC” mode.
-Setup the player video output display size refer to the screen size of the connected TV, set the “TV TYPE” to
“16:9” in system setup menu when wide screen TV connected, when connected to normal TV ,set the player’s
TV TYPE to “4:3 PS” or “4:3 LB”.
S-Video Connection Setting
Connect the S-Video output jack on the DVD Player to the Display device’s S-video input jack with a S-video
cable. Under this mode ,there is no need to do the setting in the setup menu.
Y U V Video Connection Setting
Connect the component output jack on the DVD player to the Display device’s component input jack with YUV
cable.
VGA Connection Setting
Connect the player to the display device with VGA cable if you want VGA output mode.
If the DVD player’s video output is under interlaced output mode, select “VGA” in ”COMPONENT” in the
Audio/Video menu, press ENTER button ,and restart the player, then the video out is shifted to VGA output
automatically.
If the DVD player’s video output is under Y/Pb/Pr output mode, select “VGA” in ”COMPONENT” in the
Audio/Video menu ,the press ENTER button to shift to VGA output.
Audio Output Connector
There are 5.1CH output ,optical output, coaxial digital audio output for Audio connection use.

9
SystemSetup
Connecting to an Amplifier with 5.1CH Audio Output
Connect the player’s 5.1CH output to the 5.1CH amplifier’s 5.1CH input connector with Audio cable, as shown
in below figure.
Set the player’s Audio output mode as the “DOWNMIX” to “5.1CH” in “Audio/Video” menu.
The default audio output set is Stereo, then you can enjoy the 5.1CH home theatre system sound effect.
Connecting to an Amplifier with Dolby Digital Decoder by Optical and Coaxial Jack
To enjoy HiFi sound effect ,you can also connect the player to an amplifier by using the player’s Optical output
connector or Coaxial digital output jack correspondingly. Optical digital output jack’s can keep the raw audio
signal high quality when connect to the amplifier .To assure a HiFi Dolby sound enjoyment.
After finished connection set the player’s Audio output mode as “SPDIF Output” to “SPDIF/RAW” in “SPDIF
Output ” in the Audio/Video menu.

10
SystemConnections
Exterior Recording Signal Input
The front panel of the player with Audio/Video input jacks and the DV input jack, rear panel with S-Video,
Audio/Video input jacks. Cable TV input jack ,you can connect the relevant jack as your need of recording.
Connecting with exterior Audio/Video Input Signal or S-Video Input Signal
Connecting With Cable TV:

11
SystemConnections
Connecting With Antenna
Connecting With DV

12
FUNCTIONOPERATIONS
Load Discs
After correctly connect the Player to other apparatus, turn on the player, then follow below steps.
NOTE: Please check the Disc condition before putting it in the tray, bad quality or damaged discs will
damage the pickup inside the player, and shorten its working time.
Function Operation Instruction
1. Turn on the player
Press the POWER button. then the player will
search for the disc automatically.
3. Load the disc
Put the disc in the tray
as shown in the right
fi
g
ure.
2. Open Disc tray
Press the EJECT button to open the disc tray.
4. Press the EJECT button to close the disc
tray and begin playing.
STOP
During playback, press the STOP button on remote control to stop playback. For DVD discs, after
pressing the STOP button once, if you press the ENTER button, then the player will play from the
stopped point.
PAUSE
Press the PAUSE/STEP button on remote control to pause, and press it repeatedly to achieve
frame-by-frame playback.
REPEAT
1. Use the REPEAT button to repeat a title, a chapter, a track and a disc respectively according to
different discs, and also to cancel repeat.
2. Use the A-B button to repeat section A to B. Press it once to set the starting point A, twice to set
the ending point B, and the third time to cancel repeat.
(NOTE: Some discs do not support repeat function. )
ENTER
Press the ENTER button to start playback. Press the POWER button on remote control to enter
standby status, and press it again to resume playback status. If there is no operation for a long time,
the player will automatically enter screen saver status and then enter standby status.

13
FUNCTION OPERATIONS
SEARCH BY TIME
You can use the GOTO button to search by time, namely to play from a specific time. During DVD
playback, press the GOTO button once and TV screen will display the title or chapter, then you can
use number buttons to select any one of them.
Note: Some DVD discs do not support search function.
FAST FORWARD & REVERSE
Press the and buttons to activate fast reverse or forward function, Continually press to select
different times fast reverse or forward function.
SLOW FORWARD & REVERSE
Press the SLOW button to activate slow forward or reverse, Continually press to select different
times slow forward or reverse function.
Note: There is no slow playback function for CD and MP3 discs.
DISC INFORMATION DISPLAY
Press the DISPLAY button on remote control to display the relevant disc information.
PROGRAM PLAYBACK
Use the PROGRAM button to activate program playback of DVD and CD discs.
Operation steps:
1. At STOP status, press the PROGRAM button to enter program status.
2. Use the number buttons to input contents according to prompts.
3. Repeat step 2 to program more contents.
4. Use the direction buttons to move cursor to “START” and then press the ENTER button to begin
the program playback.
ZOOM
Press ZOOM button on the remote control, to activate zoom, zoom in or Zoom out function.
Continually press the zoom button will change the zoom rate accordingly. Zoom rate is:
Zoom out rate: ×2, ×3 , ×4 ;
Zoom in rate: ×1/2, ×1/3, ×1/4;
Press the ZOOM button on the remote control to resume normal playback.
VOLUME
During playback, press the VOL+button to turn up, press the VOL-button to turn down.

14
FUNCTION OPERATIONS
DVD PLAYBACK
MENU
When playing DVD disc, Generally it will appear a menu for further selection, you can use the
direction buttons to highlight the item you would like and press the ENTER button to confirm.
TITLE & CHAPTER
Generally there are several titles in a DVD disc, and several chapters under a title. You can select
any of them quickly by using the Number buttons to enter the number of the chapter.
LANGUAGE
There are up to 8 kinds of audio languages in a DVD disc. When you play a multi-language DVD
disc, press the AUDIO button on remote control to select a different audio language.
(Note: This function is only available for discs that have several audio bit streams.)
SUBTITLE
The DVD player can support up to 32 kinds of different subtitles. When you play a multi-subtitle
discs, press the SUBTITLE button on remote control to select different subtitle.
(Note: This function is only available on the audio bit streams recorded discs.)
ANGLE
The DVD player supports multi-angle function. Press the ANGLE button continuously to view
different angles of the DVD movie.
(NOTE: This function is only available for the multiple angle shooting discs. Multi-angle means that a
scene is shot from more than one angle so that audience can watch from different angle.)

15
FUNCTIONOPERATIONS
MP3 PLAYBACK
CD PLAYBACK
PICTURE CD PLAYBACK
MP3 is the third audio compression format of international standard MPEG. The audio signal is
compressed at the rate of 12:1. using MP3 format, one disc can record more than 600 minutes
music, the timbre of which is similar with that of CD discs.
There are many different formats for storing MP3 songs. Usually, one MP3 disc includes many
folders (directories) and every folder includes several files (songs).
At stop status, use the “/” button to move the cursor to “PLAY MODE” column, and use the
“/” button to select the play mode. Press the “/” button to confirm. Similarly, use the “/”
button to select the directory you want and press the ENTER button to enter it. Press the PLAY
button to play the song you selected.
at playing status, you can use the and buttons to select other songs. The player can only
output stereo audio signal when playing MP3 discs. There is no search function during MP3
playback. Hundreds of pictures or MP3 songs can be stored in a disc in this format.
The player will play all tracks for CD discs continuously in default status. You can press the and
(PREV/NEXT SKIP) buttons or number buttons to select a certain track.
JPEG picture playback operation
1. Normal Playback
When Playing JPEG format Disc, “SMART NAVI” and “ROOT” will be displayed on the screen.
The left column is the menu for last level, and the right is the menu for next level. Use the ENTER
button and the / button to select submenus, Use the / button to select the different
contents in the menu.
2. Picture Rotation
the picture can be rotated when playing, when another picture is selected, it will be cancelled
automatically. There are two rotation modes: left Rotation & right Rotation. You can use direction
buttons to select:
“” Left button ----- Rotate left
“” Right button ----- Rotate right
3. Zoom
Press ZOOM button to activate Zoom, Zoom in and out function. After activation, use the and
buttons to adjust zoom proportion, and you can use/,/ key to move it. press Zoom
again to resume the picture back, then press the MENU button to return to the root menu.
(NOTE: some JPEG format discs may not support Picture Rotation and zoom function.)

16
DISCRECORDING
RECORD OPERATION
1. Connect whit exterior input source
According to the system connection you can connect the player with exterior input signal, you can connect the
cable TV output signal with the player directly.
2. Turn on the power
Start the player at the first time, press the power switch on the rear panel, if the player at stand by mode, press
the “POWER” key on the remote control to start it, the player get into start screen mode, press the “EJECT”
key on the remote control to open the tray, load the recordable DVD+R/RW disc and close the tray.
3. Select exterior input signal
Press the “INPUT” key on the front panel or remote control, select relevant input signal; if the signal is TV,
press the “CHANNEL-/+” key to select different TV program.
4. Record
Press the “RECORD” key, the player start recording.
In the record process, press the “PAUSE/STEP” key to pause record, press “STOP” key to stop record.
RECORD GUIDE
Recording
Recording Recording Time INPUT Recording Quality Left Time
Pause recording
Pause mode

17
DISCRECORDING
Stop recording
Stop recording mode
Input source
The DVD recorder with 5 group input jack: front AVǃrear AVǃrear S-Video ǃdigital camera ǃTV.
One key recording
While recording you can choose record time, press “RECORD” button each time it can record 30 minutes, if
the recording time over 30 minutes, you can decide the press times according to the recording time, if the
record program time is longer than the preset time, you can press the “RECORD” button to prolong the record
time; Before record you should select the relevant input source and record quality.
Manual recording
At input status, press “RECORD” button to enter manual record mode directly, at this time you can use the
“SETUP MENU” to change the settings. Press “PAUSE” button to enter pause record status, press “STOP”
button to stop record.
Timer recording
You can setup Timer recording at “SETUP MENU” or press “TIMER/REC” button to enter “timer setup menu” to
setup directly; it can save 8 timer recording message at one time, if you want the DVD recorder enter standby
mode after recording, you should let the player enter standby mode after finishing setup the timer recording.
ƹ If the player at playback status, 5 minutes before the timer recording start, the system will show a image to
remind “Timer recording will start…….”; If the player at “pause” status, the system will start and enter
recording mode 2 minutes before the preset record time.

18
DISCRECORDING
DISC EDIT
Only the disc recorded by the player can be edit.
Erase
Playing the recorded DVD+RW discs, select the title which is need to be deleted, move cursor to “Erase”,
press “ENTER” button to delete the title.
Note: The deleted program will not come back again.
Select
Playing recorded DVD+R or DVD+RW discs, use the “Select” selection to select multi-title to edit them at the
same time.
Rename
Playing recorded DVD+R or DVD+RW discs, select the title which is need to be rename, then move the cursor
to “RENAME”, press “ENTER” button and it show a small keyboard on the screen, use the direction buttons to
select the numbers or letters, press “ENTER” button to ensure. Show as the image:
DVD+RW
DVD+R or DVD+RW
DVD+R or DVD+RW

19
DISCRECORDING
Chapter edit
You can increaseǃdeleteǃhideǃedit the content of DVD+R/RW disc.
Index
Playing recorded DVD+R or DVD+RW discs, select the title which is need to index, move the cursor to “Index”,
press “ENTER” button to enter index image mode, press “REC” button to setup index image, press “STOP”
button to exit index image mode.
Divide
Playing recorded DVD+RW disc, select the title which is need to be partitioned, move the cursor to “Divide”,
press “ENTER” button to enter partition title mode, press “REC” button to setup partition title, press “STOP”
button to exit partition title mode.
Finalize
The operation only effective for DVD+R discs; After the operation of “Finalize”, the recorded content can’t
append new content, if the recorded content haven’t operate the “Finalize” then it can append new content, but
other common DVD can’t play the recorded content.
Protect
Playing recorded DVD+R or DVD+RW discs, select the title which is need to protect, move the cursor to
“Protect”, press “ENTER” button to protect the title, after protect operation, the title can’t be edit, if you want to
unprotect the title, select the protected title, move the cursor to “Unprotect”, press “ENTER” button to unprotect
the title.
Format
Playing recorded DVD+RW discs, move the cursor to “Format”, press “ENTER” button to format the disc. After
format operation the content will not come back again.
DISC OPERATION MENU
Playing recorded DVD+R or DVD+RW discs, Press “DISC OP” button, the screen will show a DISC
OPERATION MENU as below:
DVD+R or DVD+RW
DVD+RW
DVD+R
DVD+R or DVD+RW
+RW d
D
DVD+
DVD+R or DVD+RW
Table of contents
Other Olin DVD Recorder manuals