Olive MELODY N2 User manual

USER GUIDE
O P U S N ° 4 | M E L O D Y N ° 2

2OPUS | MELODY USER GUIDE
And thank you for your purchase. You’re
about to experience digital music in true
high delity. With easy, intuitive access
to your complete music collection and
no compromise in sound quality, now
you can experience all of it.
(Yes, Olive it.)
WELcOME

3
OPUS | MELODY USER GUIDE
The Opus and Melody were designed to work together so you can enjoy your music
library throughout your home. Using either a wired or wireless home network, your
Opus can be part of your stereo system in the living room while the Melody provides
access to your music in up to 10 other rooms. Let’s set up your new system and ll
your home with music.
Melody in the ofce.Melody in the master bedroom.
Opus in the living room.
Melody in the family room.

4OPUS | MELODY USER GUIDE
It’S aLL
hERE.
OLIVE It.
hOW’S that SOUND?

5
OPUS | MELODY USER GUIDE
Setup
06 Components
07 Audio
08 Connect Opus
09 Connect Melody
Navigate
10 Buttons
12 Navigation Bar
13 Navigation Icons
14 Remote Control
15 Music Library
16 Create Playlists
17 Music Sources
18 Internet Radio
19 Settings
Network Setup
20 Wired & Wireless
Opus Features
22 Import CDs
23 Import From PC
24 Burn CDs
25 Maestro: Overview
26 Maestro: Connection
27 Maestro: Playlists
27 Maestro: Edit Genre
28 Maestro: Edit Metadata
Maintain
29 Backup
30 Update Software
31 Safety & Care
Resources
32 Q & A
33 Regulation Information
34 Legal Notices
36 Warranty
37 Copyright

6OPUS | MELODY USER GUIDE
Hear, Hear your music is here! Unpack your box and nd the following items:
Opus Melody
Power Cable Power Cable
User Guide User Guide
Wireless Antenna Wireless Antenna
Remote + Batteries Remote + Batteries
Recovery CD
SETUP
Components

7
OPUS | MELODY USER GUIDE
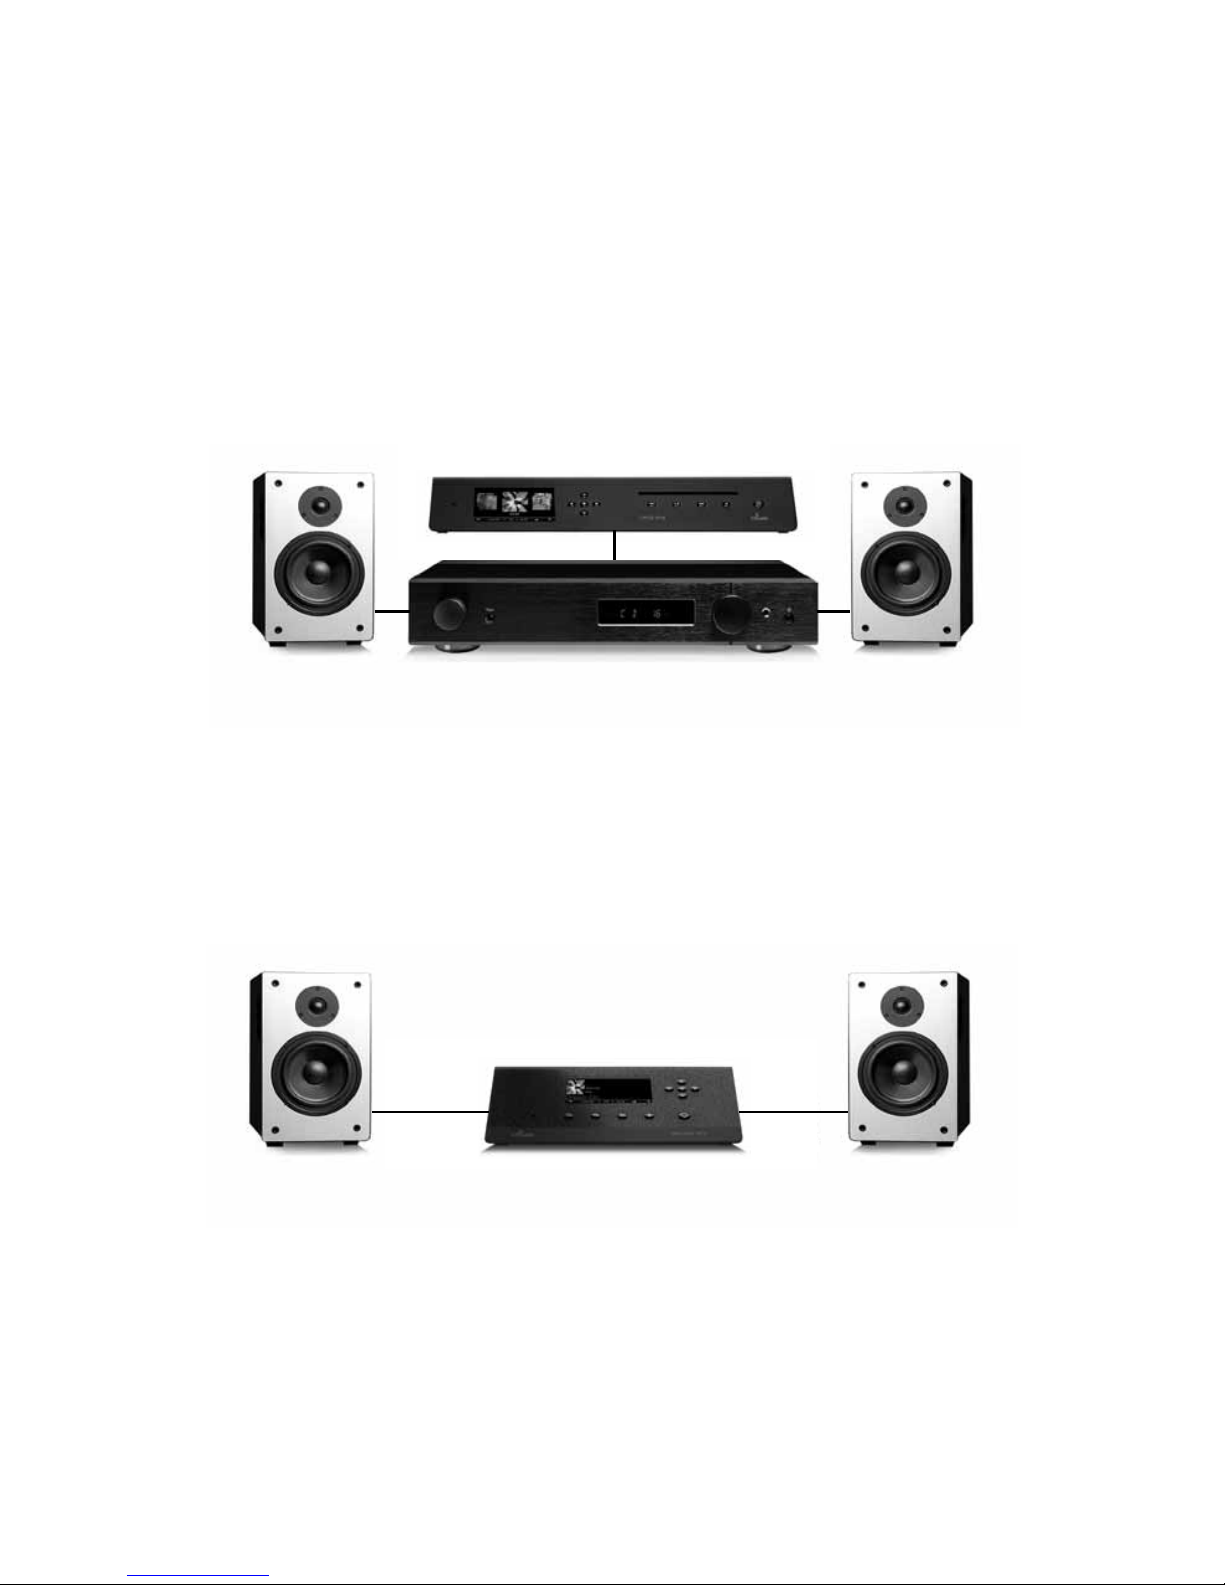
Option 2: Connect powered speakers directly to your Opus or Melody using the
analog audio outputs.
Option 1: Connect your Opus or Melody to an amplier or receiver. You may use either
analog or digital cables by connecting to the corresponding analog or digital (optical or
coax) outputs. Connect your speakers to your amplier or receiver.
Passive Speakers > Amplier/Receiver > Opus or Melody
Powered Speakers > Opus or Melody
SETUP
Audio

8OPUS | MELODY USER GUIDE
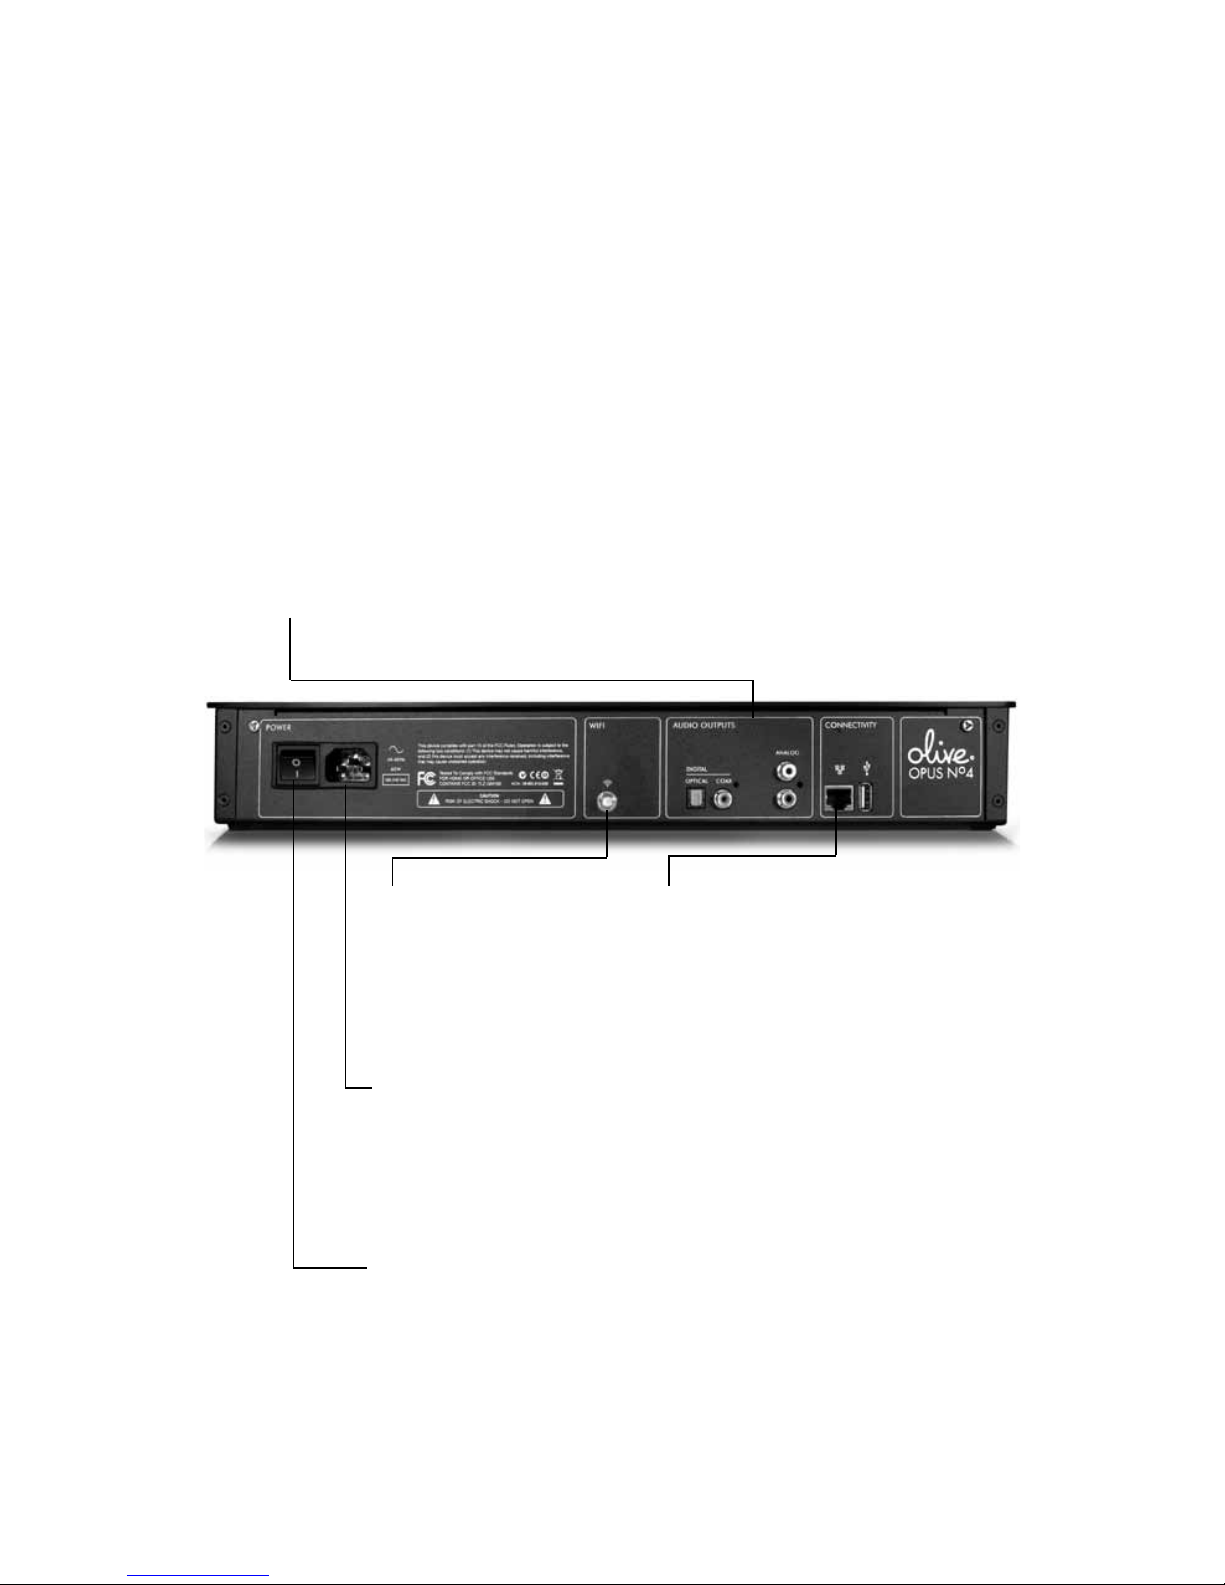
4. Master Power
Switch on your Opus using the
Master Power Switch and press
the Standby Button on the front
to activate the touchscreen.
2a. Wireless Antenna
Screw the wireless
antenna onto the WiFi
port for a wireless
connection.
3. Power Cable
Attach the Power
Cable to the power
port and then to a
wall socket.
1. Audio Output
Connect cables from your
amp/receiver or speakers
to the appropriate audio
output jacks.
2b. Ethernet Outlet
Or if you’re using a
wired network, connect
your ethernet cable.
Just follow these easy steps and you’ll set up your Opus in no time at.
SETUP
Connect Opus

9
OPUS | MELODY USER GUIDE
2a. Wireless Antenna
Screw the wireless
antenna onto the WiFi
port for a wireless
connection.
3. Power Cable
Attach the Power
Cable to the power
port and then to a
wall socket.
1. Audio Output
Connect cables from your
amp/receiver or speakers
to the appropriate audio
output jacks.
2b. Ethernet Outlet
Or if you’re using a
wired network, connect
your ethernet cable.
There are just a few steps to get your Melody ready for some melodies.
SETUP
Connect Melody

10 OPUS | MELODY USER GUIDE
Player Buttons
The Player Buttons are used like a CD player. When you push once, Play/Pause,
Forward and Back buttons allow you to navigate tracks within an album or playlist
when playing music on your Opus or Melody. When you push and hold, Play/Pause
stops your music, Forward moves Fast Forward and Back moves Fast Backward.
Disc
Drive
Eject
Forward or
Fast Forward
Stop
Forward or
Fast Forward
Back or
Fast Back
Back or
Fast Back
Play/Pause
or Stop
Play/Pause
Standby On/Off
Button
Standby On/Off
Button
Navigation
Buttons
Navigation
Buttons
Player
Buttons
Player
Buttons
NAVIGATE
Buttons

11
OPUS | MELODY USER GUIDE
Play/Pause Button
Press the Play/Pause Button from the menus below for a variety of useful functions:
Navigation Buttons
The Navigation Buttons allow you to move through the touchscreen conveniently.
Select Button
The Select Button is also a form of enter or play with a variety of useful functions:
Standby On/Off Button
The Standby Button sets or stops the power saving mode. When your Opus or
Melody is powered on but has not been in use, the Standby Button is lighted green.
Press it to activate the touchscreen.
Up
Back Next
Standby On/Off Button
Down Select
SEARCH Access Search from the Artist/Album/Track menus.
ALL ALBUMS Playback all albums.
TRACK Rate Track or Add To Playlist while listening to a track.
ARTISTS Playback all tracks by that artist.
PLAYLIST Play, Delete or Burn the highlighted playlist (page 24).
ALBUMS Playback each track from the highlighted album.
INTERNET RADIO While listening to a station, Add To or Delete From Favorites.
TRACKS Playback the full album of the highlighted track.
Play/Pause Button
NAVIGATE
Buttons

12 OPUS | MELODY USER GUIDE
1
10:25PM
-03:29
The touchscreen icons in the Navigation Bar also function as buttons. Tap the icon
to access the settings. You may also choose to make adjustments under General
Settings or Network Settings. Volume and Play Modes are only accessible by tapping
the icon in the Navigation Bar or adjusting with your Remote Control (page 14).
NAVIGATE
Navigation Bar

13
OPUS | MELODY USER GUIDE
REPEAT ONE TRACK Repeat playing a single track continuously.
REPEAT ALL TRACKS Plays the current music selection continuously.
SLEEP TIMER Fall asleep to your music without it playing all night.
ALARM Set an alarm to wake up to your music.
BACK Navigate to the previous screen.
CLOCK Set time and date. Tap icon or access from Settings menu.
SHUFFLE Plays the current music selection in random order.
PLAY/PAUSE/STOP Play, Pause or Stop the current track, album or artist.
VOLUME Reects the current volume level. Tap to adjust.
MUTE Select to mute the sound.
TRACK COUNTDOWN Time indicates the current track time remaining.
WIRED NETWORK (ETHERNET) Indicates wired network connection.
NO CONNECTION Indicates that you are disconnected from your network.
WIRELESS Indicates wireless network connection and strength.
CD BURNING/BACKUP/RESTORE Indicates a CD is burning or importing, or the
Backup or Restore process is taking place.
11
10:25PM
-03:29
Once you activate a function such as Repeat, Shufe or Play/Pause or Stop, the icon
is displayed in orange. When the Wireless or Wired icons are displayed in orange, you
are connected to your home network but not connected to the internet (page 21).
NAVIGATE
Navigation Icons

14 OPUS | MELODY USER GUIDE
Navigation Buttons
Power On/Off
Player Buttons
The buttons on the Remote Control duplicate those on your Opus or Melody. Below is
a list of shortcuts for accessing Opus and Melody functions. Before using the Remote
Control, open the back and insert the batteries.
OK This button functions as the Select Button on your Opus and Melody (page 11).
HOME Shortcut to the main menu of the Opus or Melody.
SLEEP Shortcut to the Sleep Timer (page 13).
RATING Shortcut to the pop-up to adjust your personal rating of the song playing.
TRACK Shortcut to the track currently playing.
LIBRARY Shortcut to your Opus Music Library.
ADD Shortcut to add the current track to a playlist.
SHUFFLE Shortcut to set the shufe mode while a track is playing.
SOURCES Shortcut to the list of connected Music Sources.
RADIO Shortcut to the Internet Radio selection.
REPEAT Shortcut to set the repeat mode while a track is playing.
NAVIGATE
Remote Control

15
OPUS | MELODY USER GUIDE
Search, nd and play your music easily with the intuitive categorization.
GENRES Browse your music collection alphabetically in preset genres.
ALBUM ARTWORK Flip through album covers to select music.
ALBUM NAME Search music alphabetically by album name.
PLAYLISTS Create playlists (page 16) or access playlists you’ve created.
ARTISTS Browse music alphabetically by artists rst name.
TRACKS Search music alphabetically by track title.
10:25 PM
10:43 PM
MUSIC LIBRARY GENRES
MUSIC SOURCES ALBUM ARTWORK
INTERNET RADIO ALBUM NAME
SETTINGS ARTISTS
TRACKS
PLAYLISTS
NAVIGATE
Music Library

16 OPUS | MELODY USER GUIDE
Music Library > Playlists > Add Playlist
1. Under Playlist in your Music Library, select Add Playlist.
2. Enter a name for your playlist and press Save.
3. Go back to Music Library and browse your collection.
4. Play the tracks you wish to add one at a time.
5. Press Select from the Navigation Buttons for a pop-up screen.
6. The Rate Track screen will appear with the option Add To Playlist.
7. Add the current track playing, select the playlist you created and press Save.
10:25 PM
10:43 PM
RATE TRACK
MY RATING
ADD TO PLAYLIST DELETE SAVE CANCEL
10:25 PM
10:43 PM
NEW PLAYLIST
123,?! SAVE CANCEL
Z X C V B N M
A S D F G H J K L
Q W E R T Y U I O P
NAVIGATE
Create Playlists

17
OPUS | MELODY USER GUIDE
10:25 PM
10:43 PM
MUSIC LIBRARY OPUS LIBRARY
MUSIC SOURCES YOUR COMPUTER
INTERNET RADIO
SETTINGS
OPUS LIBRARY From your Melody, you can access your Opus Music Library. From
your Opus, you can access another Opus Music Library.
YOUR COMPUTER To access music on your PC or other music libraries follow the
steps below.
Music Sources Screen
1. Be sure your computer has the appropriate UPnP software (page 32).
3. Your other music libraries will appear automatically under Music Sources.
2. Establish a network connection to access music on your Opus or other NAS device.
NAVIGATE
Music Sources

18 OPUS | MELODY USER GUIDE
Internet Radio > Add New Station
1. Connect to the internet, select Internet Radio, then Add New Station.
2. When prompted, enter the station name followed by the station URL.
3. Find the URL on the internet station page or contact the station for the stream.
FAVORITES Save your favorite stations when you press Select while listening.
GENRES Stations are led by preset genres, e.g. 50s, 60s, Classical, Disco, Rock.
REGIONS Radio stations are available all over the world by country or continent.
PUBLIC & INFO College, Community, Public Radio, Sports and Talk Radio stations.
ADD NEW STATION Enter a station name and web URL ending in “.pls” or “.m3u”.
10:25 PM
10:43 PM
MUSIC LIBRARY FAVORITES
MUSIC SOURCES GENRES
INTERNET RADIO REGIONS
SETTINGS PUBLIC & INFO
ADD NEW STATION
10:25 PM
10:43 PM
ENTER STATION URL
123,?! SAVE CANCEL
Z X C V B N M
A S D F G H J K L
Q W E R T Y U I O P
http://
Internet Radio Screen
NAVIGATE
Internet Radio

19
OPUS | MELODY USER GUIDE
The Settings Menu for Melody includes General Settings, Network Settings,
System Services and About Your Melody. The Melody does not have CD
capabilities like the Opus.
10:25 PM
10:43 PM
MUSIC LIBRARY GENERAL SETTINGS
MUSIC SOURCES CD SETTINGS
INTERNET RADIO NETWORK SETTINGS
SETTINGS SYSTEM SERVICES
ABOUT YOUR LIBRARY
ABOUT YOUR OPUS
10:25 PM
10:43 PM
MUSIC LIBRARY GENERAL SETTINGS
MUSIC SOURCES NETWORK SETTINGS
INTERNET RADIO SYSTEM SERVICES
SETTINGS ABOUT YOUR MELODY
GENERAL SETTINGS Date/time, alarm clock, sleep timer, language and power save.
CD SETTINGS CD import/export quality. Details on page 22.
NETWORK SETTINGS Network connection setup and network information.
ABOUT YOUR OPUS Capacity, serial number, software versions and storage.
SYSTEM SERVICES Software/database updates, backup/restore info, calibration.
ABOUT YOUR LIBRARY Number of tracks, albums, artists, genres and composers.
Opus Settings Screen
Melody Settings Screen
NAVIGATE
Settings

20 OPUS | MELODY USER GUIDE
By connecting to the internet through your home network you can: Download album
artwork automatically when you import new music; Listen to internet radio; Import
music stored on a computer to your Opus; and manage your music using Maestro.
WIRED You can choose to connect to your home network router directly through
an ethernet cable. A successful connection is indicated by the Wired icon.
WIRELESS You can also connect wirelessly. Based on the ISP service you
have (DSL, cable or satellite), this conguration shares network access with other
connected devices. A successful connection is indicated by the Wireless icon.
Settings > Network Settings > Network Setup
10:25 PM
10:43 PM
NETWORK SETUP
WIRED AUTOMATIC
IP-ADDRESS ALLOCATION
CONNECTION
SAVE CANCEL
10:25 PM
10:43 PM
NETWORK SETUP
WIRELESS AUTOMATIC
IP-ADDRESS ALLOCATION
CONNECTION
SAVE CANCEL
NETWORK SETUP
Wired & Wireless
This manual suits for next models
1
Table of contents
Other Olive Server manuals
Popular Server manuals by other brands

ViewSonic
ViewSonic SC-T47 user guide

Lenovo
Lenovo ThinkServer 1045 Installation and user guide

HP
HP DL320s - ProLiant 9TB SATA Storage Server... user guide

Supero
Supero FatTwin F627R3-R72B+ user manual

Broadcast Tools
Broadcast Tools NTP Server Sentinel Installation and operation manual

Panduit
Panduit CM340B instructions

Acer
Acer Veriton 9100 System guide

Supermicro
Supermicro SuperServer 6014H-8 Specifications

Moxa Technologies
Moxa Technologies EtherDevice user manual

Moxa Technologies
Moxa Technologies NPort Express DE-211 Hardware installation guide

HP
HP BL30p - ProLiant - 1 GB RAM Setup and installation guide

Axis
Axis AXIS 240 user manual