manuals.online logo
Brands
  1. Home
  2. •
  3. Brands
  4. •
  5. Olympus
  6. •
  7. Digital Camera
  8. •
  9. Olympus Camedia D-100 User manual

Olympus Camedia D-100 User manual

Other manuals for Camedia D-100

1

This manual suits for next models

2

Other Olympus Digital Camera manuals

Olympus TG-820 User manual

Olympus

Olympus TG-820 User manual

Olympus CAMEDIA C-5500 Sport Zoom User manual

Olympus

Olympus CAMEDIA C-5500 Sport Zoom User manual

Olympus FE 250 - Digital Camera - Compact Installation guide

Olympus

Olympus FE 250 - Digital Camera - Compact Installation guide

Olympus CAMEDIA C-7070 Wide Zoom Setup guide

Olympus

Olympus CAMEDIA C-7070 Wide Zoom Setup guide

Olympus CAMEDIA C-740 Ultra Zoom Installation guide

Olympus

Olympus CAMEDIA C-740 Ultra Zoom Installation guide

Olympus SZ-10 Manual

Olympus

Olympus SZ-10 Manual

Olympus E-P3 1442 Kit Black User manual

Olympus

Olympus E-P3 1442 Kit Black User manual

Olympus Camedia D-340R User manual

Olympus

Olympus Camedia D-340R User manual

Olympus CAMEDIA C-7070 Wide Zoom Installation guide

Olympus

Olympus CAMEDIA C-7070 Wide Zoom Installation guide

Olympus Stylus 800 User manual

Olympus

Olympus Stylus 800 User manual

Olympus 225905 - Stylus 760 Digital Camera User manual

Olympus

Olympus 225905 - Stylus 760 Digital Camera User manual

Olympus SP-700 Setup guide

Olympus

Olympus SP-700 Setup guide

Olympus CAMEDIA D-40 Zoom User manual

Olympus

Olympus CAMEDIA D-40 Zoom User manual

Olympus E-3 User manual

Olympus

Olympus E-3 User manual

Olympus E-P3 User manual

Olympus

Olympus E-P3 User manual

Olympus VG-170 User manual

Olympus

Olympus VG-170 User manual

Olympus E M1 1240 Kit User manual

Olympus

Olympus E M1 1240 Kit User manual

Olympus DP72 User manual

Olympus

Olympus DP72 User manual

Olympus IR 300 - Digital Camera - 5.0 Megapixel Setup guide

Olympus

Olympus IR 300 - Digital Camera - 5.0 Megapixel Setup guide

Olympus WINDER OM-1 Operating instructions

Olympus

Olympus WINDER OM-1 Operating instructions

Olympus STYLUS 9000 Installation guide

Olympus

Olympus STYLUS 9000 Installation guide

Olympus Stylus 720 SW Setup guide

Olympus

Olympus Stylus 720 SW Setup guide

Olympus Camedia D-575ZOOM User manual

Olympus

Olympus Camedia D-575ZOOM User manual

Olympus SP-500 User manual

Olympus

Olympus SP-500 User manual

Popular Digital Camera manuals by other brands

Canon WP-DC35 user guide

Canon

Canon WP-DC35 user guide

Xiaomi 70mai Dash Cam Lite user manual

Xiaomi

Xiaomi 70mai Dash Cam Lite user manual

Samsung PL70 Quick start manual

Samsung

Samsung PL70 Quick start manual

GE E1680W user manual

GE

GE E1680W user manual

Canon EOS 1200D instruction manual

Canon

Canon EOS 1200D instruction manual

Tevion MD 86497 user guide

Tevion

Tevion MD 86497 user guide

Exakta VX Features

Exakta

Exakta VX Features

Kodak Digital Science DC120 user guide

Kodak

Kodak Digital Science DC120 user guide

Nikon FM3A Specifications

Nikon

Nikon FM3A Specifications

Vectra Fitness H1 Quick reference guide

Vectra Fitness

Vectra Fitness H1 Quick reference guide

Nikon COOLPIX 775 quick start guide

Nikon

Nikon COOLPIX 775 quick start guide

Samsung EC-L100ZBBA brochure

Samsung

Samsung EC-L100ZBBA brochure

FujiFilm FINEPIX BL01124-201 owner's manual

FujiFilm

FujiFilm FINEPIX BL01124-201 owner's manual

Panasonic DMC-L10KPP Service manual

Panasonic

Panasonic DMC-L10KPP Service manual

Hyundai Electric HYU-CC-CHBF12001 Quick installation guide

Hyundai Electric

Hyundai Electric HYU-CC-CHBF12001 Quick installation guide

Sony DSC-WX80 specification

Sony

Sony DSC-WX80 specification

Nikon Nuvis S - Point & Shoot instruction manual

Nikon

Nikon Nuvis S - Point & Shoot instruction manual

Teledyne Piranha4 user manual

Teledyne

Teledyne Piranha4 user manual

manuals.online logo
manuals.online logoBrands
  • About & Mission
  • Contact us
  • Privacy Policy
  • Terms and Conditions

Copyright 2025 Manuals.Online. All Rights Reserved.

START
OLYMPUS OPTICAL CO., LTD.
San-Ei Building, 22-2, Nishi Shinjuku 1-chome, Shinjuku-ku, Tokyo, Japan.
(Customer support) Tel.0426-42-7499 Tokyo
http://www.olympus.co.jp
OLYMPUS AMERICA INC.
Two Corporate Center Drive, Melville, NY 11747-3157, U.S.A.Tel. 631-844-5000
(Technical support)Tel. 1-888-553-4448 distec @ Olympus
http://www.olympus.com
OLYMPUS OPTICAL CO.(EUROPA) GMBH.
(Premises/Goods delivery) Wendenstraße 14-18, 20097 Hamburg, Germany.Tel.040-237730
(Letters) Postfach 10 49 08, 20034 Hamburg, Germany.
http://www.olympus-europa.com
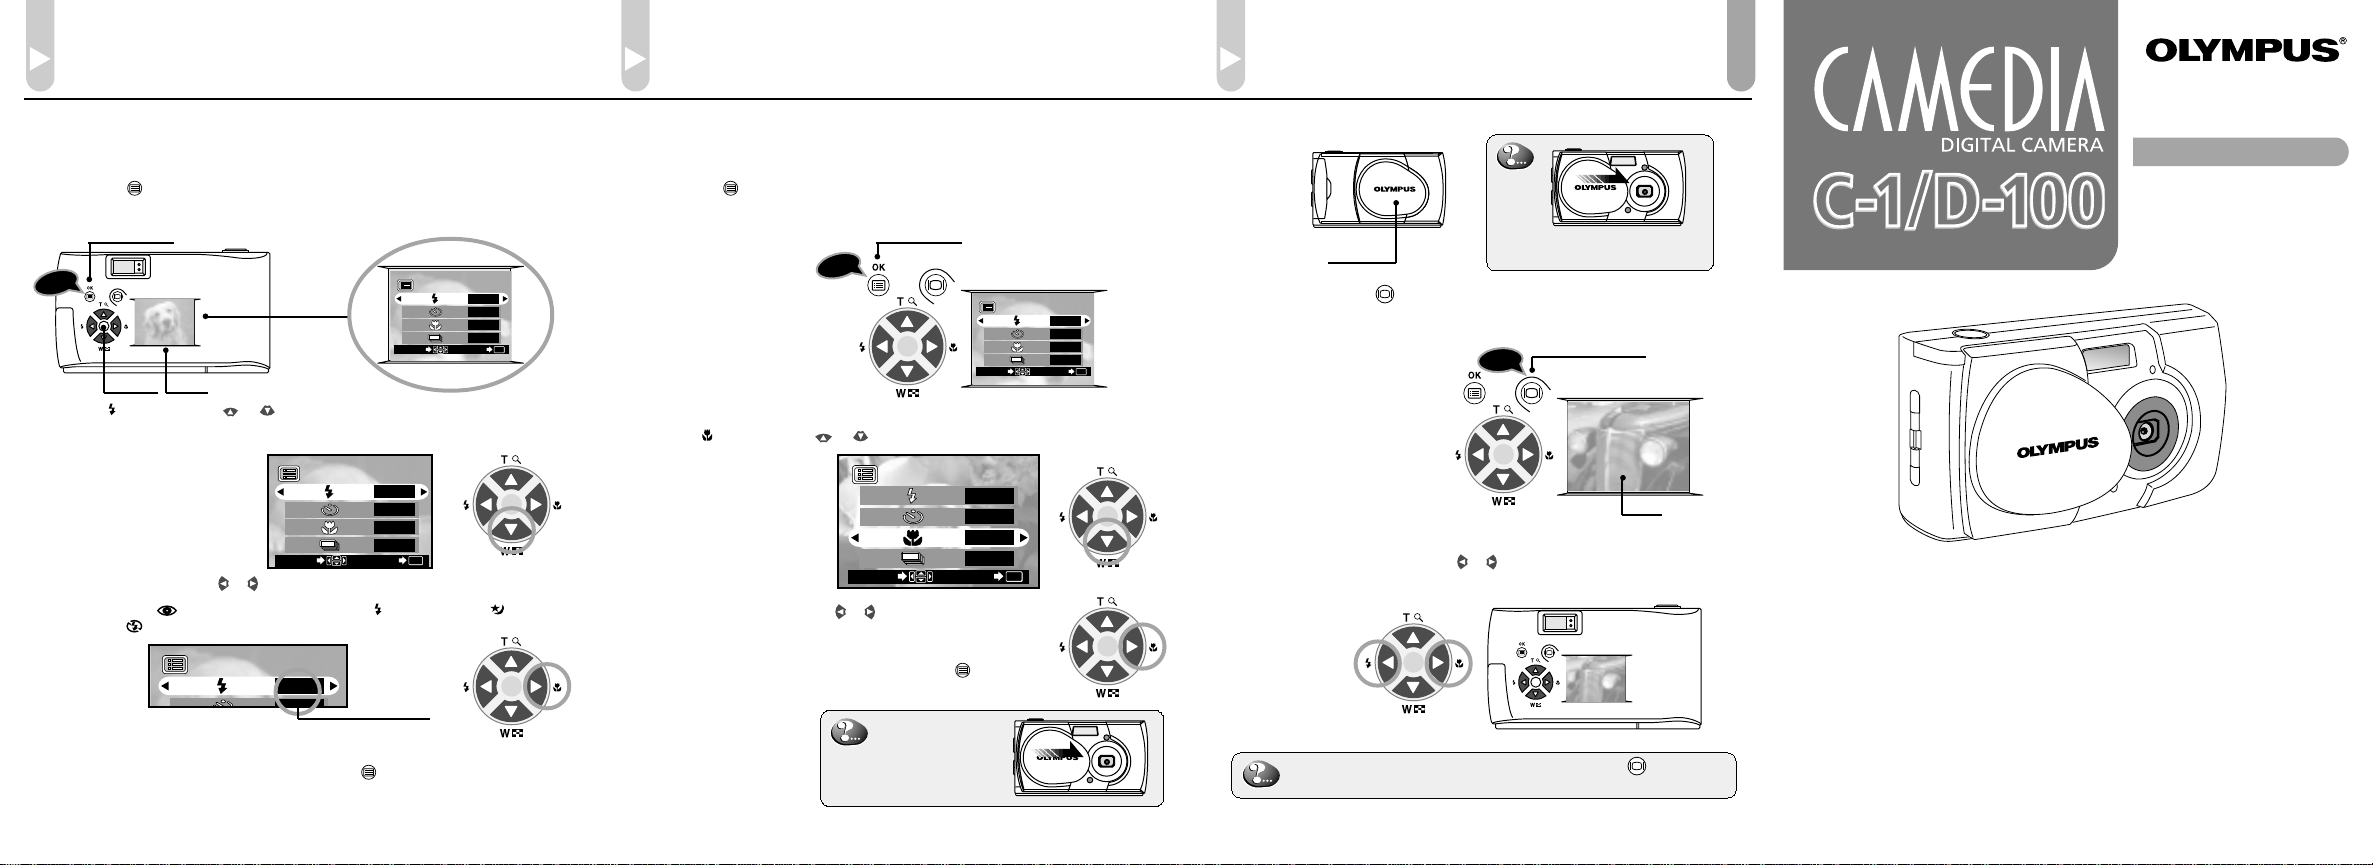
Viewing Pictures
1. Make sure the lens barrier is closed.
If the lens barrier is open,
slide it to close.
2. Press and hold the monitor button for a moment.
The last picture you took appears on the monitor.
Lens barrier
Monitor button
3. To view other images, press the or arrow pad key.
When you want to cancel viewing, press the monitor
button again.
E
N
D
Shooting a Close Subject
(at 10 cm ~ 0.5 m/0.4 in ~ 1.6 ft)
Using the Macro Mode
1. Open the lens barrier.
Slide the lens barrier until it clicks to turn on the camera.
2. Press the OK/menu button.
The monitor shows the shooting mode menu.
OK/menu button
Press
Press
1/3
AUTO
OFF
OFF
OFF
END
OK
SELECT
Arrow pad
3. Select by pressing the or arrow pad key.
1/3 AUTO
OFF
OFF
OFF
END OK
SELECT
4. Select “ON” by pressing the or arrow pad key.
5. When you have made your selection, press the OK/menu
button to enter the Macro mode.
When you want to
cancel shooting,
close the lens
barrier.
Note: The macro mode is
automatically
canceled when the
camera is turned off.
Using the Flash
1. Open the lens barrier.
Slide the lens barrier until it clicks to turn on the camera.
2. Press the OK/menu button.
The monitor shows the shooting mode menu.
OK/menu button
Press
Arrow pad Monitor
1/3
AUTO
OFF
OFF
OFF
END
OK
SELECT
Displayed menu
3. Select by pressing the or arrow pad key.
The default setting is Auto-Flash.
4. Each time you press the or arrow pad key, the flash mode changes:
Auto-Flash ➔Red-Eye Reduction Flash ➔Fill-In Flash ➔Night
Scene ➔Flash Off. Select one of these modes.
1/3 AUTO
OFF
1/3
AUTO
OFF
OFF
OFF
END
OK
SELECT
Display
changes as
key is pressed
Note: For the function and effect of each flash mode, refer to Page
56 of the camera’s Instructions.
5. When you have made your selection, press the OK/menu button.
The desired flash mode is set
VT259102
Using this camera for the first time
QUICK START
GUIDE
Monitor
Arrow pad
01/Quick start guide.En 01.3.15, 6:54 PM1
Loading the Battery and Card
(SmartMedia)
Checking the Package Contents Shooting Pictures
1. Open the lens barrier.
Slide the lens barrier until it clicks to turn on the camera.
2. Hold the camera, and look through the
viewfinder.
Lens barrier
3. Press the shutter button halfway (half-press) to make sure the green lamp on
the right of the viewfinder lights.
When lit: The subject is in focus. You can shoot.
When blinking: The subject is out of focus. Half-press the shutter button
again.
Green lamp
Viewfinder
4. Press the shutter button all the way (full-press) to take the picture.
The shutter is released and the picture is
taken.
Once the picture has been taken, it is
displayed on the monitor for a
short time.
Monitor
1. Make sure the lens barrier is closed.
Lens barrier
Card cover
If the lens barrier is open,
slide it to close.
Battery compartment cover
○○○○○○○○○○○○○○○○○○○○○○○○○○○○○○○○○
2. Slide the battery compartment
cover in the
direction of the
arrow q,
and lift the
cover in the
direction of
the arrow w.
CR-V3x1orLR6x2
3. Insert the battery in the direction
shown in the
figure.
CR-V3x1orLR6x2
4. Close the battery compartment
cover in the direction
of the arrow q,
and press the
cover in the
direction of
the arrow w
unti it clicks.
CR-V3x1orLR6x2
5. Open the card cover.
6. Insert the card as far as it will go in
the direction
shown
in the figure.
Be sure to hold the card so that the cut
corner is positioned correctly. There is
an arrow inside the card cover,
indicating the insertion direction.
7. Close the card cover until it clicks.
Note:
To remove the
card, hold the
card with your
fingertips, and
pull it out in the
direction of the
arrow .
Attaching the Provided Strap
1. Attach the strap as shown.
Strap eyelet
First make sure that all the provided accessories listed below are
included in the package. If anything is missing or damaged, contact
your local Olympus representative immediately.
Camera CD-ROM CR-V3 lithium battery pack
USB cableVideo cableStrap
Basic Manual/Warranty/
Quick Start Guide (this publication)
Static-free case for
SmartMedia
SmartMedia (8 MB)
Write-protect seals for
SmartMedia (4 pieces) Labels for SmartMedia (2 pieces) SmartMedia Instructions
01/Quick start guide.En 01.3.15, 6:54 PM2