ONCALL Extra User manual

i
Blood Glucose Monitoring System
Self-monitoring of blood glucose (SMBG) is an integral part of diabetes care, but
the high cost of testing can make this impossible. At ACON, our goal is to provide
high quality glucose monitoring at a price that allows you to test as often as
necessary. Together, we can better manage your diabetes and help you live a
longer and healthier life.
Welcome, and thank you for choosing the On Call®Extra Blood Glucose
Monitoring System. The On Call®Extra Blood Glucose Monitoring System will
give you accurate blood glucose results in just a few simple steps.
To ensure accurate results from your On Call®Extra Blood Glucose Monitoring
System, please follow these guidelines:
•Read instructions before use.
•Use only On Call®Extra Blood Glucose Test Strips with the On Call®Extra
Blood Glucose Meter.
•For in vitro diagnostic use only. Your blood glucose monitoring system is to be
used only outside the body. It’s for monitoring the effectiveness of diabetes
control. It should not be used for the diagnosis of diabetes.
•For self-testing and professional use.
•Test only whole blood samples with the On Call®Extra Blood Glucose Test
Strips and On Call®Extra Meter.
•For self-testers, consult your physician or diabetes healthcare professional
before making any adjustments to your medication, diet or activity routines.
•Keep out of reach of children.
•Keep this User’s Manual in a safe place, do not discard it.
Following the instructions outlined in this User's Manual. You will be able to use
your On Call®Extra Blood Glucose Monitoring System to monitor your blood
glucose and better manage your diabetes.

ii
Table of Contents
Getting Started.................................................................................................... 1
Component Descriptions............................................................................ 2
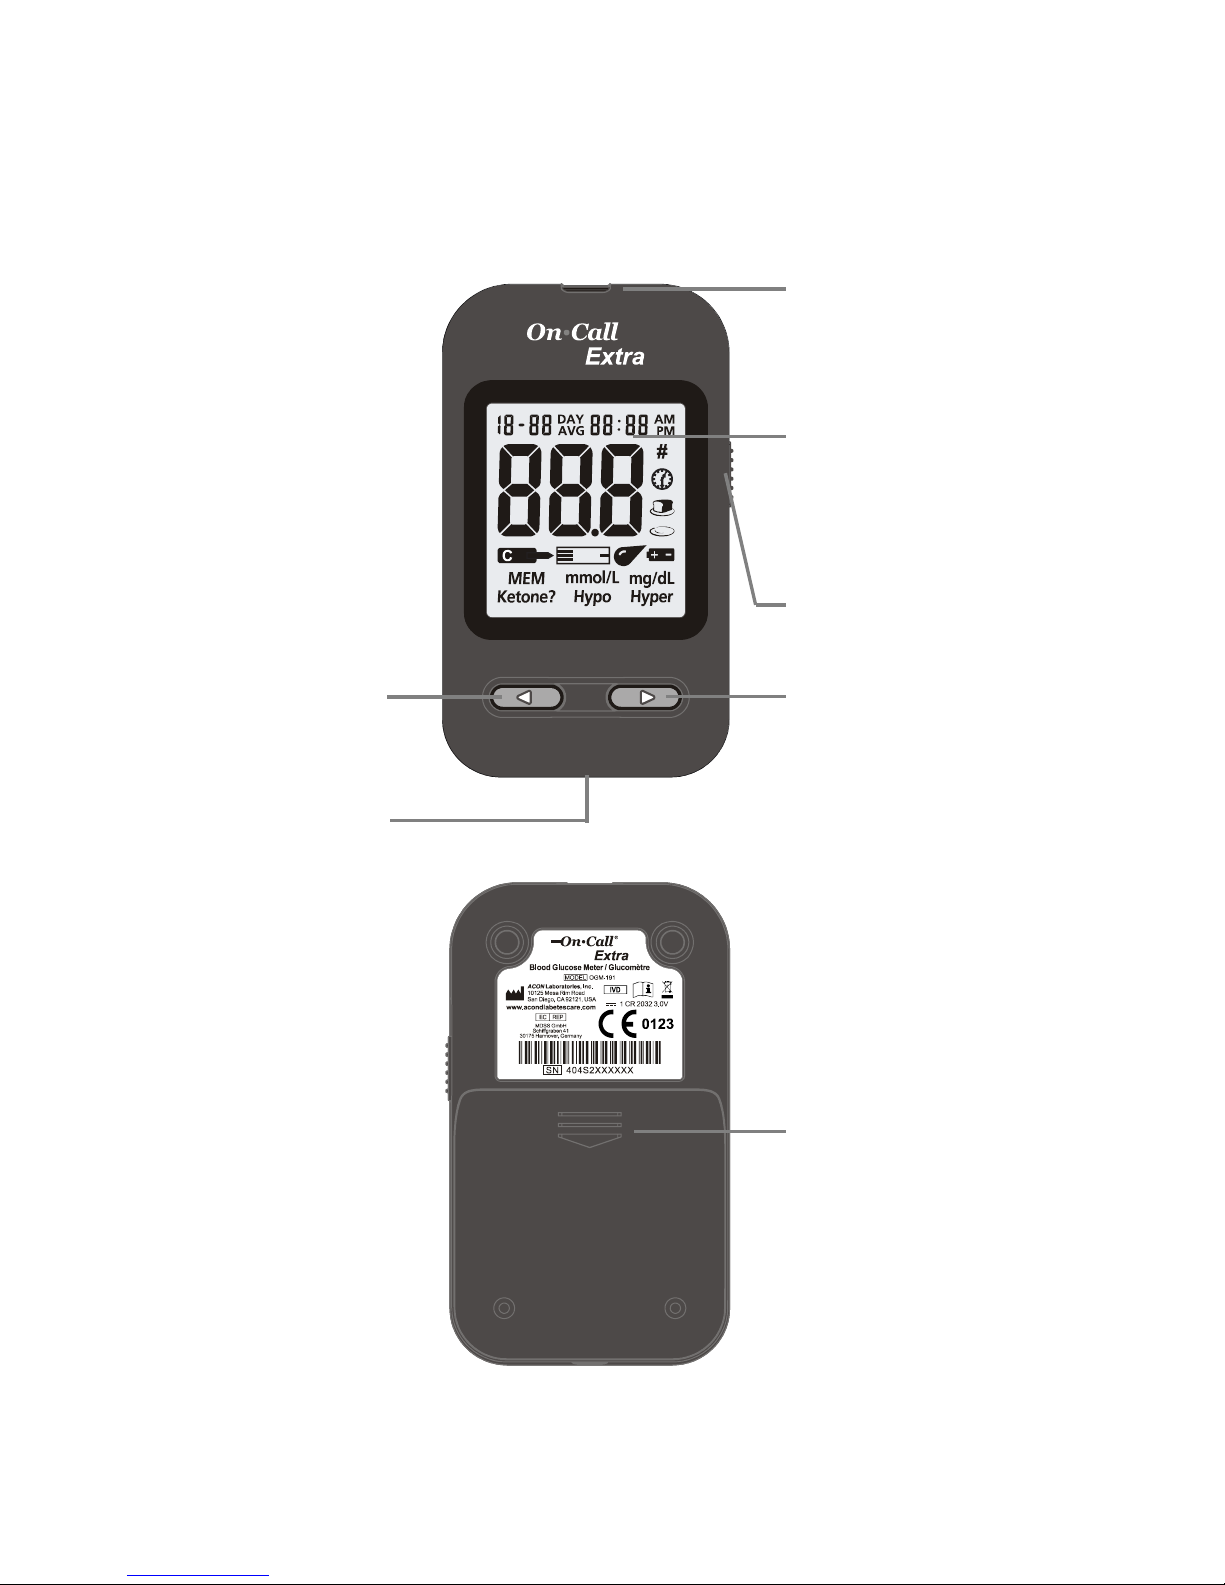
On Call®Extra Blood Glucose Meter.......................................................... 3
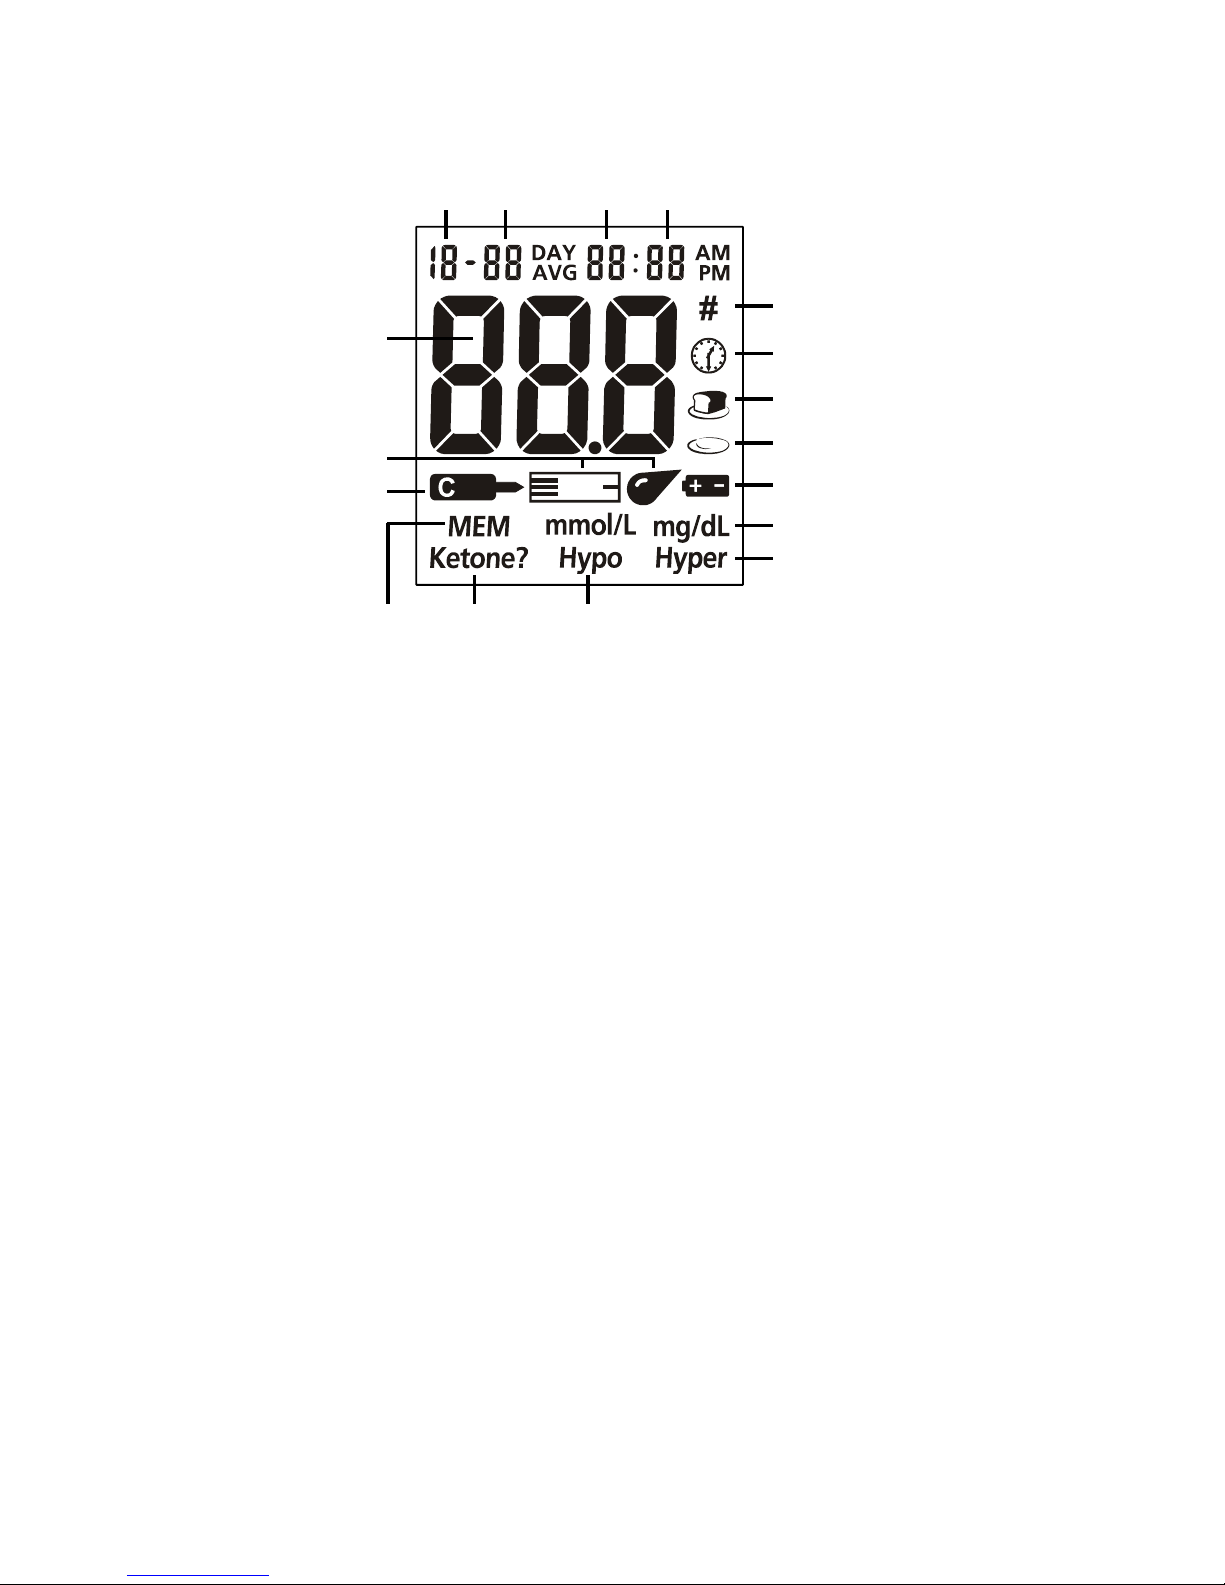
Meter Display............................................................................................. 5
On Call®Extra Blood Glucose Test Strips .................................................. 7
On Call®Extra Glucose Control Solution.................................................... 9
Installing the Battery .........................................................................................11
Meter Setup Before Testing ..............................................................................12
Performing a Quality Control Test....................................................................17
Testing Your Blood............................................................................................21
Step 1 – Getting a Drop of Blood ..............................................................21
Step 2 – Testing Blood Glucose ................................................................26
“HI” and “LO” Messages............................................................................29
“Hypo” and “Hyper” Messages ..................................................................30
“Ketone?” Message...................................................................................30
Using the Meter Memory ...................................................................................31
Viewing Stored Records............................................................................31
Clearing the Memory.................................................................................33
Transferring Records.................................................................................33
Maintenance.......................................................................................................35
Replacing the Battery................................................................................35
Caring for Your On Call®Extra Blood Glucose Monitoring System ............36
Suggested Testing Times and Target Goals....................................................37
Comparing Meter and Laboratory Results.......................................................38
Troubleshooting Guide .....................................................................................39
Specifications ....................................................................................................41
Warranty.............................................................................................................42
Index of Symbols ...............................................................................................43
Index ...................................................................................................................44

Before t
e
your O
n
On Call
®
purchas
e
on whic
h
e
sting, read the in
n
Call
®
Extra B
l
®
Extra product y
o
e
d separatel
y
. Pl
e
h
components ar
e
Blood Gluc
o
Lancing
D
Sterile
L
1
Getting
S
structions careful
l
l
ood Glucose M
o
u purchased, so
m
e
ase check the lis
t
e
included with yo
u
Carrying
o
se Mete
r
D
evice
L
ancet
S
tarted
ly
and learn abou
t
onitoring Syste
m
m
e of the compo
n
t
of contents on t
h
u
r purchase.
Case
T
Co
n
t
all the compone
n
m
. Depending on
n
ents may need
t
h
e outer box for d
e
T
est Strips
n
trol Solution
Clear Cap
n
ts of
n
the
t
o be
e
tails

2
Component Descriptions
1. Blood Glucose Meter: Reads the test strips and displays the blood glucose
concentration.
2. Test Strips: Strips with a chemical reagent system used with the meter to
measure glucose concentration in blood.
3. Lancing Device: Used with sterile lancets to prick the fingertip, palm (at the
base of the thumb) or forearm for blood sample collection. The packaged
lancing device has multiple depth settings, allowing users to adjust the depth
of the puncture and minimize discomfort. It can also eject the used lancets.
4. Clear Cap: Used with the lancing device and sterile lancet to draw a blood
sample from the forearm or palm.
5. Sterile Lancets: Used with the lancing device to draw a blood sample. Sterile
lancets are inserted into the lancing device with each blood draw and
discarded after use.
6. Control Solution: Verifies the proper operation of the blood glucose monitoring
system by checking the test strips and meter against a pre-calibrated control
solution. Control Solution 1 is all you need most of the time. Control Solution 0
and Control Solution 2 are also available if you want to do a level 0 or level 2
test. The three levels of control solution, CTRL 0, CTRL 1 and CTRL 2 are
available in the On Call®Extra Glucose Control Solution package which is sold
separately.
7. Carrying Case: Provides portability for blood glucose testing wherever you go.
8. User's Manual: Provides detailed instructions on using the blood glucose
monitoring system.
9. Quick Reference Guide: Provides a brief overview of the blood glucose
monitoring system and testing procedures. This small guide can be kept in
your carrying case.
10. Warranty Card: Should be completed and returned to the distributor to qualify
for the 5-year meter warranty.

3
On Call®Extra Blood Glucose Meter
The meter reads the test strips and displays the blood glucose concentration. Use
these diagrams to become familiar with all the parts of your meter.
Battery Cover
Strip Port
Liquid Crystal
Display (LCD)
Strip Ejector
►Button◄Button
Data Por
t

4
Liquid Crystal Display (LCD): Shows your test results and helps you through the
testing process.
◄Button: Recalls previous test results from the meter memory and performs
other menu selection functions.
►Button: Selects meter settings and performs other menu selection functions.
Strip Port: Test strips are inserted into this area to perform a test.
Strip Ejector: Slide the ejector forward to discard the used test strip.
Note: Dispose of blood samples and materials with care. Treat all blood samples
as if they are infectious materials. Follow your healthcare provider’s
recommendations for disposal.
Battery Cover: Remove the battery cover to install one CR 2032 coin cell battery.
Data Port: Sends information to a computer via an optional data transfer cable.
Allows you to view, analyze and print stored data in the meter. The data transfer
cable is available for order as an optional add-on.

5
Meter Display
Battery Symbol: Warns when you should replace the battery.
Blood Drop / Strip Symbol: Wait for the Blood Drop / Strip Symbol to appear
before applying the sample. These two symbols appear at the same time.
Pound Sign (#): Appears with the control solution test result or when you mark an
invalid result to prevent it from being included in the average.
Control Solution Symbol: Indicates a control test result. A pound sign (#) will also
be displayed when control solution symbol appears.
Test Result Area: Indicates the test result.
Test Remind Symbol: Appears when reminding you to test blood glucose.
Before Meal Symbol: Appears when before-meal test results are displayed.
After Meal Symbol: Appears when after-meal test results are displayed.
Measurement Unit: Only one unit will be displayed on your meter. It cannot be
adjusted.
Hyper Symbol: Appears when the blood glucose concentration is above the
“Hyperglycemia” (high blood sugar) target level that you have set.
Hypo Symbol: Appears when the blood glucose concentration is below the
“Hypoglycemia” (low blood sugar) target level that you have set.
Ketone: Appears when the blood glucose concentration is above 16.7 mmol/L
(300 mg/dL). This simply suggests that a ketone test is recommended. Consult
your healthcare professional about testing for ketones.
Note:This symbol does not mean that the system has detected ketones. It
recommends that a ketone test should be taken.
MEM: Shows a test result stored in memory.
Month Day Hour Minutes
Pound Sign (#)
Test Remind Symbol
Before Meal Symbol
After Meal Symbol
Battery Symbol
Measurement Unit
Hyper Symbol
Blood Drop
/
Strip Symbol
Memory Ketone Hypo Symbol
Test Resul
t
Area
Control Solution
Symbol

6
Meter Use and Precautions
•Wait for the Blood Drop / Strip Symbol to appear before applying the sample.
•The meter is pre-set to display blood glucose concentration in either millimoles
per liter (mmol/L) or milligrams per deciliter (mg/dL) depending on which unit of
measure is standard in your country. This unit of measure cannot be adjusted.
•Meter will shut off by itself after 2 minutes of inactivity.
•Do not get water or other liquids inside the meter.
•Keep the strip port area clean.
•Keep your meter dry and avoid exposing it to extremes temperature or humidity.
Do not leave it in your car.
•Do not drop the meter or get it wet. If you do, check the meter by running a
quality control test. Refer to Quality Control Test on page 17 for instructions.
•Do not take the meter apart. This will void the warranty.
•Refer to the Caring for Your Meter section on page 36 for details on cleaning
the meter.
•Keep the meter and all associated parts out of the reach of children.
Note:Follow proper precautions and all local regulations when disposing of the
meter and used battery.
All Glucose Systems Preventive Warnings with Regard to EMC:
1. This instrument is tested for immunity to electrostatic discharge as specified in
IEC 61000-4-2. However, use of this instrument in a dry environment,
especially if synthetic materials are present (synthetic clothing, carpets, etc.)
may cause damaging static discharges that may cause erroneous results.
2. This instrument complies with the emission and immunity requirements
described in EN61326-1 and EN61326-2-6. Do not use this instrument in close
proximity to sources of strong electromagnetic radiation, as these may interfere
with proper operation of the meter.
3. For professional use, the electromagnetic environment should be evaluated
prior to operation of this device.

On C
a
The On
chemic
a
to meas
the met
e
automat
transien
t
concent
r
The res
equival
e
IMPOR
T
apply bl
o
inaccur
a
Hold th
e
complet
e
not see
second
s
do not a
or an in
a
check
w
test stri
p
S
A
C
C
s
a
a
l
l
®
Extra Blo
o
Call
®
Extra Bloo
d
a
l reagent system.
u
re the glucose c
o
e
r, blood is appli
e
ically absorbed i
n
t
electrical curre
r
ation is calculat
e
ult is shown on
e
nt results.
T
ANT: Apply the
o
od or control s
o
a
te reading.
e
blood drop to t
h
e
ly full. The mete
r
the countdown
s
s
. If the check win
d
d
d more blood to
a
ccurate test res
u
w
indow does not f
p
.
ample Tip
A
pply blood or con
t
C
heck Window
C
heck to confirm t
h
a
mple has been
a
C
o
7
o
d Glucose
T
d
Glucose Te s t
S
They work with t
o
ncentration in w
h
e
d to the sample
n
to the reaction
c
nt is formed du
r
e
d based on the
e
the meter displa
y
sample only to t
o
lution to the top
h
e sample tip of
t
r
will then begin to
s
tart, you may re
a
d
ow does not fill
a
the test strip. If y
o
u
lt. In this case if t
ill, discard the st
r
trol solution here.
h
at a sufficient
a
pplied.
o
rrect
T
est Strips
S
trips are thin stri
he On Call
®
Extr
a
h
ole blood. After t
h
tip of the test st
r
c
ell where the r
e
r
ing the reactio
n
e
lectrical current
d
y
. The meter is
s
he sample tip of
of the test strip.
t
he test strip unti
l
count down. If y
o
a
pply a second
d
a
nd the meter sta
r
o
u do then you m
a
he meter begins
t
r
ip and begin the
Contact Bars
Insert this end
o
into the meter u
Incorrect
ps. The strips h
a
a
Blood Glucose
M
h
e strip is inserte
d
r
ip. The blood is
e
action takes pla
c
. The blood glu
d
etected by the
m
s
et to display pl
a
the test strip. D
o
This may result i
l
the check wind
o
u applied blood b
u
d
rop of blood wit
h
r
ts to count down,
a
y get an E-5 mes
s
t
o count down an
d
test again with a
o
f the test strip
ntil it stops.
a
ve a
M
eter
d
into
then
c
e. A
cose
m
ete
r
.
a
sma
o
not
n an
o
w is
ut do
h
in 3
then
sage
d
the
new

Storag
e
Please
r
•Stor
e
fro
m
•Do
n
•Do
n
•Do
n
clea
n
•The
•Rep
res
u
•Do
n
labe
inco
r
Not
e
Jan
u
Special
•Tes
t
kee
p
•Do
n
•Rep
l
•A n
e
Writ
e
vial
inac
c
e
and Handling
r
eview the followi
n
e
test strips in a
m
heat and direct
s
n
ot freeze or refri
g
n
ot store or use te
n
ot store the m
e
n
ers that contain
b
test strip should
b
eated insertion a
u
lt in reading erro
r
n
ot use your test
l. Using test str
r
rect test results.
e
: The expiration
u
ary, 2014.
Instructions for
t
strips must be s
t
p
s them in good
w
n
ot transfer test st
l
ace the cap on t
h
e
w vial of test str
e
the opened ex
p
6 months after
y
c
urate readings.
C
o
8
n
g storage and h
a
cool, dry place a
t
s
unlight.
g
erate.
st strips in a hum
i
e
ter, the test stri
b
leach.
b
e used immediat
e
nd removal of a
r
s.
strips past the u
n
ips past the un
o
date is printed i
Test strip in the
t
ored in the origi
n
w
orking condition.
rips to a new vial
h
e test strip vial i
m
r
ips may be used
p
iration date on t
h
y
ou first open it.
o
rrect
a
ndling instruction
s
t
2-30 °C (36-86
i
d place such as
a
ps or control so
e
ly after removin
g
test strip into th
e
n
opened expirati
o
o
pened expiratio
n
n Yea
r
-Month fo
r
Vial
n
al vial with the c
a
or any other cont
a
m
mediately after r
e
for 6 months af
t
h
e vial label afte
r
Usage after this
Incorrect
s
:
°F). Store them
a
a
bathroom.
l
ution near blea
c
g
it from container
.
e
meter strip port
o
n date printed o
n
n
date may pro
d
r
mat. 2014-01 m
e
a
p tightly closed.
a
iner.
e
moving a test str
i
er being first op
e
opening. Discar
d
period may res
u
a
way
c
h or
.
may
n
the
d
uce
eans
This
i
p.
e
ned.
d
the
u
lt in

9
Special Instructions for Test Strip in the Foil Pouch
•Tear the pouch carefully starting from the tear gap. Avoid damaging or bending
the test strip.
•Use test strip immediately after removing it from the pouch.
Test Strip Precautions
•For in vitro diagnostic use. Test strips are to be used only outside the body for
testing purposes.
•Do not use test strips that are torn, bent, or damaged in any way. Do not reuse
test strips.
•Keep the test strip vial or the foil pouch away from children and animals.
•Consult your physician or healthcare professional before making any changes
in your treatment plan based on your blood glucose test results.
See the test strip insert for more details.
On Call®Extra Glucose Control Solution
The On Call®Extra Glucose Control Solution contains a known concentration of
glucose. It is used to confirm that your On Call®Extra Blood Glucose Meter and
test strips are working together properly. It also confirms that you are performing
the test correctly. It is important to run a quality control test regularly to make sure
you are getting correct results.
You should run a quality control test:
•Before you first use your meter, to familiarize yourself with its operation.
•Before using a new box of test strips.
•When you suspect that the meter or test strips are not working
properly.
•When you suspect that your test results are inaccurate, or if they
are inconsistent with how you feel.
•When you suspect your meter is damaged.
•After cleaning your meter.
•At least once a week.
Refer to Quality Control Test on page 17 for instructions on running a quality
control test.

10
Storage and Handling
Please review the following storage and handling instructions:
•Store the control solution at 2-30 °C (36-86 °F).
•Do not refrigerate or freeze.
•If the control solution is cold, do not use until it has warmed to room
temperature.
•Use before the unopened expiration date that is shown on the bottle.
Note: The expiration date is printed in Year-Month format. 2014-01 means
January, 2014.
•Each bottle of control solution can be used for 6 months after you first open it.
Record the opened and the resulting expiration date on the bottle label.
Control Solution Precautions
•For in vitro diagnostic use. The control solution is for testing only outside the
body. Do not swallow or inject.
•Shake well before using.
•Control solution tests are designed to be accurate only when tested between
10 and 40 °C (50-104 °F).
•The control ranges shown on the test strip vial (or on the foil pouch) are not
recommended ranges for your blood glucose level. Your personal blood
glucose target ranges should be determined by your diabetes healthcare
professional.
•Do not touch the test strip with the tip of the control solution bottle.
•Use only the same brand of control solution that was provided with your kit.
See the control solution insert for more details.

11
Installing the Battery
The battery may not be preinstalled in the meter. The meter requires one CR 2032
3.0V coin cell battery. Please find the battery in your carrying case and install it
according to the following steps:
1. Turn over the meter. Slide the battery cover in the direction of the arrow to
open it.
2. Place a fresh CR 2032 3.0 V coin cell battery. Make sure it is aligned with the
plus (+) side facing up in the battery carrier.
3. Close the battery cover and make sure that it snaps shut.

12
Meter Setup Before Testing
Before using your meter for the first time, you will need to adjust the settings that
are listed in detail below.
1. Meter Setup Mode: When meter is off, in memory mode or in average mode,
press and hold the ►button for two seconds to eneter meter setup mode. The
meter will automatically enter the setup mode when turned on for the first time
by any method.
2. Clock: Set the clock to 12 or 24 hour mode. Press the ◄button to switch
between the two settings. Then press the ►button to save your choice and
then you can start to set the year, month and date.
Note: The clock needs to be reset after replacing the battery.
3. Date: The year will appear at the top of the display. Press the ◄button to
increase the year. Once you have selected the correct year, press the ►
button to save your choice and start setting the month. Press the ◄button to
increase the month. Then press the ►button to save your choice and start
setting the date. Press the ◄button to increase the date. Then press the ►
button to save your choice and start setting the time.
4. Time: The hour will appear at the top of the display. Adjust the hour with the ◄
button until the correct hour is displayed. Press the ►button to save your
choice and set the minutes. Press the ◄button to change to the correct minute.
Press the ►button to save your choice and move to set the meal marker
feature.
OR
Y
ear Month Date

13
5. Meal Marker: The meter comes with the meal marker feature disabled. The
meter allows the user to enable or disable this option. The words “On” or “Off”
will be displayed on the large center segments of the display. The before meal
symbol together with the after meal symbol will be displayed as shown below.
Press the ◄button to switch between turning the meal marker “On” and “Off”.
Press the ►button to confirm your selection.
6. Audio Feature: The meter comes with the audio feature enabled. The meter
will give one short beep when it is turned on, after sample detection and when
the result is ready. The meter will sound three short beeps to sound a warning
when an error has occurred. Please check the error number on the display to
determine what kind of error has occurred.
OR
Hou
r
Hou
r
OR
Minute Minute

14
Press the ◄button to turn the meter beep “On” and “Off”. Press the ►button
to confirm your selection.
7. Ketone Indicator: The meter comes with the Ketone indicator feature disabled.
Press the ◄button to switch between turning the Ketone indicator “On” and
“Off”. Press the ►button to confirm your selection. When the Ketone indicator
is enabled, if the test result is higher than 16.7 mmol/L (300 mg/dL), the symbol
of "Ketone?" will appear on the display.
8. Hyper Indicator: The meter comes with the Hyper indicator feature disabled.
Press the ◄button to turn the Hyper indicator “On” or “Off”. Press the ►button
to confirm your selection. When the Hyper indicator is “Off”, pressing the ►
button will go to the next Hypo indicator set up. When the Hyper indicator is
“On”, pressing the ►button will go to the Hyper indicator level set up. At the
Hyper level set up, press the ◄button to adjust the Hyper level. Press the ►
button to go to the Hypo indicator set up.
OR
OR

15
Note:The meter allows the hyperglycemia level to be as low as 6.7 mmol/L
(120 mg/dL) or higher. The hyperglycemia level should be above the
hypoglycemia level. Consult your diabetes healthcare professional before
determining what your hyper blood glucose level is.
9. Hypo Indicator: The meter comes with the Hypo indicator feature disabled.
Press the ◄button to turn the Hypo indicator “On” or “Off”. Press the ►button
to confirm your selection. When the Hypo indicator is “Off,” pressing the ►
button will go to the Test Reminder set up. When the Hypo indicator is “On”,
pressing the ►button will go to the Hypo indicator level set up. At the Hypo
level set up, press the ◄button to adjust the Hypo level. Then press the ►
button to go to the Test Reminder set up.
Note: The meter allows the hypoglycemia level to be as high as 5.6 mmol/L
(100 mg/dL). The hypoglycemia level should be below the hyperglycemia level.
Consult your diabetes healthcare professional before determining what your
hypo blood glucose level is.
10. Test Reminder: Test reminders are a useful way to remind you when to test.
You can set 1 to 5 reminders per day. Your meter is preset with the test
reminder disabled. You must turn it on to use this feature.
•Press the ◄button to turn the first Test Reminder “On” and “Off”. Press the
►button to confirm your selection. When the Test Reminder is “Off”,
pressing the ►button will go to the setup of the second Test Reminder.
When the Test Reminder is “On”, pressing the ►button will go to the setup
of the time for the first Test Reminder. Press the ◄button to adjust the first
Test Reminder time (Time is adjusted by every minute). Press the ►button
to confirm the first Test Reminder time and then go to the second Test
Reminder set up.
•When the Test Reminder is “Off” during the second Test Reminder set up,
pressing the ►button will go to the setup of the third Test Reminder. When
the Test Reminder is “On”, pressing the ►button will go to the setup of the
time for the second Test Reminder. Press the ◄button to adjust the
OR

16
second Test Reminder time (Time is adjusted by every minute). Press the
►button to confirm the second Test Reminder time and then go to the third
Test Reminder set up.
•Repeat the same set up procedure for Test Reminder 3, 4 and 5.
•After finishing the fifth Test Reminder set up, it will then end the setup mode
and power off the meter.
If one or more test reminders have been set, the reminder symbol will always
appear on the LCD screen when the meter is turned on. The display sample is
shown below.
The meter beeps 5 times when it is first set. It will beep again two minutes later,
and two minutes after that unless you insert a test strip or press any button.
This function will still work with Audio feature turned off.
When the meter beeps at the time set by the Test Reminder feature, the date,
time and strip symbol will be displayed. The Test Reminder symbol will also
flash. The display sample is shown below.
Note: For any step of the setup, if the ◄button is pressed and held, it will allow
a faster adjustment.
OR

17
Performing a Quality Control Test
The quality control test confirms that the test strips and meter are working together
properly. It also confirms that you are performing the test correctly. It is important to
perform this test:
•Before you first use your meter.
•Before using a new box of test strips.
•When you suspect that the meter or test strips are not working properly.
•When you suspect that your test results are inaccurate, or if they are
inconsistent with how you feel.
•When you suspect your meter is damaged.
•After cleaning your meter.
•At least once a week.
1. Insert a test strip into the strip port, contact bars end first and facing up. It will
turn on the meter and display all the display segments. If the audio option is on,
the meter will beep, signaling the meter is turned on.
2. Check the display to confirm that all the display segments turn on. Next, a dash
will move across the display.
3. Following this display check, the system will enter the test mode. The display
will show the date time and the strip icon with the blood sample icon blinking to
indicate that the test strip is inserted correctly.
NOTREADY NOTREADY NOTREADY
NOT READY

18
Note:If the test strip has been inserted incorrectly, the meter will not turn on.
4. Press the ◄button to mark the test as a control solution test. Once the ◄
button is pressed, the control solution symbol will appear on the display. It
indicates that a drop of control solution can be added.
5. Shake the control solution bottle well. Squeeze it gently and discard the first
drop. If the tip clogs, tap the tip gently on a clean, hard surface. Then shake
again and use. Squeeze out a second small drop on a clean nonabsorbent
surface. Touch the sample tip of the test strip to the control solution drop. If the
audio option is turned on, the meter will beep. It indicates a sufficient sample
has been applied.
Notes:
•Do not apply control solution to the test strip directly from the bottle.
•If you applied the control solution sample but do not see the starting of the
count down, you may reapply a second drop within 3 seconds.
6. Once a sufficient sample has been applied, the meter display will count down
from 3 to 1. Then the result and a control solution symbol will be displayed on
the screen. The control solution test results should be within the control range
(CTRL 1) printed on the test strip vial (or on the foil pouch). This means that
your blood glucose monitoring system is working properly and that you are
performing the procedure correctly.
READY TO TEST
Table of contents