oneConcept 10027962 User manual

Prenosný CD-prehrávač UKW USB BT
10027962 10027963 10027964 10027965

Obsah
Vážený zákazník,
gratulujeme Vám k zakúpeniu produktu.
Prosím, dôkladne si prečítajte manuál a dbajte na nasledovné pokyny, aby sa zabránilo
škodám na zariadení. Za škody spôsobené nedodržaním inštrukcií a pokynov neručíme.
Bezpečnostné pokyny 2
Obslužné prvky 4
Zostavenie 5
Obsluha 5
Technické údaje 9
Likvidácia 9
Vyhlásenie o zhode 9
Bezpečnostné pokyny
Tento prístroj obsahuje laser triedy 1.
Nebezpečenstvo vzniká len, keď sa otvorí kryt.
Blesk vo výstražnom trojuholníku je varovný znak,
ktorý Vás varuje pre nebezpečným napätím v
prístroji.
Pozor! Nebezpečenstvo zásahu elektrickým
prúdom. Neotvárajte prístroj!
Varovné symboly na prístroji
Výkričník vo výstražnom trojuholníku upozorňuje, že produktu prislúchajú dôležité pokyny na
obsluhu.
Pozor: Nebezpečenstvo zásahu elektrickým prúdom. Neotvárať.
Aby ste zabránili nebezpečenstvu zásahu elektrickým prúdom, neotvárajte kryt. Vo vnútri
krytu sa nenachádzajú žiadne
časti, ktoré by mohol opraviť používateľ. Obráťte sa na kvalifikovaný odborný personál.
2

- Prečítajte si pokyny. Všetky pokyny na použitie musia byť prečítané predtým, než prístroj
zapnete.
- Uschovajte si návod na obsluhu pre budúce použitie.
- Prístroj nesmie byť používaný v blízkosti vody alebo prísť do kontaktu s vlhkosťou.
- Dbajte na to, aby sa na prístroj nevyliala žiadna tekutina.
- Pohybujte s prístrojom opatrne. Zabráňte otrasom.
- Neblokujte otvory na prístroji.
- Neklaďte prístroj do blízkosti zdroja tepla (napr. výhrevného telesa). Nevystavujte ho
slnku.
- Pripájajte prístroj tak, ako je popísané v tomto návode na obsluhu.
- Tento prístroj je vybavený prepäťovou ochranou. V prípade, že musí byť vymenená,
obráťte sa na kvalifikovaného
elektronika.
- Okrem toho by mal byť prístroj opravený kvalifikovaným elektronikom, keď
- sieťová zástrčka a sieťový kábel sú poškodené.
- do prístroja spadli predmety alebo sa naň vyliala tekutina.
- prístroj bol vystavený dažďu.
- prístroj bez vonkajších znakov nefunguje správne.
- prístroj spadol na zem
- Neskúšajte prístroj opravovať spôsobom, ktorý nie je popísaný v tomto návode na
obsluhu.
3

Obslužné prvky
1 LCD-ukazovateľ
2 Stop
3 Titul späť
4 Opakovanie
5 Reproduktor
6 Priehradka na CD
7 Zapnutie/Vypnutie/Play
(prehrávanie)/Pause (pauza)
8 Titul dopredu
9 Programovanie
10 LED režimu BT/USB
11 USB pripojenie
12 Tyčová anténa
13 Nastavenie staníc
14 AUX-vstup
15 Priehradka na batérie
16 Rúčka
17 Regulátor hlasitosti
18 Voľba funkcií
19 AC-zásuvka pre pripojenie
prúdu
20 BT/FM
4

Zostavenie
Obsluha
Pozor:
Použitie ovládacích prvkov a rozšírenia, alebo iná obsluha, ako je tu udávaná,
môže viesť k tomu, že sa budete vystavovať
nebezpečnému žiareniu. Tento prístroj nesmie byť menený alebo opravovaný,
okrem kvalifikovanou zákazníckou službou.
- Vybaľte všetky komponenty a odstráňte ochranné balenie.
- Nepripájajte prístroj na sieť predtým, než boli vytvorené všetky spojenia.
- Nezakrývajte prieduchy. Dbajte na to, aby na zadnej časti prístroja bolo niekoľko
centimetrov miesta.
Sieťové pripojenie (striedavý prúd)
1. Spojte jeden koniec odnímateľného kábla so sieťovým pripojením prístroja (19) a
druhý koniec so zásuvkou.
2. Zapnite prístroj tým, že stlačíte tlačidlo Zapnuté/Vypnuté/Play (7).
Prevádzka s batériami (jednosmerný prúd)
- Pre prevádzku s jednosmerným prúdom nasaďte
6 mono-batérií (UM-2) do priehradky na batérie
(15). Dbajte na správne
smerovanie (pozri obrázok vpravo).
- Odstráňte počas prevádzky s batériami sieťovú
zástrčku
Rádio
Prevádzka
1. Podržte stlačené tlačidlo "Zapnuté/Vypnuté/Play" (7), aby ste prístroj zapli. Posuvný
prepínač voľby funkcií (18) nastavte
do polohy "Radio/BT" a posuvný prepínač pre BT/FM (20) posuňte do polohy "FM".
2. Pre nastavenie želanej frekvencie stanice otáčajte otočným regulátorom.
3. Pre nastavenie hlasitosti otáčajte regulátorom hlasitosti (17).
Pokyny pre najlepší príjem:
•VKV: Prijímač má tyčovú anténu (12), ktorá je pripevnená na zadnej strane krytu.
Aby ste mali najlepší príjem, mala by byť anténa úplne vytiahnutá.
5

CD
Štart
1. Posuňte prepínač voľby funkcií (18) do polohy "CD/AUX".
2. Otvorte priehradku na CD (6).
3. Vložte CD s potlačenou stranou nahor. Zatvorte priehradku na CD.
4. Vyhľadávanie beží. LCD-ukazovateľ (1) zobrazí celkový počet titulov a celkový čas
prehrávania.
Play / Pause
1. Posuňte prepínač voľby funkcií (18) do polohy "CD/AUX".
2. Otvorte priehradku na CD (6).
3. Vložte CD s potlačenou stranou nahor. Zatvorte priehradku na CD.
4. Vyhľadávanie beží. LCD-ukazovateľ (1) zobrazí celkový počet titulov a celkový čas
prehrávania.
Stop
Stlačte počas reprodukcie alebo pauzy tlačidlo "STOP" (2), a prístroj zastane.
Preskakovanie titulov(SKIP UP / SKIP DN )
1. Ak stlačíte počas reprodukcie alebo pauzy tlačidlo "SKIP UP", skočíte k ďalšiemu titulu.
Číslo titulu sa zobrazí a CD-prehrávač
zostáva vždy v režime reprodukcie alebo pauzy.
2. Ak stlačíte tlačidlo "SKIP DN", skočí CD-prehrávač na začiatok titulu. Tento sa objaví
na displeji. CD-prehrávač
zostáva vždy v režime reprodukcie alebo pauzy.
3. Ak stlačíte po kroku 2 ešte raz "SKIP DN", skočí CD-prehrávač k predchádzajúcemu
titulu a zostáva opäť v režime reprodukcie alebo pauzy.
Opakovanie
Stlačte počas reprodukcie tlačidlo "Repeat" (4), aby ste naštartovali funkciu "Opakovanie
titulu". Jednotlivé alebo všetky tituly
môžu byť reprodukované nasledovne:
(1) Opakovať titul 1 (2) Opakovať všetky tituly (3) Vypnuté
Upozornenie:
CD-prehrávač v tomto prístroji podporuje normálne kompaktné disky z
obchodu, ale nie disky s CD-MP3-formátom.
6

Poznámka:
Keďže externý vstup AUX a CD-prehrávač majú v systéme rovnaké
priradenie, prepne kanál automaticky na externý vstup (Aux), keď sa
pripojí 3,5 mm konektor a reprodukcia CD sa nastaví. Dbajte na to, aby sa
v AUX-pripojení nenachádzala žiadna zástrčka predtým, než budete
prehrávať CD
Režim reprodukcie Zobrazenie na LCD-displeji
opakovať 1 titul RPT 1
opakovať všetky RPT ALL
Vypnuté -------------
Programovanie CD
Až do 20 titulov môže byť naprogramovaných pre reprodukciu v ľubovoľnom poradí. Pred
použitím tejto funkcie sa uistite, že ste stlačili
tlačidlo "STOP".
1. Choďte do režimu CD a zastavte reprodukciu CD.
2. Stlačte tlačidlo programovania (9), nadispleji sa objaví "PROG".
3. Zvoľte želaný titul tým, že stlačíte "SKIP UP" alebo "SKIP DN".
4. Stlačte tlačidlo programovania (9), aby ste uložili titul.
5. Zopakujte kroky 3 a 4, aby ste uložili ďalšie tituly, ak si to želáte.
6. Keď boli všetky želané tituly naprogramované, stlačte tlačidlo "PLAY/PAUSE", aby ste
tituly prehrali v želanom poradí. Atlačte "STOP",
aby ste ukončili naprogramovanú reprodukciu
- Prejdenie naprogramovaných titulov: Stlačte tlačidlo programovania (9), potom, ako je
programovanie ukončené.
- Vymazanie programovania: Stlačte pri zastavenej reprodukcii CD "STOP", kým
zobrazenie "PROG" nezmizne.
Reprodukcia z MP3 cez USB-pamäťové médiá
Spojenie
•Systém vie dekódovať a reprodukovať MP3-súbory na USB-pamäťovom médiu.
Upozornenie: Displej neukazuje nič počas reprodukcie cez USB.
1. Prepnite systém najskôr do režimu Standby alebo iného režimu, okrem do režimu USB.
7

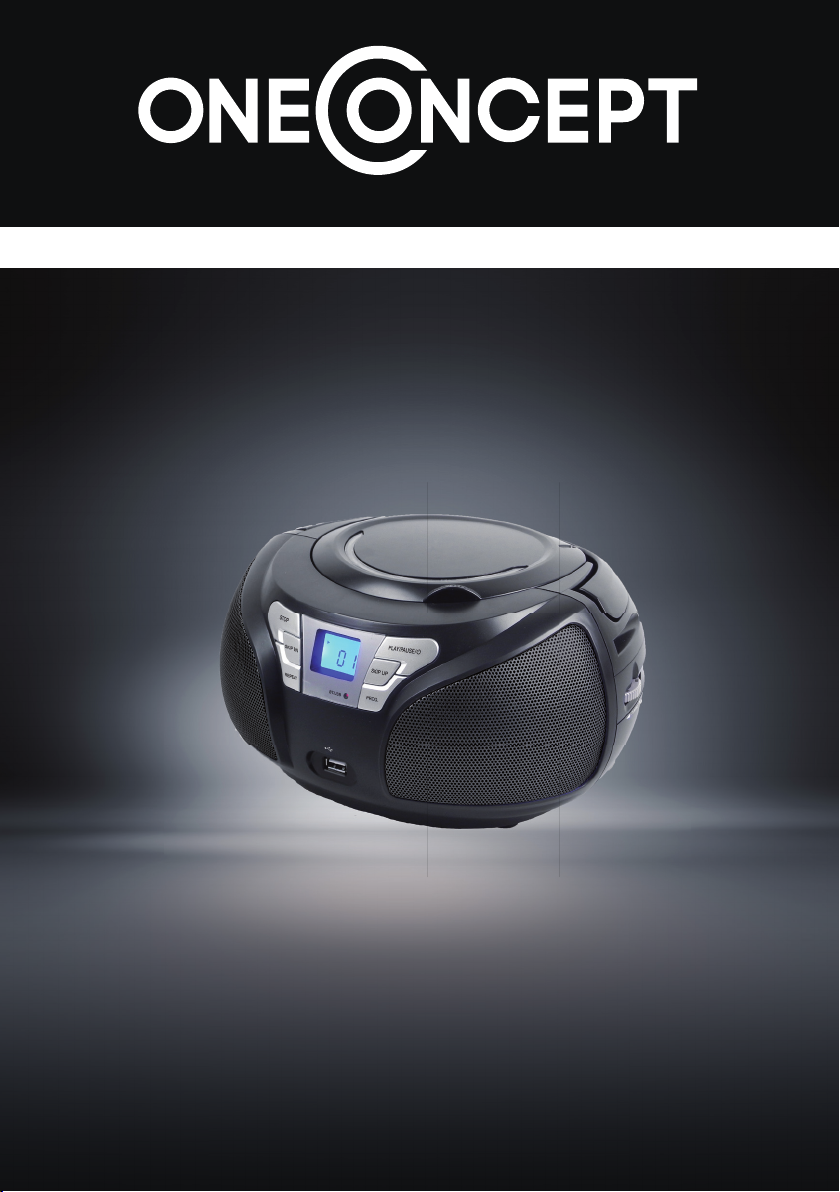
2. Pripojte USB-kľúč s hornou stranou nahor a dbajte na to, aby ste ho úplne zaviedli.
Keď zavediete USB-kľúč s nesprávnou stranou nahor,
alebo zadnou stranou dopredu, môže to prístroj alebo pamäťové médium poškodiť.
Dbajte pred pripojením na to, aby USB-kľúč bol v správnom smere.
3. Posuňte prepínač voľby funkcií (18) do "USB/BT". LED režimu BT/USB sa rozsvieti.
4. Po pripojení začne prístroj automaticky pamäťové médium preberať a reprodukovať.
Lampička režimu USB/BT začne počas reprodukcie blikať.
5. Stlačte tlačidlo "SKIP UP" alebo "SKIP DN", aby ste titul preskočili.Stlačte tlačidlo Play/
Pause (7), aby ste zastavili reprodukciu.
Odstránenie USB-prístroja
Aby ste odstránili USB-prístroj, vypnite prístroj a vytiahnite pamäťové médium priamo z
USB-pripojenia.
Pripojenie na AUX-vstup
Pripojte externý prístroj (napr. MP3-prehrávač) na CD-prehrávač tým, že ho spojíte cez
AUX-zásuvku vstupu (14) na zadnej strane krytu s
3,5 mm stereokáblom (nie je obsiahnutý v dodávke).
1. Nastavte prepínač pre voľbu funkcií (18) na "CD/AUX".
2. Pripojte externý prístroj na AUX-vstup. Kanál sa automaticky prestaví na AUX-vstup.
3. Nastavte regulátor hlasitosti (17) na želanú hlasitosť. V prípade, že je skreslenie príliš
vysoké, zredukujte hladinu hlasitosti
externého prístroja.
4. Začnite s reprodukciou na Vašom prístroji.
BT-Verbindung und BT-BT-spojenie a BT-reprodukciaWiedergabe
1. Nastavte prepínač pre voľbu funkcií (18) na "Radio/BT" a prepínač "BT/FM (20) na
"BT".
2. Na to bliká LED režimu BT/USB (10). To znamená, že prístroj sa nachádza vo
vyhľadávacom režime a ešte nie je spojený.
3. Zapnite BT na externom prístroji (napr. mobilnom telefóne) a zvoľte pre spojenie
"GROOVIE".
4. Keď BT-spojenie už bolo raz úspešne vytvorené, LED režimu BT/USB (10) svieti trvalo.
Upozornenia:
- Tento systém môže identifikovať a čítať MP3-súbory len v režime USB. Iné
formáty nie sú podporované.
- V prípade, že ste prístroj pripojili cez USB-pripojenie na MP3-prehrávač, môže sa
stať, že reprodukcia pre MP3-prehrávač cez variancie
v MP3-kódovaní nie je možná. Toto nie je chyba systému.
- USB-pripojenie nepodporuje žiadne spojenia s USB-predlžovacími káblami, a nie je
určené na priame pripojenie na PC.
8

Vyhlásenie o zhode
Výrobca: Chal-Tec GmbH, Wallstraße 16, 10179 Berlin.
Tento produkt je v súlade s nasledovnými európskymi smernicami:
1999/5/EG (R&TTE)
2004/108/EG (EMV)
2011/65/EU (RoHS)
2006/95/EG (LVD)
Pokyny k likvidácií
Podľa Európskeho nariadenia odpadu 2002/96 /EÚ tento symbol na výrobku
alebo na jeho obale znamená, že výrobok nepatrí do domáceho odpadu. Na
základe smernice by sa mal prístroj odovzdať na príslušnom zbernom mieste
pre recykláciu elektrických a elektronických zariadení. Zabezpečením
správnej likvidácie výrobku pomôžete zabrániť možným negatívnym
dopadom na životné prostredie a ľudské zdravie, čo by inak mohol byť
dôsledok nesprávnej likvidácie výrobku. Pre detailnejšie informácie o
recyklácii tohto výrobku sa obráťte na svoj Miestny úrad alebo na odpadovú
a likvidačnú službu Vašej domácnosti.
Váš produkt obsahuje baterky zahrnutej v Európskej smernici. 2006/66/EG neumožňuje
vyhadzovania bateriek do komunálneho odpadu. Informujte sa o možnostiach zberu
batérií. Správny zber a likvidácia batérií pomáha chrániť potenciálne negatívne následky
na životné prostredie a ľudské zdravie.
5. Začnite s reprodukciou na Vašom BT-prístroji a užívajte si hudbu cez reproduktory CD-
prehrávača.
Technické údaje
Číslo tovaru 10027962 10027963 10027964 10027965
Napájanie prúdom 220-240 V, 50 Hz
Rozmery (Š x H x V) 245 x 215 x 133 mm
Rádio UKW 88-108 MHz
Kompatibilné formáty
CD-prehrávača
CD, CD-R, CD-RW
Kompatibilné formáty
súborov USB-PRIPOJENIA
MP3
9

Contents
Dear Customer,
Congratulations on purchasing this equipment. Please read this manual carefully and take
care of the following hints on installation and use to avoid technical damages. Any failure
caused by ignoring the mentioned items and cautions mentioned in the operation and
installation instructions are not covered by our warranty and any liability.
Safety Instructions . . . . . . . . . . . . . . . . . . . . . . . . . . . . 10
Location of Controls . . . . . . . . . . . . . . . . . . . . . . . . . . . 12
Installation . . . . . . . . . . . . . . . . . . . . . . . . . . . . . . . 13
Operation . . . . . . . . . . . . . . . . . . . . . . . . . . . . . . . . 13
Technical Data . . . . . . . . . . . . . . . . . . . . . . . . . . . . . . 17
Disposal Considerations . . . . . . . . . . . . . . . . . . . . . . . . . 17
Declaration of Conformity. . . . . . . . . . . . . . . . . . . . . . . . . 17
Safety Instructions
Embedded class 1 laser
Exposure hazard exist only if protective housing is
removed.
Warning symbols on the unit
10

Warning: Danger of electical shock
Read the following security instructions carefully
• Read the instructions. All uses guidelines must be read before start device.
• Keep the instructions for future use.
• The device must not be used near water or be put in contact with moisture.
• Make sure has no liquid is spilled on device and device openings.
• Move device carefully, avoid shocks.
• Do not block the breakdown of the device outputs.
• Do not place the device near from a heat source (e.g. radiator). Do not expose it to the
Sun.
• Plug the device as indicated on this information form.
• This device has a connection with overload protection (security device) decision-making.
If the replacement of the overload protection is required, please turn to an experienced
technician.
• For cleaning the device, please follow the recommendations of the notice.
• The sector cord should be unplugged a long period of use.
• Device shall be repaired by a quali ed person when:
◦the taken or the power cord is damaged,
◦objects have fallen into the apparatus or a liquid has been spilled into device,
◦device was exposes to the rain,
◦device does not work correctly without notable exterior change,
◦device fell and the subwoofer is broken.
◦The user shall not try to maintain device beyond that which is described in this infor-
mation form.
11

Location of Controls
1 LCD display
2 Stop buttton
3 Skip down button
4 Repeat button
5 Speaker
6 CD component
7 On/Off/Play/Pause button
8 Skip up button
9 Program button
10 BT/USB playback LED indicator
11 USB socket
12 Rod antenna
13 Tuning knob
14 Aux in jack
15 Battery compartment
16 Handle
17 Volume knob
18 Function selector
19 AC socket
20 BT/FM selector
12

Installation
Operation
Caution:
Usage of controls or adjustments or performance of procedures other than those
speci ed herein may result in hazardous radiation exposure. This unit should not be
adjusted or repaired by anyone except quali ed service personnel.
• Unpack all parts and remove protective material.
• Do not connect the unit to the mains before checking the main voltage and before all
other connections have been made.
• Do not cover any vents and make sure that there is a space of several centimetres at
the back of the unit for ventilation.
AC connection
1. Connect the one end of the detachable power cord to the AC socket (19) and the other
end to the ac outlet.
2. Turn on the unit by press and hold On-Off/Play button (7).
DC connection
• For DC operation, please insert 6 pcs size C
(UM-2) battery at battery compartment (15)
as below direction and please unplug the AC
socket (19) during operate with battery:-
Listening to radio
Operation
1. Press and hold the On/off/Play button (7) to turn on the unit and slide function selec-
tor (18) to select Radio/BT position and keep the BT/FM selector (20) in FM position.
2. Turn the tuning knob (13) to set the station frequency as desired.
3. Adjust volume knob (17) to the desired volume level.
Hints for best reception:-
• FM : the receiver has rod antenna (12) hanging at the rear cabinet. This antenna
should be totally extended for best reception.
13

Playing compact disc
Getting started
1. Slide function selector (18) to select “ CD/AUX ” mode,
2. Open the CD door (6).
3. Place a CD with the printed side facing up inside the tray & then close the CD door.
4. Focus search is performing, the LCD display (1) will show the total number of tracks
& total playing time.
Play / pause mode
1. Press the “ play/pause ” button (7) to start playback, the rst track will start play-
back.
2. To interrupt, press the “ play/pause ” button (7) once, and the playing time will be
freeze on the LCD display (1). Press again to resume normal playback.
Stop mode
If „stop“ button (2) is pressed during play or pause mode, system will go to stop mode.
Skip mode (skip up / skip down )
1. During play or pause mode, if “skip up ” button (8) is pressed. It will go to next
track and display the track no. and then remain the play or pause mode.
2. During play or pause mode, if “skip down ” button (3) is pressed. It will go back to
the beginning of the track, original track no. Is display and remain the play or pause
mode.
3. After step 2, press “skip down ” button (3) again will go to the previous track and
remain the play or pause mode.
Repeat mode
Press the “ repeat “ button (4) during playback to select repeat function, single or all the
tracks can be played as follows:-
(1) repeat 1 (2) repeat all track (3) off mode
Play mode Indicator on LCD display
Repeat 1 track RPT 1
Repeat all RPT ALL
Off mode --------------
Remark:
This is a CD product and so it support normal Compact Disc from the
market but NOT for CD-MP3 format disc.
14

Remark:
Due to Aux and CD being designed at the same position of this system.
When Aux-in jack (14) plugged by 3.5 mm stereo plug. The channel will
change to Aux automatically and CD will stop to play. Please ensure the
Aux-in jack (14) without plugged by anything before playing CD.
CD programming
Up to 20 tacks can be programmed for disc play in any order. Before use, be sure to press
the “ stop ” button (2).
1. Set in CD mode & stop the CD playback.
2. Press the “Program” button (9), “ PROG “ will appear & fl ashing on LCD display (1).
3. Select a desired track by pressing skip up or down buttons (8/3) .
4. Press the “Program” button (10) to store the track into memory.
5. Repeat steps 3 and 4 to enter additional tracks into the memory if necessary.
6. When all the desired tracks have been programmed, press “ play/pause ” button
(7) to play the song in assigned order.
7. Press the “stop “ button (2) to terminate program play.
• After program complete, press "Program" button (9) to review the tracks being
programmed.
• Press "stop " button (2) at CD stop mode to cancel all programmed memory until the
"PROG" indicator disappear on LCD display (1).
Playback of MP3 song via USB storage media
Connecting
• The system is able to decode and playback all MP3 le which stored in the memory
media via USB host.
NOTE : LCD does not display anything during USB playback due to products design.
1. Set the system at standby mode rst or other function except USB mode.
2. Plug-in the USB pen-drive with the face up & make sure it going into completely.Con-
necting the USB upside down or backwards could damage the audio system or the
storage media (USB thumb driver). Check to be sure the direction is correct before
connection.
3. Slide the functions selector (18) to USB mode. The USB/BT indicator (10) will light up
4. The system will start reading and playback the storage media automatically after con-
necting, the USB/BT indicator will change to fl ash mode during playback.
5. Press “skip up ” button (8) or button (3) to skip the track. Press play/pause button
(7) to change to stop mode.
15

Removing of USB
To remove the USB, turn off the power then un-plug it by pulling out the USB socket di-
rectly.
Aux-in connection
Connect the unit to any auxiliary device (i.e. MP3 player, or iPod ® (not included) by con-
necting the Aux-in jack (14) at the rear cabinet with one end of 3.5mm stereo cable (not
provided) and the other end connect to the auxiliary device to perform the music.
1. Slide function selector (18) to select “ CD/AUX” mode.
2. Plug the Aux-in jack. The channel will switch to Aux automatically.
3. Adjust Volume Knob (17) to the desired volume level. If the distortion is too high, re-
duce the volume level of your auxiliary device. Start to playback your device.
BT connecting and Playback
1. Set the function selector (18) to Radio/BT position and keep the BT/FM selector (20)
in BT position
2. The BT/USB LED indicator (10) will fl ashing, it means the BT in non connection /
searching mode.
3. Switch on the BT feature of your BT device (such as mobile phone) and select
“GROOVIE” BT equipment to connecting.
4. Once the connecting was nish and connect successfully, the BT LED (10) will change
to light up.
5. Start to playback your BT device and enjoy the music by the main unit.
Remark:
• The system can detect and read the le under MP3 format only at USB mode but
not other music le format.
• If connect the system to MP3 player via the USB socket, due to variances in MP3
encoding format, some MP3 player may not be able to play via the USB socket.
This is not a malfunction of the system.
• USB port does not support connection with USB extension cable and is not
designed for communication with computer directly.
16

Declaration of Conformity
Producer: Chal-Tec GmbH, Wallstraße 16, 10179 Berlin.
This product is conform to the following European Directives:
1999/5/EC (R&TTE)
2004/108/EC (EMC)
2011/65/EU (RoHS)
2006/95/EC (LVD)
Disposal Considerations
According to the European waste regulation 2002/96/EC this symbol on the
product or on its packaging indicates that this product may not be treated
as household waste. Instead it should be taken to the appropriate collection
point for the recycling of electrical and electronic equipment. By ensuring
this product is disposed of correctly, you will help prevent potential negative
consequences for the environment and human health, which could otherwise
be caused by inappropriate waste handling of this product. For more detailed
information about recycling of this product, please contact your local council
or your household waste disposal service.
Your product contains batteries covered by the European Directive. 2006/66/EC, which
cannot be disposed of with normal household waste. Please check local rules on separate
collection of batteries. The correct disposal of batteries helps prevent potentially negative
consequences on the environment and human health.
Technical Data
Item number 10027962 10027963 10027964 10027965
Power source AC: 220-240 V, 50 Hz
DC: 9 V (6 batteries à 1.5 V, UM-2/LR20)
Unit dimensions
(W x D x H)
245 x 215 x 133 mm
Tuner FM 88-108 MHz
CD -Player: Compatible formats CD, CD-R, CD-RW
USB socket: Compatible formats MP3
17

Sommaire
Chère cliente, cher client,
Toutes nos félicitations pour l’acquisition de ce nouvel appareil. Veuillez lire attentive-
ment et respecter les consignes suivantes de branchements et d’utilisation pour éviter
d’éventuels dommages techniques. Le fabricant ne saurait être tenu pour responsable des
dommages dus au non-respect des consignes de sécurité et à la mauvaise utilisation de
l’appareil.
Consignes de sécurité . . . . . . . . . . . . . . . . . . . . . . . . . . 18
Éléments de commande . . . . . . . . . . . . . . . . . . . . . . . . . 20
Installation . . . . . . . . . . . . . . . . . . . . . . . . . . . . . . . 21
Fiche technique . . . . . . . . . . . . . . . . . . . . . . . . . . . . . 25
Information sur le recyclage . . . . . . . . . . . . . . . . . . . . . . . 25
Déclaration de conformité . . . . . . . . . . . . . . . . . . . . . . . . 25
Consignes de sécurité
Cet appareil comporte un laser de classe 1.
Il représente un danger uniquement en cas
d’ouverture du boîtier.
Le symbole de l’éclair dans le triangle avertit l’uti-
lisateur qu’une tension électrique dangereuse se
trouve à l’intérieur de l’appareil.
Attention ! Risques d’électrocution. Ne pas ouvrir
l’appareil.
Symboles d’avertissement sur l’appareil
Le point d’exclamation dans le triangle indique que le produit est accompagné de consignes
importantes d’utilisation.
Attention : risques d’électrocution. Ne pas ouvrir !
Pour éviter tout risque d’électrocution, ne pas ouvrir le boîtier. L’intérieur du boîtier ne contient
pas de pièces à entretenir par l’utilisateur. Contacter un spécialiste quali é.
18

• Lire les instructions. Lire toutes les consignes d’utilisation avant de mettre l’appareil en
marche.
• Conserver le mode d’emploi pour pouvoir s’y référer ultérieurement.
• Ne pas utiliser l’appareil à proximité d’eau et ne pas l’exposer à l’humidité.
• Veiller à ne pas faire couler de liquide sur l’appareil.
• Déplacer l’appareil avec précaution. Éviter de le secouer.
• Ne pas obstruer les ouvertures d’aération.
• Ne pas placer l’appareil à proximité de sources de chaleur (par exemple un radiateur). Ne
pas l’exposer au soleil.
• Brancher l’appareil comme indiqué dans ce mode d’emploi.
• Cet appareil est équipé d’une protection contre la surtension. S’il doit être remplacé,
contacter un électronicien qualié.
• Faire réparer l’appareil par un électronicien qualié si :
◦ la che d’alimentation ou le cordon d’alimentation sont endommagés.
◦des objets sont tombés dans l’appareil ou si un liquide s’est déversé dessus.
◦l’appareil a été exposé à la pluie.
◦l’appareil s’arrête de fonctionner inopinément.
◦l’appareil est tombé par terre.
• Ne pas essayer d’entretenir l’appareil d’une manière autre que celles décrites dans le
mode d’emploi.
19

Éléments de commande
1 Afcheur LCD
2 Arrêt
3 Titre précédent
4 Répétition
5 Haut-parleurs
6 Compartiment à CD
7 Marche/arrêt/lecture/pause
8 Titre précédent
9 Programmation
10 Voyant LED du mode USB/BT
11 Prise USB
12 Antenne à tige
13 Paramètres radio
14 Entrée Aux
15 Compartiment des piles
16 Poignée
17 Bouton de volume
18 Commutateur de fonction
19 Prise AC d’alimentation
20 BT/FM
20
Other manuals for 10027962
1
This manual suits for next models
3
Table of contents
Languages:
Other oneConcept Portable Stereo System manuals
Popular Portable Stereo System manuals by other brands

Insignia
Insignia NS-BBTCD01 Quick setup guide

Panasonic
Panasonic RXD16 - RADIO CASSETTE W/CD operating instructions

Daewoo International
Daewoo International DBU-10 GRAF user manual

Studebaker
Studebaker SB2140 owner's manual

Philips
Philips AZ1133/12 Quick use guide

Sony
Sony ZS-Y3 - Personal Cd Audio System Specifications