manuals.online logo
Brands
  1. Home
  2. •
  3. Brands
  4. •
  5. Ongo
  6. •
  7. Indoor Furnishing
  8. •
  9. Ongo Ongo Stand Product guide

Ongo Ongo Stand Product guide

Warranty
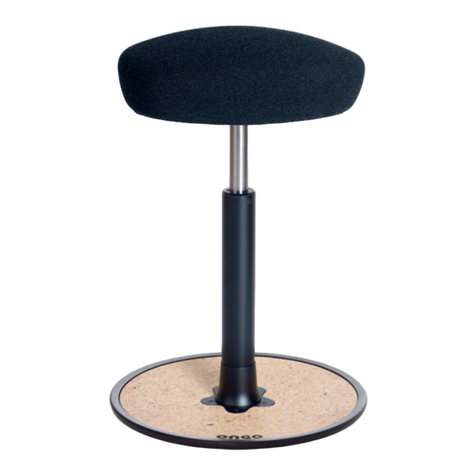
The ONGO®Stand is a high-quality product. Its indi-
vidual components meet the highest quality require-
ments. Therefore, we are able to provide a warranty
of functionality for the ONGO®Stand for three years.
This warranty is valid for all original parts and starts
when the seat is delivered. Please keep your receipt/
delivery slip for warranty claims. During the warranty
period, ONGO® will provide repair or replacement free
ONGO® GmbH
Klopstockstrasse 51
70193 Stuttgart
Germany
T + 49 (0) 711 469 078-70
F + 49 (0) 711 469 078-99
info@ongo.eu
www.ongo.eu
of charge after a claim has been submitted and
approved by ONGO®. All you need to pay is the costs
of transportation. The warranty does not apply to
normal wear and tear of parts subject to wear, such
as the cover material, defects resulting from improper
handling (particularly improper care or damage from
knocks, scratches or rips, use of force) and any
modifications made by third parties that are not
authorized by ONGO® and not TÜV-certified.
Thank you for choosing the innovative ONGO®Stand.
The ONGO®Stand is for people who have realized
that it is healthier and more productive to work while
standing. And also for people who are required
to stand due to their work but want to rest without
giving up their mobility.
Particularly noteworthy on the ONGO®Stand are the
seat and the elastic support of the standpipe in the
3-armed foot. The shape of the seat was chosen in
accordance with ergonomic requirements so that the
user will feel comfortable both sitting on it as well
as using it as a pure standing aid to lean on. The seat
adjusts to each person’s working conditions opti-
mally through the elastic mounting of the standpipe.
This allows a range of positions and inclinations of
the seat letting the user become more flexible and
healthier.
Assembly
Out of respect for the environment the ONGO®Stand
will be sent in a size-optimized box. For this the Stand
has been separated into its three main components
(seat, gas spring and foot). You will only need to place
the gas spring into the cones on the seat and foot.
Please follow our assembly guide:
1. First lay the seat in front of you on a table. Then
take the gas spring and insert it into the cone holder
of the seat so that the arrow marks (*) are in a line
between the seat and the gas spring. Press it well,
and then remove the marks, see Fig. 1.
Operating and assembly instructions
2. Place the base of the chair on the floor und push
the gas spring and seat into the cone holder on the
base so that the arrow marks (*) are in line with the
gas spring, see Fig. 2. Sit down and push on the seat
so that the gas spring solidifies its hold. Now you can
remove the arrow markings.
(*) The markings should help you position the seat in
exact alignment with the foot. This is important
because the gas spring will automatically be reset in
one direction. Therefore, an alignment correction can
only be made through releasing one of the cones. If
this becomes necessary we recommend tapping
the underside of the seat
with a hammer while
pulling on the cone holder
until it is possible to loos-
en and re-align the seat.
Under no circumstance
however use force on the
gas spring!
Fig. 1
®
Fig. 2
Height adjustment
The seat adjusts precisely to your needs. To adjust
the height, sit or lean on the ONGO®Stand. Press the
bar located below the seat on one of its sides; to
lower push your weight down, to raise lighten the
load on the seat.
Elasticity of stand pipe
In the center of the underside of the aluminium base is
an opening, through which the central holding screw
can be reached. If you turn the screw with a 6 Allen
wrench to the right, you will reduce the elasticity and
this reduce the ease to deflect the standing pipe. If
you turn the screw to the left, you will increase the
elasticity and at the same time the ease to deflect
the standing pipe. Make sure that you do not loosen
the screws too far. This would loosen the elastic joint
in the socket.
Seat cushion
The seat cushion for the saddle seat of the ONGO®-
Stand is optional and can be easily attached and
subsequently removed from the seat for replacement.
Fit the cushion to the seat so that the lugs fit into the
holes provided, apply pressure to clip on. To remove
loosen the locking lugs on the bottom with slight
pressure and lift the pad. This makes the ONGO®Stand
ideal for a large variation of workplaces for example
the production, oce or reception.
Caring for your ONGO®Stand
Cleaning the microfiber fleece on the seat cushion
can be done with commercially available cleaning
agents. Please note that the staining by jeans or
other textiles is excluded from any manufacturer
warranty.
The saddle seat can be kept clean with mild house-
hold or plastic detergent and a soft cloth. Do not use
strong solvents or abrasives .
Recycling
Sustainability and durability are top priorities in all of
our design, production and distribution activities.
Short transportation distances reduce environmental
impact. The materials of the ONGO®Stand can be
separated relatively easily for recycling. The compo-
nents either have material labels or can be identified
easily using the material list. Dispose of individual
materials and components properly according to
local recycling and disposal requirements. To avoid
unnecessary transportation, the main components of
the ONGO®Stand are manufactured by a capable,
ISO-certified company in Germany, configured with
other components (pneumatic height adjuster, cover
etc.) according to the customer’s specifications, and
shipped directly. ONGO® GmbH accepts discarded
stools for recycling.
Made in Germany
The design, origin of the materials used and assem-
bly of our products stand for lasting quality and
durability.
Warnings
• Seek medical advice before using. In case of acute
back pain you have to ask your doctor or physical
therapist how to use in your specific case.
• Tipping hazard. Despite the non-slip NBR glides of
the foot base, inappropriate movements can cause
the base to slide outward, causing the stool to tip
over. Do not use the ONGO®Stand as a ladder. Be
particularly careful with children who cannot yet
reach the floor with their feet when sitting on the
stool. The ONGO®Stand was designed for persons
who have to stand because of their work require-
ments, but want to have relief without restricting
their flexibility. It has not been designed and manu-
factured for any other purposes.
Use the ONGO®Stand only for the intended purpose.
• Use by one person only. The ONGO®Stand was
designed and manufactured only for the use by one
person at any time. If it is being used by several
persons simultaneously it might collapse and cause-
serious injuries.
Its maximum load is 110 kg or 243 lbs.
• Do not perform mechanical work on the pneumatic
height adjuster. Working on or replacing the pneu-
matic height adjuster must be performed by trained
personnel only.
• Use of force. Any misuse and/or application of force
on the ONGO®Stand might result in serious physical
injuries.
• Packaging material. Dispose of any packaging
material properly. Keep packaging material out of
the reach of children. A risk of suocation might
occur.
Technical specifications
• height 61–90 cm (24–35.4 in)
• seat 37 x 30 cm (14.6–11.8 in),
available in black and white
• height adjustable by gas spring
with automatic reset
• elastic support of the standpipe
• 3-arm foot 53 x 33 cm (20.9 x 13 in)
• non-slip gliders in NBR
• weight 5.5 kg (11 lbs)
• optionally available in ESD-compatible design
Materials
• seat cover:
a) microfiber fleece: 88% polyester and
12% polyurethane, 70% recycled polyester, light
fastness > 5, cycles > 50,000 (Martindale test –
ISO 12947-1-2-3-4)
b) skai® nature base: approx. 80% natural and re-
newable raw materials, Öko-Tex standard 100,
meets German medical product requirements,
durable, lightfast, abrasion-resistant
• seat foam: CFC-free polyurethane foam
• seat (saddle seat): PA6 GF30
• height adjustment lever: PA6 GF30
• cone holder at the seat: aluminum
• gas spring: steel/aluminum/plastic
• elastic bearing: NBR/steel
• collar: silicone
• cone holder at the bottom: aluminum/steel
• base: aluminum
• gliders: NBR

Other Ongo Indoor Furnishing manuals

Ongo Roll Product guide

Ongo

Ongo Roll Product guide

Ongo Wing Product guide

Ongo

Ongo Wing Product guide

Ongo You Product guide

Ongo

Ongo You Product guide

Ongo Kit Product guide

Ongo

Ongo Kit Product guide

Ongo FREE Product guide

Ongo

Ongo FREE Product guide

Ongo School User manual

Ongo

Ongo School User manual

Popular Indoor Furnishing manuals by other brands

Regency LWMS3015 Assembly instructions

Regency

Regency LWMS3015 Assembly instructions

Furniture of America CM7751C Assembly instructions

Furniture of America

Furniture of America CM7751C Assembly instructions

Safavieh Furniture Estella CNS5731 manual

Safavieh Furniture

Safavieh Furniture Estella CNS5731 manual

PLACES OF STYLE Ovalfuss Assembly instruction

PLACES OF STYLE

PLACES OF STYLE Ovalfuss Assembly instruction

Trasman 1138 Bo1 Assembly manual

Trasman

Trasman 1138 Bo1 Assembly manual

Costway JV10856 manual

Costway

Costway JV10856 manual

moss DESIGN Caisson Credenza Assembly instructions

moss DESIGN

moss DESIGN Caisson Credenza Assembly instructions

Aquaglide FULL DECK 15.0 owner's manual

Aquaglide

Aquaglide FULL DECK 15.0 owner's manual

AREBOS AR-HE-SW30 user manual

AREBOS

AREBOS AR-HE-SW30 user manual

Till-Hilft Fulda 87005.330 Assembly instructions

Till-Hilft

Till-Hilft Fulda 87005.330 Assembly instructions

Twoey Outside 2010 quick start guide

Twoey Outside

Twoey Outside 2010 quick start guide

Hettich Easys 200 operating instructions

Hettich

Hettich Easys 200 operating instructions

The bedboss RELAX 404 Series owner's manual

The bedboss

The bedboss RELAX 404 Series owner's manual

Oeseder Möbelindustrie Bern 991 720 Assembly instructions

Oeseder Möbelindustrie

Oeseder Möbelindustrie Bern 991 720 Assembly instructions

Costway HW68469 user manual

Costway

Costway HW68469 user manual

Next ALIX A27743 Assembly instructions

Next

Next ALIX A27743 Assembly instructions

BROSA Hans Assembly guide

BROSA

BROSA Hans Assembly guide

Prodigg MINIKA PBA015T-FUR installation manual

Prodigg

Prodigg MINIKA PBA015T-FUR installation manual

manuals.online logo
manuals.online logoBrands
  • About & Mission
  • Contact us
  • Privacy Policy
  • Terms and Conditions

Copyright 2025 Manuals.Online. All Rights Reserved.