Onn LA19T3W User manual

0090509448
0090509448
L19K3
A
2009.02.04
00000309243

LCD TV
USER MANUAL
Please read this manual carefully
before using this TV set and leep it
for future reference.
MODELS:
LA19T3W(STOCK#ONN19LCD)
LX19T3W(STOCK#ONN19LCDV)
LA22T3W(STOCK#ONN22LCD)
LX22T3W(STOCK#ONN22LCDV)

CAUTION: These servicing instructions arefor use byqualified service
personnel only. To reduce the risk of electric shock, do not perform any
servicing other thanthat contained inthe operating instructionsunless
you are qualified to do so.
CAUTION: USE OF ANY CONTROLS, ADJUSTMENTS, ORPROCEDURES
OTHER THAN THOSE SPECIFIED HEREIN MAY RESULT IN HAZARDOUS
RADIATION EXPOSURE. (This itemis only forTV with DVD models.)
The lightning flash with arrowhead symbol, within an equilateral
triangle is intended to alert the user to the presence of
uninsulated dangerous voltagewithin the products
enclosure that maybe of sufficient magnitude to constitute a
risk of electricshock.
The exclamation point within an equilateral triangle is intended
to alert the user to the presence of important operating and
maintenance (servicing) instructionsin the literature
accompanying the appliance.
CAUTION: TO REDUCE THE RISK OF ELECTRIC SHOCK,
DO NOT REMOVE COVER (OR BACK).
NO USER SERVICEABLE PARTS INSIDE.
REFER SERVICING TO QUALIFIED SERVICE
PERSONNEL.
WARNING: TO PREVENT FIRE OR SHOCK HAZARD, DO NOT
EXPOSE THIS APPLIANCE TO RAIN OR MOISTURE.
CAUTION: TO PREVENT ELECTRIC SHOCK DO NOT USE THIS
POLARIZED PLUG WITH AN EXTENSION CORD,
RECEPTACLE OR OTHER OUTLET UNLESS THE
BLADES CAN BE FULLY INSERTED TO PREVENT
BLADE EXPOSURE.

IMPORTANT SAFETY INSTRUCTIONS
1) Read theseinstructions.
2) Keep theseinstructions.
3) Heed allwarnings.
4) Follow allinstructions.
5) Do not use this apparatus near water.
6) Clean only with dry cloth.
7) Do not block any ventilation openings. Install in accordance with the
manufacturer's instructions.
8) Do notinstall near anyheat sources suchas radiators, heatregisters, stoves,
or other apparatus(including amplifiers) thatproduce heat.
9) Protect the power cord from being walked on or pinched particularly at plugs,
convenience receptacles, andthe point wherethey exit fromthe apparatus.
10) Only use attachments/accessories specified by the manufacturer.
11) Use only with the cart, stand, tripod, bracket, or table specified by the
manufacturer, or sold with the apparatus. When a cart is used, use caution when
moving the cart/apparatus combination to avoid injury from tip-over.
12) Unplug this apparatus during lightning storms or when unused for long
periods of time.
13) Refer all servicing to qualified service personnel. Servicing is required when
the apparatus has been damaged in any way, such as power-supply cord or plug
is damaged, liquid has been spilled or objects have fallen into the apparatus, the
apparatus has been exposed to rain or moisture, does not operate normally, or
has been dropped.
14)The apparatus shall not be exposed to dripping or splashing and that no
objects filled withliquids, such asvases, shall beplaced on theapparatus.
15)The mains plug or appliance inlet is used as the disconnect device, remain it
readily operable during the apparatus normal use.

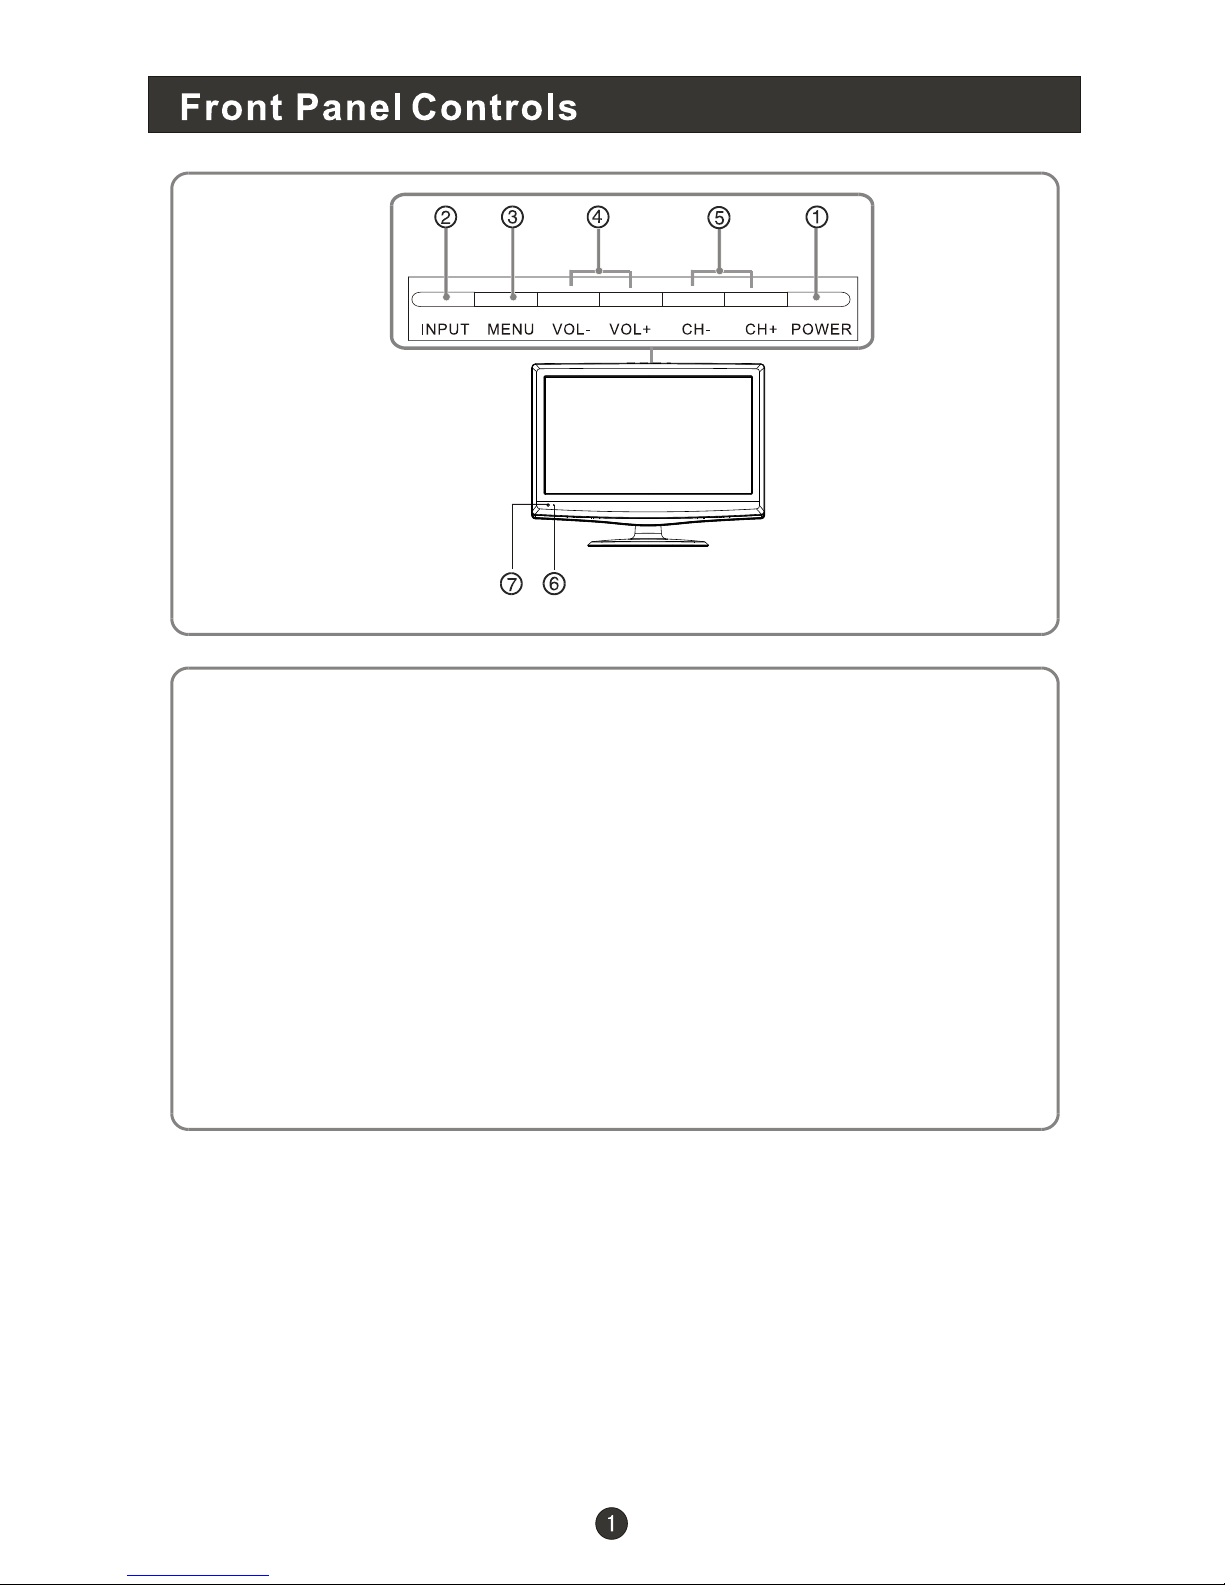
Front Panel Controls..................................................................................
Connection Options...................................................................................
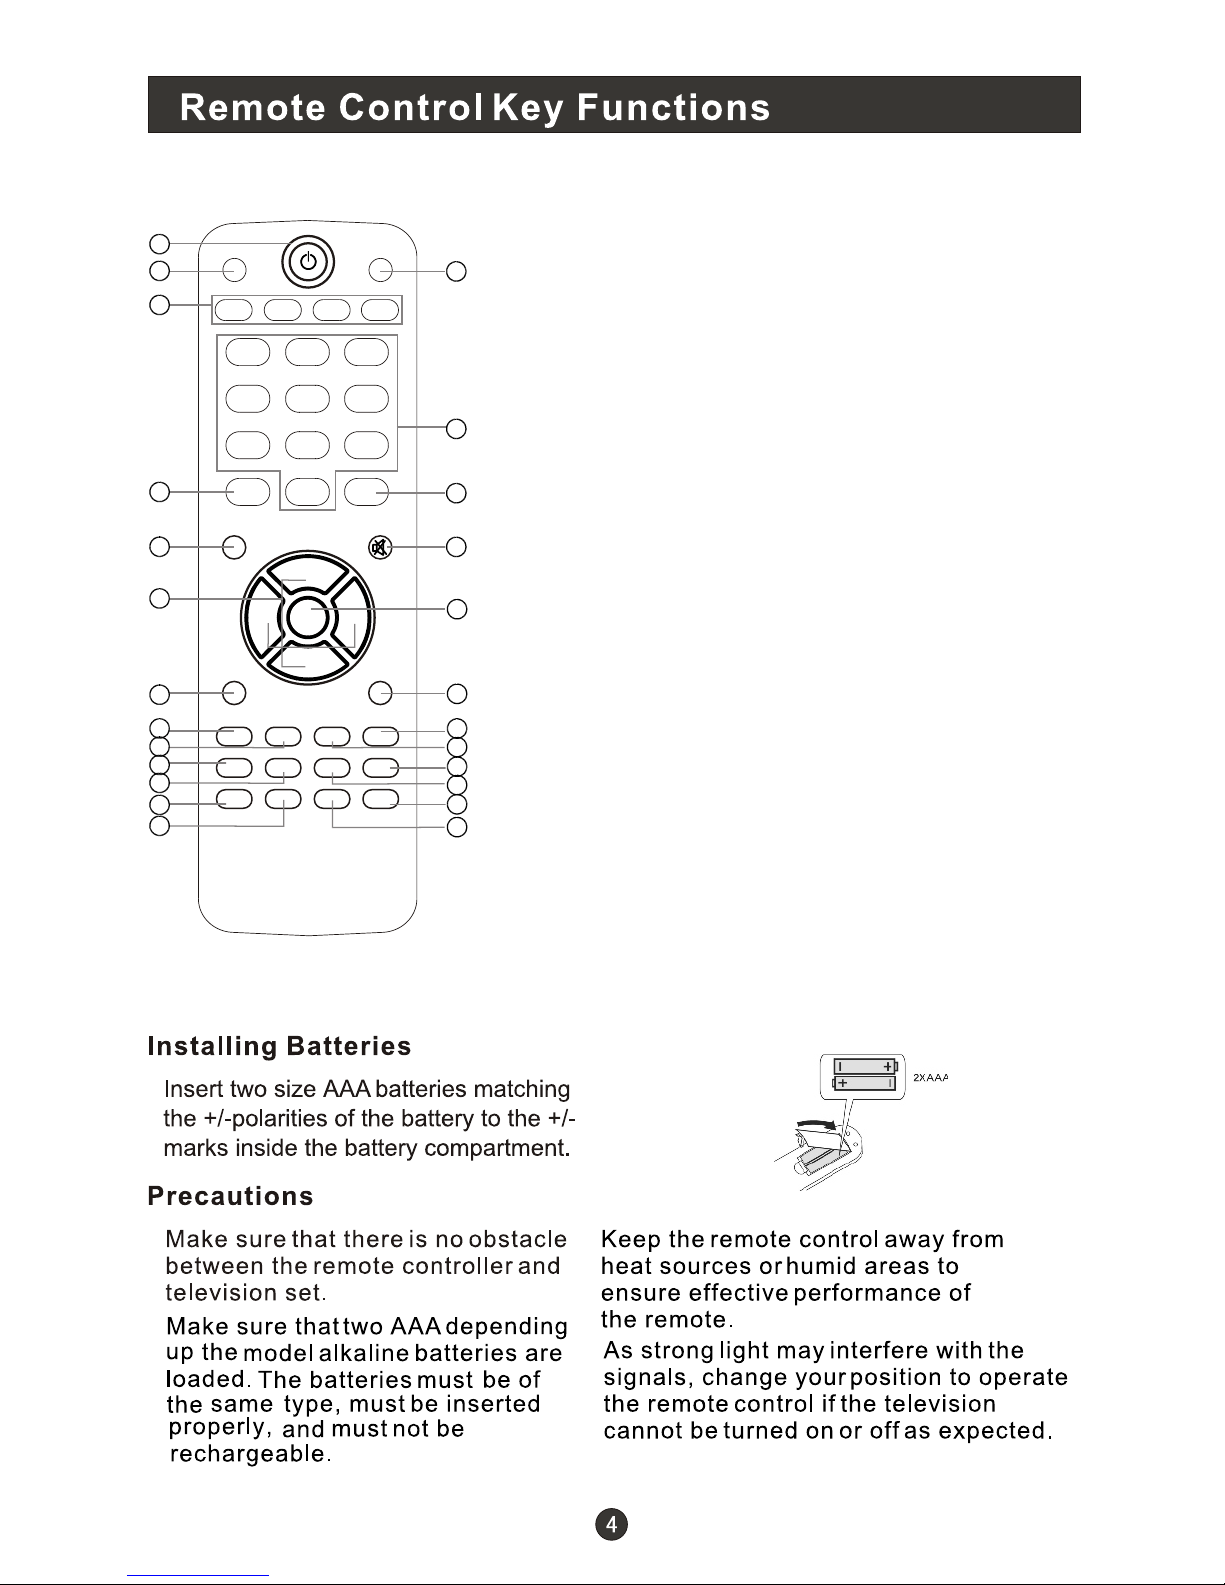
Remote Control KeyFunctions....................................................................
Connection Instructions.............................................................................
External equipment Connections..............................................................
Basic Operating Instructions.......................................................................
Turn onthe LCD TV...................................................................................
Audio Control..........................................................................................
Mute.......................................................................................................
...
................................................................................
Sleep......................................................................................................
H.LOCK...................................................................................................
Menu Operations........................................................................................
Picture Menu Options................................................................................
Sound Menu Options.................................................................................
Function Menu Options.............................................................................
Tuner MenuOptions.................................................................................
Timer MenuOptions.................................................................................
Adjust MenuOptions.................................................................................
DVD Features............................................................................................
Special Function Playback..........................................................................
DVD System Setup.....................................................................................
Playable Discs...........................................................................................
Disc Protection andDVD Characteristics.....................................................
Troubleshooting Guide...............................................................................
Specifications...........................................................................................
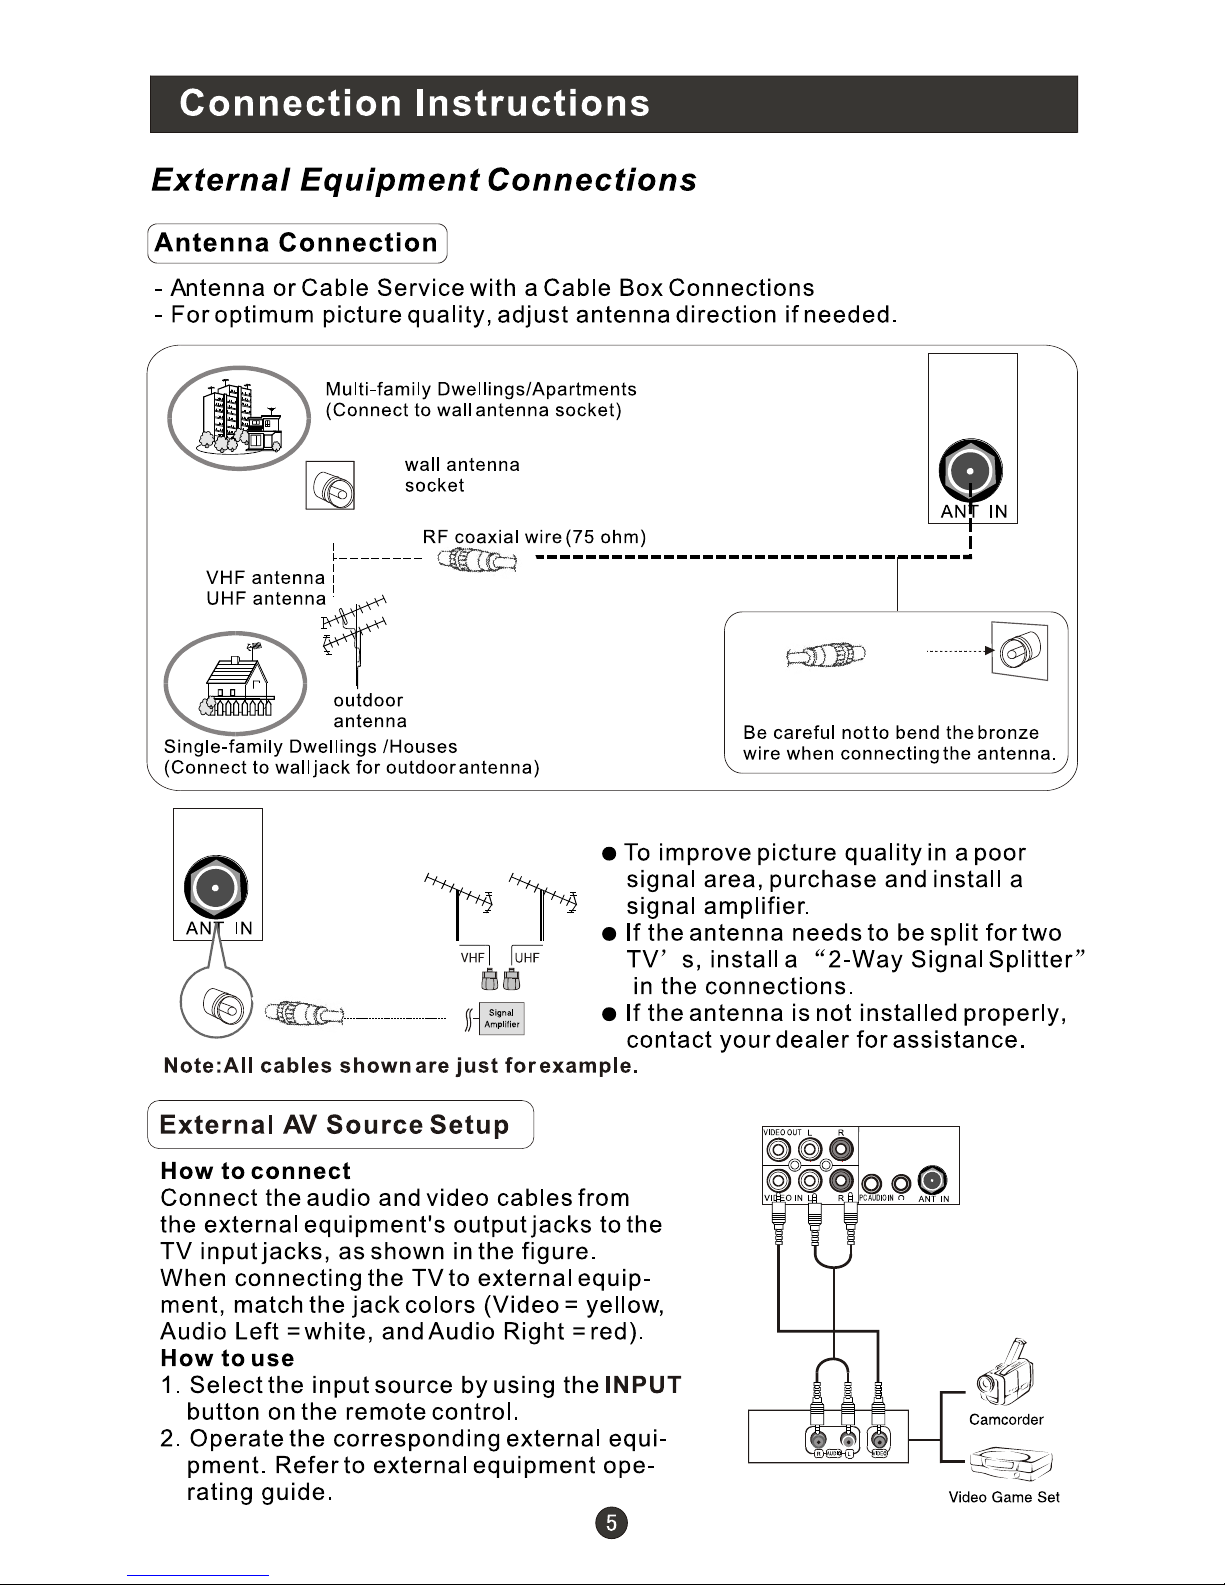
Antenna Connection...............................................................................
External AV Source Setup.......................................................................
PC Setup...............................................................................................
YPbPr Input...........................................................................................
VCR Setup.............................................................................................
Cable TV Setup.......................................................................................
Select the TV Channel You Want.............................................................
P.MODE Mode..........................................................................................
S.MODE Mode.........
1
2
3
5
5
5
5
6
6
7
7
8
8
8
8
8
8
8
8
9
10
10
11
12
13
14
14
15
17
18
20
21
22
23

Control Panel Function
1. POWER Press to turnon and off the TV.
2. INPUT Selects the inputsignals.
3. MENU Menu display. Press to access the on-screen menu display.
4. VOL- Volume down / Left button to adjust the item in the OSD.
VOL+ Volume up/ Right buttonto adjust theitem in theOSD
/Press to enter.
5. CH- TV channel down / to select the item in the menu.
CH+ TV channel up / to select the item in the menu.
6. Power indicator
7. Remote Sensor Receivers IR signals from the remote control.
Do not put anything near the sensor ,which may
block the remote control signal.

The above figure is for reference
only, connections may differ
depending upon the models and
terminals of some models may be
on the back bottom of the set
DVD slot load
DVD
STOP
PLAY/PAUSE
OPEN/CLOSE
PREV
NEXT
Insert DVD withthe label sidefacing towards
the back. (Silver"shiny" side facingtowards you)
1. HDMI: Connect a HDMI device to receive digital audio and uncompressed
digital video.
2.VGA Connect to theVGA 15PINanalog output connectorof a PC
graphics card to use set as a PC display.
3.Component Input Connect a componentvideo device tothese jacks.
4.S-VIDEO Connect S-Video out from anS-Video device to the jacks.
5.VIDEO Out
Out
Video in Connect video outputfrom an externaldevice to thisjack.
8.Audio in Connect audio output from an external device to these jacks.
9.PC audio in Connect the audiooutput from thepc to thePC audio input port.
10..Headphone jack : Headphone audio output terminal.
11. ANT IN(Antenna Input) Connect cable orantenna signals tothe TV,
either directly or through your cable box.
Connect video inputfrom an externaldevice to thisjack.
6.AUDIO Connect audio inputfrom an externaldevice to thesejacks.
7.

(For TV with DVD)
PLAY/PAUSE
REV
SEARCH
TITLE
ANGLE D.CALL
10+
A-B
OK
STOPZOOMREPEAT
PREV NEXT
SETUP
PROGRAM
DISPLAY
ARC
INPUT
MUTE
VOL CH
MENU
EXIT D.MENU
H.LOCK
RECALL
SCAN
D.AUDIO
SUBTITLE
CCD MTS/SAP
P.MODE S.MODE SLEEP
OPEN/CLOSE
18
19
20
21
22
23
24
25
26
27
28
29
30
31
32
33
34
35
36
37
38
39
40
1
2
3
4
5
6
7
8
9
10
11
12
13
14
15
16
17
Remote Control Key Functions
When using the remote control, aim it
towards the remotesensor on theTV
1.Press to turn on and off the TV
2.Press to display the TV status information on the top
of the TV screen
3.Press to change the aspect ratio
4.Press repeatedly to cycle through the available picture
modes
5.
6.DVD SUBTITLE
7.Show the input source
8.Switches the TV sound on or off
9.Press to adjust the volume
10.Press to open the on-screen menu
11.Thumbstick(Up/Down/Left/Right)
Allows you to navigate the on-screen menus
and adjust the system settings to your preference
12.Clears all on-screen displays and returns to TV viewing
from any menu
13.DVD ZOOM
14.DVD REPEAT
15.DVD FAST FORWARD
16.DVD FAST REVERSE
17.DVD TITLE
18.DVD SET UP
19.DVD PROGRAM
20.DVD A-B
21.DVD Open/close
22.Press to display the sleep timer option
23.Press to cycle through different sound settings
24.
25.Select a closed caption option
26.Press to change a channel
27.SCAN
28.Press to jump back and forth between two channels
29.Press to scan through channels. To scan quickly
between the last two channels, press and hold down
either +/- .
30.
31.Confirm button
32. DVD menu
33. DVD PLAY/PAUSE
34. DVD STOP
35. DVD Previous Chapter
36. DVD Next Chapter
37.DVD SEARCH
38.DVD 10+
39.DVD CALL
40.DVD ANGLE
DVD AUDIO
Select MONO, STEREO, SAP
V-CHIP

SCAN
MENU
VOL-
EXIT
P.MODE ARC
CCD MTS/SAP
PIP SWAP MOVE
1 2 3
4 5 6
7 8 9
CH+
CH-
VOL+
OK
SLEEP
H.LOCK
0
HDMI
S.MODE
FREEZE
FAVORITE
MUTE
RECALL
1
2
3
4
5
6
7
8
9
10
11
12
13
14
15
16
17
18
19
20
21
22
23
24
25
1.
2.SCAN
3.Not available
4.
5.
6.Volume/Channel Selection
7.
8.
9.
10.
11.
12.Not available
13.Not available
14.HDMI mode
15.
16.
17.
18.Confirm button
19.
20.
21.
22.Not available
23.
24.Not available
25.Not available
Press to turn on and off the TV
Show the input source
Press to open the on-screen menu
Clears all on-screen displays and returns to TV viewing
from any menu
Press repeatedly to cycle through the available picture
modes
Press to change the aspect ratio
Select a closed caption option
Press to display the TV status information on the top
of the TV screen
Switches the TV sound on or off
Press to jump back and forth between two channels
Press to cycle through different sound settings
Press to display the sleep timer option
Select MONO, STEREO, SAP
Press to change a channel
V-CHIP
INPUT DISPLAY
When using theremote control, aimit towards theremote sensor on the TV.
(For TV withoutDVD)


VOL+/OK

Press H.LOCK to enter it and input the password correctly, the H.LOCK menu
will appear onthe screen(The initialpassword is 0000).
Password: The password can bechanged. Press VOL+/OKto enter.The screen
will display New PW ----, then enter the new password and the screen display
Confirm PW ----,if the samepassword is inputcorrectly twice, theold password
will be changed.
V-Chip: Press VOL+/-to select Onor Off.
TV-Rating:The Parental control will automatically block certain categories that
are more restrictive . For example, if you block TV-Y category, then all the
categories in theyoung adult groupwill be blocked(TV-Y, TV-Y7, TV-G, TV-PG,
TV-14 andTV-MA).
The sub-ratings (D, L, S, V, FV) work together similarly.
CH+/-
VOL+/-
Movie-Rating:
English-Rating:
Press VOL+/OK to enter the sub-menu,
VOL+/-
French-Rating:
Press VOL+/OK to enter the sub-menu,
VOL+/-
How to setthe D, L,S, V andFV sub-ratings
First, press button select oneof these Ratings:
TV-Y, TV-Y7,TV-G, TV-PG,TV-14, orTV-MA, and press button.
A symbol ”U” will be displayed for each sub-rating.
While”U” is selected, press OK button to go to a sub rating. To select a different
Rating, press CH+/-buttons and thenrepeat the process.
Note
The V-chipwill automatically blockcertain categories thatare More restrictive.
For example, if you block B sub-rating in TV-PG, then the B sub-ratings in
TV-14 and TV-MA will automatically be blocked.
Blocks movies accordingto the movieratings limits specified,so
children cannot view certain movies. You can set the ratings limit by blocking out
all the movies with the ratings above a specified level. Keep in mind that the
movie ratings limit only applies to movies shown on TV, not TV programs, such as
soap operas.
English Language Rating
press CH+/- toselect one ofthese
Ratings: Empty, C, C8+, G, PG, 14+, or 18+, andpress to select
UNBLOCK or BLOCK.
French Language Rating
press CH+/- toselect one ofthese
Ratings: Empty, G, 8ans+, 13ans+, 16ans+,or 18ans+, andpress to
select UNBLOCK orBLOCK.

Not available inPC
Not available
In this manual,the OSD (OnScreen Display) maybe different from your TV s
because it is just an example to illustrate the TV operation.
Press INPUT to select theinput source, andthe menu foreach source is different.
1. Press MENU button to display the main menu, and VOL+/-to select the main
menu.
2. Press CH+/-to scroll throughthe parameters, press .
3. Press VOL+/- buttons to make changes to the parameters.
4. Press EXIT button to exit the menu.
VOL+/OK to confirm
Reset : Reset all settings to factory mode.

Reset : Reset all settings to factory mode.

Menu Language Selection:
The menus canbe shown onthe screen inthe selected language.First select
your language.
1. Press MENU button and VOL+/- until the following menu appears on the screen.
2. Press CH+/-button to enterthe function menuand to goup and down to select
the desired option .
3. Press VOL+/- button to adjust the selected option to your preference .
Functions:
Language: This item displays the language of the OSD.
Pic. Size: To select thedisplay mode :4:3/Full/Zoom.
Menu Time: To select 5S/10S/15S.
Halftone: To select themenu transparency.
Blue screen :Press VOL+/- to select Onor Off. To set On, screen willbe in blue
screen after 3 seconds if there is no signal.
DNR: Digital NoiseReduction. Reduces theappearance of digitizingerrors
caused by compression.Press VOL+/- toselect On orOff.

1. Press MENU and VOL+/- button until the following menu appears on the
screen.
Note: This menu is only appears in TV mode .
2. Press CH+/-button to enterthe turning menuand to goup and down to
select the desired option .
3.Press VOL+/- button to adjust the selected option to your preference .
Functions:
Channel Type: Press VOL+/- to select Air or cable.
Auto Search: Auto search and save the channel .Press the VOL+ button to start
automatic search function operation. All channelsnow available will be
automatically preset in order .After the search has finished, the first program
number will displayon the screen.This search automatically adds onlythe active
channels in yourarea to theTV's memory. It deletes any channels on which there
is no broadcast or a poor signal.
Note: The Auto Searchfunction will scanthe channels onthe selectedAir input.
If the TV is connected to cable, please select Cable under ' Air ' sub menu.
Fine Tune : If the image and/ or sound received is not very good , you can press
CH+/- to select Fine Tune inthe menu . Then , press VOL+/- button to adjust and
improve the image quality. Do not use this feature unless reception is poor.
Skip : If you want skip a channel , press VOL+/- to select On , and this channel
will be skipped next time when you press CH+/- . You can press the digit buttons
to select thechannel . Ifyou want torestore the channel, select Off.

1. Press MENU and VOL+/- button until the following menu appears on the
screen.
2. Press CH+/-button to enterthe turning menuand to goup and down to
select the desired option .
3.Press VOL+/- button to adjust the selected option to your preference.
Functions:
Clock: Set the Correct time.
Time Off: Set the time that the TV goes off automatically.
Time On: Set the time that the TV comes on automatically.
Book Channel: Set the channel that the TV comes on automatically.
Remind Time: Set the time that you want to remind.
Remind Channel: Set the channel that you want to remind.
1. Press MENU and VOL+/- button until the following menu appears on the
screen.
Note: This menu is only appears in PC mode .
2. Press CH+/-button to enterthe adjust menuand to goup and down to
select the desired option .
3.Press VOL+/- button to increase and decrease the level to adjust the
selected option toyour preference .
Functions:
H-Position: Picture horizontalposition adjust.
V-Position: Picture vertical position adjust.
Clock : Adjust the TFT-LCD to match the PC input source.
Phase : Removes any horizontal distortion and clears or sharpness the displayed
characters.
Auto Adjust : Is opted for adjustmentof picture locationfrequency and phase
parameters.

DVD Features
Basic Playback
1.Place the DVD in the disc slot. The disc will be
loaded automatically after one to two seconds
then the DVD player reads the DVD and displays
the opening menu If there is no disc placed in
DVD mode, OPEN will display on the screen all
the times)
Do not place a disc that is unplayable in this
DVD player.
2. Some discs may start playback with a menu. Use
the cursor buttons on the remote control to select
menu options and press to start. You
may also press the digit buttons to select a menu
option directly. Many DVDs will not allow this during
start-up.
PLAY/PAUSE
1. Press to pause playback (still mode).
The sound will be muted during still mode.
2. Press to resume normal playback.
PLAY/PAUSE
PLAY/PAUSE
1. Press STOP button to go to stop mode, the TV
screen will show the start logo. With some discs,
such as DVD or CDs, the player can resume
playback from the point where it was stopped.
2. Press PLAY/PAUSE to resume playback from the
location where the playback was stopped.
3. Press STOP twice to stop completely.
1. Press FWD to fast forward through the disc.
Each time the FWD button is pressed, the
fast forward motion speed changes.
2. Press to resume normal playback.
3. Press REV to fast reverse through the disc.
Each time the REV button is pressed, the
fast reverse motion speed changes.
4. Press to resume normal playback.
PLAY/PAUSE
PLAY/PAUSE
1. When paused, press continuous
to single step forward to the next frame in the
video.
2. Press to resume normal playback.
PLAY/PAUSE
PLAY/PAUSE
Preparations
Press DVD button on the remote control
to enter the DVD status.
Note: Do not insert a disc until the DVD input states
open
Pause playback
Stop playback
Previous and Next
Fast forward and Fast reverse
Basic playback
Single step playback
Some discs donot start automatically. Press
PLAY/PAUSE to startplayback.
During Playing, pressingthe PREV button will
restart the lastchapter and skip chapters
backwards with eachsubsequent press until the
start of thedisc is reached.
Each press ofNEXT button duringplaying will
skip the currentchapter and play the next one.
This manual suits for next models
3
Table of contents
Other Onn LCD TV manuals